Acura MDX 2011 Owner's Manual
Manufacturer: ACURA, Model Year: 2011, Model line: MDX, Model: Acura MDX 2011Pages: 609, PDF Size: 12.7 MB
Page 171 of 609

Your vehicle has a memory feature
for the steering wheel, driver's seat,
and outside mirror positions.
Seat, except for power lumbar,
steering wheel and outside mirror
positions can be stored in separate
memories. You select a memorized
position by pushing the appropriate
button or using the appropriate
remote transmitter (Driver 1 or
Driver 2). For more information see
page 147.Storing a Driving Position in
Memory
Store a driving position only when
the vehicle is parked.
1. Turn the ignition switch to the ON
(II) position. You cannot add a new
driving position to the memory
unless the ignition switch is in the
ON (II) position. You can recall a
memorized position with the
ignition switch in any position.
2. Adjust the seat to a comfortable position (see page 148).
Adjust the steering wheel to a
comfortable position (see page
133).
Adjust the outside mirrors for best
visibility (see page 164).
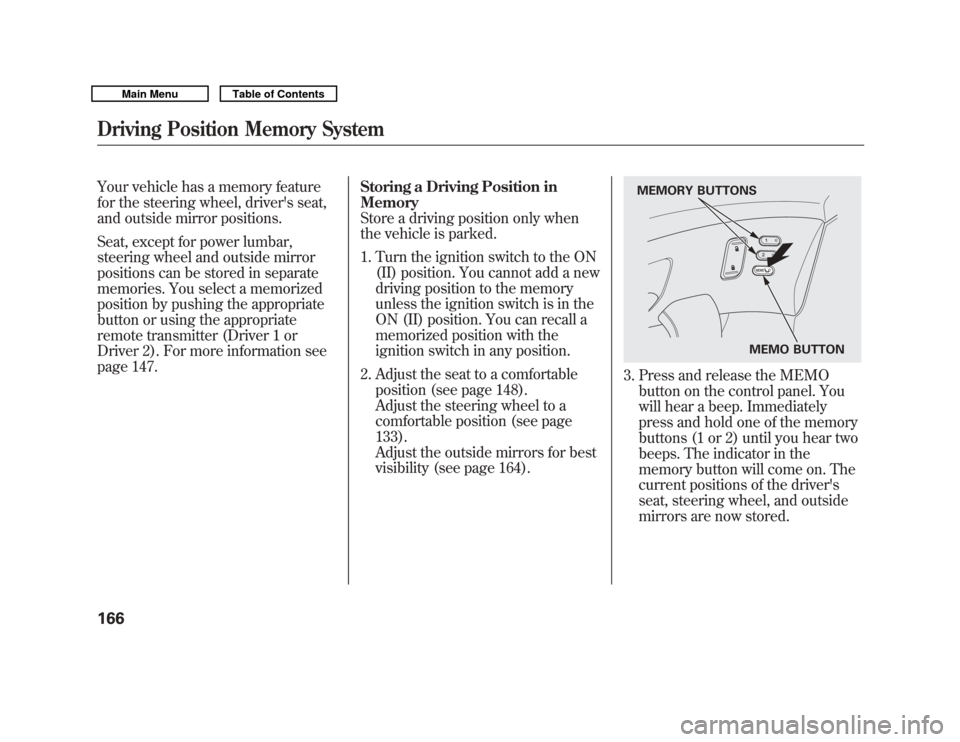
3. Press and release the MEMObutton on the control panel. You
will hear a beep. Immediately
press and hold one of the memory
buttons (1 or 2) until you hear two
beeps. The indicator in the
memory button will come on. The
current positions of the driver's
seat, steering wheel, and outside
mirrors are now stored.
MEMO BUTTON
MEMORY BUTTONS
Driving Position Memory System16610/06/29 11:59:04 11 ACURA MDX MMC North America Owner's M 50 31STX640 enu
Page 172 of 609

Doing any of the following after
pressing the MEMO button will
cancel the storing procedure.●
Not pressing a memory button
within 5 seconds.
●
Readjusting the seat position.
●
Readjusting the outside mirror
position.
Each memory button stores only one
driving position. Storing a new
position erases the previous setting
stored in that button's memory. If
you want to add a new position while
retaining the current one, use the
other memory button. Selecting a Memorized Position
To select a memorized position, do
this:
1. Make sure the vehicle is parked.
2. Press the desired memory button
(1 or 2) until you hear a beep, then
release the button.
The system will move the seat,
steering wheel, and outside mirrors
to the memorized positions. The
indicator in the selected memory
button will flash during movement.
When the adjustments are complete,
you will hear two beeps, and the
indicator will remain on.
To change the ‘‘MEMORY
POSITION LINK ’’setting, see page
107. To stop the system's automatic
adjustment, do any of these actions:
●
Press any button on the control
panel: MEMO, 1, or 2.
●
Push any of the adjustment
switches for the seat.
●
Shift out of Park.
●
Adjust the outside mirrors.
If desired, you can use the
adjustment switches to change the
positions of the seat, steering wheel
or outside mirrors after they are in
their memorized position. If you
change the memorized position, the
indicator in the memory button will
go out. To keep this driving position
for later use, you must store it in the
driving position memory.
Driving Position Memory System
167
Instruments and Controls
10/06/29 11:59:04 11 ACURA MDX MMC North America Owner's M 50 31STX640 enu
Page 173 of 609

Light Control ButtonsYour vehicle has the light control
buttons on the front ceiling. With
these buttons, you can select three
positions: OFF, Door (door activated
position), and ON. To select a
position, press the appropriate
button.
When you press the DOOR button,
the green indicator in the button
comes on as a reminder.To turn off the setting, press the OFF
button.
OFF position:●
The front individual map lights can
be turned on and off by pressing
each map light button (
).
●
The second and third row
individual map lights cannot be
turned on.
Door (Door activated position):●
The individual map lights in the
front, second and third row come
on when any door is opened, when
the remote transmitter is used to
unlock the doors (see page 144).
When the doors are closed, each
light can be turned on and off by
pushing the map light button (
).
After all doors are closed tightly, the
lights dim slightly, then fade out in
about 30 seconds.
To change the ‘‘INTERIOR LIGHT
DIMMING TIME’’ setting, see page
110.
ON position:●
All the individual map lights come
on and stay on.
Front
ON
DOOR ACTIVATE
OFF
Second and Third row
Front
MAP LIGHT BUTTONS
Interior Lights16810/06/29 11:59:04 11 ACURA MDX MMC North America Owner's M 50 31STX640 enu
Page 174 of 609

Individual Map LightsTurn on the front individual map
lights by pushing each map light
button (
). Push the button again to
turn it off. When the door activated
position is selected with the light
control button, the second and the
third row map lights can be turned
on by pushing each map light button
(
). Push the button again to turn it
off. If any map light is left on when the
ignition switch is turned off and all
doors are closed, it will turn off when
the vehicle is locked with the remote
transmitter, or after 15 minutes.
Courtesy Lights
The courtesy lights between the
front map lights come on when the
parking lights are turned on. To
adjust its brightness, press either of
the instrument panel brightness
control buttons (+
or-) with the
ignition switch in the ON (II)
position.
Second and Third row
Front
COURTESY LIGHT
CONTINUED
Interior Lights
169
Instruments and Controls
10/06/29 11:59:04 11 ACURA MDX MMC North America Owner's M 50 31STX640 enu
Page 175 of 609

Tailgate Lights
The lights in the tailgate have an on-
off switch to control if the lights
come on when the tailgate is opened.
The tailgate lights do not come on
when any other doors are opened.Individual Interior Lights
The courtesy lights in all four doors
come on when you open any door.
The light around the ignition switch
comes on when any door is opened.
After you close the door, the ignition
switch light stays on for about 30
seconds regardless of the interior
light dimming time setting (see page
110).Interior Lights17010/06/29 11:59:04 11 ACURA MDX MMC North America Owner's M 50 31STX640 enu
Page 176 of 609

SUN VISORSUNGLASSES HOLDER COAT HOOK
STORAGE COMPARTMENTS
VANITY MIRROR
GROCERY HOOK
GLOVE BOX
CENTER POCKET ACCESSORY
POWER SOCKET CONSOLE COMPARTMENT ARMREST/BEVERAGE HOLDER ACCESSORY POWER SOCKET BEVERAGE HOLDER
Interior Convenience Items
171
Instruments and Controls
10/06/29 11:59:04 11 ACURA MDX MMC North America Owner's M 50 31STX640 enu
Page 177 of 609

Beverage Holders
Be careful when you are using the
beverage holders. A spilled liquid
that is very hot can scald you or your
passengers. Liquid can also spill
from the door pocket beverage
holders when you open or close the
doors. Use only resealable containers
in the door pockets.
Spilled liquids can damage the
upholstery, carpeting, and electrical
components in the interior.
Open the front beverage holder by
sliding the lid.
Beverage holders are also provided
in the second row seat armrest. Pivot
down the seat-back to use them.
To open the beverage holder, press
and release the front lid. To close,
press the lid again until it latches.
When you put back the armrest in
the center seat-back, make sure the
lid is closed properly.
ARMREST
FRONT LIDBEVERAGE HOLDER
Interior Convenience Items17210/06/29 11:59:04 11 ACURA MDX MMC North America Owner's M 50 31STX640 enu
Page 178 of 609

Console CompartmentYour vehicle is equipped with a front
seat armrest pad that is also a
console compartment. To open the
console compartment fully, push
both buttons at the front of the
compartment.
The console compartment has a
removable tray. Pull the tray straight
up to remove it.Storage Compartment
The storage compartment with a
sliding lid is at the left-side foot of the
front passenger seat.
For the third row, a storage
compartment is located in the
passenger side armrest. To open the
compartment, push the button and
lift the lid.
Glove Box
Open the glove box by pulling the
handle to the left. Close it with a firm
push. Lock or unlock the glove box
with the master key.
An open glove box can cause
serious injury to your passenger
in a crash, even if the
passenger is wearing the seat
belt.
Always keep the glove box
closed while driving.
BUTTONS
LIDS
LID
Interior Convenience Items
173
Instruments and Controls
10/06/29 11:59:04 11 ACURA MDX MMC North America Owner's M 50 31STX640 enu
Page 179 of 609

Sunglasses HolderTo open the sunglasses holder, push
on the lid. It will unlatch and swing
down. To close it, push it until it
latches. Make sure the holder is
closed while you are driving.
Some larger styles of sunglasses may
not fit in the holder.
You may also store small items in
this holder. Make sure they are small
enough to let the holder close and
latch, and that they are not heavy
enough to cause the holder to pop
open while driving.Sun Visor
To use the sun visor, pull it down.
When using the sun visor for the
side window, remove the support rod
from the clip, and swing it out.
In this position, the sun visor can be
adjusted by moving it on its slider.
Do not use the extended sun visor
over the inside mirror.
Make sure you put the sun visor
back in place when you are getting
into or out of the vehicle.
SUNGLASSES HOLDER
PUSH
SUN VISOR
Slide
Interior Convenience Items17410/06/29 11:59:04 11 ACURA MDX MMC North America Owner's M 50 31STX640 enu
Page 180 of 609

Vanity MirrorTo use the vanity mirror on the back
of the sun visor, pull up the cover.
The vanity mirror light will not come
on if the sun visor is slid outward.Accessory Power Sockets
Your vehicle has two or three
accessory power sockets, depending
on the model. All models have the
front accessory power socket under
the audio system and rear socket
behind the third row seat on the
driver's side.
On models without rear entertainment
systemThe accessory power socket is
located at the back of the front
console compartment.
To use an accessory power socket,
the ignition switch must be in the
ACCESSORY (I) or ON (II) position.
CONTINUED
Interior Convenience Items
175
Instruments and Controls
10/06/29 11:59:04 11 ACURA MDX MMC North America Owner's M 50 31STX640 enu