Lock Acura MDX 2011 Repair Manual
[x] Cancel search | Manufacturer: ACURA, Model Year: 2011, Model line: MDX, Model: Acura MDX 2011Pages: 609, PDF Size: 12.7 MB
Page 233 of 609
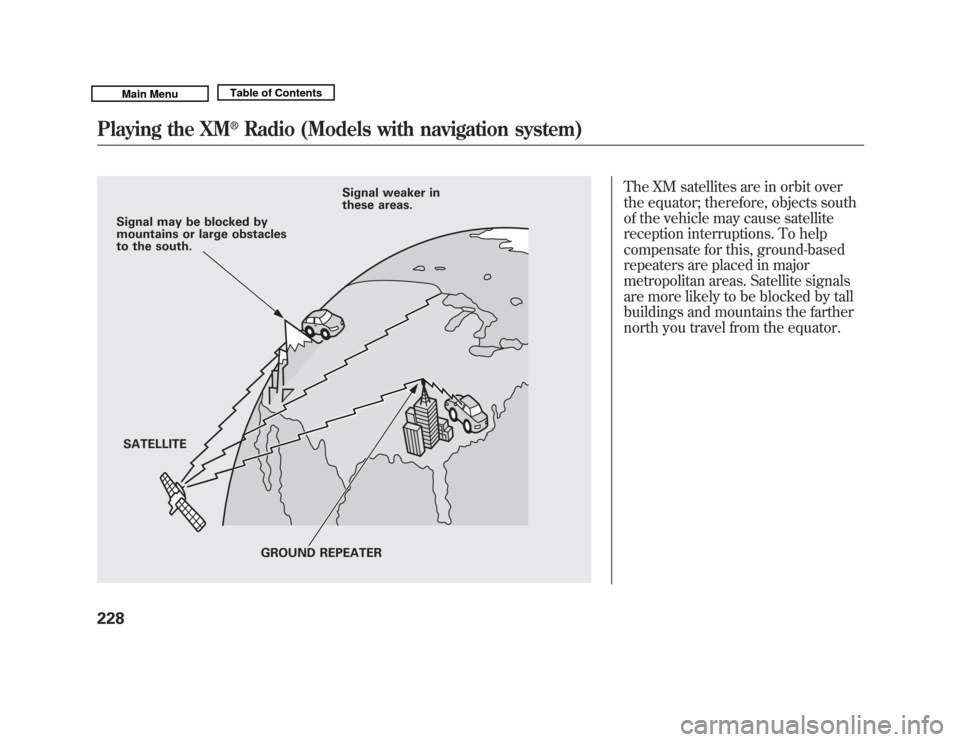
The XM satellites are in orbit over
the equator; therefore, objects south
of the vehicle may cause satellite
reception interruptions. To help
compensate for this, ground-based
repeaters are placed in major
metropolitan areas. Satellite signals
are more likely to be blocked by tall
buildings and mountains the farther
north you travel from the equator.
Signal may be blocked by
mountains or large obstacles
to the south.SATELLITE Signal weaker in
these areas.
GROUND REPEATER
Playing the XM
®
Radio (Models with navigation system)
22810/06/29 11:59:04 11 ACURA MDX MMC North America Owner's M 50 31STX640 enu
Page 290 of 609
To Play a USB Flash Memory
Device
This audio system can select and
play the audio files on a USB flash
memory device with the same
controls used for the disc player. To
play a USB flash memory device,
connect it to the USB adapter cable
in the console compartment, then
press the USB/AUX button until you
see‘‘USB’’ in the display. The
ignition switch must be in
ACCESSORY (I) or ON (II) position. The audio system reads and plays
the audio files on the USB flash
memory device in MP3, WMA or
ACC
ꭧ
formats. The USB flash
memory device limit is up to 700
folders or up to 15000 files.
ꭧ : Only AAC format files recorded
with iTunes are playable on this
audio unit.
The recommended USB flash
memory devices are 256 MB or
higher, and formatted with the FAT
file system. Some digital audio
players may be compatible as well.
Some USB flash memory devices
(such as devices with security
lockout features, etc.) will not work
in this audio unit.
NOTE:
●
Do not use a device such as a card
reader or hard drive as it or your
files may be damaged.
●
Do not connect your USB flash
memory device using a hub.
●
Do not use an extension cable to
the USB adapter cable equipped
with your vehicle.
●
Do not keep a USB flash memory
device in the vehicle. Direct
sunlight and high heat will damage
it.
●
We recommend backing up your
data before playing a USB flash
memory device.
●
Some devices cannot be powered
or charged via the USB adapter, if
this is the case use the accessory
adapter to supply power to your
device.
●
Depending on the type and
number of files, it may take some
time before they begin to play.
CONTINUED
Playing a USB Flash Memory Device (Models with navigation system)
285
Features
10/06/29 11:59:04 11 ACURA MDX MMC North America Owner's M 50 31STX640 enu
Page 311 of 609
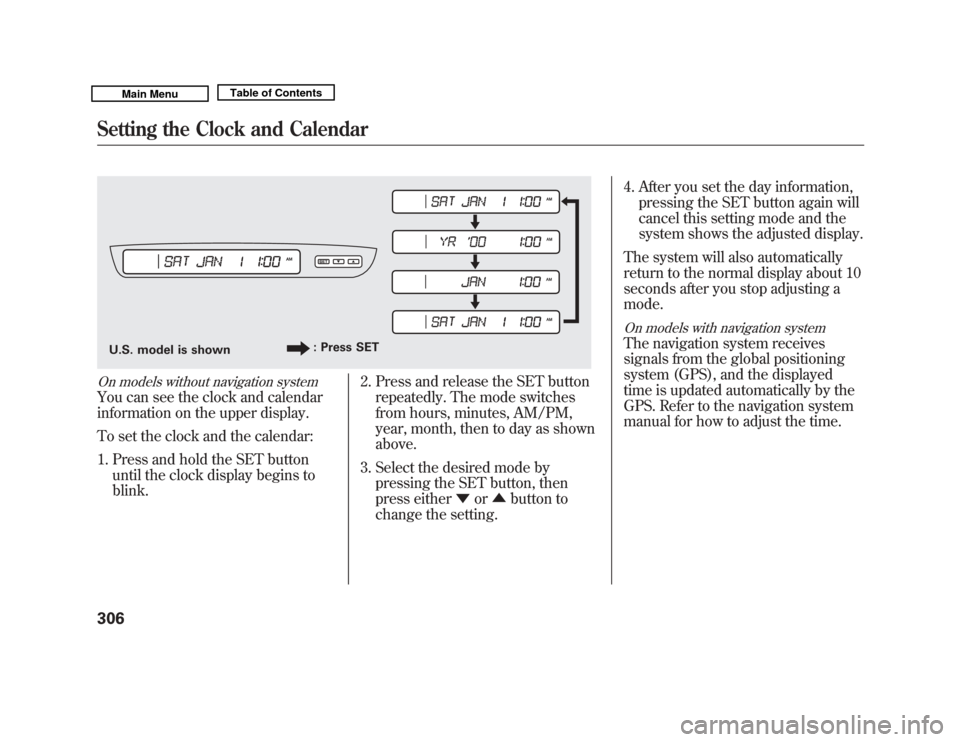
On models without navigation systemYou can see the clock and calendar
information on the upper display.
To set the clock and the calendar:1. Press and hold the SET button until the clock display begins to
blink. 2. Press and release the SET button
repeatedly. The mode switches
from hours, minutes, AM/PM,
year, month, then to day as shown
above.
3. Select the desired mode by pressing the SET button, then
press either ▼or▲ button to
change the setting. 4. After you set the day information,
pressing the SET button again will
cancel this setting mode and the
system shows the adjusted display.
The system will also automatically
return to the normal display about 10
seconds after you stop adjusting a
mode.
On models with navigation systemThe navigation system receives
signals from the global positioning
system (GPS), and the displayed
time is updated automatically by the
GPS. Refer to the navigation system
manual for how to adjust the time.
U.S. model is shown : Press SETSetting the Clock and Calendar30610/06/29 11:59:04 11 ACURA MDX MMC North America Owner's M 50 31STX640 enu
Page 341 of 609
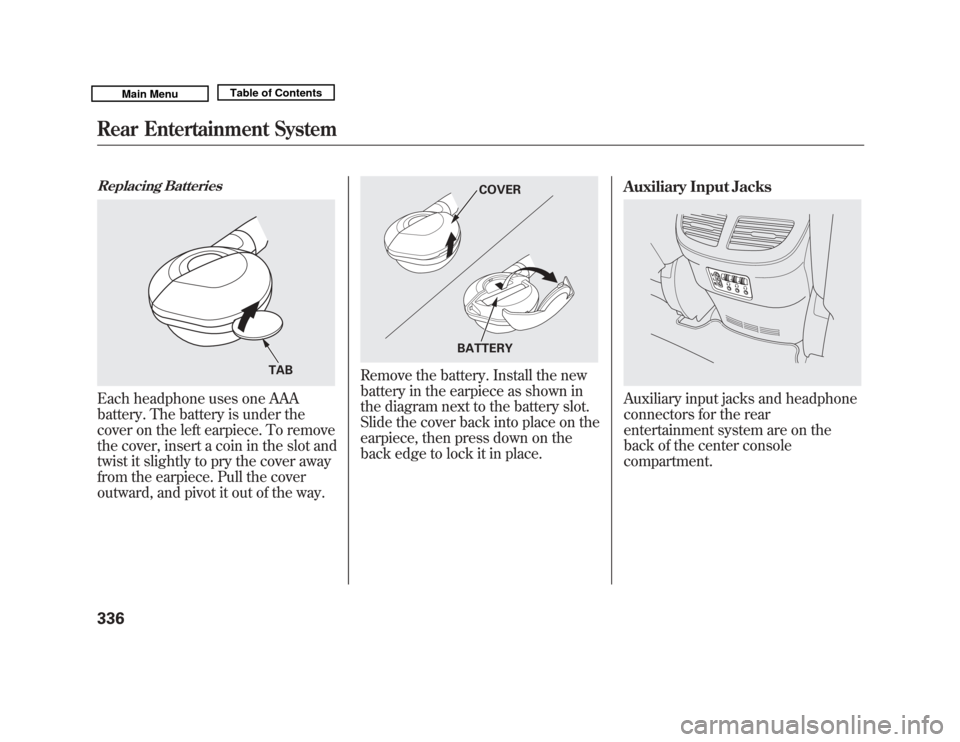
Replacing BatteriesEach headphone uses one AAA
battery. The battery is under the
cover on the left earpiece. To remove
the cover, insert a coin in the slot and
twist it slightly to pry the cover away
from the earpiece. Pull the cover
outward, and pivot it out of the way.
Remove the battery. Install the new
battery in the earpiece as shown in
the diagram next to the battery slot.
Slide the cover back into place on the
earpiece, then press down on the
back edge to lock it in place.Auxiliary Input Jacks
Auxiliary input jacks and headphone
connectors for the rear
entertainment system are on the
back of the center console
compartment.
TAB
COVER
BATTERY
Rear Entertainment System33610/06/29 11:59:04 11 ACURA MDX MMC North America Owner's M 50 31STX640 enu
Page 342 of 609
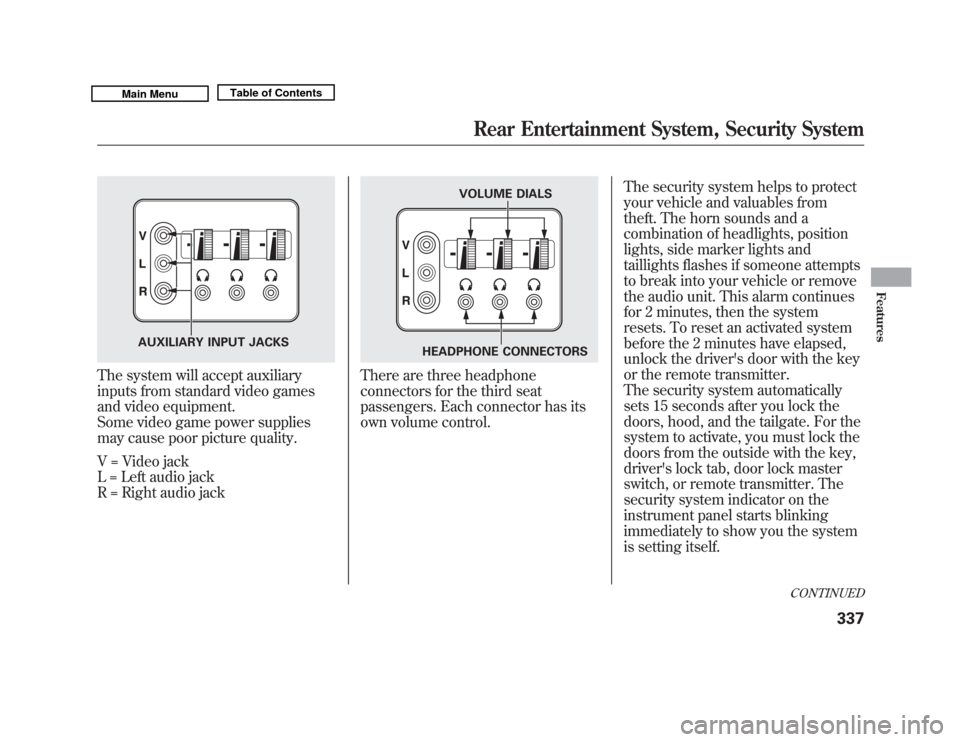
The system will accept auxiliary
inputs from standard video games
and video equipment.
Some video game power supplies
may cause poor picture quality.
V = Video jack
L = Left audio jack
R = Right audio jack
There are three headphone
connectors for the third seat
passengers. Each connector has its
own volume control.The security system helps to protect
your vehicle and valuables from
theft. The horn sounds and a
combination of headlights, position
lights, side marker lights and
taillights flashes if someone attempts
to break into your vehicle or remove
the audio unit. This alarm continues
for 2 minutes, then the system
resets. To reset an activated system
before the 2 minutes have elapsed,
unlock the driver's door with the key
or the remote transmitter.
The security system automatically
sets 15 seconds after you lock the
doors, hood, and the tailgate. For the
system to activate, you must lock the
doors from the outside with the key,
driver's lock tab, door lock master
switch, or remote transmitter. The
security system indicator on the
instrument panel starts blinking
immediately to show you the system
is setting itself.
AUXILIARY INPUT JACKS
VOLUME DIALS
HEADPHONE CONNECTORS
CONTINUED
Rear Entertainment System, Security System
337
Features
10/06/29 11:59:04 11 ACURA MDX MMC North America Owner's M 50 31STX640 enu
Page 344 of 609
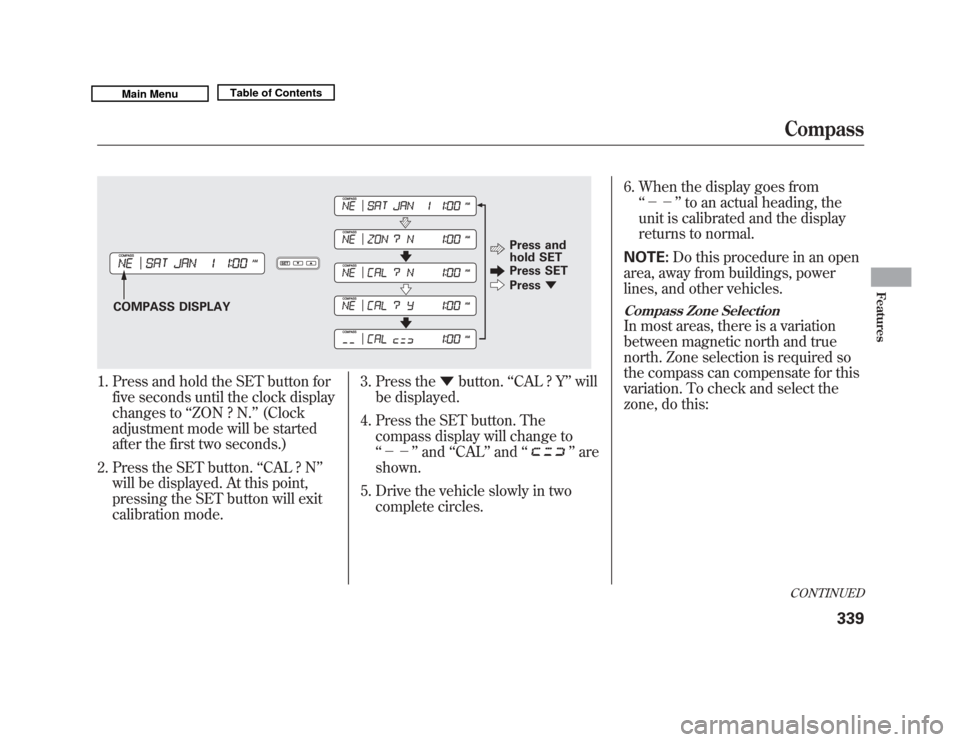
1. Press and hold the SET button forfive seconds until the clock display
changes to ‘‘ZON ? N. ’’(Clock
adjustment mode will be started
after the first two seconds.)
2. Press the SET button. ‘‘CAL ? N ’’
will be displayed. At this point,
pressing the SET button will exit
calibration mode. 3. Press the
▼button. ‘‘CAL ? Y ’’will
be displayed.
4. Press the SET button. The compass display will change to
‘‘-- ’’and ‘‘CAL ’’and ‘‘
’’are
shown.
5. Drive the vehicle slowly in two complete circles. 6. When the display goes from
‘‘-- ’’to an actual heading, the
unit is calibrated and the display
returns to normal.
NOTE: Do this procedure in an open
area, away from buildings, power
lines, and other vehicles.
Compass Zone SelectionIn most areas, there is a variation
between magnetic north and true
north. Zone selection is required so
the compass can compensate for this
variation. To check and select the
zone, do this:
COMPASS DISPLAY Press and
hold SET
Press SET
Press
▼
CONTINUEDCompass
339
Features
10/06/29 11:59:04 11 ACURA MDX MMC North America Owner's M 50 31STX640 enu
Page 345 of 609
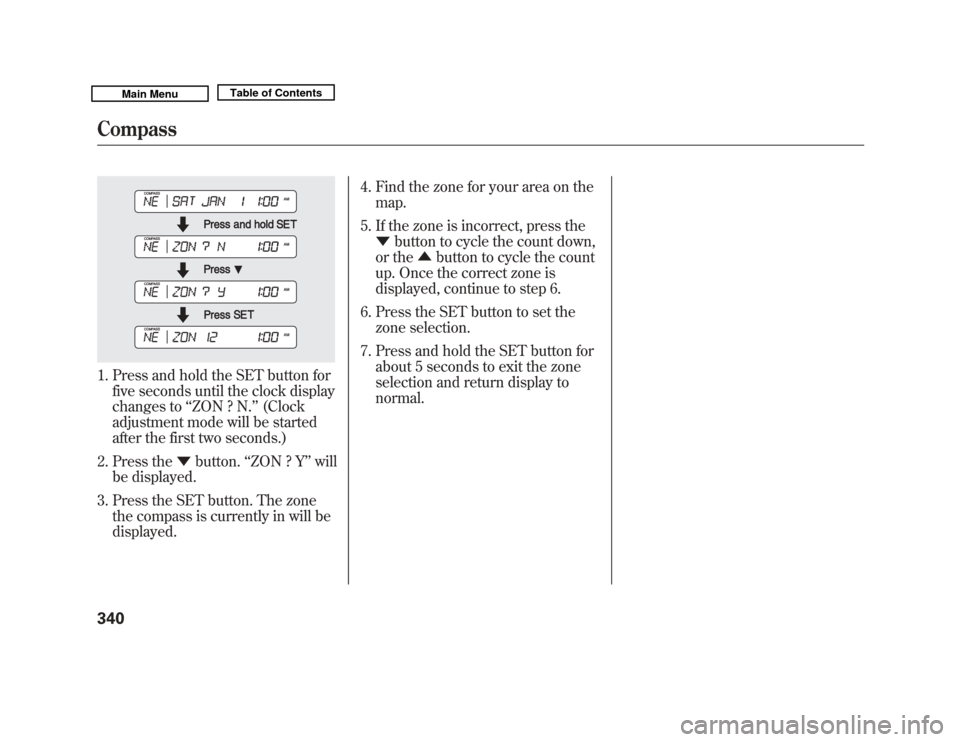
1. Press and hold the SET button forfive seconds until the clock display
changes to ‘‘ZON ? N. ’’(Clock
adjustment mode will be started
after the first two seconds.)
2. Press the ▼button. ‘‘ZON ? Y ’’will
be displayed.
3. Press the SET button. The zone the compass is currently in will be
displayed. 4. Find the zone for your area on the
map.
5. If the zone is incorrect, press the ▼ button to cycle the count down,
or the ▲button to cycle the count
up. Once the correct zone is
displayed, continue to step 6.
6. Press the SET button to set the zone selection.
7. Press and hold the SET button for about 5 seconds to exit the zone
selection and return display to
normal.Compass34010/06/29 11:59:04 11 ACURA MDX MMC North America Owner's M 50 31STX640 enu
Page 361 of 609
●
Driving on a mountainous road, or
driving off road for extended
periods.
●
Abrupt steering wheel movement.
●
When the ABS or VSA is activated.
●
When the VSA indicator comes on.
If ACC is canceled by any these
conditions, wait until the condition
improves, then press the RES/
ACCEL button to restore ACC. When
you do this, the vehicle will resume
its set cruising speed.
If you turn the ignition switch to the
ACCESSORY (I) or LOCK (0)
position after ACC was automatically
canceled, the set speed is erased,
and you must enter it again (see page
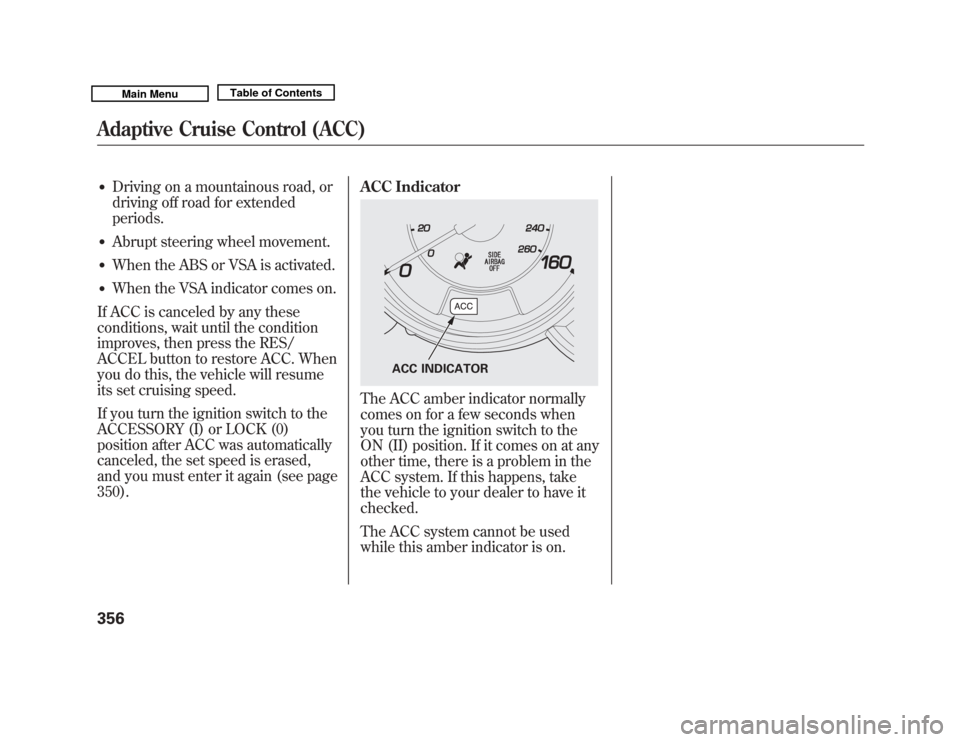
350). ACC Indicator
The ACC amber indicator normally
comes on for a few seconds when
you turn the ignition switch to the
ON (II) position. If it comes on at any
other time, there is a problem in the
ACC system. If this happens, take
the vehicle to your dealer to have it
checked.
The ACC system cannot be used
while this amber indicator is on.
ACC INDICATOR
Adaptive Cruise Control (ACC)35610/06/29 11:59:04 11 ACURA MDX MMC North America Owner's M 50 31STX640 enu
Page 381 of 609

To set a 4-digit passcode to lock theHFL system for security purposes:Press and release the HFL Talk
button before a command.
1. Say ‘‘System setup .’’
2. Say ‘‘Security ’’after the prompts.
3. Follow the HFL prompts and say the 4-digit passcode you want to
set.
4. Follow the HFL prompts to confirm the number. NOTE:
Once a passcode is set, you
will need to enter it to use HFL each
time you start the vehicle. If you
forget the code, your dealer will have
to reset it for you, or you will have to
clear the entire system (see page
377).
To change your security pass code:Press and release the HFL Talk
button before a command.
1. Say ‘‘System setup .’’
2. Say ‘‘Change passcode ’’after the
prompts.
3. Follow the HFL prompts and say the new 4-digit passcode.
4. Follow the HFL prompts to confirm the number.
Bluetooth
®
HandsFreeLink
®
37610/06/29 11:59:04 11 ACURA MDX MMC North America Owner's M 50 31STX640 enu
Page 431 of 609

Modifying your vehicle, or installing
some non-Acura accessories, can
make your vehicle unsafe. Before
you make any modifications or add
any accessories, be sure to read the
following information.
Accessories
Your dealer has Acura accessories
that allow you to personalize your
vehicle. These accessories have been
designed and approved for your
vehicle, and are covered by warranty.
Although non-Acura accessories may
fit on your vehicle, they may not
meet factory specifications, and could
adversely affect your vehicle's
handling, stability, and reliability.
Improper accessories or
modifications can affect your
vehicle's handling, stability, and
performance, and cause a
crash in which you can be hurt
or killed.
Follow all instructions in this
owner's manual regarding
accessories and modifications.
When properly installed, cellular
phones, alarms, two-way radios, and
low-powered audio systems should
not interfere with your vehicle's
computer controlled systems, such
as your airbags, anti-lock brakes, and
tire pressure monitoring system. Before installing any accessory:
●
Make sure the accessory does not
obscure any lights, or interfere
with proper vehicle operation or
performance.
●
Be sure electronic accessories do
not overload electrical circuits (see
page 560) or interfere with proper
operation of your vehicle.
●
Do not install accessories on the
side pillars or across the rear
windows. Accessories installed in
these areas may interfere with
proper operation of the side
curtain airbags.
●
Before installing any electronic
accessory, have the installer
contact your dealer for assistance.
If possible, have your dealer
inspect the final installation.
Accessories and Modifications42610/06/29 11:59:04 11 ACURA MDX MMC North America Owner's M 50 31STX640 enu