Lock Acura MDX 2011 Service Manual
[x] Cancel search | Manufacturer: ACURA, Model Year: 2011, Model line: MDX, Model: Acura MDX 2011Pages: 609, PDF Size: 12.7 MB
Page 148 of 609

If you try to drive off with the tailgate
not closed completely, a beeper
sounds and a‘‘DOOR & TAILGATE
OPEN ’’message is shown on the
multi-information display.
Keep the tailgate closed at all times
while driving to avoid damaging the
tailgate and to prevent exhaust gas
from getting into the interior. See
Carbon Monoxide Hazard on page
60.
If there is a problem in the power
tailgate system, you will see a
‘‘ CHECK POWER TAILGATE ’’
message on the multi-information
display. Have the system checked by
your dealer.
With this message shown on the
multi-information display, you can
still open or close the tailgate
manually. Unlocking the Tailgate
If the power door lock system cannot
unlock the tailgate, unlock it
manually.
Use a small flat-tipped screwdriver to
remove the cover on the back of the
tailgate.
Push the release lever to the right as
shown.
If you need to unlock the tailgate
manually, it means there is a
problem with the tailgate. Have the
vehicle checked by your dealer.
Tailgate
143
Instruments and Controls
10/06/29 11:59:04 11 ACURA MDX MMC North America Owner's M 50 31STX640 enu
Page 149 of 609
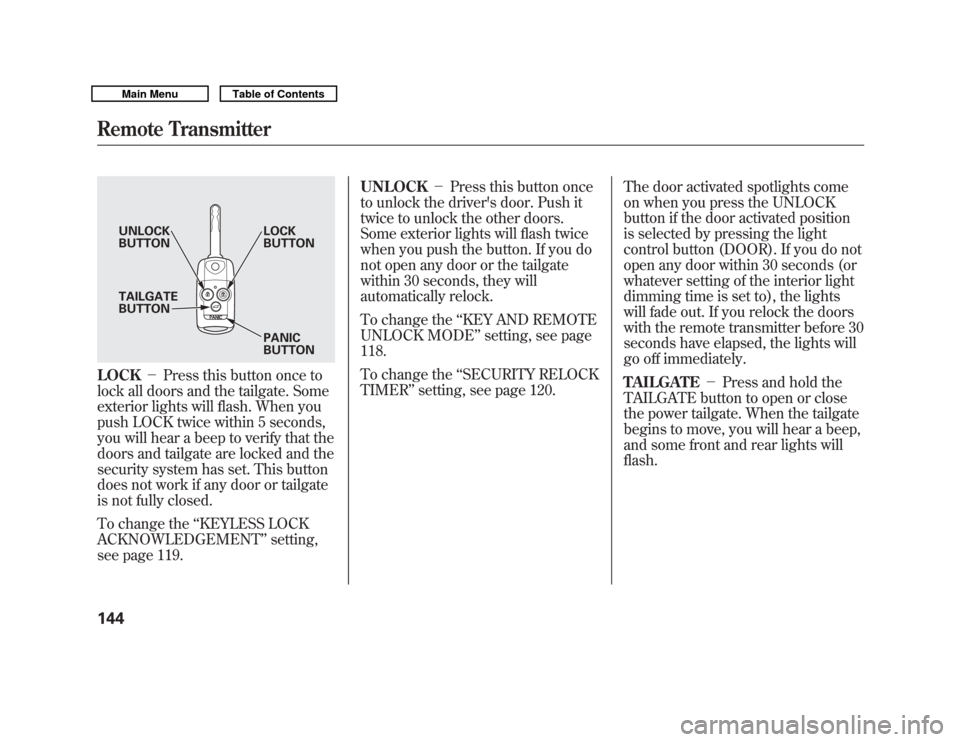
LOCK-Press this button once to
lock all doors and the tailgate. Some
exterior lights will flash. When you
push LOCK twice within 5 seconds,
you will hear a beep to verify that the
doors and tailgate are locked and the
security system has set. This button
does not work if any door or tailgate
is not fully closed.
To change the ‘‘KEYLESS LOCK
ACKNOWLEDGEMENT ’’setting,
see page 119. UNLOCK
-Press this button once
to unlock the driver's door. Push it
twice to unlock the other doors.
Some exterior lights will flash twice
when you push the button. If you do
not open any door or the tailgate
within 30 seconds, they will
automatically relock.
To change the ‘‘KEY AND REMOTE
UNLOCK MODE ’’setting, see page
118.
To change the ‘‘SECURITY RELOCK
TIMER ’’setting, see page 120. The door activated spotlights come
on when you press the UNLOCK
button if the door activated position
is selected by pressing the light
control button (DOOR). If you do not
open any door within 30 seconds (or
whatever setting of the interior light
dimming time is set to), the lights
will fade out. If you relock the doors
with the remote transmitter before 30
seconds have elapsed, the lights will
go off immediately.
TAILGATE
-Press and hold the
TAILGATE button to open or close
the power tailgate. When the tailgate
begins to move, you will hear a beep,
and some front and rear lights will
flash.
UNLOCK
BUTTON LOCK
BUTTON
PANIC
BUTTON
TAILGATE
BUTTON
Remote Transmitter14410/06/29 11:59:04 11 ACURA MDX MMC North America Owner's M 50 31STX640 enu
Page 150 of 609
If you push the same button again
while the tailgate is opening or
closing, three beeps sound, the
tailgate stops moving, reverses
direction and stops in the fully
opened or fully closed position.
PANIC-Press and hold this
button for about 1 second to attract
attention; the horn will sound, and
the exterior lights will flash for about
30 seconds. To cancel panic mode,
press any other button on the remote
transmitter, or turn the ignition
switch to the ON (II) position. Panic
mode does not work when the key is
in the ignition switch.
Remote Transmitter Care●
Avoid dropping or throwing the
transmitter.
●
Protect the transmitter from
extreme temperature.
●
Do not immerse the transmitter in
any liquid.
●
If you lose a transmitter, the
replacement needs to be
reprogrammed by your dealer.
Replacing the Transmitter Battery
If it takes several pushes on the
button to lock or unlock the doors
and the tailgate, replace the battery
as soon as possible.
Battery type: CR1616
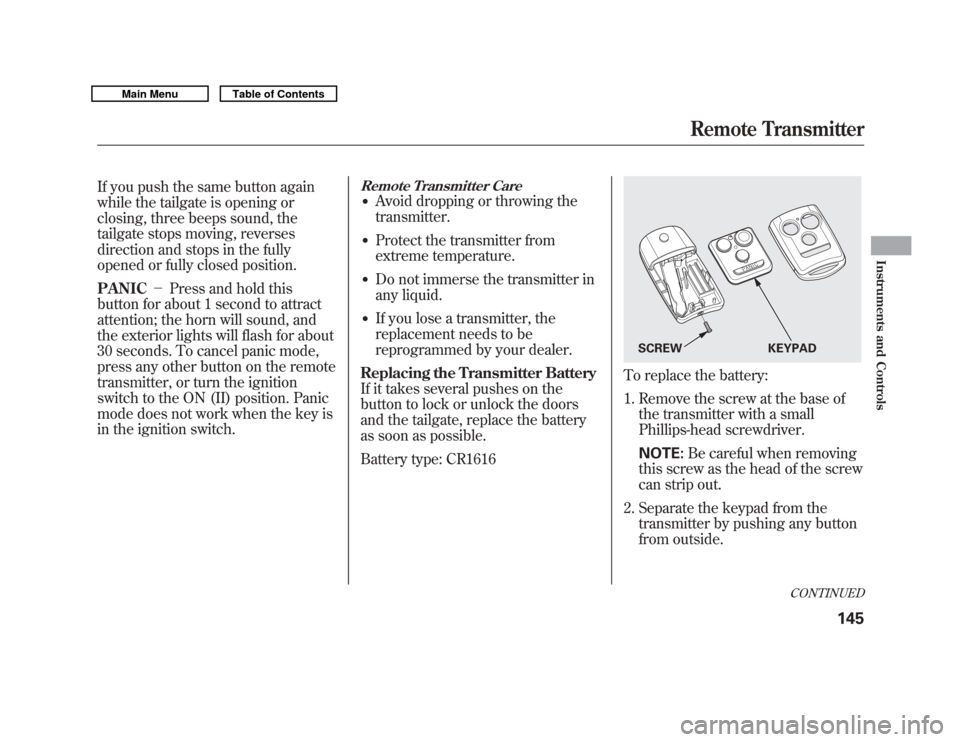
To replace the battery:
1. Remove the screw at the base of the transmitter with a small
Phillips-head screwdriver.
NOTE: Be careful when removing
this screw as the head of the screw
can strip out.
2. Separate the keypad from the transmitter by pushing any button
from outside.
SCREW KEYPAD
CONTINUED
Remote Transmitter
145
Instruments and Controls
10/06/29 11:59:04 11 ACURA MDX MMC North America Owner's M 50 31STX640 enu
Page 152 of 609
Recalling a Memorized Driving
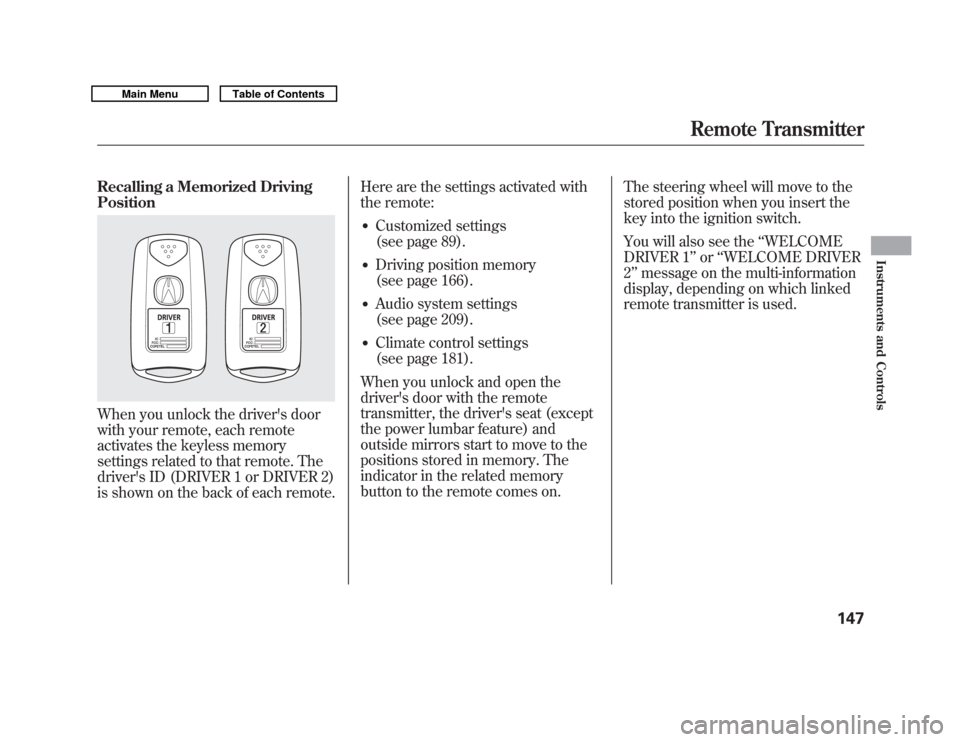
PositionWhen you unlock the driver's door
with your remote, each remote
activates the keyless memory
settings related to that remote. The
driver's ID (DRIVER 1 or DRIVER 2)
is shown on the back of each remote.Here are the settings activated with
the remote:
●
Customized settings
(see page 89).
●
Driving position memory
(see page 166).
●
Audio system settings
(see page 209).
●
Climate control settings
(see page 181).
When you unlock and open the
driver's door with the remote
transmitter, the driver's seat (except
the power lumbar feature) and
outside mirrors start to move to the
positions stored in memory. The
indicator in the related memory
button to the remote comes on. The steering wheel will move to the
stored position when you insert the
key into the ignition switch.
You will also see the
‘‘WELCOME
DRIVER 1’’ or‘‘WELCOME DRIVER
2’’ message on the multi-information
display, depending on which linked
remote transmitter is used.
Remote Transmitter
147
Instruments and Controls
10/06/29 11:59:04 11 ACURA MDX MMC North America Owner's M 50 31STX640 enu
Page 155 of 609
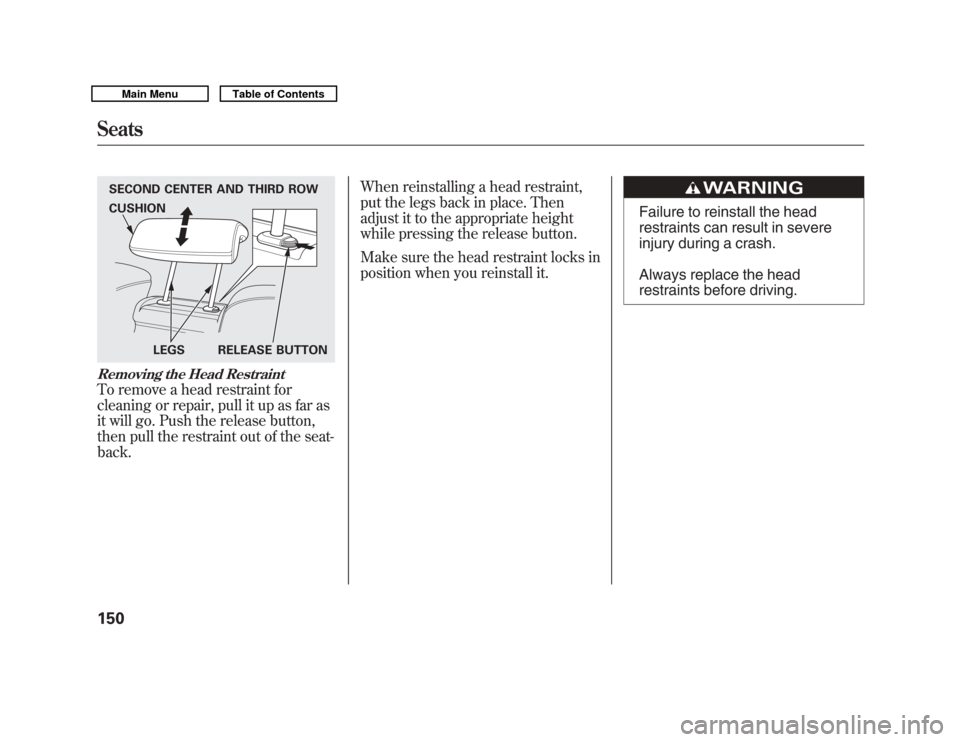
Removing the Head RestraintTo remove a head restraint for
cleaning or repair, pull it up as far as
it will go. Push the release button,
then pull the restraint out of the seat-
back.When reinstalling a head restraint,
put the legs back in place. Then
adjust it to the appropriate height
while pressing the release button.
Make sure the head restraint locks in
position when you reinstall it.
Failure to reinstall the head
restraints can result in severe
injury during a crash.
Always replace the head
restraints before driving.
SECOND CENTER AND THIRD ROW
LEGS RELEASE BUTTON
CUSHIONSeats15010/06/29 11:59:04 11 ACURA MDX MMC North America Owner's M 50 31STX640 enu
Page 157 of 609

Adjusting the Second Row SeatsTo change the seat-back angle of the
seats in the second row, pull up on
the handle on the outside of the seat-
back, and push the seat-back.
Overall, the seat-back has six
different positions.Folding the Second Row Seats
The left and right halves can be
folded separately.
1. To unlatch the detachable anchor
before folding the seat-back, insert
the latch plate into the slot on the
side of the anchor buckle (see
page 154) and allow the seat belt to
retract. Store the detachable
anchor and seat belt latch plates in
the retractor housing.
2. Lower the head restraints to their lowest positions.
3. Pull up the handle on the outside of the seat-back.
4. Fold the seat-back forward.
Reverse this procedure to return the
seat to the upright position. Make
sure the seat is locked securely
before driving. Make sure that the folded seat-back
does not press against the front
passenger's seat, as this could cause
the weight sensors to work
improperly.
HANDLE
Seats15210/06/29 11:59:04 11 ACURA MDX MMC North America Owner's M 50 31STX640 enu
Page 158 of 609

Third Row AccessTo get into the third row seats, pull
up the lever on the side of the
passenger's side second row seat-
back. The seat-back will tilt forward,
and then can be slid forward.
After you return the seat-back to the
upright position, push the whole seat
backwards until it latches. Make sure
the seat is fully latched before sitting
in it.Folding the Third Row Seat
1. Use the latch plate to release the
seat belt from the detachable
anchor (see page 154).
2. Lower the head restraints to their lowest positions.
NOTE: To fold the third row seat, the
second row seat-back must be folded
down or in the full up right position.
3. Unlock the seat-back by pulling the handle. Push the seat-back
forward.
Make sure the outer shoulder belts
are positioned on each hook on the
side panel whenever the third seat is
folded.
RELEASE LEVER
THIRD ROW SEAT HANDLE
CONTINUED
Seats
153
Instruments and Controls
10/06/29 11:59:04 11 ACURA MDX MMC North America Owner's M 50 31STX640 enu
Page 159 of 609

Reverse this procedure to return the
seat to the upright position. Make
sure the seat is locked securely
before driving. Reconnect the seat
belts to the detachable anchors.
Make sure all items in the cargo area
are secured. Loose items can fly
forward and cause injury if you have
to brake hard (SeeCarrying Cargo
on page 428). Detachable Anchor
The seat belts in the second row
center seat and the third row seats
are equipped with detachable
anchors.
To unlatch the detachable anchor,
insert the latch plate into the slot on
the side of the anchor buckle. Store
the detachable anchor and seat belt
latch plates in the retractor housing.When the seats are returned to the
upright position, these detachable
anchors should be latched back
properly.
Using the seat belt with the
detachable anchor unlatched
increases the chance of serious
injury or death in a crash.
Before using the seat belt,
make sure the detachable
anchor is correctly latched.
LATCH PLATE
Seats15410/06/29 11:59:04 11 ACURA MDX MMC North America Owner's M 50 31STX640 enu
Page 165 of 609
If your vehicle's battery is
disconnected or goes dead, or the
driver's window fuse is removed, the
AUTO function may be disabled. If
the AUTO function is disabled, the
power window system will need to be
reset after reconnecting the battery
or installing the fuse.1. Start the engine. Push down and hold the driver's window switch
until the window is fully open.
2. Pull and hold the driver's window switch to close the window
completely, then hold the switch
for about 2 seconds.
If the power windows do not operate
properly after resetting, have your
vehicle checked by your dealer. Opening the Windows and
Moonroof with the Remote
Transmitter
You can open all of the windows and
the moonroof from outside with the
remote transmitter.
1. Press the UNLOCK button once to
unlock the driver's door.
2. Press the UNLOCK button a second time, and hold it. All the
doors unlock, and all four windows
and moonroof start to open. To
stop the windows and moonroof,
release the button.
3. To open the windows and moonroof further, press the button
again (within 10 seconds of step 1)
and hold it. If the windows and the
moonroof stop before the desired
position, repeat steps 1 and 2.
You cannot close the windows or the
moonroof with the remote
transmitter. Opening/Closing the Windows
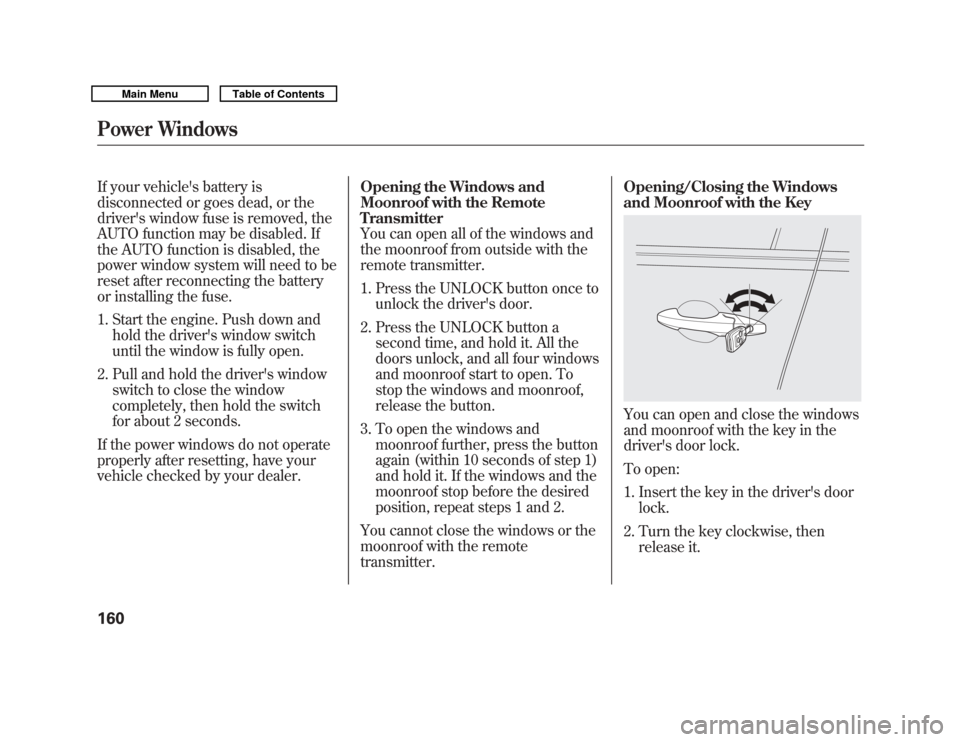
and Moonroof with the Key
You can open and close the windows
and moonroof with the key in the
driver's door lock.
To open:
1. Insert the key in the driver's door
lock.
2. Turn the key clockwise, then release it.
Power Windows16010/06/29 11:59:04 11 ACURA MDX MMC North America Owner's M 50 31STX640 enu
Page 166 of 609
3. Turn the key clockwise again, andhold it. All four windows and the
moonroof start to open. To stop
the windows and the moonroof,
release the key.
4. To open the windows and the moonroof further, turn and hold
the key again (within 10 seconds
of step 2).
To close: 1. Insert the key in the driver's door lock.
2. Turn the key counterclockwise, then release it.
3. Turn the key counterclockwise again, and hold it. All four windows
and the moonroof start to close. To
stop the windows and the
moonroof, release the key. 4. To close the windows and the
moonroof further, turn and hold
the key again (within 10 seconds
of step 2).
Auto reverse does not work when
closing the windows and moonroof
with the key.
NOTE: If the windows and the
moonroof stop before the desired
position, repeat steps 2 and 3. Moonroof
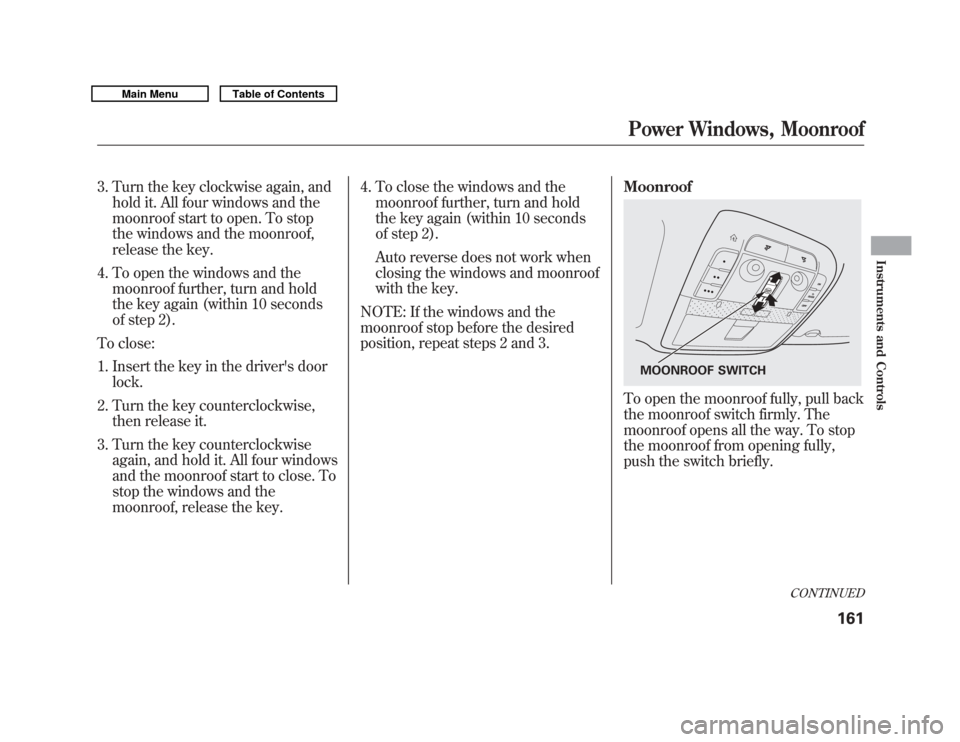
To open the moonroof fully, pull back
the moonroof switch firmly. The
moonroof opens all the way. To stop
the moonroof from opening fully,
push the switch briefly.
MOONROOF SWITCH
CONTINUED
Power Windows, Moonroof
161
Instruments and Controls
10/06/29 11:59:04 11 ACURA MDX MMC North America Owner's M 50 31STX640 enu