Lock Acura MDX 2011 Manual Online
[x] Cancel search | Manufacturer: ACURA, Model Year: 2011, Model line: MDX, Model: Acura MDX 2011Pages: 609, PDF Size: 12.7 MB
Page 501 of 609
Accelerating and Braking
For better traction on all surfaces,
accelerate slowly and gradually build
up speed. If you try to start too fast
on wet soil, mud, snow, or ice, you
might not have enough traction to
get underway, and you may dig
yourself a hole. Starting with the shift
lever in the D position will help you
have a smoother start on snow or ice.
Keep in mind that you will usually
need more time and distance to
brake to a stop on unpaved surfaces.
Avoid hard braking. Do not‘‘pump ’’
the brakes; let the anti-lock braking
system pump them for you.
Avoiding Obstacles
Debris in the road can damage your
suspension or other components.
Because your vehicle has a high
center of gravity, driving over a large
obstacle, or allowing a wheel to drop
into a deep hole can cause your
vehicle to tip or roll over. Driving on Slopes
If you can't clearly see all conditions
or obstacles on a slope, walk the
slope before you drive on it. If you
have any doubt whether or not you
can safely drive on the slope, don't
do it. Find another route.
If you are driving up a hill and find
that you cannot continue,
do not try to
turn around.
Your vehicle could roll
over. Slowly back down the hill,
following the same route you took up
the hill.
Crossing a Stream
Before driving through water, stop,
get out if necessary, and make sure
that:
●
The water is not deep enough to
cover your wheel hubs, axles, or
exhaust pipe. You could stall and
not be able to restart your engine.
The water can also damage
important vehicle components.
●
The banks are sloped so you can
drive out.
●
The water is not flowing too fast.
Deep rushing water can sweep you
downstream. Even very shallow
rushing water can wash the
ground from under your tires and
cause you to lose traction and
possibly roll over.
●
The banks and surface under the
water provide good traction. The
water may hide hazards such as
rocks, holes, or mud.
If you decide it is safe to drive
through water, choose a suitable
speed, and proceed without shifting,
changing speeds, stopping, or
shutting off the engine.
After driving through water, test your
brakes. If they got wet, gently
‘‘ pump ’’them while driving slowly
until they operate normally.
Off-Highway Driving Guidelines49610/06/29 11:59:04 11 ACURA MDX MMC North America Owner's M 50 31STX640 enu
Page 518 of 609
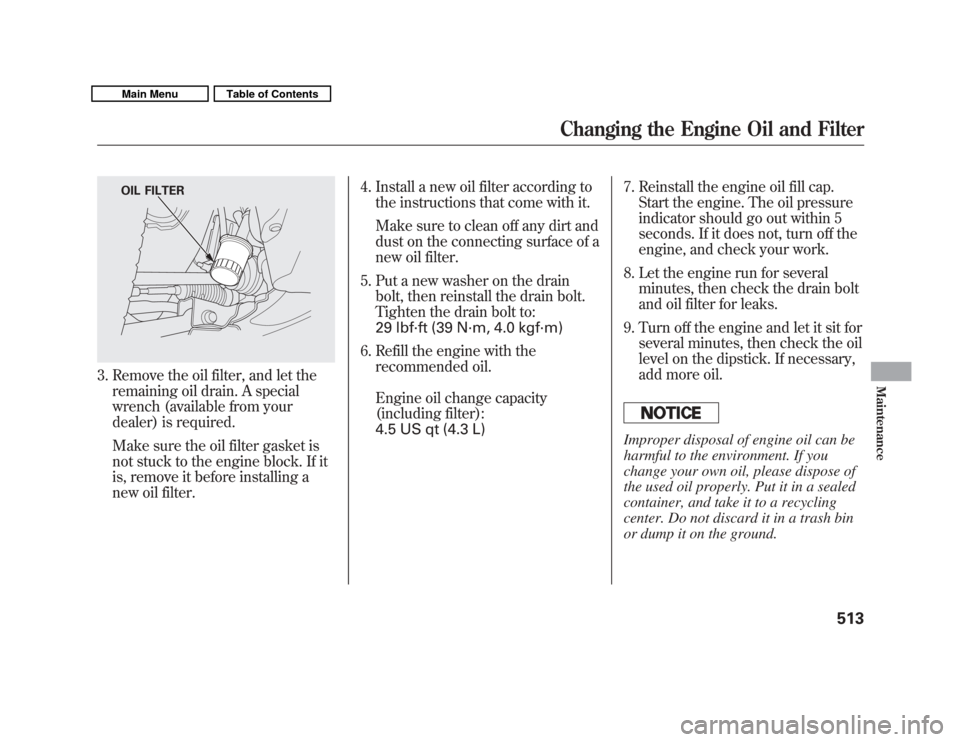
3. Remove the oil filter, and let theremaining oil drain. A special
wrench (available from your
dealer) is required.
Make sure the oil filter gasket is
not stuck to the engine block. If it
is, remove it before installing a
new oil filter. 4. Install a new oil filter according to
the instructions that come with it.
Make sure to clean off any dirt and
dust on the connecting surface of a
new oil filter.
5. Put a new washer on the drain bolt, then reinstall the drain bolt.
Tighten the drain bolt to:
29 lbf·ft (39 N·m, 4.0 kgf·m)
6. Refill the engine with the recommended oil.
Engine oil change capacity
(including filter):
4.5 US qt (4.3 L) 7. Reinstall the engine oil fill cap.
Start the engine. The oil pressure
indicator should go out within 5
seconds. If it does not, turn off the
engine, and check your work.
8. Let the engine run for several minutes, then check the drain bolt
and oil filter for leaks.
9. Turn off the engine and let it sit for several minutes, then check the oil
level on the dipstick. If necessary,
add more oil.
Improper disposal of engine oil can be
harmful to the environment. If you
change your own oil, please dispose of
the used oil properly. Put it in a sealed
container, and take it to a recycling
center. Do not discard it in a trash bin
or dump it on the ground.
OIL FILTER
Changing the Engine Oil and Filter
513
Maintenance
10/06/29 11:59:04 11 ACURA MDX MMC North America Owner's M 50 31STX640 enu
Page 520 of 609
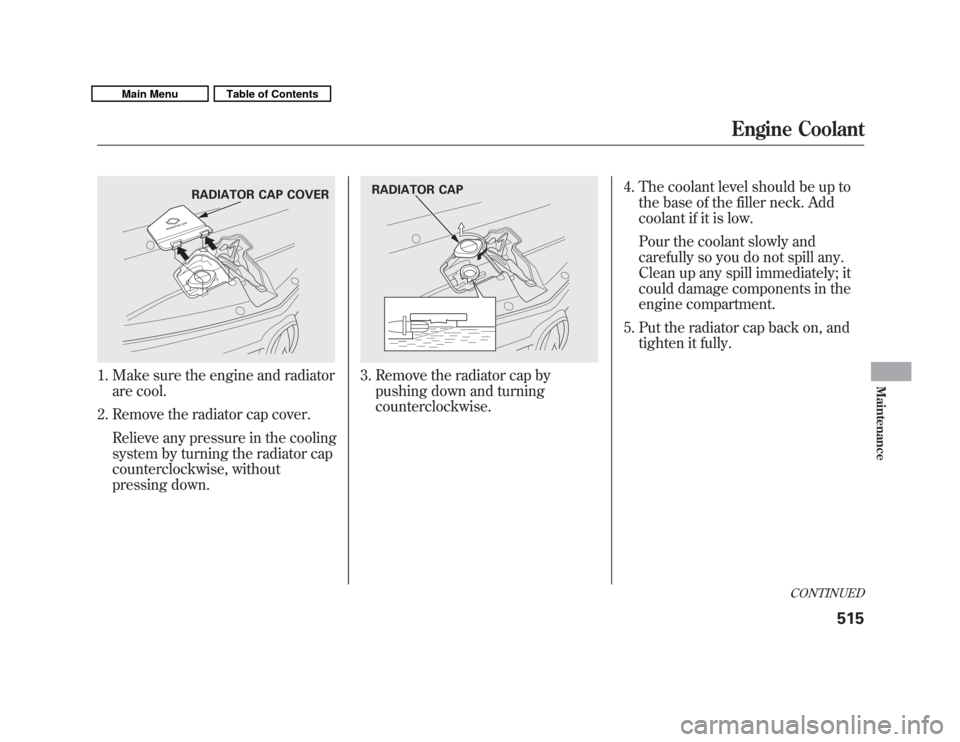
1. Make sure the engine and radiatorare cool.
2. Remove the radiator cap cover. Relieve any pressure in the cooling
system by turning the radiator cap
counterclockwise, without
pressing down.
3. Remove the radiator cap bypushing down and turning
counterclockwise. 4. The coolant level should be up to
the base of the filler neck. Add
coolant if it is low.
Pour the coolant slowly and
carefully so you do not spill any.
Clean up any spill immediately; it
could damage components in the
engine compartment.
5. Put the radiator cap back on, and tighten it fully.
RADIATOR CAP COVER
RADIATOR CAP
CONTINUED
Engine Coolant
515
Maintenance
10/06/29 11:59:04 11 ACURA MDX MMC North America Owner's M 50 31STX640 enu
Page 525 of 609
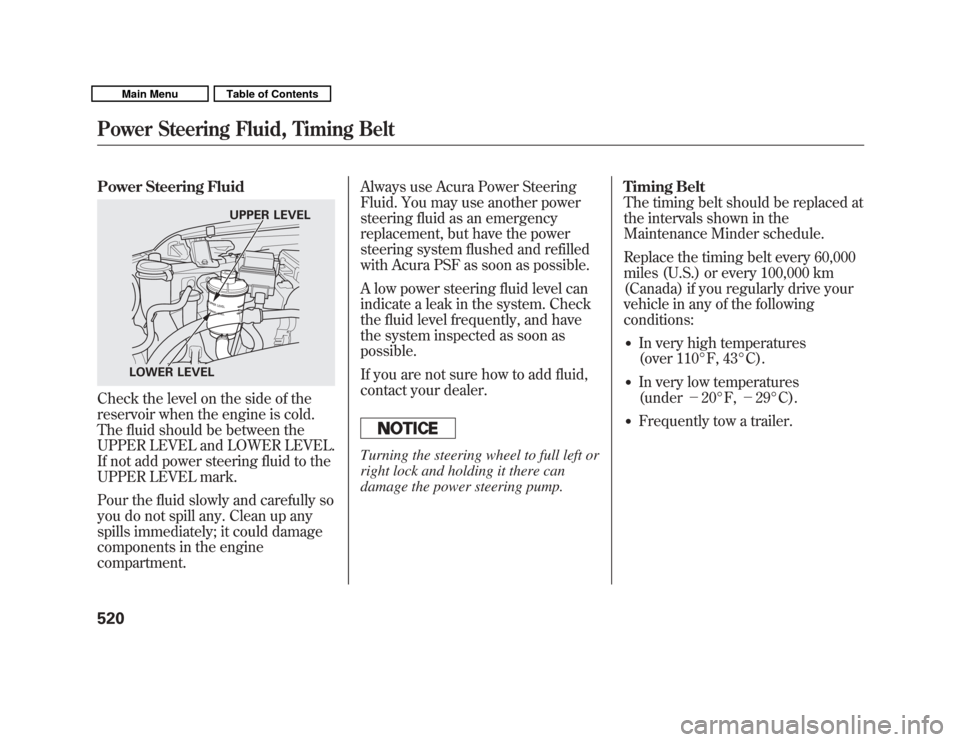
Power Steering FluidCheck the level on the side of the
reservoir when the engine is cold.
The fluid should be between the
UPPER LEVEL and LOWER LEVEL.
If not add power steering fluid to the
UPPER LEVEL mark.
Pour the fluid slowly and carefully so
you do not spill any. Clean up any
spills immediately; it could damage
components in the engine
compartment.Always use Acura Power Steering
Fluid. You may use another power
steering fluid as an emergency
replacement, but have the power
steering system flushed and refilled
with Acura PSF as soon as possible.
A low power steering fluid level can
indicate a leak in the system. Check
the fluid level frequently, and have
the system inspected as soon as
possible.
If you are not sure how to add fluid,
contact your dealer.
Turning the steering wheel to full left or
right lock and holding it there can
damage the power steering pump.
Timing Belt
The timing belt should be replaced at
the intervals shown in the
Maintenance Minder schedule.
Replace the timing belt every 60,000
miles (U.S.) or every 100,000 km
(Canada) if you regularly drive your
vehicle in any of the following
conditions:
●
In very high temperatures
(over 110°F, 43°C).
●
In very low temperatures
(under
-20°F, -29°C).
●
Frequently tow a trailer.
UPPER LEVEL
LOWER LEVEL
Power Steering Fluid, Timing Belt52010/06/29 11:59:04 11 ACURA MDX MMC North America Owner's M 50 31STX640 enu
Page 527 of 609
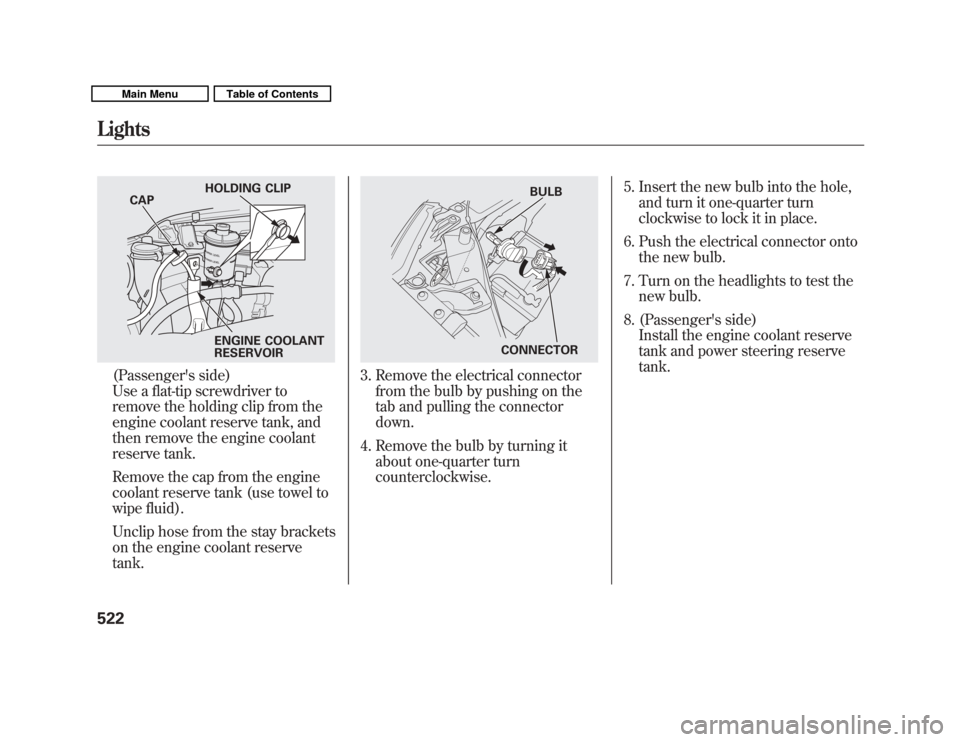
(Passenger's side)
Use a flat-tip screwdriver to
remove the holding clip from the
engine coolant reserve tank, and
then remove the engine coolant
reserve tank.
Remove the cap from the engine
coolant reserve tank (use towel to
wipe fluid).
Unclip hose from the stay brackets
on the engine coolant reserve
tank.
3. Remove the electrical connectorfrom the bulb by pushing on the
tab and pulling the connector
down.
4. Remove the bulb by turning it about one-quarter turn
counterclockwise. 5. Insert the new bulb into the hole,
and turn it one-quarter turn
clockwise to lock it in place.
6. Push the electrical connector onto the new bulb.
7. Turn on the headlights to test the new bulb.
8. (Passenger's side) Install the engine coolant reserve
tank and power steering reserve
tank.
HOLDING CLIP
CAP
ENGINE COOLANT
RESERVOIR
BULB
CONNECTOR
Lights52210/06/29 11:59:04 11 ACURA MDX MMC North America Owner's M 50 31STX640 enu
Page 528 of 609
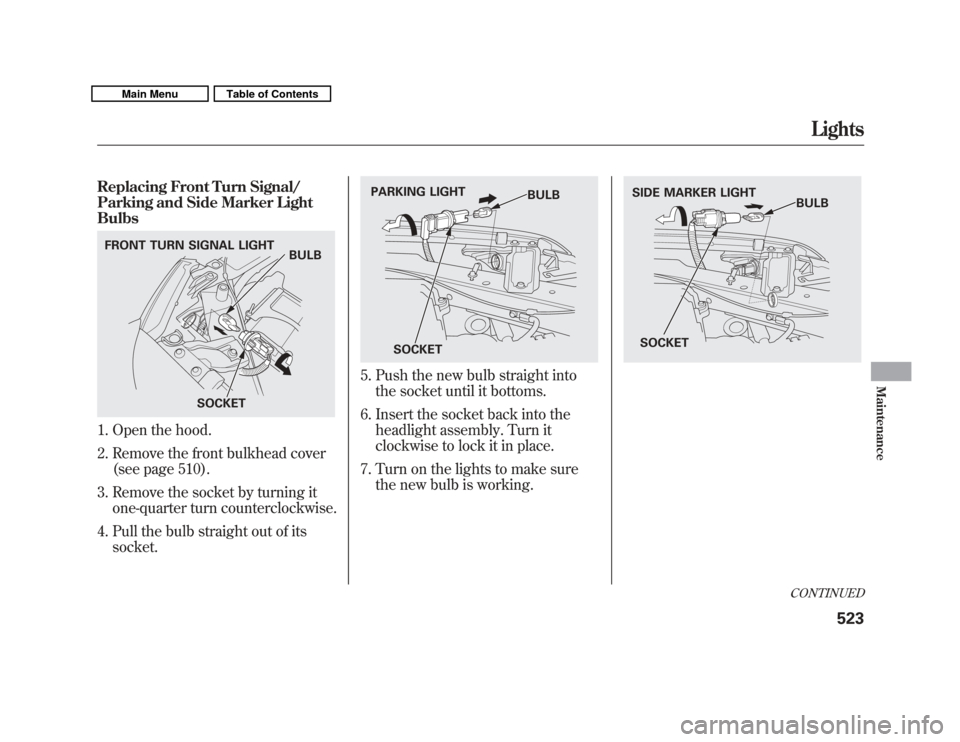
Replacing Front Turn Signal/
Parking and Side Marker Light
Bulbs1. Open the hood.
2. Remove the front bulkhead cover(see page 510).
3. Remove the socket by turning it one-quarter turn counterclockwise.
4. Pull the bulb straight out of its socket.
5. Push the new bulb straight intothe socket until it bottoms.
6. Insert the socket back into the headlight assembly. Turn it
clockwise to lock it in place.
7. Turn on the lights to make sure the new bulb is working.
FRONT TURN SIGNAL LIGHT BULB
SOCKET
BULB
PARKING LIGHT
SOCKET
SIDE MARKER LIGHT BULB
SOCKET
CONTINUED
Lights
523
Maintenance
10/06/29 11:59:04 11 ACURA MDX MMC North America Owner's M 50 31STX640 enu
Page 530 of 609
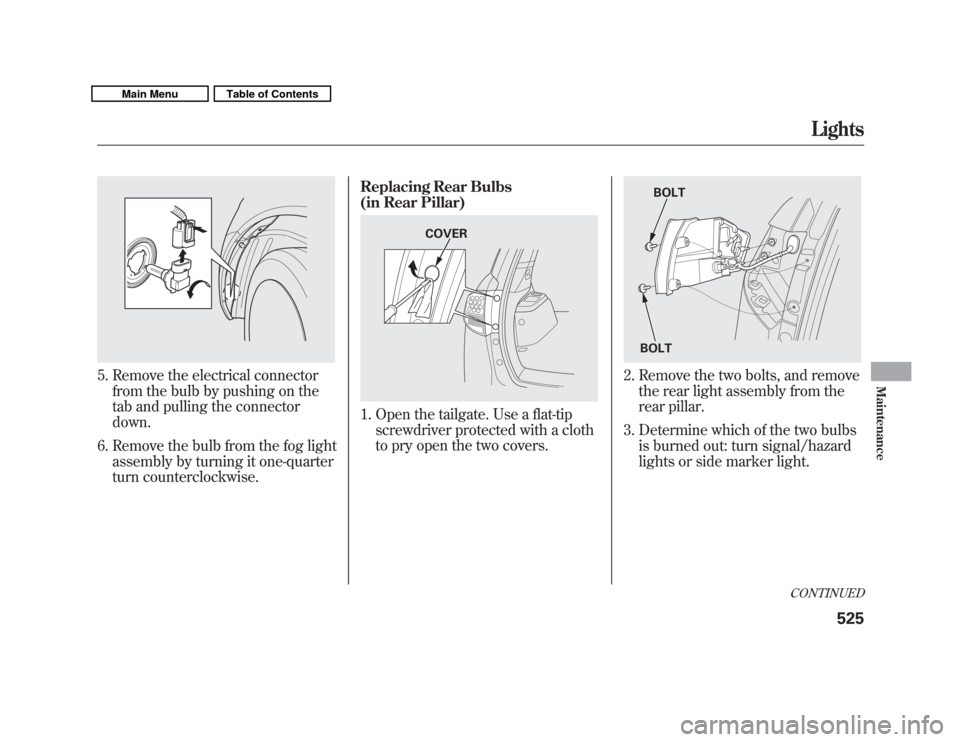
5. Remove the electrical connectorfrom the bulb by pushing on the
tab and pulling the connector
down.
6. Remove the bulb from the fog light assembly by turning it one-quarter
turn counterclockwise. Replacing Rear Bulbs
(in Rear Pillar)
1. Open the tailgate. Use a flat-tip
screwdriver protected with a cloth
to pry open the two covers.
2. Remove the two bolts, and removethe rear light assembly from the
rear pillar.
3. Determine which of the two bulbs is burned out: turn signal/hazard
lights or side marker light.
COVER
BOLT
BOLT
CONTINUED
Lights
525
Maintenance
10/06/29 11:59:04 11 ACURA MDX MMC North America Owner's M 50 31STX640 enu
Page 531 of 609
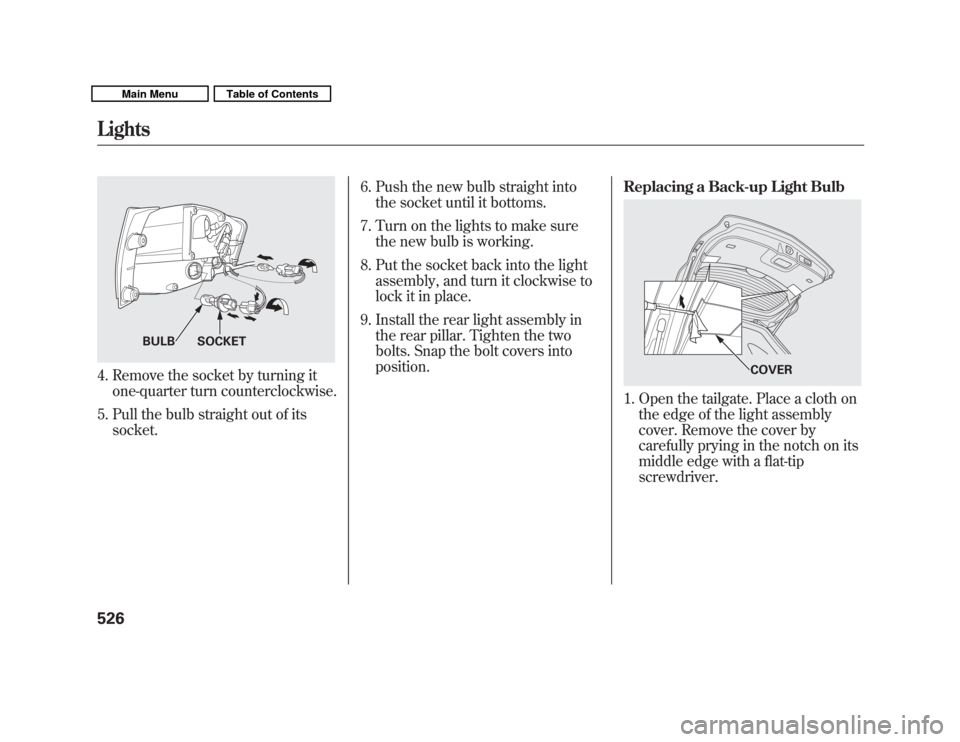
4. Remove the socket by turning itone-quarter turn counterclockwise.
5. Pull the bulb straight out of its socket. 6. Push the new bulb straight into
the socket until it bottoms.
7. Turn on the lights to make sure the new bulb is working.
8. Put the socket back into the light assembly, and turn it clockwise to
lock it in place.
9. Install the rear light assembly in the rear pillar. Tighten the two
bolts. Snap the bolt covers into
position. Replacing a Back-up Light Bulb
1. Open the tailgate. Place a cloth on
the edge of the light assembly
cover. Remove the cover by
carefully prying in the notch on its
middle edge with a flat-tip
screwdriver.
BULB SOCKET
COVER
Lights52610/06/29 11:59:04 11 ACURA MDX MMC North America Owner's M 50 31STX640 enu
Page 532 of 609
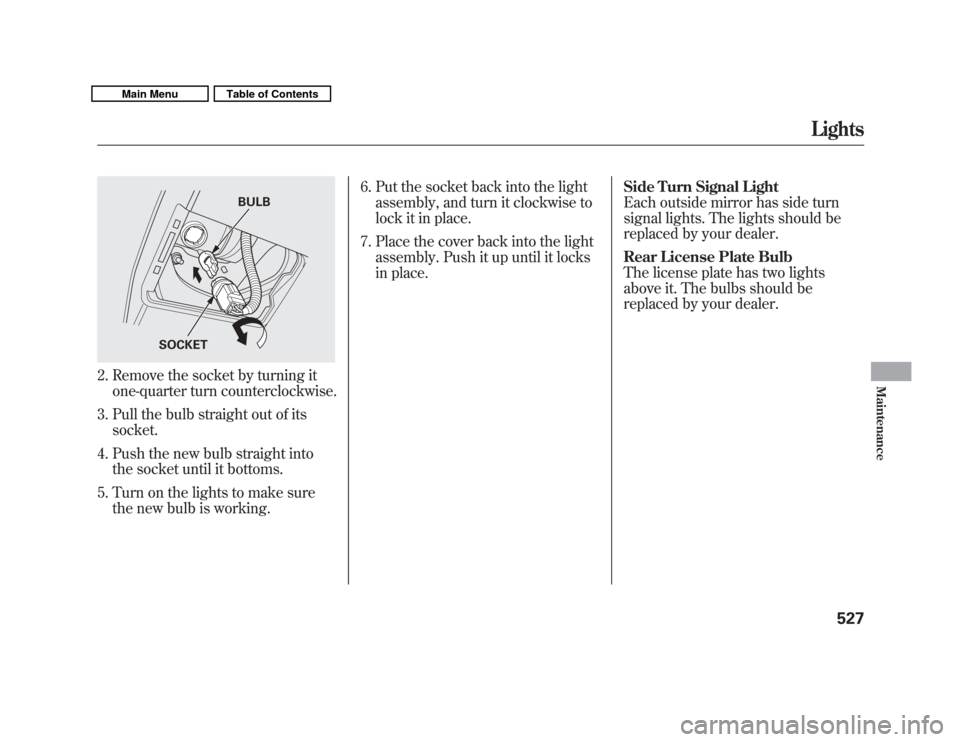
2. Remove the socket by turning itone-quarter turn counterclockwise.
3. Pull the bulb straight out of its socket.
4. Push the new bulb straight into the socket until it bottoms.
5. Turn on the lights to make sure the new bulb is working. 6. Put the socket back into the light
assembly, and turn it clockwise to
lock it in place.
7. Place the cover back into the light assembly. Push it up until it locks
in place. Side Turn Signal Light
Each outside mirror has side turn
signal lights. The lights should be
replaced by your dealer.
Rear License Plate Bulb
The license plate has two lights
above it. The bulbs should be
replaced by your dealer.
BULB
SOCKET
Lights
527
Maintenance
10/06/29 11:59:04 11 ACURA MDX MMC North America Owner's M 50 31STX640 enu
Page 535 of 609
Check the condition of the wiper
blades at least every 6 months.
Replace them if you find signs of
cracking in the rubber, and areas
that are getting hard or if they leave
streaks and unwiped areas when
used.
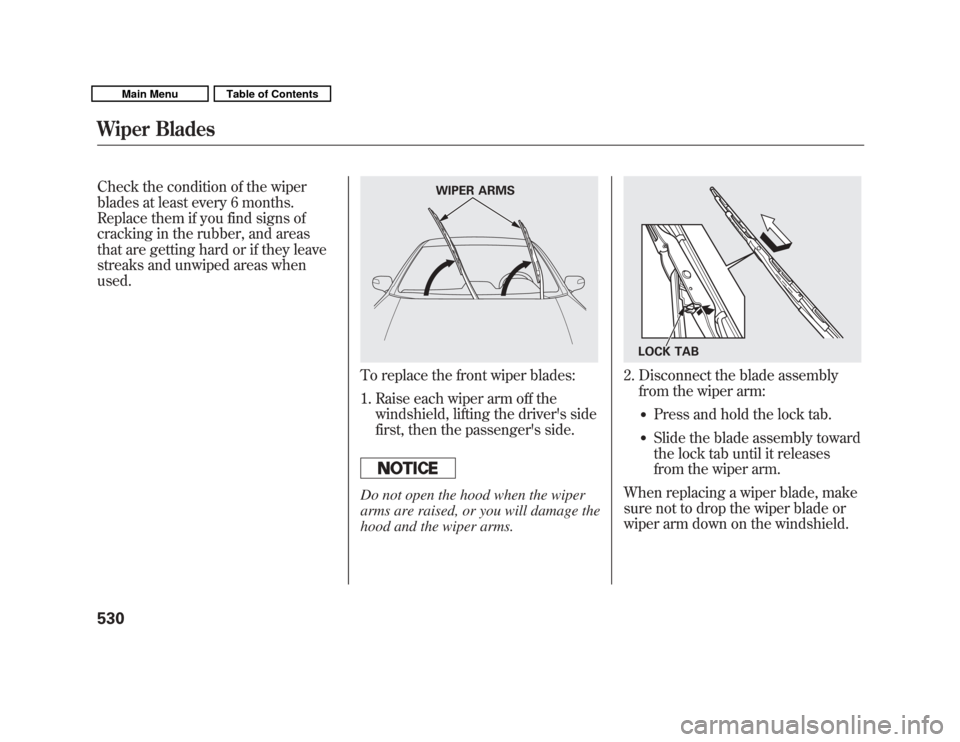
To replace the front wiper blades:
1. Raise each wiper arm off thewindshield, lifting the driver's side
first, then the passenger's side.Do not open the hood when the wiper
arms are raised, or you will damage the
hood and the wiper arms.
2. Disconnect the blade assemblyfrom the wiper arm:
●
Press and hold the lock tab.
●
Slide the blade assembly toward
the lock tab until it releases
from the wiper arm.
When replacing a wiper blade, make
sure not to drop the wiper blade or
wiper arm down on the windshield.
WIPER ARMS
LOCK TAB
Wiper Blades53010/06/29 11:59:04 11 ACURA MDX MMC North America Owner's M 50 31STX640 enu