Acura MDX 2012 Owner's Manual
Manufacturer: ACURA, Model Year: 2012, Model line: MDX, Model: Acura MDX 2012Pages: 621, PDF Size: 11.15 MB
Page 571 of 621

U.S. Canada
The brake system
indicator normally
comes on when you turn the ignition
switch to the ON (II) position, and as
a reminder to check the parking
brake. It will stay on if you do not
fully release the parking brake.
If the brake system indicator comes
on while driving, the brake fluid level
is probably low. Press lightly on the
brake pedal to see if it feels normal. If
it does, check the brake fluid level
the next time you stop at a service
station (see page 525).
You will also see a‘‘LOW BRAKE
FLUID’’message on the multi-
information display (see page 87).If the fluid level is low, take your
vehicle to a dealer, and have the
brake system inspected for leaks or
worn brake pads.
However, if the brake pedal does not
feel normal, you should take
immediate action. A problem in one
part of the system's dual circuit
design will still give you braking at
two wheels. You will feel the brake
pedal go down much farther before
the vehicle begins to slow down, and
you will have to press harder on the
pedal.
You will also see a‘‘CHECK BRAKE
SYSTEM’’message on the multi-
information display (see page 87).Slow down by shifting to a lower
gear, and pull to the side of the road
when it is safe. Because of the long
distance needed to stop, it is
hazardous to drive the vehicle. You
should have it towed, and repaired as
soon as possible (seeEmergency
Towingon page 572).
If you must drive the vehicle a short
distance in this condition, drive
slowly and carefully.
If the ABS indicator and the VSA
system indicator come on with the
brake system indicator, have your
vehicle inspected by your dealer
immediately.
Brake System Indicator564
Page 572 of 621

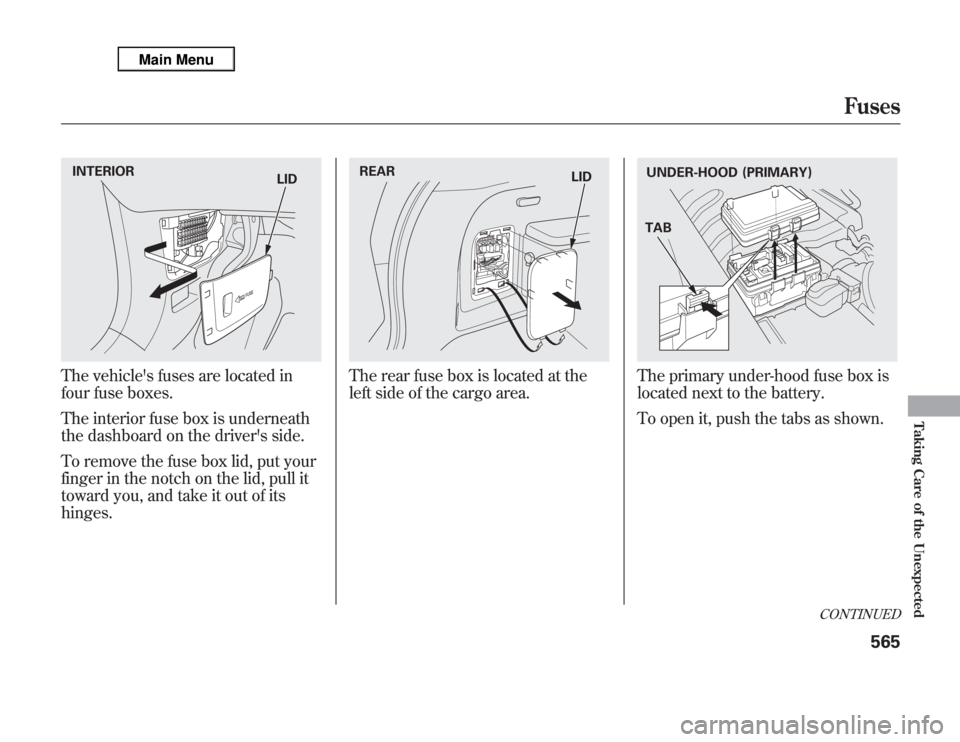
The vehicle's fuses are located in
four fuse boxes.
The interior fuse box is underneath
the dashboard on the driver's side.
To remove the fuse box lid, put your
finger in the notch on the lid, pull it
toward you, and take it out of its
hinges.
The rear fuse box is located at the
left side of the cargo area.
The primary under-hood fuse box is
located next to the battery.
To open it, push the tabs as shown.
INTERIOR
LID
REAR
LID
UNDER-HOOD (PRIMARY)
TAB
CONTINUED
Fuses
565
Taking Care of the Unexpected
Page 573 of 621

The secondary fuse box is on the
passenger's side.
To open it, push the tabs as shown.
If equippedThe sub fuse box is on the
passenger's side.
To open it, push the tabs as shown.Checking and Replacing Fuses
If something electrical in your
vehicle stops working, the first thing
you should check for is a blown fuse.
Determine from the chart on pages
569, 570, and 571, or the diagram on
the fuse box lid, which fuse or fuses
control that device. Check those
fuses first, but check all the fuses
before deciding that a blown fuse is
the cause. Replace any blown fuses,
and check if the device works.
1. Turn the ignition switch to the
LOCK (0) position. Make sure the
headlights and all other
accessories are off.
2. Remove the cover from the fuse
box.
UNDER-HOOD (SECONDARY)
TAB
UNDER-HOOD (SUB)
TAB
Fuses566
Page 574 of 621

3. Check each of the large fuses in
the under-hood fuse boxes by
looking through the top at the wire
inside. Removing these fuses
requires a Phillips-head
screwdriver.
4. Check the smaller fuses in the
under-hood fuse boxes and rear
fuse box, and all the fuses in the
interior and rear fuse boxes by
pulling out each one with the fuse
puller provided in the primary
under-hood fuse box.
FUSE BLOWN
BLOWN
FUSE PULLER
CONTINUED
Fuses
567
Taking Care of the Unexpected
Page 575 of 621

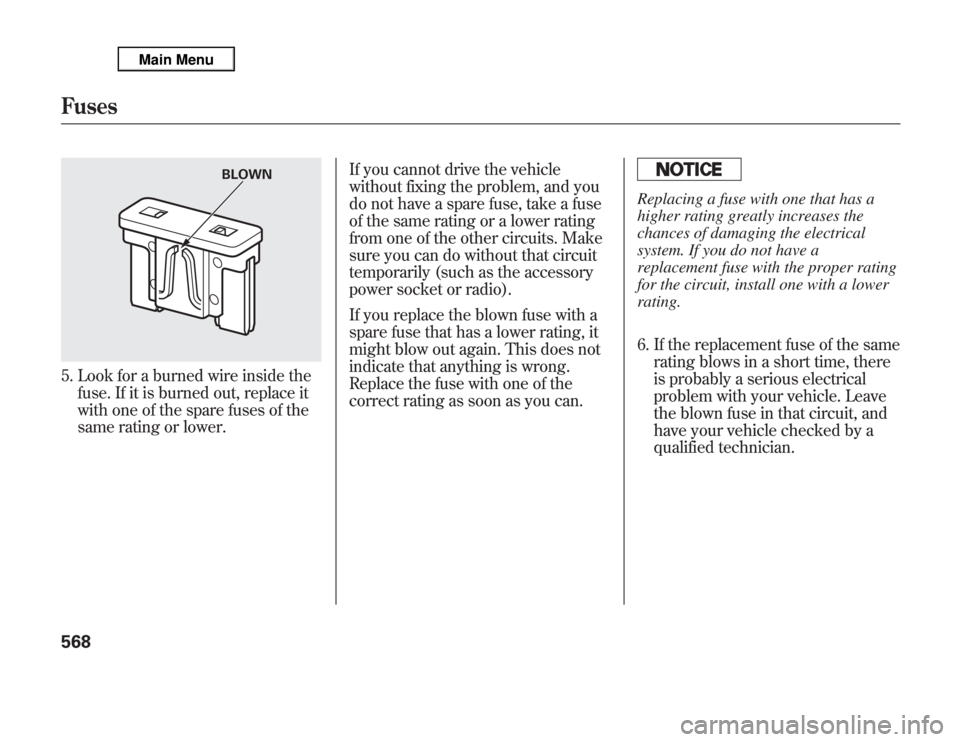
5. Look for a burned wire inside the
fuse. If it is burned out, replace it
with one of the spare fuses of the
same rating or lower.If you cannot drive the vehicle
without fixing the problem, and you
do not have a spare fuse, take a fuse
of the same rating or a lower rating
from one of the other circuits. Make
sure you can do without that circuit
temporarily (such as the accessory
power socket or radio).
If you replace the blown fuse with a
spare fuse that has a lower rating, it
might blow out again. This does not
indicate that anything is wrong.
Replace the fuse with one of the
correct rating as soon as you can.
Replacing a fuse with one that has a
higher rating greatly increases the
chances of damaging the electrical
system. If you do not have a
replacement fuse with the proper rating
for the circuit, install one with a lower
rating.
6. If the replacement fuse of the same
rating blows in a short time, there
is probably a serious electrical
problem with your vehicle. Leave
the blown fuse in that circuit, and
have your vehicle checked by a
qualified technician.
BLOWN
Fuses568
Page 576 of 621

PRIMARY UNDER-HOOD FUSE BOX
No. Amps. Circuits Protected
1 120 A Main fuse
-Not Used
2-1 30 A ADS
ᤳ2
2-2 30 A SH-AWD
2-3 30 A Rear Blower Motor
2-4 40 A ABS VSA
2-5 40 A Trailer Main
2-6 40 A Power Seats, Driver's Position
Memory System, Subwoofer,
Telescopic Steering Wheel
2-7 40 A Front Heated Seat, TPMS,
Moonroof, Driver's Lumbar
Support
2-8--
3-1 60 A Fog Lights, Front Blower
Motor, Interior Light
3-2 40 A Headlights, Daytime Running
Lights
3-3 60 A Cooling Fan, Condenser Fan,
MG Clutch, Headlight
Washer
ᤳ1
3-4 50 A Ignition Switch Main
ᤳ1: Canadian model
ᤳ2: If equippedNo. Amps. Circuits Protected
3-5 50 A Power Window
3-6 60 A Power Tailgate Opener/Closer,
Rear ACC Socket, Interior
Light,
Rear Defroster
3-7 30 A ECU (PCM)
3-8 30 A TECH
4 40 A Audio, Door Lock, Interior
Lights, Front ACC Socket
5 30 A EPT-L
ᤳ2
6 30 A EPT-R
ᤳ2
7 30 A FI ECU
8 30 A Audio Amplifier
9 7.5 A Battery Sensor
10 15 A Hazard
11 15 A Horn, Stop
12 20 A ABS VSA
13 20 A Trailer (Brake)
14 20 A Rear Heated Seat
ᤳ2
15 20 A A/C Inverter
CONTINUED
Fuse Locations
569
Taking Care of the Unexpected
Page 577 of 621

SECONDARY UNDER-HOOD FUSE BOXNo. Amps. Circuits Protected
1 10 A Left Daytime Running Light
2 10 A Right Daytime Running
Light
3 10 A Left Headlight High
4 10 A Right Headlight High
5 7.5 A Small Lights (Exterior)
6 30 A Headlight Low Main
7 7.5 A Cooling Fan Timer
8 15 A IGP
9 15 A IG Coil
10 15 A DBW
11 15 A AFHT
12 40 A Front Blower MotorNo. Amps. Circuits Protected
13 20 A Fog Lights
14 30 A Headlight Washer
ᤳ
15 30 A Condenser Fan
16 30 A Cooling Fan
17 7.5 A A/C Clutch
18 15 A Left Headlight Low
19 15 A Right Headlight Low
22 7.5 A Small Lights (Interior)
ᤳ: Canadian modelSUB FUSE BOXIf equippedNo. Amps. Circuits Protected
1 10 A ACC/CMBS, BSI, ADS, EPT,
AVS
REAR FUSE BOXNo. Amps. Circuits Protected
1-Not Used
2-Not Used
3-Not Used
4-Not Used
5 10 A Rear ACC Socket
6 20 A Power Tailgate
7-Not Used
8 7.5 A Interior Light
9-Not Used
10 30 A Rear Defroster
11 40 A Power Tailgate
Fuse Locations570
Page 578 of 621

INTERIOR FUSE BOXNo. Amps. Circuits Protected
1 7.5 A TPMS
2 10 A Driver's Lumbar Support
Motor
3 15 A Moonroof
4 20 A Front Heated Seats
5 10 A Audio
6 7.5 A Interior Light
7 10 A Back Up
8 20 A Door Lock
9 15 A ACC Socket
10 15 A IG Coil
11 30 A Windshield Wiper
12 10 A Subwoofer
13 20 A Passenger's Power ReclineNo. Amps. Circuits Protected
14 20 A Driver's Power Slide
15 20 A Telescopic Steering Wheel
16 20 A Driver's Power Recline
17 20 A Passenger's Power Slide
18 10 A Alternator
19 20 A Fuel Pump
20 10 A SH-AWD, ODS
21 7.5 A Gauges
22 10 A SRS
23-Not Used
24 20 A Left Rear Power Window
25 20 A Right Rear Power Window
26 30 A Passenger's Power Window
27 30 A Driver's Power Window
28 20 A Tilt Steering Wheel
29 10 A ABS VSA
30 10 A A/C
31 15 A Washer
32 10 A ACC
33-Not Used
Auxiliary (Holder1)No. Amps. Circuits Protected
1 7.5 A Starter DIAG
2 7.5 A SH-AWDAuxiliary (Holder2)No. Amps. Circuits Protected
1 7.5 A STS
2 7.5 A ODS
Auxiliary
(Holder1)Auxiliary
(Holder2)
Fuse Locations
571
Taking Care of the Unexpected
Page 579 of 621

Opening the Fuel Fill Door
ManuallyIf the fuel fill door release button
does not work, use the release lever
inside the rear fuse box lid in the
cargo area.
To open the fuel fill door, pull the
release lever rearward.Emergency Towing
If your vehicle needs to be towed,
call a professional towing service or
organization. Never tow your vehicle
with just a rope or chain. It is very
dangerous.
The only way you can safely tow
your vehicle is with flat-bed
equipment.The operator will load
your vehicle on the back of a truck.
Any other method of towing will
damage the drive system. When you
contact the towing agency, inform
them a flat-bed is required.
Towing with only two tires on the
ground will damage parts of the all-
wheel-drive system. Your vehicle should
be transported on a flat-bed truck or
trailer.
LID
RELEASE LEVER
Opening the Fuel Fill Door Manually, Emergency Towing572
Page 580 of 621

If your vehicle gets stuck in sand,
mud, or snow, call a towing service to
pull it out (see the previous page).
For very short distances, such as
freeing the vehicle, you can use the
detachable towing hook that mounts
on the anchors in the front and rear
bumpers.
1. Remove the cover, put cloth on the
edge of the cover to prevent
scratches and carefully pry with a
small flat-tip screwdriver or a metal
fingernail file.
The cover is attached to the bumper
with a tether.
Front COVER
Rear
COVER
CONTINUED
If Your Vehicle Gets Stuck
573
Taking Care of the Unexpected