Acura MDX 2014 Owner's Manual
Manufacturer: ACURA, Model Year: 2014, Model line: MDX, Model: Acura MDX 2014Pages: 500, PDF Size: 11.72 MB
Page 301 of 500

300
uuBluetooth® HandsFreeLink®uHFL Menus
Features
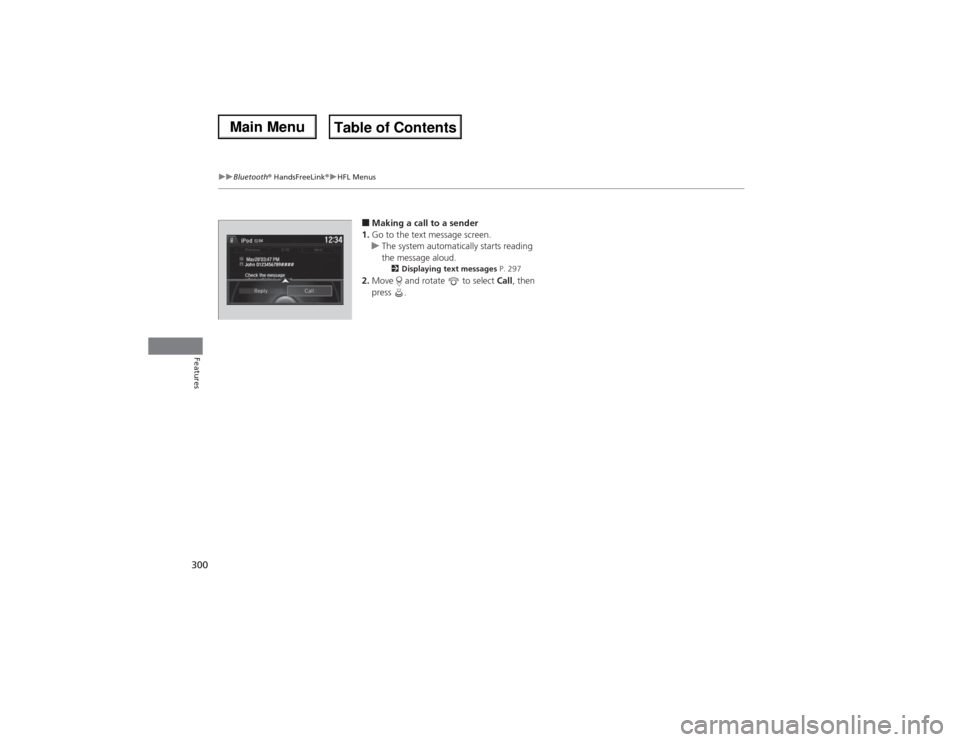
■Making a call to a sender
1.Go to the text message screen.
uThe system automatically starts reading
the message aloud.
2Displaying text messages P. 297
2.Move and rotate to select Call, then
press .
John 0123456789####Reply Call
Page 302 of 500

301Features
Compass
*
When you set the power mode to ON, the compass self-calibrates, and the compass
display appears.Compass CalibrationIf the compass indicates the wrong direction, or the CAL indicator blinks, you need
to manually calibrate the system.
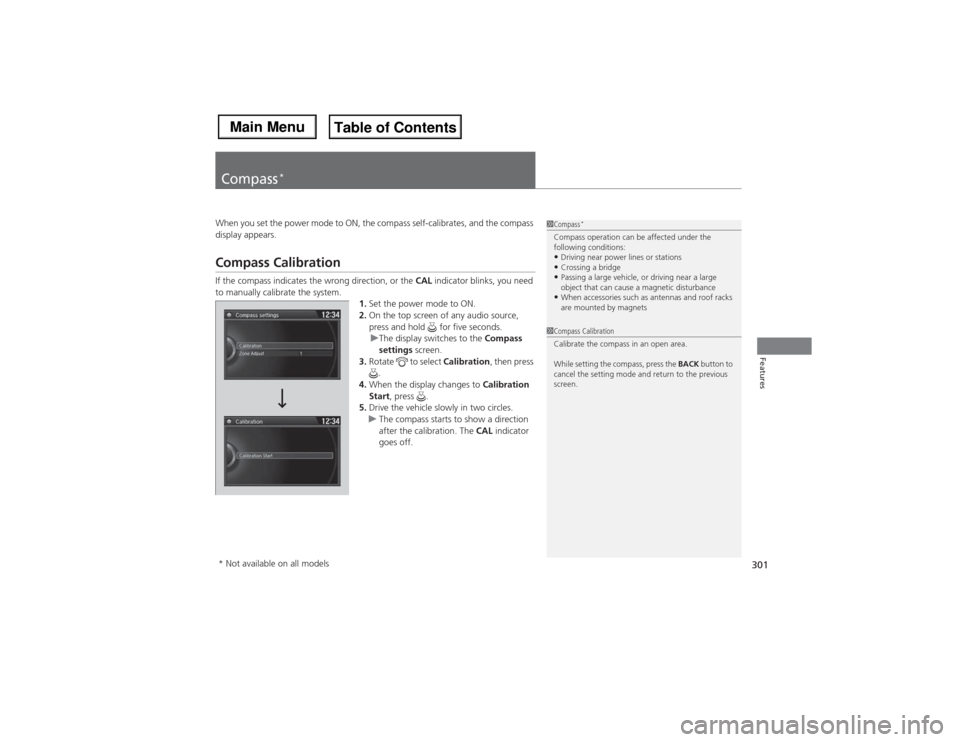
1.Set the power mode to ON.
2.On the top screen of any audio source,
press and hold for five seconds.
uThe display switches to the Compass
settings screen.
3.Rotate to select Calibration, then press
.
4.When the display changes to Calibration
Start, press .
5.Drive the vehicle slowly in two circles.
uThe compass starts to show a direction
after the calibration. The CAL indicator
goes off.
1Compass
*
Compass operation can be affected under the
following conditions:•Driving near power lines or stations•Crossing a bridge•Passing a large vehicle, or driving near a large
object that can cause a magnetic disturbance•When accessories such as antennas and roof racks
are mounted by magnets
1Compass Calibration
Calibrate the compass in an open area.
While setting the compass, press the BACK button to
cancel the setting mode and return to the previous
screen.
* Not available on all models
Page 303 of 500

302
uuCompass
*uCompass Zone Selection
Features
Compass Zone Selection
1.Set the power mode to ON.
2.On the top screen of any audio source,
press and hold for five seconds.
uThe display switches to the Compass
settings screen.
3.Rotate to select Zone Adjust, then
press .
uThe display shows the current zone
number the system is set to.
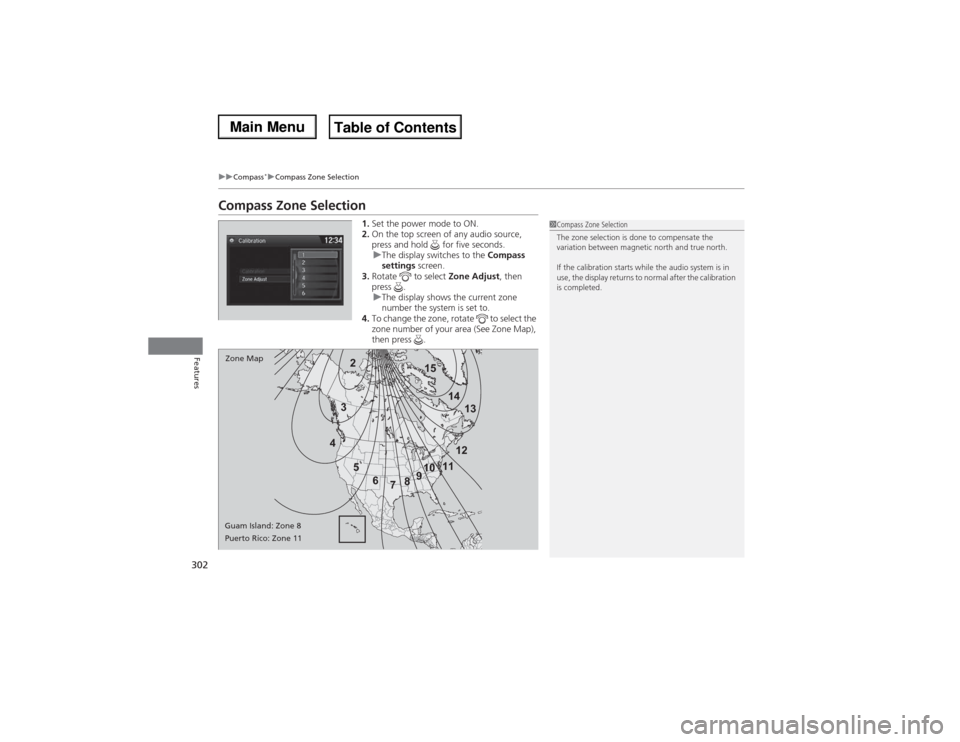
4.To change the zone, rotate to select the
zone number of your area (See Zone Map),
then press .2
3
4
5
6
78910111213 14 15
Zone Map
Guam Island: Zone 8
Puerto Rico: Zone 11
1Compass Zone Selection
The zone selection is done to compensate the
variation between magnetic north and true north.
If the calibration starts while the audio system is in
use, the display returns to normal after the calibration
is completed.
Page 304 of 500

303
Driving
This chapter discusses driving, refueling, and information on items such as accessories.
Before Driving
Driving Preparation .......................... 304
Maximum Load Limit........................ 307
Towing a Trailer................................ 309
Off-Highway Driving Guidelines..... 320
When Driving
Starting the Engine .......................... 322
Precautions While Driving................. 327
Automatic Transmission ................... 328
Shifting ............................................ 329
Integrated Dynamics System (IDS)..... 333
Cruise Control ................................. 334
Adaptive Cruise Control (ACC) with Low
Speed Follow (LSF)
*......................... 337Forward Collision Warning (FCW)
*.. 346
Lane Departure Warning (LDW)
*..... 350
Lane Keeping Assist System (LKAS)*.. 353
VSA® (Vehicle Stability Assist), aka ESC
(Electronic Stability Control), System .. 358Agile Handling Assist System............ 360
Blind Spot Information (BSI) System
*... 361
Super Handling-All Wheel DriveTM (SH-
AWD®)
*......................................... 363
Tire Pressure Monitoring System (TPMS) ... 363Tire Pressure Monitoring System (TPMS) -
Required Federal Explanation ......... 365
Braking
Brake System ................................... 367Anti-lock Brake System (ABS) ........... 369
Brake Assist System ......................... 370
Collision Mitigation Braking System
TM
(CMBS
TM)*..................................... 371
Parking Your Vehicle
When Stopped ................................ 377
Parking Sensor System
*................... 378
Multi-View Rear Camera*................ 382
Refueling
Fuel Information .............................. 383
How to Refuel ................................. 384
Fuel Economy.................................... 385
Accessories and Modifications........ 386
* Not available on all models
Page 305 of 500

304Driving
Before DrivingDriving PreparationCheck the following items before you start driving.
•Make sure there are no obstructions on the windows, door mirrors, exterior
lights, or other parts of the vehicle.
uRemove any frost, snow, or ice.
uRemove any snow on the roof, as this can slip down and obstruct your field of
vision while driving. If frozen solid, remove ice once it has softened.
uWhen removing ice from around the wheels, be sure not to damage the wheel
or wheel components.
•Make sure the hood is securely closed.
uIf the hood opens while driving, your front view will be blocked.
•Make sure the tires are in good condition.
uCheck air pressure, check for damage and excessive wear.
2Checking and Maintaining Tires P. 417
•Make sure there are no people or objects behind or around the vehicle.
uThere are blind spots from the inside.■Exterior Checks
1Exterior ChecksNOTICEWhen doors are frozen shut, use warm water around
the door edges to melt any ice. Do not try to force
them open, as this can damage the rubber trim
around the doors. When done, wipe dry to avoid
further freezing.
Do not pour warm water into the key cylinder.
You will be unable to insert key if the water freezes in
the hole.
Heat from the engine and exhaust can ignite
flammable materials left under the hood, causing a
fire. If you’ve parked your vehicle for an extended
period, inspect and remove any debris that may have
collected, such as dried grass and leaves that have
fallen or have been carried in for use as a nest by a
small animal.
Also check under the hood for leftover flammable
materials after you or someone else has performed
maintenance on your vehicle.
Page 306 of 500

Continued
305
uuBefore DrivinguDriving Preparation
Driving
•Store or secure all items on board properly.
uCarrying too much cargo, or improperly storing it, can affect your vehicle’s
handling, stability, stopping distance, and tires, and make it unsafe.
2Maximum Load Limit P. 307
•Do not pile items higher than the seat height.
uThey can block your view and may be thrown forward in the event of sudden
braking.
•Do not place anything in the front seat footwells. Make sure to secure the floor
mat.
uAn object or unsecured floor mat can interfere with your brake and accelerator
pedal operation while driving.
•If you have any animals on board, do not let them move around in the vehicle.
uThey may interfere with driving and a crash could occur.
•Securely close and lock all doors and the tailgate.
2Locking/Unlocking the Doors from the Inside P. 124
•Adjust your seating position properly.
uAdjust the head restraint, too.
2Adjusting the Seats P. 161
2Adjusting the Head Restraints P. 164
•Adjust the mirrors and steering wheel properly for your driving.
uAdjust them while sitting in the proper driving position.
2Adjusting the Steering Wheel P. 157
2Adjusting the Mirrors P. 158
■Interior Checks
1Interior Checks
The headlight aim is set by the factory, and does not
need to be adjusted. However, if you regularly carry
heavy items in the cargo area or tow a trailer, have
the aiming readjusted at a dealer or by a qualified
technician.
Page 307 of 500

306
uuBefore DrivinguDriving Preparation
Driving
•Be sure items placed on the floor behind the front seats cannot roll under the
seats.
uThey can interfere with the driver’s ability to operate the pedals, the operation
of the seats, or the operation of the sensors under the seats.
•Everyone in the vehicle must fasten their seat belt.
2Fastening a Seat Belt P. 34
•Make sure that the indicators in the instrument panel come on when you start the
vehicle, and go off soon after.
uAlways have a dealer check the vehicle if a problem is indicated.
2Indicators P. 70
Page 308 of 500

307
uuBefore DrivinguMaximum Load Limit
Continued
Driving
Maximum Load LimitThe maximum load for your vehicle is 1,173 lbs (532 kg).
See Tire and Loading Information label attached to the driver’s doorjamb.
This figure includes the total weight of all occupants, cargo, and
accessories, and the tongue load if you are towing a trailer.
Steps for Determining Correct Load Limit -
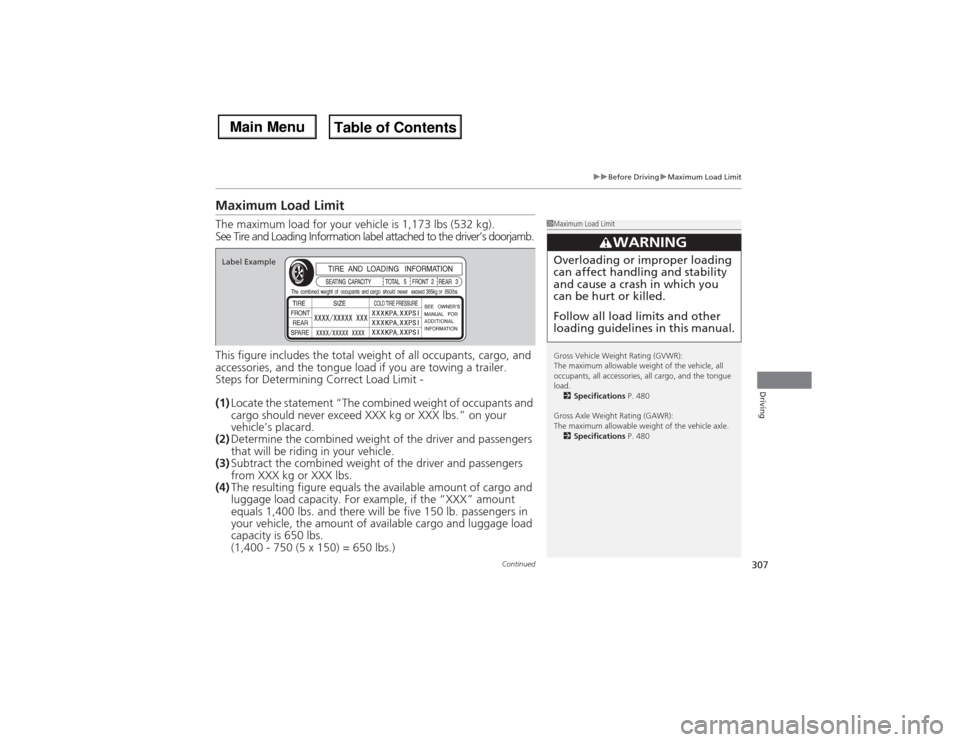
(1)Locate the statement “The combined weight of occupants and
cargo should never exceed XXX kg or XXX lbs.” on your
vehicle’s placard.
(2)Determine the combined weight of the driver and passengers
that will be riding in your vehicle.
(3)Subtract the combined weight of the driver and passengers
from XXX kg or XXX lbs.
(4)The resulting figure equals the available amount of cargo and
luggage load capacity. For example, if the “XXX” amount
equals 1,400 lbs. and there will be five 150 lb. passengers in
your vehicle, the amount of available cargo and luggage load
capacity is 650 lbs.
(1,400 - 750 (5 x 150) = 650 lbs.)
1Maximum Load Limit
Gross Vehicle Weight Rating (GVWR):
The maximum allowable weight of the vehicle, all
occupants, all accessories, all cargo, and the tongue
load.
2Specifications P. 480
Gross Axle Weight Rating (GAWR):
The maximum allowable weight of the vehicle axle.
2Specifications P. 480
3
WARNING
Overloading or improper loading
can affect handling and stability
and cause a crash in which you
can be hurt or killed.
Follow all load limits and other
loading guidelines in this manual.
Label Example
Page 309 of 500

308
uuBefore DrivinguMaximum Load Limit
Driving
(5)Determine the combined weight of luggage and cargo being
loaded on the vehicle. That weight may not safely exceed the
available cargo and luggage load capacity calculated in step 4.
(6)If your vehicle will be towing a trailer, load from your trailer will
be transferred to your vehicle. Consult this manual to
determine how this reduces the available cargo and luggage
load capacity of your vehicle.
In addition, the total weight of the vehicle, all occupants,
accessories, cargo, and trailer tongue load must not exceed the
Gross Vehicle Weight Rating (GVWR) or the Gross Axle Weight
Rating (GAWR). Both are on a label on the driver’s doorjamb.Load Limits Example
Example1
Max Load
1,173 lbs
(532 kg)Passenger Weight
150 lbs x 2 = 300 lbs
(68 kg x 2 = 136 kg)Cargo Weight
873 lbs
(396 kg)
Example2
Max Load
1,173 lbs
(532 kg)Passenger Weight
150 lbs x 5 = 750 lbs
(68 kg x 5 = 340 kg)Cargo Weight
423 lbs
(192 kg)
Page 310 of 500

309
Continued
Driving
Towing a TrailerTowing PreparationYour vehicle can tow a trailer if you carefully observe the load limits, use the proper
equipment, and follow the towing guidelines. Check the load limits before driving.
■Total trailer weight
Do not exceed the maximum allowable
weight of the trailer, cargo, and everything in
or on it shown in the table.
Towing loads in excess of this can seriously
affect vehicle handling and performance and
can damage the engine and drivetrain.
Each weight limit is calculated based on the following conditions:
•Occupants fill seats from the front of the vehicle to the back
•Each occupant weights 150 lbs (68 kg)
•Each occupant has 15 lbs (7 kg) of cargo in the cargo area
Any additional weight, cargo or accessories reduce the maximum trailer weight and
maximum tongue load.
■Towing Load Limits
1Towing Load Limits
Check if all loads are within limits at a public scale.
If a public scale is not available, add the estimated
weight of your cargo load to the weight of your
trailer (as quoted by the manufacturer), and then
measure the tongue load with an appropriate scale or
tongue gauge or estimate it based on cargo
distribution.
Refer to the trailer owner’s manual for additional
information.
Break-in Period
Avoid towing a trailer during your vehicle’s first 600
miles (1,000 km).
Never exceed the gross weight ratings.
Gross weight information
2Vehicle Specifications P. 480
3
WARNING
Exceeding any load limit or improperly
loading your vehicle and trailer can cause a
crash in which you can be seriously hurt or
killed.
Check the loading of your vehicle and
trailer carefully before starting to drive.
Total Load
Number of
occupants
4WD models with
ATF cooler
4WD models
without ATF cooler
2WD models
2
5,000 lbs (2,268 kg)
3,500 lbs (1,588 kg)
3,500 lbs (1,588 kg)
3
4,750 lbs (2,155 kg)
3,250 lbs (1,474 kg)
3,250 lbs (1,474 kg)
4
4,500 lbs (2,041 kg)
3,000 lbs (1,361 kg)
3,000 lbs (1,361 kg)
5
4,250 lbs (1,928 kg)
2,750 lbs (1,247 kg)
2,750 lbs (1,247 kg)
6
4,000 lbs (1,814 kg)
2,500 lbs (1,134 kg)
2,500 lbs (1,134 kg)
7
Towing not recommended