Acura MDX 2017 Workshop Manual
Manufacturer: ACURA, Model Year: 2017, Model line: MDX, Model: Acura MDX 2017Pages: 170, PDF Size: 12.43 MB
Page 51 of 170
44 |
V
EHICLE CONTROLS
Adjusting the
Head Restraints
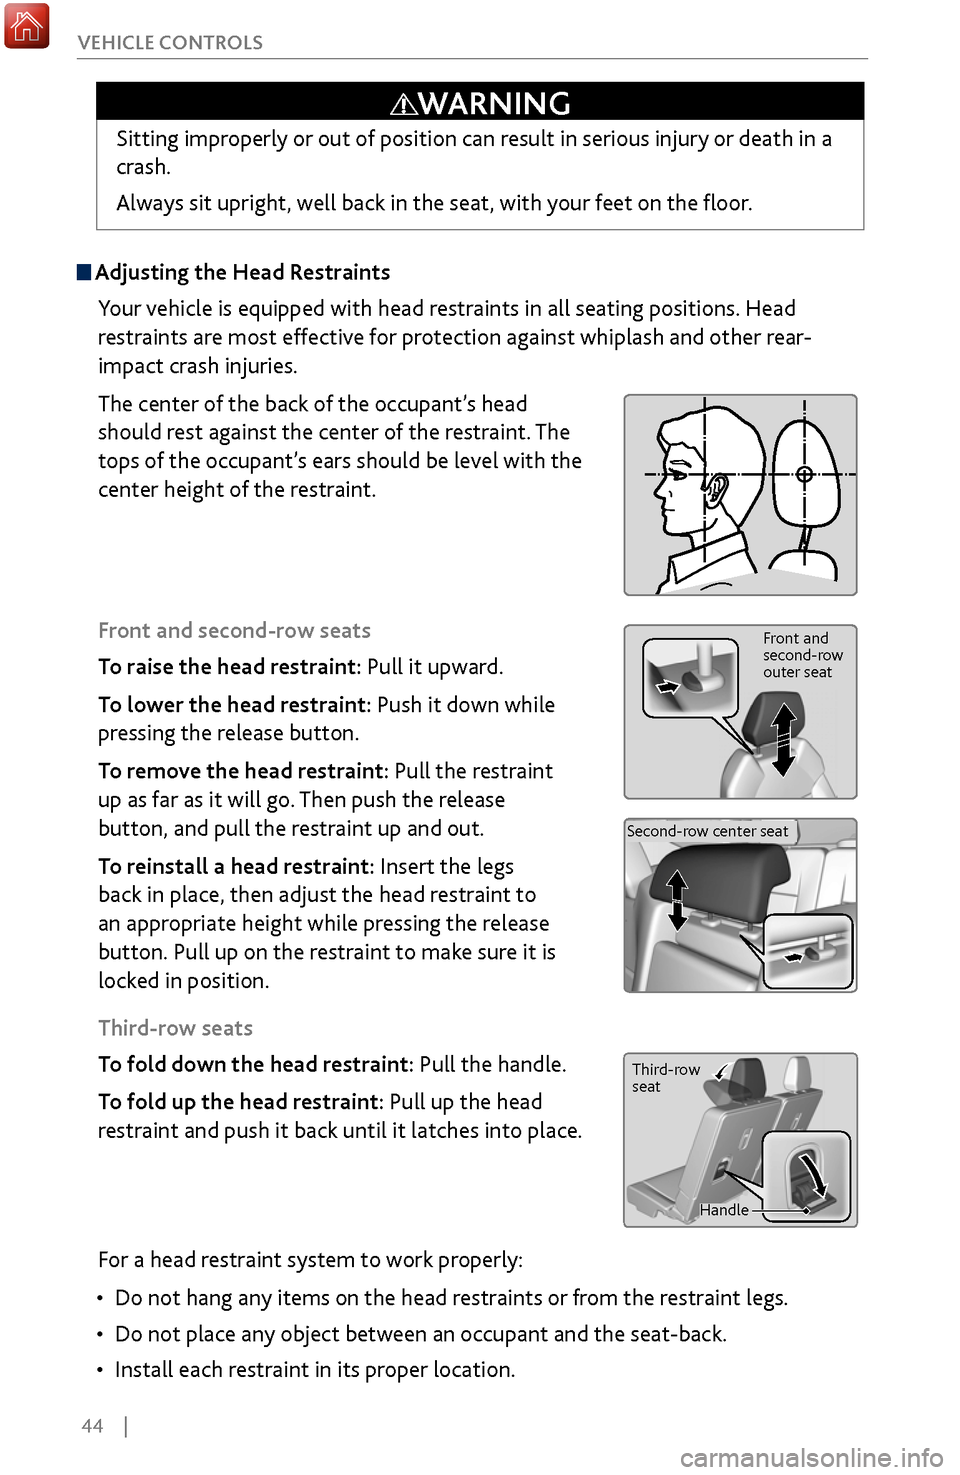
Your vehicle is equipped with head restraints in all seating positions. Head
restraints are most effective for protection against whiplash and other rear-
impact crash injuries.
The center of the back of the occupant’s head
should rest against the center of the restraint. The
tops of the occupant’s ears should be level with the
center height of the restraint.
Front and second-row seats
To raise the head restraint: Pull it upward.
To lower the head restraint: Push it down while
pressing the release button.
To remove the head restraint: Pull the restraint
up as far as it will go. Then push the release
button, and pull the restraint up and out.
To reinstall a head restraint: Insert the legs
back in place, then adjust the head restraint to
an appropriate height while pressing the release
button. Pull up on the restraint to make sure it is
locked in position.
Third-row seats
To fold down the head restraint: Pull the handle.
To fold up the head restraint: Pull up the head
restraint and push it back until it latches into place.
Front and
second-row
outer seat
Second-row center seat
Sitting improperly or out of position can result in serious injury or death in a
crash.
Always sit upright, well back in the seat, with your feet on the floor.
WARNING
Third-row
seat
Handle
For a head restraint system to work properly:
•
Do not hang any items on
the head restraints or from the restraint legs.
•
Do not place any object between an
occupant and the seat-back.
•
Install each restraint in its proper location.
Page 52 of 170
| 45
V
EHICLE CONTROLS
Failure to reinstall, or correctly reinstall, the head restraints can result in
severe injury during a crash.
Always replace the head restraints before driving.
WARNING
Improperly positioning head restraints reduces their effectiveness and
increases the likelihood of serious injury in a crash.
Make sure head restraints are in place and positioned properly before driving.
WARNING
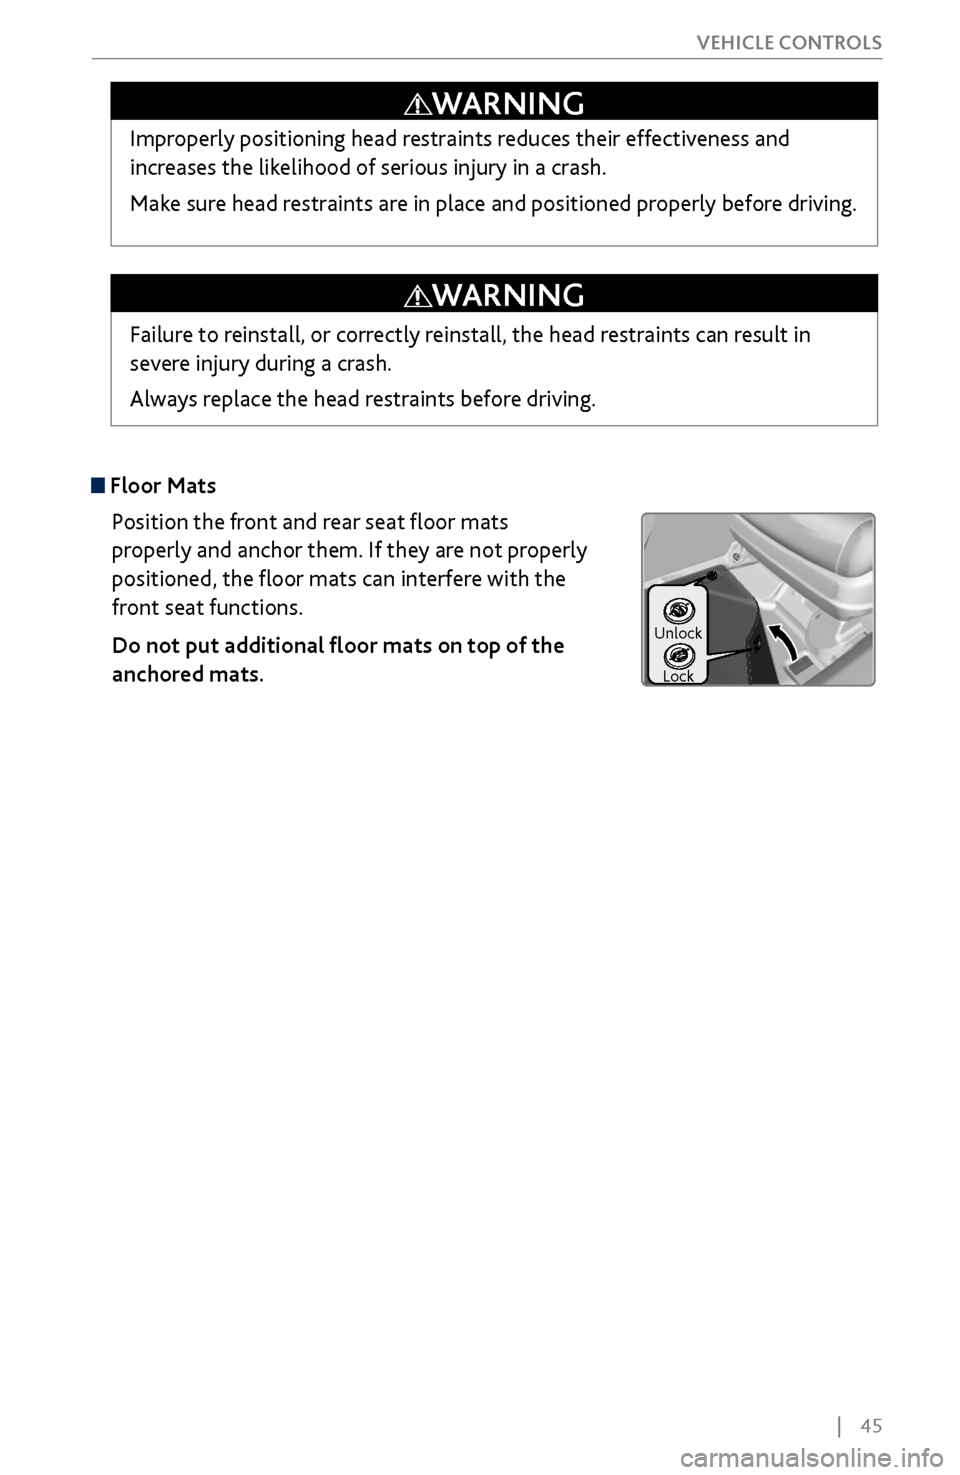
Floor Mats
Position the front and rear seat floor mats
properly and anchor them. If they are not properly
positioned, the floor mats can interfere with the
front seat functions.
Do not put additional floor mats on top of the
anchored mats.
Unlock
Lock
Page 53 of 170
46 |
V
EHICLE CONTROLS
Adjusting the
Mirrors
Adjust the angle of the mirrors for the best visibility when you are sitting in the
correct driving position.
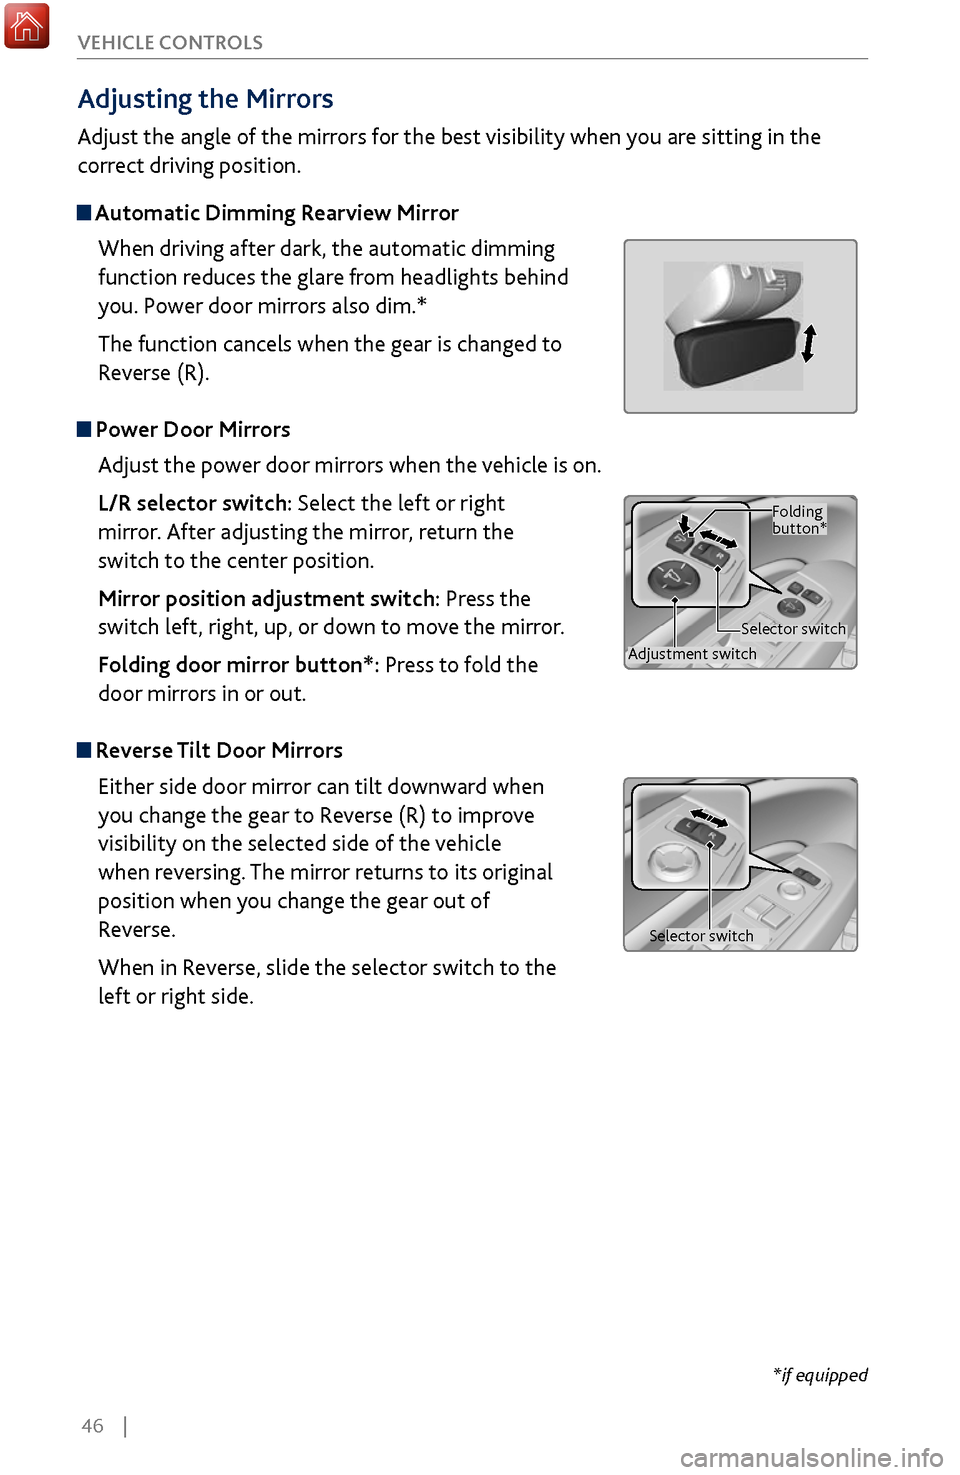
Automatic Dimming Rearview Mirror
When driving after dark, the automatic dimming
function reduces the glare from headlights behind
you. Power door mirrors also dim.*
The function cancels when the gear is changed to
Reverse (R).
Power Door MirrorsAdjust the power door mirrors when the vehicle is on.
L/R selector switch: Select the left or right
mirror. After adjusting the mirror, return the
switch to the center position.
Mirror position adjustment switch: Press the
switch left, right, up, or down to move the mirror.
Folding door mirror button*: Press to fold the
door mirrors in or out.
Reverse Tilt Door MirrorsEither side door mirror can tilt downward when
you change the gear to Reverse (R) to improve
visibility on the selected side of the vehicle
when reversing. The mirror returns to its original
position when you change the gear out of
Reverse.
When in Reverse, slide the selector switch to the
left or right side.
*if equipped
Adjustment switch Selector switchFolding
button*
Selector switch
Page 54 of 170
| 47
V
EHICLE CONTROLS
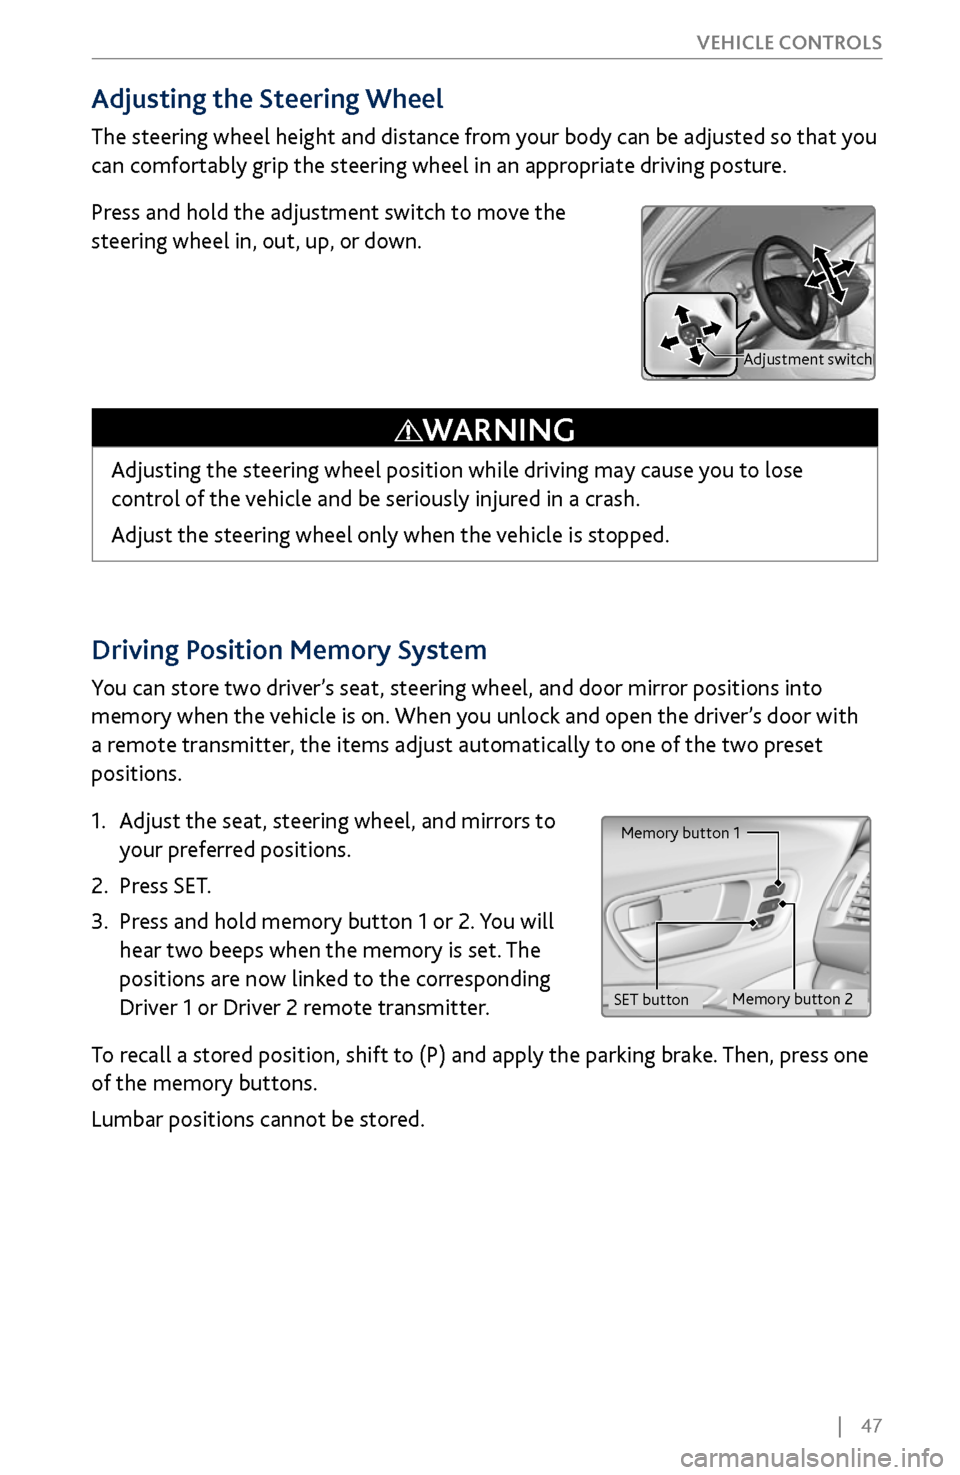
Driving Position Memory System
You can store two driver’s seat, steering wheel, and door mirror positions into
memory when the vehicle is on. When you unlock and open the driver’s door with
a remote transmitter, the items adjust automatically to one of the two preset
positions.
1.
Adjust the seat
, steering wheel, and mirrors to
your preferred positions.
2.
Press SET.
3.
Press and hold memory button 1 or 2.
You will
hear two beeps when the memory is set. The
positions are now linked to the corresponding
Driver 1 or Driver 2 remote transmitter.
To recall a stored position, shift to (P) and apply the parking brake. Then, press one
of the memory buttons.
Lumbar positions cannot be stored.
Memory button 1
Memory button 2
SET button
Adjusting the Steering Wheel
The steering wheel height and distance from your body can be adjusted so that you
can comfortably grip the steering wheel in an appropriate driving posture.
Press and hold the adjustment switch to move the
steering wheel in, out, up, or down.
Adjusting the steering wheel position while driving may cause you to lose
control of the vehicle and be seriously injured in a crash.
Adjust the steering wheel only when the vehicle is stopped.
WARNING
Adjustment switch
Page 55 of 170
48 |
V
EHICLE CONTROLS
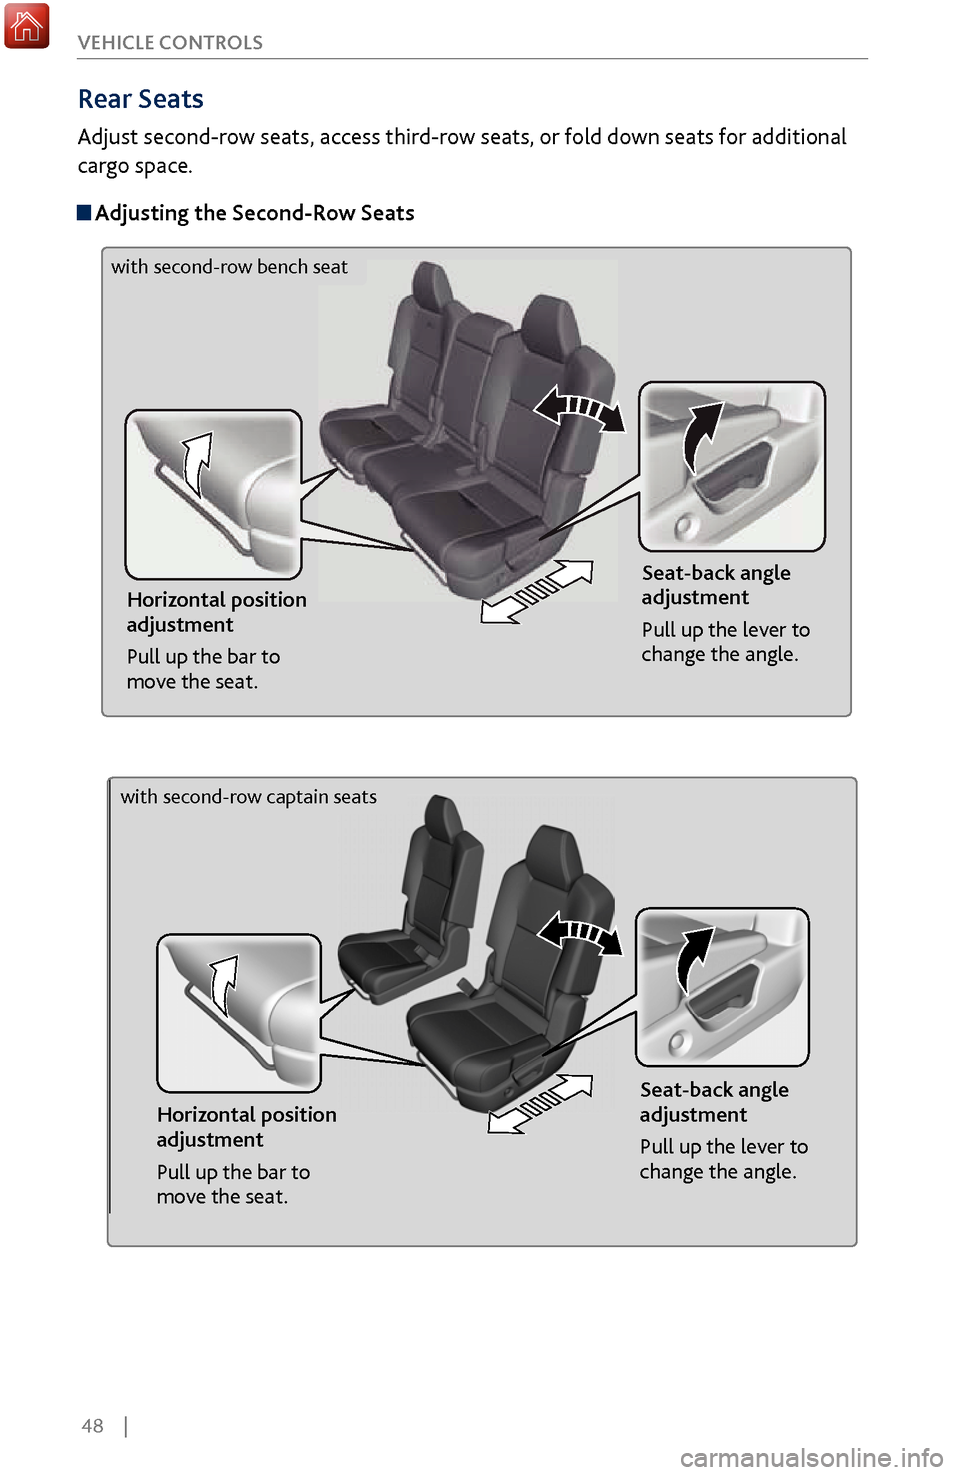
Rear Seats
Adjust second-row seats, access third-row seats, or fold down seats for additional
cargo space.
Adjusting the
Second-Row Seats
Horizontal position
adjustment
Pull up the bar to
move the seat. Seat-back angle
adjustment
Pull up the lever to
change the angle.
Horizontal position
adjustment
Pull up the bar to
move the seat.
Seat-back angle
adjustment
Pull up the lever to
change the angle.
with second-row bench seat
with second-row captain seats
Page 56 of 170
| 49
V
EHICLE CONTROLS
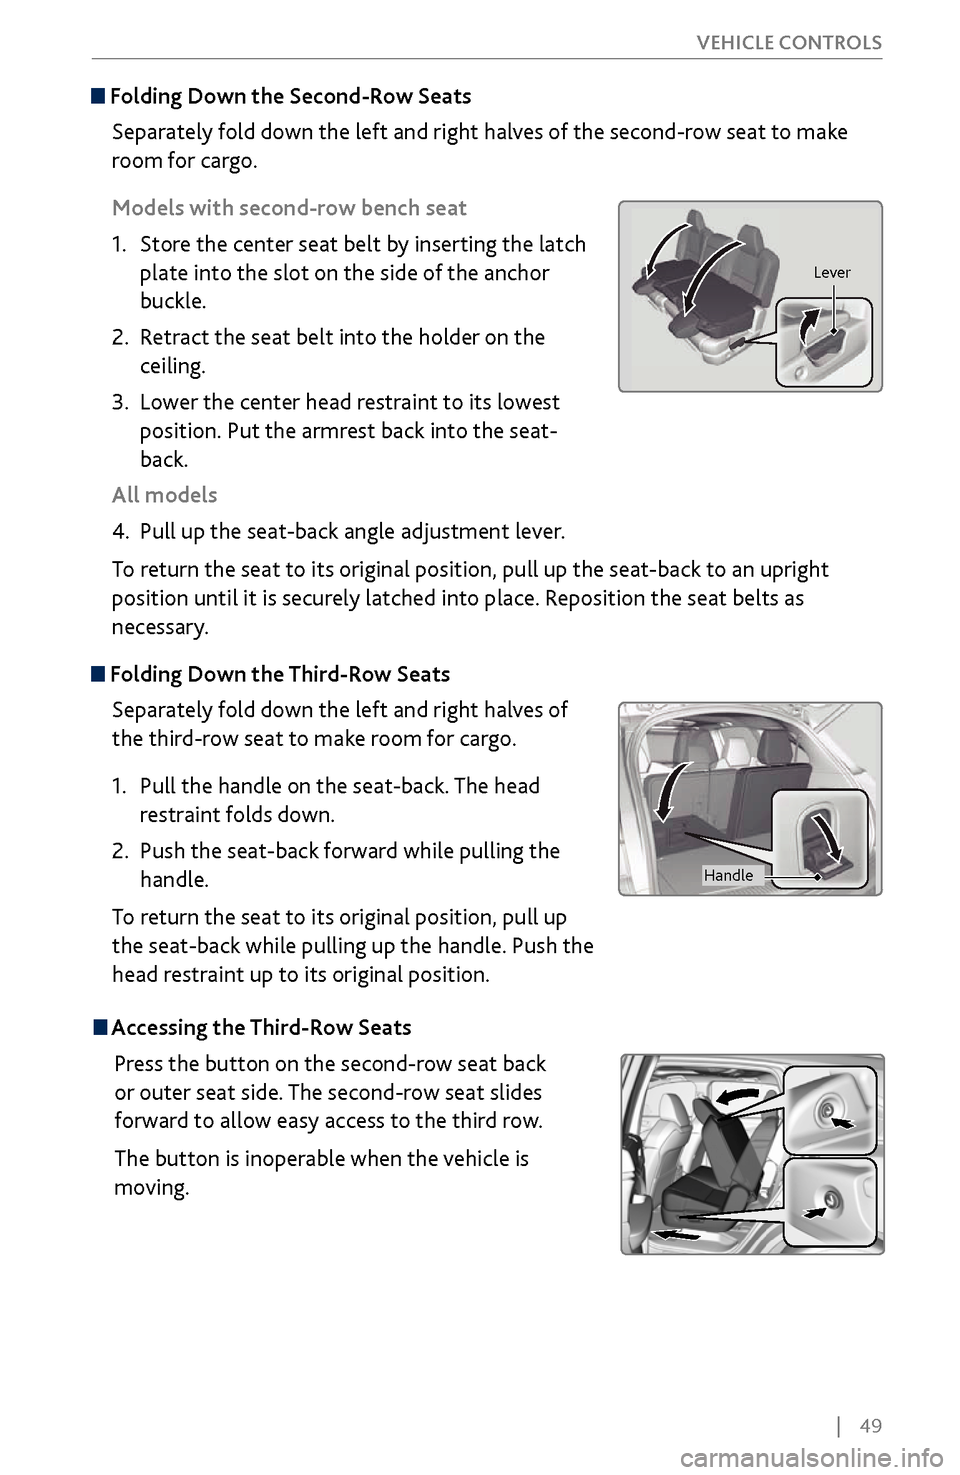
Folding Down the
Second-Row Seats
Separately fold down the left and right halves of the second-row seat to make
room for cargo.
Models with second-row bench seat
1.
Store the center seat belt b
y inserting the latch
plate into the slot on the side of the anchor
buckle.
2.
Retract the seat
belt into the holder on the
ceiling.
3.
Lower the center head restraint
to its lowest
position. Put the armrest back into the seat-
back.
All models
4.
Pull up the seat-back angle adjustment lev
er.
To return the seat to its original position, pull up the seat-back to an upright
position until it is securely latched into place. Reposition the seat belts as
necessary.
Folding Down the Third-Row Seats
Separately fold down the left and right halves of
the third-row seat to make room for cargo.
1.
Pull the handle on the seat
-back. The head
restraint folds down.
2.
Push the seat-back
forward while pulling the
handle.
To return the seat to its original position, pull up
the seat-back while pulling up the handle. Push the
head restraint up to its original position.
Lever
Handle
Accessing the Third-Row Seats
Press the button on the second-row seat back
or outer seat side. The second-row seat slides
forward to allow easy access to the third row.
The button is inoperable when the vehicle is
moving.
Page 57 of 170
50 |
V
EHICLE CONTROLS
HomeLink®
Universal Transceiver
Program your vehicle to operate up to three remote-controlled devices around your
home—such as garage doors, lighting, or home security systems—using the buttons
on the ceiling.
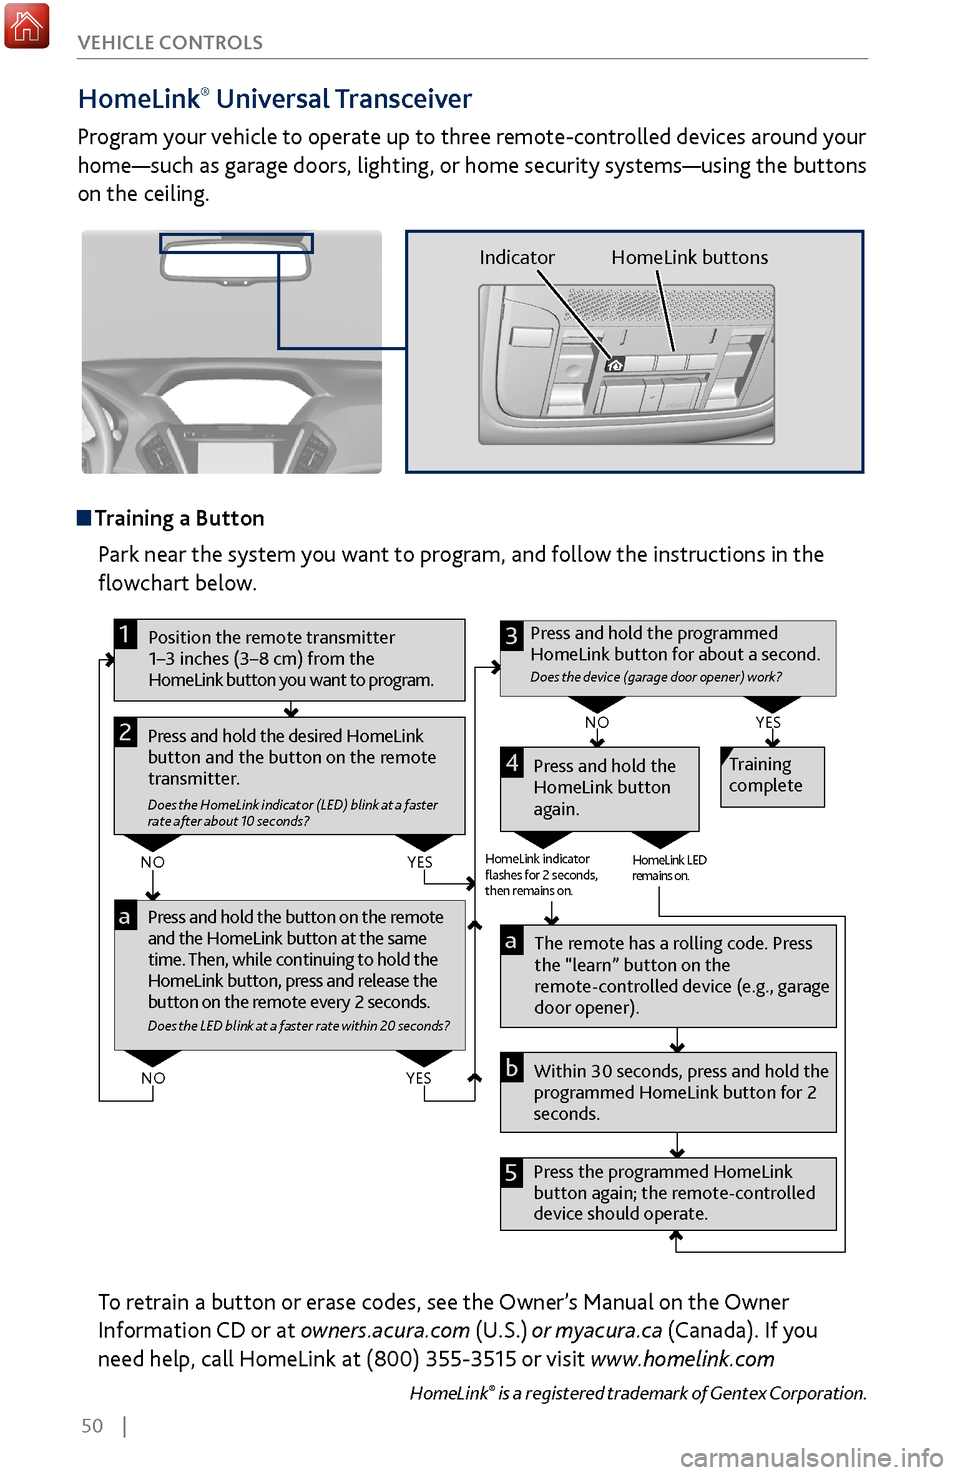
Training a Button
Park near the system you want to program, and follow the instructions in the
flowchart below.
Pr ess and hold the button on the r emote
and the HomeLink button at the same
time. Then, while continuing to hold the
HomeLink button, press and r elease the
button on the remote every 2 seconds.
Does the LED blink at a faster ra te within 20 seconds ?
Press and hold the
HomeLink button
again. Training
complete
YES
NO
HomeLink indicator
�ashes for 2 seconds,
then rem ains on. HomeLink LED
r
emains on.YES
NO
YES
NO
Position the remote transmitter
1–3 inches (3–8 cm) from the
HomeLink button you want to program.1
Press and hold the desired HomeLink
button and the button on the remote
transmitter.
Does the HomeLink indicator (LED) blink at a f aster
rate after about 10 seconds ?
2
a
The remote has a ro lling code. Press
the “learn” button on the
remote-controlled device (e.g., garage
door opener).
Press the programmed HomeLink
button again; the re mote-controlled
device should operate. Within 30 seconds, press and hold the
programmed HomeLink button for 2
seconds.a
Press and hold the programmed
HomeLink button for about a second.
Does the devic e (garage door opener) work ?
3
b
4
5
To retrain a button or erase codes, see the Owner’s Manual on the Owner
Information CD or at owners.acura.com (U.S.) or myacura.ca (Canada). If you
need help, call HomeLink at (800) 355-3515 or visit www.homelink.com
HomeLink® is a registered trademark of Gentex Corporation.
Indicator HomeLink buttons
Page 58 of 170
| 51
V
EHICLE CONTROLS
Climate Control System
Set your preferred interior temperature by selecting the proper mix of heated or
cooled air and fan speed.
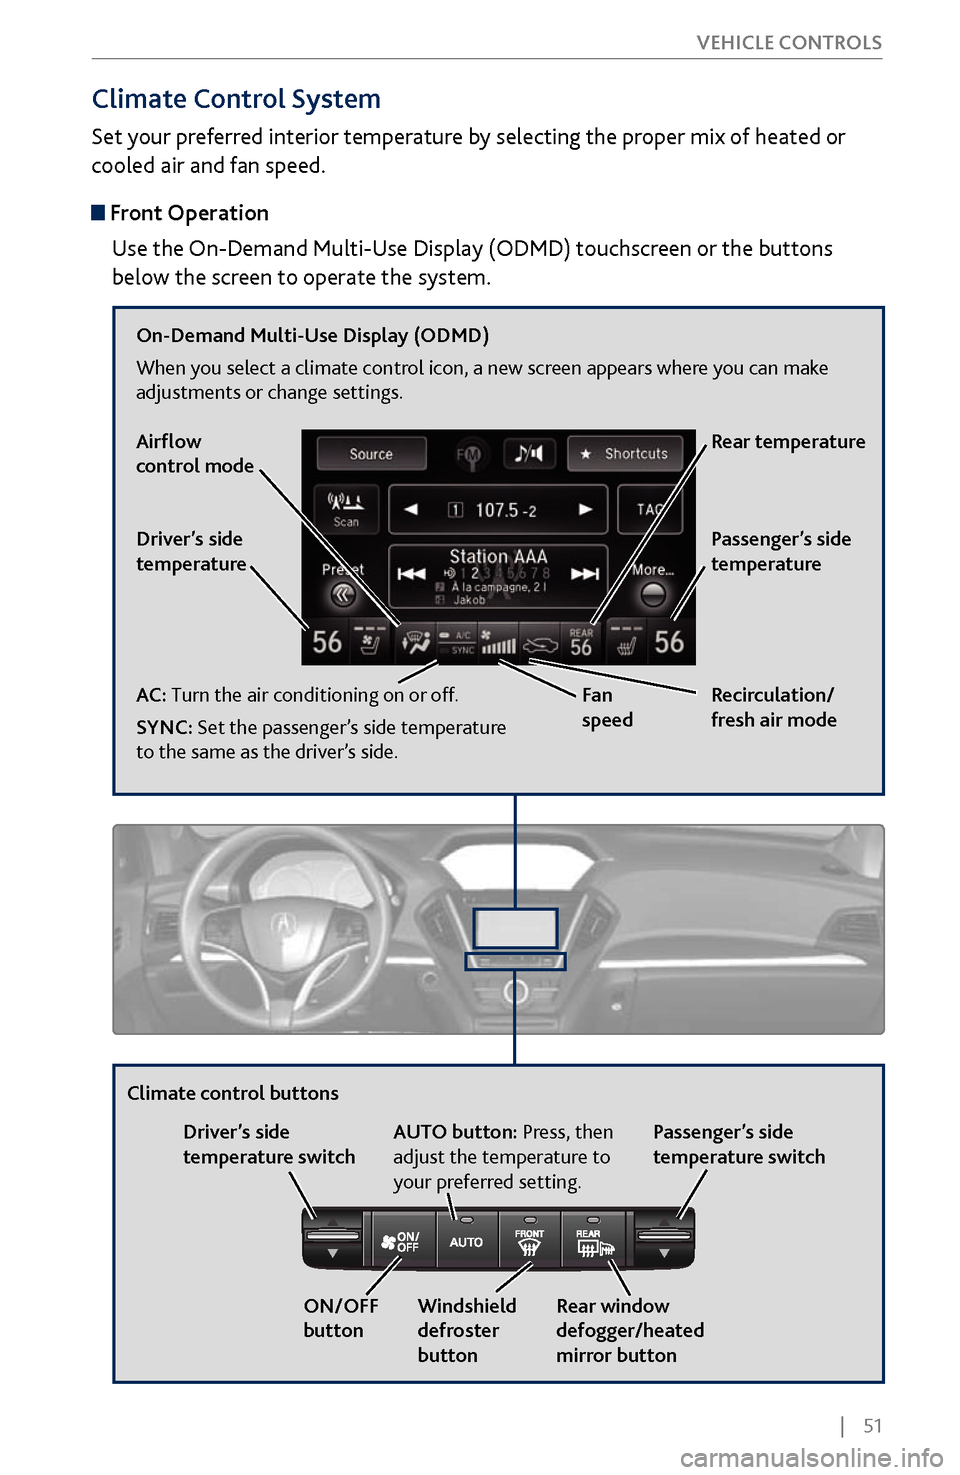
Front Operation
Use the On-Demand Multi-Use Display (ODMD) touchscreen or the buttons
below the screen to operate the system.
Recirculation/
fresh air mode
Driver’s side
temperature
On-Demand Multi-Use Display (ODMD)
When you select a climate control icon, a new screen appears where you can make
adjustments or change settings.
Airflow
control mode
AC: Turn the air conditioning on or off.
SYNC: Set the passenger’s side temperature
to the same as the driver’s side.
Fan
speedRear temperature
Passenger’s side
temperature
Windshield
defroster
button
Driver’s side
temperature switch
Climate control buttons
ON/OFF
buttonAUTO button: Press, then
adjust the temperature to
your preferred setting.
Rear window
defogger/heated
mirror buttonPassenger’s side
temperature switch
Page 59 of 170
52 |
V
EHICLE CONTROLS
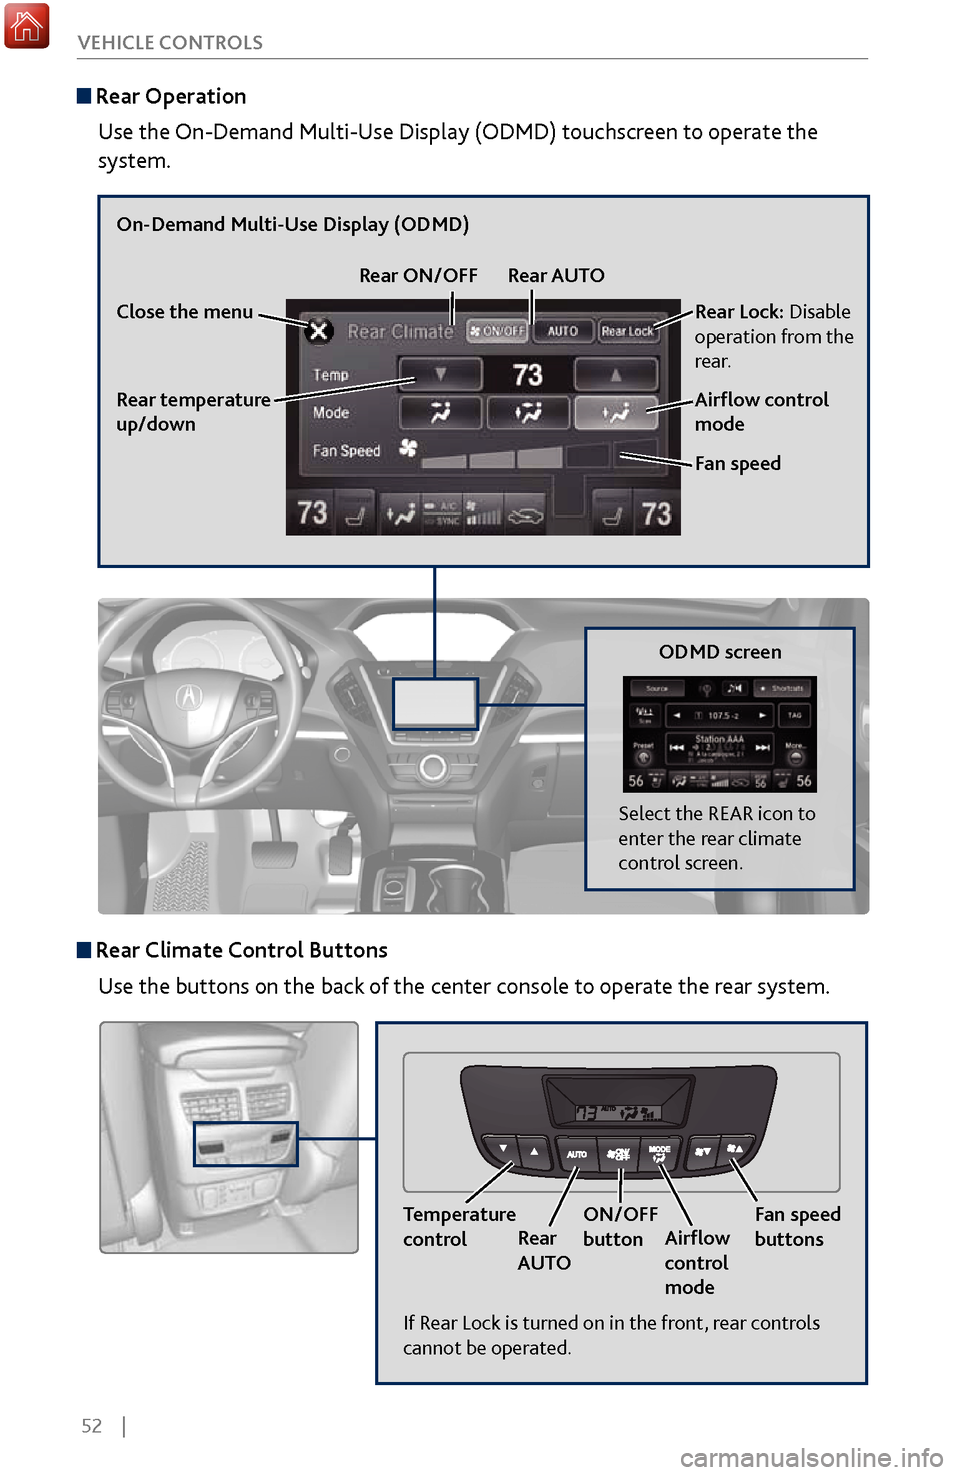
Rear Operation
Use the On-Demand Multi-Use Display (ODMD) touchscreen to operate the
system.
Rear Lock: Disable
operation from the
rear.
Rear temperature
up/down
On-Demand Multi-Use Display (ODMD)
Close the menu Rear ON/OFF
Rear AUTO
Fan speed Airflow control
mode
If Rear Lock is turned on in the front, rear controls
cannot be operated.
ODMD screen
Select the REAR icon to
enter the rear climate
control screen.
Rear Climate Control ButtonsUse the buttons on the back of the center console to operate the rear system.
Temperature
controlRear
AUTO ON/OFF
button
Airflow
control
mode Fan speed
buttons
Page 60 of 170
| 53
V
EHICLE CONTROLS
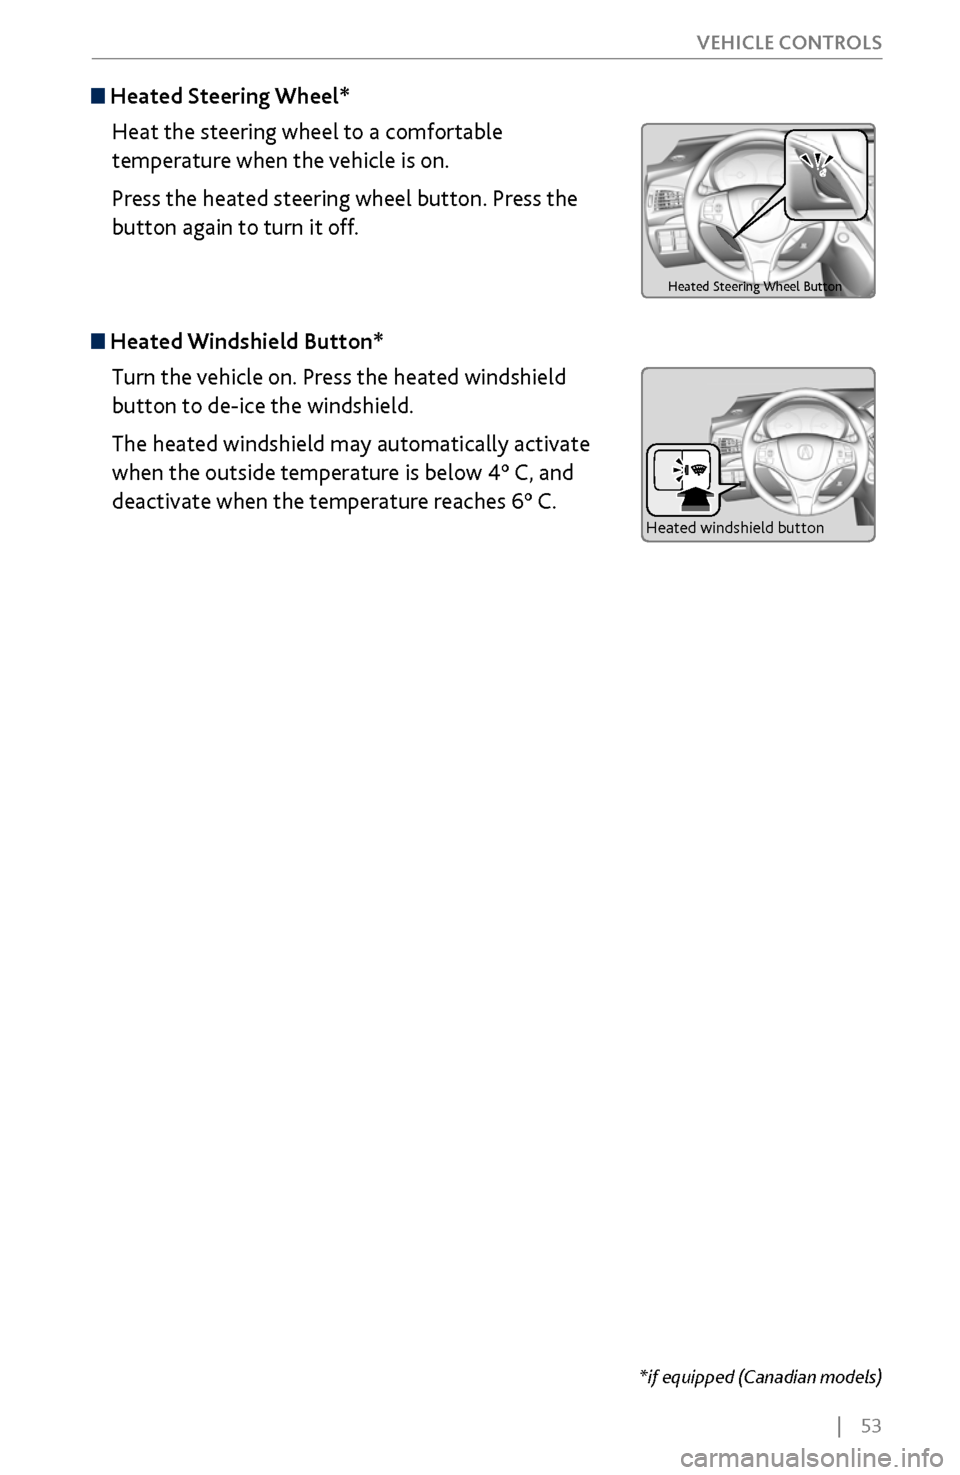
Heated Steering Wheel*
Heat the steering wheel to a comfortable
temperature when the vehicle is on.
Press the heated steering wheel button. Press the
button again to turn it off.
Heated Steering Wheel Butto n
Heated Windshield Button*
Turn the vehicle on. Press the heated windshield
button to de-ice the windshield.
The heated windshield may automatically activate
when the outside temperature is below 4° C, and
deactivate when the temperature reaches 6° C.
Heated windshield button
*if equipped (Canadian models)