warning Acura MDX 2019 Owners Manual
[x] Cancel search | Manufacturer: ACURA, Model Year: 2019, Model line: MDX, Model: Acura MDX 2019Pages: 701, PDF Size: 38.75 MB
Page 611 of 701
610
uuChecking and Maintaining Tires uTire and Wheel Replacement
Maintenance
Tire and Wheel Replacement
Replace your tires with radials of the sa me size, load range, speed rating, and
maximum cold tire pressure ra ting (as shown on the tire’s sidewall). Using tires of a
different size or construction can cause ce rtain vehicle systems such as the ABS and
Vehicle Stability Assist ® (VSA®) system to work incorrectly.
It is best to replace all four tires at the same time. If that isn’t possible, replace the
front or rear tires in pairs.
If you replace a wheel, only use TPMS sp ecified wheels approved for your vehicle.
Make sure that the wheel’s specifications match those of the original wheels.1 Tire and Wheel Replacement
3WARNING
Installing improper tires on your vehicle can
affect handling and stability. This can cause
a crash in which you can be seriously hurt or
killed.
Always use the size and type of tires
recommended in this owner’s manual.
19 ACURA MDX-31TZ56510.book 610 ページ 2018年12月11日 火曜日 午後4時47分
Page 613 of 701
612
uuChecking and Maintaining Tires uWinter Tires
Maintenance
Winter Tires
If driving on snowy or frozen roads, mount all season marked M+S tires, snow tires,
or tire chains; reduce speed; and maintain sufficient distance be tween vehicles when
driving.
Be particularly careful when operating the steering wheel or brakes to prevent
skidding.
Use tire chains, snow tires, or all season ti res when necessary or according to the law.
When mounting, refer to the following points.
For winter tires:
• Select the size and load ranges that are the same as the original tires.
• Mount the tires to all four wheels.
For tire chains:
• Install them on the front tires only.
• Because your vehicle has limited tire clearance, we strongly recommend using the
chains listed below:
• Follow the chain manufacturer’s instruction when installing. Mount them as
tightly as you can.
• Check that the chains do not to uch the brake lines or suspension.
• Drive slowly.
Cable-type: SCC Cable Ch ain Super Z LT - ZT735
Cable-type: SCC Cable Chain Super Z6 - SZ435
1Winter Tires
NOTICE
Traction devices that are th e wrong size or improperly
installed can damage your vehicle’s brake lines,
suspension, body, and wheels. Stop driving if they are
hitting any part of the vehicle.
When tire chains are mounted, follow the chain
manufacturer’s instructi ons regarding vehicle
operational limits.
If your vehicle is equipped with summer tires, be
aware that these tires are not designed for winter
driving conditions. For more information, contact a
dealer.
3WARNING
Using the wrong chains, or not properly
installing chains, can damage the brake
lines and cause a crash in which you can be
seriously injured or killed.
Follow all instruction s in this owner’s
manual regarding the selection and use of
tire chains.
Models with 245/60R18 105H tires
Models with 245/50R20 102H tires
Models with 265/45R20 104H tires
Models with 265/45R20 104V tires
19 ACURA MDX-31TZ56510.book 612 ページ 2018年12月11日 火曜日 午後4時47分
Page 614 of 701
613
Maintenance
Battery
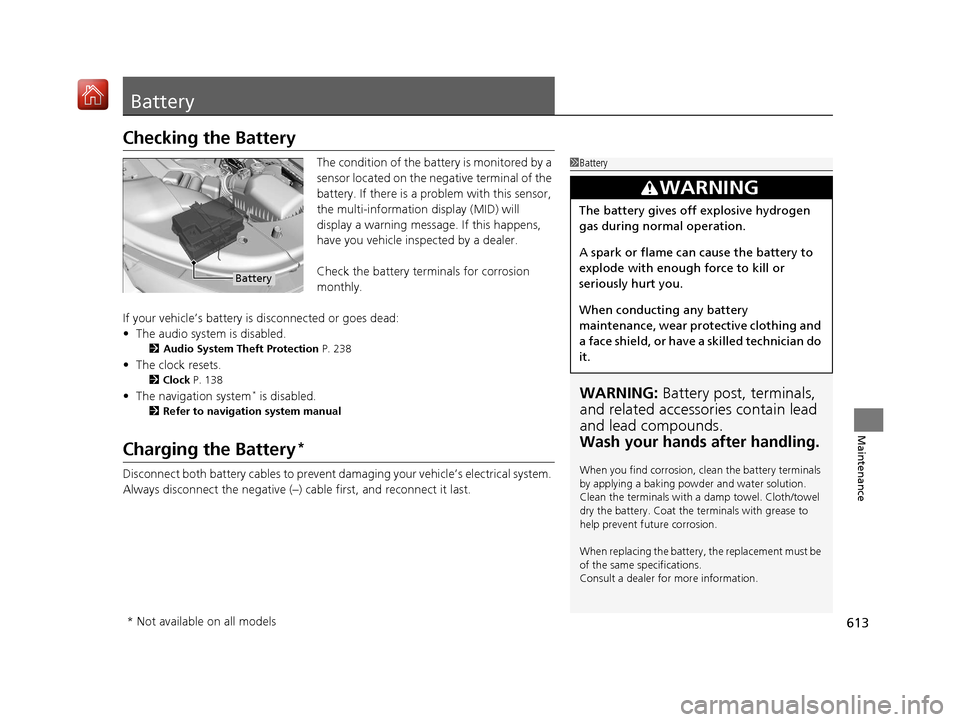
Checking the Battery
The condition of the battery is monitored by a
sensor located on the negative terminal of the
battery. If there is a problem with this sensor,
the multi-information display (MID) will
display a warning message. If this happens,
have you vehicle inspected by a dealer.
Check the battery terminals for corrosion
monthly.
If your vehicle’s battery is disconnected or goes dead:
• The audio system is disabled.
2 Audio System Theft Protection P. 238
•The clock resets.
2 Clock P. 138
•The navigation system* is disabled.
2 Refer to navigation system manual
Charging the Battery*
Disconnect both battery cables to prevent damaging your vehicle’s electrical system.
Always disconnect the negative (–) cable first, and reconnect it last.
1Battery
WARNING: Battery post, terminals,
and related accessories contain lead
and lead compounds.
Wash your hands after handling.
When you find corrosion, cl ean the battery terminals
by applying a baking powder and water solution.
Clean the terminals with a damp towel. Cloth/towel
dry the battery. Coat the terminals with grease to
help prevent future corrosion.
When replacing the battery, the replacement must be
of the same specifications.
Consult a dealer for more information.
3WARNING
The battery gives off explosive hydrogen
gas during normal operation.
A spark or flame can cause the battery to
explode with enough force to kill or
seriously hurt you.
When conducting any battery
maintenance, wear prot ective clothing and
a face shield, or have a skilled technician do
it.
Battery
* Not available on all models
19 ACURA MDX-31TZ56510.book 613 ページ 2018年12月11日 火曜日 午後4時47分
Page 616 of 701

615Continued
Maintenance
Remote Transmitter Care
Replacing the Button Battery
If the indicator does not come on when the button is pressed, replace the battery.
1. Remove the built-in key.
2. Remove the upper half of the cover by
carefully prying on the edge with a coin.
u Remove carefully to avoid losing the
buttons.
u Wrap a coin with a cloth to prevent
scratching the transmitter.
3. Make sure to replace the battery with the
correct polarity.
1Replacing the Button Battery
NOTICE
An improperly disposed of battery can damage the
environment. Always conf irm local regulations for
battery disposal.
Replacement batteries are commercially available or
at a dealer.
3WARNING
CHEMICAL BURN HAZARD
The battery that powers the remote
transmitter can cause severe internal burns
and can even lead to death if swallowed.
Keep new and used batteries away from
children.
If you suspect that a child has swallowed
the battery, seek medical attention
immediately.
Models without remote control engine start system
Battery type: CR2032
Battery
19 ACURA MDX-31TZ56510.book 615 ページ 2018年12月11日 火曜日 午後4時47分
Page 618 of 701
617Continued
Maintenance
Remote Control and Wireless Headphone Care*
Replacing the Battery
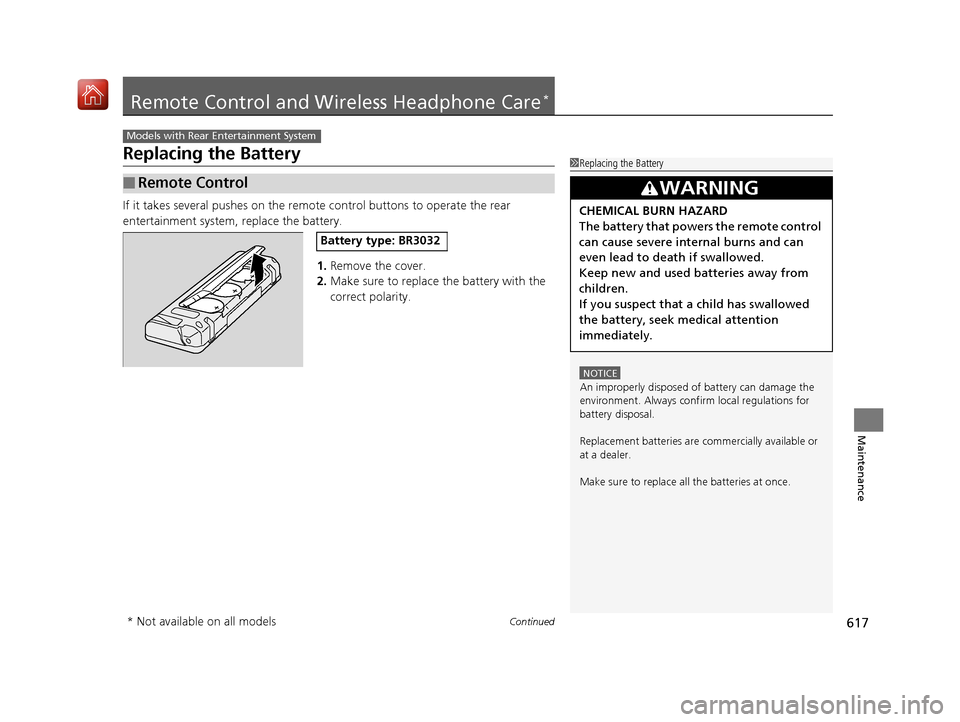
If it takes several pushes on the remo te control buttons to operate the rear
entertainment system, replace the battery.
1.Remove the cover.
2. Make sure to replace the battery with the
correct polarity.
■Remote Control
Models with Rear Entertainment System
1Replacing the Battery
NOTICE
An improperly disposed of battery can damage the
environment. Always conf irm local regulations for
battery disposal.
Replacement batteries are commercially available or
at a dealer.
Make sure to replace all the batteries at once.
3WARNING
CHEMICAL BURN HAZARD
The battery that powers the remote control
can cause severe internal burns and can
even lead to death if swallowed.
Keep new and used batteries away from
children.
If you suspect that a child has swallowed
the battery, seek medical attention
immediately.
Battery type: BR3032
* Not available on all models
19 ACURA MDX-31TZ56510.book 617 ページ 2018年12月11日 火曜日 午後4時47分
Page 626 of 701
625
Maintenance
Accessories and Modifications
Accessories
When installing accessories, check the following:
• Do not install accessories on the windsh ield. They can obstruct your view and
delay your reaction to driving conditions.
• Do not install any accessories over areas marked SRS Airbag, on the sides or backs
of the front seats, on front or side pillars, or near the side windows.
Accessories installed in these areas may interfere with proper operation of the
vehicle’s airbags or may be propelled into you or another occupant if the airbags
deploy.
• Be sure electronic accessories do not overload electrical circuits or interfere with
proper operation of your vehicle.
2 Fuses P. 662
•Before installing any electro nic accessory, have the installer contact a dealer for
assistance. If possible, have a deal er inspect the final installation.
1Accessories and Modifications
Acura Genuine accessori es are recommended to
ensure proper operati on on your vehicle.
3WARNING
Improper accessories or modifications can
affect your vehicle’s handling, stability, and
performance, and cause a crash in which
you can be seriously hurt or killed.
Follow all instruction s in this owner’s
manual regarding accessories and
modifications.
19 ACURA MDX-31TZ56510.book 625 ページ 2018年12月11日 火曜日 午後4時47分
Page 628 of 701
627
Handling the Unexpected
This chapter explains how to handle unexpected troubles.
ToolsTypes of Tools .................................. 628
If a Tire Goes Flat Changing a Flat Tire
*....................... 629
Temporarily Repair ing a Flat Tire*..... 636
Engine Does Not Start Checking the Engine ........................ 650
If the Keyless Access Remote Battery is Weak ............................................. 651
Emergency Engine Stop ................... 652
Jump Starting .................................... 653 Overheating
How to Handle Overheating............. 655
Indicator, Coming On/Blinking
If the Low Oil Pressure Indicator Comes On ... 657
If the Charging System Indicator Comes On ................................................. 657
If the Malfunction Indicator Lamp Comes On or Blinks ................................... 658
If the Brake System Indicator (Red) Comes On ................................................... 659
If the Speed-Sensitive Electric Power Steering
(EPS) System Indicator Comes On........... 659
If the Low Tire Pressure/TPMS Indicator Comes On or Blinks ....................... 661
If the Transmission System Indicator Blinks along with the Warning Message ...... 661
Fuses Fuse Locations ................................. 662
Inspecting and Changing Fuses ........ 669
Emergency Towing ........................... 670
When You Cannot Unlock the Fuel Fill Door.. 671
When You Cannot Open the Tailgate.. 672
Refueling........................................... 673
Refueling From a Portable Fuel Container.. 673
* Not available on all models
19 ACURA MDX-31TZ56510.book 627 ページ 2018年12月11日 火曜日 午後4時47分
Page 630 of 701
629Continued
Handling the Unexpected
If a Tire Goes Flat
Changing a Flat Tire*
If a tire goes flat while driving, grasp the steering wheel firmly, and brake gradually
to reduce speed. Then, stop in a safe plac e. Replace the flat tire with a compact
spare tire. Go to a dealer as soon as possib le to have the full-size tire repaired or
replaced.
1. Park the vehicle on firm, level, non-slip pery surface and apply the parking brake.
2. Change the gear position to
(P.
3. Turn on the hazard warning lights an d set the power mode to VEHICLE OFF
(LOCK).
1 Changing a Flat Tire*
Periodically check the tire pressure of the compact
spare. It should be set to the specified pressure.
Specified Pressure: 60 psi (420 kPa, 4.2 kgf/cm
2)
When driving with the compact spare tire, keep the
vehicle speed under 50 mph (80 km/h). Replace with
a full-size tire as soon as possible.
The compact spare tire and wheel in your vehicle are
specifically for this model. Do not use them with
another vehicle. Do not us e another type of compact
spare tire or wheel with your vehicle.
Do not mount tire chains on a compact spare tire.
If a chain-mounted front tire goes flat, remove one of
the full-size rear tires and replace it with the compact
spare tire. Remove the flat front tire and replace it
with the full-size tire that was removed from the rear.
Mount the tire chains on the front tire.
Do not use a puncture-repairing agent other than the
one provided in the kit that came with your vehicle (if
equipped). If a different agent is used, you may
permanently damage the tire pressure sensor.
* Not available on all models
19 ACURA MDX-31TZ56510.book 629 ページ 2018年12月11日 火曜日 午後4時47分
Page 634 of 701
Continued633
uuIf a Tire Goes Flat uChanging a Flat Tire*
Handling the Unexpected
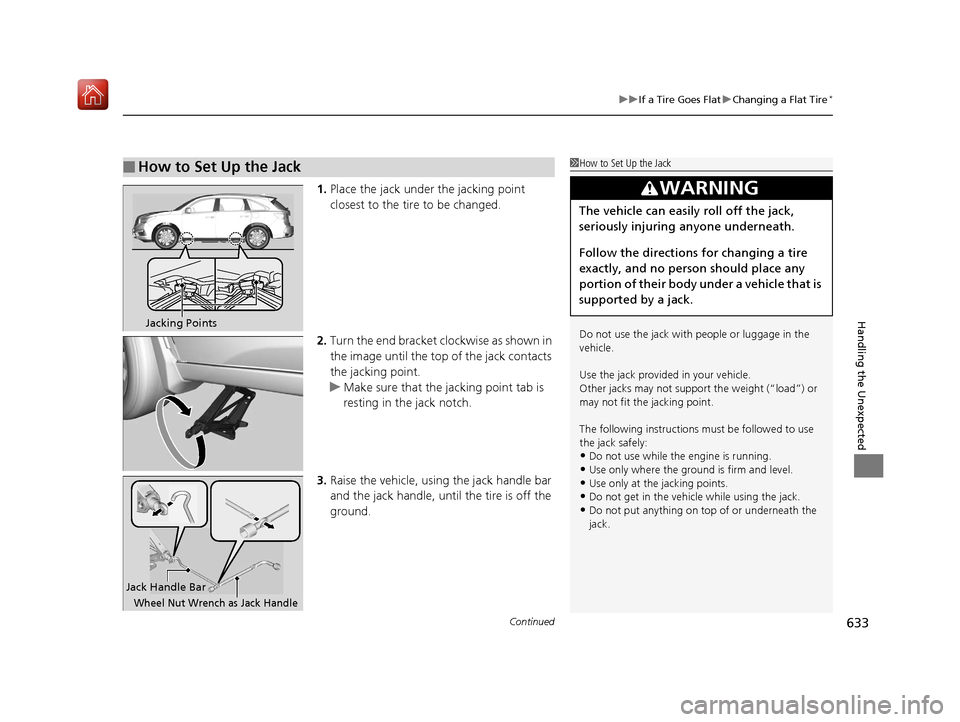
1. Place the jack under the jacking point
closest to the tire to be changed.
2. Turn the end bracket cl ockwise as shown in
the image until the top of the jack contacts
the jacking point.
u Make sure that the jacking point tab is
resting in the jack notch.
3. Raise the vehicle, using the jack handle bar
and the jack handle, until the tire is off the
ground.
■How to Set Up the Jack1How to Set Up the Jack
Do not use the jack with people or luggage in the
vehicle.
Use the jack provided in your vehicle.
Other jacks may not support the weight (“load”) or
may not fit the jacking point.
The following instructions must be followed to use
the jack safely:
•Do not use while the engine is running.
•Use only where the ground is firm and level.•Use only at the jacking points.
•Do not get in the vehicl e while using the jack.
•Do not put anything on top of or underneath the
jack.
3WARNING
The vehicle can easily roll off the jack,
seriously injuring anyone underneath.
Follow the directions for changing a tire
exactly, and no person should place any
portion of their body under a vehicle that is
supported by a jack.
Jacking Points
Jack Handle Bar
Wheel Nut Wrench as Jack Handle
19 ACURA MDX-31TZ56510.book 633 ページ 2018年12月11日 火曜日 午後4時47分
Page 636 of 701
635
uuIf a Tire Goes Flat uChanging a Flat Tire*
Handling the Unexpected
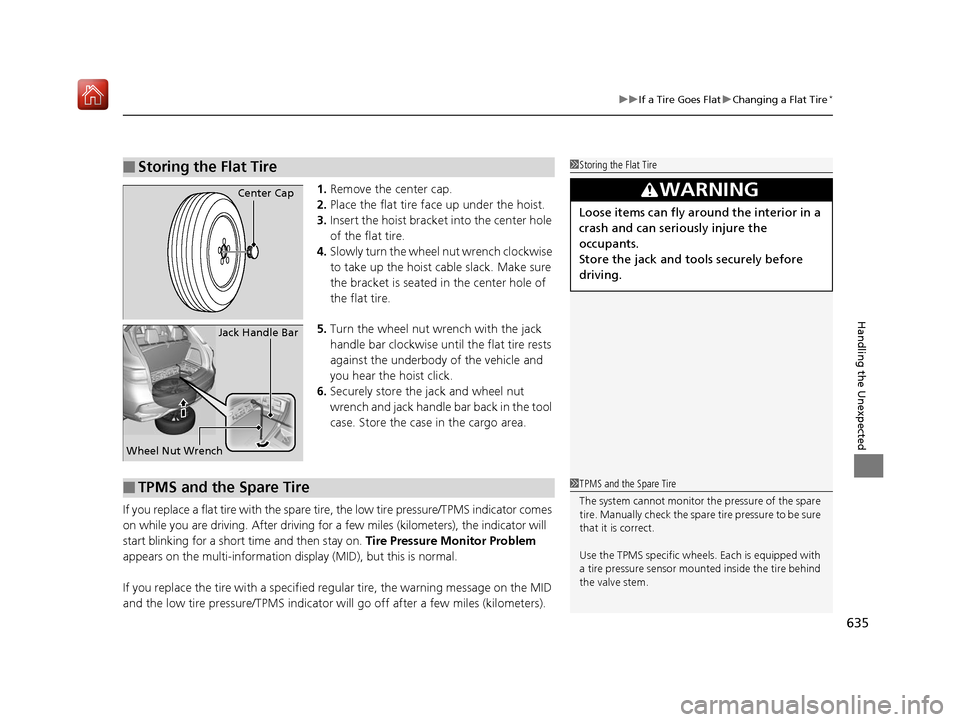
1. Remove the center cap.
2. Place the flat tire face up under the hoist.
3. Insert the hoist bracke t into the center hole
of the flat tire.
4. Slowly turn the wheel nut wrench clockwise
to take up the hoist cable slack. Make sure
the bracket is seated in the center hole of
the flat tire.
5. Turn the wheel nut wrench with the jack
handle bar clockwise until the flat tire rests
against the underbody of the vehicle and
you hear the hoist click.
6. Securely store the jack and wheel nut
wrench and jack handle bar back in the tool
case. Store the case in the cargo area.
If you replace a flat tire wi th the spare tire, the low tire pressure/TPMS indicator comes
on while you are driving. After driving for a few miles (kilometers), the indicator will
start blinking for a short time and then stay on. Tire Pressure Monitor Problem
appears on the multi-information display (MID), but this is normal.
If you replace the tire with a specified regular tire, the warning message on the MID
and the low tire pressure/TPMS indicator will go off after a few miles (kilometers).
■Storing the Flat Tire1Storing the Flat Tire
3WARNING
Loose items can fly around the interior in a
crash and can seriously injure the
occupants.
Store the jack and tools securely before
driving.
Center Cap
Wheel Nut Wrench Jack Handle Bar
■TPMS and the Spare Tire1
TPMS and the Spare Tire
The system cannot monitor th e pressure of the spare
tire. Manually check the spare tire pressure to be sure
that it is correct.
Use the TPMS specific wheels. Each is equipped with
a tire pressure sensor mount ed inside the tire behind
the valve stem.
19 ACURA MDX-31TZ56510.book 635 ページ 2018年12月11日 火曜日 午後4時47分