fuse ACURA NSX 1991 Service Service Manual
[x] Cancel search | Manufacturer: ACURA, Model Year: 1991, Model line: NSX, Model: ACURA NSX 1991Pages: 1640, PDF Size: 60.48 MB
Page 841 of 1640

Headlight Relay Test
1. Remove the headlight relay from the under-hood
fuse/relay box.
2. Check continuity at the relay terminals.
• There should be continuity between the C and D
terminals.
• There should be continuity between the A and B
terminals when power and ground are connect-
ed to the C and D terminals.
• There should be no continuity between the A and
B terminals when power is disconnected.
Dimmer Relay Test
1. Remove the dimmer relay from the under-hood
fuse/relay box.
2. Check continuity at the relay terminals.
• There should be continuity between the F and E
terminals and between the B and C terminals.
• There should be continuity between the A and C
terminals when power and ground are connect-
ed to the E and F terminals.
• There should be no continuity between the A and
C terminals when power is disconnected.ProCarManuals.com
Page 845 of 1640
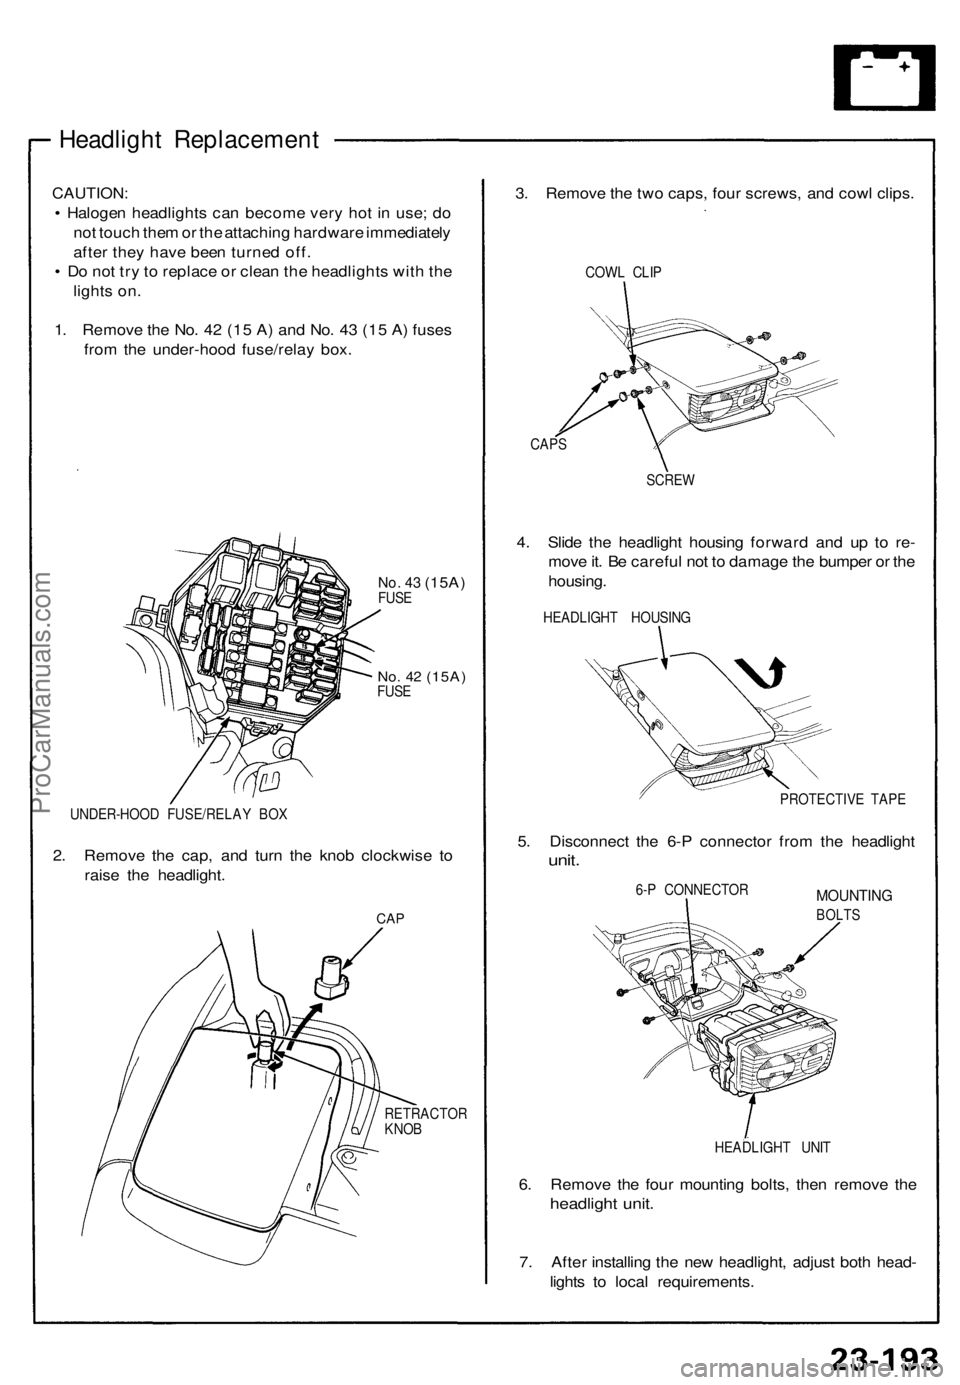
Headlight Replacement
CAUTION:
• Halogen headlights can become very hot in use; do
not touch them or the attaching hardware immediately
after they have been turned off.
• Do not try to replace or clean the headlights with the
lights on.
1. Remove the No. 42 (15 A) and No. 43 (15 A) fuses
from the under-hood fuse/relay box.
No. 43
(15A)
FUSE
No. 42
(15A)
FUSE
UNDER-HOOD FUSE/RELAY BOX
2. Remove the cap, and turn the knob clockwise to
raise the headlight.
CAP
RETRACTOR
KNOB
3. Remove the two caps, four screws, and cowl clips.
COWL CLIP
CAPS
SCREW
4. Slide the headlight housing forward and up to re-
move it. Be careful not to damage the bumper or the
housing.
HEADLIGHT HOUSING
PROTECTIVE TAPE
5. Disconnect the 6-P connector from the headlight
unit.
6-P CONNECTOR
MOUNTING
BOLTS
HEADLIGHT UNIT
6. Remove the four mounting bolts, then remove the
headlight unit.
7. After installing the new headlight, adjust both head-
lights to local requirements.ProCarManuals.com
Page 850 of 1640
(95-96 Models)
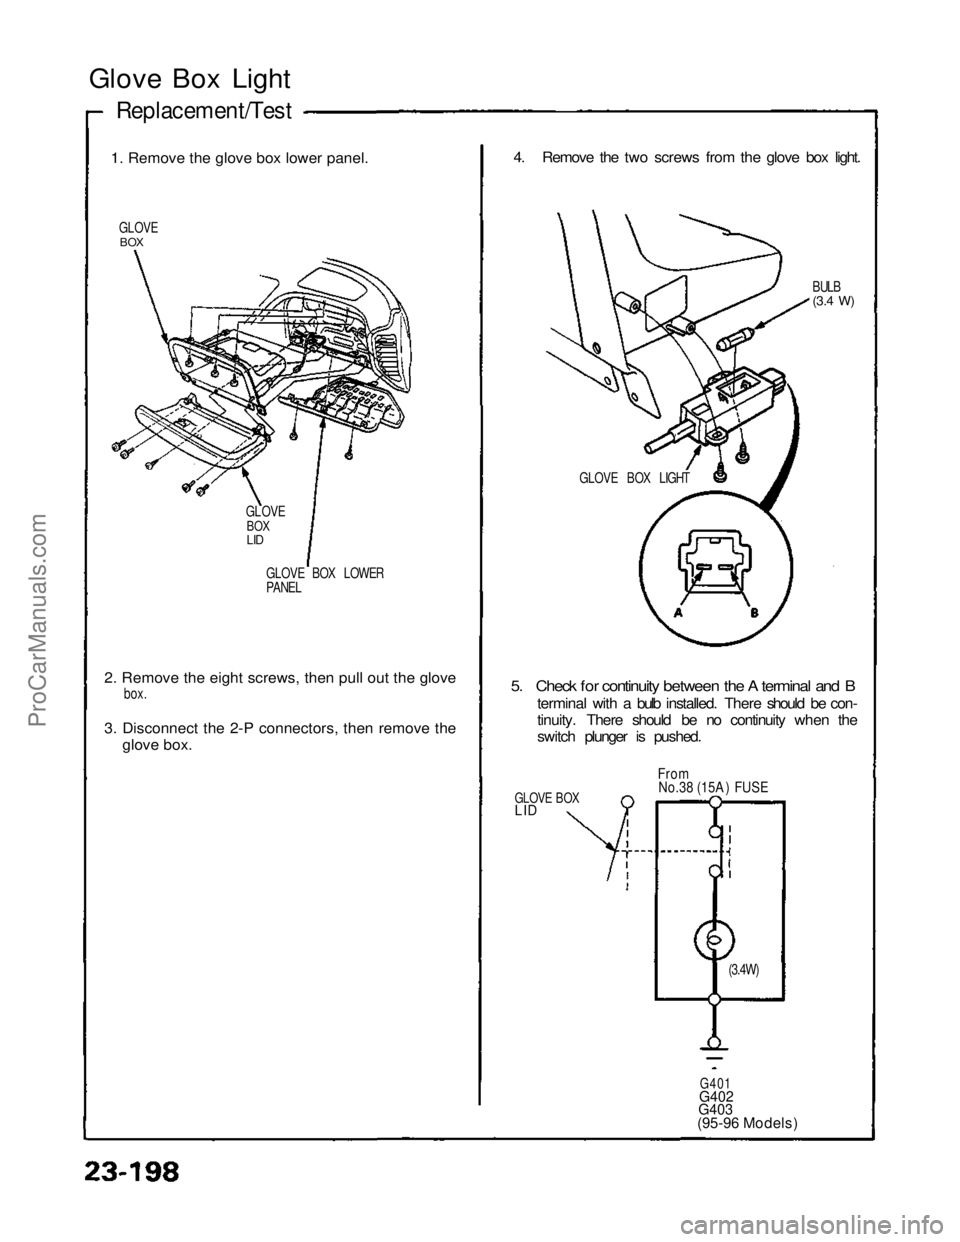
Glove Box Light
1
.
Remove the glove box lower panel.
GLOVE
BOX
GLOVE BOX LOWER
PANEL
2
.
Remove the eight screws, then pull out the glove
box
.
3
.
Disconnect the 2-P connectors, then remove theglov
e
box.
4. Remove the two screws from the glove box light.
BULB
(3.4
W)
5. Check for continuity between the A terminal and B
terminal with a bulb installed. There should be con-
tinuity. There should be no continuity when the
switch plunger is pushed.
GLOVE BOX
LID
From
No.38 (15A ) FUSE
G401
G402
G403
Replacement/Test
GLOVE
BOX
LID
GLOVE BOX LIGHT
(3.4W)ProCarManuals.com
Page 856 of 1640

Trunk Light Test/Replacement
NOTE: The bulb or lens alone can be replaced without
having to remove the trunk side panel.
1. Remove the trunk side panel.
2. Disconnect the 3-P connector from the light housing.
3. Remove the two screws and the retainer plate, then
remove the light from the trunk side panel.
TRUNK SIDE
PANEL
RETAINER
PLATE
BULB (3.4W)
LENS
4. Make sure that the bulb is OK, then check for con-
tinuity between the A and B terminals. There should
be continuity.
NOTE: This light has a built-in diode. To get an ac-
curate reading, either test it with a volt-ohmmeter
that compensates for diodes, or make sure you con-
nect your test leads to match the polarity shown.
From No.34 (15A) FUSE
To LATCH SWITCH
Latch Switch Test/Replacement
1. Open the trunk lid, and remove the trunk rear panel.
2. Disconnect the trunk latch 3-P connector.
TRUNK LATCH
LOCK ROD
TRUNK OPENER
CABLE
3-P CONNECTOR
View from wire side
3. Check for continuity between the A terminal and
body ground with the latch open. There should be
continuity.
4. If you need to remove the latch, disconnect the lock
rod from the latch, then remove the two bolts, and
pull the latch toward the left side.
5. Disconnect the trunk opener cable from the latch.
HOUSINGProCarManuals.com
Page 857 of 1640

Back-up Lights
Component Location Index
A/T GEAR POSITION SWITCH
(Back-u
p
light switch)
Test, page 23-160 ('93-'96) ('91-'92).
UNDER-DASH
FUSE BOX BACK-UP LIGHT SWITCH (M/T)
Test, page 23-208 ('93-'96) ('91-'92).
BACK-UP LIGHTS
Bulb replacement, page 23-206ProCarManuals.com
Page 858 of 1640
G551 '93-'96 Models )
G551 '93-'96 Models)
Back-up Lights
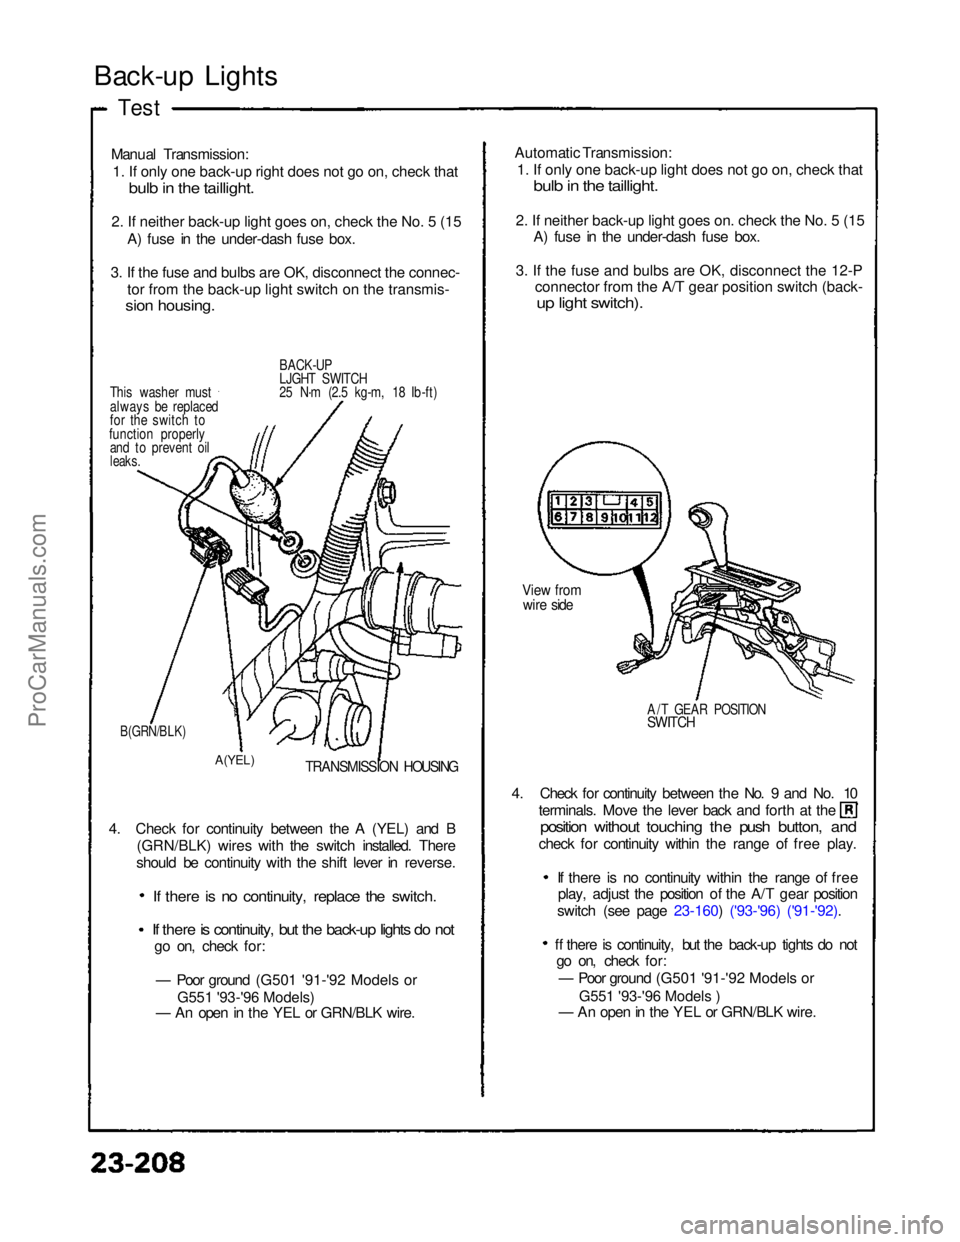
Test
Manual Transmission:
1
.
If only one back-up right does not go on, check that
bul
b
in the taillight.
2
.
If neither back-up light goes on, check the No. 5 (15
A) fuse in the under-dash fuse box.
3
.
If the fuse and bulbs are OK, disconnect the connec- to
r
from the back-up light switch on the transmis-
sio
n
housing.
BACK-UP
LJGHT SWITCH
25 N·m (2.5 kg-m, 18 Ib-ft)
This washer must
always be replaced
for the switch to
function properly and to prevent oil
leaks.
B(GRN/BLK)
A(YEL)
TRANSMISSION HOUSING
4. Check for continuity between the A (YEL) and B (GRN/BLK) wires with the switch installed. There
should be continuity with the shift lever in reverse.
If there is no continuity, replace the switch.
If there is continuity, but the back-up lights do not
go on, check for:
— Poor ground (G501 '91-'92 Models or
— An open in the YEL or GRN/BLK wire. 4. Check for continuity between the No. 9 and No. 10 terminals. Move the lever back and forth at the
position without touching the push button, and
check for continuity within the range of free play.
If there is no continuity within the range of freeplay, adjust the position of the A/T gear position
switch (see page 23-160) ('93-'96) ('91-'92).
ff there is continuity, but the back-up tights do not go on, check for:
— Poor ground (G501 '91-'92 Models or
— An open in the YEL or GRN/BLK wire.
A/T GEAR POSITION
SWITCH
View from
wire side
Automatic Transmission:
1
.
If only one back-up light does not go on, check that
bul
b
in the taillight.
2
.
If neither back-up light goes on. check the No. 5 (15
A) fuse in the under-dash fuse box.
3
.
If the fuse and bulbs are OK, disconnect the 12-P
connector from the A/T gear position switch (back-
u
p
light switch).
ProCarManuals.com
Page 860 of 1640
(G551) '95-'96 Models.
(G401,G402,G551) '93-94 Models or
Brake Switch
Test
1
.
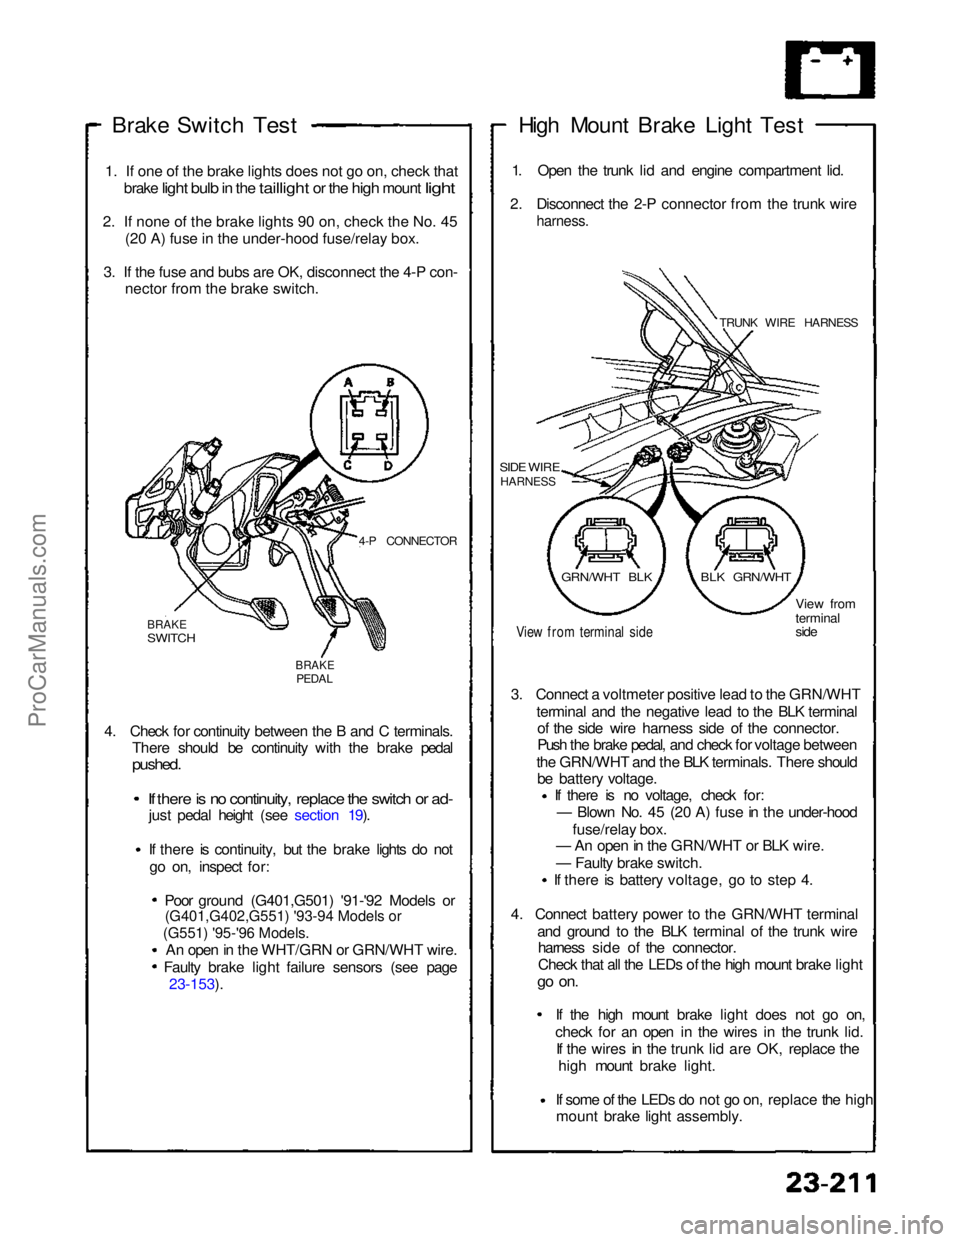
If one of the brake lights does not go on, check that
brake
light bulb in the taillight or the high mount light
2
.
If none of the brake lights 90 on, check the No. 45 (2
0
A) fuse in the under-hood fuse/relay box.
3
.
If the fuse and bubs are OK, disconnect the 4-P con- necto
r
from the brake switch.
4-P CONNECTOR
BRAKE
SWITCH
BRAKE
PEDAL
4. Check for continuity between the B and C terminals. There should be continuity with the brake pedal
pushed.
If there is no continuity, replace the switch or ad-
just pedal height (see section 19).
If there is continuity, but the brake lights do not
go on, inspect for:
Poor ground (G401,G501) '91-'92 Models or
An open in the WHT/GRN or GRN/WHT wire. Faulty brake light failure sensors (see page 23-153). High Mount Brake Light Test
1. Open the trunk lid and engine compartment lid.
2. Disconnect the 2-P connector from the trunk wire
harness.
TRUNK WIRE HARNESS
SIDE WIRE
HARNESS
View from terminal side
View from
terminal
side
3. Connect a voltmeter positive lead to the GRN/WHT terminal and the negative lead to the BLK terminalof the side wire harness side of the connector.
Push the brake pedal, and check for voltage between
the GRN/WHT and the BLK terminals. There should be battery voltage. If there is no voltage, check for:
— Blown No. 45 (20 A) fuse in the under-hood
fuse/relay box.
— An open in the GRN/WHT or BLK wire.
— Faulty brake switch.
If there is battery voltage, go to step 4.
4. Connect battery power to the GRN/WHT terminal and ground to the BLK terminal of the trunk wireharness side of the connector.
Check that all the LEDs of the high mount brake light
go on.
If the high mount brake light does not go on,check for an open in the wires
in the trunk lid.
If the wires in the trunk lid are OK, replace the
high mount brake light.
If some of the LEDs do not go on,
replace the high
mount brake light assembly.
GRN/WHT BLK
BLK GRN/WHTProCarManuals.com
Page 862 of 1640
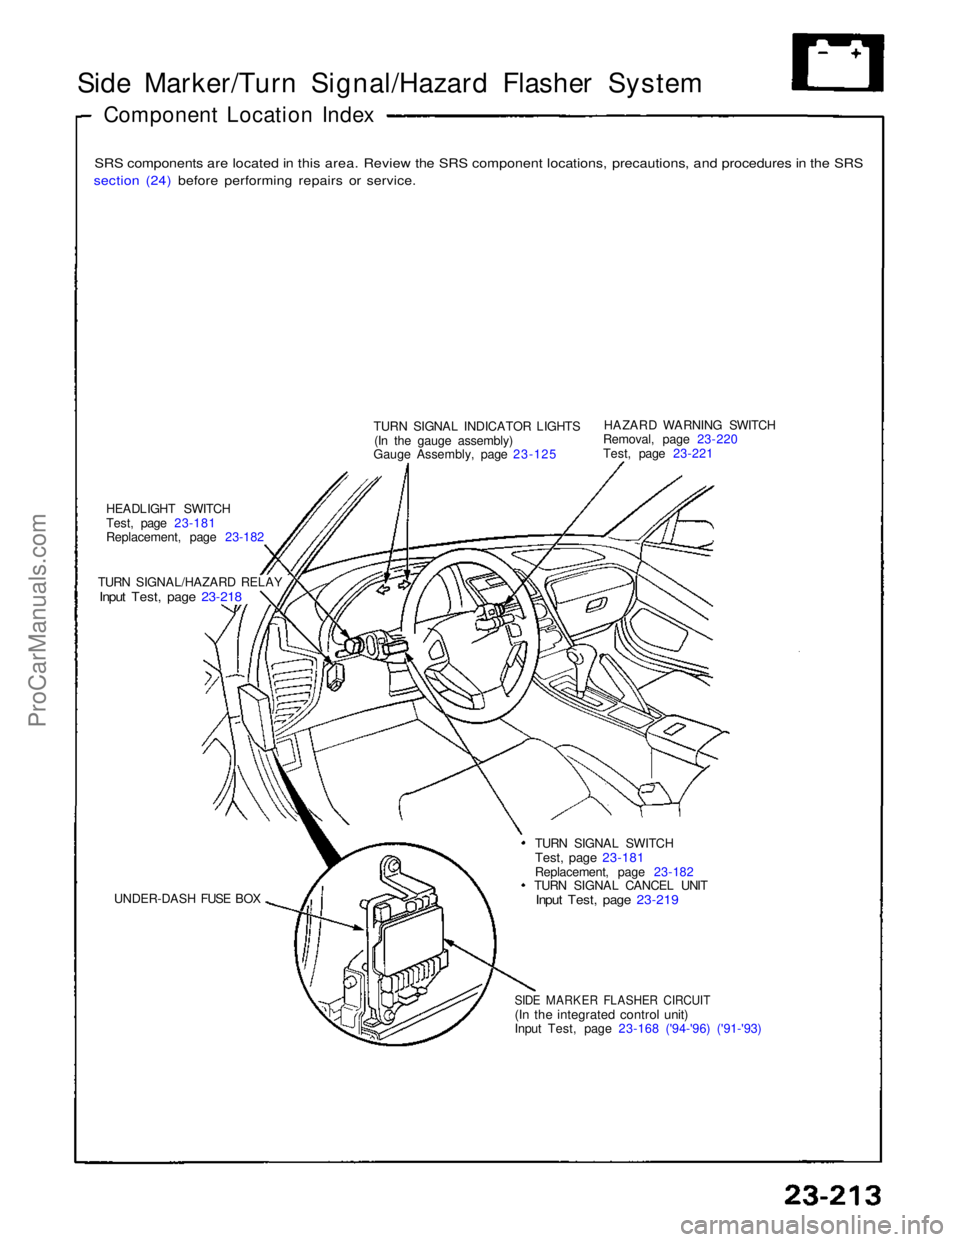
Side Marker/Turn Signal/Hazard Flasher System
Component Location Index
SRS components are located in this area. Review the SRS component locations, precautions, and procedures in the SRS
section (24) before performing repairs or service.
TURN SIGNAL INDICATOR LIGHTS(In the gauge assembly)
Gauge Assembly, page 23-125 HAZARD WARNING SWITCH
Removal, page 23-220
Test, page 23-221
HEADLIGHT SWITCH
Test, page 23-181
Replacement, page 23-182
TURN SIGNAL/HAZARD RELAY
Input Test, page 23-218
UNDER-DASH FUSE BOX TURN SIGNAL SWITCH
Test, page 23-181
Replacement, page 23-182 TURN SIGNAL CANCEL UNIT
Input Test, page 23-219
SIDE MARKER FLASHER CIRCUIT
(In the integrated control unit)
Input Test, page 23-168 ('94-'96) ('91-'93)ProCarManuals.com
Page 874 of 1640
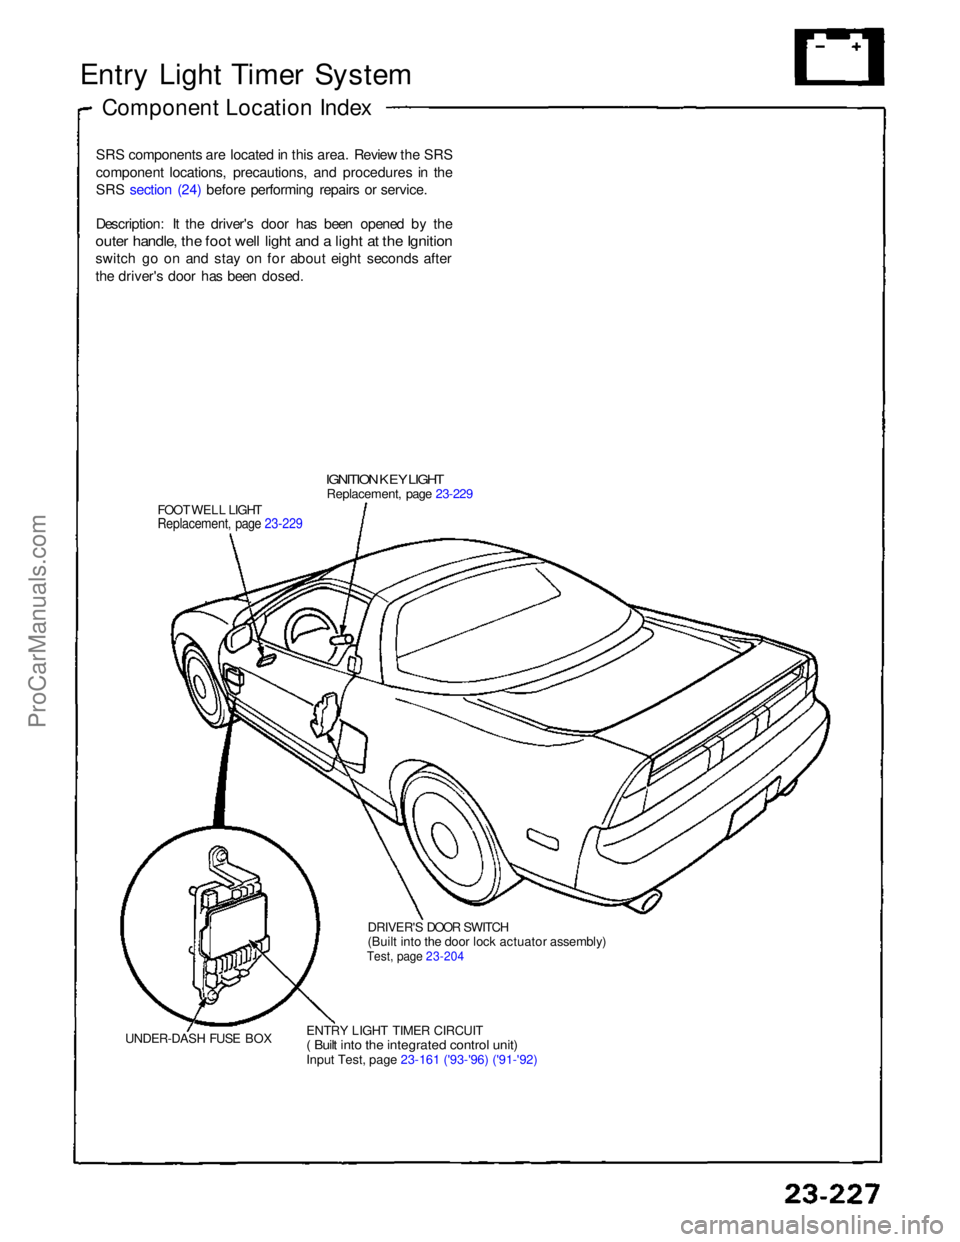
Entry Light Timer System
Component Location Index
SRS components are located in this area. Review the SRS
component locations, precautions, and procedures in the
SRS section (24) before performing repairs or service.
Description: It the driver's door has been opened by the
outer handle, the foot well light and a light at the Ignition
switch go on and stay on for about eight seconds after
the driver's door has been dosed.
IGNITION KEY LIGHT
Replacement, page 23-229
FOOT WELL LIGHT
Replacement, page 23-229
DRIVER'S DOOR SWITCH
(Built into the door lock actuator assembly)
Test, page 23-204
UNDER-DASH FUSE BOX ENTRY LIGHT TIMER CIRCUIT
( Built into the integrated control unit)
Input Test, page 23-161 ('93-'96) ('91-'92)
ProCarManuals.com
Page 888 of 1640
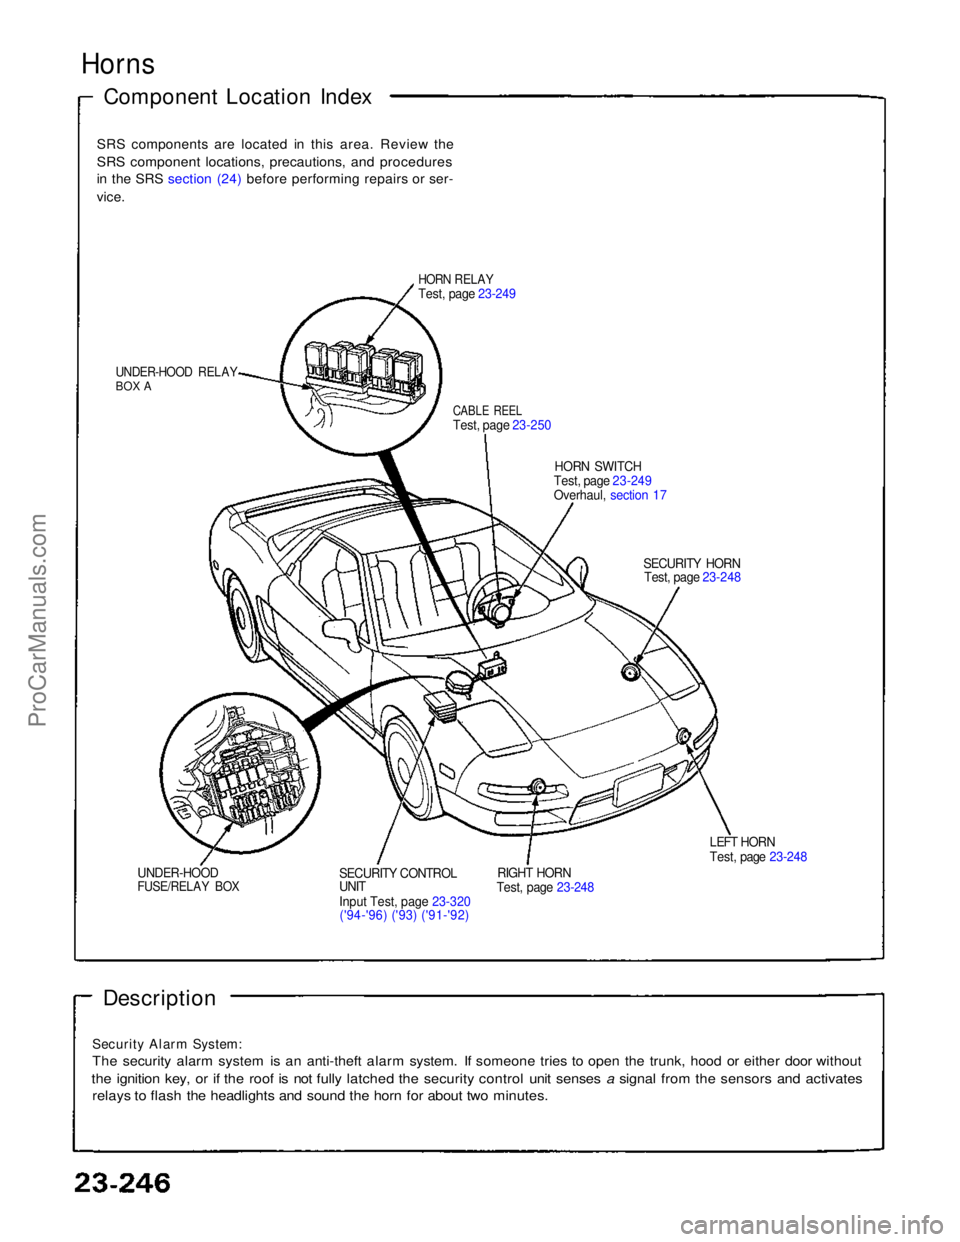
Horns
Component Location Index
SRS components are located in this area. Review the
SRS component locations, precautions, and procedures
in the SRS section (24) before performing repairs or ser-
vice.
HORN RELAY
Test, page 23-249
UNDER-HOOD RELAY
BOX A
CABLE REEL
Test, page 23-250
HORN SWITCH
Test, page 23-249
Overhaul, section 17
SECURITY HORNTest, page 23-248
LEFT HORN
Test, page 23-248
RIGHT HORN
Test, page 23-248
SECURITY CONTROL
UNIT
Inpu
t
Test, page 23-320
('94-'96) ('93) ('91-'92)
UNDER-HOOD
FUSE/RELAY BOX
Description
Security Alarm System:
The security alarm system is an anti-theft alarm system. If someone tries to open the trunk, hood or either door without
the ignition key, or if the roof is not fully latched the security control unit senses a signal from the sensors and activates
relays to flash the headlights and sound the horn for about two minutes.ProCarManuals.com