OBD port ACURA NSX 1991 Service Repair Manual
[x] Cancel search | Manufacturer: ACURA, Model Year: 1991, Model line: NSX, Model: ACURA NSX 1991Pages: 1640, PDF Size: 60.48 MB
Page 207 of 1640

Troubleshooting
Troubleshooting Procedure s
I. Ho w T o Begi n Troubleshootin g
Whe n th e Malfunctio n Indicato r Lam p (MIL ) ha s bee n reporte d on , o r ther e is a driveabilit y problem , us e th e appropri -
at e procedur e belo w to diagnos e an d repai r th e problem .
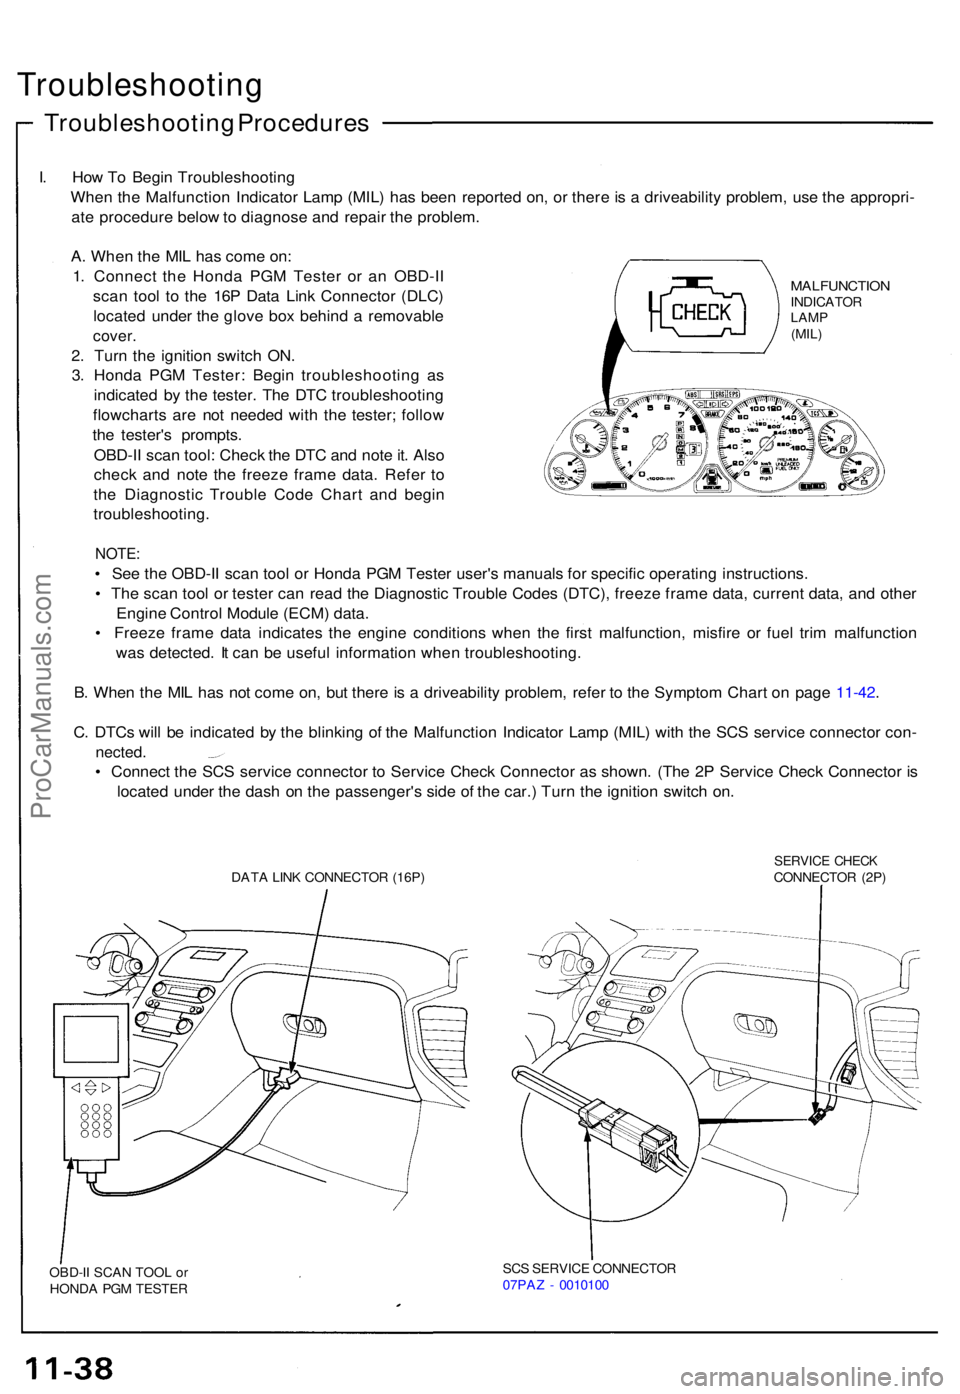
MALFUNCTIO NINDICATOR
LAM P
(MIL)
A. Whe n th e MI L ha s com e on :
1 . Connec t th e Hond a PG M Teste r o r a n OBD-I I
sca n too l t o th e 16 P Dat a Lin k Connecto r (DLC )
locate d unde r th e glov e bo x behin d a removabl e
cover.
2. Tur n th e ignitio n switc h ON .
3 . Hond a PG M Tester : Begi n troubleshootin g a s
indicate d b y th e tester . Th e DT C troubleshootin g
flowchart s ar e no t neede d wit h th e tester ; follo w
th e tester' s prompts .
OBD-I I sca n tool : Chec k th e DT C an d not e it . Als o
chec k an d not e th e freez e fram e data . Refe r t o
th e Diagnosti c Troubl e Cod e Char t an d begi n
troubleshooting .
NOTE:
• Se e th e OBD-I I sca n too l o r Hond a PG M Teste r user' s manual s fo r specifi c operatin g instructions .
• Th e sca n too l o r teste r ca n rea d th e Diagnosti c Troubl e Code s (DTC) , freez e fram e data , curren t data , an d othe r
Engin e Contro l Modul e (ECM ) data .
• Freez e fram e dat a indicate s th e engin e condition s whe n th e firs t malfunction , misfir e o r fue l tri m malfunctio n
wa s detected . I t ca n b e usefu l informatio n whe n troubleshooting .
B . Whe n th e MI L ha s no t com e on , bu t ther e is a driveabilit y problem , refe r t o th e Sympto m Char t o n pag e 11-42 .
C . DTC s wil l b e indicate d b y th e blinkin g o f th e Malfunctio n Indicato r Lam p (MIL ) wit h th e SC S servic e connecto r con -
nected .
• Connec t th e SC S servic e connecto r t o Servic e Chec k Connecto r a s shown . (Th e 2 P Servic e Chec k Connecto r i s
locate d unde r th e das h o n th e passenger' s sid e o f th e car. ) Tur n th e ignitio n switc h on .
DAT A LIN K CONNECTO R (16P )SERVIC E CHEC KCONNECTO R (2P )
OBD-I I SCA N TOO L o r
HOND A PG M TESTE R SC
S SERVIC E CONNECTO R
07PA Z - 001010 0
ProCarManuals.com
Page 247 of 1640

Idle Contro l Syste m
Idle Spee d Settin g
Inspection/Adjustmen t
NOTE: Befor e settin g th e idl e speed , chec k th e followin g
items :
— Th e Chec k Engin e ligh t ha s no t bee n reporte d on .
— Ignitio n timin g
— Spar k plug s
— Ai r cleane r
— PC V syste m
1 . Star t th e engine . Hol d th e engin e a t 3,00 0 rp m wit h
no loa d (A/ T in position , M/ T in neutral ) unti l
th e radiato r fa n come s on , the n tur n th e ignitio n
switc h OFF .
2 . Connec t th e SC S servic e connecto r t o servic e chec k
connector .
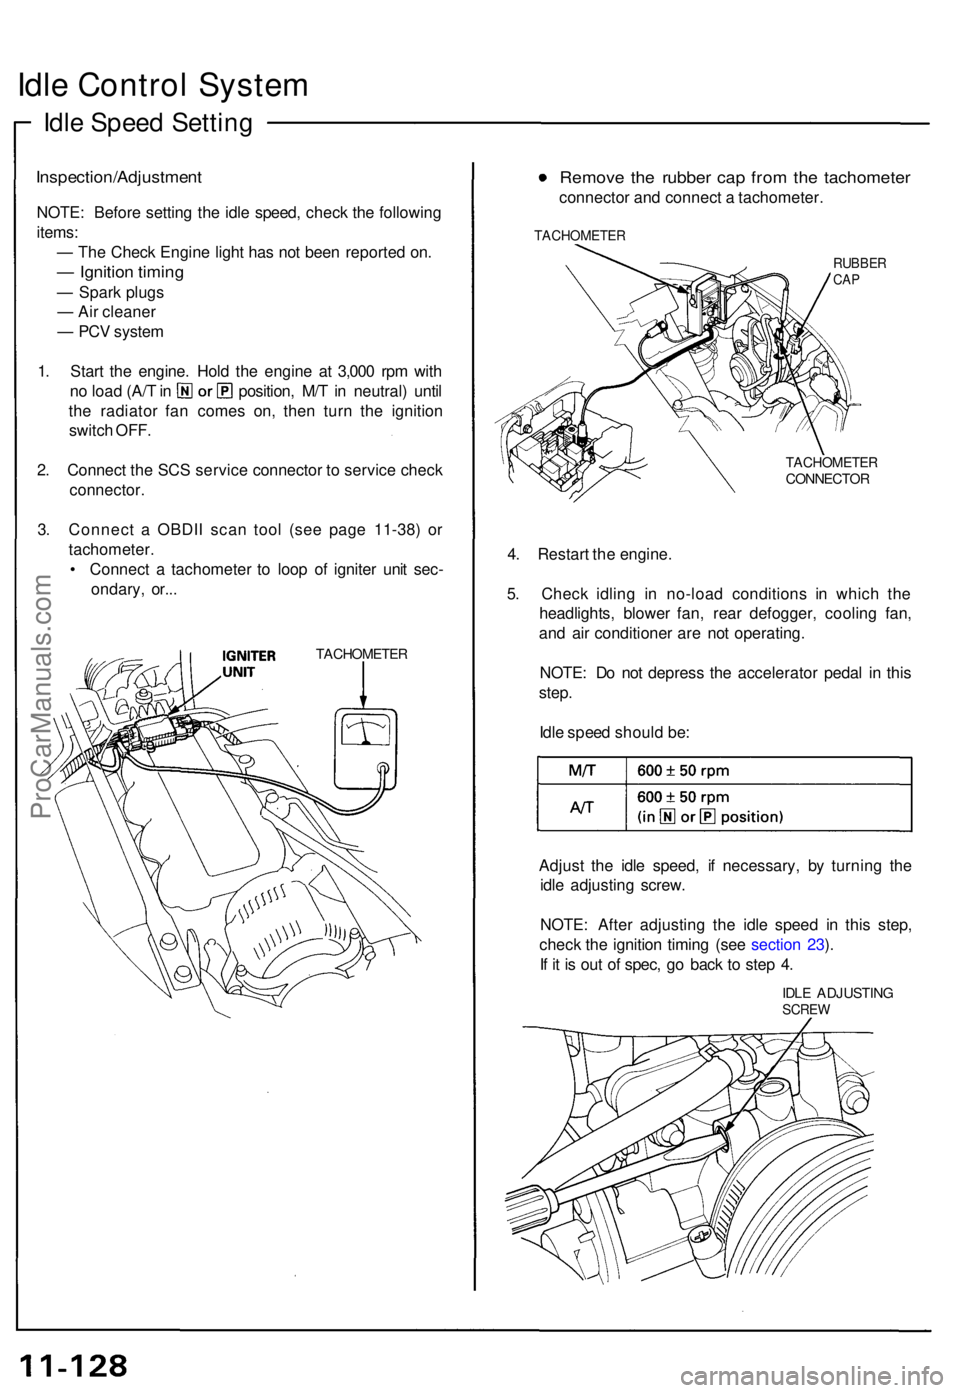
3. Connec t a OBDI I sca n too l (se e pag e 11-38 ) o r
tachometer .
• Connec t a tachomete r t o loo p o f ignite r uni t sec -
ondary , or.. .
TACHOMETE R
Remove th e rubbe r ca p fro m th e tachomete r
connector an d connec t a tachometer .
TACHOMETE R
RUBBERCAP
TACHOMETE RCONNECTOR
4. Restar t th e engine .
5 . Chec k idlin g i n no-loa d condition s i n whic h th e
headlights , blowe r fan , rea r defogger , coolin g fan ,
an d ai r conditione r ar e no t operating .
NOTE : D o no t depres s th e accelerato r peda l i n thi s
step .
Idl e spee d shoul d be :
Adjus t th e idl e speed , i f necessary , b y turnin g th e
idl e adjustin g screw .
NOTE : Afte r adjustin g th e idl e spee d i n thi s step ,
chec k th e ignitio n timin g (se e sectio n 23 ).
I f i t i s ou t o f spec , g o bac k t o ste p 4 .
IDL E ADJUSTIN GSCREW
ProCarManuals.com