flat tire ACURA NSX 1997 Service Repair Manual
[x] Cancel search | Manufacturer: ACURA, Model Year: 1997, Model line: NSX, Model: ACURA NSX 1997Pages: 1503, PDF Size: 57.08 MB
Page 252 of 1503
Wheel Alignment
Height
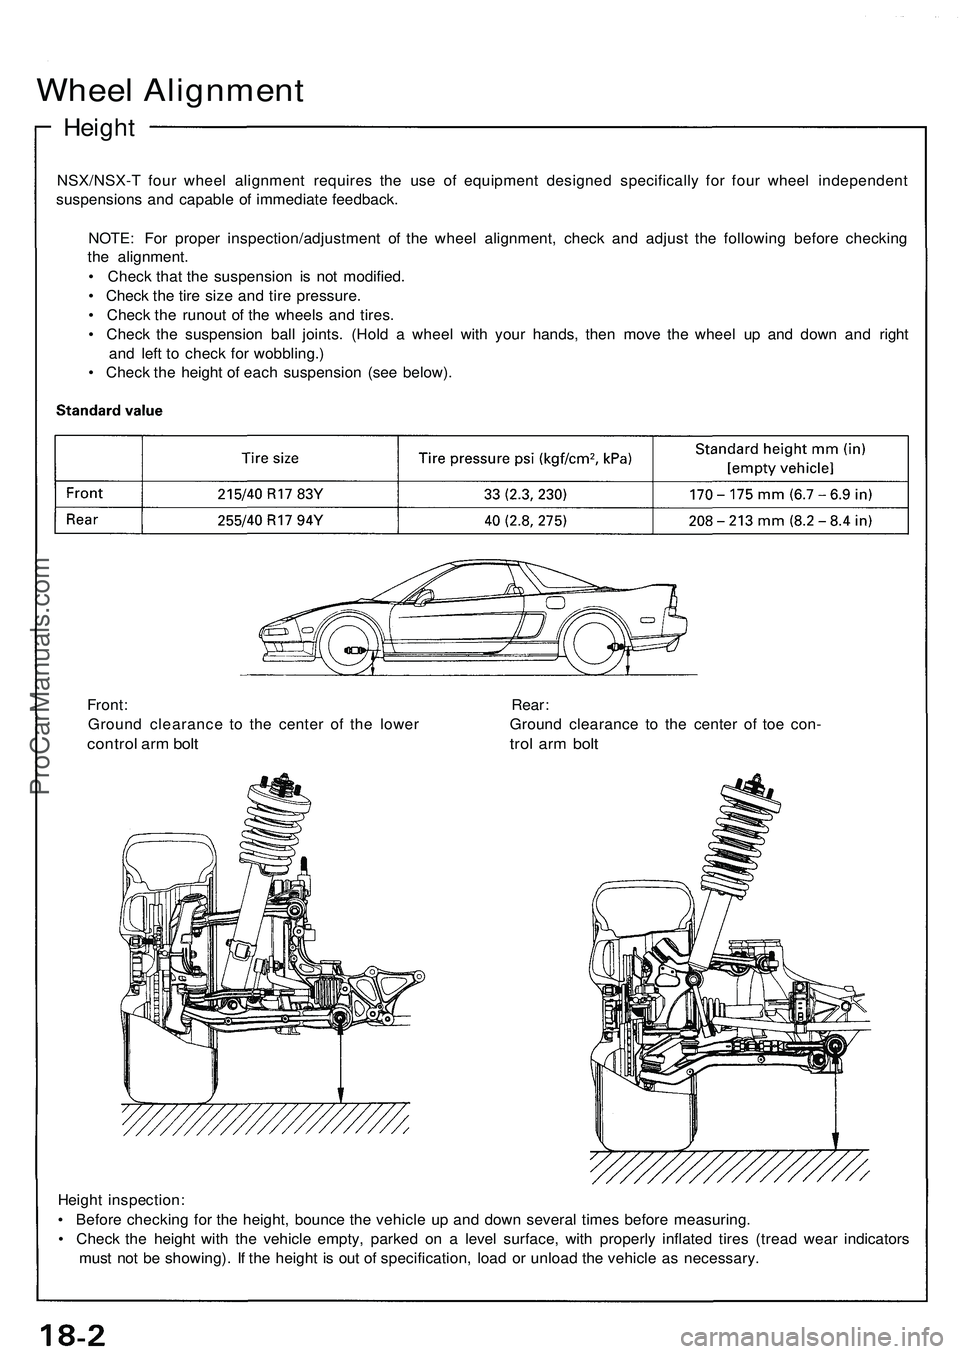
NSX/NSX- T fou r whee l alignmen t require s th e us e o f equipmen t designe d specificall y fo r fou r whee l independen t
suspension s an d capabl e o f immediat e feedback .
NOTE : Fo r prope r inspection/adjustmen t o f th e whee l alignment , chec k an d adjus t th e followin g befor e checkin g
th e alignment .
• Chec k tha t th e suspensio n i s no t modified .
• Chec k th e tir e siz e an d tir e pressure .
• Chec k th e runou t o f th e wheel s an d tires .
• Chec k th e suspensio n bal l joints . (Hol d a whee l wit h you r hands , the n mov e th e whee l u p an d dow n an d righ t
an d lef t t o chec k fo r wobbling. )
• Chec k th e heigh t o f eac h suspensio n (se e below) .
Heigh t inspection :
• Befor e checkin g fo r th e height , bounc e th e vehicl e u p an d dow n severa l time s befor e measuring .
• Chec k th e heigh t wit h th e vehicl e empty , parke d o n a leve l surface , wit h properl y inflate d tire s (trea d wea r indicator s
mus t no t b e showing) . I f th e heigh t i s ou t o f specification , loa d o r unloa d th e vehicl e a s necessary .
Front
: Rear :
Groun d clearanc e t o th e cente r o f th e lowe r Groun d clearanc e t o th e cente r o f toe con -
contro l ar m bol t tro l ar m bol t
ProCarManuals.com
Page 257 of 1503
Door lower Trim
Replacement
CAUTION:
• Put on gloves to protect you hands.
• When prying with a flat-tip screwdriver, wrap it with
protective tape to prevent damage.
NOTE:
• Take care not to scratch the door.
• Be careful not to damage the door lower trim.
1. Remove the door panel.
2. Remove the plastic cover as necessary.
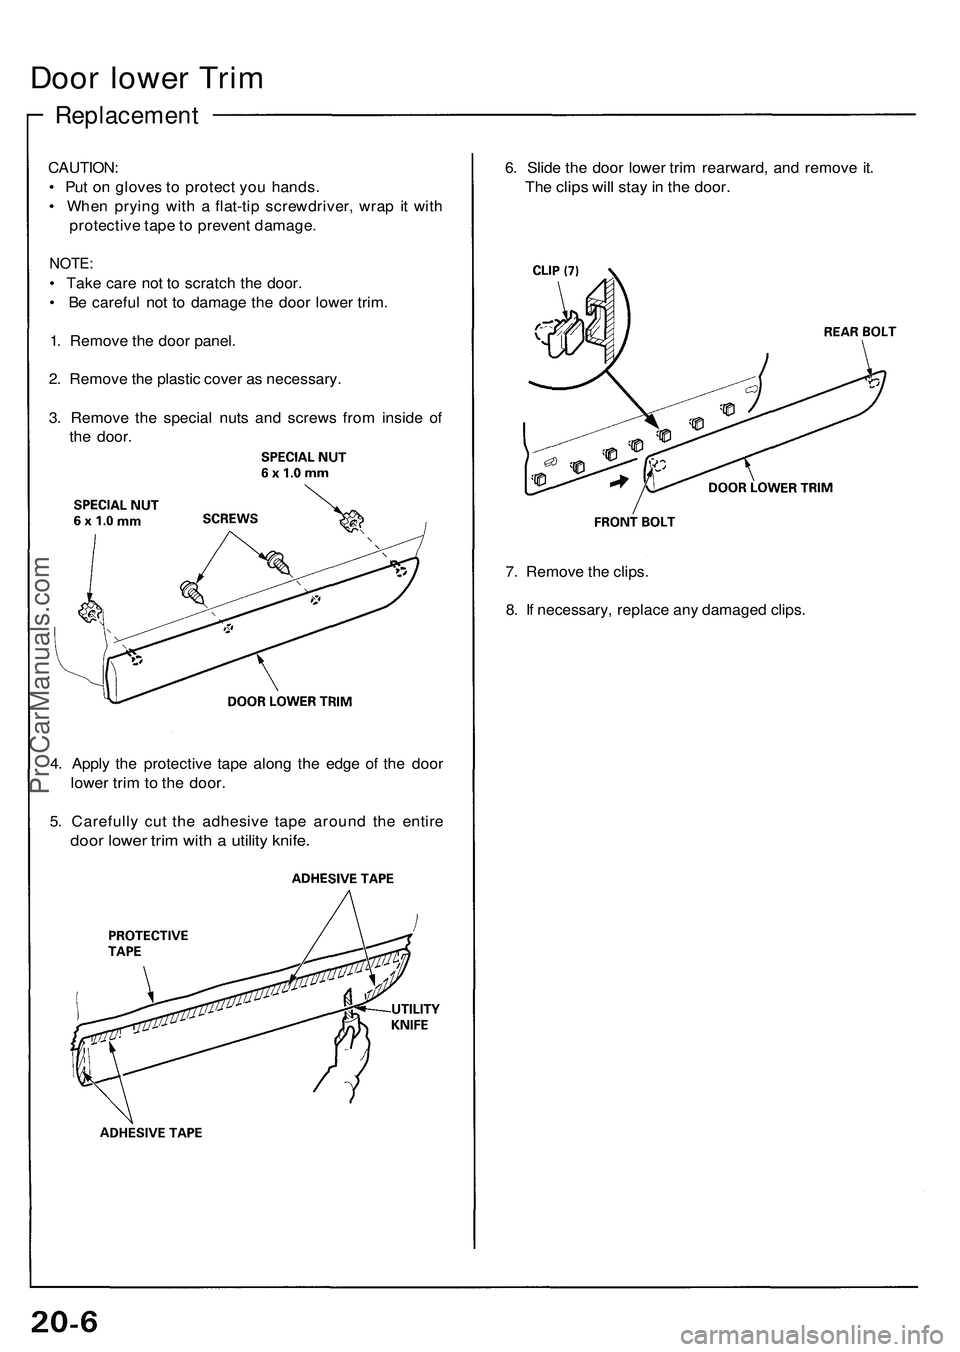
3. Remove the special nuts and screws from inside of
the door.
6. Slide the door lower trim rearward, and remove it.
The clips will stay in the door.
7. Remove the clips.
8. If necessary, replace any damaged clips.
4. Apply the protective tape along the edge of the door
lower trim to the door.
5. Carefully cut the adhesive tape around the entire
door lower trim with a utility knife.ProCarManuals.com
Page 374 of 1503
4-5
Y
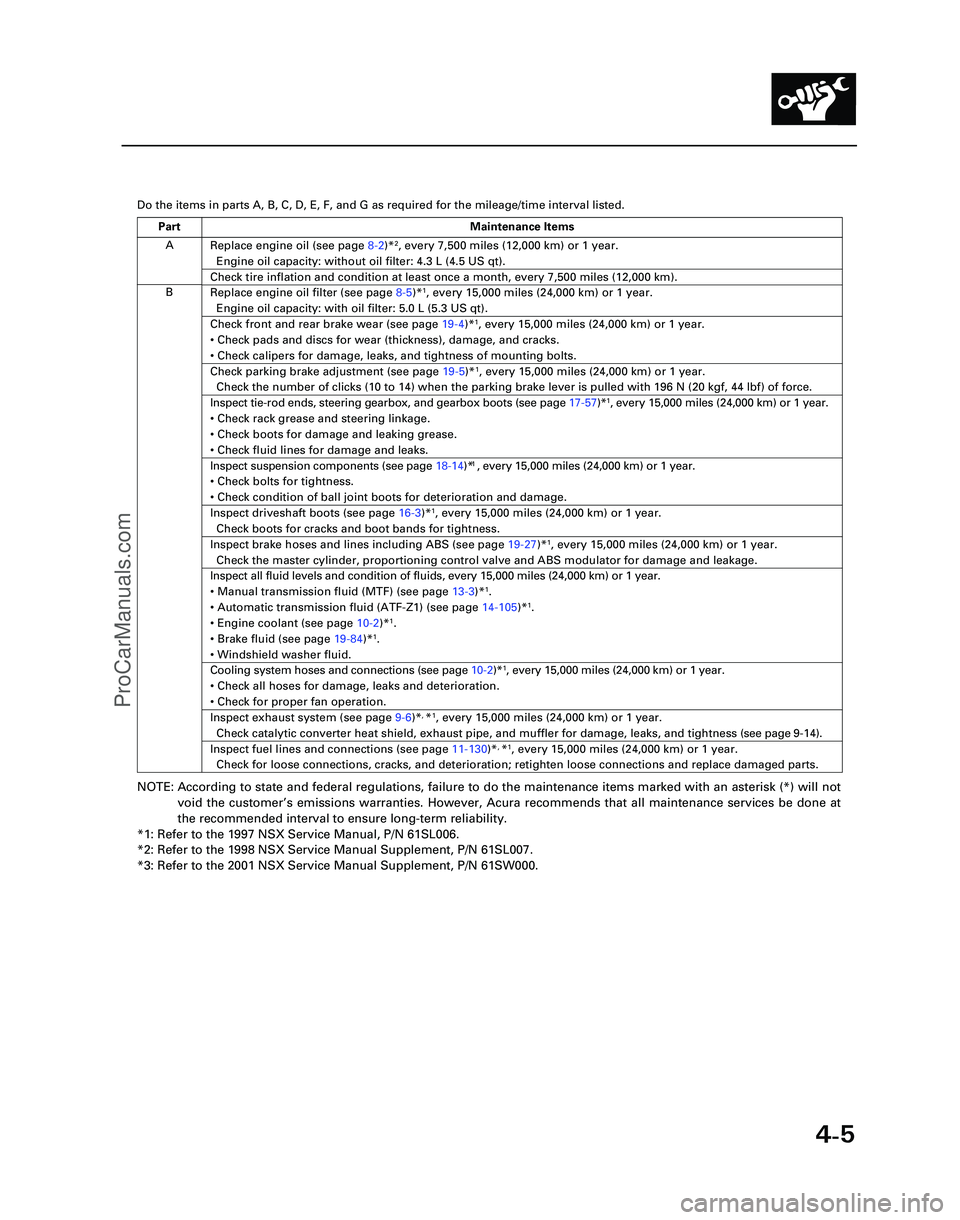
Do the items in parts A, B, C, D, E, F, and G as required for the mileag\
e/time interval listed.
NOTE: According to state and federal regulations, failure to do the maintenanc\
e items marked with an asterisk (*) will not
void the customer ’s emissions warranties. However, Acura recommends that all maintenance s\
ervices be done at
the recommended interval to ensure long-term reliability.
*1: Refer to the 1997 NSX Service Manual, P/N 61SL006.
*2: Refer to the 1998 NSX Service Manual Supplement, P/N 61SL007.
*3: Refer to the 2001 NSX Service Manual Supplement, P/N 61SW000.
A
B Replace engine oil (see page
8-2)*
2, every 7,500 miles (12,000 km) or 1 year.
Engine oil capacity: without oil filter: 4.3 L (4.5 US qt).
Check tire inflation and condition at least once a month, every 7,500 mi\
les (12,000 km).
Replace engine oil filter (see page 8-5)*1, every 15,000 miles (24,000 km) or 1 year.
Engine oil capacity: with oil filter: 5.0 L (5.3 US qt).
Check front and rear brake wear (see page 19-4)*1, every 15,000 miles (24,000 km) or 1 year.
• Check pads and discs for wear (thickness), damage, and cracks.
• Check calipers for damage, leaks, and tightness of mounting bolts.
Check parking brake adjustment (see page 19-5)*1, every 15,000 miles (24,000 km) or 1 year.
Check the number of clicks (10 to 14) when the parking brake lever is pulled with 196 N (20 kgf,\
44 lbf) of force.
Inspect tie-rod ends, steering gearbox, and gearbox boots (see page 17-57)*1, every 15,000 miles (24,000 km) or 1 year.
• Check rack grease and steering linkage.
• Check boots for damage and leaking grease.
• Check fluid lines for damage and leaks.1
• Check bolts for tightness.
• Check condition of ball joint boots for deterioration and damage.
Inspect driveshaft boots (see page 16-3)*1, every 15,000 miles (24,000 km) or 1 year.
Check boots for cracks and boot bands for tightness.
Inspect brake hoses and lines including ABS (see page 19-27)*1, every 15,000 miles (24,000 km) or 1 year.
Check the master cylinder, proportioning control valve and ABS modulator\
for damage and leakage.
Inspect all fluid levels and condition of fluids, every 15,000 miles (2\
4,000 km) or 1 year.
• Manual transmission fluid (MTF) (see page 13-3)*
1.
• Automatic transmission fluid (ATF-Z1) (see page 14-105)*1.
• Engine coolant (see page 10-2)*1.
• Brake fluid (see page 19-84)*1.
• Windshield washer fluid.
Cooling system hoses and connections (see page 10-2)*1, every 15,000 miles (24,000 km) or 1 year.
• Check all hoses for damage, leaks and deterioration.
• Check for proper fan operation.
Inspect exhaust system (see page 9-6)*, *1, every 15,000 miles (24,000 km) or 1 year.
Check catalytic converter heat shield, exhaust pipe, and muffler for dam\
age, leaks, and tightness ( see page 9-14 ).
Inspect fuel lines and connections (see page 11-130)*, *1, every 15,000 miles (24,000 km) or 1 year.
Check for loose connections, cracks, and deterioration; retighten loose \
connections and replace damaged parts.
Part Maintenance Items
*05-NSX (61SW004)SEC04(01-10) 9/22/04 1:49 PM Page 4-5
Inspect suspension components (see page 18-14)* , every 15,000 miles (24,000 km) or 1 year.
ProCarManuals.com
Page 384 of 1503
Towing
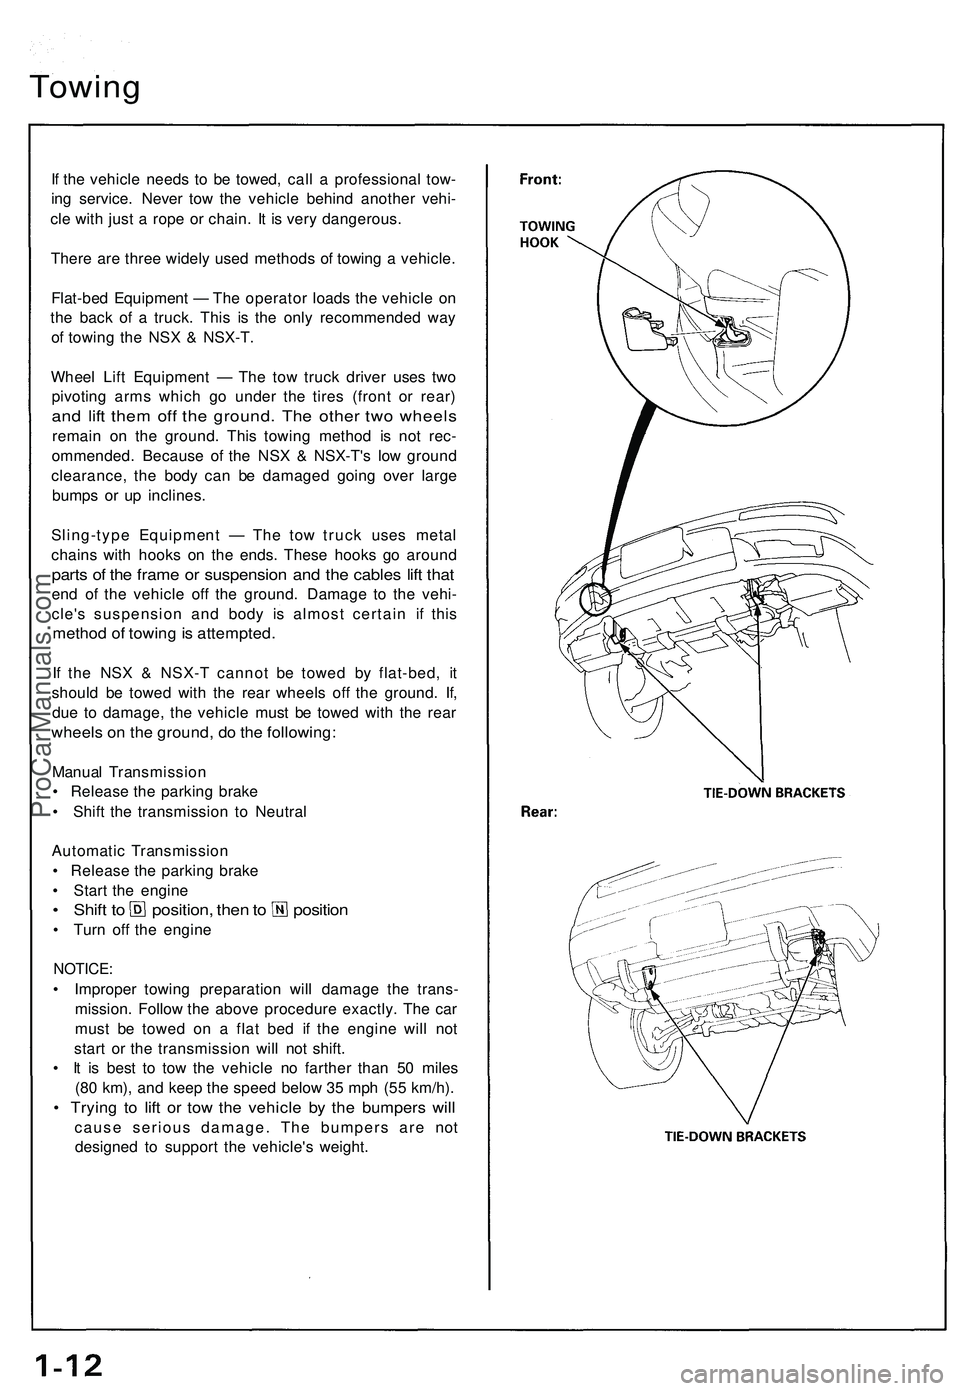
If the vehicle needs to be towed, call a professional tow-
ing service. Never tow the vehicle behind another vehi-
cle with just a rope or chain. It is very dangerous.
There are three widely used methods of towing a vehicle.
Flat-bed Equipment — The operator loads the vehicle on
the back of a truck. This is the only recommended way
of towing the NSX & NSX-T.
Wheel Lift Equipment — The tow truck driver uses two
pivoting arms which go under the tires (front or rear)
and lift them off the ground. The other two wheels
remain on the ground. This towing method is not rec-
ommended. Because of the NSX & NSX-T's low ground
clearance, the body can be damaged going over large
bumps or up inclines.
Sling-type Equipment — The tow truck uses metal
chains with hooks on the ends. These hooks go around
parts of the frame or suspension and the cables lift that
end of the vehicle off the ground. Damage to the vehi-
cle's suspension and body is almost certain if this
method of towing is attempted.
If the NSX & NSX-T cannot be towed by flat-bed, it
should be towed with the rear wheels off the ground. If,
due to damage, the vehicle must be towed with the rear
wheels on the ground, do the following:
Manual Transmission
• Release the parking brake
• Shift the transmission to Neutral
Automatic Transmission
• Release the parking brake
• Start the engine
• Shift to position, then to position
• Turn off the engine
NOTICE:
• Improper towing preparation will damage the trans-
mission. Follow the above procedure exactly. The car
must be towed on a flat bed if the engine will not
start or the transmission will not shift.
• It is best to tow the vehicle no farther than 50 miles
(80 km), and keep the speed below 35 mph (55 km/h).
• Trying to lift or tow the vehicle by the bumpers will
cause serious damage. The bumpers are not
designed to support the vehicle's weight.ProCarManuals.com
Page 939 of 1503
Wheel Alignment
Height
NSX/NSX-T four wheel alignment requires the use of equipment designed specifically for four wheel independent
suspensions and capable of immediate feedback.
NOTE: For proper inspection/adjustment of the wheel alignment, check and adjust the following before checking
the alignment.
• Check that the suspension is not modified.
• Check the tire size and tire pressure.
• Check the runout of the wheels and tires.
• Check the suspension ball joints. (Hold a wheel with your hands, then move the wheel up and down and right
and left to check for wobbling.)
• Check the height of each suspension (see below).
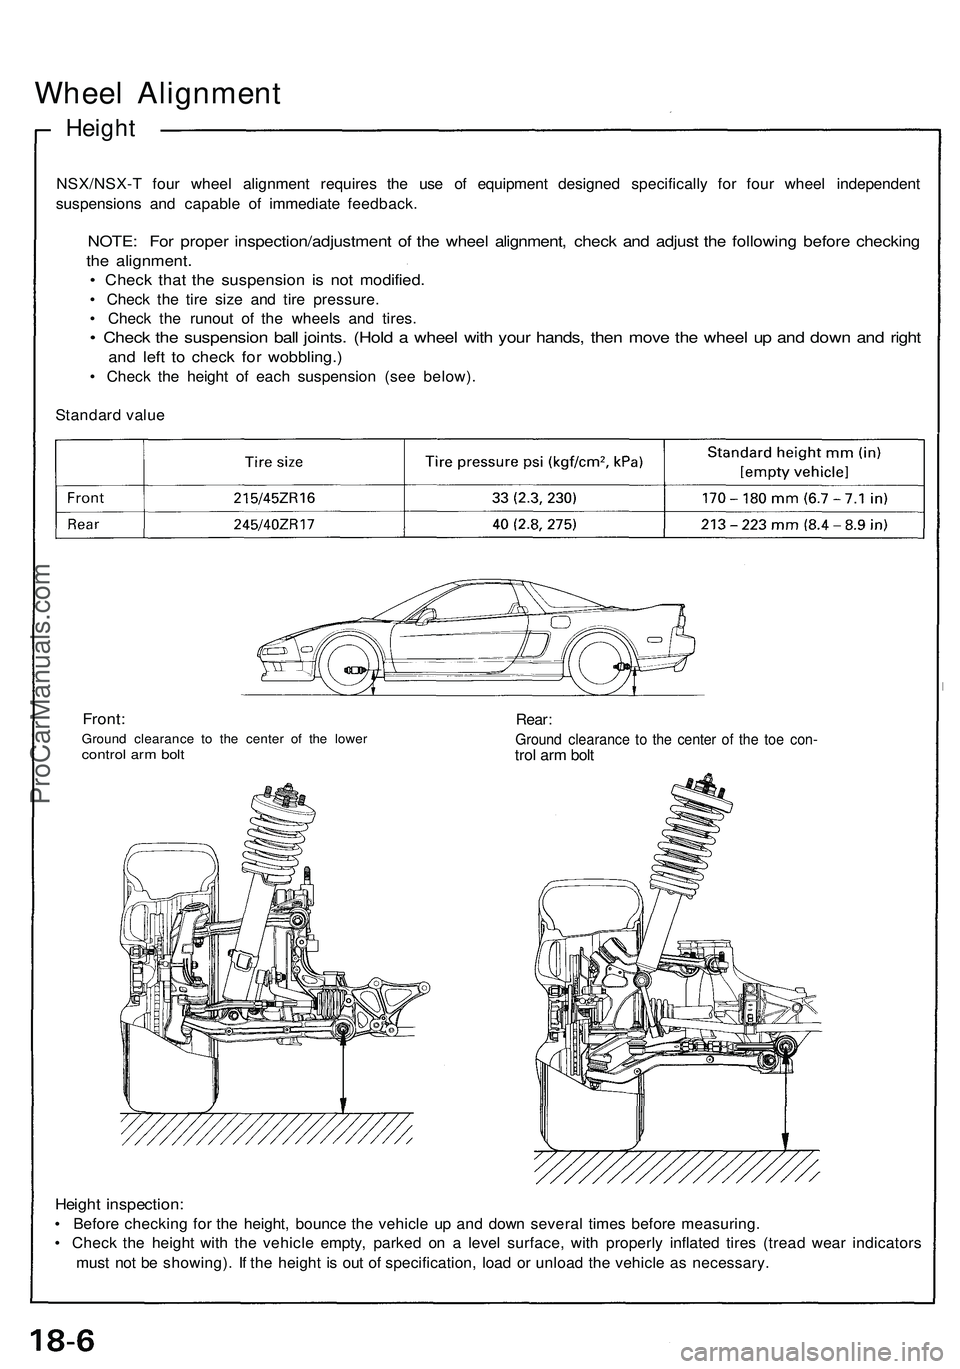
Standard value
Front:
Ground clearance to the center of the lower
control arm bolt
Rear:
Ground clearance to the center of the toe con-
trol arm bolt
Height inspection:
• Before checking for the height, bounce the vehicle up and down several times before measuring.
• Check the height with the vehicle empty, parked on a level surface, with properly inflated tires (tread wear indicators
must not be showing). If the height is out of specification, load or unload the vehicle as necessary.ProCarManuals.com
Page 1489 of 1503
Supplemental Restrain t Syste m (SRS )
Airbag/Sea t Bel t Tensione r Disposa l
6. Connec t a 1 2 vol t batter y t o th e tool :
• I f th e gree n ligh t o n th e too l come s on , th e airba g
ignite r circui t i s defectiv e an d canno t b e
deployed . G o t o Damage d Airba g Specia l
Procedure .
• I f th e re d ligh t o n th e too l come s on , th e airba g i s
read y t o b e deployed .
7 . Pus h th e tool' s deploymen t switch . Th e airba g
shoul d deplo y (deploymen t i s bot h highl y audibl e
an d visibl e — a lou d nois e an d rapi d inflatio n o f th e
bag , followe d b y slo w deflation) .
• I f deploymen t happen s an d th e gree n ligh t o n
the too l come s on , continu e wit h thi s procedure .
• I f th e airba g doesn' t deploy , ye t th e gree n ligh t
come s on , it s ignite r i s defective . G o t o Damage d
Airba g Specia l Procedure .
Durin g deployment , th e airba g
assembl y ca n becom e ho t enoug h t o bur n you .
Wai t thirt y minute s afte r deploymen t befor e
touchin g th e assembly .
8 . Dispos e o f th e complet e airba g assembly . N o par t
of it ca n b e reused . Plac e i t i n a sturd y plasti c ba g
an d sea l i t securely .
CAUTION :
• Wea r a fac e shiel d an d glove s whe n handin g a
deploye d airbag .
• Was h you r hand s an d rins e the m wel l wit h
wate r afte r handlin g a deploye d airbag .
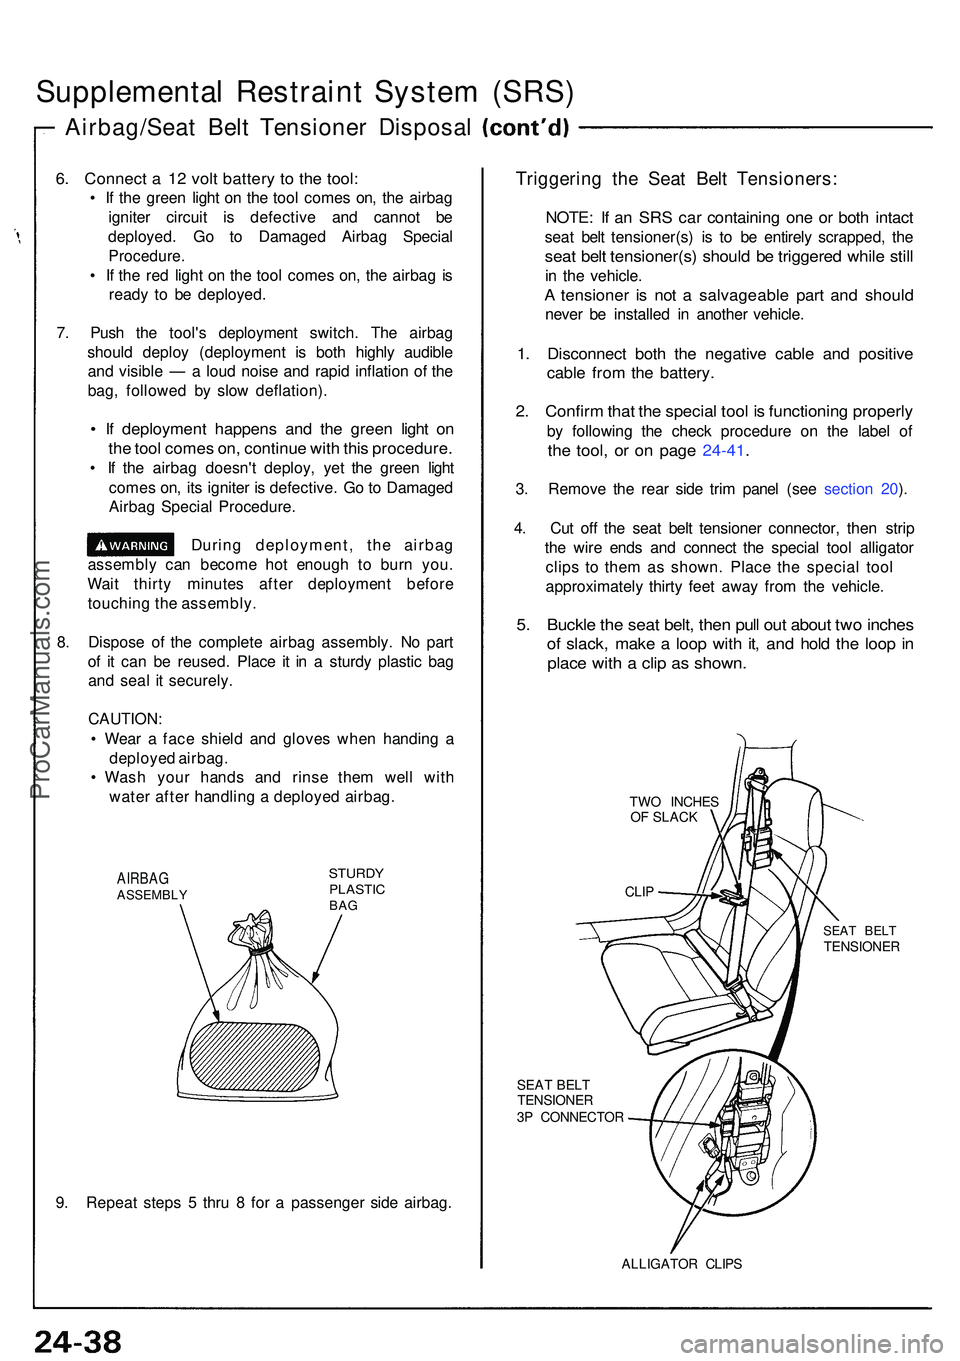
AIRBAGASSEMBL Y
STURDYPLASTI CBAG
9. Repea t step s 5 thru 8 fo r a passenge r sid e airbag .
Triggerin g th e Sea t Bel t Tensioners :
NOTE: I f a n SR S ca r containin g on e o r bot h intac t
seat bel t tensioner(s ) i s t o b e entirel y scrapped , th e
sea t bel t tensioner(s ) shoul d b e triggere d whil e stil l
in th e vehicle .
A tensione r i s no t a salvageabl e par t an d shoul d
never b e installe d i n anothe r vehicle .
1. Disconnec t bot h th e negativ e cabl e an d positiv e
cable fro m th e battery .
2. Confir m tha t th e specia l too l i s functionin g properl y
by followin g th e chec k procedur e o n th e labe l o f
the tool , o r o n pag e 24-41 .
3. Remov e th e rea r sid e tri m pane l (se e sectio n 20 ).
4 . Cu t of f th e sea t bel t tensione r connector , the n stri p
th e wir e end s an d connec t th e specia l too l alligato r
clip s t o the m a s shown . Plac e th e specia l too l
approximatel y thirt y fee t awa y fro m th e vehicle .
5. Buckl e th e sea t belt , the n pul l ou t abou t tw o inche s
of slack , mak e a loo p wit h it , an d hol d th e loo p in
plac e wit h a cli p a s shown .
TWO INCHE S
O F SLAC K
SEAT BEL TTENSIONE R
3 P CONNECTO R
SEAT BEL TTENSIONE R
ALLIGATOR CLIP S
CLIP
ProCarManuals.com