wheel Acura NSX 2017 Owner's Guide
[x] Cancel search | Manufacturer: ACURA, Model Year: 2017, Model line: NSX, Model: Acura NSX 2017Pages: 116, PDF Size: 7.19 MB
Page 2 of 116
TABLE OF CONTENTS
*if equipped
This Owner’s Guide is intended to help you quickly get acquainted with your 2017 Acura NSX. It
provides basic information and instructions on technology and convenience features, as well as
emergency procedures and how to get assistance.
This guide is for vehicles sold in the United States and Canada. It covers all NSX models, so you
may find descriptions of features and equipment that are not in your vehicle.
Images throughout this guide are from U.S. vehicles and represent features and equipment that
are available on some, but not all, models. Images shown in this guide should be considered
examples and used for demonstration purposes only.
This guide is not intended to be a substitute for the Owner’s Manual. The Owner Information
CD enclosed in your information kit includes the Owner’s Manual, Navigation Manual, and
vehicle and tire warranties in electronic format. This information can be viewed on a computer
(PC
or Mac platform) and saved or printed for
your reference. In addition, you can visit owners.
acura.com (U.S.) or myacura.ca (Canada) to view the complete and most current information.
If you are the first registered owner of your vehicle, you may request a complimentary printed
copy of the Owner’s Manual, Navigation Manual, or Vehicle Warranty within the first six months
of vehicle purchase. To request a copy, visit owners.acura.com and create or log in to your
account. In Canada, please request a copy from your authorized Acura NSX dealer.
American Honda Motor Co., Inc. strives to be proactive in protecting our environment and
natural resources. By using electronic delivery for a considerable portion of the information
typically found in a vehicle owner’s manual, we are further reducing our impact on the
environment.
VISUAL INDEX ................................................................ 2
Steering Wheel and Nearby C ontrols ..............................2
Dashboard and C
eiling Controls
....................................... 6
PHONE PAIRING QUICK
START...................................8
HANDS-FREE PHONE QUICK START
........................ 10
VOICE RECOGNITION QUICK ST
ART
.......................11
SPORT HYBRID SUPER HANDLING ALL
-WHEEL
DRIVE
™ ........................................................................\
.. 13
SAFETY INFORMATION
.............................................. 14
High-Voltage S
ystem Precautions
................................. 18
Seat Belts ........................................................................\
.... 19
Airbags ........................................................................\
......... 24
Child Safety ........................................................................\
.33
Safety Label Locations
......................................................43
Reporting Safety Defects ................................................ 44
INSTRUMENT PANEL..................................................
45
Malfunction Indicators
..................................................... 46
Condition Indicators ........................................................ 48
On/Off Indicators .............................................................. 50
Driver Information Interface ........................................... 51
VEHICLE CONTROLS
.................................................. 54
Using the R
emote Transmitter
........................................ 54
Keyless Access
System
...................................................... 55
Door Operation from
Inside the Vehicle
.......................57
Power Window Operation ............................................... 59
Interior and Exterior Lights .............................................. 60
Wiper Operation ................................................................ 63Intermittent (INT) wipers
................................................
64
Adjusting the Seats ........................................................... 65
Driving Position Memory S
ystem*
................................
71
Adjusting the Mirr
ors
........................................................
72
HomeLink® Universal T
ransceiver
..................................
74
Climate Control
System
...................................................
76
Seat Heaters* ..................................................................... 77
Customized Featur
es
........................................................
78
Setting the Clock ............................................................... 79
AUDIO AND CONNECTIVITY
................................... 80
Basic Audio Operation ..................................................... 80
Operating Display Audio ................................................. 84
Wi-Fi Connection ............................................................... 87
Apple® CarPlay® ................................................................ 88
Android Auto™ ................................................................... 90
FM Radio ........................................................................\
.....92
SiriusXM
® Radio* ............................................................... 93
USB Flash Drive .................................................................. 96
Pandora®* ........................................................................\
.... 97
Bluetooth® Audio ............................................................... 99
BLUETOOTH
® HANDSFREELINK® ............................ 101
Basic HFL Operation ....................................................... 101
Pairing a Phone.................................................................
103
Making a Call
.................................................................... 104
SMS Text Messaging and E-Mail ................................... 108
Siri™ Eyes Free ................................................................... 109
Page 4 of 116
2 || 3
VISUAL INDEXVISUAL INDEX
VISUAL INDEX
Quickly locate items in the vehicle’s interior.
Steering Wheel and Nearby Controls
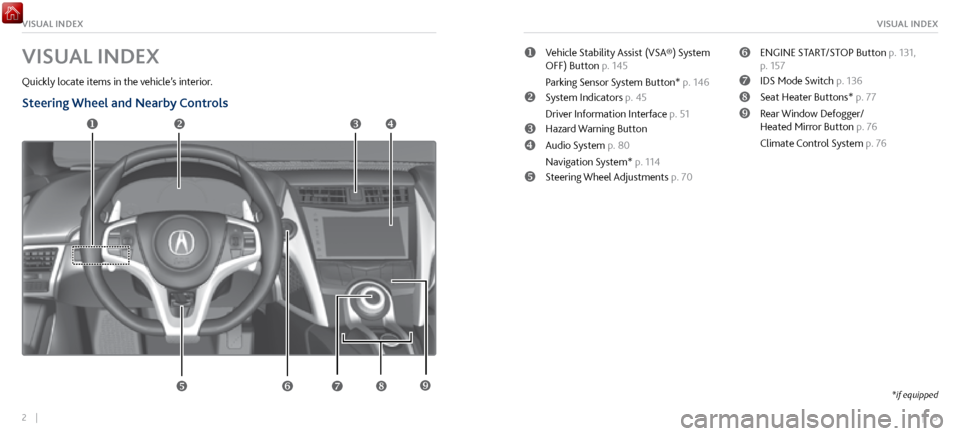
uVehicle Stability Assist (VSA®) System
OFF) Button p. 145
Parking Sensor System Button* p. 146
vSystem Indicators p. 45
Driver Information Interface p. 51
wHazard Warning Button
xAudio System p. 80
Navigation System* p. 114
ySteering Wheel Adjustments p. 70
zENGINE START/STOP Button p. 131,
p. 157
{IDS Mode Switch p. 136
|Seat Heater Buttons* p. 77
}Rear Window Defogger/
Heated Mirror Button p. 76
Climate Control System p. 76uv w x
y z { |
*if equipped}
Page 5 of 116

4 || 5
VISUAL INDEXVISUAL INDEX
Steering Wheel and Nearby Controls (continued)uLights/turn signals p. 60, p. 62
vPaddle Shifters p. 133
wBrightness Control p. 61
Km/Mile Change Button
xWipers/Washers p. 63
yRight Selector Wheel
zTRIP Button p. 53
{Horn (Press an area around )
|Voice Control Buttons /
Bluetooth HandsFreeLink System p. 101
}Audio Remote Controls p. 82u
v
w
x
y
z
{
}
|
Page 8 of 116

10 || 11
QUICK STARTQUICK START
VOICE RECOGNITION QUICK START
Depending on how your vehicle is equipped, you can use voice recognition to place phone calls,
adjust the audio and climate-control systems, work with the available navigation system and
more.
Use these tips for better voice recognition.
Hang-up/Back Button
Talk Button Microphone
Pick-up Button
Volume up
Volume down
Left Selector Wheel
• Push the Talk button before giving a command
•
The microphone is near the rear
-view mirror
•
Recognition works best in a quiet en
vironment with windows closed
•
Speak in a clear, natural voice,
while seated normally and looking ahead
HANDS-FREE PHONE QUICK START
Once a phone has been paired and its phonebook imported (see page 105), use audio-unit
controls, steering-wheel controls or voice recognition to operate the HandsFreeLink (HFL)
phone system.
Follow these steps to learn how to place a call.
shown without navigation
See page 104 for expanded instructions.
1. Select Phone (on the HOME screen)
2.
Select MENU
3.
Select Phonebook
4.
Select a name
Select Search to sear
ch by letter
Use the keyboard
to enter a name 5. Select a number
The system will then dial
There are other
ways to dial, including
by voice
Page 9 of 116
12 || 13
QUICK STARTQUICK START
Follow these steps to access the voice-recognition system.
shown with navigation
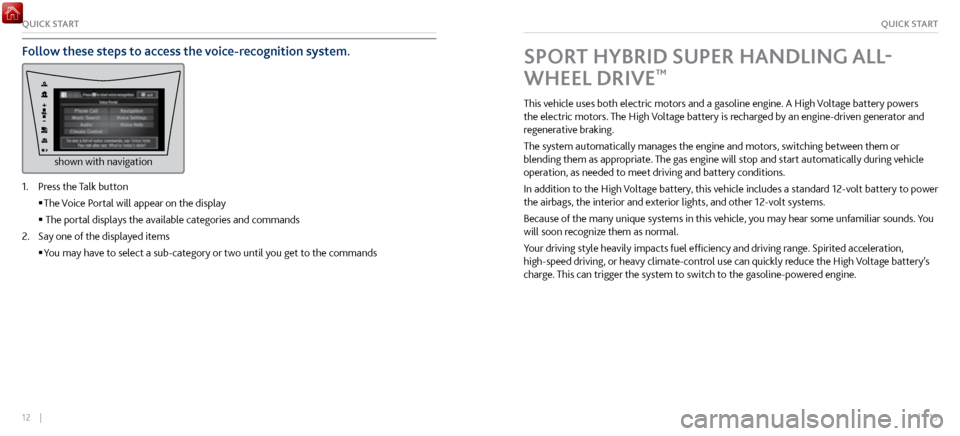
1. Press the Talk button
The Voice P
ortal will appear on the display
The portal displays the available categories and commands
2.
Say one of the displayed items
You may have to select a sub-category
or two until you get to the commands
SPORT HYBRID SUPER HANDLING ALL-
WHEEL DRIVE
™
This vehicle uses both electric motors and a gasoline engine. A High Voltage battery powers
the electric motors. The High Voltage battery is recharged by an engine-driven generator and
regenerative braking.
The system automatically manages the engine and motors, switching between them or
blending them as appropriate. The gas engine will stop and start automatically during vehicle
operation, as needed to meet driving and battery conditions.
In addition to the High Voltage battery, this vehicle includes a standard 12-volt battery to power
the airbags, the interior and exterior lights, and other 12-volt systems.
Because of the many unique systems in this vehicle, you may hear some unfamiliar sounds. You
will soon recognize them as normal.
Your driving style heavily impacts fuel efficiency and driving range. Spirited acceleration,
high-speed driving, or heavy climate-control use can quickly reduce the High Voltage battery’s
charge. This can trigger the system to switch to the gasoline-powered engine.
Page 15 of 116

24 || 25
SAFETYSAFETY
Airbags
Your vehicle is equipped with three types of airbags: front airbags, side airbags, and side curtain
airbags.
n
Front Airbags (SRS)
The
front SRS airbags inflate in a moderate-to-severe frontal collision to help protect the
head and chest of the driver and/or passenger. They are housed in the center of the steering
wheel for the driver, and in the dashboard for the passenger. Both airbags are marked SRS
AIRBAG.
SRS (Supplemental Restraint System) indicates that the airbags are designed to supplement
seat belts, not replace them. Seat belts are the occupant’s primary restraint system.
n
Advanced Airbags
Your fr
ont airbags have advanced features to help reduce the likelihood of airbag-related
injuries to smaller occupants.
The passenger’s advanced front airbag system has weight
sensors. Although Acura recommends against carrying an
infant or small child in the passenger seat, if the sensors
detect the weight of a child (up to 65 lbs or 29 kg), the
system will automatically turn off the passenger’s front
airbag.
Passenger’s
Seat
Weight
Sensors
For both advanced front airbags to work properly:
•
Do not spill any liquid on or under
the seats.
•
Do not put any object under the passenger
’s seat.
•
Make sure any
objects are positioned properly on the floor. Improperly positioned objects
can interfere with the advanced airbag sensors.
•
All occupants should sit upright and wear their seat belts pr
operly.
•
Do not place any cover
over any part of the passenger side dashboard.
n
Side Airbags
The side airbags help protect the upper torso and pel
vis of the driver and passenger during
a moderate-to-severe side impact. They are housed in the outside edge of the driver’s and
passenger’s seat-backs. Both are marked SIDE AIRBAG.
n
Side Curtain Airbags
The side curtain airbags help protect the heads
of the driver and any passenger during a
moderate-to-severe side impact. The side curtain airbags equipped in this vehicle are also
designed to help reduce the likelihood of partial and complete ejection of vehicle occupants
through side windows in crashes, particularly rollover crashes.
Page 16 of 116

26 || 27
SAFETYSAFETY
The side curtain airbags are located in the ceiling above the
side windows on both sides of the vehicle.
The side curtain airbags are designed to deploy in a rollover
or a moderate-to-severe side impact. If the SRS control unit
senses that your vehicle is about to roll over, it immediately
deploys both side curtain airbags and activates both front
seat belt tensioners. If the impact is on the passenger’s side,
the passenger’s side curtain airbag deploys even if there is no
passenger in the passenger seat.
To get the best protection from the side curtain airbags,
occupants should wear their seat belts properly and sit
upright and well back in their seats.
Do not attach any objects to the side windows or roof pillars,
as they can interfere with the proper operation of the side
curtain airbags.
Side Curtain Airbag Storage
Deployed Side Curtain Airbag
n Knee Airbags
The driver’
s knee SRS airbag inflates in a moderate to
severe frontal collision to help keep the driver in the
proper position and to help to maximize the benefit
provided by the vehicle’s other safety features.When
in�ated
Airbag
Knee
n Important Facts About Y our Airbags
Always wear your seat belt properly, and sit upright and as far back from the steering wheel
as possible while allowing full control of the vehicle. A passenger should move their seat as
far back from the dashboard as possible.
Do not place hard or sharp objects between yourself and a front airbag. Carrying hard
or sharp objects on your lap, or driving with a pipe or other sharp object in your mouth, can
result in injuries if your front airbag inflates.
Do not attach or place objects on the front airbag covers. Objects on the covers marked
SRS AIRBAG could interfere with the proper operation of the airbags or be propelled inside
the vehicle and hurt someone if the airbags inflate.
Do not attach accessories on or near the side airbags. They can interfere with the proper
operation of the airbags, or hurt someone if an airbag inflates.
Do not attach any objects to the side windows or roof pillars. They can interfere with
the proper operation of the side curtain airbags.
Do not cover or replace the seat-back covers. This can prevent your side airbags from
properly deploying during a side impact.
An open glove box can cause serious injury to your passenger in a crash, even if
the passenger is wearing the seat belt.
Always keep the glove box closed while driving.
WARNING
Page 18 of 116

30 || 31
SAFETYSAFETY
n Airbag System Components
8
8
8
8109876
6
811
The front, driver’s knee, side, and side curtain airbags are deployed according to the direction
and severity of impact. Both side curtain airbags are deployed in a rollover. The airbag
system includes:
uTwo SRS (Supplemental Restraint System) front airbags. The driver’s airbag is stored in
the center of the steering wheel; the passenger’s airbag is stored in the dashboard. Both
are marked SRS AIRBAG.
vDriver’s knee airbag. The knee airbag is stored under the steering column. It is marked
SRS AIRBAG.
wTwo side airbags, one for the driver and one for a passenger. The airbags are stored in
the outer edges of the seatbacks. Both are marked SIDE AIRBAG.
xTwo side curtain airbags, one for each side of the vehicle. The airbags are stored in the
ceiling, above the side windows. The front and rear pillars are marked SIDE CURTAIN
AIRBAG.
y An electronic control unit that, when the power system is on, continually monitors
information about the various impact sensors, seat and buckle sensors, rollover sensor,
airbag activators, seat belt tensioners, and other vehicle information. During a crash
event the unit records such information.
zAutomatic seat belt tensioners. In addition, the driver’s and passenger’s seat belt
buckles incorporate sensors that detect whether or not the belts are fastened.
{Weight sensors in the passenger’s seat. The passenger’s airbag will be turned off if the
weight on the seat is 65 lbs (29 kg) or less (the weight of an infant or small child).
|Impact sensors that can detect a moderate-to-severe front or side impact.
}An indicator on the dashboard that alerts you that the passenger’s front airbag has
been turned off.
~An indicator on the instrument panel that alerts you to a possible problem with your
airbag system or seat belt tensioners.
11A rollover sensor that can detect if your vehicle is about to roll over and signal the
control unit to deploy both side curtain airbag.
Page 35 of 116
64 || 65
VEHICLE CONTROLSVEHICLE CONTROLS
Intermittent (INT) wipers
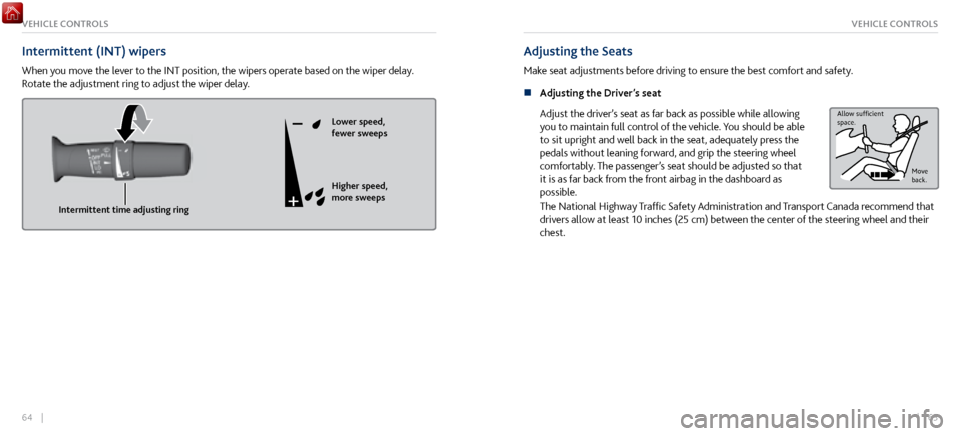
When you move the lever to the INT position, the wipers operate based on the wiper delay.
Rotate the adjustment ring to adjust the wiper delay.
Intermittent time adjusting ringLower speed,
fewer sweeps
Higher speed,
more sweeps
Adjusting the Seats
Make seat adjustments before driving to ensure the best comfort and safety.
n
Adjusting the Driver
’s seat
Adjust the driver’s seat as far back as possible while allowing
you to maintain full control of the vehicle. You should be able
to sit upright and well back in the seat, adequately press the
pedals without leaning forward, and grip the steering wheel
comfortably. The passenger’s seat should be adjusted so that
it is as far back from the front airbag in the dashboard as
possible.
Allow suf�cient
space.
Move
back.
The National Highway Traffic Safety Administration and Transport Canada recommend that
drivers allow at least 10 inches (25 cm) between the center of the steering wheel and their
chest.
Page 38 of 116
70 || 71
VEHICLE CONTROLSVEHICLE CONTROLS
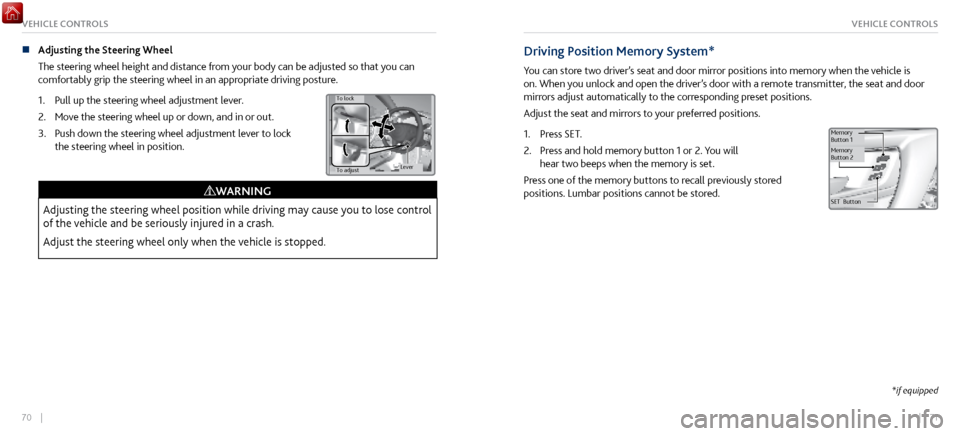
n Adjusting the Steering Wheel
The steering wheel height and distance
from your body can be adjusted so that you can
comfortably grip the steering wheel in an appropriate driving posture.
1.
Pull up the steering wheel adjustment lever
.
2.
Move the steering
wheel up or down, and in or out.
3.
Push down the steering wheel adjustment lev
er to lock
the steering wheel in position.
To adjust
To lock
Lever
Adjusting the steering wheel position while driving may cause you to lose control
of the vehicle and be seriously injured in a crash.
Adjust the steering wheel only when the vehicle is stopped.
WARNING
Driving Position Memory System*
You can store two driver’s seat and door mirror positions into memory when the vehicle is
on. When you unlock and open the driver’s door with a remote transmitter, the seat and door
mirrors adjust automatically to the corresponding preset positions.
Adjust the seat and mirrors to your preferred positions.
1.
Press SET.
2.
Press and hold memory button 1 or 2. Y
ou will
hear two beeps when the memory is set.
Press one of the memory buttons to recall previously stored
positions. Lumbar positions cannot be stored.
SET Button
Memory
Button
1
Memory
Button 2
*if equipped