engine Acura RDX 2013 Manual Online
[x] Cancel search | Manufacturer: ACURA, Model Year: 2013, Model line: RDX, Model: Acura RDX 2013Pages: 364, PDF Size: 12.54 MB
Page 332 of 364
331
Continued
Handling the Unexpected
OverheatingHow to Handle OverheatingOverheating symptoms are as follows:
•The temperature gauge needle is at the mark or the engine suddenly loses
power.
• Steam or spray comes out of the engine compartment.■
First thing to do
1. Immediately park the vehicle in a safe place.
u Turn off all accessories and turn on the hazard warning lights.
2. No steam or spray present: Keep the engine running and open the hood.
Steam or spray is present: Turn off the engine and wait until it subsides. Then,
open the hood.
1 How to Handle Overheating
NOTICEContinuing to drive with the temperature gauge
needle at the mark may damage the engine.
3
WARNING
Steam and spray from an overheated
engine can seriously scald you.
Do not open the hood if steam is coming
out.
H
H
Page 333 of 364
uuOverheating uHow to Handle Overheating
332Handling the Unexpected
■
Next thing to do
1.Check that the cooling fan is operating and
stop the engine once the temperature
gauge needle comes down.
u If the cooling fan is not operating,
immediately stop the engine.
2. Once the engine has cooled down, inspect
the coolant level and check the cooling
system components for leaks.
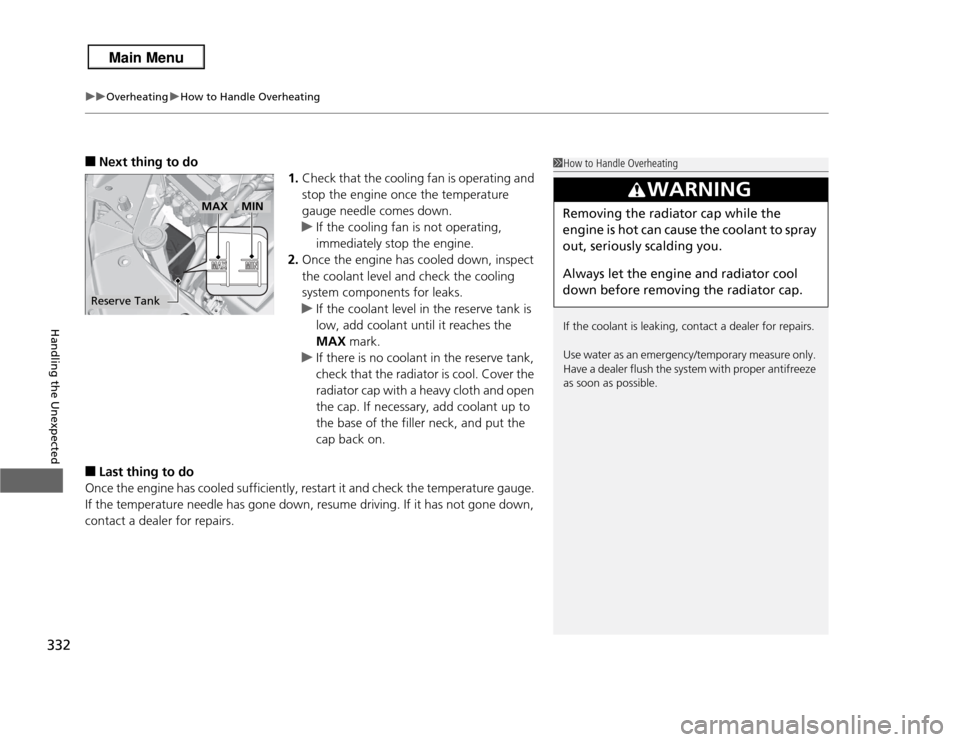
u If the coolant level in the reserve tank is
low, add coolant until it reaches the
MAX mark.
u If there is no coolant in the reserve tank,
check that the radiator is cool. Cover the
radiator cap with a heavy cloth and open
the cap. If necessary, add coolant up to
the base of the filler neck, and put the
cap back on.
■
Last thing to do
Once the engine has cooled sufficiently, restart it and check the temperature gauge.
If the temperature needle has gone down, resume driving. If it has not gone down,
contact a dealer for repairs.
1 How to Handle Overheating
If the coolant is leaking, contact a dealer for repairs.
Use water as an emergency/temporary measure only.
Have a dealer flush the system with proper antifreeze
as soon as possible.
3
WARNING
Removing the radiator cap while the
engine is hot can cause the coolant to spray
out, seriously scalding you.
Always let the engine and radiator cool
down before removing the radiator cap.
Reserve Tank
MAX
MIN
Page 334 of 364
333Handling the Unexpected
Indicator, Coming On/BlinkingIf the Low Oil Pressure Indicator Comes On
■
Reasons for the indicator to come on
Comes on when the engine oil pressure is low.
■
What to do as soon as the indicator comes on
1. Immediately park the vehicle in a safe place.
2. If necessary, turn the hazard warning lights on.
■
What to do after parking the vehicle
1. Stop the engine and let it sit for about one minute.
2. Open the hood and check the oil level.
u Add oil as necessary.
3. Start the engine and check the low oil pressure indicator.
u The light goes out: Start driving again.
u The light does not go out within 10 seconds: Stop the engine and
contact a dealer for repairs immediately.
If the Charging System Indicator Comes On
■
Reasons for the indicator to come on
Comes on when the battery is not being charged.
■
What to do when the indicator comes on
Turn off the climate control system, rear defogger, and other electrical
systems, and immediately contact a dealer for repairs.
1 If the Low Oil Pressure Indicator Comes On
NOTICERunning the engine with low oil pressure can cause
serious mechanical damage almost immediately.1If the Charging System Indicator Comes On
If you need to stop temporarily, do not turn off the
engine. Restarting the engine may rapidly discharge
the battery.
Page 335 of 364
334
uuIndicator, Coming On/Blinking uIf the Malfunction Indicator Lamp Comes On or Blinks
Handling the Unexpected
If the Malfunction Indicator Lamp Comes On or Blinks
■
Reasons for the indicator lamp to come on or blink
• Comes on when there is a problem with the engine emissions control
system, or the fuel fill cap is missing, or loose.
• Blinks when engine misfiring is detected.
■
What to do when the indicator lamp comes on
Avoid high speeds and immediately get your vehicle inspected at a
dealer.
■
What to do when the indicator lamp blinks
Park the vehicle in a safe place with no flammable items and wait at least
ten minutes or more with the engine stopped until it cools.
■
The message appears on when:
An evaporative system leak is detected. This may be caused by the fuel fill cap being
loose or not being installed.
■
What to do when the message appears:
1. Stop the engine.
2. Check that the fuel fill cap is fully installed.
u If not, loosen the cap, and then retighten it until it clicks at least once.
3. Drive for several days of normal driving.
u The message should go off.
■
When the malfunction indicator lamp comes on
Malfunction indicator lamp comes on if the system continues to detect a leak of
gasoline vapor. If this happens, check the fuel fill cap using the procedures described
above.
■
Tighten Fuel Cap Message
1 If the Malfunction Indicator Lamp Comes On or Blinks
NOTICEIf you drive with the malfunction indicator lamp on,
the emissions control system and the engine could be
damaged.
If the malfunction indicator lamp blinks again when
restarting the engine, drive to the nearest dealer at
31 mph (50 km/h) or less. Have your vehicle
inspected.
Page 336 of 364
335
uuIndicator, Coming On/Blinking uIf the Brake System Indicator (Red) Comes On
Handling the Unexpected
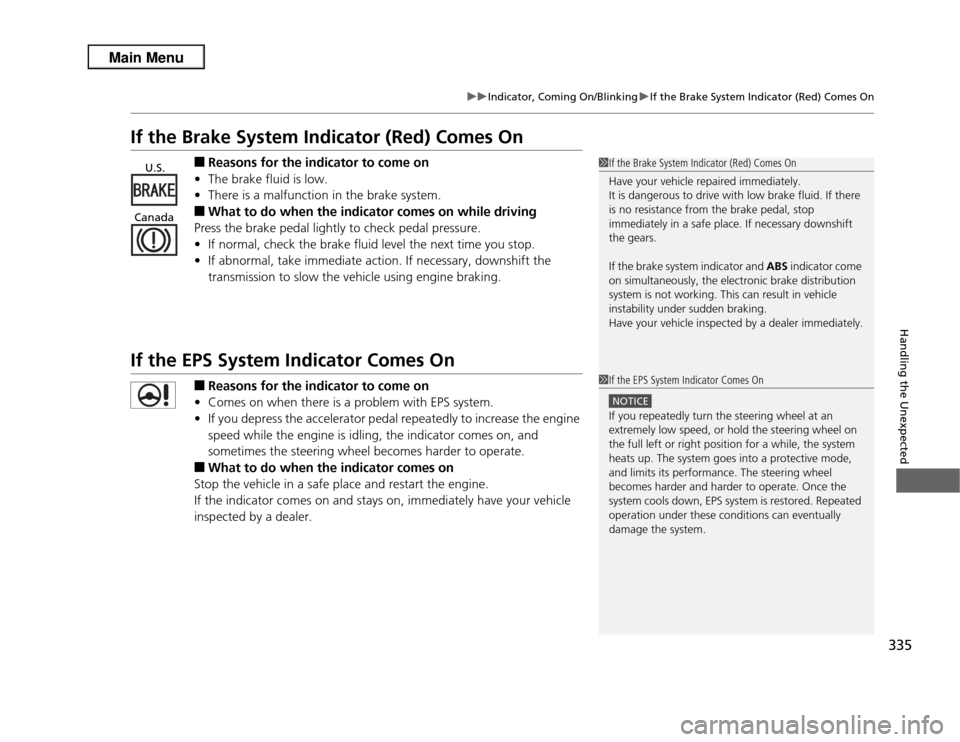
If the Brake System Indicator (Red) Comes On
■
Reasons for the indicator to come on
• The brake fluid is low.
• There is a malfunction in the brake system.
■
What to do when the indicator comes on while driving
Press the brake pedal lightly to check pedal pressure.
• If normal, check the brake fluid level the next time you stop.
• If abnormal, take immediate action. If necessary, downshift the
transmission to slow the vehicle using engine braking.
If the EPS System Indicator Comes On
■
Reasons for the indicator to come on
• Comes on when there is a problem with EPS system.
• If you depress the accelerator pedal repeatedly to increase the engine
speed while the engine is idling, the indicator comes on, and
sometimes the steering wheel becomes harder to operate.
■
What to do when the indicator comes on
Stop the vehicle in a safe place and restart the engine.
If the indicator comes on and stays on, immediately have your vehicle
inspected by a dealer.
1 If the Brake System Indicator (Red) Comes On
Have your vehicle repaired immediately.
It is dangerous to drive with low brake fluid. If there
is no resistance from the brake pedal, stop
immediately in a safe place. If necessary downshift
the gears.
If the brake system indicator and ABS indicator come
on simultaneously, the electronic brake distribution
system is not working. This can result in vehicle
instability under sudden braking.
Have your vehicle inspected by a dealer immediately.
U.S.
Canada
1 If the EPS System Indicator Comes On
NOTICEIf you repeatedly turn the steering wheel at an
extremely low speed, or hold the steering wheel on
the full left or right position for a while, the system
heats up. The system goes into a protective mode,
and limits its performance. The steering wheel
becomes harder and harder to operate. Once the
system cools down, EPS system is restored. Repeated
operation under these conditions can eventually
damage the system.
Page 338 of 364
337
Continued
Handling the Unexpected
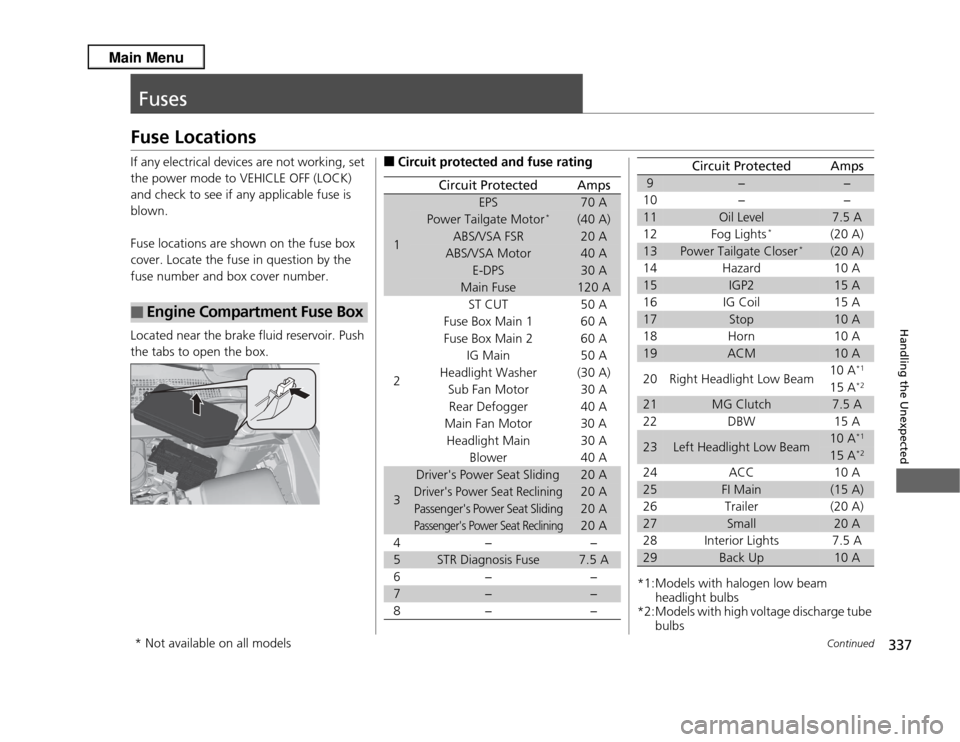
FusesFuse LocationsIf any electrical devices are not working, set
the power mode to VEHICLE OFF (LOCK)
and check to see if any applicable fuse is
blown.
Fuse locations are shown on the fuse box
cover. Locate the fuse in question by the
fuse number and box cover number.
Located near the brake fluid reservoir. Push
the tabs to open the box.■
Engine Compartment Fuse Box
■
Circuit protected and fuse rating
Circuit Protected
Amps
1
EPS
70 A
Power Tailgate Motor
*
(40 A)
ABS/VSA FSR
20 A
ABS/VSA Motor
40 A
E-DPS
30 A
Main Fuse
120 A
2
ST CUT
50 A
Fuse Box Main 1 60 A
Fuse Box Main 2
60 A
IG Main 50 A
Headlight Washer
(30 A)
Sub Fan Motor 30 A Rear Defogger 40 A
Main Fan Motor 30 A Headlight Main 30 A Blower 40 A
3
Driver's Power Seat Sliding
20 A
Driver's Power Seat Reclining
20 A
Passenger's Power Seat Sliding
20 A
Passenger's Power Seat Reclining
20 A
4− −
5
STR Diagnosis Fuse
7.5 A
6− −
7
−
−
8− −
*1:Models with halogen low beam headlight bulbs
*2:Models with high voltage discharge tube
bulbs9
−
−
10 − −
11
Oil Level
7.5 A
12 Fog Lights
*
(20 A)
13
Power Tailgate Closer
*
(20 A)
14 Hazard 10 A
15
IGP2
15 A
16 IG Coil 15 A
17
Stop
10 A
18 Horn 10 A
19
ACM
10 A
20 Right Headlight Low Beam 10 A
*1
15 A
*2
21
MG Clutch
7.5 A
22 DBW 15 A
23
Left Headlight Low Beam
10 A
*1
15 A
*2
24ACC 10 A25
FI Main
(15 A)
26 Trailer (20 A)
27
Small
20 A
28 Interior Lights 7.5 A
29
Back Up
10 A
Circuit Protected
Amps
* Not available on all models
Page 340 of 364
339
uuFuses uInspecting and Changing Fuses
Handling the Unexpected
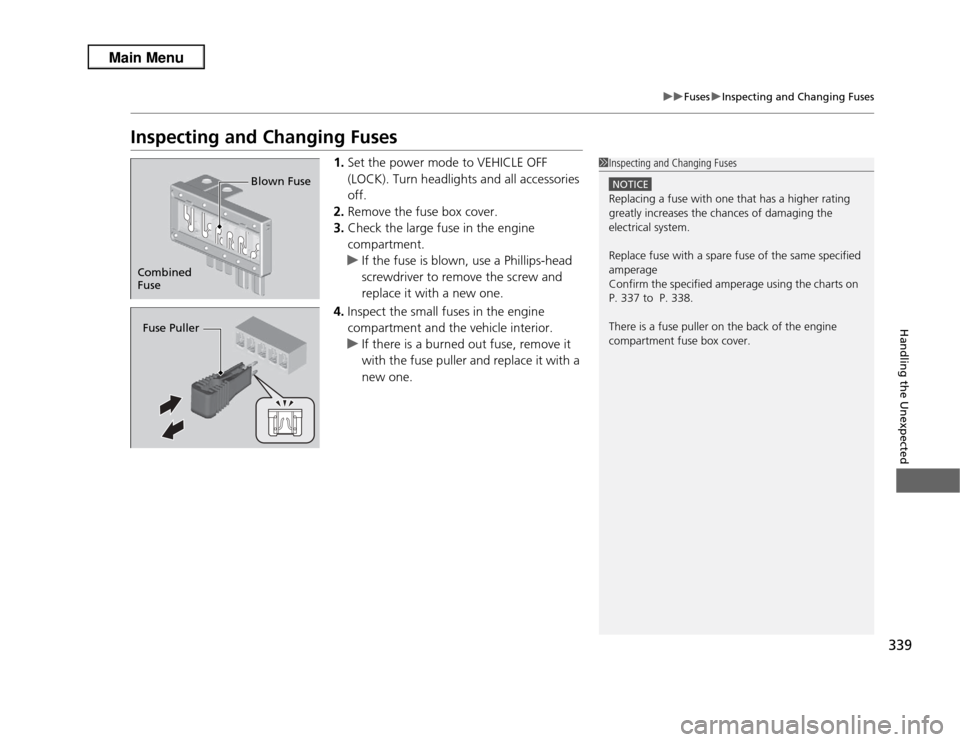
Inspecting and Changing Fuses
1. Set the power mode to VEHICLE OFF
(LOCK). Turn headlights and all accessories
off.
2. Remove the fuse box cover.
3. Check the large fuse in the engine
compartment.
u If the fuse is blown, use a Phillips-head
screwdriver to remove the screw and
replace it with a new one.
4. Inspect the small fuses in the engine
compartment and the vehicle interior.
u If there is a burned out fuse, remove it
with the fuse puller and replace it with a
new one.
1Inspecting and Changing Fuses
NOTICEReplacing a fuse with one that has a higher rating
greatly increases the chances of damaging the
electrical system.
Replace fuse with a spare fuse of the same specified
amperage
Confirm the specified amperage using the charts on
P. 337 to P. 338.
There is a fuse puller on the back of the engine
compartment fuse box cover.
Combined
Fuse Blown FuseFuse Puller
Page 344 of 364
343
Information
This chapter includes your vehicle's specifications, locations of identification numbers, and otherinformation required by regulation.
Specifications.................................... 344
Identification NumbersVehicle Identification Nu mber (VIN) ...... 346Engine Number and Transmission
Number...................................... 346Devices that Emit Radio Waves ....... 347
Reporting Safety Defects ................. 348Emissions Testing
Testing of Readiness Codes.............. 349
Warranty Coverages ........................ 351
Authorized Manuals ......................... 353
Client Service Information ............... 354
Page 345 of 364
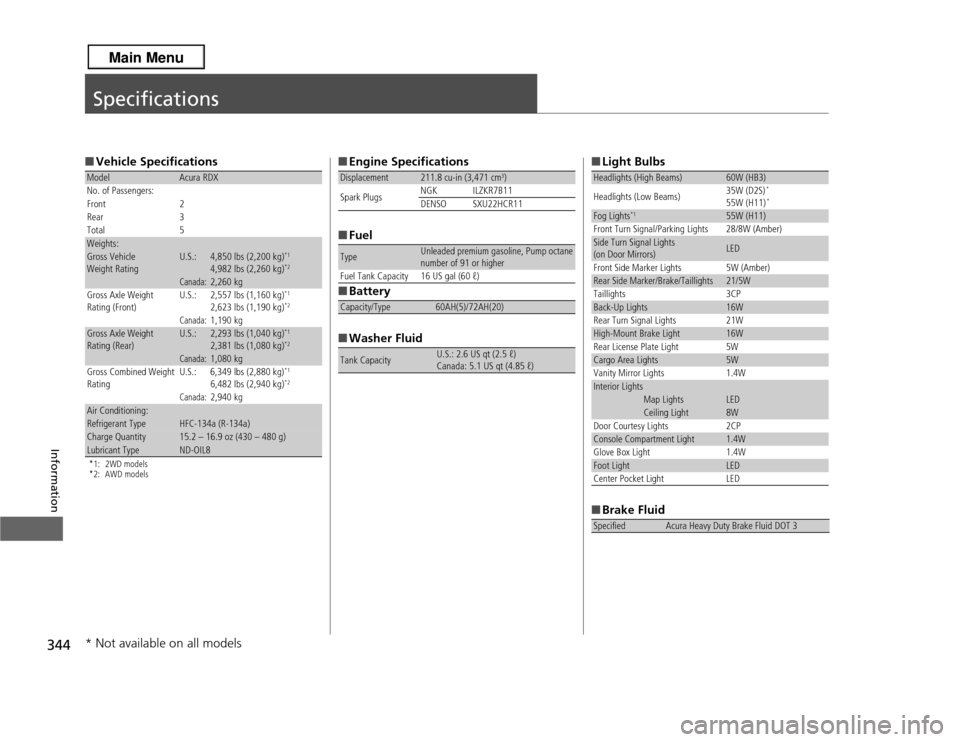
344Information
Specifications■Vehicle Specifications*1: 2WD models
*2: AWD modelsModel
Acura RDX
No. of Passengers:
Front 2
Rear 3
Total 5
Weights:Gross Vehicle
Weight Rating
U.S.:
4,850 lbs (2,200 kg)
*1
4,982 lbs (2,260 kg)
*2
Canada:
2,260 kg
Gross Axle Weight
Rating (Front)
U.S.:
2,557 lbs (1,160 kg)
*1
2,623 lbs (1,190 kg)
*2
Canada:
1,190 kg
Gross Axle Weight
Rating (Rear)
U.S.:
2,293 lbs (1,040 kg)
*1
2,381 lbs (1,080 kg)
*2
Canada:
1,080 kg
Gross Combined Weight
Rating U.S.: 6,349 lbs (2,880 kg)
*1
6,482 lbs (2,940 kg)
*2
Canada:
2,940 kg
Air Conditioning:Refrigerant Type
HFC-134a (R-134a)
Charge Quantity
15.2 – 16.9 oz (430 – 480 g)
Lubricant Type
ND-OIL8
■
Engine Specifications
■ Fuel
■ Battery
■ Washer FluidDisplacement
211.8 cu-in (3,471 cm
3)
Spark Plugs NGK ILZKR7B11
DENSO SXU22HCR11
Type
Unleaded premium gasoline, Pump octane
number of 91 or higher
Fuel Tank Capacity 16 US gal (60 ℓ)
Capacity/Type
60AH(5)/72AH(20)
Tank Capacity
U.S.: 2.6 US qt (2.5 ℓ)
Canada: 5.1 US qt (4.85 ℓ)
■ Light Bulbs
■ Brake FluidHeadlights (High Beams)
60W (HB3)
Headlights (Low Beams) 35W (D2S)
*
55W (H11)
*
Fog Lights
*1
55W (H11)
Front Turn Signal/Parking Lights 28/8W (Amber)
Side Turn Signal Lights
(on Door Mirrors)
LED
Front Side Marker Lights 5W (Amber)
Rear Side Marker/Brake/Taillights
21/5W
Taillights 3CP
Back-Up Lights
16W
Rear Turn Signal Lights 21W
High-Mount Brake Light
16W
Rear License Plate Light 5W
Cargo Area Lights
5W
Vanity Mirror Lights 1.4W
Interior Lights
Map Lights
LED
Ceiling Light
8W
Door Courtesy Lights 2CP
Console Compartment Light
1.4W
Glove Box Light 1.4W
Foot Light
LED
Center Pocket Light LED
Specified
Acura Heavy Duty Brake Fluid DOT 3
* Not available on all models
Page 346 of 364
345
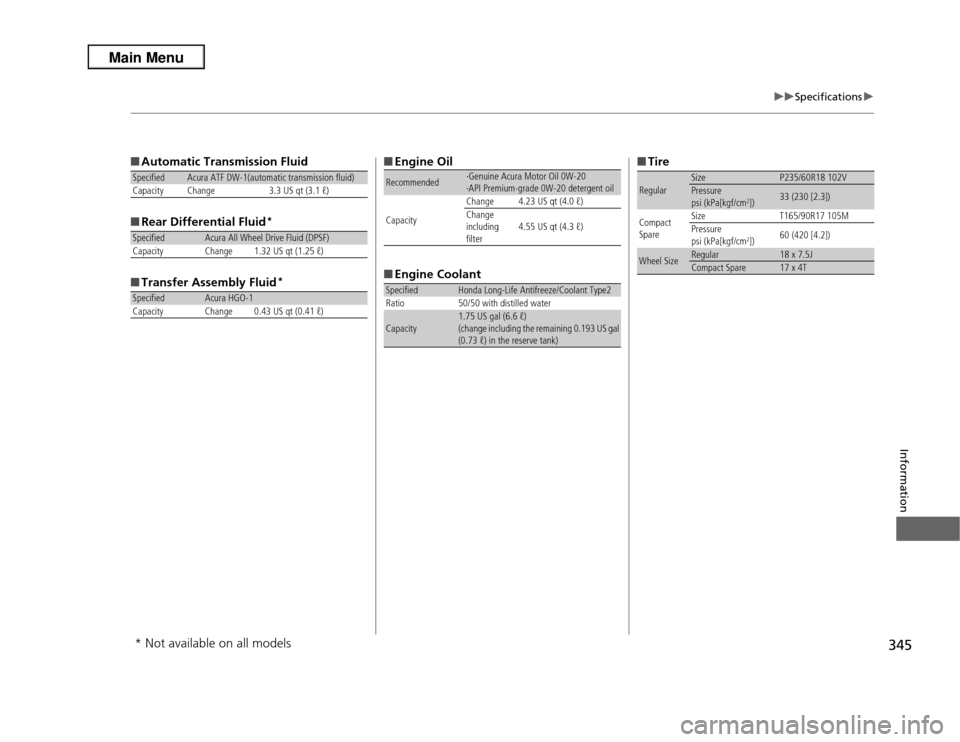
uuSpecifications u
Information
■Automatic Transmission Fluid
■ Rear Differential Fluid
*
■Transfer Assembly Fluid
*
Specified
Acura ATF DW-1(automatic transmission fluid)
Capacity Change 3.3 US qt (3.1 ℓ)
Specified
Acura All Wheel Drive Fluid (DPSF)
Capacity Change 1.32 US qt (1.25 ℓ)
Specified
Acura HGO-1
Capacity Change 0.43 US qt (0.41 ℓ)
■ Engine Oil
■ Engine CoolantRecommended
·Genuine Acura Motor Oil 0W-20
·API Premium-grade 0W-20 detergent oil
Capacity Change 4.23 US qt (4.0 ℓ)
Change
including
filter
4.55 US qt (4.3 ℓ)
Specified
Honda Long-Life Antifreeze/Coolant Type2
Ratio 50/50 with distilled water
Capacity
1.75 US gal (6.6 ℓ)
(change including the remaining 0.193 US gal
(0.73 ℓ) in the reserve tank)
■ TireRegular
Size
P235/60R18 102V
Pressure
psi (kPa[kgf/cm
2])
33 (230 [2.3])
Compact
Spare Size
T165/90R17 105M
Pressure
psi (kPa[kgf/cm
2]) 60 (420 [4.2])
Wheel Size
Regular
18 x 7.5J
Compact Spare
17 x 4T
* Not available on all models