sensor ACURA RL KA9 1996 Service Manual Online
[x] Cancel search | Manufacturer: ACURA, Model Year: 1996, Model line: RL KA9, Model: ACURA RL KA9 1996Pages: 1954, PDF Size: 61.44 MB
Page 681 of 1954
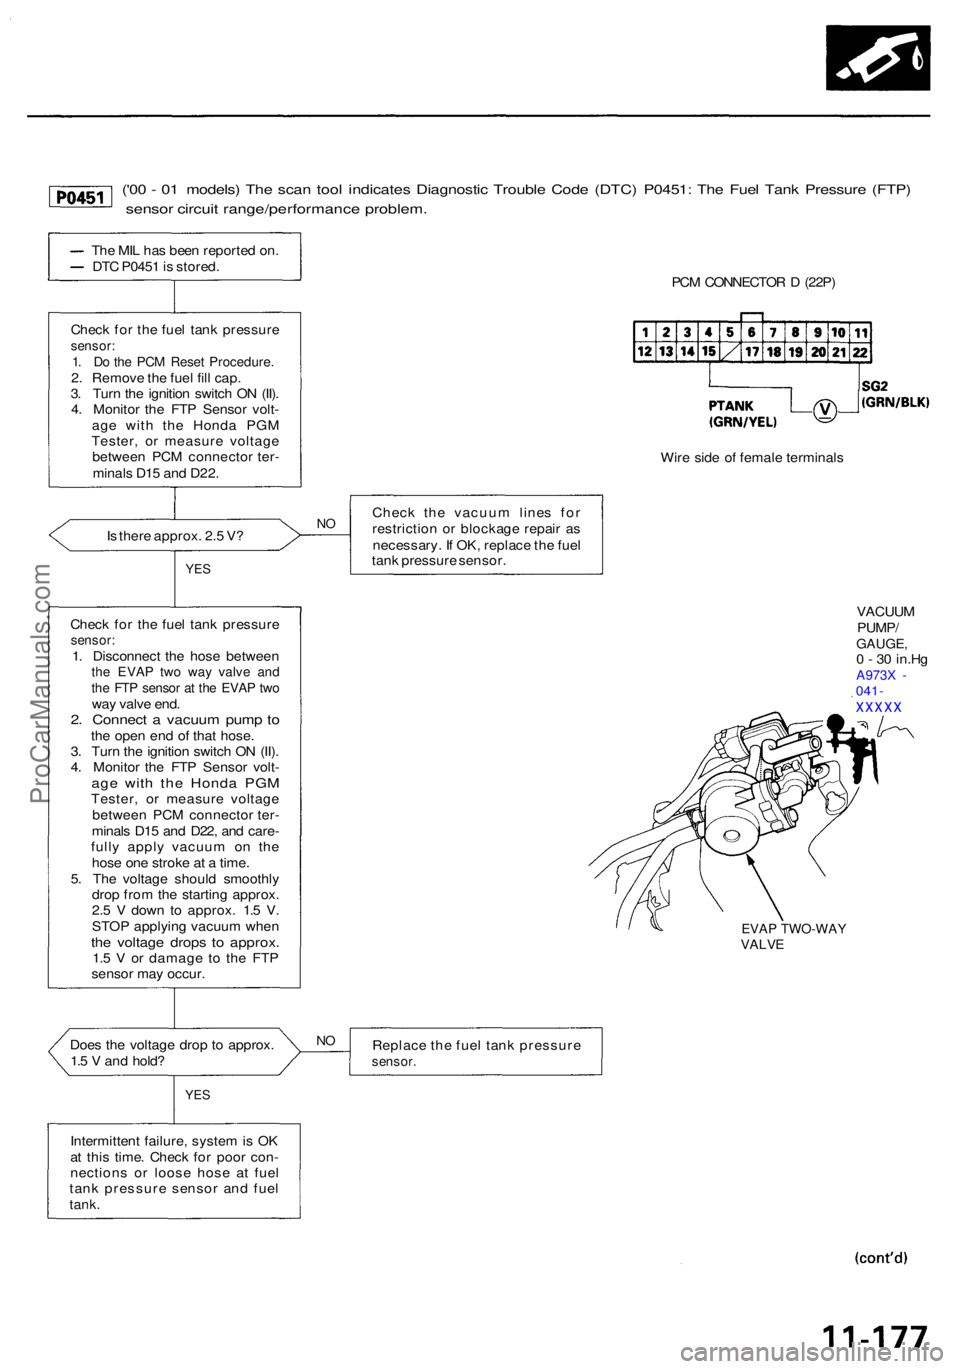
('00 - 0 1 models ) Th e sca n too l indicate s Diagnosti c Troubl e Cod e (DTC ) P0451 : Th e Fue l Tan k Pressur e (FTP )
senso r circui t range/performanc e problem .
The MI L ha s bee n reporte d on .
DT C P045 1 is stored .
Chec k fo r th e fue l tan k pressur e
sensor:1. D o th e PC M Rese t Procedure .2. Remov e th e fue l fil l cap .
3 . Tur n th e ignitio n switc h O N (II) .
4 . Monito r th e FT P Senso r volt -
ag e wit h th e Hond a PG M
Tester , o r measur e voltag e
betwee n PC M connecto r ter -
minal s D1 5 an d D22 .
I s ther e approx . 2. 5 V ?
YE S
Chec k fo r th e fue l tan k pressur esensor:1. Disconnec t th e hos e betwee nthe EVA P tw o wa y valv e an dthe FT P senso r a t th e EVA P tw oway valv e end .2. Connec t a vacuu m pum p t oth e ope n en d o f tha t hose .
3 . Tur n th e ignitio n switc h O N (II) .
4 . Monito r th e FT P Senso r volt -
age wit h th e Hond a PG MTester , o r measur e voltag e
betwee n PC M connecto r ter -
minal s D1 5 an d D22 , an d care -
full y appl y vacuu m o n th e
hos e on e strok e a t a time .
5 . Th e voltag e shoul d smoothl y
dro p fro m th e startin g approx .
2. 5 V dow n t o approx . 1. 5 V .
STO P applyin g vacuu m whe n
the voltag e drop s t o approx .1.5 V or damag e t o th e FT P
senso r ma y occur .
Doe s th e voltag e dro p t o approx .
1. 5 V an d hold ?
YES
Intermitten t failure , syste m is O K
a t thi s time . Chec k fo r poo r con -
nection s o r loos e hos e a t fue l
tan k pressur e senso r an d fue l
tank .
PCM CONNECTO R D (22P )
Wir e sid e o f femal e terminal s
Chec k th e vacuu m line s fo r
restrictio n o r blockag e repai r a s
necessary . I f OK , replac e th e fue l
tan k pressur e sensor .
VACUUM
PUMP /
GAUGE ,0 - 3 0 in.H gA973 X -041 -xxxx x
EVAP TWO-WA YVALVE
Replac e th e fue l tan k pressur esensor.
NO
N O
ProCarManuals.com
Page 682 of 1954
Emission Contro l Syste m
Evaporativ e Emissio n (EVAP ) Control s (cont'd )
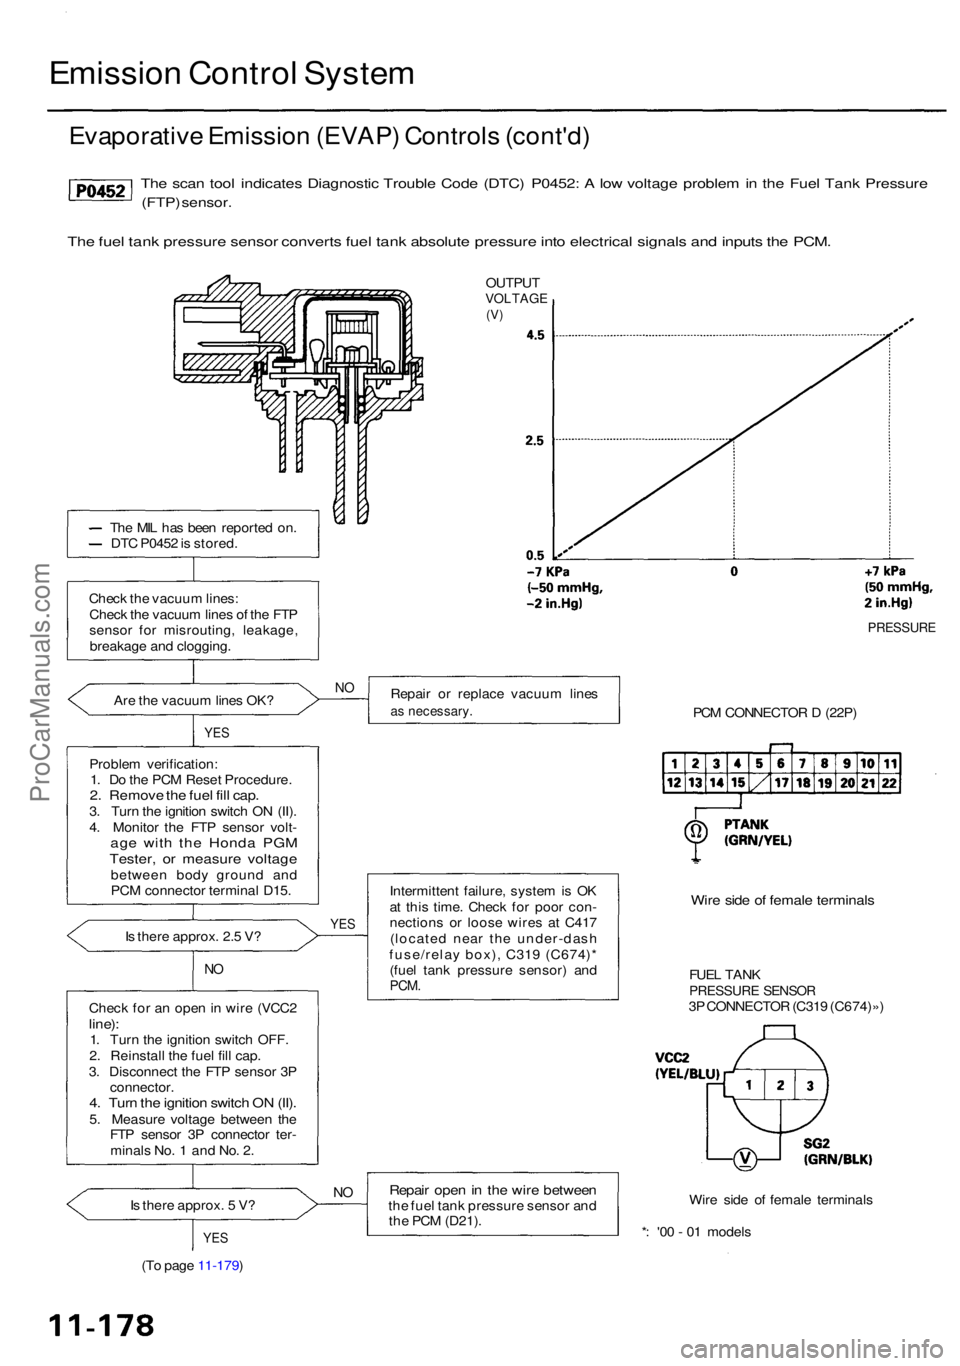
The sca n too l indicate s Diagnosti c Troubl e Cod e (DTC ) P0452 : A lo w voltag e proble m in th e Fue l Tan k Pressur e
(FTP) sensor .
The fue l tan k pressur e senso r convert s fue l tan k absolut e pressur e int o electrica l signal s an d input s th e PCM .
OUTPU TVOLTAG E(V)
Th e MI L ha s bee n reporte d on .
DT C P045 2 is stored .
Chec k th e vacuu m lines :
Chec k th e vacuu m line s o f th e FT P
senso r fo r misrouting , leakage ,
breakag e an d clogging .
Ar e th e vacuu m line s OK ?
YES
Proble m verification :
1 . D o th e PC M Rese t Procedure .
2. Remov e th e fue l fil l cap .3. Tur n th e ignitio n switc h O N (II) .
4 . Monito r th e FT P sensor volt-
age wit h th e Hond a PG MTester , o r measur e voltag ebetwee n bod y groun d an d
PC M connecto r termina l D15 .
I s ther e approx . 2. 5 V ?
NO
Chec k fo r a n ope n in wir e (VCC 2line):1. Tur n th e ignitio n switc h OFF .
2 . Reinstal l th e fue l fil l cap .
3 . Disconnec t th e FT P senso r 3 P
connector .
4. Tur n th e ignitio n switc h O N (II) .5. Measur e voltag e betwee n th e
FT P senso r 3 P connecto r ter -
minal s No . 1 an d No . 2 .
I s ther e approx . 5 V ?
YE S
Repai r o r replac e vacuu m line sas necessary .
Intermittent failure , syste m is O K
a t thi s time . Chec k fo r poo r con -
nection s o r loos e wire s a t C41 7
(locate d nea r th e under-das h
fuse/rela y box) , C31 9 (C674) *
(fue l tan k pressur e sensor ) an d
PCM .
Repai r ope n in th e wir e betwee nthe fue l tan k pressur e senso r an d
th e PC M (D21) .
PRESSUR E
PCM CONNECTO R D (22P )
Wire sid e o f femal e terminal s
FUEL TAN KPRESSUR E SENSO R3P CONNECTO R (C31 9 (C674)» )
Wir e sid e o f femal e terminal s
* : '0 0 - 0 1 model s
(T o pag e 11-179 )
YES
NO
N O
ProCarManuals.com
Page 683 of 1954
(From pag e 11-178 )
Chec k fo r a shor t i n th e wir e
(PTAN K line) :
Measur e voltag e betwee n th e FT P
senso r 3 P connecto r terminal s
No. 2 an d No . 3 .
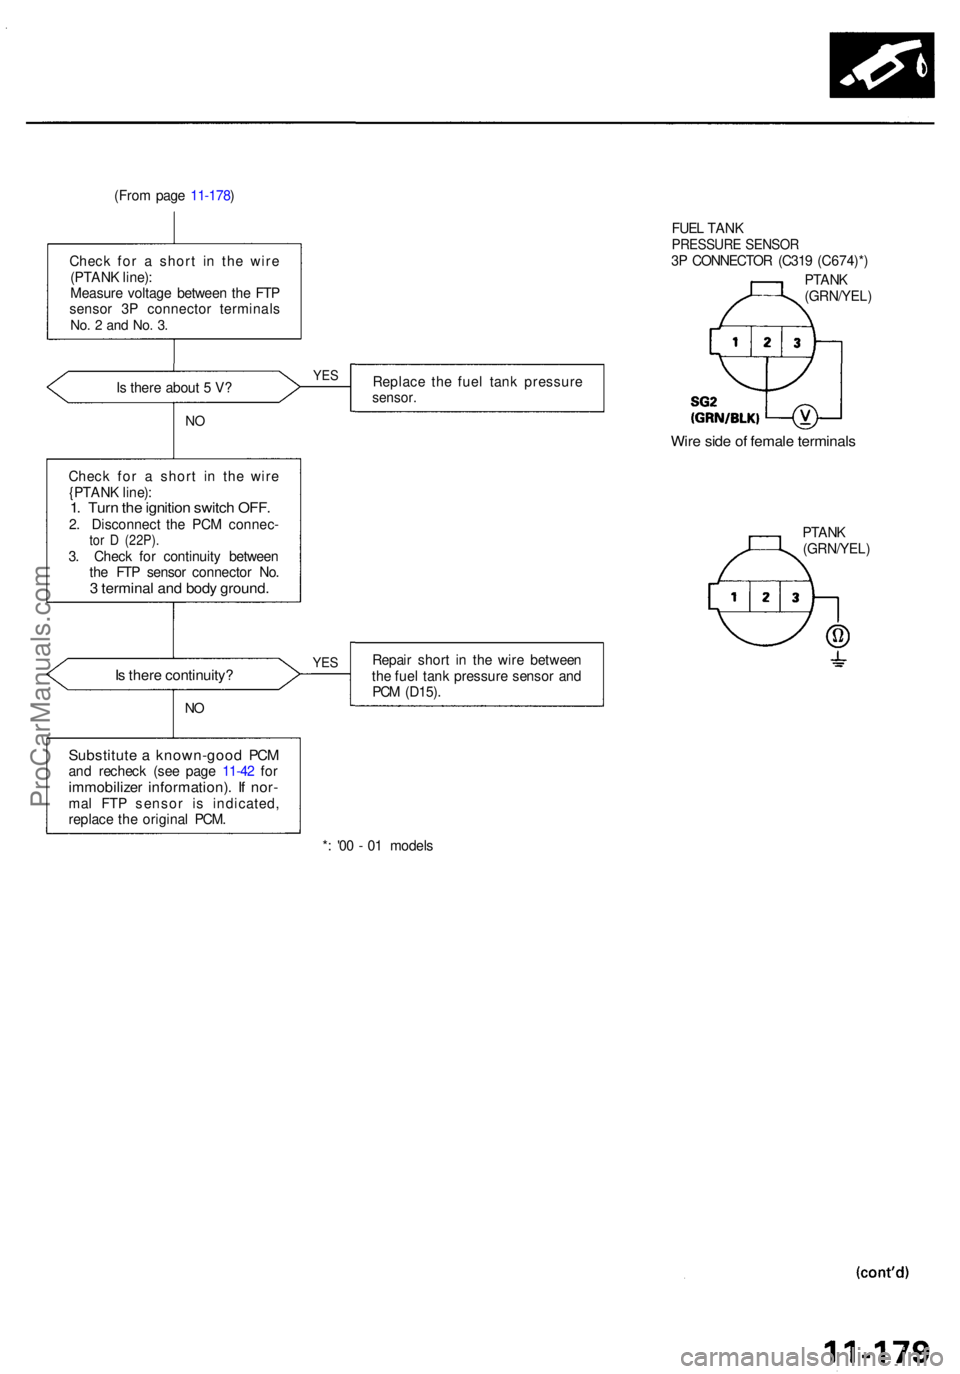
FUE L TAN KPRESSUR E SENSO R3P CONNECTO R (C31 9 (C674)* )
PTAN K
(GRN/YEL )
I s ther e abou t 5 V ? Replac
e th e fue l tan k pressur e
sensor.
NO
Chec k fo r a shor t i n th e wir e
{PTAN K line) :
1. Tur n th e ignitio n switc h OFF .2. Disconnec t th e PC M connec -tor D (22P) .3. Chec k fo r continuit y betwee n
th e FT P senso r connecto r No .
3 termina l an d bod y ground .
PTANK
(GRN/YEL )
Is ther e continuity ?
NO
Repai r shor t i n th e wir e betwee n
th e fue l tan k pressur e senso r an d
PC M (D15) .
Substitut e a known-goo d PC Mand rechec k (se e pag e 11-42 fo rimmobilize r information) . I f nor -mal FT P senso r i s indicated ,
replac e th e origina l PCM .
*: '0 0 - 0 1 model s
YES
Wir e sid e o f femal e terminal s
YES
ProCarManuals.com
Page 684 of 1954
Emission Contro l Syste m
Evaporativ e Emissio n (EVAP ) Control s (cont'd )
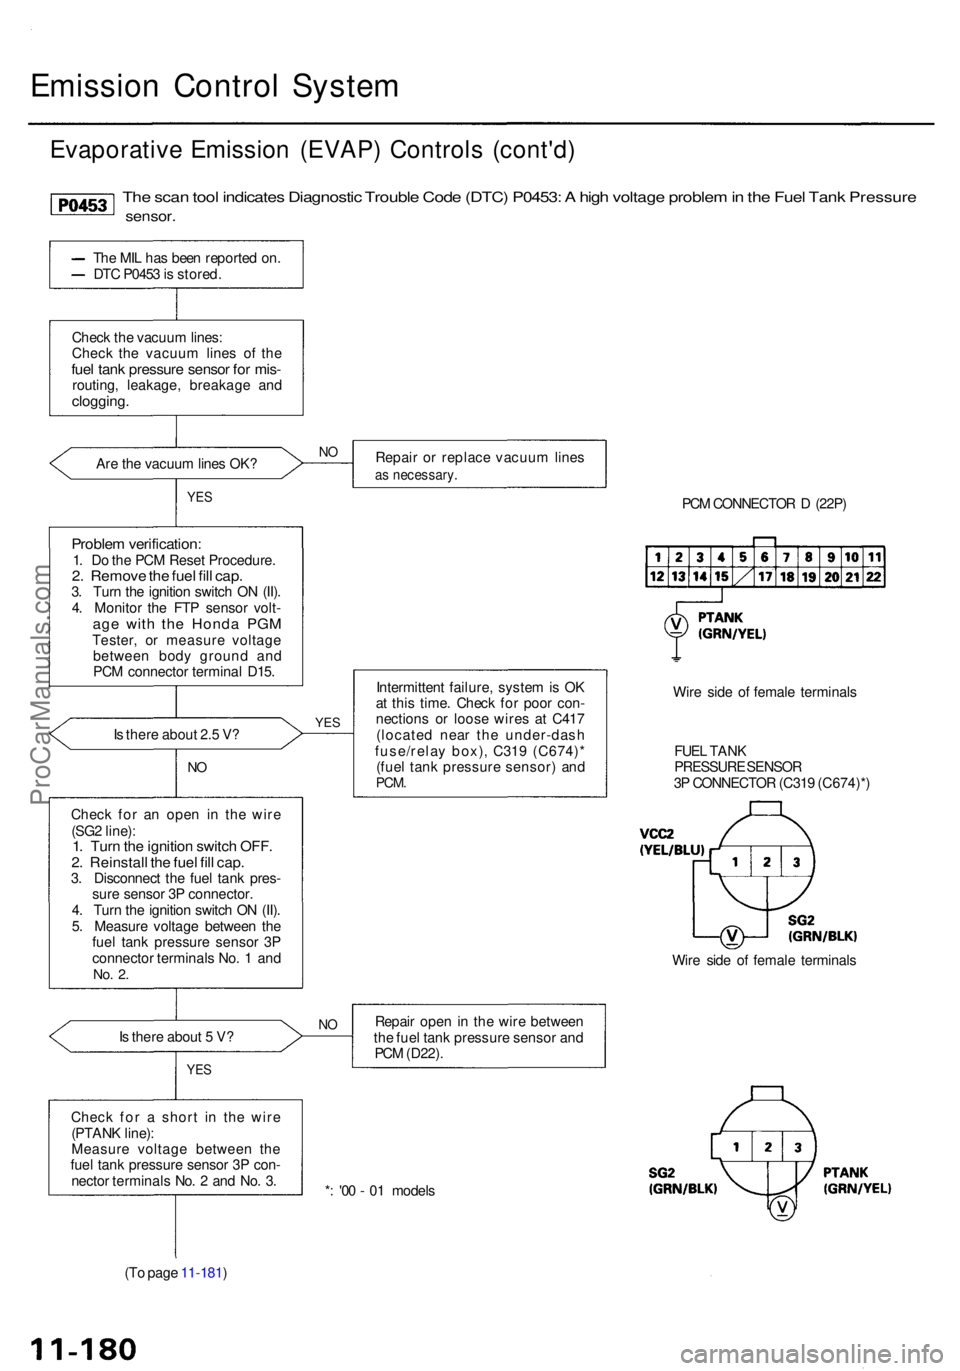
The sca n too l indicate s Diagnosti c Troubl e Cod e (DTC ) P0453 : A hig h voltag e proble m in th e Fue l Tan k Pressur e
sensor.
The MI L ha s bee n reporte d on .
DT C P045 3 is stored .
Chec k th e vacuu m lines :
Chec k th e vacuu m line s o f th e
fuel tan k pressur e senso r fo r mis -routing , leakage , breakag e an dclogging .
Are th e vacuu m line s OK ?
YES
Proble m verification :1. D o th e PC M Rese t Procedure .2. Remov e th e fue l fil l cap .3. Tur n th e ignitio n switc h O N (II) .
4 . Monito r th e FT P sensor volt-
age wit h th e Hond a PG MTester , o r measur e voltag e
betwee n bod y groun d an d
PC M connecto r termina l D15 .
I s ther e abou t 2. 5 V ?
NO
Chec k fo r a n ope n i n th e wir e
(SG 2 line) :
1. Tur n th e ignitio n switc h OFF .2. Reinstal l th e fue l fil l cap .3. Disconnec t th e fue l tan k pres -
sur e senso r 3 P connector .
4 . Tur n th e ignitio n switc h O N (II) .
5 . Measur e voltag e betwee n th e
fue l tan k pressur e senso r 3 P
connecto r terminal s No . 1 an d
No. 2 .
Is ther e abou t 5 V ?
YE S
Chec k fo r a shor t i n th e wir e
(PTAN K line) :
Measur e voltag e betwee n th e
fue l tan k pressur e senso r 3 P con -
necto r terminal s No . 2 an d No . 3 .
(T o pag e 11-181 ) Repai
r o r replac e vacuu m line s
as necessary .
PCM CONNECTO R D (22P )
YES
Intermitten t failure , syste m is O K
a t thi s time . Chec k fo r poo r con -
nection s o r loos e wire s a t C41 7
(locate d nea r th e under-das h
fuse/rela y box) , C31 9 (C674) *
(fue l tan k pressur e sensor ) an d
PCM .
Wire sid e o f femal e terminal s
FUE L TAN K
PRESSUR E SENSO R
3 P CONNECTO R (C31 9 (C674)* )
Repai r ope n in th e wir e betwee n
th e fue l tan k pressur e senso r an d
PC M (D22) .
* : '0 0 - 0 1 model s
NO
Wir e sid e o f femal e terminal s
NO
ProCarManuals.com
Page 685 of 1954
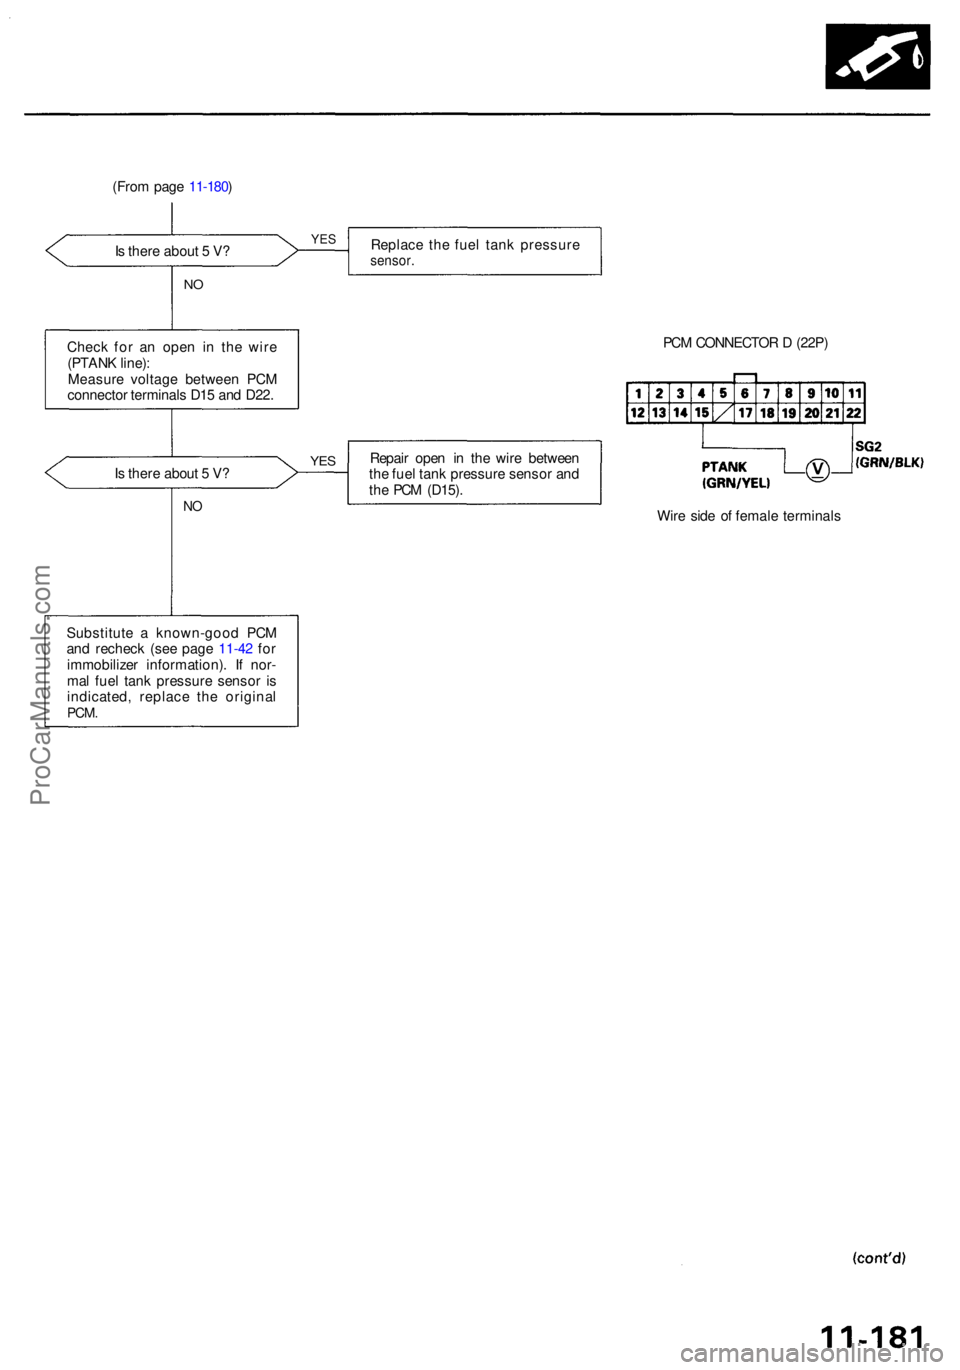
(From pag e 11-180 )
I s ther e abou t 5 V ? Replac
e th e fue l tan k pressur e
sensor.
NO
Chec k fo r a n ope n i n th e wir e
(PTAN K line) :
Measur e voltag e betwee n PC M
connecto r terminal s D1 5 an d D22 . PC
M CONNECTO R D (22P )
I s ther e abou t 5 V ?
NO
Repai r ope n i n th e wir e betwee n
th e fue l tan k pressur e senso r an d
th e PC M (D15) .
Wire sid e o f femal e terminal s
Substitut e a known-goo d PC M
an d rechec k (se e pag e 11-42 fo r
immobilize r information) . I f nor -
ma l fue l tan k pressur e senso r i s
indicated , replac e the origina l
PCM.
YES
YES
ProCarManuals.com
Page 686 of 1954
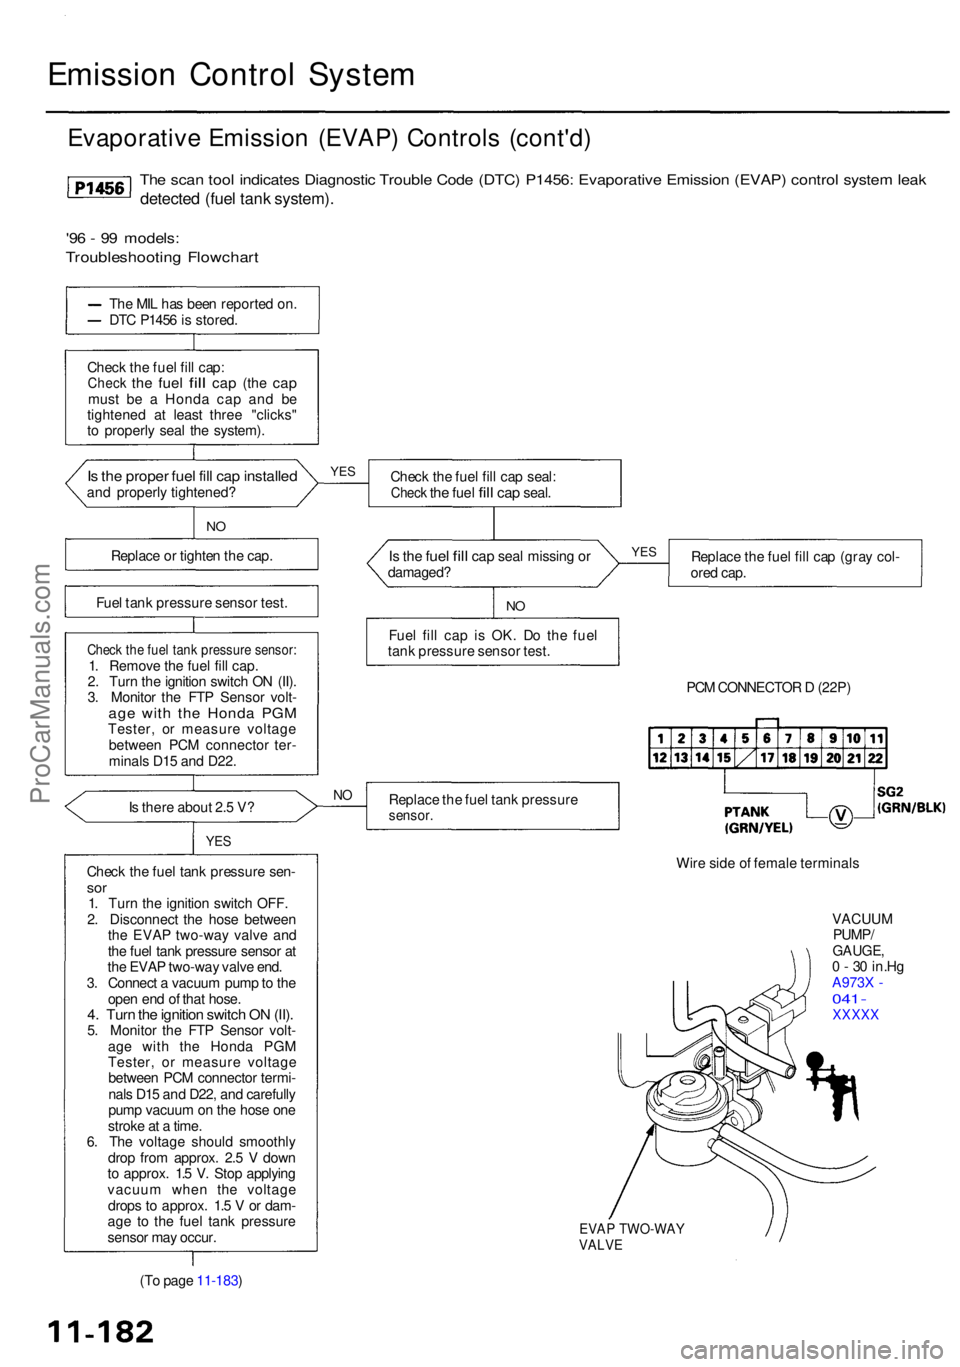
Emission Contro l Syste m
Evaporativ e Emissio n (EVAP ) Control s (cont'd )
The sca n too l indicate s Diagnosti c Troubl e Cod e (DTC ) P1456 : Evaporativ e Emissio n (EVAP ) contro l syste m lea k
detecte d (fue l tan k system) .
'96 - 9 9 models :
Troubleshootin g Flowchar t
The MI L ha s bee n reporte d on .
DT C P145 6 is stored .
Chec k th e fue l fil l cap :
Chec k the fue l fill cap (th e capmus t b e a Hond a ca p an d b e
tightene d a t leas t thre e "clicks "
t o properl y sea l th e system) .
Is th e prope r fue l fil l ca p installe dand properl y tightened ?
Fue l tan k pressur e senso r test .
Chec k th e fue l tan k pressur e sensor :1. Remov e th e fue l fil l cap .
2 . Tur n th e ignitio n switc h O N (II) .
3 . Monito r th e FT P Senso r volt -
age wit h th e Hond a PG MTester , o r measur e voltag e
betwee n PC M connecto r ter -
minal s D1 5 an d D22 .
I s ther e abou t 2. 5 V ?
YE S
Chec k th e fue l tan k pressur e sen -sor1. Tur n th e ignitio n switc h OFF .
2 . Disconnec t th e hos e betwee n
th e EVA P two-wa y valv e an d
th e fue l tan k pressur e senso r a t
th e EVA P two-wa y valv e end .
3 . Connec t a vacuu m pum p to th e
ope n en d o f tha t hose .
4. Tur n th e ignitio n switc h O N (II) .5. Monito r th e FT P Senso r volt -
ag e wit h th e Hond a PG M
Tester , o r measur e voltag e
betwee n PC M connecto r termi -
nal s D1 5 an d D22 , an d carefull y
pum p vacuu m on th e hos e on e
strok e a t a time .
6 . Th e voltag e shoul d smoothl y
dro p fro m approx . 2. 5 V dow n
t o approx . 1. 5 V . Sto p applyin g
vacuu m whe n th e voltag e
drop s t o approx . 1. 5 V or dam -
ag e t o th e fue l tan k pressur e
senso r ma y occur . Replac
e th e fue l fil l ca p (gra y col -
ore d cap .
NO
Fue l fil l ca p i s OK . D o th e fue l
tan k pressur e senso r test .
PCM CONNECTO R D (22P )
Replac e th e fue l tan k pressur e
sensor.
Wire sid e o f femal e terminal s
VACUU M
PUMP /
GAUGE ,0 - 3 0 in.H g
A973 X -
04 1 -XXXX X
EVAP TWO-WA YVALVE
(To pag e 11-183 )
NO
Replac e o r tighte n th e cap .
NO
YE S
YESChec k th e fue l fil l ca p seal :Chec k the fue l fill ca p seal .
Is th e fue l fill ca p sea l missin g ordamaged ?
ProCarManuals.com
Page 687 of 1954
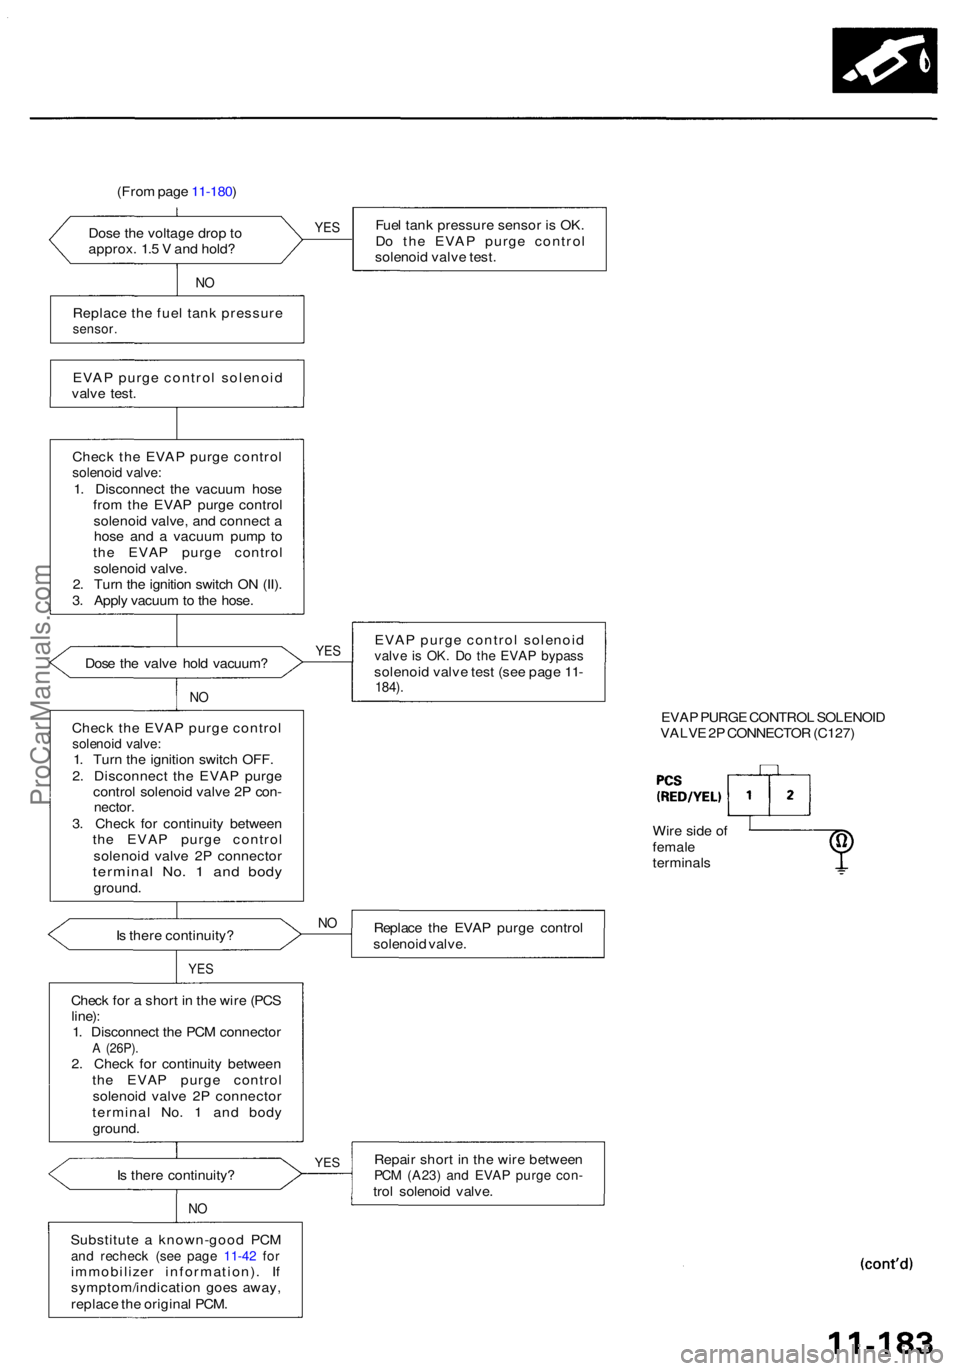
(From pag e 11-180 )
Dos e th e voltag e dro p t o
approx . 1. 5 V an d hold ?
NO
Replac e th e fue l tan k pressur esensor.
EVAP purg e contro l solenoi d
valv e test .
Chec k th e EVA P purg e contro l
solenoid valve :1. Disconnec t th e vacuu m hos e
fro m th e EVA P purg e contro l
solenoi d valve , an d connec t a
hos e an d a vacuu m pum p t o
th e EVA P purg e contro l
solenoi d valve .
2 . Tur n th e ignitio n switc h O N (II) .
3 . Appl y vacuu m to th e hose .
Dos e th e valv e hol d vacuum ?
NO
Chec k th e EVA P purg e contro lsolenoid valve :1. Tur n th e ignitio n switc h OFF .
2 . Disconnec t th e EVA P purg e
contro l solenoi d valv e 2 P con -
nector .3. Chec k fo r continuit y betwee n
th e EVA P purg e contro l
solenoi d valv e 2 P connecto r
terminal No . 1 an d bod yground .
I s ther e continuity ?
YES
Chec k fo r a shor t i n th e wir e (PC S
line) :
1 . Disconnec t th e PC M connecto r
A (26P) .2. Chec k fo r continuit y betwee n
th e EVA P purg e contro l
solenoi d valv e 2 P connecto r
termina l No . 1 an d bod y
ground .
I s ther e continuity ?
NO
Substitut e a known-goo d PC Mand rechec k (se e pag e 11-42 fo rimmobilize r information) . I f
symptom/indicatio n goe s away ,
replac e th e origina l PCM . Fue
l tan k pressur e senso r i s OK .
D o th e EVA P purg e contro l
solenoi d valv e test .
EVA P purg e contro l solenoi d
valve i s OK . D o th e EVA P bypas ssolenoi d valv e tes t (se e pag e 11 -184) .
EVA P PURG E CONTRO L SOLENOI D
VALV E 2P CONNECTO R (C127 )
Replac e th e EVA P purg e contro l
solenoi d valve .
Repai r shor t i n th e wir e betwee n
PCM (A23 ) an d EVA P purg e con -trol solenoi d valve . Wir
e sid e o f
femal eterminal s
YES
YE S
NO
YE S
ProCarManuals.com
Page 696 of 1954
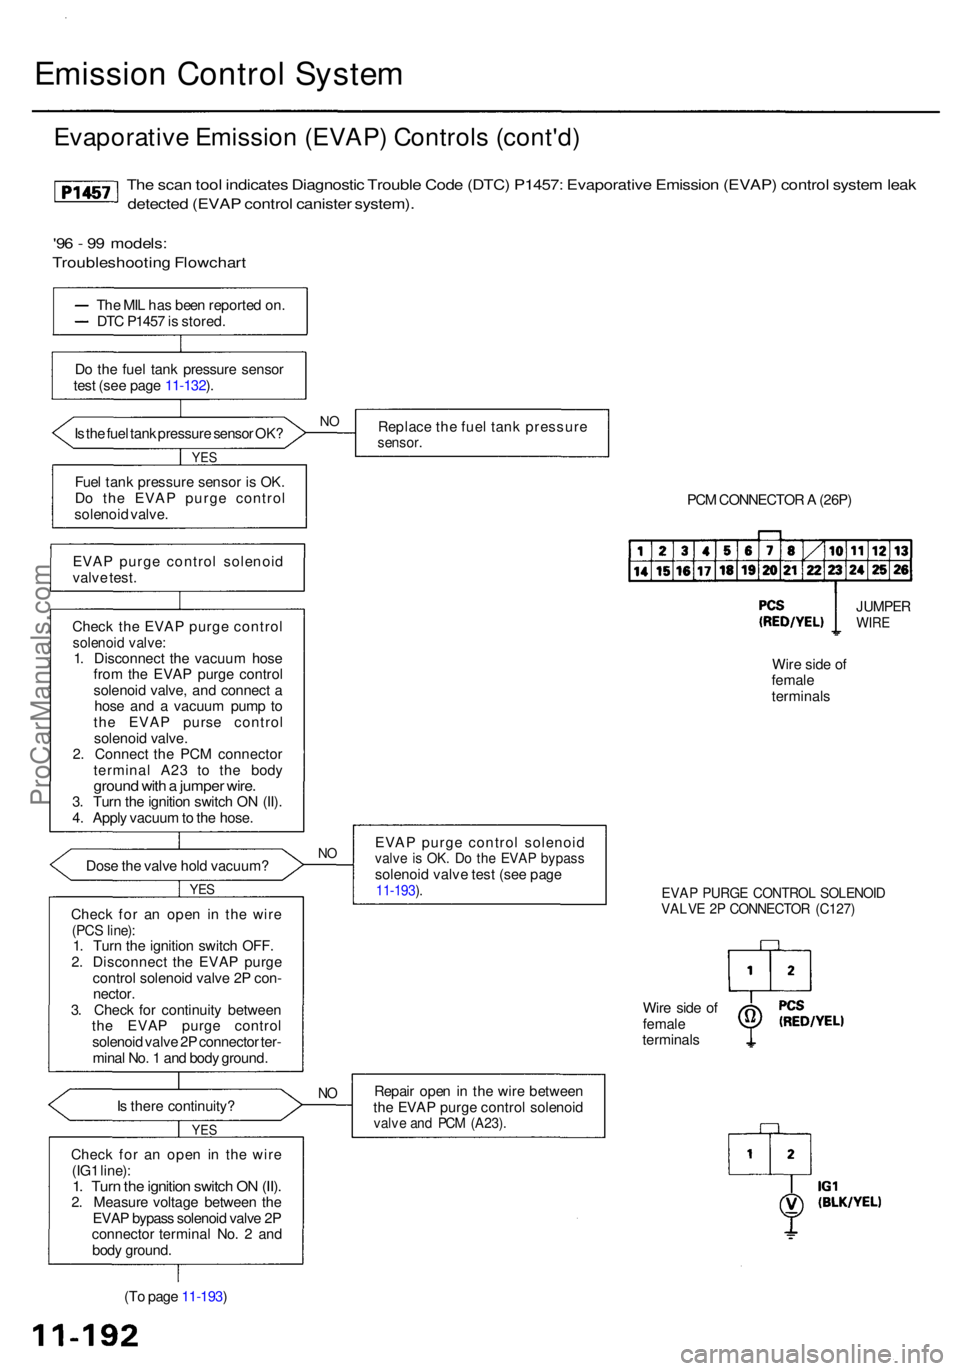
Emission Contro l Syste m
Evaporativ e Emissio n (EVAP ) Control s (cont'd )
The sca n too l indicate s Diagnosti c Troubl e Cod e (DTC ) P1457 : Evaporativ e Emissio n (EVAP ) contro l syste m lea k
detecte d (EVA P contro l caniste r system) .
'9 6 - 9 9 models :
Troubleshootin g Flowchar t
The MI L ha s bee n reporte d on .
DT C P145 7 is stored .
D o th e fue l tan k pressur e senso r
tes t (se e pag e 11-132 ).
I s th e fue l tan k pressur e senso r OK ?
Fue l tan k pressur e senso r i s OK .
D o th e EVA P purg e contro l
solenoi d valve .
EVA P purg e contro l solenoi d
valv e test .
Chec k th e EVA P purg e contro l
solenoid valve :1. Disconnec t th e vacuu m hos e
fro m th e EVA P purg e contro l
solenoi d valve , an d connec t a
hos e an d a vacuu m pum p t o
th e EVA P purs e contro l
solenoi d valve .
2 . Connec t th e PC M connecto r
termina l A2 3 t o th e bod y
groun d wit h a jumpe r wire .3. Tur n th e ignitio n switc h O N (II) .
4 . Appl y vacuu m to th e hose .
Dos e th e valv e hol d vacuum ?
Chec k fo r a n ope n i n the wire
(PCS line) :1. Tur n th e ignitio n switc h OFF .
2 . Disconnec t th e EVA P purg e
contro l solenoi d valv e 2 P con -
nector .
3 . Chec k fo r continuit y betwee n
th e EVA P purg e contro l
solenoi d valv e 2 P connecto r ter -
mina l No . 1 an d bod y ground .
I s ther e continuity ?
YES
Chec k fo r a n ope n i n th e wir e
(IG 1 line) :
1. Tur n th e ignitio n switc h O N (II) .2. Measur e voltag e betwee n th e
EVA P bypas s solenoi d valv e 2 P
connecto r termina l No . 2 an d
bod y ground . Replac
e th e fue l tan k pressur e
sensor.
PCM CONNECTO R A (26P )
Wir e sid e o f
femal eterminal s
EVA P purg e contro l solenoi d
valve i s OK . D o th e EVA P bypas ssolenoi d valv e tes t (se e pag e11-193 ).EVA P PURG E CONTRO L SOLENOI DVALVE 2 P CONNECTO R (C127 )
Repair ope n in th e wir e betwee n
th e EVA P purg e contro l solenoi d
valve an d PC M (A23) .
(To pag e 11-193 )
NO
Wir e sid e o ffemal eterminal s
YES
NO
JUMPE RWIRE
YES
NO
ProCarManuals.com
Page 712 of 1954
Description
The automatic transmission is a combination of a 3-element torque converter and a dual-shaft electronically controlled
automatic transmission which provides 4 speeds forward and 1 reverse. The entire unit is positioned in line with the engine.
Torque Converter, Gears and Clutches
The torque converter consists of a pump, turbine and stator, assembled in a single unit. They are connected to the engine
crankshaft so they turn together as a unit as the engine turns. Around the outside of the drive plate is a ring gear which
meshes with the starter pinion when the engine is being started.
The entire torque converter assembly serves as a flywheel while transmitting power to the transmission mainshaft.
The transmission has two parallel shafts: the mainshaft and the countershaft. The mainshaft is in line with the engine
crankshaft. The mainshaft includes the 1st, 4th and 2nd clutches and gears for 4th, 1st, 2nd and reverse (3rd gear is integral
with the mainshaft). The countershaft includes the 3rd, 1st-hold and reverse clutches, and gears for 3rd, 4th, 1st, 2nd,
reverse and park. The secondary drive gear is integrated with the countershaft. The gears on the mainshaft are in constant
mesh with those on the countershaft. When certain combinations of gears in the transmission are engaged by clutches,
power is transmitted from the mainshaft to the countershaft to provide , , , and positions.
Electronic Control
The electronic control system consists of a Powertrain Control Module (PCM), sensors, a A/T clutch pressure control solenoid
and four solenoid valves. Shifting and lock-up are electronically controlled for comfortable driving under all conditions.
The PCM is located below the dashboard, under the front lower panel on the passenger's side.
Hydraulic Control
The lower valve body assembly includes the main valve body, the secondary valve body, the throttle valve body, the
solenoid, the shift solenoid valves and the ATF passage body. They are bolted on the lower part of the transmission hous-
ing. Other valve bodies, the regulator valve body, the ATF pump body and the accumulator body, are bolted to the torque
converter housing.
The main valve body contains the manual valve, the 1-2 shift valve, the 2-3 shift valve, the 3-4 shift valve, the 4-3 kick-down
valve and the main orifice control valve. The secondary valve body contains the 3-4 orifice control valve, the 4-3 shift timing
valve, the line pressure control valve, the modulator valve and the accumulator pistons. The throttle valve body includes
the throttle valve which is bolted onto the secondary valve body. The A/T clutch pressure control solenoid is joined to the
throttle valve body. The regulator valve body contains the regulator valve, the lock-up shift valve and the cooler relief valve.
Fluid from the regulator passes through the manual valve to the various control valves. The ATF pump body contains the
lock-up timing valve, the lock-up control valve and the relief valve. The torque converter check valve is located in the torque
converter housing under the ATF pump body. The accumulator body contains the accumulator pistons. The reverse accu-
mulator and the 1st-hold accumulator pistons are assembled in the rear cover.
The 1st, 1st-hold, 2nd and reverse clutches receive fluid from their respective feed pipes, and the 3rd and 4th clutches
receive fluid from the internal hydraulic circuit.
Shift Control Mechanism
Input from various sensors located throughout the vehicle determines which shift solenoid valve the PCM will activate.
Activating a shift solenoid valve changes modulator pressure, causing a shift valve to move. This pressurizes a line to one
of the clutches, engaging the clutch and its corresponding gear.
Lock-up Mechanism
In position, in 2nd, 3rd, and 4th, and position in 3rd, pressurized fluid is drained from the back of the torque con-
verter through a fluid passage, causing the lock-up piston to be held against the torque converter cover. As this takes
place, the mainshaft rotates at the same speed as the engine crankshaft. Together with hydraulic control, the PCM opti-
mizes the timing of the lock-up mechanism. The lock-up valves control the range of lock-up according to torque converter
clutch (lock-up control) solenoid valves A and B, and throttle valve. When torque converter clutch (lock-up control)
solenoid valves A and B activate, modulator pressure changes. The torque converter clutch (lock-up control) solenoid
valves A and B are mounted on the torque converter housing, and are controlled by the PCM.ProCarManuals.com
Page 728 of 1954
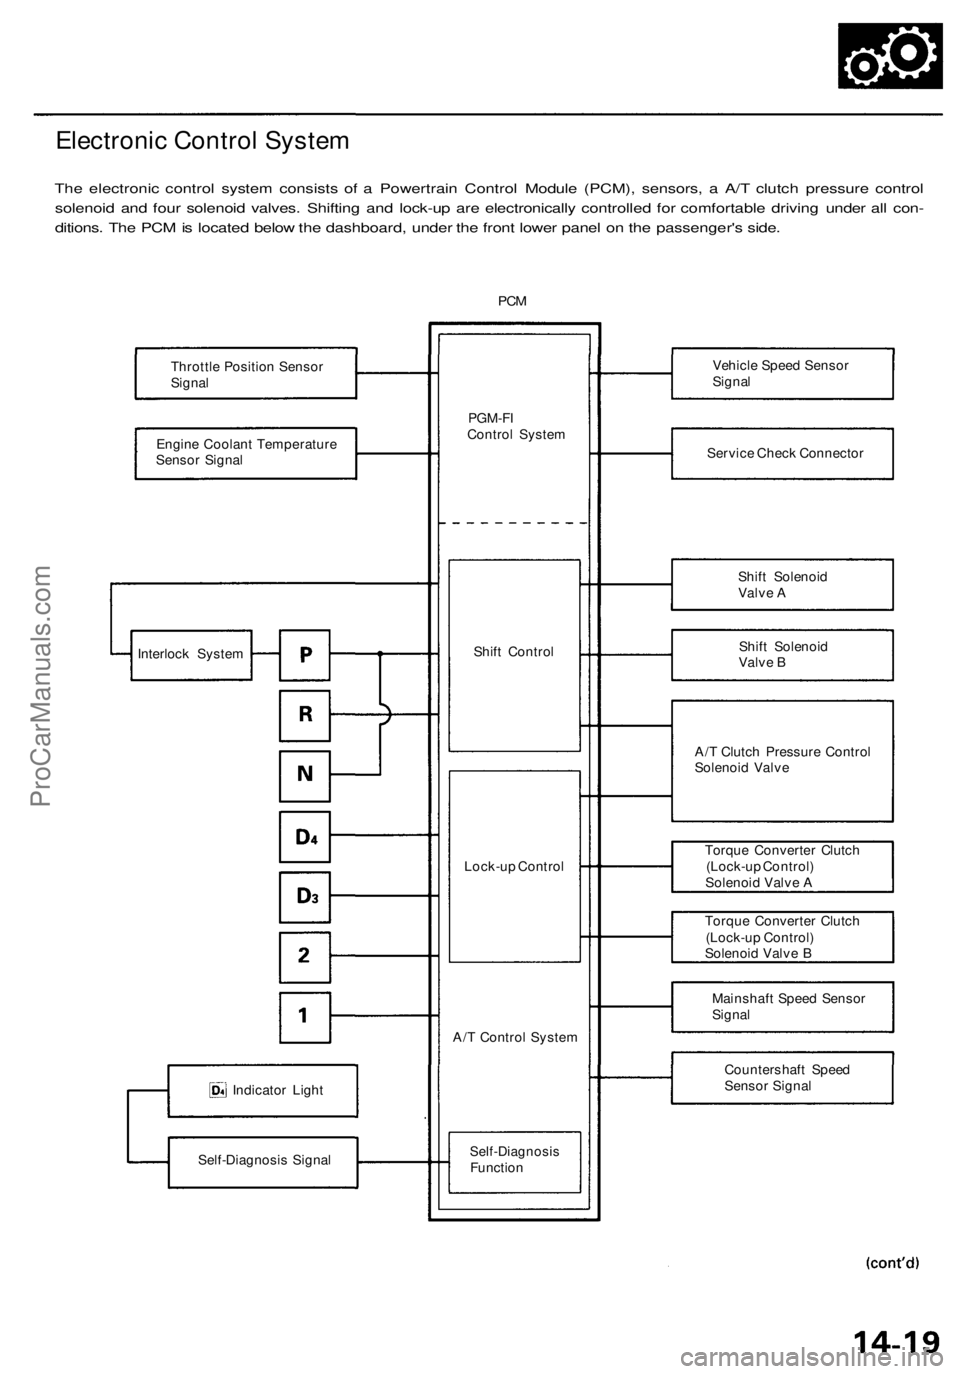
Electronic Control System
The electronic control system consists of a Powertrain Control Module (PCM), sensors, a A/T clutch pressure control
solenoid and four solenoid valves. Shifting and lock-up are electronically controlled for comfortable driving under all con-
ditions. The PCM is located below the dashboard, under the front lower panel on the passenger's side.
PCM
Throttle Position Sensor
Signal
Engine Coolant Temperature
Sensor Signal
Indicator Light
Self-Diagnosis Signal
PGM-FI
Control System
Shift Control
Lock-up Control
A/T Control System
Self-Diagnosis
Function
Vehicle Speed Sensor
Signal
Service Check Connector
Shift Solenoid
Valve A
Shift Solenoid
Valve B
A/T Clutch Pressure Control
Solenoid Valve
Torque Converter Clutch
(Lock-up Control)
Solenoid Valve A
Torque Converter Clutch
(Lock-up Control)
Solenoid Valve B
Mainshaft Speed Sensor
Signal
Countershaft Speed
Sensor Signal
Interlock SystemProCarManuals.com