Acura RLX 2017 Owner's Manual
Manufacturer: ACURA, Model Year: 2017, Model line: RLX, Model: Acura RLX 2017Pages: 557, PDF Size: 37.97 MB
Page 281 of 557

280
uuCustomized Features u
Features
*1:Default SettingSetup
Group Customizable Features Description Selectable Settings
Camera
SettingsMVCS
Guidelines
Fixed
GuidelineSets whether to turn
on the reference line
display.On*1/ Off
Dynamic
GuidelineSets whether to turn on the projection line
display.On*1/Off
Preferences
Automatically
show camera
after reverseSets the rear view to be automatically switched to
the front view when the shift lever is moved out
of
(R.
On*1/ Off
Default
camera mode
in forwardSelects which screen to display when the
surround view camera system is turned on while
the vehicle is moving forward.Front Ground
View*1/Last Used /
Front Blind View /
Side View
Default
camera mode
in reverseSets which screen to display when the surround
view camera system is tu rned on while the vehicle
is reversing.Rear Ground View*1/
Last Used /Rear
View/ Rear Wide
View
Models with
surround view
camera system
(MVCS)
17 ACURA RLX-31TY26300.book 280 ページ 2016年6月17日 金曜日 午前8時12分
Page 282 of 557

281
uuCustomized Features u
Continued
Features
*1:Default SettingSetup
Group Customizable Features Description Selectable Settings
Camera
Settings
MVCS
Preferences
Show camera
when
decelerating
Sets the screen to automatically return to the
camera view at vehicle speeds of 7 mph (12 km/
h) or lower. The screen
can return only when the
display has been switched to the audio/
information screen at the vehicle speed of over 9
mph (15 km/h).
On*1/ Off
Clear parking
guidance
automatically
Turns the parking guide lines on and off.On*1/Off
DisplayAdjusts the screen’s preferences.—
DefaultCancels/Resets all customized items in the
Camera Settings group as default.Default/OK
Cross Traffic MonitorTurns the cross traffic mo nitor feature on and off.On*1/Off
Models with
surround view
camera system
(MVCS)
17 ACURA RLX-31TY26300.book 281 ページ 2016年6月17日 金曜日 午前8時12分
Page 283 of 557

282
uuCustomized Features u
Features
*1:Default SettingSetup
Group Customizable Features Desc
ription Selectable Settings
Audio
SettingsCD/HDD
Recording from CD
Selects whether the songs on music CDs are
automatically recorded to the HDD.
Auto*1/
Manual
Recording Quality Selects the quality of the music files recorded
to the HDD.
Standard
*1/
High
HDD Info Displays the HDD capacity. —
Update Gracenote Album
Info Updates the Gracenote
® Album Info
(Gracenote ® Media Database). Update by USB
*1/
Update by CD
Delete All HDD Data2 Deleting all HDD Data P. 287—
Bluetooth Bluetooth Device List Edits or deletes a
Bluetooth® Audio device
paired to HFL. —
Connect Bluetooth Audio
DeviceConnects, disconnects or pairs a
Bluetooth®
Audio device to HFL. —
CD mode
CD mode
HDD mode
CD or HDD mode
HDD mode
Bluetooth®
Audio, Pandora ®* or
AhaTM mode
Bluetooth® Audio, Pandora ®* or
AhaTM mode
* Not available on all models
17 ACURA RLX-31TY26300.book 282 ページ 2016年6月17日 金曜日 午前8時12分
Page 284 of 557

283
uuCustomized Features u
Continued
Features
*1:Default SettingSetup
Group Customizable Features Description Selectable Settings
Audio
SettingsOther
Source Select Popup
Selects whether the list of selectable audio
sources comes on when the
AUDIO button is
pressed. On
/Off*1
HD Radio Mode*
Selects whether the audio system automatically
switches to the digital radio waves or receives the
analogue waves only. Auto*1/
Analog
Cover Art Turns on and off the cover art display.
On
*1/Off
Default Cancels/Resets all customized items in the
Audio
Settings group as default. Default/
OK
Phone
SettingsPhone
Connect phone
Pairs a new phone to HFL, connects or
disconnects a paired phone.
2Phone Setup P. 296
—
Bluetooth Device List
Pairs a new phone to HFL, edits or deletes a
paired phone, or creates a security PIN.
2Phone Setup P. 296
—
Edit Speed DialEdits, adds or deletes a speed dial entry.
2Phone Setup P. 296—
AM/FM mode
CD (MP3/WMA/AAC), iPod, USB,
Pandora®* or AhaTM mode
* Not available on all models
17 ACURA RLX-31TY26300.book 283 ページ 2016年6月17日 金曜日 午前8時12分
Page 285 of 557

284
uuCustomized Features u
Features
*1:Default SettingSetup
Group Customizable Features Descri
ption Selectable Settings
Phone
Settings
Phone
Auto TransferSets calls to automatically transfer from your
phone to HFL when you enter the vehicle.On*1/Off
Auto AnswerSets whether to automatically answer an
incoming call after about four seconds.On /Off*1
Ring ToneSelects the ring tone.Fixed /Mobile
Phone*1/ Off
Automatic Phone SyncSets a phonebook data to be automatically
imported when a phone is paired to HFL.On*1/Off
Use Contact PhotoDisplays a caller’s picture on an incoming call
screen.On*1/Off
Text/
Email
Enable Text/EmailTurns the text/e-mail me ssage function on and
off.On*1/ Off
Select AccountSelects a text/e-mail message account.—
New Text/Email Alert
Selects whether a pop-up alert comes on the
screen when HFL receiv es a new text/e-mail
message.
On /Off*1
DefaultCancels/Resets all customized items in the Phone
Settings group as default.Default/OK
17 ACURA RLX-31TY26300.book 284 ページ 2016年6月17日 金曜日 午前8時12分
Page 286 of 557

285
uuCustomized Features u
Features
*1:Default SettingSetup
Group Customizable Features Description Selectable Settings
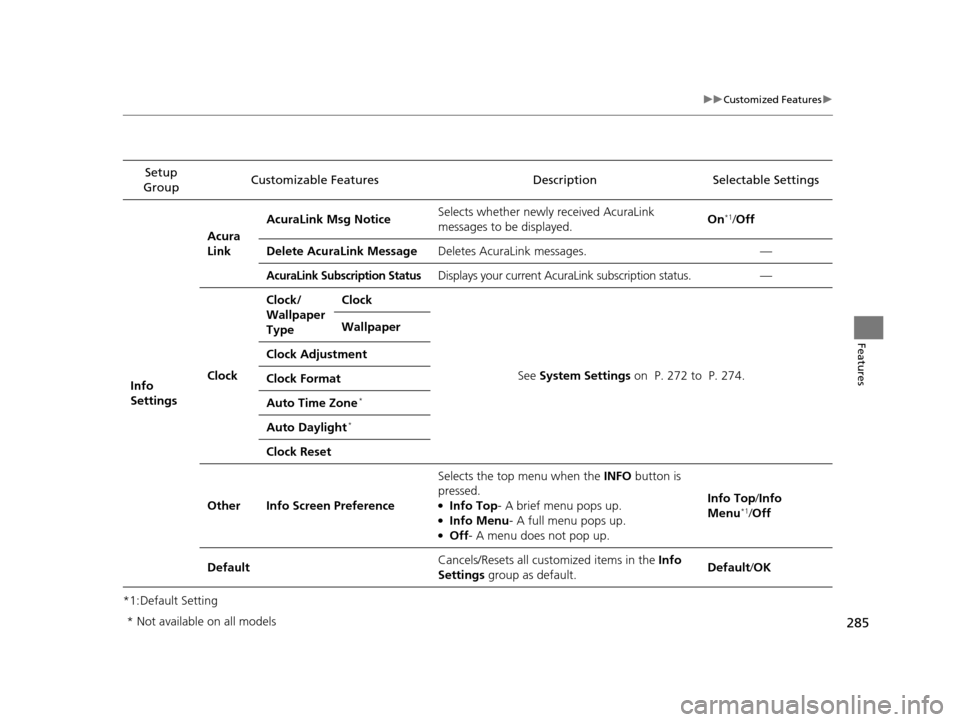
Info
Settings Acura
Link
AcuraLink Msg Notice
Selects whether newly received AcuraLink
messages to be displayed. On
*1/
Off
Delete AcuraLink Message Deletes AcuraLink messages. —
AcuraLink Subscription StatusDisplays your current AcuraLink subscription status. —
Clock Clock/
Wallpaper
Type
Clock
See System Settings on P. 272 to P. 274.
Wallpaper
Clock Adjustment
Clock Format
Auto Time Zone
*
Auto Daylight*
Clock Reset
Other Info Screen Preference Selects the top menu when the
INFO button is
pressed.
●Info Top- A brief menu pops up.●Info Menu - A full menu pops up.●Off- A menu does not pop up. Info Top/
Info
Menu
*1/ Off
Default Cancels/Resets all customized items in the
Info
Settings group as default. Default/
OK
* Not available on all models
17 ACURA RLX-31TY26300.book 285 ページ 2016年6月17日 金曜日 午前8時12分
Page 287 of 557

286
uuCustomized Features uDefaulting All the Settings
Features
Defaulting All the Settings
You can reset all the menu and customiz ed settings as the factory defaults.
1. Press the SETTINGS button.
2. Rotate to select System Settings, then
press .
3. Move or to select the Others tab.
4. Rotate to select Factory Data Reset ,
then press .
u The pop-up menu appears on the screen.
5. Rotate to select Yes, then press .
u The confirmation message will appear.
6. Rotate to select Yes, then press
again to reset the settings.
u The confirmation message will appear.
Press to select OK.1Defaulting All the Settings
When you transfer the vehicle to a third party, reset
all settings to default a nd delete all personal data.
The following settin gs will be reset:
•Routing & Guidance: Rerout ing, Unverified Area
Routing, Traffic Re routing, Edit Waypoint Search
Area, Guidance Mode, Street Name Guidance
•Route Preference
•Audio preset settings
•Phonebook entries•Other display and each item settings.
17 ACURA RLX-31TY26300.book 286 ページ 2016年6月17日 金曜日 午前8時12分
Page 288 of 557

287
uuCustomized Features uDeleting all HDD Data
Features
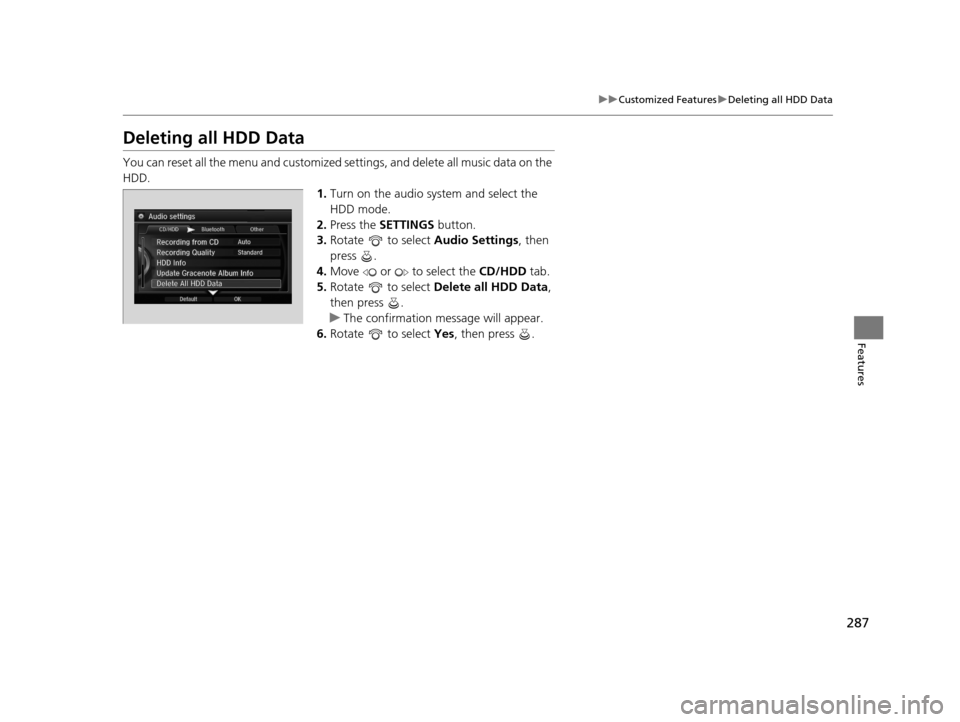
Deleting all HDD Data
You can reset all the menu and customized se ttings, and delete all music data on the
HDD. 1.Turn on the audio system and select the
HDD mode.
2. Press the SETTINGS button.
3. Rotate to select Audio Settings, then
press .
4. Move or to select the CD/HDD tab.
5. Rotate to select Delete all HDD Data ,
then press .
u The confirmation message will appear.
6. Rotate to select Yes, then press .
17 ACURA RLX-31TY26300.book 287 ページ 2016年6月17日 金曜日 午前8時12分
Page 289 of 557

288
Features
HomeLink® Universal Transceiver
The HomeLink ® Universal Transceiver can be pr ogrammed to operate up to three
remote controlled devices around your home, such as garage doors, lighting, or
home security systems.
Refer to the safety information that came wi th your garage door opener to test that
the safety features are functioning properly. If you do not have the safety
information, contact the manufacturer.
Before programming HomeLink, make sure that people and objects are out of the
way of the garage or gate to prevent potential injury or damage.
When programming a garage door opener, park just outside the garage door’s
path.
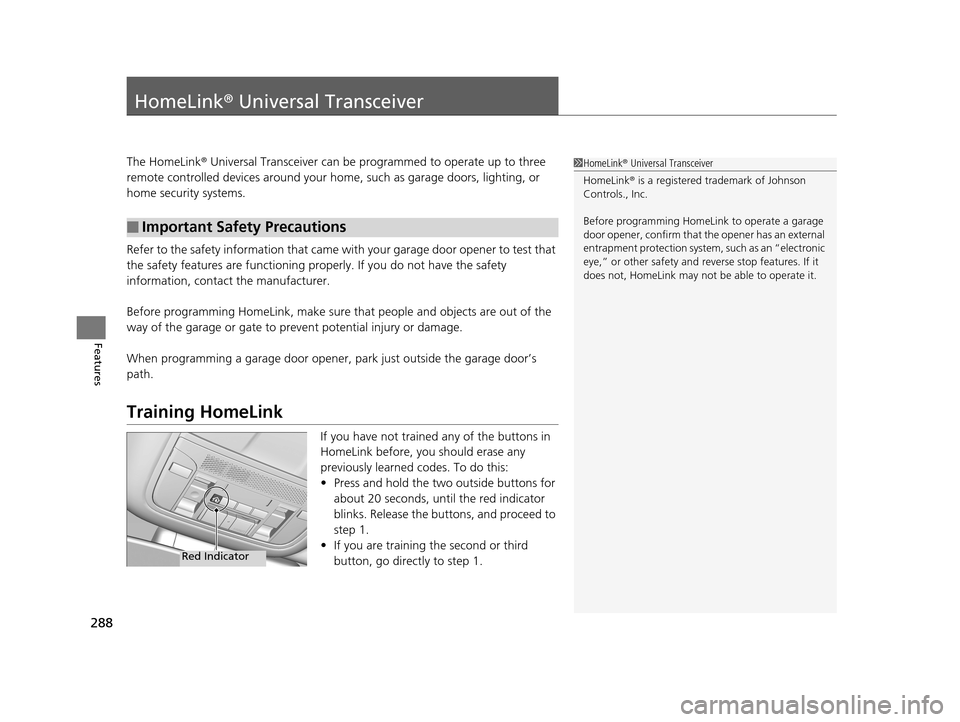
Training HomeLink
If you have not trained any of the buttons in
HomeLink before, you should erase any
previously learned codes. To do this:
• Press and hold the two outside buttons for
about 20 seconds, until the red indicator
blinks. Release the bu ttons, and proceed to
step 1.
• If you are training the second or third
button, go directly to step 1.
■Important Safety Precautions
1HomeLink ® Universal Transceiver
HomeLink® is a registered tra demark of Johnson
Controls., Inc.
Before programming HomeLi nk to operate a garage
door opener, confirm that the opener has an external
entrapment protection system, such as an “electronic
eye,” or other safety and reverse stop features. If it
does not, HomeLink may not be able to operate it.
Red Indicator
17 ACURA RLX-31TY26300.book 288 ページ 2016年6月17日 金曜日 午前8時12分
Page 290 of 557

289
uuHomeLink ® Universal Transceiver uTraining HomeLink
Features
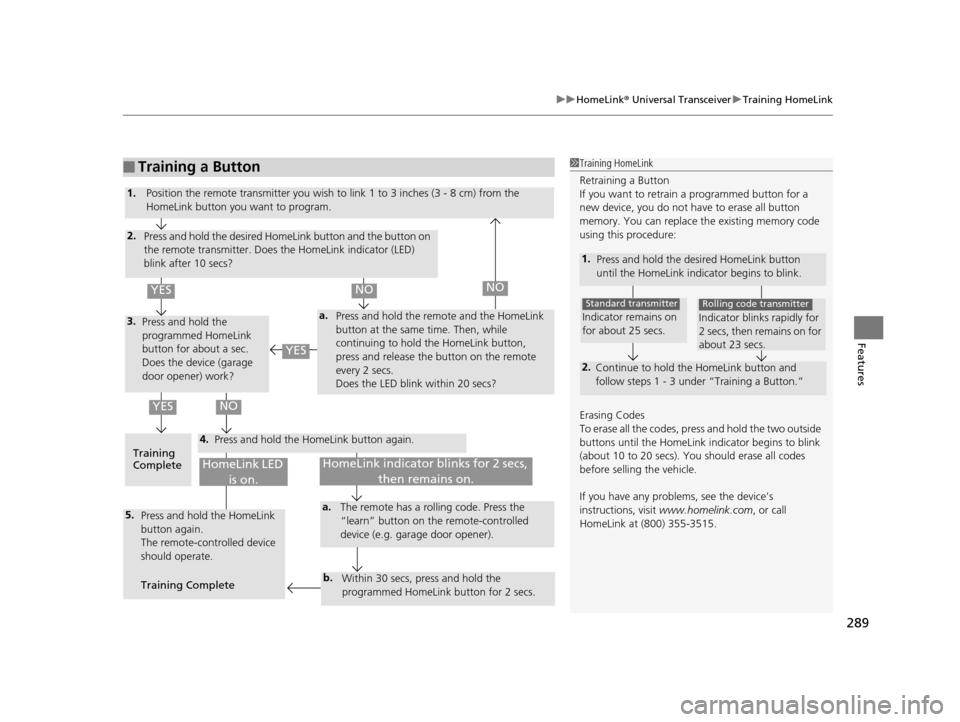
■Training a Button1Training HomeLink
Retraining a Button
If you want to retrain a programmed button for a
new device, you do not ha ve to erase all button
memory. You can replace the existing memory code
using this procedure:
1. Press and hold the desired HomeLink button
until the HomeLink indi cator begins to blink.
2.
Continue to hold the HomeLink button and
follow steps 1 - 3 unde r “Training a Button.”
Indicator remains on
for about 25 secs.
Standard transmitter
Indicator blinks rapidly for
2 secs, then remains on for
about 23 secs.
Rolling code transmitter
Erasing Codes
To erase all the codes, press and hold the two outside
buttons until the HomeLink i ndicator begins to blink
(about 10 to 20 secs). You should erase all codes
before selling the vehicle.
If you have any problems, see the device’s
instructions, visit www.homelink.com , or call
HomeLink at (800) 355-3515.
4.
a.3.
2.
5.a.
b.
1. Position the remote transmitter you wish to link 1 to 3 inches (3 - 8 cm) from the
HomeLink button you want to program.
Press and hold the desired HomeLink button and the button on
the remote transmitter. Does the HomeLink indicator (LED)
blink after 10 secs?
Press and hold the
programmed HomeLink
button for about a sec.
Does the device (garage
door opener) work? Press and hold the remote and the HomeLink
button at the same time. Then, while
continuing to hold the HomeLink button,
press and release the button on the remote
every 2 secs.
Does the LED blink within 20 secs?
Training
Complete Press and hold the HomeLink button again.
Press and hold the HomeLink
button again.
The remote-controlled device
should operate.
Training Complete The remote has a ro
lling code. Press the
“learn” button on the remote-controlled
device (e.g. garage door opener).
Within 30 secs, press and hold the
programmed HomeLink button for 2 secs.
HomeLink indicator blinks for 2 secs, then remains on.HomeLink LED is on.
YESNO
YES
YESNONO
17 ACURA RLX-31TY26300.book 289 ページ 2016年6月17日 金曜日 午前8時12分