Tail lights Acura TL 2000 3.2 Owner's Manual
[x] Cancel search | Manufacturer: ACURA, Model Year: 2000, Model line: TL, Model: Acura TL 2000Pages: 311, PDF Size: 3.05 MB
Page 66 of 311
Controls Near the Steering Wheel
Headlights
The rotating switch on the left lever controls the lights. Turning thisswitch to the " " position turns
on the parking lights, taillights,
instrument panel lights, side-marker
lights, and rear license plate lights.
Turning the switch to the" I " position turns on the headlights. If you leave the lights on with the
ignition switch in ACCESSORY (I) or LOCK (0), you will hear a
reminder chime when you open the driver's door.
To change between low beams and high beams, pull the turn signal lever
until you hear a click, then let go.
The blue high beam indicator will light (see page 56). To flash the high beams, pull the
turn signal lever back lightly, thenrelease it. The high beams will comeon and go off.
The high beams will stay on for as long as you hold the lever back, nomatter what position the headlightswitch is in.
Instruments and Controls
Page 67 of 311
Controls Near the Steering Wheel
Automatic Lighting Off Feature
The Automatic Lighting Off featureturns off the headlights, parking
lights, taillights, side marker lights,
license plate lights and instrument panel lights within 15 seconds ofremoving the key from the ignition switch and closing the driver's door.
This feature activates if you leave the headlight switch in the " "or " " position, remove the key,,
open, then close the driver's door
If you remove the key from the
ignition switch with the headlight switch on, but do not open the door
and get out, the lights will turn off
after ten minutes.
The lights will turn on again when you unlock or open the driver's door.If you unlock the door, but do notopen it within 15 seconds, the lights
will go off. With the driver's door open, you will hear a lights-on
reminder chime. Daytime Running Lights
(Canadian Models)
With the headlight switch off, the high beam headlights come on with
reduced brightness when you turn
the ignition switch to ON (II) and
release the parking brake. They
remain on until you turn the ignition off, even if you set the parking brake.
The headlights revert to normal operation when you turn them on
with the switch. Instrument Panel Brightness
The dial on the instrument panel controls the brightness of the
instrument panel lights. Turn the dial
to adjust the brightness.
Instruments and Controls
Page 81 of 311

Keys and Locks
Remote Transmitter
LEDBUTTON
TRUNK
RELEASE
BUTTON
UNLOCK
BUTTON
You can lock and unlock your car
with the remote transmitter. When
you push the LOCK button, all doors lock. The parking lights, side marker
lights, and taillights flash once. When you push the UNLOCK button
once, only the driver's door unlocks.
The remaining doors unlock when you push the button a second time.
The parking lights, side marker lights, and taillights flash twice. The ceiling light (if the ceiling light
switch is in the center position) will
come on when you press the
UNLOCK button. If you do not open any door, the light stays on for about10 seconds, then fades out. If you
relock the doors with the remote
transmitter before 10 seconds have
elapsed, the light will go off
immediately.
Instruments and Controls
PANIC
BUTTON LOCK
Page 146 of 311

Security System
The security system helps to protectyour vehicle and valuables from theft.
The horn sounds and a combination of headlights, parking lights, side
marker lights and taillights flashes if someone attempts to break into your
vehicle or remove the radio. This alarm continues for two minutes,
then the system resets. To reset an alarming system before the two
minutes have elapsed, unlock either
front door with the key or the remote transmitter.
The security system sets auto- matically fifteen seconds after you
lock the doors, hood, and trunk. For
the system to activate, you must lock
the doors from the outside with the
key, lock tab, door lock switch, or
remote transmitter. The securitysystem light next to the driver's door
lock starts blinking immediately to show you the system is setting itself.SECURITY SYSTEM LIGHT
Once the security system is set,
opening any door (without using the
key or the remote transmitter), or the hood, will cause it to alarm. Italso alarms if the radio is removed
from the dashboard or the wiring is cut. With the system set, you can still
open the trunk with the remote
transmitter without triggering the alarm. The alarm will sound if the
trunk is opened with the trunk
release handle.
The security system will not set if the hood, trunk, or any door is not
fully closed. If the system will not set,check the Door Monitor on the
instrument panel (see page 56), to see if the doors and trunk are fully
closed. Since it is not part of the
monitor display, manually check the
hood.
Do not attempt to alter this system or add other devices to it.
Comfort and Convenience Features
Page 186 of 311
Towing a Trailer
Trailer Brakes
Honda recommends that any trailer
having a total weight of 1,000 lbs (450 kg) or more be equipped with
its own electric or surge-type brakes.
If you choose electric brakes, be sure they are electronically actuated.
Do not attempt to tap into your
vehicle's hydraulic system. No matter how successful it may seem,any attempt to attach trailer brakes
to your vehicle's hydraulic system
will lower braking effectiveness and create a potential hazard. Trailer Lights
GROUND
(BLACK)
BACK-UP LIGHT
(GREEN/BLACK)
RIGHT TURN SIGNAL
(GREEN/YELLOW) BRAKE LIGHT
(WHITE/BLACK) LEFT TURN SIGNAL
(GREEN/BLUE)
TAILLIGHT (RED/BLACK)
Your car has a trailer lighting
connector located behind the left
side panel in the trunk. Refer to the
drawing above for the wiring color
code and purpose of each pin.
If you use a converter, you can get
the connector and pins that mate
with the connector in your car from
your Acura dealer. Since lighting and wiring vary with
trailer type and brand, you should
also have a qualified technician
install a suitable connector between
the vehicle and the trailer.
CONTINUED
Driving
Page 202 of 311
Owner Maintenance Checks
You should check the followingitems at the specified intervals. If
you are unsure of how to perform any check, turn to the page given. • Engine oil level — Check every
time you fill the fuel tank. See
page 150.
• Engine coolant level — Check the radiator reserve tank every time
you fill the fuel tank. See page 151.
• Windshield washer fluid — Check the level in the reservoir monthly.If weather conditions cause you to
use the washers frequently, check
the reservoir each time you stop
for fuel. See page 212 .
• Automatic transmission — Check the fluid level monthly. See page213.
• Brakes — Check the fluid level monthly. See page 214 . • Tires — Check the tire pressure
monthly. Examine the tread for
wear and foreign objects. See page
229.
• Lights — Check the operation of the headlights, parking lights,
taillights, high-mount brake light,
turn signals, brake lights, and
license plate lights monthly. See
page 234.
Maintenance
Page 238 of 311
Lights
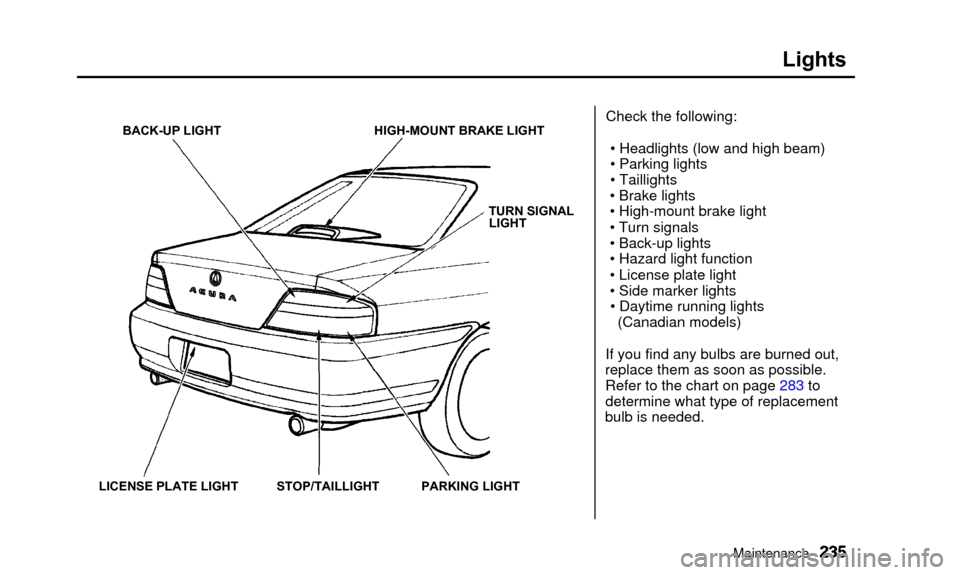
BACK-UP LIGHT HIGH-MOUNT BRAKE LIGHTTURN SIGNALLIGHT
LICENSE PLATE LIGHT STOP/TAILLIGHT PARKING LIGHTCheck the following: • Headlights (low and high beam)
• Parking lights
• Taillights
• Brake lights
• High-mount brake light
• Turn signals
• Back-up lights
• Hazard light function
• License plate light
• Side marker lights • Daytime running lights (Canadian models)
If you find any bulbs are burned out,
replace them as soon as possible. Refer to the chart on page 283 to
determine what type of replacement
bulb is needed.
Maintenance
Page 242 of 311

Lights
2. Determine which of the four bulbsis burned out: stop/taillight or turn
signal light, back-up light
3. Remove the socket by turning it one-quarter turn counterclockwise. 4. Pull the bulb straight out of its
socket
Push the new bulb straight into
the socket until it bottoms.
5. Reinstall the socket into the light assembly by turning it clockwise
until it locks.
6. Test the lights to make sure the new bulb is working.
7. Reinstall the trunk lining. Make sure it is installed under the edge
of the trunk seal 8. Put the fastener in the hole on the
side of the trunk lining and push
on the center until it locks (the
center is flush with the head).
9. Screw the cargo net mounting button back into the hole.
Maintenance
Page 286 of 311
Specifications
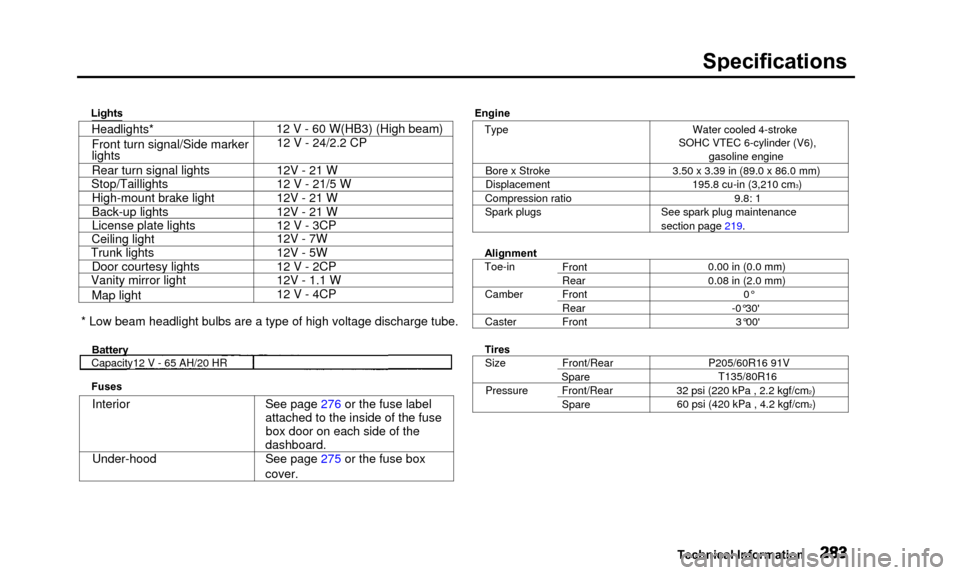
Lights
TypeBore x Stroke
Displacement
Compression ratio
Spark plugs
Alignment
Toe-in Camber
Caster
Tires Size
Pressure Front
Rear
Front
Rear
Front
Front/Rear
Spare Front/Rear
Spare Water cooled 4-stroke
SOHC VTEC 6-cylinder (V6), gasoline engine
3.50 x 3.39 in (89.0 x 86.0 mm) 195.8 cu-in (3,210 cm
3)
9.8: 1
See spark plug maintenance
section page 219.
0.00 in (0.0 mm)
0.08 in (2.0 mm)0°
-0°30' 3°00'
P205/60R16 91V T135/80R16
32 psi (220 kPa , 2.2 kgf/cm
2)
60 psi (420 kPa , 4.2 kgf/cm2)
Technical Information
Headlights* Front turn signal/Side marker
lights
Rear turn signal lights
Stop/Taillights
High-mount brake light
Back-up lights
License plate lights
Ceiling light
Trunk lights
Door courtesy lights
Vanity mirror light
Map light 12 V - 60 W(HB3) (High beam)
12 V - 24/2.2 CP
12V - 21 W
12 V - 21/5 W
12V - 21 W
12V - 21 W
12 V - 3CP
12V - 7W
12V - 5W
12 V - 2CP
12V - 1.1 W
12 V - 4CP
* Low beam headlight bulbs are a type of high voltage discharge tube.
Battery
Fuses
Interior
Under-hood See page 276 or the fuse label
attached to the inside of the fuse
box door on each side of the
dashboard.
See page 275 or the fuse box
cover.
Capacity12 V - 65 AH/20 HR
Engine
Page 309 of 311
Index
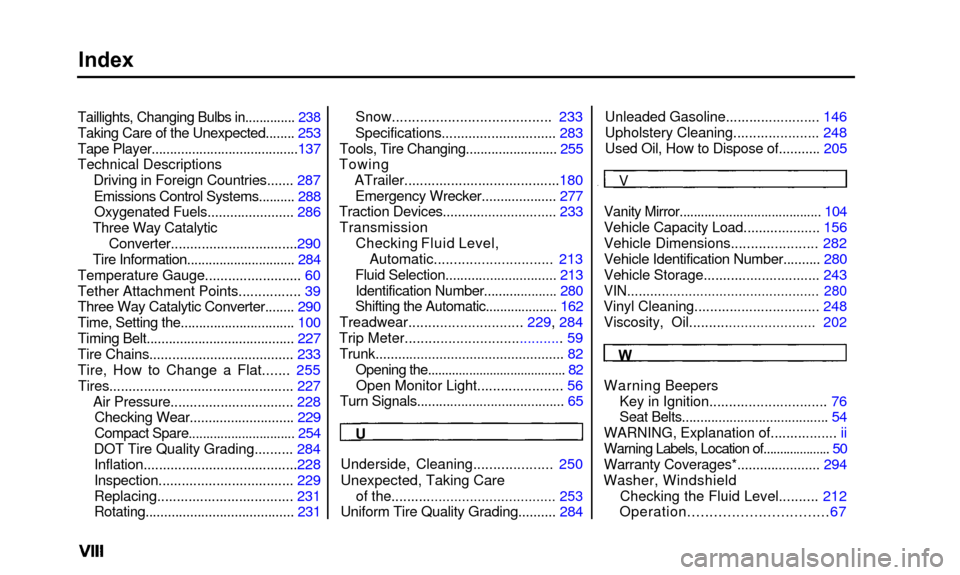
Taillights, Changing Bulbs in.............. 238
Taking Care of the Unexpected........ 253
Tape Player........................................137
Technical Descriptions
Driving in Foreign Countries....... 287
Emissions Control Systems.......... 288
Oxygenated Fuels....................... 286
Three Way Catalytic
Converter.................................290
Tire Information.............................. 284
Temperature Gauge......................... 60
Tether Attachment Points................ 39
Three Way Catalytic Converter........ 290
Time, Setting the............................... 100
Timing Belt........................................ 227
Tire Chains...................................... 233
Tire, How to Change a Flat....... 255
Tires................................................ 227
Air Pressure................................ 228
Checking Wear............................ 229
Compact Spare.............................. 254
DOT Tire Quality Grading.......... 284
Inflation........................................228
Inspection................................... 229
Replacing................................... 231
Rotating........................................ 231
Snow........................................ 233
Specifications.............................. 283
Tools, Tire Changing......................... 255
Towing
ATrailer........................................180
Emergency Wrecker.................... 277
Traction Devices.......... .................... 233
Transmission Checking Fluid Level,
Automatic.............................. 213
Fluid Selection.......... .................... 213
Identification Number.................... 280
Shifting the Automatic.................... 162
Treadwear............................. 229, 284
Trip Meter....................................... . 59
Trunk......... ........................................ . 82
Opening the......... .............................. . 82
Open Monitor Light...................... 56
Turn Signals....................................... . 65Unleaded Gasoline..........
.............. 146
Upholstery Cleaning...................... 248
Used Oil, How to Dispose of.......... . 205
U
Underside, Cleaning.......... .......... 250
Unexpected, Taking Care
of the.......................................... 253
Uniform Tire Quality Grading.......... 284
V
Vanity Mirror........................................ 104
Vehicle Capacity Load.......... .......... 156
Vehicle Dimensions...................... 282
Vehicle Identification Number.......... 280
Vehicle Storage.............................. 243
VIN.................................................. 280
Vinyl Cleaning................................ 248
Viscosity, Oil................................ 202
W
Warning Beepers Key in Ignition......... ..................... 76
Seat Belts......... .............................. . 54
WARNING, Explanation of......... ........ ii
Warning Labels, Location of......... ........... 50
Warranty Coverages*.......... ............ 294
Washer, Windshield Checking the Fluid Level.......... 212
Operation................................67