display Acura ZDX 2012 Owner's Manual
[x] Cancel search | Manufacturer: ACURA, Model Year: 2012, Model line: ZDX, Model: Acura ZDX 2012Pages: 645, PDF Size: 16.36 MB
Page 211 of 645
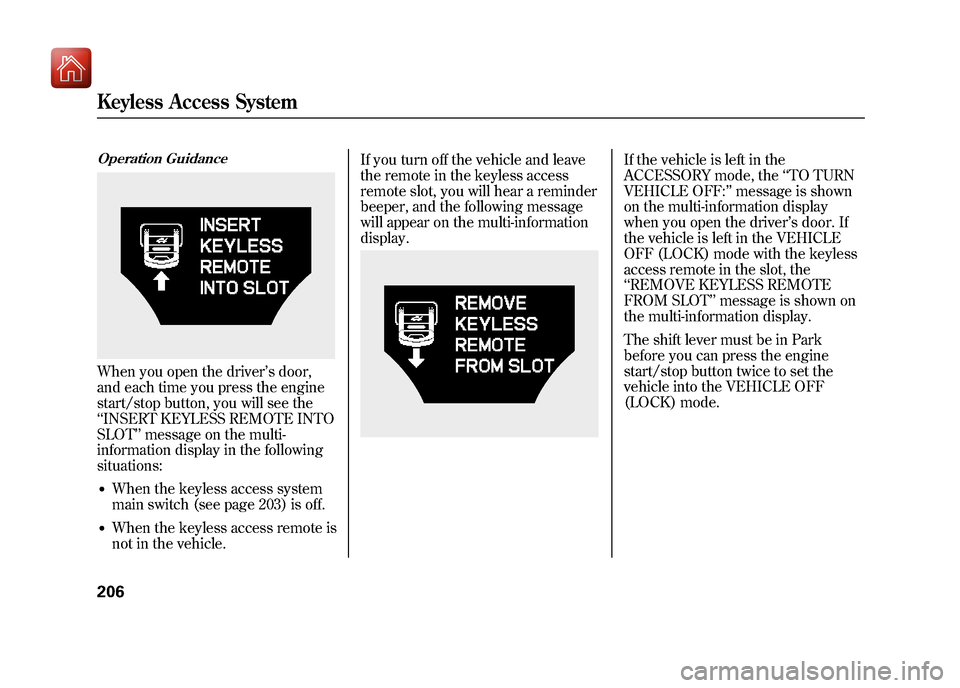
Operation GuidanceWhen you open the driver’s door,
and each time you press the engine
start/stop button, you will see the
‘‘ INSERT KEYLESS REMOTE INTO
SLOT’’ message on the multi-
information display in the following
situations:●When the keyless access system
main switch (see page 203) is off.●When the keyless access remote is
not in the vehicle. If you turn off the vehicle and leave
the remote in the keyless access
remote slot, you will hear a reminder
beeper, and the following message
will appear on the multi-information
display.
If the vehicle is left in the
ACCESSORY mode, the
‘‘TO TURN
VEHICLE OFF: ’’message is shown
on the multi-information display
when you open the driver’ s door. If
the vehicle is left in the VEHICLE
OFF (LOCK) mode with the keyless
access remote in the slot, the
‘‘ REMOVE KEYLESS REMOTE
FROM SLOT’’ message is shown on
the multi-information display.
The shift lever must be in Park
before you can press the engine
start/stop button twice to set the
vehicle into the VEHICLE OFF
(LOCK) mode.
Keyless Access System20609/10/28 17:15:37 10 ACURA ZDX KA KC New North America Own 50 31SZN600 enu
Page 224 of 645
The climate control system in your
vehicle provides a comfortable driving
environment in all weather conditions.
The standard audio system has many
features. This section describes those
features and how to use them.
Your vehicle has an anti-theft audio
system that requires a code number to
enable it.
Climate Control System
..................
220
Audio System
................................
228
Audio System (Models without Navigation System)
....................
229
Playing the AM/FM Radio (Models
without navigation system)
..........
230
Playing the XM
®Radio (Models
without navigation system)
..........
238
Playing Discs (Models without navigation system)
.....................
244
Disc Changer Error Message (Models without navigationsystem)
.................................
254 Playing an iPod
®(Models without
navigation system)
.....................
255
iPod
®Error Messages (Models
without navigation system)
..........
263
Playing a USB Flash Memory Device
(Models without navigationsystem)
.................................
264
USB Flash Memory Device Error
Messages (Models withoutnavigation system)
.................
271
Bluetooth
®Audio System (Models
without navigation system)
..........
272
Audio System (Models with navigation system)
.....................
277
Playing the AM/FM Radio (Models with navigation system)
..............
278
Playing the XM
®Radio (Models with
navigation system)
.....................
291
Playing a Disc (Models with navigation system)
.....................
300
Disc Player Error Messages (Models with navigation system)
..............
311
Playing Hard Disc Drive (HDD)
Audio (Models with navigationsystem)
.................................
312
Playing an iPod
®(Models with
navigation system)
.....................
340 iPod
®Error Messages (Models with
navigation system)
.....................
348
Playing a USB Flash Memory Device (Models with navigationsystem)
.................................
349
USB Flash Memory Device Error Messages (Models with navigationsystem)
.................................
359
Bluetooth
®Audio System (Models
with navigation system)
..............
360
Protecting Your Discs
.....................
365
FM/AM Radio Reception
................
369
Auxiliary Input Jack
........................
371
Remote Audio Controls
...................
371
Radio Theft Protection
....................
374
Setting the Clock
...........................
375
Security System
.............................
378
Cruise Control
...............................
379
Adaptive Cruise Control (ACC)
........
382
HomeLink
®Universal Transceiver
....
396
Bluetooth
®HandsFreeLink
®(Models
without navigation system)..........
399
Bluetooth
®HandsFreeLink
®(Models
with navigation system)..............
416
AcuraLink
®(U.S. models only)
.........
435
Rearview Mirror with Rearview
Camera Display
.........................
451
Features
219
Features
09/10/28 17:15:37 10 ACURA ZDX KA KC New North America Own 50 31SZN600 enu
Page 225 of 645
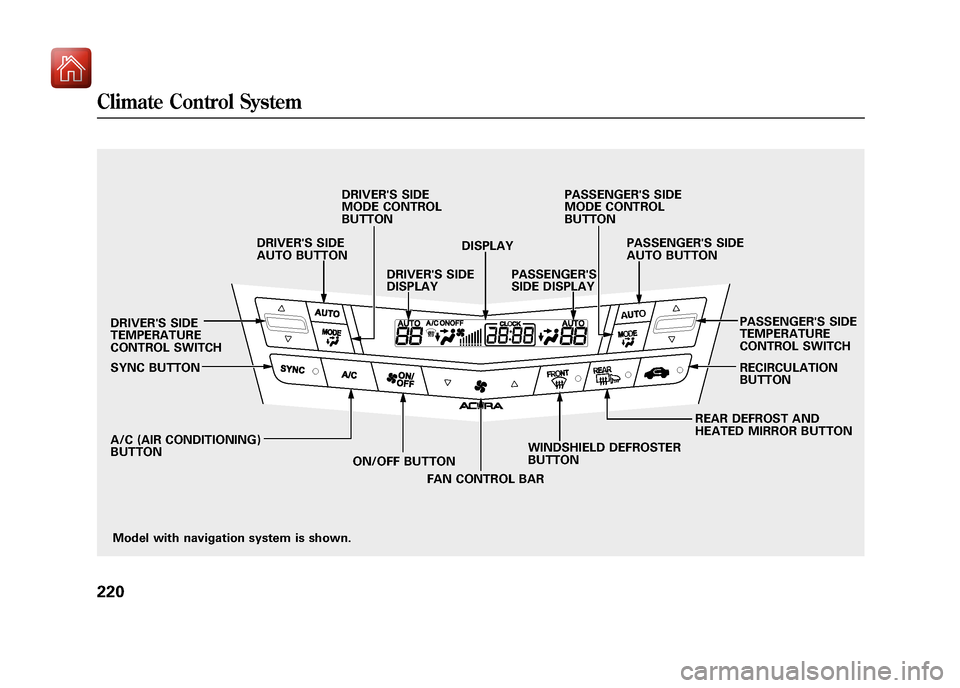
Model with navigation system is shown.
DRIVER'S SIDE
TEMPERATURE
CONTROL SWITCH
SYNC BUTTON
A/C (AIR CONDITIONING)
BUTTON
ON/OFF BUTTON
FAN CONTROL BAR WINDSHIELD DEFROSTER
BUTTON REAR DEFROST AND
HEATED MIRROR BUTTONRECIRCULATION
BUTTON PASSENGER'S SIDE
TEMPERATURE
CONTROL SWITCH
DRIVER'S SIDE
AUTO BUTTON
DRIVER'S SIDE
MODE CONTROL
BUTTON
DRIVER'S SIDE
DISPLAY DISPLAY
PASSENGER'S
SIDE DISPLAY PASSENGER'S SIDE
AUTO BUTTON
PASSENGER'S SIDE
MODE CONTROL
BUTTON
Climate Control System22009/10/28 17:15:37 10 ACURA ZDX KA KC New North America Own 50 31SZN600 enu
Page 226 of 645
Personalization Setting
When you unlock the doors with
your remote transmitter (keyless
access remote on models with
navigation system), the driver’sID
(Driver 1 or Driver 2) is detected,
and the climate control settings are
turned to the respective mode
automatically with the ignition switch
in the ON (II) position, or the power
mode ON.
Voice Control SystemOn models with navigation systemThe climate control system can also
be operated by voice control. See the
navigation system manual for
complete details. Using Automatic Climate Control
The automatic climate control system
in your vehicle maintains the interior
temperature you select. The system
also adjusts the fan speed and airflow
levels.
1. Press the driver’
s or passenger’s
AUTO button. You will see AUTO
and the selected temperature on
the appropriate side of the display.
2. Set the desired temperature with the temperature control switch.
You can set the driver’ s side
temperature and the passenger ’s
side temperature separately.
The system automatically selects the
proper mix of conditioned and/or
heated air that will, as quickly as
possible, raise or lower the interior
temperature to your preference. The
system also dehumidifies the
interior.
Temperature ControlThe driver ’s side temperature and
the passenger ’s side temperature can
be set separately. Push up the switch
of the appropriate temperature
control to increase the temperature
of airflow. Push down the switch to
decrease it. Each set temperature is
shown in the display.
CONTINUED
Climate Control System
221
Features
09/10/28 17:15:37 10 ACURA ZDX KA KC New North America Own 50 31SZN600 enu
Page 228 of 645
ON/OFF ButtonEach time you press this button, the
climate control system switches
between on and off. Turning on the
system with this button selects your
last climate control selection.To Turn Everything Off
To turn the system completely off,
press the ON/OFF button.
●Keep the system completely off for
short periods only.●To keep stale air and mustiness
from collecting, you should have
the fan running at all times.
Semi-automatic Operation
You can manually select various
functions of the climate control
system when it is in fully automatic
mode. All other features remain
automatically controlled. Making any
manual selection causes the word
AUTO in the display to go out.
Fan Control
Press the
▲ side of the bar to
increase the fan speed and airflow.
Press the▼ side of the bar to
decrease it.
Air Conditioning (A/C) ButtonThis button turns the air
conditioning on and off. You will see
A/C ON or A/C OFF in the display.
When you turn the A/C off, the
system cannot regulate the inside
temperature if you set the
temperature control below the
outside temperature.
CONTINUED
Climate Control System
223
Features
09/10/28 17:15:37 10 ACURA ZDX KA KC New North America Own 50 31SZN600 enu
Page 231 of 645
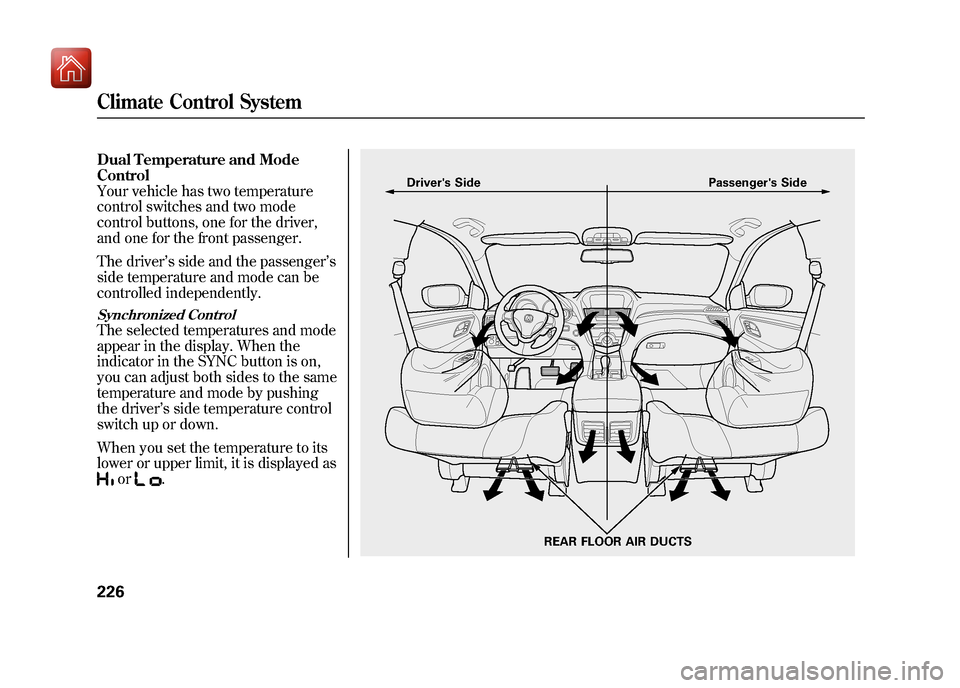
Dual Temperature and Mode
Control
Your vehicle has two temperature
control switches and two mode
control buttons, one for the driver,
and one for the front passenger.
The driver’s side and the passenger ’s
side temperature and mode can be
controlled independently.Synchronized ControlThe selected temperatures and mode
appear in the display. When the
indicator in the SYNC button is on,
you can adjust both sides to the same
temperature and mode by pushing
the driver’ s side temperature control
switch up or down.
When you set the temperature to its
lower or upper limit, it is displayed as
or
.
Driver's Side Passenger's Side
REAR FLOOR AIR DUCTS
Climate Control System22609/10/28 17:15:37 10 ACURA ZDX KA KC New North America Own 50 31SZN600 enu
Page 234 of 645
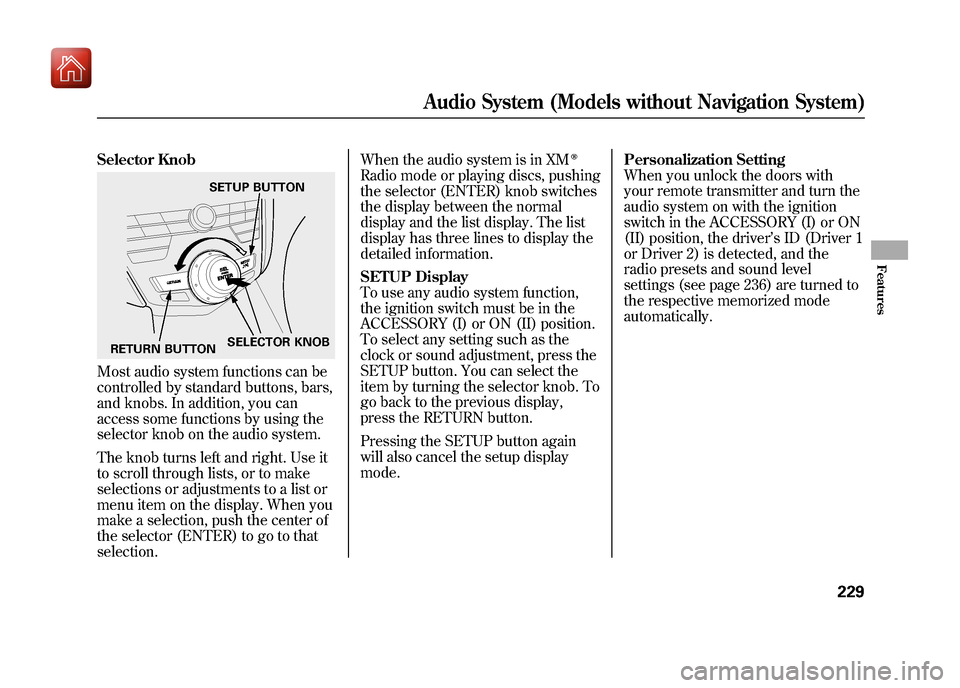
Selector KnobMost audio system functions can be
controlled by standard buttons, bars,
and knobs. In addition, you can
access some functions by using the
selector knob on the audio system.
The knob turns left and right. Use it
to scroll through lists, or to make
selections or adjustments to a list or
menu item on the display. When you
make a selection, push the center of
the selector (ENTER) to go to that
selection.When the audio system is in XM
ꭂ
Radio mode or playing discs, pushing
the selector (ENTER) knob switches
the display between the normal
display and the list display. The list
display has three lines to display the
detailed information.
SETUP Display
To use any audio system function,
the ignition switch must be in the
ACCESSORY (I) or ON (II) position.
To select any setting such as the
clock or sound adjustment, press the
SETUP button. You can select the
item by turning the selector knob. To
go back to the previous display,
press the RETURN button.
Pressing the SETUP button again
will also cancel the setup display
mode.
Personalization Setting
When you unlock the doors with
your remote transmitter and turn the
audio system on with the ignition
switch in the ACCESSORY (I) or ON
(II) position, the driver
’s ID (Driver 1
or Driver 2) is detected, and the
radio presets and sound level
settings (see page 236) are turned to
the respective memorized mode
automatically.
SETUP BUTTON
RETURN BUTTON SELECTOR KNOB
Audio System (Models without Navigation System)
229
Features
09/10/28 17:15:37 10 ACURA ZDX KA KC New North America Own 50 31SZN600 enu
Page 235 of 645
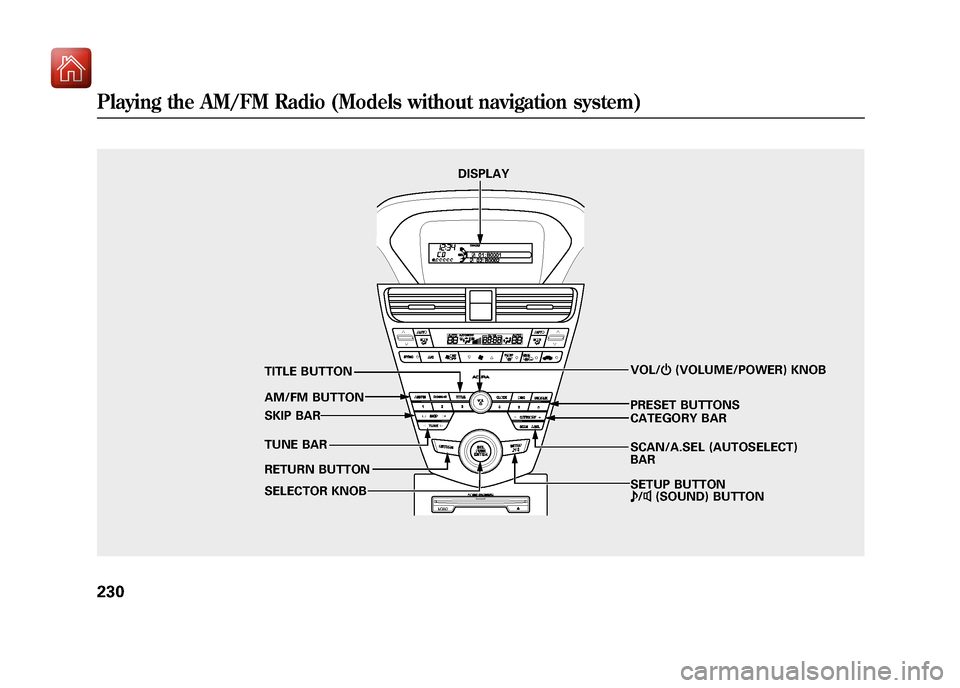
SCAN/A.SEL (AUTOSELECT)
BAR VOL/ꂻ(VOLUME/POWER) KNOB
AM/FM BUTTON
TUNE BAR PRESET BUTTONS
DISPLAY
TITLE BUTTON
SKIP BAR
RETURN BUTTON
SELECTOR KNOB CATEGORY BAR
SETUP BUTTON
ꂼ
/ꂽ (SOUND) BUTTON
Playing the AM/FM Radio (Models without navigation system)23009/10/28 17:15:37 10 ACURA ZDX KA KC New North America Own 50 31SZN600 enu
Page 236 of 645
To Play the Radio
The ignition switch must be in the
ACCESSORY (I) or ON (II) position.
Turn the system on by pushing the
VOL/
(power/volume) knob or
the AM/FM button. Adjust the
volume by turning the VOL/
knob.
The band and frequency that the
radio was last tuned to are displayed.
To change bands, press the AM/FM
button. On the FM band, ST will be
displayed if the station is
broadcasting in stereo. Stereo
reproduction in AM is not available. To Select a Station
You can use any of five methods to
find radio stations on the selected
band: tune, skip, scan, the preset
buttons, and auto select.
On the FM band, you can also use
the features provided by the radio
data system (RDS). For more
information on the RDS, see page
233.
TUNE
-Use the TUNE bar to tune
the radio to a desired frequency.
Press the
side of the bar to tune to
a higher frequency, or the
side to
tune to a lower frequency. To tune
with the selector knob, turn the knob
right to tune to a higher frequency,
or left to tune to a lower frequency.
SKIP -The skip function searches
up and down from the current
frequency to find a station with a
strong signal. To activate it, press the
or
side of the SKIP bar, then
release it. SCAN
-The scan function samples
all stations with strong signals on the
selected band. To activate it, press
the SCAN side of the SCAN/A.SEL
bar, then release it. You will see
SCAN in the display. The system will
scan for a station with a strong
signal. When it finds one, it will stop
and play that station for about 10
seconds.
If you do nothing, the system will
scan for the next strong station and
play it for 10 seconds. When it plays
a station that you want to listen to,
press the SCAN side of the SCAN/A.
SEL bar again.
CONTINUED
Playing the AM/FM Radio (Models without navigation system)
231
Features
09/10/28 17:15:37 10 ACURA ZDX KA KC New North America Own 50 31SZN600 enu
Page 237 of 645
Preset-Each preset button can
store one frequency on AM and two
frequencies on FM.
1. Select the desired band, AM or FM. FM1 and FM2 let you store
six stations each.
2. Use the tune, skip, scan, or RDS function to tune the radio to a
desired station.
3. Pick a preset button, and hold it until you hear a beep.
4. Repeat steps 1 through 3 to store a total of six stations on AM and
twelve stations on FM. AUTO SELECT
-If you are
traveling far from home and can no
longer receive your preset stations,
you can use the auto select feature to
find stations in the local area.
Press the A.SEL side of the SCAN/
A.SEL bar. ‘‘AUTO SELECT’’ flashes
in the display, and the system goes
into scan mode for several seconds.
It stores the strongest frequencies of
six AM and twelve FM stations in the
preset buttons.
You will see a ‘‘0’’ displayed after
pressing a preset button if auto select
cannot find a strong station for that
preset button.
If you do not like the stations auto
select has stored, you can store other
frequencies on the preset buttons as
previously described.
To turn off auto select,
press the A.SEL
side of the bar. This restores the
presets you originally set.
For information on AM/FM radio
frequencies and reception, see page
369.
Playing the AM/FM Radio (Models without navigation system)23209/10/28 17:15:37 10 ACURA ZDX KA KC New North America Own 50 31SZN600 enu