buttons Acura ZDX 2012 User Guide
[x] Cancel search | Manufacturer: ACURA, Model Year: 2012, Model line: ZDX, Model: Acura ZDX 2012Pages: 370, PDF Size: 10.06 MB
Page 171 of 370

169
uuAudio System uUSB Adapter Cable
Features
USB Adapter Cable
1. Unclip the USB connector and loosen the
adapter cable.
2. Install the iPod ® dock connector or the USB
flash drive to the USB connector.
Auxiliary Input Jack
Use the jack to connect standard audio devices. 1.Open the AUX cover.
2. Connect a standard audio device to the
input jack using a 1/8 inch (3.5 mm) stereo
miniplug.
u The audio system auto matically switches
to the AUX mode.
1 USB Adapter Cable
•Do not leave the iPod ® or USB flash drive in the
vehicle. Direct sunlight and high temperatures may
damage it.
•Do not use an extension cable with the USB
adapter cable.
•Do not connect the iPod ® or USB flash drive using a
hub.
•Do not use a device such as a card reader or hard
disk drive, as the device or your files may be
damaged.
•We recommend backing up your data before using
the device in your vehicle.
•Displayed messages may va ry depending on the
device model and software version.
If the audio system does not recognize the iPod ®, try
reconnecting it a few times or reboot the device. To
reboot, follow the manufa cturer’s instructions
provided with the iPod ® or visit www.apple.com/
ipod .
1Auxiliary Input Jack
To switch the mode, pre ss any of the audio mode
buttons. You can return to the AUX mode by
pressing the AUX button.
You cannot use the auxiliary input jack if you replace
the audio system.
State or local laws may limit the circumstances in
which you can launch or control your attached audio
device.
Page 172 of 370
170
uuAudio System uAudio System Theft Protection
Features
Audio System Theft Protection
The audio system is disabled when it is disconnected from the po wer source, such as
when the battery is disc onnected or goes dead.
■Entering the audio security code
ENTER CODE appears on the display when the power is reconnected.
1. Turn on the audio system.
2. Enter the audio security code using the pr eset buttons. If you enter an incorrect
digit, continue to the last digit, then try again. If you do not enter the code
correctly after 10 tries, you need to visit a dealer to have the system reset.
1 Audio System Theft Protection
Find the audio system’s security code and serial
number on the radio code card.
Do not store the card in your vehicle. If you lose the
radio code card, you must obtain the information
from a dealer.
Page 175 of 370
173
uuAudio System Basic Operation uPlaying the AM/FM Radio
Continued
Features
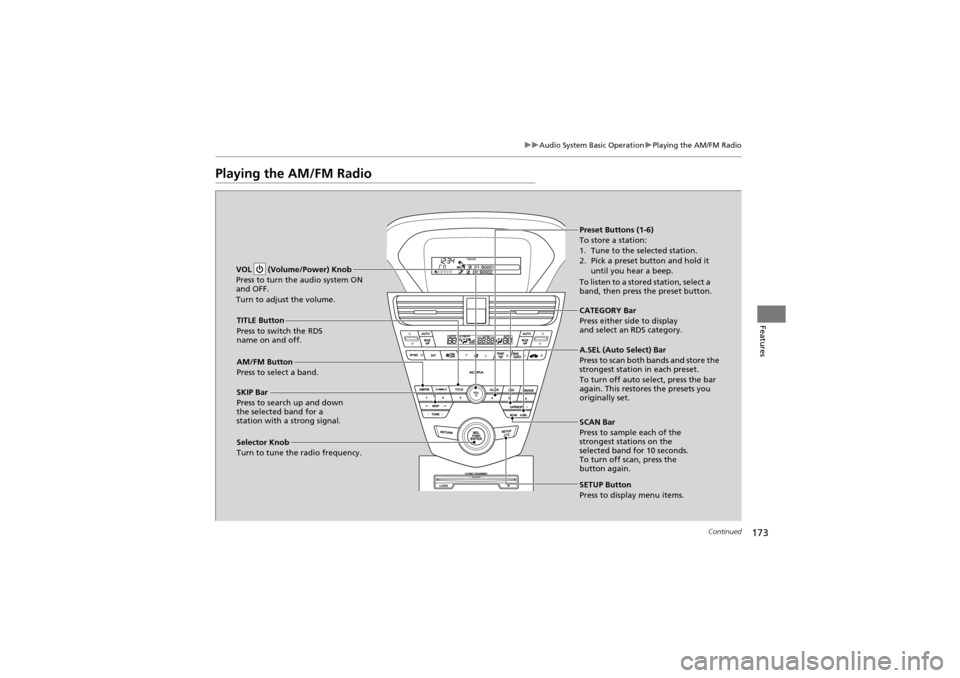
Playing the AM/FM Radio
SCAN Bar
Press to sample each of the
strongest stations on the
selected band for 10 seconds.
To turn off scan, press the
button again.
VOL (Volume/Power) Knob
Press to turn the audio system ON
and OFF.
Turn to adjust the volume.
Preset Buttons (1-6)
To store a station:
1. Tune to the selected station.
2. Pick a preset button and hold it
until you hear a beep.
To listen to a stored station, select a
band, then press the preset button.
SKIP Bar
Press to search up and down
the selected band for a
station with a strong signal. SETUP Button
Press to display menu items.
Selector Knob
Turn to tune the radio frequency. AM/FM Button
Press to select a band. TITLE Button
Press to switch the RDS
name on and off.
CATEGORY Bar
Press either side to display
and select an RDS category.
A.SEL (Auto Select) Bar
Press to scan both bands and store the
strongest station in each preset.
To turn off auto select, press the bar
again. This restores the presets you
originally set.
Page 176 of 370
uuAudio System Basic Operation uPlaying the AM/FM Radio
174
Features
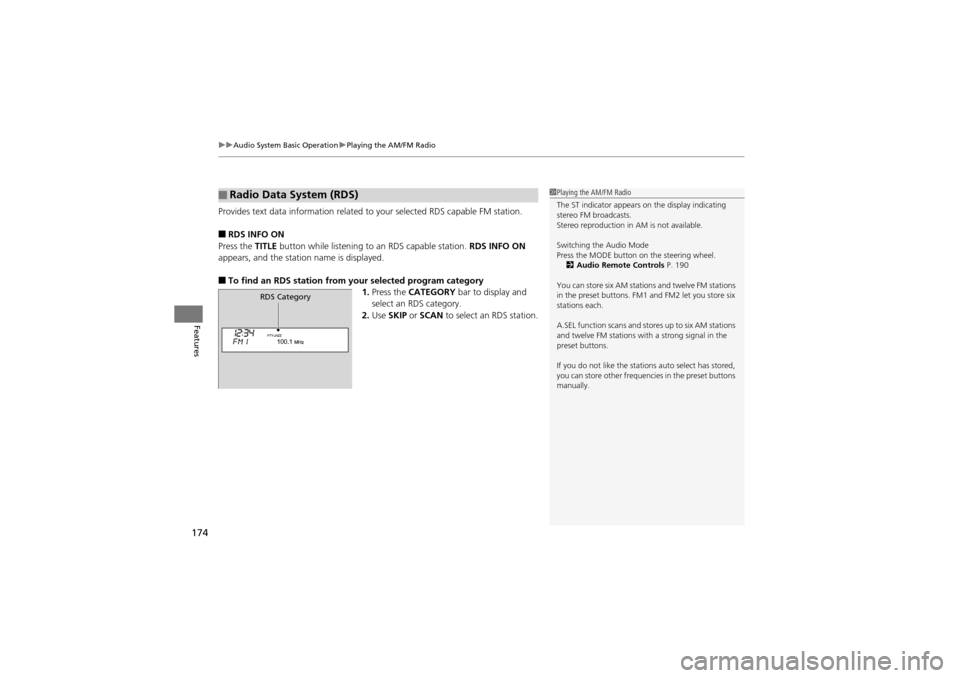
Provides text data information related to your selected RDS capable FM station.
■RDS INFO ON
Press the TITLE button while listening to an RDS capable station. RDS INFO ON
appears, and the station name is displayed.
■To find an RDS station from your selected program category 1.Press the CATEGORY bar to display and
select an RDS category.
2. Use SKIP or SCAN to select an RDS station.
■Radio Data System (RDS)1Playing the AM/FM Radio
The ST indicator appears on the display indicating
stereo FM broadcasts.
Stereo reproduction in AM is not available.
Switching the Audio Mode
Press the MODE button on the steering wheel.
2 Audio Remote Controls P. 190
You can store six AM stations and twelve FM stations
in the preset buttons. FM1 and FM2 let you store six
stations each.
A.SEL function scans and stores up to six AM stations
and twelve FM stations with a strong signal in the
preset buttons.
If you do not like the stations auto select has stored,
you can store other frequencies in the preset buttons
manually.
RDS Category
Page 177 of 370
175
uuAudio System Basic Operation uPlaying the XM ® Radio
Continued
Features
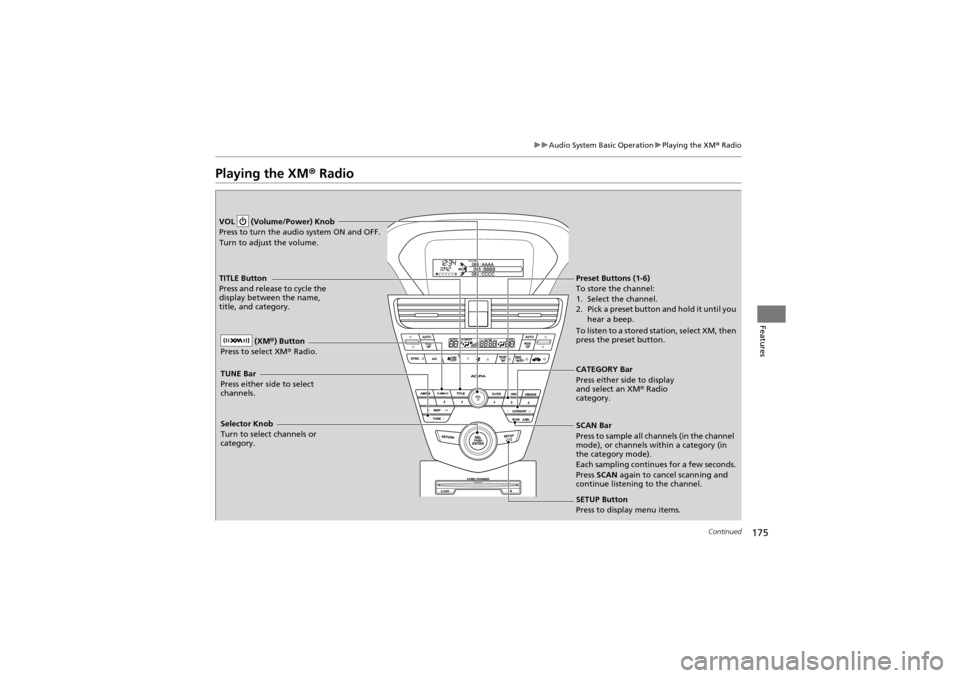
Playing the XM ® Radio
CATEGORY Bar
Press either side to display
and select an XM ® Radio
category.
VOL (Volume/Power) Knob
Press to turn the audio system ON and OFF.
Turn to adjust the volume.
Preset Buttons (1-6)
To store the channel:
1. Select the channel.
2. Pick a preset button and hold it until you
hear a beep.
To listen to a stored st ation, select XM, then
press the preset button.
SCAN Bar
Press to sample all ch annels (in the channel
mode), or channels within a category (in
the category mode).
Each sampling continues for a few seconds.
Press SCAN again to cancel scanning and
continue listening to the channel.
Selector Knob
Turn to select channels or
category. (XM
®) Button
Press to select XM ® Radio.TITLE Button
Press and release to cycle the
display between the name,
title, and category.
TUNE Bar
Press either side to select
channels.
SETUP Button
Press to display menu items.
Page 178 of 370
uuAudio System Basic Operation uPlaying the XM ® Radio
176
Features
1. Press the button to select the XM ® radio band (XM1 or XM2).
2. Press and hold the TITLE button to switch between the channel mode and
category mode.
3. Select a channel using the TUNE, CATEGORY , SCAN bar, or Preset buttons.
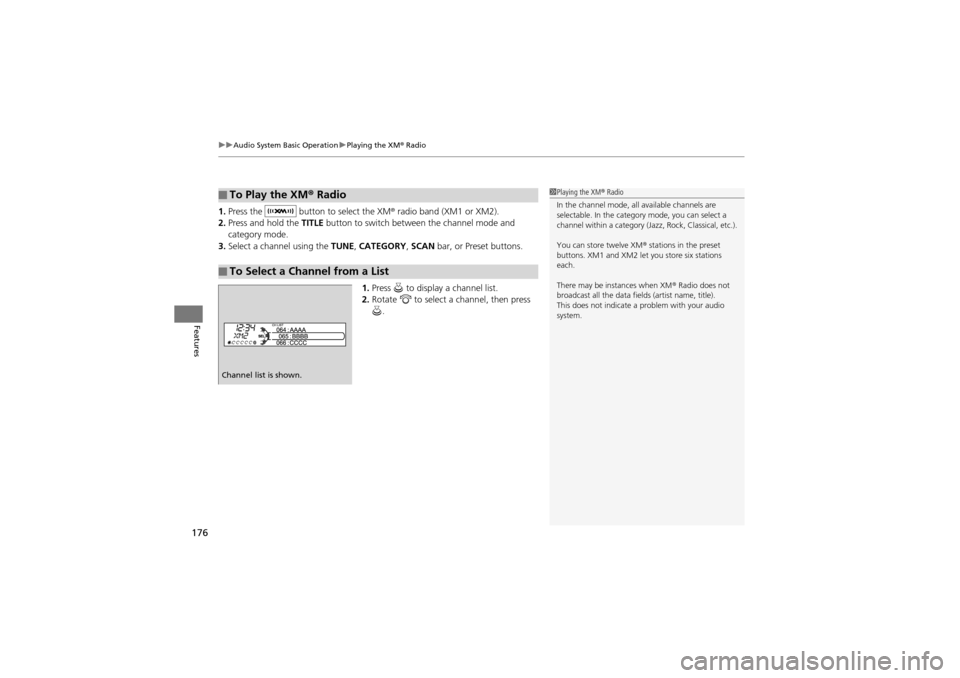
1. Press to display a channel list.
2. Rotate to select a channel, then press
.
■To Play the XM ® Radio
■To Select a Channel from a List
1 Playing the XM ® Radio
In the channel mode, all available channels are
selectable. In the category mode, you can select a
channel within a category (J azz, Rock, Classical, etc.).
You can store twelve XM ® stations in the preset
buttons. XM1 and XM2 let you store six stations
each.
There may be instances when XM ® Radio does not
broadcast all the data fiel ds (artist name, title).
This does not indicate a problem with your audio
system.
Channel list is shown.
Page 197 of 370
195Continued
Features
HomeLink® Universal Transceiver
The HomeLink ® Universal Transceiver can be prog rammed to operate up to three
remote controlled devices around your home, such as garage doors, lighting, or
home security systems.
Refer to the safety information that comes wi th your garage door opener to test that
the safety features are functioning properly. If you do not have the safety
information, contact the manufacturer.
Before programming HomeLink, make sure that people and objects are out of the
way of the garage or gate to pr event potential injury or damage.
When programming a garage door opener, park just outside the garage door’s
path.
Training HomeLink
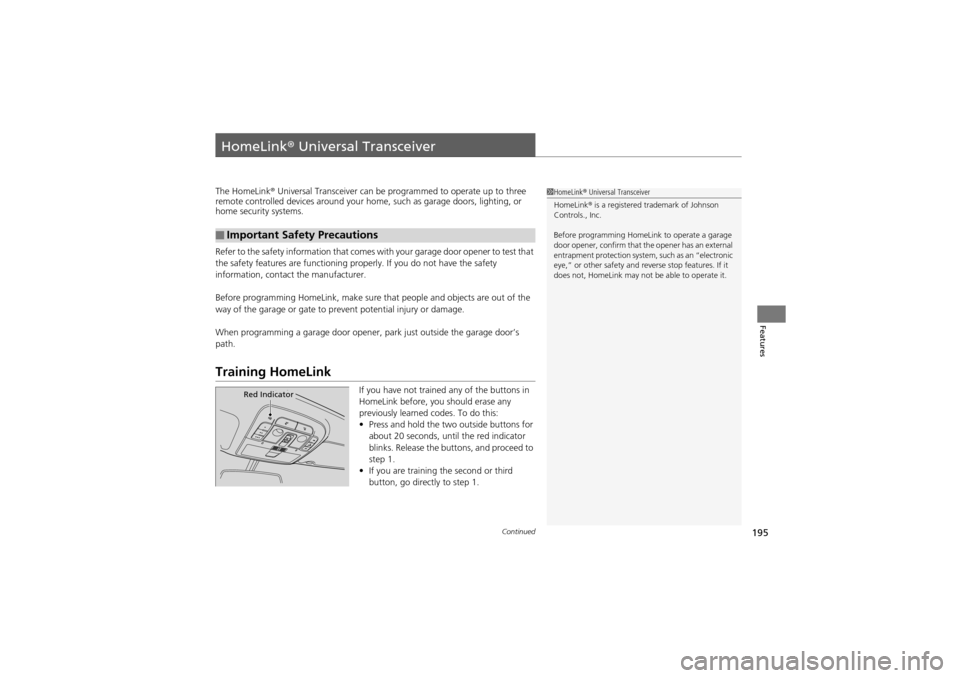
If you have not trained any of the buttons in
HomeLink before, you should erase any
previously learned codes. To do this:
• Press and hold the tw o outside buttons for
about 20 seconds, until the red indicator
blinks. Release the bu ttons, and proceed to
step 1.
• If you are training the second or third
button, go directly to step 1.
■Important Safety Precautions
1HomeLink ® Universal Transceiver
HomeLink ® is a registered trademark of Johnson
Controls., Inc.
Before programming HomeLink to operate a garage
door opener, confirm that the opener has an external
entrapment protection system, such as an “electronic
eye,” or other safety and re verse stop features. If it
does not, HomeLink may not be able to operate it.
Red Indicator
Page 198 of 370
uuHomeLink ® Universal Transceiver uTraining HomeLink
196
Features
■Training a Button1Training HomeLink
Retraining a Button
If you want to retrain a programmed button for a
new device, you do not have to erase all button
memory. You can replace the existing memory code
using this procedure:
1.
Press and hold the de sired HomeLink button
until the HomeLink indicator begins to blink.
2. Continue to hold the HomeLink button and
follow steps 1 - 3 under “Training a Button.”
Indicator remains on
for about 25 secs.Standard transmitterIndicator blinks rapidly for
2 secs, then remains on for
about 23 secs.Rolling code transmitter
Erasing Codes
To erase all the codes, press and hold the two outside
buttons until the HomeLink indicator begins to blink
(about 10 to 20 secs). You should erase all codes
before selling the vehicle.
If you have any proble ms, see the device’s
instructions, visit www.homelink.com , or call
HomeLink at (800) 355-3515.
4.
a.3.
2.
5.a.
b.
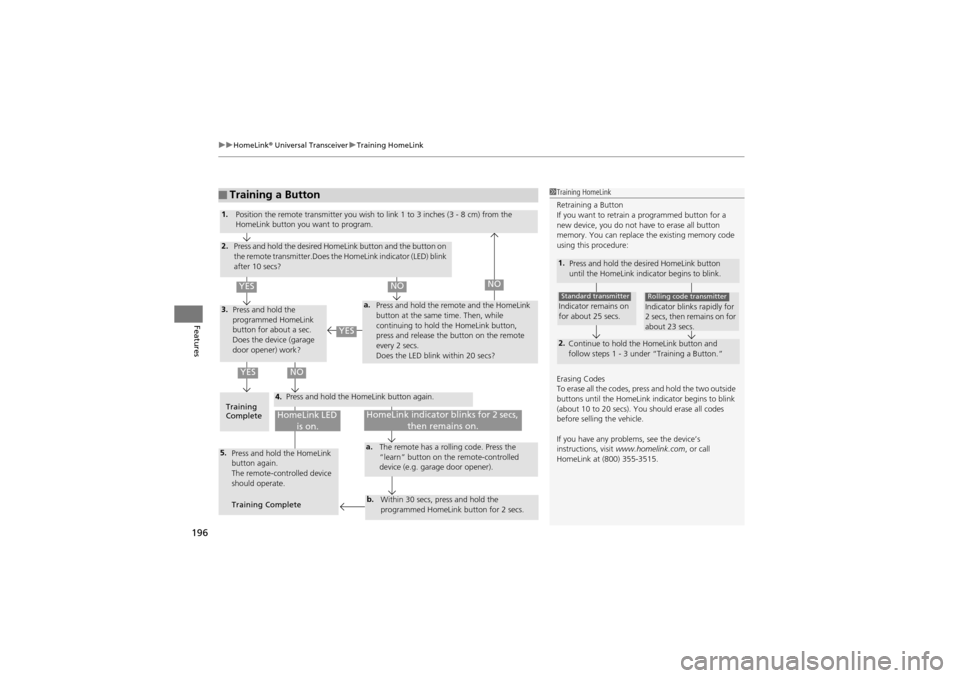
1. Position the remote transmitter you wish to link 1 to 3 inches (3 - 8 cm) from the
HomeLink button you want to program.
Press and hold the desired HomeLink button and the button on
the remote transmitter.Does the HomeLink indicator (LED) blink
after 10 secs?
Press and hold the
programmed HomeLink
button for about a sec.
Does the device (garage
door opener) work? Press and hold the remote and the HomeLink
button at the same
time. Then, while
continuing to hold the HomeLink button,
press and release the button on the remote
every 2 secs.
Does the LED blink within 20 secs?
Training
Complete Press and hold the HomeLink button again.
Press and hold the HomeLink
button again.
The remote-controlled device
should operate.
Training Complete The remote has a ro
lling code. Press the
“learn” button on the remote-controlled
device (e.g. garage door opener).
Within 30 secs, press and hold the
programmed HomeLink button for 2 secs.
HomeLink indicator blinks for 2 secs, then remains on.HomeLink LED is on.
YESNO
YES
YESNONO
Page 199 of 370
197Continued
Features
Bluetooth® HandsFreeLink®
For models with the navigation system, see the Navigation System Manual for how
to operate Bluetooth® HandsFreeLink ®.
Bluetooth ® HandsFreeLink ® (HFL) allows you to place and receive phone calls using
your vehicle’s audio system, without handling your cell phone.
Using HFL
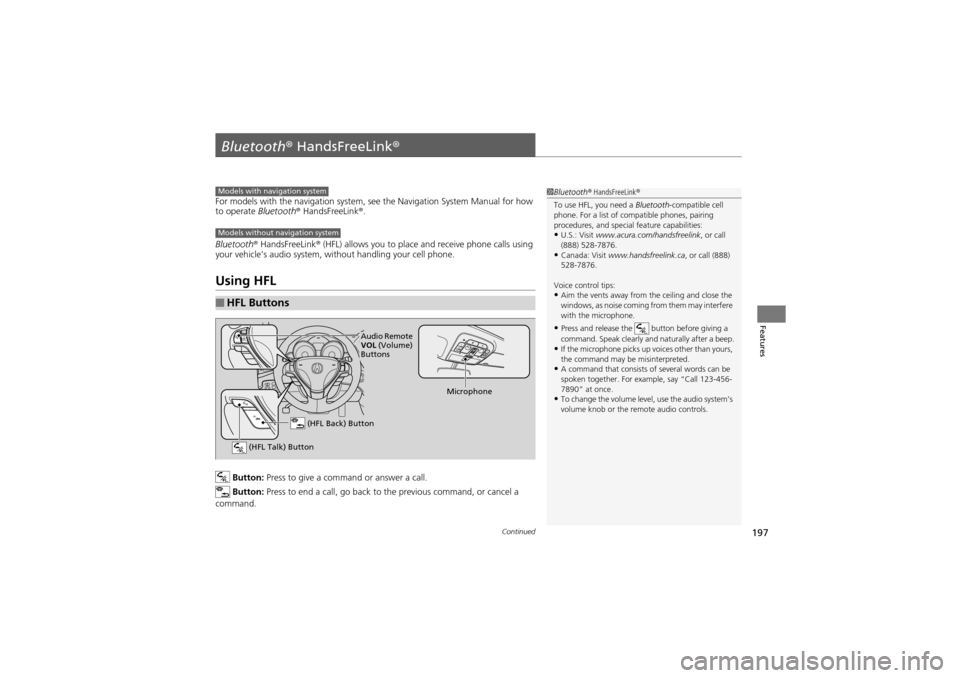
Button: Press to give a command or answer a call.
Button: Press to end a call, go back to the previous command, or cancel a
command.
■HFL Buttons
1 Bluetooth ® HandsFreeLink ®
To use HFL, you need a Bluetooth-compatible cell
phone. For a list of compatible phones, pairing
procedures, and special feature capabilities:
•U.S.: Visit www.acura.com/h andsfreelink, or call
(888) 528-7876.
•Canada: Visit www.handsfreelink.ca , or call (888)
528-7876.
Voice control tips:
•Aim the vents away from the ceiling and close the
windows, as noise coming from them may interfere
with the microphone.
•Press and release the button before giving a
command. Speak clearly and naturally after a beep.
•If the microphone picks up voices other than yours,
the command may be misinterpreted.
•A command that consists of several words can be
spoken together. For example, say “Call 123-456-
7890” at once.
•To change the volume level, use the audio system’s
volume knob or the re mote audio controls.
Models with navigation system
Models without navigation system
(HFL Talk) Button
Microphone
(HFL Back) Button
Audio Remote
VOL (Volume)
Buttons
Page 236 of 370
uuWhen Driving uCruise Control*
234
Driving
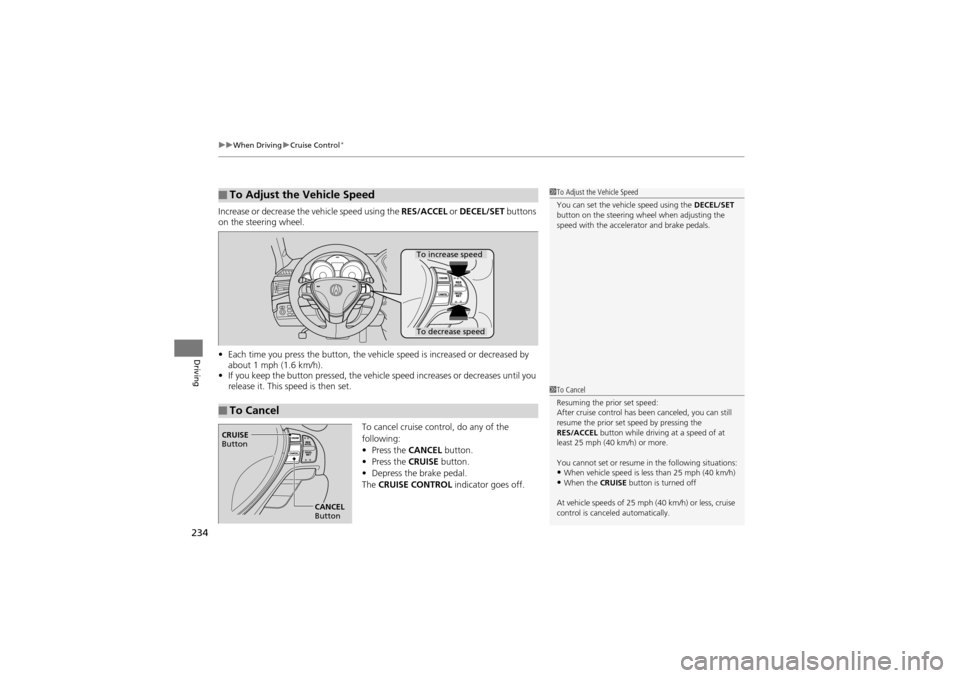
Increase or decrease the vehicle speed using the RES/ACCEL or DECEL/SET buttons
on the steering wheel.
• Each time you press the button, the vehicl e speed is increased or decreased by
about 1 mph (1.6 km/h).
• If you keep the button pressed, the vehicl e speed increases or decreases until you
release it. This speed is then set.
To cancel cruise control, do any of the
following:
•Press the CANCEL button.
• Press the CRUISE button.
• Depress the brake pedal.
The CRUISE CONTROL indicator goes off.
■To Adjust the Vehicle Speed1To Adjust the Vehicle Speed
You can set the vehicle speed using the DECEL/SET
button on the steering wh eel when adjusting the
speed with the accelera tor and brake pedals.
■To Cancel
To decrease speed
To increase speed
1To Cancel
Resuming the prior set speed:
After cruise control has b een canceled, you can still
resume the prior set speed by pressing the
RES/ACCEL button while driving at a speed of at
least 25 mph (40 km/h) or more.
You cannot set or resume in the following situations:
•When vehicle speed is less than 25 mph (40 km/h)•When the CRUISE button is turned off
At vehicle speeds of 25 mph (40 km/h) or less, cruise
control is canceled automatically.
CRUISE
Button
CANCEL
Button