start stop button Acura ZDX 2012 Workshop Manual
[x] Cancel search | Manufacturer: ACURA, Model Year: 2012, Model line: ZDX, Model: Acura ZDX 2012Pages: 370, PDF Size: 10.06 MB
Page 173 of 370

171
Features
Audio System Basic Operation
To use the audio system function, the ignition switch must be in ACCESSORY q or
ON
w*1. Use the selector knob or SETUP button to
access some audio functions.
Press to switch between the normal and
extended display for some functions.
The extended display has three segments to
display detailed information.
Selector knob: Rotate left or right to scroll
through the available choices. Press to set
your selection.
SETUP/ button: Press to select any
setting such as the clock or sound control.
RETURN button: Press to go back to the
previous display.
*1: Models with the keyless access system have an ENGINE START/STOP button
instead of an ig nition switch.1Audio System Basic Operation
These indications are used to show how to operate
the selector knob.
Rotate to select.
Press to ENTER.
Selector
Knob
SETUP
Button
RETURN
Button
Menu Display
Page 201 of 370
199
uuBluetooth® HandsFreeLink ®u HFL Menus
Continued
Features
HFL Menus
The ignition switch must be in ACCESSORY q or ON w*1 to use HFL.
*1: Models with the keyless access system have an ENGINE START/STOP button
instead of an ig nition switch.1HFL Menus
To use HFL, you must first pair your Bluetooth-
compatible cell phone to the system while the vehicle
is parked.
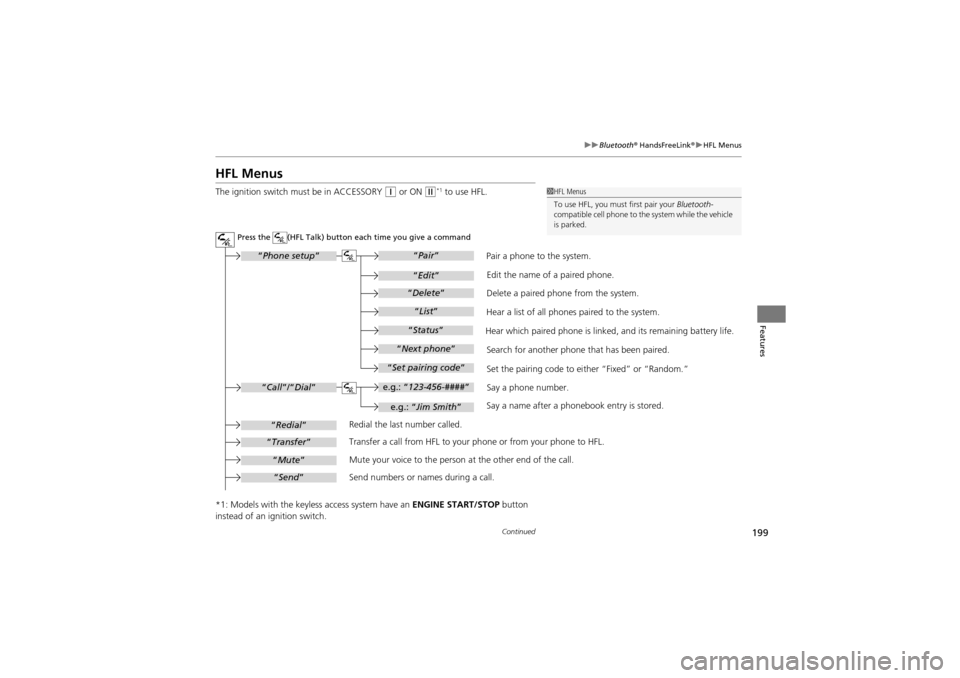
Redial the last number called.
Transfer a call from HFL to your phone or from your phone to HFL.
Mute your voice to the person at the other end of the call.
Send numbers or names during a call. Pair a phone to the system.
Say a name after a phonebook entry is stored.Say a phone number.
Set the pairing code to ei
ther “Fixed” or “Random.”
Search for another phone that has been paired. Edit the name of a paired phone.
Delete a paired phone from the system.
Hear a list of all phones paired to the system.
Hear which paired phone is linked, and its remaining battery life.
Press the (HFL Talk) button each time you give a command
e.g.: “ 123-456-#### ”
“Phone setup”
“Call ”/“Dial ”
“Redial”
“Transfer”
“Mute”
“Send ”
“Pair ”
“Edit ”
“Delete ”
“List ”
“Status ”
“Next phone ”
“Set pairing code ”
e.g.: “Jim Smith ”
Page 225 of 370
223Continued
Driving
When Driving
Starting the Engine
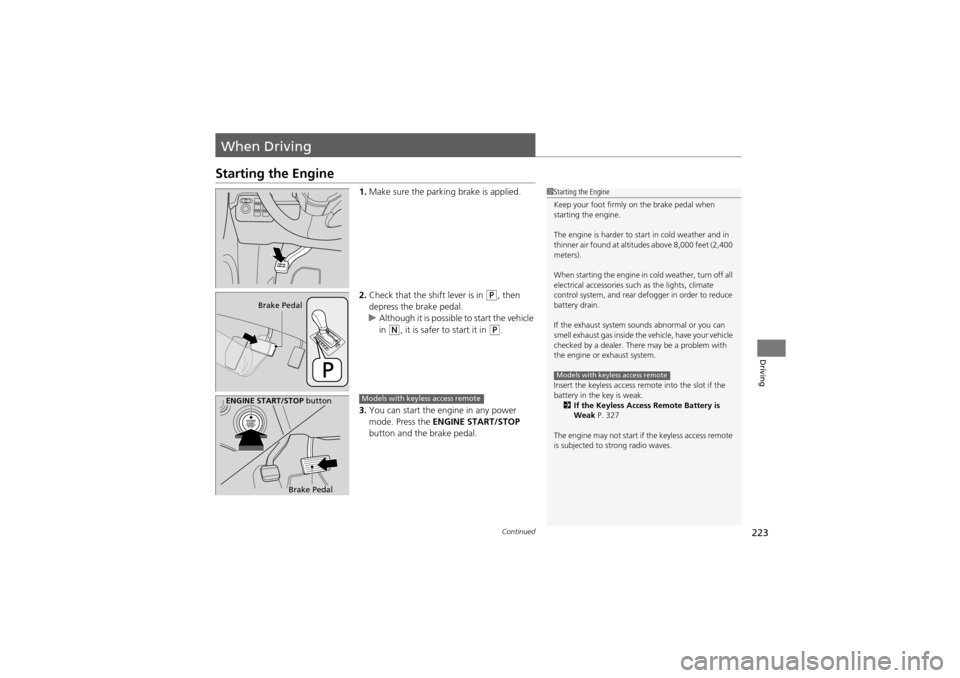
1.Make sure the parking brake is applied.
2. Check that the shift lever is in
P, then
depress the brake pedal.
u Although it is possible to start the vehicle
in
N, it is safer to start it in P.
3. You can start the engine in any power
mode. Press the ENGINE START/STOP
button and the brake pedal.
1 Starting the Engine
Keep your foot firmly on the brake pedal when
starting the engine.
The engine is harder to start in cold weather and in
thinner air found at altitu des above 8,000 feet (2,400
meters).
When starting the engine in cold weather, turn off all
electrical accessories such as the lights, climate
control system, and rear defogger in order to reduce
battery drain.
If the exhaust system sounds abnormal or you can
smell exhaust gas inside the vehicle, have your vehicle
checked by a dealer. There may be a problem with
the engine or exhaust system.
Insert the keyless access remo te into the slot if the
battery in the key is weak. 2 If the Keyless Access Remote Battery is
Weak P. 327
The engine may not start if the keyless access remote
is subjected to strong radio waves.
Models with keyless access remote
Brake Pedal
ENGINE START/STOP button
Brake Pedal
Models with keyless access remote
Page 226 of 370
uuWhen Driving uStarting the Engine
224
Driving
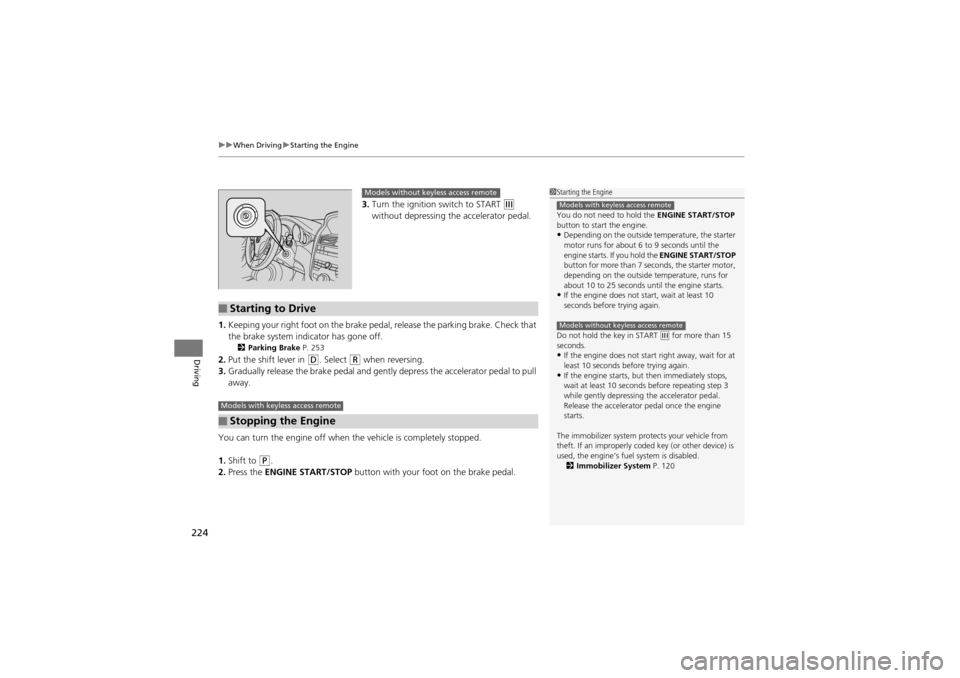
3. Turn the ignition switch to START e
without depressing the accelerator pedal.
1. Keeping your right foot on the brake peda l, release the parking brake. Check that
the brake system indicator has gone off.
2 Parking Brake P. 253
2.Put the shift lever in D. Select R when reversing.
3. Gradually release the brake pedal and gent ly depress the accelerator pedal to pull
away.
You can turn the engine off when the vehicle is completely stopped.
1. Shift to
P.
2. Press the ENGINE START/STOP button with your foot on the brake pedal.
1Starting the Engine
You do not need to hold the ENGINE START/STOP
button to start the engine.
•Depending on the outside temperature, the starter
motor runs for about 6 to 9 seconds until the
engine starts. If you hold the ENGINE START/STOP
button for more than 7 seconds, the starter motor,
depending on the outside temperature, runs for
about 10 to 25 seconds until the engine starts.
•If the engine does not start, wait at least 10
seconds before trying again.
Do not hold the key in START
(e for more than 15
seconds.
•If the engine does not sta rt right away, wait for at
least 10 seconds before trying again.
•If the engine starts, but then immediately stops,
wait at least 10 seconds before repeating step 3
while gently depressing the accelerator pedal.
Release the accelerator pedal once the engine
starts.
The immobilizer system protects your vehicle from
theft. If an improperly co ded key (or other device) is
used, the engine’s fuel system is disabled. 2 Immobilizer System P. 120
Models with keyless access remote
Models without keyless access remote
Models without keyless access remote
■Starting to Drive
■Stopping the Engine
Models with keyless access remote
Page 228 of 370
226
uuWhen Driving uPrecautions While Driving
Driving
Precautions While Driving
Utility vehicles have a significantly higher rollover rate than other types of vehicles.
To prevent rollovers or loss of control:
• Take corners at slower speeds than you would with a passenger vehicle.
• Avoid sharp turns and abrupt maneuvers whenever possible.
• Do not modify your vehicle in any way th at you would raise the center of gravity.
• Do not carry heavy cargo on the roof.
Avoid driving in deep water and on flooded roads. This can damage the engine or
cause electrical component failure.
If there is a strong impact with something under the vehicl e, stop in a safe location.
Check the underside of the vehicl e for damage or any fluid leaks.
■Driving Guidelines for Your Utility Vehicle
■In Rain
■Other Precautions
1Precautions While Driving
NOTICEDo not operate the shift lever while pressing the
accelerator pedal. You could damage the
transmission.
If the ignition switch is turned to ACCESSORY
(q or
LOCK (0*1 while driving, the engine will shut down
and all steering and brake power assist functions will
stop, making it difficult to control the vehicle.
Do not put the shift lever in
( N, as you will lose
engine braking (and acce leration) performance.
During the first 600 mile s (1,000 km) of operation,
avoid sudden acceleration or full throttle operation so
as not to damage the engine or powertrain.
Avoid hard braking for the first 200 miles (300 km).
You should also follow this when the brake pads are
replaced.
1 Driving Guidelines for Your Utility Vehicle
Failure to operate your vehi cle correctly might result
in a crash or a roll over.
2 Important Handling Information P. 24
2 Off-Highway Driving Guidelines P. 220
*1: Models with the keyles s access system have an
ENGINE START/STOP button instead of an ignition
switch.
Page 230 of 370
228
uuWhen Driving uShifting
Driving
Shifting
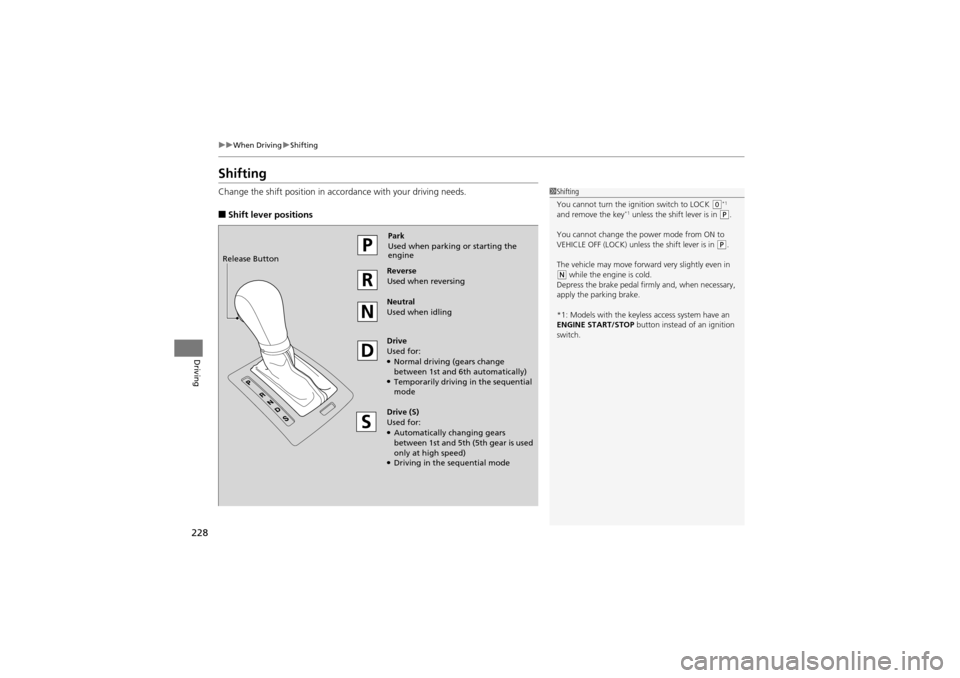
Change the shift position in accordance with your driving needs.
■Shift lever positions
1Shifting
You cannot turn the ignition switch to LOCK
(0*1
and remove the key*1 unless the shift lever is in ( P.
You cannot change the power mode from ON to
VEHICLE OFF (LOCK) unless the shift lever is in
(P.
The vehicle may move forward very slightly even in
( N while the engine is cold.
Depress the brake pedal firmly and, when necessary,
apply the parking brake.
*1: Models with the keyles s access system have an
ENGINE START/STOP button instead of an ignition
switch.
Park
Used when parking or starting the
engine
Reverse
Used when reversing
Neutral
Used when idling
Drive
Used for:
●Normal driving (gears change
between 1st and 6t h automatically)
●Temporarily driving in the sequential
mode
Drive (S)
Used for:
●Automatically changing gears
between 1st and 5th (5 th gear is used
only at high speed)
●Driving in the sequential mode
Release Button
Page 246 of 370
uuWhen Driving uVSA ® (Vehicle Stability Assist), aka ESC (Electronic Stability Control), System
244
Driving
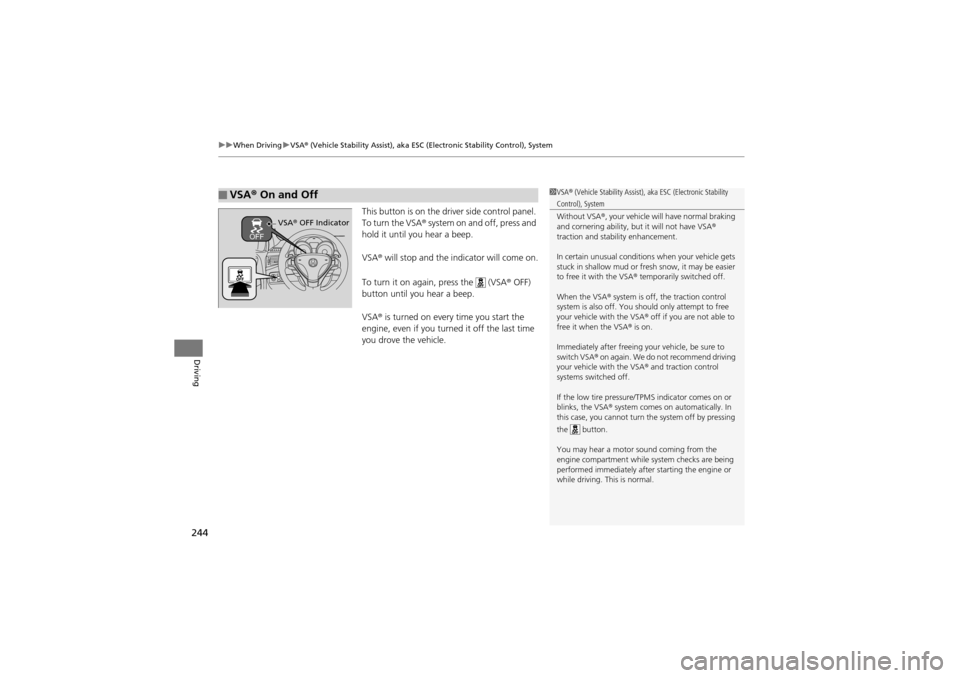
This button is on the driver side control panel.
To turn the VSA® system on and off, press and
hold it until you hear a beep.
VSA ® will stop and the indicator will come on.
To turn it on agai n, press the (VSA ® OFF)
button until you hear a beep.
VSA ® is turned on every time you start the
engine, even if you turned it off the last time
you drove the vehicle.
■VSA ® On and Off1 VSA ® (Vehicle Stability Assist), aka ESC (Electronic Stability
Control), System
Without VSA ®, your vehicle will have normal braking
and cornering ability, but it will not have VSA ®
traction and stability enhancement.
In certain unusual condition s when your vehicle gets
stuck in shallow mud or fresh snow, it may be easier
to free it with the VSA ® temporarily switched off.
When the VSA ® system is off, the traction control
system is also off. You sh ould only attempt to free
your vehicle with the VSA ® off if you are not able to
free it when the VSA ® is on.
Immediately after freeing yo ur vehicle, be sure to
switch VSA ® on again. We do not recommend driving
your vehicle with the VSA ® and traction control
systems switched off.
If the low tire pressure/T PMS indicator comes on or
blinks, the VSA ® system comes on automatically. In
this case, you cannot turn the system off by pressing
the button.
You may hear a motor sound coming from the
engine compartmen t while system checks are being
performed immediately after starting the engine or
while driving. This is normal.
VSA ® OFF Indicator
Page 250 of 370
248
uuWhen Driving uTPMS (Tire Pressure Monitoring System)
Driving
TPMS (Tire Pressure Monitoring System)
Monitors the tire pressure while you are driving. If your vehicle’s tire pressure
becomes significantly low, the low tire pressure/TPMS indicator comes on and a
message appears on the mu lti-information display.
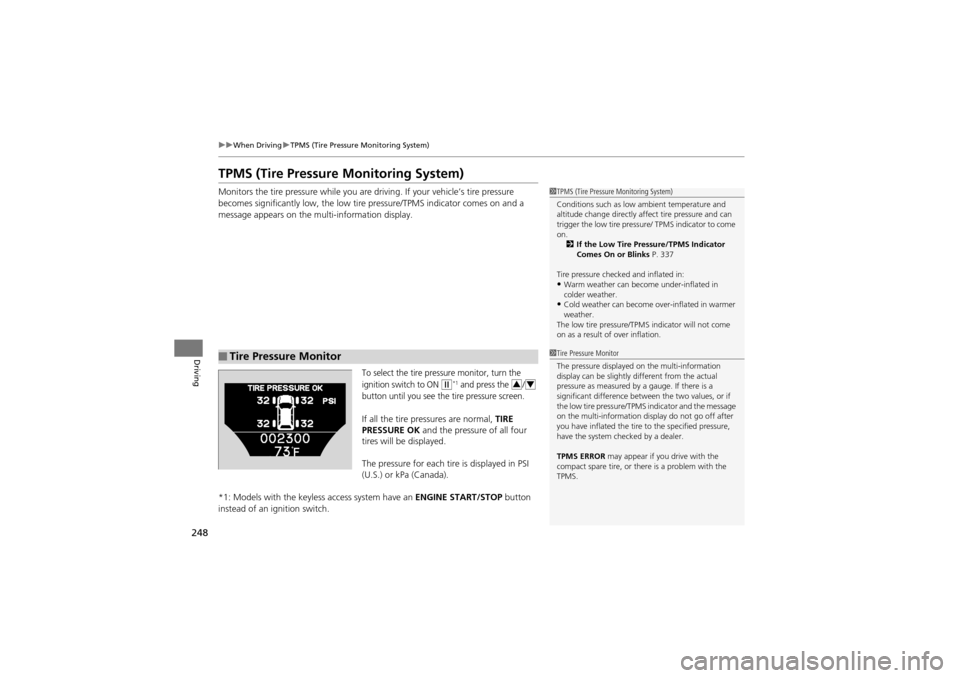
To select the tire pressure monitor, turn the
ignition switch to ON
w*1 and press the /
button until you see the tire pressure screen.
If all the tire pressures are normal, TIRE
PRESSURE OK and the pressure of all four
tires will be displayed.
The pressure for each tire is displayed in PSI
(U.S.) or kPa (Canada).
*1: Models with the keyless access system have an ENGINE START/STOP button
instead of an ignition switch.
■Tire Pressure Monitor
1 TPMS (Tire Pressure Monitoring System)
Conditions such as low ambient temperature and
altitude change directly affect tire pressure and can
trigger the low tire pressure / TPMS indicator to come
on. 2 If the Low Tire Pressure/TPMS Indicator
Comes On or Blinks P. 337
Tire pressure checked and inflated in:
•Warm weather can beco me under-inflated in
colder weather.
•Cold weather can become over-inflated in warmer
weather.
The low tire pressure/TPM S indicator will not come
on as a result of over inflation.
1 Tire Pressure Monitor
The pressure displayed on the multi-information
display can be slightly different from the actual
pressure as measured by a gauge. If there is a
significant difference between the two values, or if
the low tire pressure/TPMS indicator and the message
on the multi-information display do not go off after
you have inflated the tire to the specified pressure,
have the system checked by a dealer.
TPMS ERROR may appear if you drive with the
compact spare tire, or ther e is a problem with the
TPMS.
34
Page 275 of 370
273Continued
Maintenance
Maintenance MinderTM
If the engine oil life is less than 15%, you will see the Maintenance Minder messages
appear on the multi-information display every time you turn the ignition switch to
ON
w*1. The messages notify you when to change the engine oil, or when to bring
your vehicle to a dealer for indicated maintenance services.
To Use Maintenance MinderTM
1.Turn the ignition switch to ON w*1.
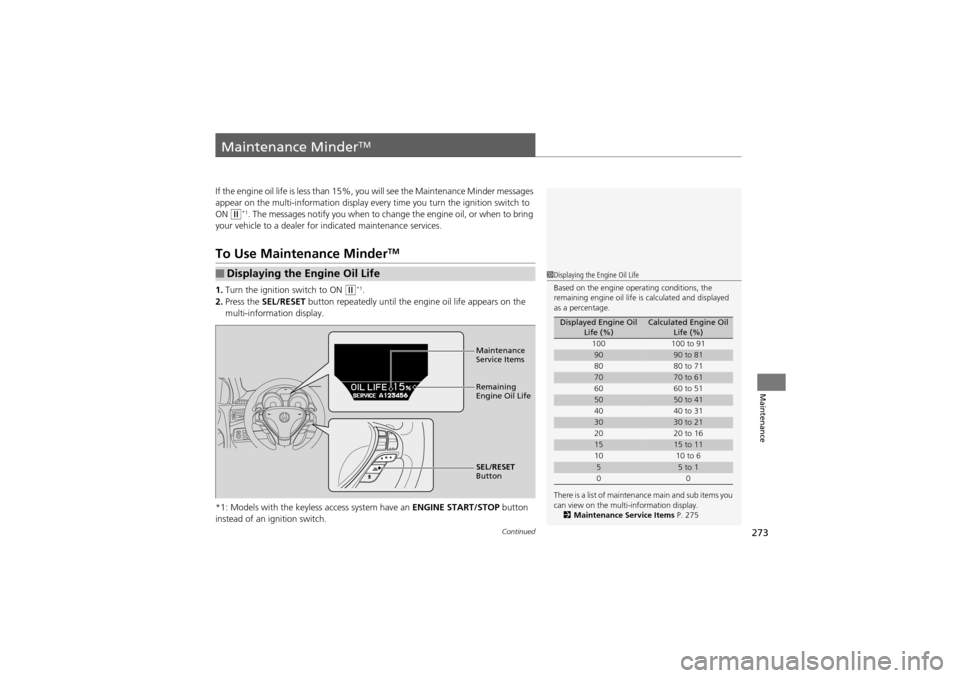
2. Press the SEL/RESET button repeatedly until the engine oil life appears on the
multi-information display.
*1: Models with the keyless access system have an ENGINE START/STOP button
instead of an ig nition switch.
■Displaying the Engine Oil Life1Displaying the Engine Oil Life
Based on the engine operating conditions, the
remaining engine oil life is calculated and displayed
as a percentage.
There is a list of maintenance main and sub items you
can view on the multi-information display. 2 Maintenance Service Items P. 275
Displayed Engine Oil
Life (%)Calculated Engine Oil Life (%)
100 100 to 91
9090 to 81
80 80 to 71
7070 to 61
60 60 to 51
5050 to 41
40 40 to 31
3030 to 21
20 20 to 16
1515 to 11
10 10 to 6
55 to 1
00
Maintenance
Service Items
Remaining
Engine Oil Life
SEL/RESET
Button
Page 278 of 370
uuMaintenance MinderTMuTo Use Maintenance MinderTM
276
Maintenance
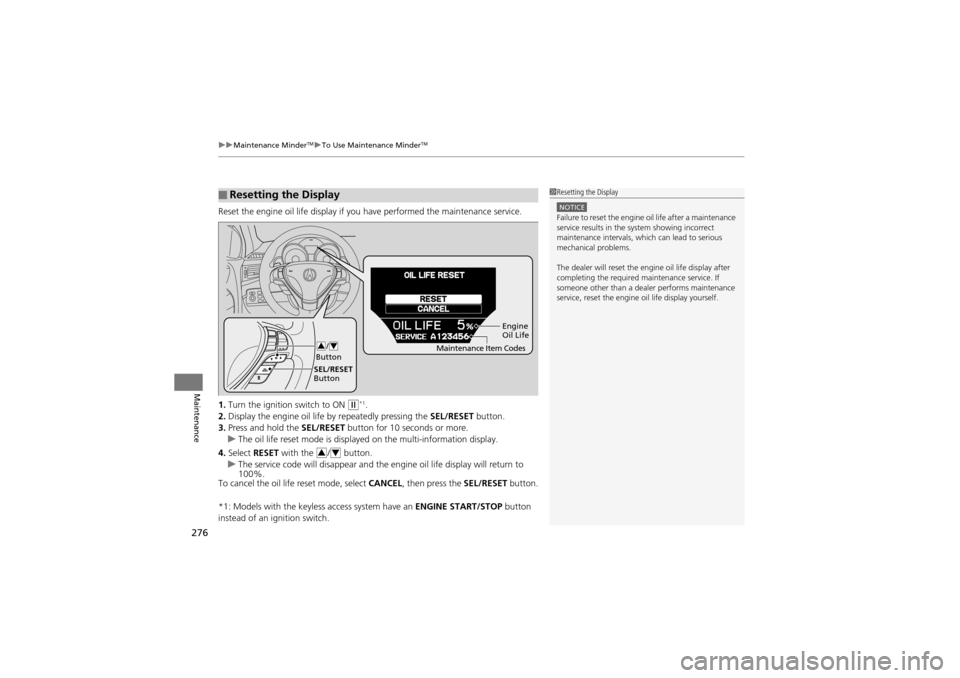
Reset the engine oil life display if y ou have performed the maintenance service.
1. Turn the ignition switch to ON
w*1.
2. Display the engine oil life by repeatedly pressing the SEL/RESET button.
3. Press and hold the SEL/RESET button for 10 seconds or more.
u The oil life reset mode is displayed on the multi-information display.
4. Select RESET with the / button.
u The service code will disappear and the engine oil life display will return to
100%.
To cancel the oil life reset mode, select CANCEL, then press the SEL/RESET button.
*1: Models with the keyless access system have an ENGINE START/STOP button
instead of an ignition switch.
■Resetting the Display1 Resetting the Display
NOTICEFailure to reset the engine oil life after a maintenance
service results in the system showing incorrect
maintenance intervals, which can lead to serious
mechanical problems.
The dealer will reset the engine oil life display after
completing the required ma intenance service. If
someone other than a dealer performs maintenance
service, reset the engine oil life display yourself.
Engine
Oil Life
SEL/RESET
Button /
Button
34Maintenance Item Codes
34