display Acura ZDX 2012 Manual PDF
[x] Cancel search | Manufacturer: ACURA, Model Year: 2012, Model line: ZDX, Model: Acura ZDX 2012Pages: 370, PDF Size: 10.06 MB
Page 272 of 370
270
Maintenance
Before Performing Maintenance
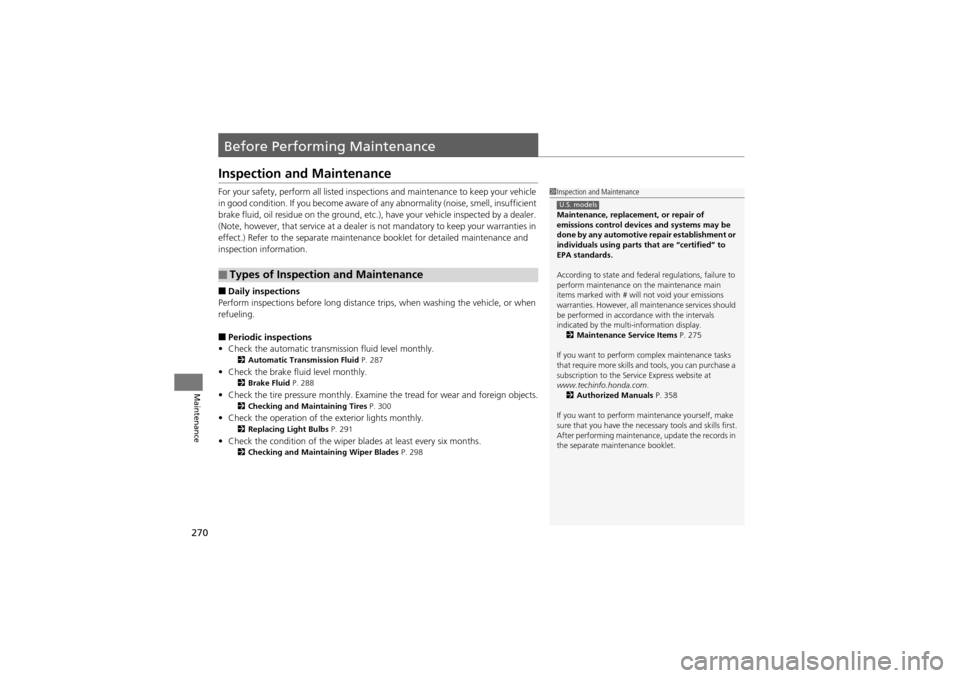
Inspection and Maintenance
For your safety, perform all listed inspections and maintenance to keep your vehicle
in good condition. If you become aware of any abnormality (noise, smell, insufficient
brake fluid, oil residue on the ground, etc.), have your vehicle inspected by a dealer.
(Note, however, that service at a dealer is not mandatory to keep your warranties in
effect.) Refer to the separate maintenanc e booklet for detailed maintenance and
inspection information.
■Daily inspections
Perform inspections before long distance trips, when washing the vehicle, or when
refueling.
■Periodic inspections
• Check the automatic transmi ssion fluid level monthly.
2Automatic Tran smission Fluid P. 287
•Check the brake fluid level monthly.2 Brake Fluid P. 288
•Check the tire pressure monthly. Examin e the tread for wear and foreign objects.2Checking and Maintaining Tires P. 300
•Check the operation of th e exterior lights monthly.2Replacing Light Bulbs P. 291
•Check the condition of the wiper bl ades at least every six months.2Checking and Maintaining Wiper Blades P. 298
■Types of Inspection and Maintenance
1Inspection and Maintenance
Maintenance, replacement, or repair of
emissions contro l devices and systems may be
done by any automotive repair establishment or
individuals using parts that are “certified” to
EPA standards.
According to state and federal regulations, failure to
perform maintenance on the maintenance main
items marked with # will not void your emissions
warranties. However, all maintenance services should
be performed in accordance with the intervals
indicated by the multi-information display.
2 Maintenance Service Items P. 275
If you want to perform complex maintenance tasks
that require more skills an d tools, you can purchase a
subscription to the Serv ice Express website at
www.techinfo.honda.com .
2 Authorized Manuals P. 358
If you want to perform ma intenance yourself, make
sure that you have the nece ssary tools and skills first.
After performing ma intenance, update the records in
the separate maintenance booklet.
U.S. models
Page 275 of 370
273Continued
Maintenance
Maintenance MinderTM
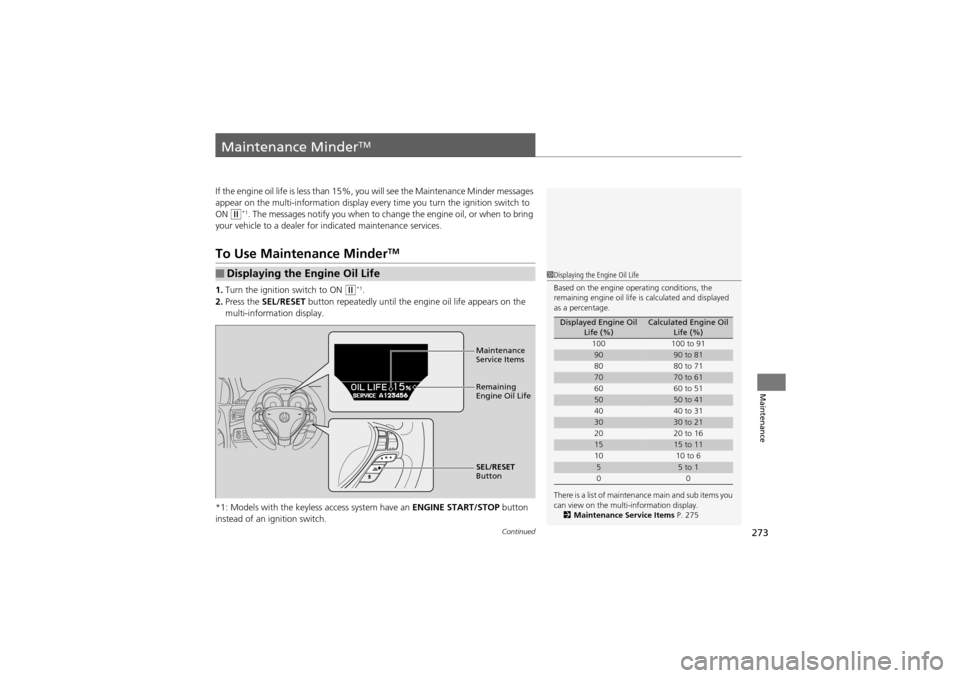
If the engine oil life is less than 15%, you will see the Maintenance Minder messages
appear on the multi-information display every time you turn the ignition switch to
ON
w*1. The messages notify you when to change the engine oil, or when to bring
your vehicle to a dealer for indicated maintenance services.
To Use Maintenance MinderTM
1.Turn the ignition switch to ON w*1.
2. Press the SEL/RESET button repeatedly until the engine oil life appears on the
multi-information display.
*1: Models with the keyless access system have an ENGINE START/STOP button
instead of an ig nition switch.
■Displaying the Engine Oil Life1Displaying the Engine Oil Life
Based on the engine operating conditions, the
remaining engine oil life is calculated and displayed
as a percentage.
There is a list of maintenance main and sub items you
can view on the multi-information display. 2 Maintenance Service Items P. 275
Displayed Engine Oil
Life (%)Calculated Engine Oil Life (%)
100 100 to 91
9090 to 81
80 80 to 71
7070 to 61
60 60 to 51
5050 to 41
40 40 to 31
3030 to 21
20 20 to 16
1515 to 11
10 10 to 6
55 to 1
00
Maintenance
Service Items
Remaining
Engine Oil Life
SEL/RESET
Button
Page 276 of 370
274
uuMaintenance MinderTMuTo Use Maintenance MinderTM
Maintenance
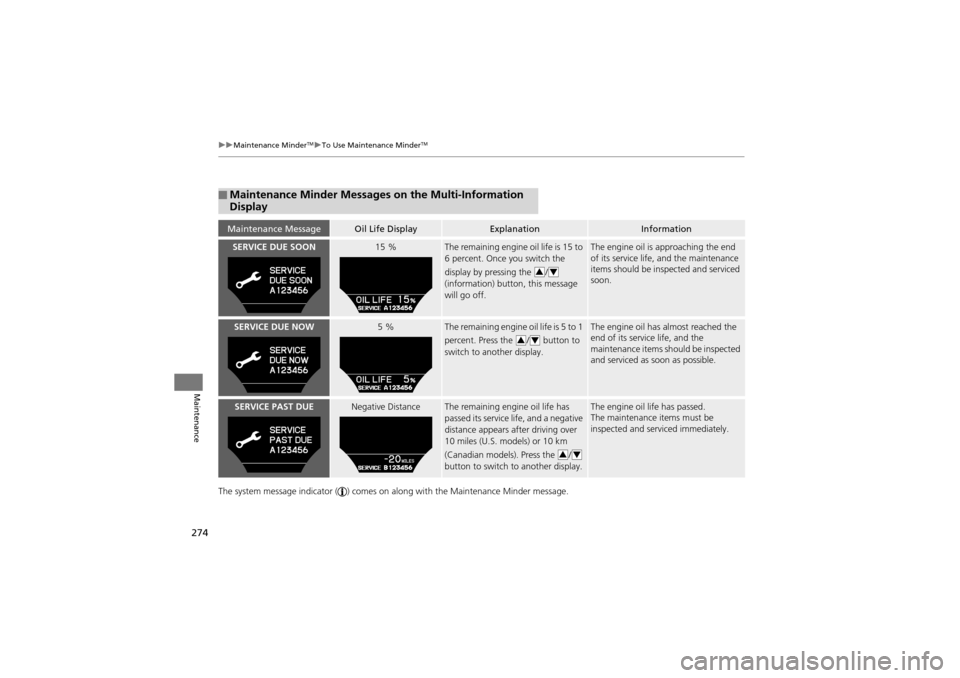
The system message indicator ( ) comes on al ong with the Maintenance Minder message.
■Maintenance Minder Messages on the Multi-Information
Display
Maintenance MessageOil Life DisplayExplanationInformation
SERVICE DUE SOON15 %The remaining engine oil life is 15 to
6 percent. Once you switch the
display by pressing the /
(information) button, this message
will go off.The engine oil is approaching the end
of its service life, and the maintenance
items should be inspected and serviced
soon.
SERVICE DUE NOW5 %The remaining engine oil life is 5 to 1
percent. Press the / button to
switch to another display.The engine oil has almost reached the
end of its service life, and the
maintenance items should be inspected
and serviced as soon as possible.
SERVICE PAST DUENegative DistanceThe remaining engine oil life has
passed its service life, and a negative
distance appears after driving over
10 miles (U.S. models) or 10 km
(Canadian models). Press the /
button to switch to another display.The engine oil life has passed.
The maintenance items must be
inspected and serviced immediately.
34
34
34
Page 277 of 370
275
uuMaintenance MinderTMuTo Use Maintenance MinderTM
Continued
Maintenance
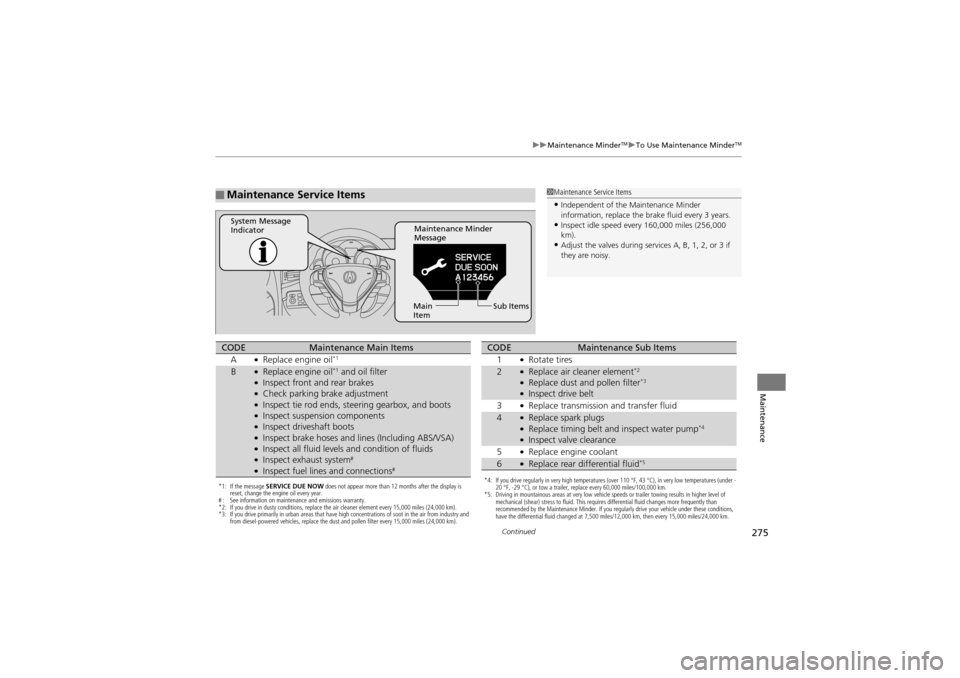
■Maintenance Service Items1Maintenance Service Items
•Independent of the Maintenance Minder
information, replace the brake fluid every 3 years.
•Inspect idle speed every 160,000 miles (256,000
km).
•Adjust the valves during services A, B, 1, 2, or 3 if
they are noisy.
Maintenance Minder
Message
System Message
Indicator
Sub Items
Main
Item
*1: If the message SERVICE DUE NOW does not appear more than 12 months after the display is
reset, change the engine oil every year.
# : See information on maintenance and emissions warranty.
*2: If you drive in dusty conditions, replace the air cleaner element every 15,000 miles (24,000 km).
*3: If you drive primarily in urban areas that have high concentrations of soot in the air from industry and
from diesel-powered vehicles, replace the dust and pollen filter every 15,000 miles (24,000 km).
CODEMaintenance Main Items
A●Replace engine oil*1
B●Replace engine oil*1 and oil filter●Inspect front and rear brakes●Check parking brake adjustment●Inspect tie rod ends, steering gearbox, and boots●Inspect suspension components●Inspect driveshaft boots●Inspect brake hoses and li nes (Including ABS/VSA)●Inspect all fluid levels and condition of fluids●Inspect exhaust system#
●Inspect fuel lines and connections#*4: If you drive regularly in very high temperatures (over 110 °F, 43 °C), in very low temperatures (under -
20 °F, -29 °C), or tow a trailer, replace every 60,000 miles/100,000 km.
*5: Driving in mountainous areas at very low vehicle speeds or trailer towing results in higher level of
mechanical (shear) stress to fluid. This requires differential fluid changes more frequently than
recommended by the Maintenance Minder. If you regularly drive your vehicle under these conditions,
have the differential fluid changed at 7,500 miles/12,000 km, then every 15,000 miles/24,000 km.
CODEMaintenance Sub Items
1●Rotate tires
2●Replace air cleaner element*2
●Replace dust and pollen filter*3
●Inspect drive belt
3●Replace transmission and transfer fluid
4●Replace spark plugs●Replace timing belt an d inspect water pump*4
●Inspect valve clearance
5●Replace engine coolant
6●Replace rear differential fluid*5
Page 278 of 370
uuMaintenance MinderTMuTo Use Maintenance MinderTM
276
Maintenance
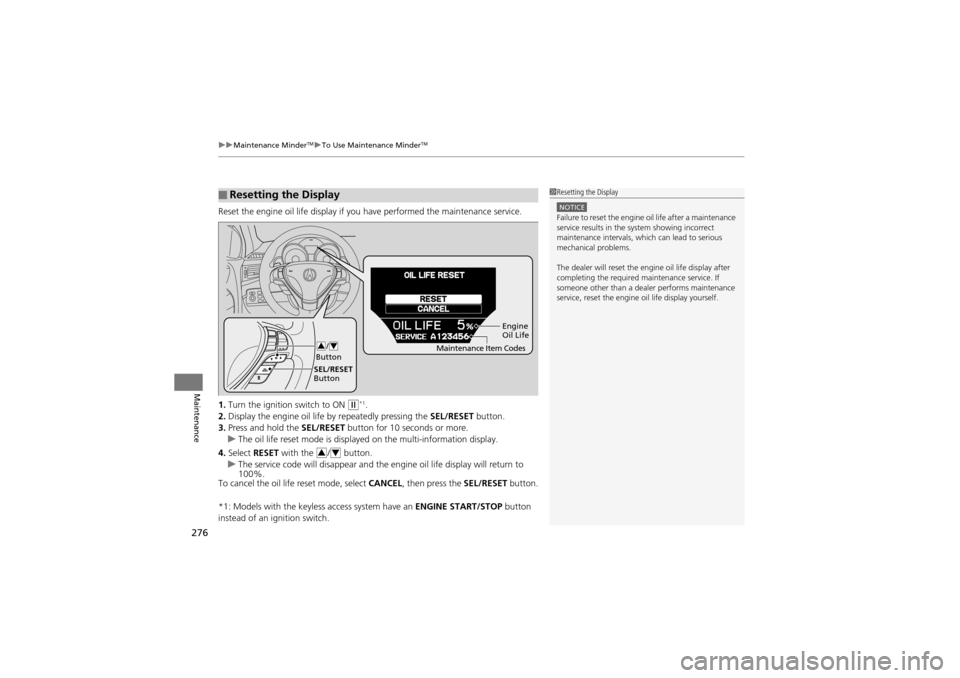
Reset the engine oil life display if y ou have performed the maintenance service.
1. Turn the ignition switch to ON
w*1.
2. Display the engine oil life by repeatedly pressing the SEL/RESET button.
3. Press and hold the SEL/RESET button for 10 seconds or more.
u The oil life reset mode is displayed on the multi-information display.
4. Select RESET with the / button.
u The service code will disappear and the engine oil life display will return to
100%.
To cancel the oil life reset mode, select CANCEL, then press the SEL/RESET button.
*1: Models with the keyless access system have an ENGINE START/STOP button
instead of an ignition switch.
■Resetting the Display1 Resetting the Display
NOTICEFailure to reset the engine oil life after a maintenance
service results in the system showing incorrect
maintenance intervals, which can lead to serious
mechanical problems.
The dealer will reset the engine oil life display after
completing the required ma intenance service. If
someone other than a dealer performs maintenance
service, reset the engine oil life display yourself.
Engine
Oil Life
SEL/RESET
Button /
Button
34Maintenance Item Codes
34
Page 285 of 370
283
uuMaintenance Under the Hood uChanging the Engine Oil and Oil Filter
Continued
Maintenance
Changing the Engine Oil and Oil Filter
You must change the engine oil and oil f ilter regularly in order to maintain the
engine’s lubrication. The engine may be damaged if they are not changed regularly.
Change the oil and filter in accordance with the maintenance message on the multi-
information display. 1.Run the engine until it reaches normal
operating temperature, and then turn the
engine off.
2. Open the hood and re move the engine oil
fill cap.
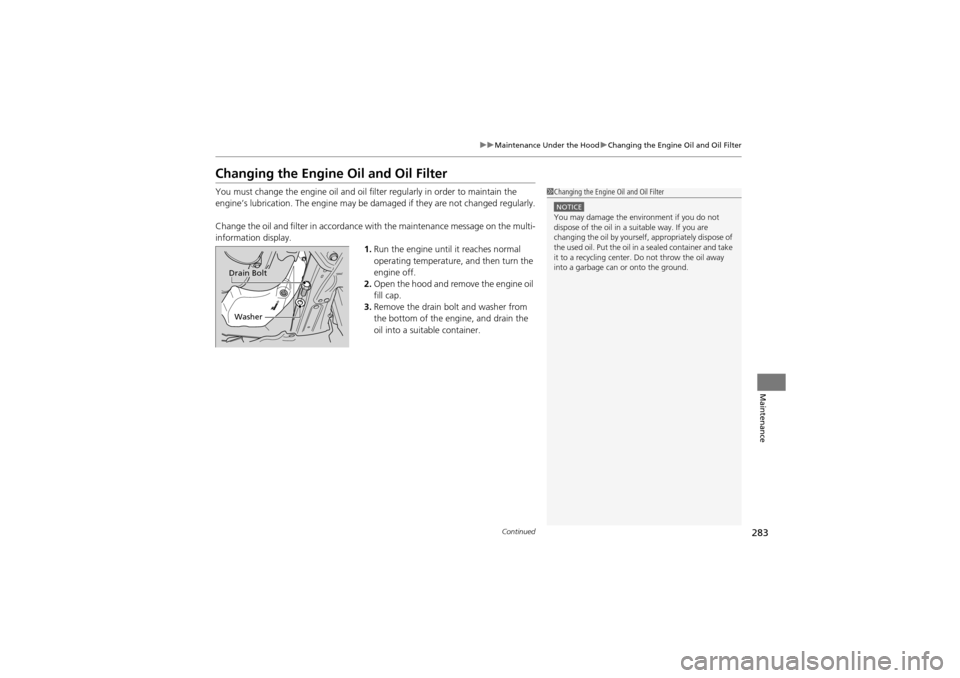
3. Remove the drain bolt and washer from
the bottom of the engine, and drain the
oil into a suitable container.1Changing the Engine Oil and Oil Filter
NOTICEYou may damage the environment if you do not
dispose of the oil in a suitable way. If you are
changing the oil by yourself, appropriately dispose of
the used oil. Put the oil in a sealed container and take
it to a recycling center. Do not throw the oil away
into a garbage can or onto the ground.
Washer
Drain Bolt
Page 292 of 370
290
uuMaintenance Under the Hood uRefilling Window Washer Fluid
Maintenance
Refilling Window Washer Fluid
If the washer fluid is low, a message appears on the multi-information display.
Pour the washer fluid carefully. Do not overflow the reservoir.1Refilling Window Washer Fluid
NOTICEDo not use engine antifr eeze or a vinegar/water
solution in the windshield washer reservoir.
Antifreeze can damage your vehicle’s paint. A
vinegar/water solution ca n damage the windshield
washer pump.
Page 309 of 370
307
uuChecking and Maintaining Tires uTire Rotation
Maintenance
Tire Rotation
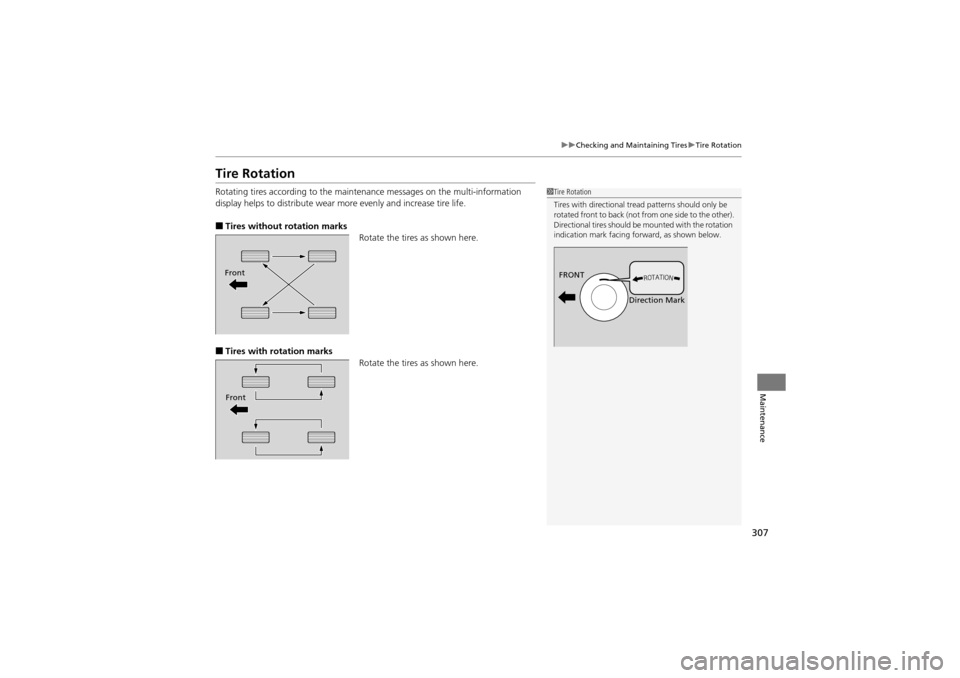
Rotating tires according to the maintenance messages on the multi-information
display helps to distribute wear more evenly and increase tire life.
■Tires without rotation marks Rotate the tires as shown here.
■Tires with rotation marksRotate the tires as shown here.
1Tire Rotation
Tires with directional tread patterns should only be
rotated front to back (not from one side to the other).
Directional tires should be mounted with the rotation
indication mark facing forward, as shown below.
FRONT
Direction MarkFront
Front
Page 327 of 370
325
uuIf a Tire Goes Flat uChanging a Flat Tire
Handling the Unexpected
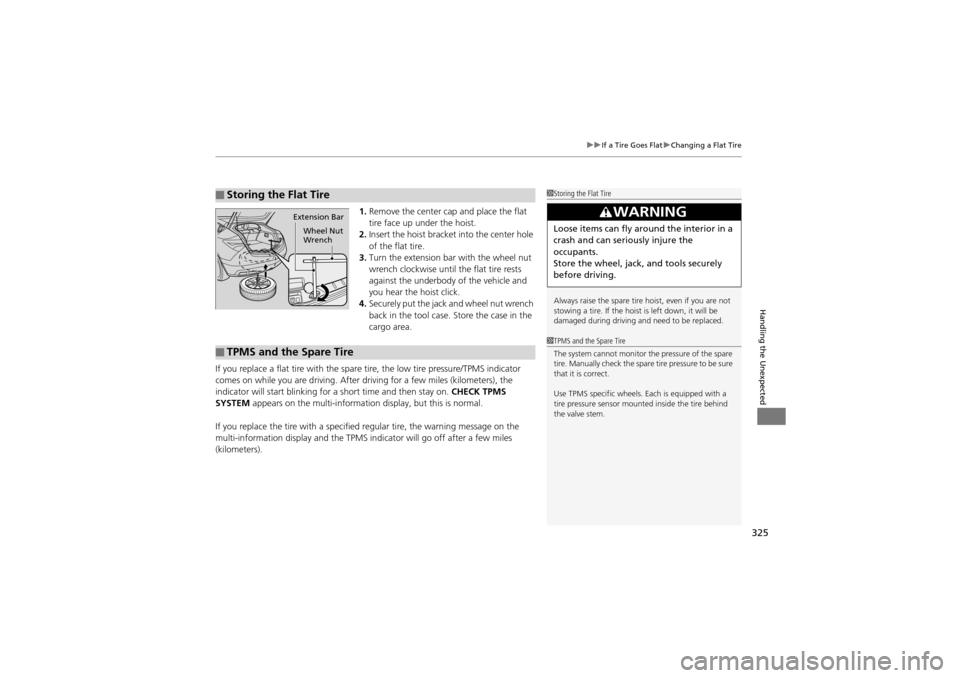
1. Remove the center cap and place the flat
tire face up under the hoist.
2. Insert the hoist bracket into the center hole
of the flat tire.
3. Turn the extension bar with the wheel nut
wrench clockwise until the flat tire rests
against the underbody of the vehicle and
you hear the hoist click.
4. Securely put the jack and wheel nut wrench
back in the tool case. Store the case in the
cargo area.
If you replace a flat tire with the spare tire, the low tire pressure/TPMS indicator
comes on while you are driving. After dr iving for a few miles (kilometers), the
indicator will start blinking for a short time and then stay on. CHECK TPMS
SYSTEM appears on the multi-information display, but this is normal.
If you replace the tire with a specified regular tire, the warning message on the
multi-information display and the TPMS indi cator will go off after a few miles
(kilometers).
■Storing the Flat Tire1 Storing the Flat Tire
Always raise the spare tire hoist, even if you are not
stowing a tire. If the hoist is left down, it will be
damaged during driving and need to be replaced.
3WARNING
Loose items can fly around the interior in a
crash and can seriously injure the
occupants.
Store the wheel, jack, and tools securely
before driving.
Extension Bar
Wheel Nut
Wrench
■TPMS and the Spare Tire
1TPMS and the Spare Tire
The system cannot monitor the pressure of the spare
tire. Manually check the spare tire pressure to be sure
that it is correct.
Use TPMS specific wheels. Each is equipped with a
tire pressure sensor mounted inside the tire behind
the valve stem.
Page 365 of 370
363
Index
Lockout Prevention System..................... 107
DOT Tire Quality Grading ........................ 303
Driving ...................................................... 209
Automatic Transmission .......................... 227
Braking ................................................... 253
Cruise Control ........................................ 232
Shifting Gear .......................................... 228
Starting the Engine ................................. 223
Driving Position Memory System ............ 138
Dust and Po llen Filter.............................. 312
E
ECPS (Electric Contro lled Power Steering
System) .............................................. 73, 336
Elapsed Time .............................................. 92
Electric Controlled Po wer Steering System
(ECPS)
Indicator ........................................... 73, 336
Electronic Stability Control (ESC) ............ 243
Emergency ................................................ 344
Emissions Testing (Readiness Codes) ...... 354
Engine ....................................................... 351
Coolant .................................................. 285
Jump Starting ......................................... 329
Oil .......................................................... 280
Starting................................................... 223
Switch Buzzer ......................................... 127
Engine Coolant ........................................ 285
Adding to the Radiator ........................... 286
Adding to the Reserve Tank .................... 285 Overheating ............................................ 332
Temperature Gauge .................................. 87
Engine Oil ................................................. 280
Adding .................................................... 282
Checking ................................................. 281
Displaying Oil Life .................................... 273
Low Oil Pressure Indicator.................. 68, 334
Recommended Engine Oil........................ 280
Exhaust Gas Hazard (Carbon Monoxide) .. 64
Exterior Care (Cleaning) ........................... 315
Exterior Mirrors ........................................ 142F
Features..................................................... 167
Filters Dust and Pollen ....................................... 312
Oil ........................................................... 283
Flat Tire ..................................................... 319
Floor Mats ................................................. 314
Fluids
Automatic Transmission.... ....................... 287
Brake....................................................... 288
Engine Coolant........................................ 285
Windshield Washer.................................. 290
Fog Light Indicator ..................................... 75
Folding Down the Rear Seats .................. 149
Foot Brake ................................................. 254
Front Airbags (SRS) ..................................... 38
Front Seat Heaters
and Seat Ventilation .............................. 161 Front Seats
................................................ 143
Adjusting ................................................ 143
Fuel ...................................................... 14, 263
Economy ................................................. 266
Gauge ....................................................... 87
Instant Fuel Economy ....... ......................... 92
Low Fuel Indicator .......... ........................... 71
Range ....................................................... 92
Recommendation .................................... 263
Refueling................................................. 263
Fuel Economy ........................................... 266
Fuel Fill Cap ........................................ 14, 265
Message.................................................. 335
Fuel Fill Door ...................................... 14, 264
Fuses Locations................................................. 338
G
Gasoline (Fuel)Economy ................................................. 266
Gauge ....................................................... 87
Information ............................................. 263
Instant Fuel Economy ....... ......................... 92
Low Fuel Indicator .......... ........................... 71
Refueling................................................. 263
Gauges ........................................................ 87
Gear Shift Lever Positions Automatic Transmission .......................... 228
Glass (care) ................................................ 316
Glove Box .................................................. 153