boot Alfa Romeo 156 2004 Owner handbook (in English)
[x] Cancel search | Manufacturer: ALFA ROMEO, Model Year: 2004, Model line: 156, Model: Alfa Romeo 156 2004Pages: 357, PDF Size: 5.04 MB
Page 232 of 357

IN AN EMERGENCY
230
ADDITIONAL STOP LIGHT
(3
rdSTOP)
To replace the bulbs proceed as follows:
– Open the boot.
– Turn the fastening buttons (A-fig. 48)
until they release and lower the trim.
– Slacken the knob (B-fig. 49)and with-
draw the complete unit.
– Slacken the screws (C-fig. 50).
– Remove the transparent cover (D-
fig. 51) and replace the bulb concerned.– Refit the transparent cover and install the
unit locking it with the knob (B-fig. 49).
– Re-position the trim correctly and fasten
with its buttons (A-fig. 48).
IF ONE OF THE
INTERNAL LIGHTS
GOES OUTFRONT ROOF LIGHTTo replace the bulbs proceed as follows:
– Remove the roof light (A-fig. 52) lev-
ering in the points shown by the arrows.
– Open the cover (B-fig. 53).
– Replace the bulb concerned (C-
fig. 53) by pulling it outwards and freeing
it from the lateral contacts ensuring that the
new bulb is correctly fitted between the con-
tacts.
fig. 48
A0B0192m
fig. 50
A0B0205m
fig. 49
A0B0204m
fig. 51
A0B0206m
Page 235 of 357

IN AN EMERGENCY
233
– Change the bulb (C-fig. 62) which
is pressure-fitted.
– Refit the cover (B-fig. 61).
– Re-install the light inserting it in the cor-
rect position firstly on one side and then
pushing on the other until the tab clicks.
LUGGAGE COMPARTMENT
LIGHTTo remove the bulb proceed as follows:
– Open the boot.
– Turn the fastening buttons (A-fig. 63)
until they click and lower the trim.
– Withdraw the clear plastic cover and
bulb (A-fig. 64) using a flat-bladed screw-
driver.– Replace the bulb (B-fig. 65)of the
cylindrical type pulling it outwards ensuring
that the new bulb is correctly positioned be-
tween the contacts.
– Refit the transparent cover ensuring that
the retaining tabs click into place (C-
fig. 65).
fig. 61
A0B0194m
fig. 62
A0B0193m
fig. 65
A0B0190m
fig. 64
A0B0191m
fig. 63
A0B0192m
Page 241 of 357
IN AN EMERGENCY
239
69
69
69
69
71
71
69
71
69
69
69
69
72
69
69
69
69
69
69
71 10
11
13
5
4
5
3
7
15
13
15
9
1
4
12
2
15
12
12
10
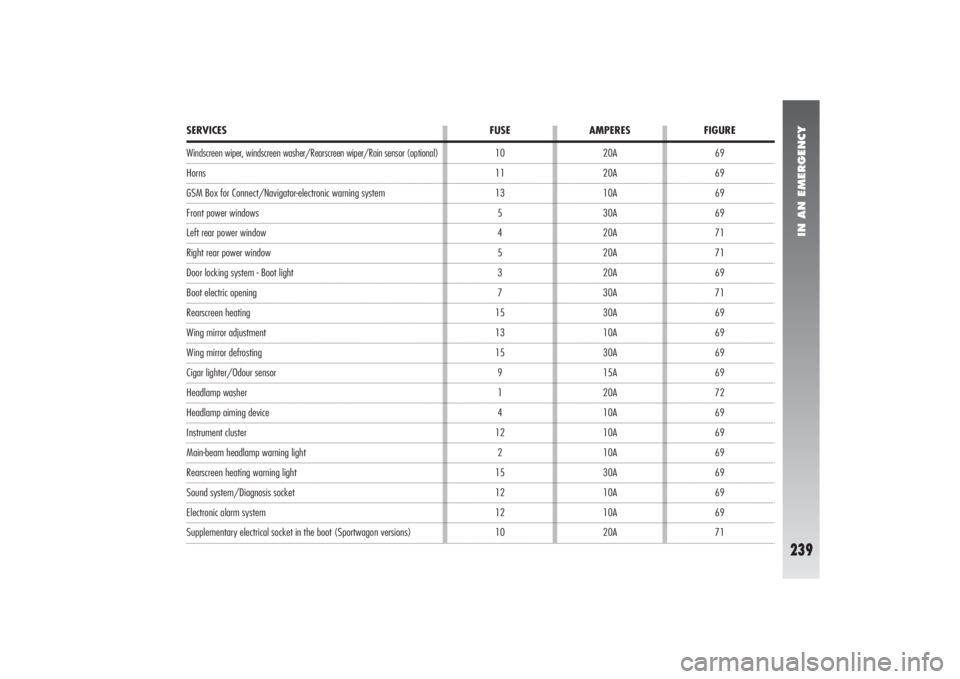
SERVICES FUSE AMPERES FIGUREWindscreen wiper, windscreen washer/Rearscreen wiper/Rain sensor (optional)HornsGSM Box for Connect/Navigator-electronic warning systemFront power windowsLeft rear power windowRight rear power windowDoor locking system - Boot lightBoot electric openingRearscreen heatingWing mirror adjustmentWing mirror defrostingCigar lighter/Odour sensorHeadlamp washerHeadlamp aiming deviceInstrument clusterMain-beam headlamp warning lightRearscreen heating warning lightSound system/Diagnosis socketElectronic alarm system Supplementary electrical socket in the boot (Sportwagon versions)20A
20A
10A
30A
20A
20A
20A
30A
30A
10A
30A
15A
20A
10A
10A
10A
30A
10A
10A
20A
Page 245 of 357

IN AN EMERGENCY
243
IF THE VEHICLE IS TO BE TOWEDThe tow ring supplied with the vehicle is
housed in the tool box under the boot mat.
To install the tow ring, proceed as follows:
– Take the tow ring from the tool box.
– Remove the cover (A) snap-fitted on the
front (fig. 77) or rear bumper (fig. 78).
If the supplied flat screwdriver is used to car-
ry out this operation, protect the tip with a
soft cloth to prevent damaging the car.– Firmly screw the ring in its housing.fig. 77
A0B0593m
fig. 78
A0B0594m
Carefully clean the thread-
ed housing before tighten-
ing the ring. Before beginning to
tow the car make sure that the
tow ring is firmly tightened in its
threaded housing.
WARNING
Before beginning to tow
the car, turn the ignition
key to MAR and then to STOP, do
not remove it. Removing the key
automatically engages the steering
lock resulting in the impossibility
to steer the wheels. When towing
remember that without the help of
the servo-brake and power steer-
ing, it is necessary to exert more
effort on the brake pedal and for
steering. Do not use flexible cables
for towing and avoid jerks. Dur-
ing towing operations make sure
that fastening the joint to the car
does not damage the components
in contact with it. When towing the
car it is compulsory to comply with
the specific traffic regulations con-
cerning both the towing device and
behaviour on the road.
WARNING
Page 251 of 357
CAR MAINTENANCE
249
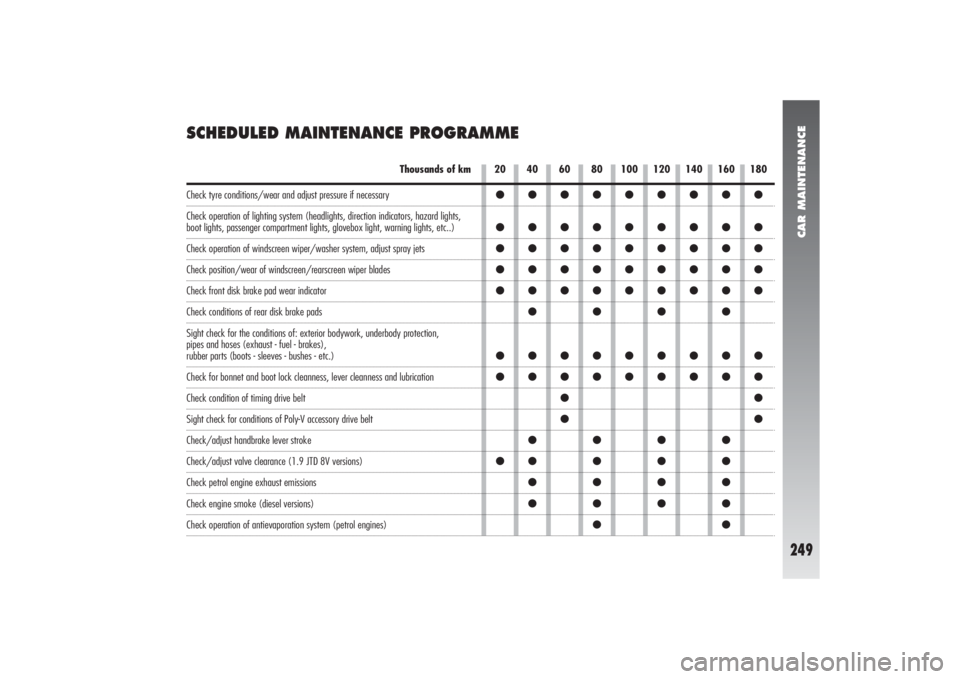
SCHEDULED MAINTENANCE PROGRAMME
20 40 60 80 100 120 140 160 180
Thousands of km
●●●●●●●●●
●●●●●●●●●
●●●●●●●●●
●●●●●●●●●
●●●●●●●●●
●●●●
●●●●●●●●●
●●●●●●●●●
●●
●●
●●●●
●●●●●
●●●●
●●●●
●●
Check tyre conditions/wear and adjust pressure if necessary
Check operation of lighting system (headlights, direction indicators, hazard lights,boot lights, passenger compartment lights, glovebox light, warning lights, etc..)Check operation of windscreen wiper/washer system, adjust spray jetsCheck position/wear of windscreen/rearscreen wiper bladesCheck front disk brake pad wear indicatorCheck conditions of rear disk brake pads
Sight check for the conditions of: exterior bodywork, underbody protection,
pipes and hoses (exhaust - fuel - brakes), rubber parts (boots - sleeves - bushes - etc.)Check for bonnet and boot lock cleanness, lever cleanness and lubricationCheck condition of timing drive beltSight check for conditions of Poly-V accessory drive beltCheck/adjust handbrake lever strokeCheck/adjust valve clearance (1.9 JTD 8V versions)Check petrol engine exhaust emissionsCheck engine smoke (diesel versions)Check operation of antievaporation system (petrol engines)
Page 253 of 357
CAR MAINTENANCE
251
ADDITIONAL
OPERATIONSEvery 1000 kmor before long journeys
check and if necessary top up:
– engine coolant level
– brake fluid/hydraulic clutch control flu-
id level
– power steering fluid level
– windscreen washer and headlamp wash-
er fluid level
– tyre pressure and conditions.
Every 3000 kmcheck the level of the
engine oil and top up if necessary.
You are recommended to use products of
the FL Selenia, designed and developed
expressly for Alfa Romeo cars (see the table
“Specifications of fluids and lubricants” in
the “Technical specifications” chapter).
ANNUAL INSPECTION
PROGRAMMEAn annual inspection programme
has been established for cars thet
cover less than 20,000 km (e.g.
10,000 km). It consists of the fol-
lowing:
– Check tyre conditions/wear and adjust
pressure if required (including the compact
spare wheel)
– Check lighting system operation (head-
lights, direction indicators, hazard lights,
boot lights, passenger compartment lights,
glovebox light, warning lights of instrument
panel, etc.)
– Check windscreen and rear-screen
wiper/washer operation, adjust nozzles
– Check windscreen/rear-screen blade po-
sition/wear
– Check condition and wear of the front
brake pad
– Check for bonnet and boot lock clean-
ness, lever cleanness and lubrication– Visually check the following: engine,
gearbox, transmission, piping (exhaust - fu-
el - brakes) rubber components (casings -
sleeves - bushings, etc..), brake and fuel
hoses
– Check battery charge condition
– Visually check the condition of the belts
and various controls
– Check and top up if necessary, the flu-
id levels (coolant, brake fluid, windscreen
washer fluid, battery, etc.)
– Change engine oil
– Replace engine oil filter
– Change pollen filter.
Page 271 of 357
CAR MAINTENANCE
269
USEFUL HINTS TO EXTEND
THE LIFE OF YOUR BATTERYTo avoid quickly draining the battery and
to preserve its operating conditions over the
course of time, carefully follow the instruc-
tions below:
– The terminals must always be tightened.
– As far as possible, avoid keeping ser-
vices on for a long time with the engine
stopped (radio, hazard lights, parking lights,
etc.).
– When leaving the car parked in a
garage, make sure that the doors, bonnet,
boot and interior lids are properly shut to
prevent lights from staying on.
– Before doing any work on the electric
system, disconnect the battery negative ter-
minal.– If after purchasing the car, you wish to
install electrical accessories which need a
permanent electrical supply (alarm, hands-
free phone, radio-navigator with satellite an-
ti-theft function, etc.) contact Alfa Romeo
Authorized Services whose qualified per-
sonnel, in addition to suggesting the most
suitable devices from Lineaccessori Alfa
Romeo will be able to evaluate the total
electrical absorption, checking whether the
car’s electric system is able to support the
load required or whether a battery with high-
er capacity is necessary. In fact, these de-
vices continue to absorb current with the
ignition key off (car parked, engine off) and
may gradually drain the battery.
REPLACING THE BATTERYIf required, replace the battery with a gen-
uine spare part having the same specifica-
tions. If a battery with different specifica-
tions is fitted, the service intervals given in
the Programmed Maintenance Schedule in
this section will no longer be valid. Refer
to the instructions provided by the battery
manufacturer.
Page 284 of 357
ALFA 156 SPORTWAGON
282
LUGGAGE
COMPARTMENTThe boot lid can be opened from outside
the vehicle (pressing the button on the key)
and from inside the vehicle.
WARNINGIf the tailgate is not shut
properly, this will be shown by the corre-
sponding warning light
´
and warning mes-
sage on the Infocenter display.
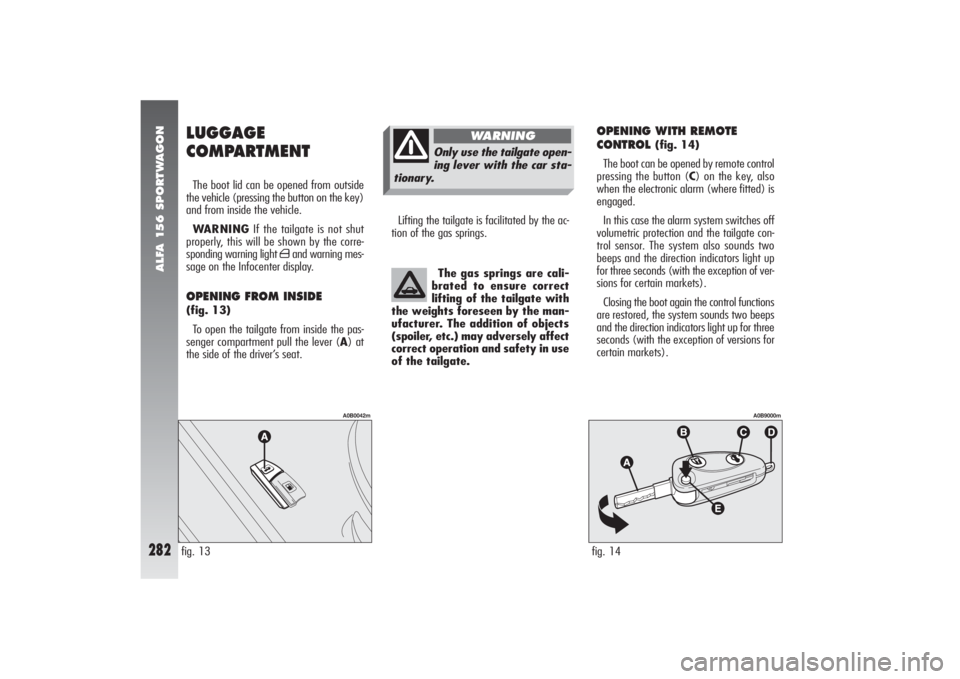
OPENING FROM INSIDE (fig. 13)
To open the tailgate from inside the pas-
senger compartment pull the lever (A) at
the side of the driver’s seat.fig. 13
A0B0042m
Lifting the tailgate is facilitated by the ac-
tion of the gas springs.
The gas springs are cali-
brated to ensure correct
lifting of the tailgate with
the weights foreseen by the man-
ufacturer. The addition of objects
(spoiler, etc.) may adversely affect
correct operation and safety in use
of the tailgate.
OPENING WITH REMOTE
CONTROL
(fig. 14)
The boot can be opened by remote control
pressing the button (C) on the key, also
when the electronic alarm (where fitted) is
engaged.
In this case the alarm system switches off
volumetric protection and the tailgate con-
trol sensor. The system also sounds two
beeps and the direction indicators light up
for three seconds (with the exception of ver-
sions for certain markets).
Closing the boot again the control functions
are restored, the system sounds two beeps
and the direction indicators light up for three
seconds (with the exception of versions for
certain markets).
fig. 14
A0B9000m
Only use the tailgate open-
ing lever with the car sta-
tionary.
WARNING
Page 285 of 357

ALFA 156 SPORTWAGON
283
CLOSING THE TAILGATE (fig. 15)
To lower the tailgate use the grip (A) on
the interior trim.fig. 15
A0B0084m
fig. 16
A0B0085m
CAUTIONS FOR CARRYING
LUGGAGEOn versions not fitted with the automatic
rear geometry control system, when trav-
elling at night with a load in the boot, it is
necessary to adjust the height of the low
beams (see “Headlamps” paragraph in the
chapter “Getting to know your car”). For
correct use of the aiming device, also make
sure that the load does not exceed the val-
ues given in the same paragraph.
RESTRAINING THE LOAD(fig. 16-17)
The loads carried can be held in place with
the belts hooked to the rings provided at the
corners of the boot.
The rings also serve for fastening the lug-
gage retainer net (available on request for
versions/markets where applicable c/o Al-
fa Romeo Authorized Services).
fig. 17
A0B0086m
Page 286 of 357

ALFA 156 SPORTWAGON
284
fig. 19
A0B0092m
fig. 18
A0B0091m
ODDMENTS COMPARTMENT (fig. 18-19)
On the sides of the boot there are two re-
cesses closed by a lid.
To open the cover, press button (A) and
turn it downwards. As optional for ver-
sions/markets where applicable, the odd-
ment compartment on the left-hand side can
be provided with CD-Changer.
When using the boot, nev-
er exceed the maximum
permissible loads given in the
“Technical specifications” chapter.
Also make sure that the items con-
tained in the boot are firmly se-
cured, to prevent them being
thrown forward and harming the
passengers in the event of abrupt
braking.
WARNING
Heavy luggage without
restraints could cause se-
rious harm to the passengers in an
accident.
WARNING
If you want to carry fuel in
a reserve can, you should
comply with legal regulations, on-
ly using a certified can suitably fas-
tened to the load retainer rings at
the corner of the boot. However,
remember that this increases the
risk of fire in the event of an acci-
dent.
WARNING