start stop button Alfa Romeo 156 2004 Owner handbook (in English)
[x] Cancel search | Manufacturer: ALFA ROMEO, Model Year: 2004, Model line: 156, Model: Alfa Romeo 156 2004Pages: 357, PDF Size: 5.04 MB
Page 16 of 357
GETTING TO KNOW YOUR CAR14
AUTOMATIC ENGAGEMENT
OF THE ALARM (optional for versions/markets
where applicable)
If the alarm has not been engaged with
the remote control it will come on auto-
matically after an established time of 30
seconds from the moment that the ignition
key has been turned to the STOPor
PARKpositions and a door or the boot has
been opened and then closed again. This
condition is shown by the intermittent illu-
mination of the led in the car and by the sig-
nalling described previously.
To deactivate the alarm press the button
on the remote control.
The alarm is also automatically engaged
when the doors are closed using the key.
When the alarm is engaged automatically
the doors are not locked.
WHEN THE ALARM
IS TRIGGEREDWhen the alarm is engaged it will sound
when:
– one of the doors, the bonnet or the tail-
gate is opened;
– the battery is disconnected or the elec-
tric cables are cut, or the emergency key ca-
bles are cut;
– intrusion into the passenger compart-
ment, e.g. window being broken (volumetric
protection);
– attempt to start the engine (key at
MAR);
– abnormal car raising/sloping (for ver-
sions/markets where applicable).
Depending on the markets, the triggering
of the alarm will activate the siren and the
hazard warning lights (for about 26 sec-
onds). The methods of operation and the
number of cycles may vary depending on
the versions/markets.
However a maximum number of cycles is
foreseen.
Once the alarm cycle has come to an end,
the system will return to its normal moni-
toring state.
INTERRUPTING THE ALARMTo interrupt the alarm press the button on
the remote control or, if the remote control
battery is down, get into the car, insert the
key into the ignition switch and turn the key
to MAR.
WARNINGIf it is necessary for the ve-
hicle to lie inactive for long periods (over 3
weeks), close the vehicle using the key to
deactivate the alarm.
Page 19 of 357
GETTING TO KNOW YOUR CAR17
IGNITION DEVICE THE SWITCH
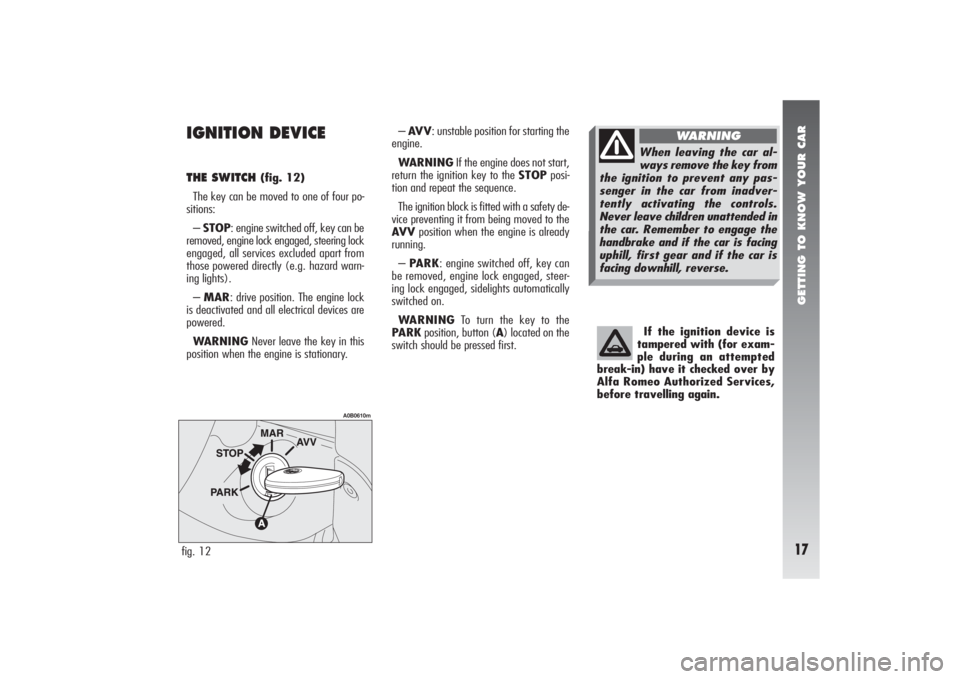
(fig. 12)
The key can be moved to one of four po-
sitions:
– STOP: engine switched off, key can be
removed, engine lock engaged, steering lock
engaged, all services excluded apart from
those powered directly (e.g. hazard warn-
ing lights).
– MAR: drive position. The engine lock
is deactivated and all electrical devices are
powered.
WARNINGNever leave the key in this
position when the engine is stationary.– AV V: unstable position for starting the
engine.
WARNINGIf the engine does not start,
return the ignition key to the STOPposi-
tion and repeat the sequence.
The ignition block is fitted with a safety de-
vice preventing it from being moved to the
AV Vposition when the engine is already
running.
– PARK: engine switched off, key can
be removed, engine lock engaged, steer-
ing lock engaged, sidelights automatically
switched on.
WARNINGTo turn the key to the
PARKposition, button (A) located on the
switch should be pressed first.If the ignition device is
tampered with (for exam-
ple during an attempted
break-in) have it checked over by
Alfa Romeo Authorized Services,
before travelling again.
fig. 12
A0B0610m
When leaving the car al-
ways remove the key from
the ignition to prevent any pas-
senger in the car from inadver-
tently activating the controls.
Never leave children unattended in
the car. Remember to engage the
handbrake and if the car is facing
uphill, first gear and if the car is
facing downhill, reverse.
WARNING
Page 89 of 357

GETTING TO KNOW YOUR CAR87
GENERAL TRIP - TRIP BThe TRIP COMPUTER function gives information relating to the operating status of the vehicle on the Infocenter display. This function comprises
the GENERAL TRIP concerning the complete mission of the car and TRIP B concerning the partial car mission. This function (as shown in the
graph below) is contained within the complete mission. Both functions are resettable.
The GENERAL TRIP displays the figures relating to
RANGE
, TRAVEL DISTANCE
, AVERAGE CONSUMPTION
, ACTUAL CONSUMPTION
, AVERAGE VELOCITY
, TRAVELTIME
(com-
plete mission time).
The TRIP B (with automatic reset each time at least 2 hours have passed since stopping the engine), displays information concerning TRAVEL
DISTANCE B
, AVERAGE CONSUMPTION B
, AVERAGE SPEED B
, TRAVEL TIME B
(partial mission time).
Start of journey procedure (reset)
To start a new journey monitored by the GENERAL TRIP, with the ignition key at MAR, press the button
ã
with
å
(see “Control buttons”).
The reset operation (pressing the
å
button) in the presence of the screens concerning the GENERAL TRIP also makes it possible to reset
TRIP B. The reset operation (pressing the å
button) in the presence of only the screens concerning TRIP B makes it possible to reset only the
information associated with this function.
WARNINGThe
RANGE
and
ACTUAL CONSUMPTION
information cannot be reset.
Reset TRIP B
End of partial mission
Start of new partial mission
˙
Reset TRIP B
End of partial mission
Start of new partial mission
˙
˙
Reset TRIP B
˙
˙
˙
TRIP B
TRIP B
TRIP B
End of partial mission
Start of new partial missionReset TRIP B
End of partial mission
Start of new partial mission
GENERAL TRIP
Reset GENERAL TRIP
End of complete mission
Start of new mission
˙
Reset GENERAL TRIP
End of complete mission
Start of new mission
˙
Page 121 of 357
GETTING TO KNOW YOUR CAR
119
HOW TO USE THE AUTOMATIC
TWO-ZONE CLIMATE CONTROL(fig. 101)
WARNINGThe knob rings are not pro-
vided with automatic stopper; therefore,
they are free to rotate in both directions once
they have reached the maximum or mini-
mum values.
The system can be started in different
ways, but it is recommended that the re-
quired temperatures are set on the
displays; then, press (14)
AUTO
button.
Thus, the system will start operating fully
automatic, to reach the set temperatures
in the shortest possible time and keep them.
During the fully automatic operation of the
system, the set temperatures can however
be modified at any time: the system will au-
tomatically modify its own settings to adapt
itself to the new requirements.WARNINGThe temperature difference
between the driver’s and the passenger’s
sides must not be greater than 7°C in order
to be accepted by the system.
The selections made by the system in au-
tomatic mode can be customized by man-
ually acting on the following controls:
– fan speed adjustment knob (3)
– air distribution selection button (8)
– inside air recirculation on/off button (7)
v– climate control compressor on enable
button (12)
√
.
Manually selecting one or more of these
functions turns off the right led on the but-
ton (14)
AUTO
.With one or more functions switched on
manually, the temperature control for the air
admitted to the passenger compartment will
in any case continue to be monitored auto-
matically by the system (left led on button
14
AUTO
on), except with the climate con-
trol compressor off.
In fact, in this condition, the temperature
of the air admitted into the passenger com-
partment cannot be lower than the outside
air temperature; this condition is indicated
by the turning off of the two leds on but-
ton (14) AUTO
and flashing on the display
(2) and/or (5) related with the tempera-
ture rate that cannot be obtained.
Page 135 of 357
GETTING TO KNOW YOUR CAR
133
When the maximum demisting/defrost-
ing function is on, the only manual opera-
tions possible are manual adjustment of the
fan and switching rearscreen heating off.
Pressing one of the following buttons:
(10)
-
, (7)
v
, (11)
MONO
, (14)
AUTO
or (12)
√
the system switches off
the maximum demisting/defrosting func-
tion, resuming the system operating condi-
tions prior to turning it on, in addition to
activating the last function required, if any.
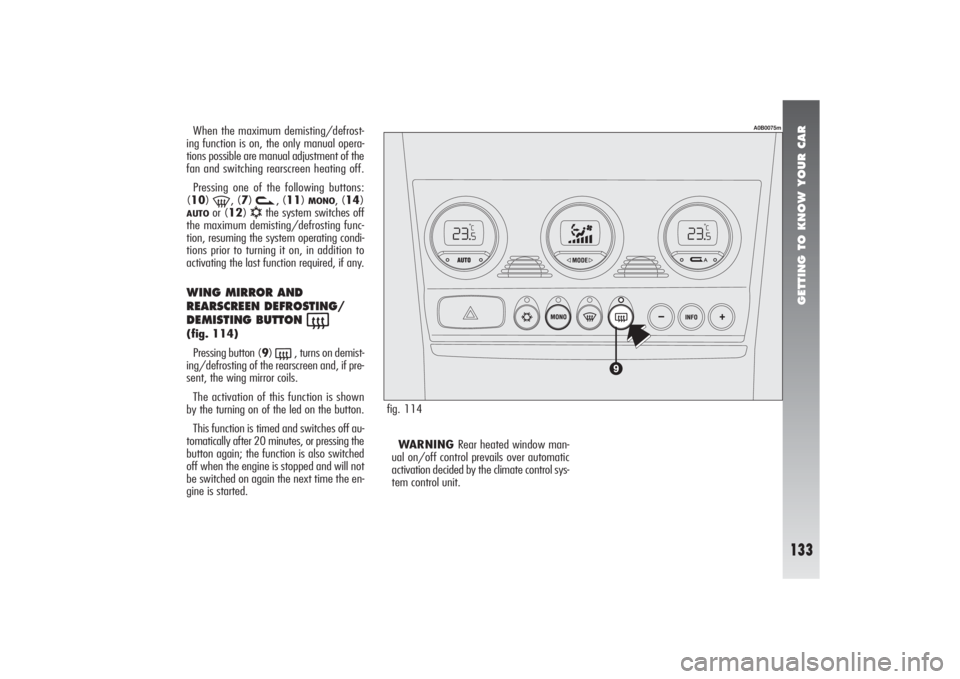
WING MIRROR AND
REARSCREEN DEFROSTING/
DEMISTING BUTTON
(
(fig. 114)
Pressing button (9)
(
, turns on demist-
ing/defrosting of the rearscreen and, if pre-
sent, the wing mirror coils.
The activation of this function is shown
by the turning on of the led on the button.
This function is timed and switches off au-
tomatically after 20 minutes, or pressing the
button again; the function is also switched
off when the engine is stopped and will not
be switched on again the next time the en-
gine is started.WARNING Rear heated window man-
ual on/off control prevails over automatic
activation decided by the climate control sys-
tem control unit.
fig. 114
A0B0075m
Page 136 of 357

GETTING TO KNOW YOUR CAR
134
This function is timed and switches off au-
tomatically after 20 minutes, or pressing the
button again; the function is also switched
off when the engine is stopped and will not
be switched on again the next time the en-
gine is started.
WARNINGThe system turns on
rearscreen heating automatically if the tem-
perature is below 3°C.
WARNINGDo not apply stickers on the
inside of the rearscreen over the heating fil-
aments to avoid damage that might cause
it to stop working properly.
WARNINGWhen reconnecting the neg-
ative battery cable after having disconnected
it, wait for 2 minutes before turning the key
to enable the climate control system to re-
set actuator strokes properly.
POLLEN FILTER This filter has the specific capability of com-
bining the mechanical filtering of the air with
an electrostatic effect so that the outside air
admitted to the passenger compartment is
purified and free from particles such as dust,
pollen, etc.
In addition to the above, it also effectively
reduces the concentration of pollutants.
The filtering action takes place under all
air inlet conditions and it is clearly most ef-
fective with the windows shut.
Have the conditions of the filter checked by
Alfa Romeo Authorized Services at least once
a year, preferably on the onset of summer.If the vehicle is used mainly in polluted
or dusty areas it should be checked and if
necessary replaced, at shorter intervals.
Failure to replace the fil-
ter may considerably re-
duce the effectiveness of
the climate control system up to
blocking the air flow from the out-
lets and vents.
Page 138 of 357
GETTING TO KNOW YOUR CAR
136
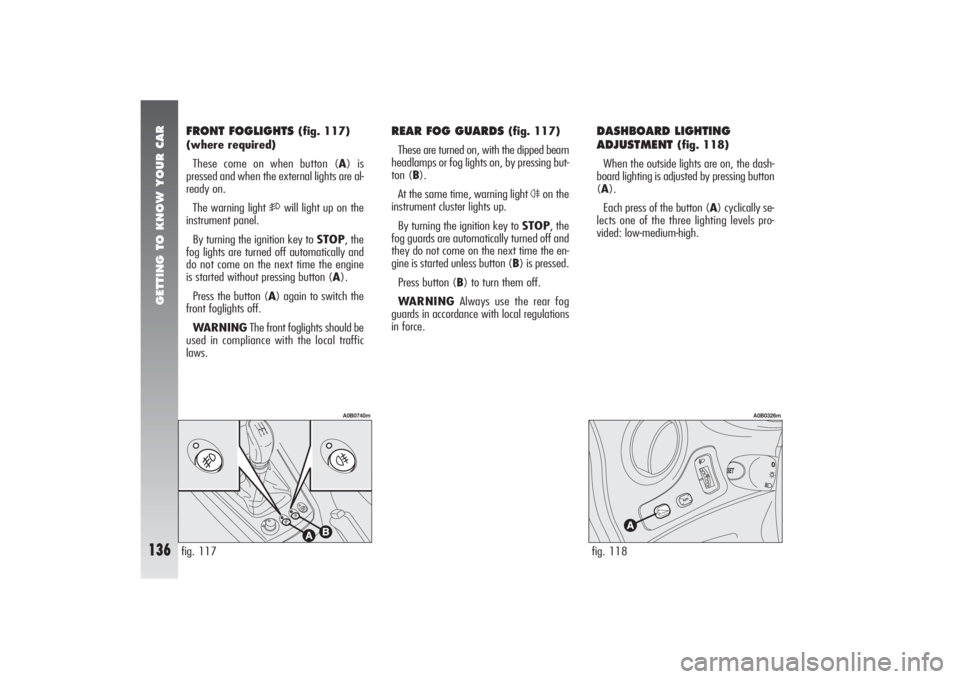
DASHBOARD LIGHTING
ADJUSTMENT
(fig. 118)
When the outside lights are on, the dash-
board lighting is adjusted by pressing button
(A).
Each press of the button (A) cyclically se-
lects one of the three lighting levels pro-
vided: low-medium-high.
FRONT FOGLIGHTS
(fig. 117)
(where required)
These come on when button (A) is
pressed and when the external lights are al-
ready on.
The warning light
5
will light up on the
instrument panel.
By turning the ignition key to STOP, the
fog lights are turned off automatically and
do not come on the next time the engine
is started without pressing button (A).
Press the button (A) again to switch the
front foglights off.
WARNINGThe front foglights should be
used in compliance with the local traffic
laws.
REAR FOG GUARDS
(fig. 117)
These are turned on, with the dipped beam
headlamps or fog lights on, by pressing but-
ton (B).
At the same time, warning light
4
on the
instrument cluster lights up.
By turning the ignition key to STOP, the
fog guards are automatically turned off and
they do not come on the next time the en-
gine is started unless button (B) is pressed.
Press button (B) to turn them off.
WARNINGAlways use the rear fog
guards in accordance with local regulations
in force.
fig. 117
A0B0740m
fig. 118
A0B0326m
Page 139 of 357

GETTING TO KNOW YOUR CAR
137
Inspect the care carefully to make sure that
there are no fuel leaks, for instance in the
engine compartment, under the vehicle or
near the tank area.
If no leaks are found and the vehicle can
be restarted again, press button (A) to ac-
tivate the fuel supply system.
After a collision, remember to turn the ig-
nition key to STOP so as not to run the bat-
tery down.
INERTIAL FUEL CUT-OFF
SWITCH
(fig. 119)
This is an automatic safety switch which is
triggered in the event of crash to interrupt
the flow of fuel.
The intervention of the inertial switch is in-
dicated by a message + symbol on the In-
focenter display (see “Infocenter Display”
in this chapter) and by the door unlocking.
fig. 119
A0B0574m
fig. 120
A0B0044m
OPENING THE FUEL FLAP(fig. 120)
The fuel flap is released from inside the car
raising the front part of the lever (A).
If a smell of fuel is noted
following an accident, or
the fuel system is leaking, to avoid
the risk of fire do not reset the
switch.
WARNING
Page 155 of 357

GETTING TO KNOW YOUR CAR
153
In an emergency (failures, flat battery,
etc.), it is possible to move the lever from
position P, pressing the special mechanical
button under the gearshift lever cover, in the
area (A-fig. 135); at the same time
move the lever from position Pto the re-
quired position. If the engine is being
started, move the lever to position N, which
is the only one that allows this operation
in this case.
WARNINGThe ignition key in the
STOPposition can only be removed from
the ignition switch provided that the
gearshift lever is at P(Key-lock).In an emergency (failures, flat battery,
etc.), it is possible to remove the ignition
key also with the selector lever not posi-
tioned at P.
Press the release device (A-fig. 136),
next to the ignition switch inside the trim,
with your finger removing the key at the
same time.
Do not take the car to peak performance
until the engine has reached normal oper-
ating temperature.fig. 135
A0B0267m
fig. 136
A0B0266m
fig. 137
A0B0385m
SELECTING AUTOMATIC/
MANUAL GEARSHIFTINGThe main feature of this gearbox is the pos-
sibility of using it either automatically or
manually. The choice of the operating mode
is carried out positioning the gearshift lever
in the right sector (automatic gearshifting)
or in the left sector (manual gearshifting).
The gearbox operating mode and the gear
engaged are shown on the display inside the
rev counter (A-fig. 137).