ESP Alfa Romeo 4C 2016 Owner handbook (in English)
[x] Cancel search | Manufacturer: ALFA ROMEO, Model Year: 2016, Model line: 4C, Model: Alfa Romeo 4C 2016Pages: 182, PDF Size: 9.49 MB
Page 132 of 182
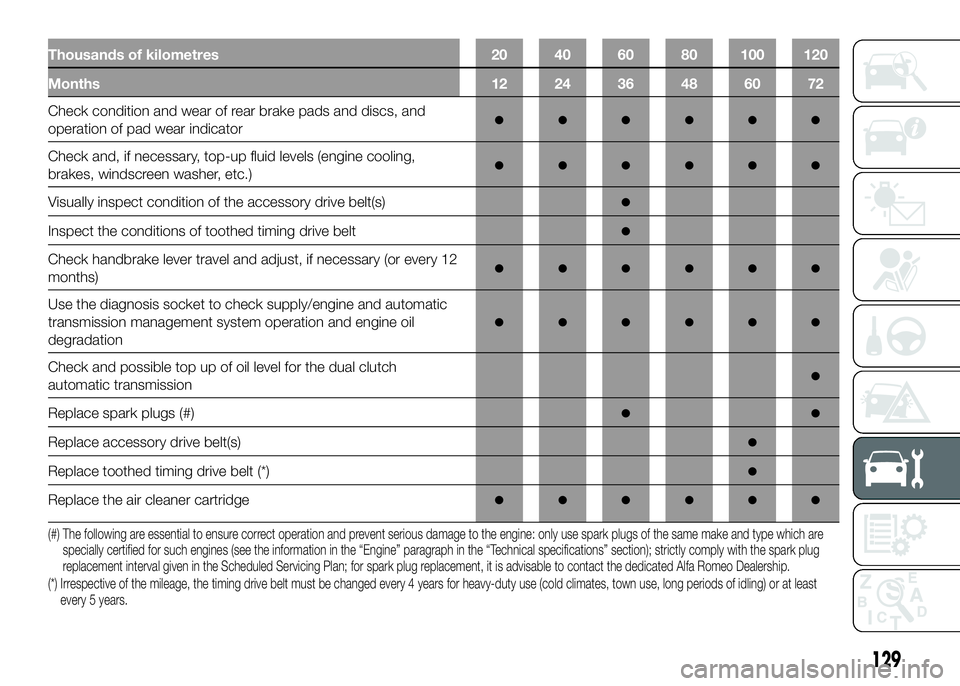
Thousands of kilometres 20 40 60 80 100 120
Months 12 24 36 48 60 72
Check condition and wear of rear brake pads and discs, and
operation of pad wear indicator●●●●●●
Check and, if necessary, top-up fluid levels (engine cooling,
brakes, windscreen washer, etc.)●●●●●●
Visually inspect condition of the accessory drive belt(s)●
Inspect the conditions of toothed timing drive belt●
Check handbrake lever travel and adjust, if necessary (or every 12
months)●●●●●●
Use the diagnosis socket to check supply/engine and automatic
transmission management system operation and engine oil
degradation
●●●●●●
Check and possible top up of oil level for the dual clutch
automatic transmission●
Replace spark plugs (#)●●
Replace accessory drive belt(s)●
Replace toothed timing drive belt (*)●
Replace the air cleaner cartridge●●●●●●
(#) The following are essential to ensure correct operation and prevent serious damage to the engine: only use spark plugs of the same make and type whichare
specially certified for such engines (see the information in the “Engine” paragraph in the “Technical specifications” section); strictly comply with the spark plug
replacement interval given in the Scheduled Servicing Plan; for spark plug replacement, it is advisable to contact the dedicated Alfa Romeo Dealership.
(*) Irrespective of the mileage, the timing drive belt must be changed every 4 years for heavy-duty use (cold climates, town use, long periods of idling) or at least
every 5 years.
129
Page 136 of 182
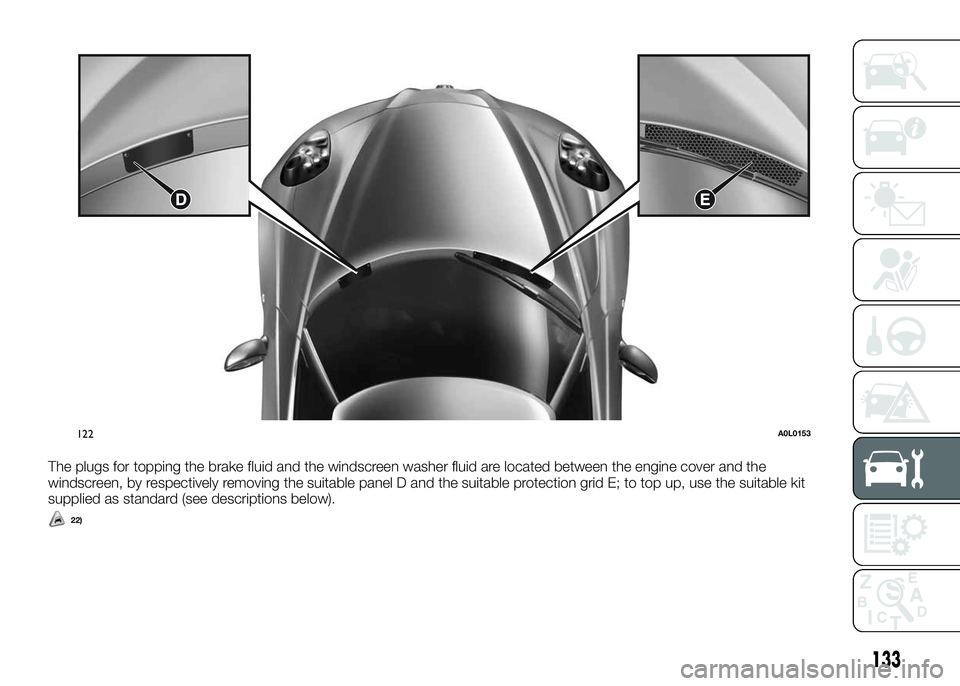
The plugs for topping the brake fluid and the windscreen washer fluid are located between the engine cover and the
windscreen, by respectively removing the suitable panel D and the suitable protection grid E; to top up, use the suitable kit
supplied as standard (see descriptions below).
22)
122A0L0153
133
Page 137 of 182
ENGINE OIL
Check that the oil level is between the
MIN and MAX marks on the dipstick A
fig. 121.
For this check, take out the dipstick
from its seat, clean it with a lint-free
cloth, reinsert the dipstick; take it out
again and check the oil level.
121)
If the level of the oil is close to or below
the MIN mark, add oil via the filler fitting
B fig. 121 until the MAX mark is
reached.
23)
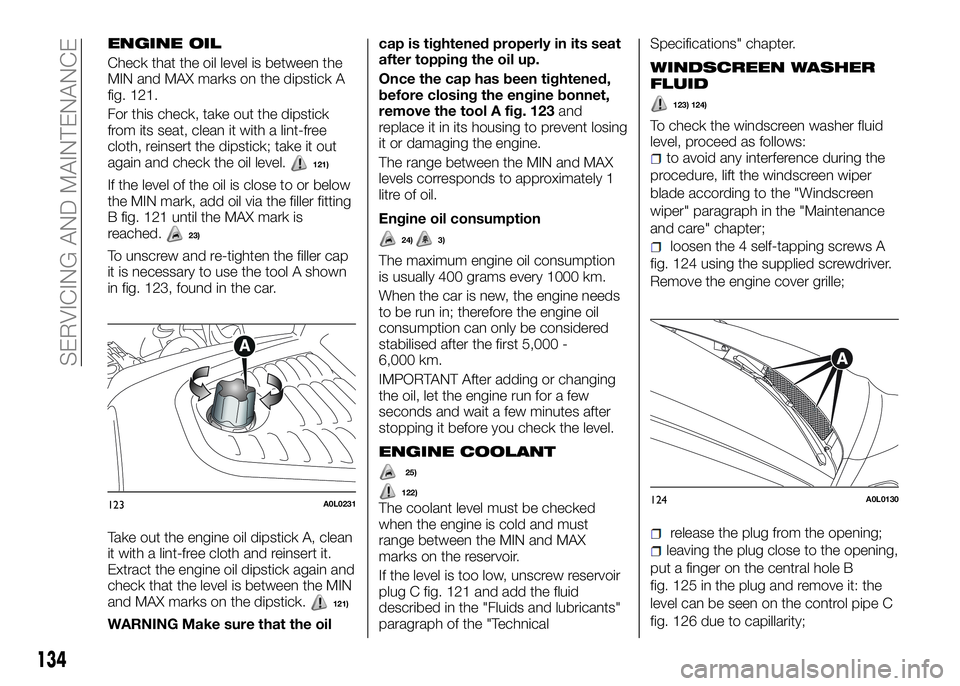
To unscrew and re-tighten the filler cap
it is necessary to use the tool A shown
in fig. 123, found in the car.
Take out the engine oil dipstick A, clean
it with a lint-free cloth and reinsert it.
Extract the engine oil dipstick again and
check that the level is between the MIN
and MAX marks on the dipstick.
121)
WARNING Make sure that the oilcap is tightened properly in its seat
after topping the oil up.
Once the cap has been tightened,
before closing the engine bonnet,
remove the tool A fig. 123and
replace it in its housing to prevent losing
it or damaging the engine.
The range between the MIN and MAX
levels corresponds to approximately 1
litre of oil.
Engine oil consumption
24)3)
The maximum engine oil consumption
is usually 400 grams every 1000 km.
When the car is new, the engine needs
to be run in; therefore the engine oil
consumption can only be considered
stabilised after the first 5,000 -
6,000 km.
IMPORTANT After adding or changing
the oil, let the engine run for a few
seconds and wait a few minutes after
stopping it before you check the level.
ENGINE COOLANT
122)
The coolant level must be checked
when the engine is cold and must
range between the MIN and MAX
marks on the reservoir.
If the level is too low, unscrew reservoir
plug C fig. 121 and add the fluid
described in the "Fluids and lubricants"
paragraph of the "TechnicalSpecifications" chapter.
WINDSCREEN WASHER
FLUID
123) 124)
To check the windscreen washer fluid
level, proceed as follows:
to avoid any interference during the
procedure, lift the windscreen wiper
blade according to the "Windscreen
wiper" paragraph in the "Maintenance
and care" chapter;
loosen the 4 self-tapping screws A
fig. 124 using the supplied screwdriver.
Remove the engine cover grille;
release the plug from the opening;
leaving the plug close to the opening,
put a finger on the central hole B
fig. 125 in the plug and remove it: the
level can be seen on the control pipe C
fig. 126 due to capillarity;
123A0L0231124A0L0130
134
SERVICING AND MAINTENANCE
25)
Page 139 of 182
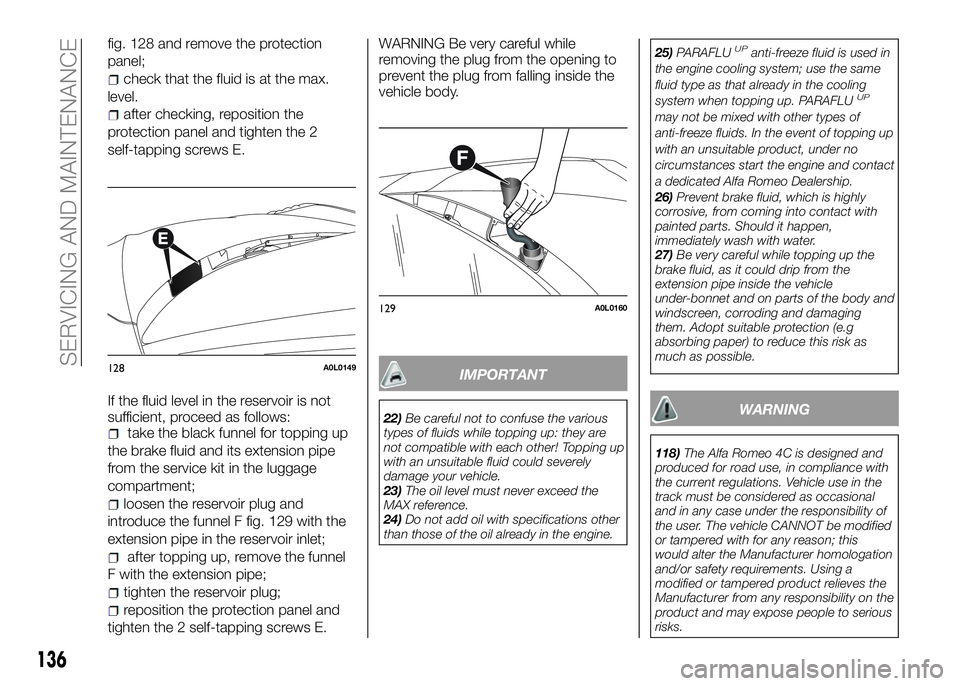
fig. 128 and remove the protection
panel;
check that the fluid is at the max.
level.
after checking, reposition the
protection panel and tighten the 2
self-tapping screws E.
If the fluid level in the reservoir is not
sufficient, proceed as follows:
take the black funnel for topping up
the brake fluid and its extension pipe
from the service kit in the luggage
compartment;
loosen the reservoir plug and
introduce the funnel F fig. 129 with the
extension pipe in the reservoir inlet;
after topping up, remove the funnel
F with the extension pipe;
tighten the reservoir plug;
reposition the protection panel and
tighten the 2 self-tapping screws E.WARNING Be very careful while
removing the plug from the opening to
prevent the plug from falling inside the
vehicle body.
IMPORTANT
22)Be careful not to confuse the various
types of fluids while topping up: they are
not compatible with each other! Topping up
with an unsuitable fluid could severely
damage your vehicle.
23)The oil level must never exceed the
MAX reference.
24)Do not add oil with specifications other
than those of the oil already in the engine.25)PARAFLU
UPanti-freeze fluid is used in
the engine cooling system; use the same
fluid type as that already in the cooling
system when topping up. PARAFLU
UP
may not be mixed with other types of
anti-freeze fluids. In the event of topping up
with an unsuitable product, under no
circumstances start the engine and contact
a dedicated Alfa Romeo Dealership.
26)Prevent brake fluid, which is highly
corrosive, from coming into contact with
painted parts. Should it happen,
immediately wash with water.
27)Be very careful while topping up the
brake fluid, as it could drip from the
extension pipe inside the vehicle
under-bonnet and on parts of the body and
windscreen, corroding and damaging
them. Adopt suitable protection (e.g
absorbing paper) to reduce this risk as
much as possible.
WARNING
118)The Alfa Romeo 4C is designed and
produced for road use, in compliance with
the current regulations. Vehicle use in the
track must be considered as occasional
and in any case under the responsibility of
the user. The vehicle CANNOT be modified
or tampered with for any reason; this
would alter the Manufacturer homologation
and/or safety requirements. Using a
modified or tampered product relieves the
Manufacturer from any responsibility on the
product and may expose people to serious
risks.
128A0L0149
129A0L0160
136
SERVICING AND MAINTENANCE
Page 141 of 182
BATTERY
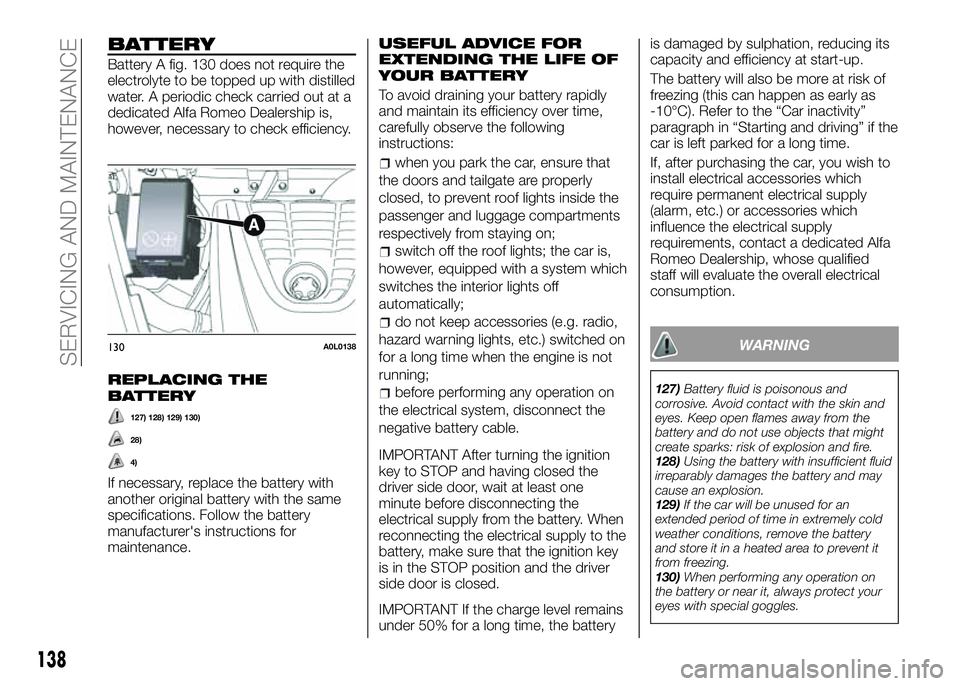
Battery A fig. 130 does not require the
electrolyte to be topped up with distilled
water. A periodic check carried out at a
dedicated Alfa Romeo Dealership is,
however, necessary to check efficiency.
REPLACING THE
BATTERY
127) 128) 129) 130)
28)
4)
If necessary, replace the battery with
another original battery with the same
specifications. Follow the battery
manufacturer's instructions for
maintenance.
USEFUL ADVICE FOR
EXTENDING THE LIFE OF
YOUR BATTERY
To avoid draining your battery rapidly
and maintain its efficiency over time,
carefully observe the following
instructions:
when you park the car, ensure that
the doors and tailgate are properly
closed, to prevent roof lights inside the
passenger and luggage compartments
respectively from staying on;
switch off the roof lights; the car is,
however, equipped with a system which
switches the interior lights off
automatically;
do not keep accessories (e.g. radio,
hazard warning lights, etc.) switched on
for a long time when the engine is not
running;
before performing any operation on
the electrical system, disconnect the
negative battery cable.
IMPORTANT After turning the ignition
key to STOP and having closed the
driver side door, wait at least one
minute before disconnecting the
electrical supply from the battery. When
reconnecting the electrical supply to the
battery, make sure that the ignition key
is in the STOP position and the driver
side door is closed.
IMPORTANT If the charge level remains
under 50% for a long time, the batteryis damaged by sulphation, reducing its
capacity and efficiency at start-up.
The battery will also be more at risk of
freezing (this can happen as early as
-10°C). Refer to the “Car inactivity”
paragraph in “Starting and driving” if the
car is left parked for a long time.
If, after purchasing the car, you wish to
install electrical accessories which
require permanent electrical supply
(alarm, etc.) or accessories which
influence the electrical supply
requirements, contact a dedicated Alfa
Romeo Dealership, whose qualified
staff will evaluate the overall electrical
consumption.
WARNING
127)Battery fluid is poisonous and
corrosive. Avoid contact with the skin and
eyes. Keep open flames away from the
battery and do not use objects that might
create sparks: risk of explosion and fire.
128)Using the battery with insufficient fluid
irreparably damages the battery and may
cause an explosion.
129)If the car will be unused for an
extended period of time in extremely cold
weather conditions, remove the battery
and store it in a heated area to prevent it
from freezing.
130)When performing any operation on
the battery or near it, always protect your
eyes with special goggles.
130A0L0138
138
SERVICING AND MAINTENANCE
Page 150 of 182
BODYWORK PAINT
IDENTIFICATION PLATE
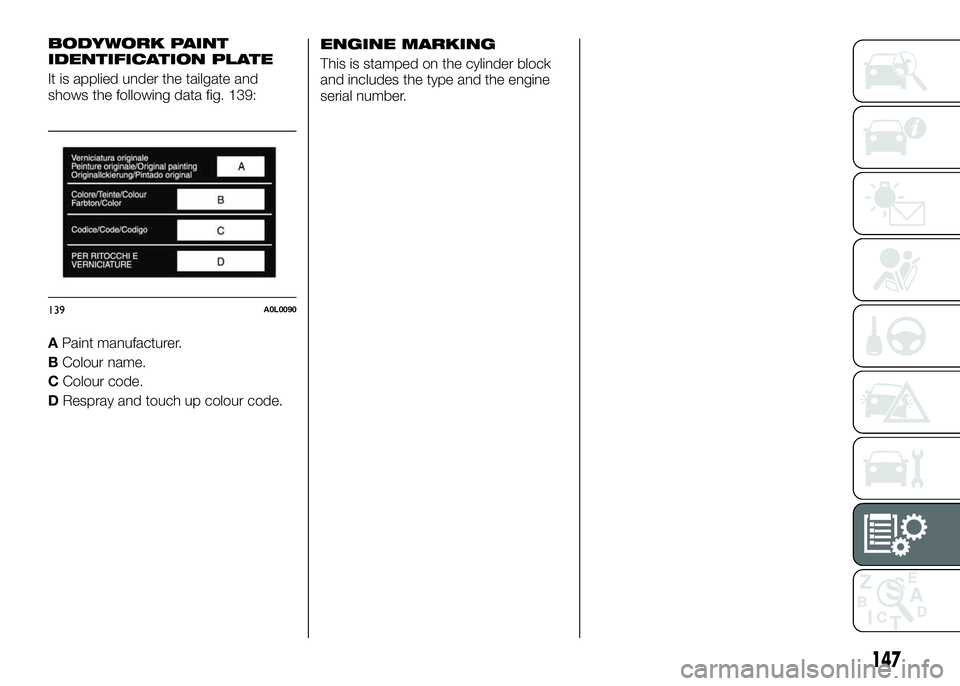
It is applied under the tailgate and
shows the following data fig. 139:
APaint manufacturer.
BColour name.
CColour code.
DRespray and touch up colour code.
ENGINE MARKING
This is stamped on the cylinder block
and includes the type and the engine
serial number.
139A0L0090
147
Page 152 of 182
ENGINE
GENERAL1750 Turbo Petrol
Engine code960A1000
CycleOtto
Number and position of cylinders 4 in line
Piston bore and stroke (mm) 83 × 80.5
Total displacement (cm³) 1742
Compression ratio 9.25 ± 0.25
Maximum power (EC) (kW)
177
(*)
Maximum power (EEC) (HP) 240
- corresponding engine speed (rpm) 6000
Maximum torque (EC) (Nm)
350
(*)
Maximum torque (EC) (kgm) 35.7
- corresponding engine speed (rpm) 2100 ÷ 4000
Spark plugsNGK ILKAR7D6G
Fuel 98 RON or 95 RON (EN228 specification) unleaded petrol
(*) Figures obtained using 98 RON unleaded petrol.
149
Page 158 of 182
RIMS AND TYRES
RIMS AND TYRES
Alloy rims. Tubeless radial carcass
tyres. All approved tyres are listed in the
Registration Document.
IMPORTANT If there are any
discrepancies between the Owner
Handbook and the Registration
Document, take the information from
the latter.
For safe driving, the car must be fitted
with tyres of the same make and type
on all wheels.
IMPORTANT Do not use air chambers
with tubeless tyres.
READING THE TYRE
CODE
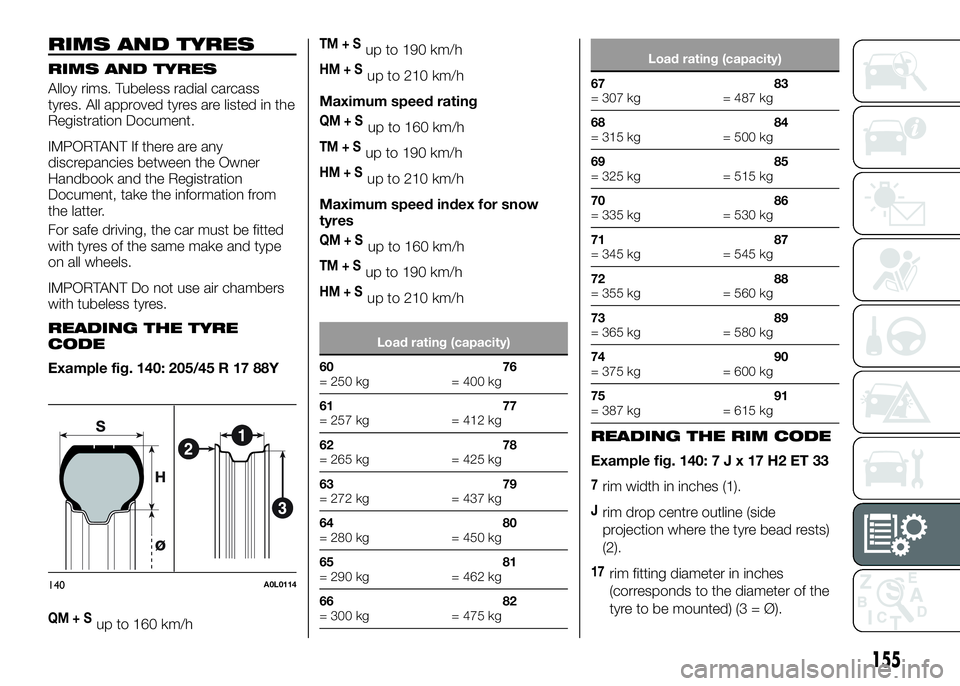
Example fig. 140: 205/45 R 17 88Y
QM+Sup to 160 km/h
TM+Sup to 190 km/h
HM+Sup to 210 km/h
Maximum speed rating
QM+Sup to 160 km/h
TM+Sup to 190 km/h
HM+Sup to 210 km/h
Maximum speed index for snow
tyres
QM+Sup to 160 km/h
TM+Sup to 190 km/h
HM+Sup to 210 km/h
Load rating (capacity)
60
= 250 kg76
= 400 kg
61
= 257 kg77
= 412 kg
62
= 265 kg78
= 425 kg
63
= 272 kg79
= 437 kg
64
= 280 kg80
= 450 kg
65
= 290 kg81
= 462 kg
66
= 300 kg82
= 475 kg
Load rating (capacity)
67
= 307 kg83
= 487 kg
68
= 315 kg84
= 500 kg
69
= 325 kg85
= 515 kg
70
= 335 kg86
= 530 kg
71
= 345 kg87
= 545 kg
72
= 355 kg88
= 560 kg
73
= 365 kg89
= 580 kg
74
= 375 kg90
= 600 kg
75
= 387 kg91
= 615 kg
READING THE RIM CODE
Example fig. 140: 7 J x 17 H2 ET 33
7rim width in inches (1).
Jrim drop centre outline (side
projection where the tyre bead rests)
(2).
17rim fitting diameter in inches
(corresponds to the diameter of the
tyre to be mounted) (3 = Ø).140A0L0114
155
Page 160 of 182
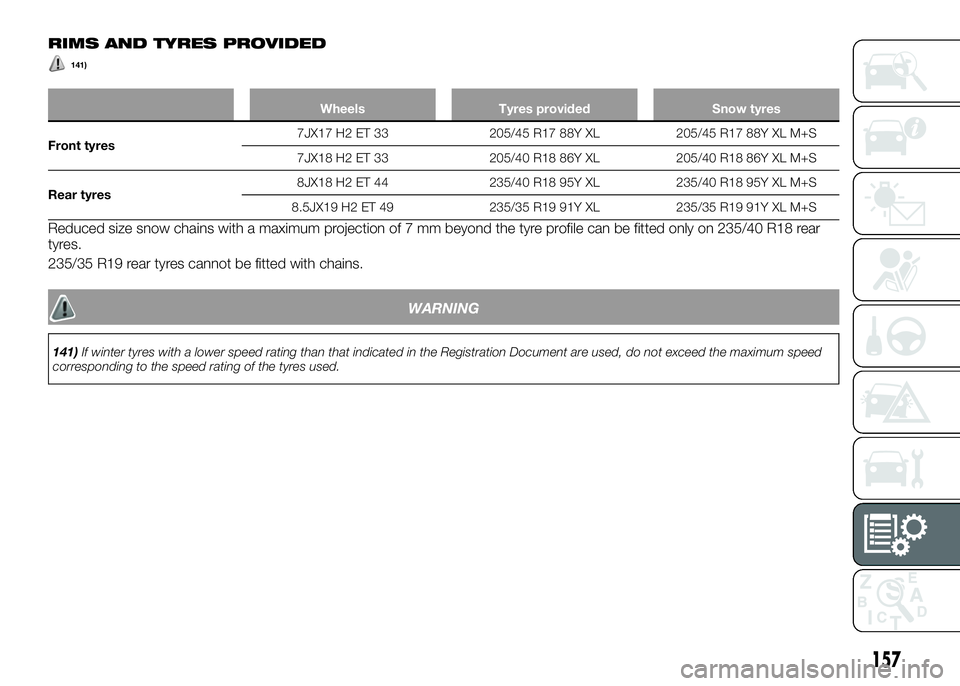
RIMS AND TYRES PROVIDED
141)
Wheels Tyres provided Snow tyres
Front tyres7JX17 H2 ET 33 205/45 R17 88Y XL 205/45 R17 88Y XL M+S
7JX18 H2 ET 33 205/40 R18 86Y XL 205/40 R18 86Y XL M+S
Rear tyres8JX18 H2 ET 44 235/40 R18 95Y XL 235/40 R18 95Y XL M+S
8.5JX19 H2 ET 49 235/35 R19 91Y XL 235/35 R19 91Y XL M+S
Reduced size snow chains with a maximum projection of 7 mm beyond the tyre profile can be fitted only on 235/40 R18 rear
tyres.
235/35 R19 rear tyres cannot be fitted with chains.
WARNING
141)If winter tyres with a lower speed rating than that indicated in the Registration Document are used, do not exceed the maximum speed
corresponding to the speed rating of the tyres used.
157
Page 162 of 182
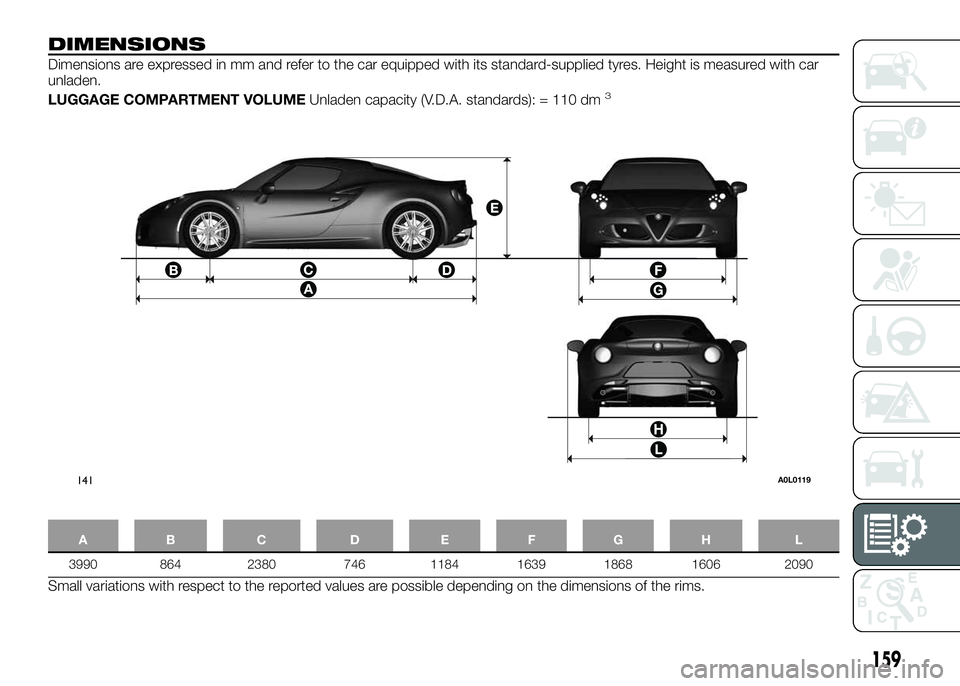
DIMENSIONS
Dimensions are expressed in mm and refer to the car equipped with its standard-supplied tyres. Height is measured with car
unladen.
LUGGAGE COMPARTMENT VOLUMEUnladen capacity (V.D.A. standards): = 110 dm
3
AB C D EFGH L
3990 864 2380 746 1184 1639 1868 1606 2090
Small variations with respect to the reported values are possible depending on the dimensions of the rims.
141A0L0119
159