service Alfa Romeo 8C 2010 Owner handbook (in English)
[x] Cancel search | Manufacturer: ALFA ROMEO, Model Year: 2010, Model line: 8C, Model: Alfa Romeo 8C 2010Pages: 223, PDF Size: 14.35 MB
Page 200 of 223

198
8
A
B
C
BATTERYThe battery is of the “low maintenance” type,
and is located on the right side of the luggage
compartment
To access the battery lift the shelf and
A and the
box cover
B releasing the hooks.
C.
With the vehicle standing on a flat surface, the
battery fluid level (electrolyte) must be between
the MIN and MAX reference notches shown on
the battery.
If the level is lower than the MIN reference
notch, contact an Authorised Service Centre
of the Manufacturer’s Network to have it
checked.To recharge the battery, see the section “In an
emergency”.
CAUTION
The fluid contained in the
battery is poisonous and corrosive.
Avoid contact with the skin and eyes.
Do not approach the battery with open
flames or possible sources of sparks:
risk of explosion and fire!
Batteries contain substances that are very
harmful for the environment. We advise you
to have the battery replaced at an Authorised
Service Centre of the Manufacturer’s
Network, where all the necessary equipment
is available to dispose of the used parts in compliance with applicable legislation and in an
environment-friendly manner.
WARNING: Incorrect assembly of electrical and
electronic accessories can cause serious damage
to the vehicle.USEFUL HINTS FOR
EXTENDING THE LIFE OF
THE BATTERY
When parking the vehicle, make sure that the
doors, luggage and engine compartment lids
are properly closed. All interior lights should be
off. When the engine is off, do not keep the
connected devices switched on for a long time
(for example the radio, the hazard warning
lights, the fan, etc.).
Page 204 of 223

202
8
CAUTION
During the tyre life, the rolling
direction of the first fitting shall
always be observed, also in case of
“non-directional” tyres.
CAUTION
Check the depth of the tyre
tread at regular intervals (minimum
allowed value 1.6 mm). The thinner
is the tread, the greater is the risk of
skidding.
CAUTION
Drive carefully on wet roads to
decrease the risk of aquaplaning.
WINDSCREEN
WIPERSClean the rubber parts regularly using the
appropriate products.
Change the blades if the edge of the rubber
is deformed or worn. In any case, the blades
should be changed about once a year.
CAUTION
Travelling with worn wiper
blades is very dangerous because it
reduces the visibility in the event of
poor atmospheric conditions.
CAUTION
The arms of the wiper blade
have to be replaced with new ones
after having disassembled them twice.
The special arm fixing system ensures
optimal mechanical stability only after
the first two refitting operations,
provided that the specified tightening
torque is observed.CAUTION
We advise you to have any
operations involving removal of the
windscreen wiper arms performed at
an Authorised Service Centre of the
Manufacturer’s Network.
Some simple measures may reduce the
possibility of damage to the blades.
- In the case of temperatures below zero °C,
check that ice has not stuck the rubber part
against the windscreen glass. If necessary,
release with an anti-ice product.
- Remove any snow on the windscreen: as
well as protecting the blades, this avoids
forcing and overheating the electric motor.
- Do not activate the windscreen wipers when
the windscreen is dry.
Page 205 of 223

203
8
B
A
C
MAINTENANCE
SPRAY NOZZLES
If the jet does not work, first check that there
is fluid in the pan (see “Level checks” in this
section) then check that the nozzles are not
clogged.REPLACING THE WIPER
BLADES
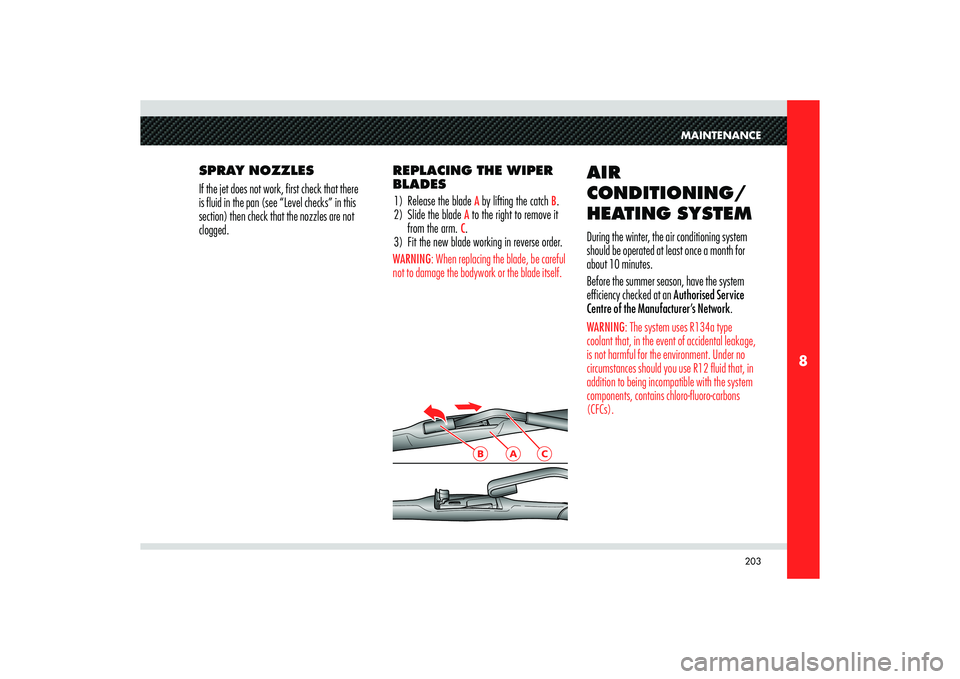
1) Release the blade
A by lifting the catch
B.
2) Slide the blade
A to the right to remove it
from the arm. C.
3) Fit the new blade working in reverse order.
WARNING: When replacing the blade, be careful
not to damage the bodywork or the blade itself.
AIR
CONDITIONING/
HEATING SYSTEMDuring the winter, the air conditioning system
should be operated at least once a month for
about 10 minutes.
Before the summer season, have the system
efficiency checked at an Authorised Service
Centre of the Manufacturer’s Network. WARNING: The system uses R134a type
coolant that, in the event of accidental leakage,
is not harmful for the environment. Under no
circumstances should you use R12 fluid that, in
addition to being incompatible with the system
components, contains chloro-fluoro-carbons
(CFCs).
Page 208 of 223

206
8
INTERIORSCheck at regular intervals that there is no water
trapped under the mats (due to drips off shoes,
umbrellas etc.) which may cause the metal parts
to oxidise.
CLEANING THE LEATHER
UPHOLSTERY
- Remove the dried dirt with a slightly damp
deerskin or a cloth, without rubbing too
hard.
- Remove any liquid or grease stains with a
dry absorbent cloth, without rubbing.
- Then run a soft cloth or deerskin damped
with water and neutral detergent.
- If the stain persists, use specifi c products
carefully following the instructions for use. WARNING: Never use alcohol, alcohol-based
products or solvents.
It is in any case advisable to use the Car Care
Kit (specifically for cleaning leather) included in
the Alfa Romeo accessory line. The kit cannot be
used on suede.
LEATHER UPHOLSTERY
TREATMENT
Have the leather upholstery treated according
to the Maintenance Schedule and only
at an Authorised Service Centre of the
Manufacturer’s Network, where the specific
products required for the treatment are available.CARBON PARTS
Have small scratches and marks on the carbon
structure removed by an Authorised Service
Centre of the Manufacturer’s Network.
Improper operations may irreparably damage the
carbon parts.
CAUTION
Do not use aggressive organic
substances, such as: petrol, kerosene,
petroleum, acetone or solvents.
Page 209 of 223

207
8
MAINTENANCE
the Authorised Service Centres of the
Manufacturer’s Network). Do not use
thick plastic sheets, which do not allow
the humidity on the vehicle surface to
evaporate.
- Infl ate the tyres up to a pressure which
must be 0.5 bar higher than the normally
prescribed one, and check it at regular
intervals.
CAUTION
The tyre pressure must be
brought back to the prescribed value
before reusing the vehicle.
- Do not drain the engine cooling system. BATTERY CONDITIONER
SOCKET
Located under the left-hand seat, it can be
accessed by moving the seat forward and folding
down the backrest.
IF THE VEHICLE
IS LAID UP FOR
LONG PERIODS- If the vehicle is not used for several months,
take the following precautions:
- Wash and dry the vehicle thoroughly.
- Store the vehicle in a covered, dry and, if
possible, ventilated area.
- Engage a gear.
- Disconnect the battery (see page 168).
- Check the battery charge condition. This
check should be carried out monthly while
the vehicle is idle. Recharge the battery if
the load-free voltage is below 12.5 V.
- Check that the electric parking brake is not
applied.
- Clean and protect the painted parts applying
protective waxes.
- Clean and protect polished metal parts with
specifi c products available on the market.
- Talc the windscreen wiper blades and raise
them from the windscreen.
- Cover the vehicle with a fabric sheet
to allow transpiration (available at all
Page 211 of 223

209
8
MAINTENANCE
Always first disconnect the power cable from
the mains and then disconnect the battery
conditioner from the vehicle socket. WARNING: The vehicle cannot be started as
long as the battery conditioner is connected to
the vehicle socket (even when it is disconnected
from the mains).When the warning light (1) is on permanently: it
means that there is an electric system fault in the
vehicle or the battery.
When the warning light (2) is on permanently:
it means that the battery conditioner is in the
“Active” phase. During this phase the battery
is recharged to the optimal charge level, from a
lower one.
When the warning light (3) is on permanently:
it means that the battery is fully charged and the
battery conditioner is in the “Passive” phase.
During this phase, the device maintains the
battery at an optimal charge level.
When the warning lights (2 and 3) are on and
flash alternately:
- if the warning lights fl ash a few times a
second, it means that the battery may be
sulphated. - if the warning lights fl ash alternately for
more than 60 minutes, it means that the
battery must be replaced.
- if the warning lights fl ash at intervals of a
few minutes, it means that the battery self-
discharge percentage is high and it might
have to be replaced.
When no warning light is on, the following may
have occurred:
- the battery conditioner cables may be
disconnected;
- the battery may not be properly connected
to the vehicle system;
- the battery may be defective;- the battery voltage may be low or there
may be a lack of power on the mains
socket.
1- error warning light
2- active phase warning light: signalling
3- maintenance warning light: maintenance
After checking the connection of the battery
conditioner (both to the mains and the vehicle
socket) and that the mains are powered, if
the (2 or 3) “Active” and “Passive” phase
warning lights do not illuminate a few seconds
after connecting the battery conditioner,
contact an Authorised Service Centre of the
Manufacturer’s Network to have the electric
system of the vehicle checked.
1
2
3
Page 218 of 223

216
9
IT IS ESSENTIAL THAT YOU READ THIS MANUAL! .. 3
Consulting the Manual ...................................... 4
Abbreviations ................................................... 4
Updating ......................................................... 4
Service ........................................................... 5
“Q-Select” ..................................................... 5
Audio and IT systems ........................................ 5
Towing the vehicle ............................................ 5
Symbols ..............................................................6
Danger symbols .............................................. 6
Symbols of prohibitions ..................................... 6
Warning symbols .............................................. 7
Symbols indicating mandatory measures .............. 7
Vehicle identifi cation data ......................... 11
Identi� cation plates and labels ..........................12
Chassis marking ............................................. 12
Engine marking .............................................. 12
Paint identifi cation label .................................. 12
Vehicle identifi cation plate ............................... 13
Electronic key ....................................................14
Code Card ..................................................... 14
Alfa Romeo Code System ...................................14
Operation ...................................................... 14Active and passive safety ......................... 17
Seat belts .........................................................18
Fastening the seat belts .................................. 18
Load limiting devices ...................................... 18
Pretensioners ................................................. 19
General warnings regarding the use
of the seat belts .......................................... 20
Safe transport of children ................................ 22
Groups 0 and 0+ ........................................... 23
Group 1 ........................................................ 24
Group 2 ........................................................ 24
Group 3 ........................................................ 25
Front airbags .....................................................26
“Smart bag” system (multistage front airbags) .. 28
Driver’s front airbag ........................................ 29
Passenger’s front airbag .................................. 29
Passenger’s airbag manual deactivation switch ... 30
General warnings .......................................... 31
VDC system .......................................................33
Activation ...................................................... 33
Failure signals ................................................ 33
ASR system (electronic anti-skid device) ..............34
Activation ...................................................... 35
Fault indicators .............................................. 35
MSR function
(engine braking torque adjustment) ............... 35
ABS and EBD systems .........................................36Fuel cut-out inertia switch ...................................38
Resetting the switch ....................................... 38
Instruments and controls .......................... 41
Dashboard .........................................................42
Instrument panel ...............................................45
Recon� gurable multifunction display .................46
Information shown on the standard page .......... 46
Control buttons .............................................. 47
Menu .......................................................... 47
TRIP ............................................................. 47
+/- .............................................................. 47
Setup menu .................................................. 48
Trip computer ................................................. 57
TRIP button ................................................... 58
Warning lights and messages .............................60
General warnings ........................................... 60
Indicators and warning lights ............................ 61
Warning lights on the display .......................... 63
Instruments and gauges .....................................66
Tachometer/speedometer ............................... 66
Rev. Counter .................................................. 66
Fuel gauge .................................................... 67
Coolant thermometer ...................................... 67
Engine oil thermometer ................................... 68
Controls ............................................................68
Controls to the left of the steering wheel ........... 69
TABLE OF
CONTENTS
Page 221 of 223

219
9
TABLE OF CONTENTS
If there are injured persons ............................ 171
First aid kit .................................................. 172
Capacities and technical specifi cations ...... 175
Fuel ................................................................176
Engine oil ........................................................176
Capacities: quantity and speci� cations of the
products to use .............................................177
Capacities and recommended products ............. 177
Fuel consumption .............................................179
Fuel consumption following the 2004/3/EC
directive (litres per 100 km) ....................... 179
CO2 exhaust emissions .....................................179
CO2 emissions according to Directive
2002/80B/EC (g/km) ............................ 179
Technical speci� cations .....................................180
Engine ........................................................ 180
Injection – Ignition ....................................... 180
Lubrication system ....................................... 181
Cooling system ............................................ 181
Transmission ................................................ 181
Gearshifting ................................................. 182
Brakes ........................................................ 182
Suspension ................................................. 183
Steering ...................................................... 183
Wheels ....................................................... 183
Performance ................................................ 184Weights ...................................................... 184
Dimensions ................................................ 185
Tyre pressure ...................................................186
Maintenance .......................................... 189
Scheduled Maintenance ....................................190
After the 11
th service ................................... 190
Additional checks .............................................192
WARNING - Engine oil .................................... 192
WARNING - Air fi lter ..................................... 192
Level checks ....................................................193
Engine oil .................................................... 194
Gearbox oil ................................................. 195
Engine coolant ............................................. 195
Windscreen/headlight washer fl uid ................. 195
Power steering fl uid ...................................... 196
Brake fl uid ................................................. 196
Air � lter ..........................................................197
Anti-dust/anti-pollen � lter ...............................197
Battery ............................................................198
Useful hints for extending the life
of the battery ........................................... 198
Electronic control units .....................................199
Spark plugs .....................................................200
Wheels and tyres .............................................200
How to use the tyres .................................... 201Windscreen wipers ...........................................202
Spray nozzles .............................................. 203
Replacing the wiper blades ............................ 203
Air conditioning/heating system .......................203
Bodywork ........................................................204
Protection from atmospheric agents ................ 204
Tips for keeping the bodywork in good
condition .................................................. 204
Engine compartment ..................................... 205
Interiors ..........................................................206
Cleaning the leather upholstery ...................... 206
Leather upholstery treatment ......................... 206
Carbon parts ................................................ 206
If the vehicle is laid up for long periods ............207
Battery conditioner socket ............................. 207
Restarting the vehicle .................................... 210
Re-connecting the battery .............................. 211
Radio-frequency remote control: Ministerial
homologation ..............................................211
Conversion table ..............................................212
Table of contents .................................... 215
Table of contents ..............................................216