Alfa Romeo Giulia 2017 Owner's Manual
Manufacturer: ALFA ROMEO, Model Year: 2017, Model line: Giulia, Model: Alfa Romeo Giulia 2017Pages: 268, PDF Size: 18.64 MB
Page 221 of 268
With engine and system cold, do
not top up with coolant beyond the
maximum level indicated on the
reservoir in the engine compartment.
Braking System
In order to guarantee the efficiency of
the braking system, periodically check
its components; for this operation,
contact an authorized dealer.
See the "Maintenance Plan" for the
correct servicing intervals.
Note: Driving with your foot resting on
the brake pedal may compromise its
efficiency, increasing the risk of
accidents. When driving, never keep
your foot on the brake pedal and don’t
put unnecessary strain on it to prevent
the brakes from overheating: excess
pad wear may cause damage to the
braking system.
When an insufficient oil level is
detected, contact an authorized dealer
to have the system checked.
Always keep the cap of the brake
fluid reservoir (in the engine
compartment) completely closed.
Warning!
Use only manufacturer's recommended
brake fluid. Refer to “Fluids And Lubricants”
in “Technical Specifications” for further
information. Using the wrong type of brake
fluid can severely damage your brake
system and/or impair its performance. The
proper type of brake fluid for your vehicle is
also identified on the original factory
installed hydraulic master cylinder reservoir.
To avoid contamination from foreign
matter or moisture, use only new brake
fluid or fluid that has been in a tightly
closed container. Keep the master cylinder
reservoir cap secured at all times. Brake
fluid in a open container absorbs moisture
from the air resulting in a lower boiling
point. This may cause it to boil
unexpectedly during hard or prolonged
braking, resulting in sudden brake failure.
This could result in a collision.
Overfilling the brake fluid reservoir can
result in spilling brake fluid on hot engine
parts, causing the brake fluid to catch fire.
Brake fluid can also damage painted and
vinyl surfaces, care should be taken to
avoid its contact with these surfaces.
Do not allow petroleum based fluid to
contaminate the brake fluid. Brake seal
components could be damaged, causing
partial or complete brake failure. This could
result in a collision.
Automatic Transmission
Use only a transmission oil with the
same characteristics as those indicated
in the "Fluids and Lubricants" table (see
"Technical Specifications" chapter).
Special Additives
Do not use any type of additive with the
automatic transmission oil. The
automatic transmission oil is a product
designed specially for this vehicle and
its performance may be compromised
through the use of further additives.
Caution!
Do not use chemical flushes in your
transmission as the chemicals can damage
your transmission components. Such
damage is not covered by the New Vehicle
Limited Warranty.
219
Page 222 of 268
Frequency of Oil Changes
In normal vehicle operating conditions,
it is not necessary to change the
transmission oil.
Caution!
If a transmission fluid leak occurs, visit your
authorized dealer immediately. Severe
transmission damage may occur. Your
authorized dealer has the proper tools to
adjust the fluid level accurately.
Replacing The Battery
If necessary, replace the battery with
another battery with the same
specifications. It is advised to contact
an authorized dealer for replacement.
Follow the battery manufacturer's
instructions for maintenance.
Note:
It will not be possible to open the trunk
with a key or by pressing the button in
the passenger compartment when the
battery is disconnected. So, always
position the manual trunk opening strap
on the trunk lock before disconnecting
the battery. The procedure is described
in the "Storing The Vehicle" section in
this chapter.
RAISING THE
VEHICLE
If the vehicle requires lifting, visit an
authorized dealer which is equipped
with shop jacks or jack arms.
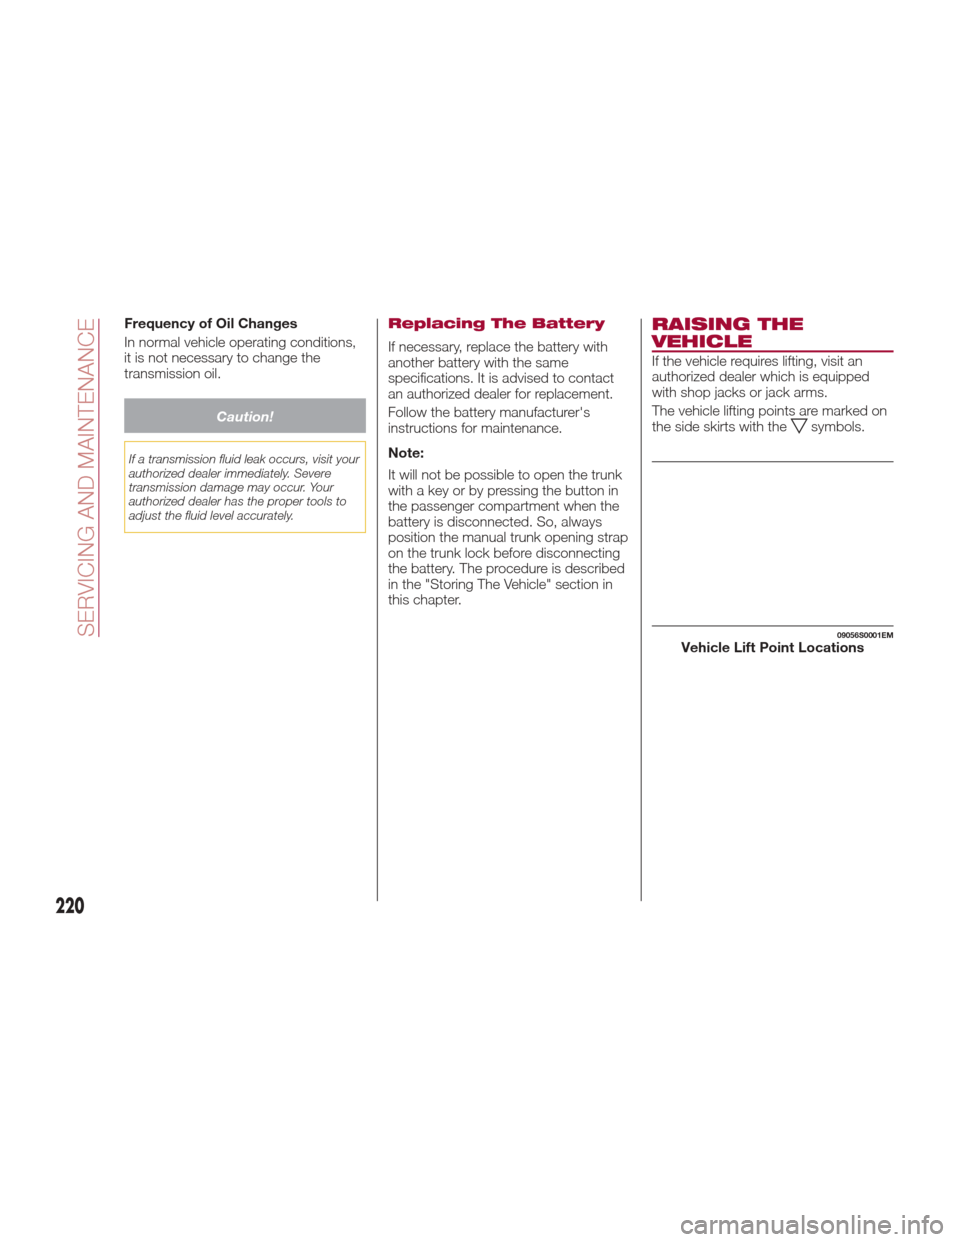
The vehicle lifting points are marked on
the side skirts with the
symbols.
09056S0001EMVehicle Lift Point Locations
220
SERVICING AND MAINTENANCE
Page 223 of 268

TIRES
Tire Safety Information
Tire safety information will cover
aspects of the following information:
Tire Markings, Tire Identification
Numbers, Tire Terminology and
Definitions, Tire Pressures, and Tire
Loading.
Tire Markings
Note:
P (Passenger) — Metric tire sizing is
based on U.S. design standards.
P-Metric tires have the letter “P”
molded into the sidewall preceding the
size designation. Example:
P215/65R15 95H.
European — Metric tire sizing is
based on European design standards.
Tires designed to this standard have
the tire size molded into the sidewall
beginning with the section width. The
letter "P" is absent from this tire size
designation. Example: 215/
65R15 96H.
LT (Light Truck) — Metric tire sizing
is based on U.S. design standards.
The size designation for LT-Metric tires
is the same as for P-Metric tires except
for the letters “LT” that are molded into
the sidewall preceding the size
designation. Example: LT235/85R16.
Temporary spare tires are designed
for temporary emergency use only.
Temporary high pressure compact
spare tires have the letter “T” or “S”
molded into the sidewall preceding the
size designation. Example:
T145/80D18 103M.
High flotation tire sizing is based on
U.S. design standards and it begins
with the tire diameter molded into the
sidewall. Example: 31x10.5 R15 LT.
Tire Identification Number (TIN)
The TIN may be found on one or both
sides of the tire; however, the date code
mayonlybeononeside.Tireswith
white sidewalls will have the full TIN,
including the date code, located on the
white sidewall side of the tire. Look for
the TIN on the outboard side of black
sidewall tires as mounted on the
vehicle. If the TIN is not found on the
outboard side, then you will find it on
the inboard side of the tire.
GUID-0601085395USTire Markings
1 — U.S. DOT Sa-
fety Standards
Code (TIN) 4 — Maximum
Load
2 — Size Designa-
tion 5 — Maximum
Pressure
3 — Service De-
scription 6 — Treadwear,
Traction and Tem-
perature Grades
221
Page 224 of 268
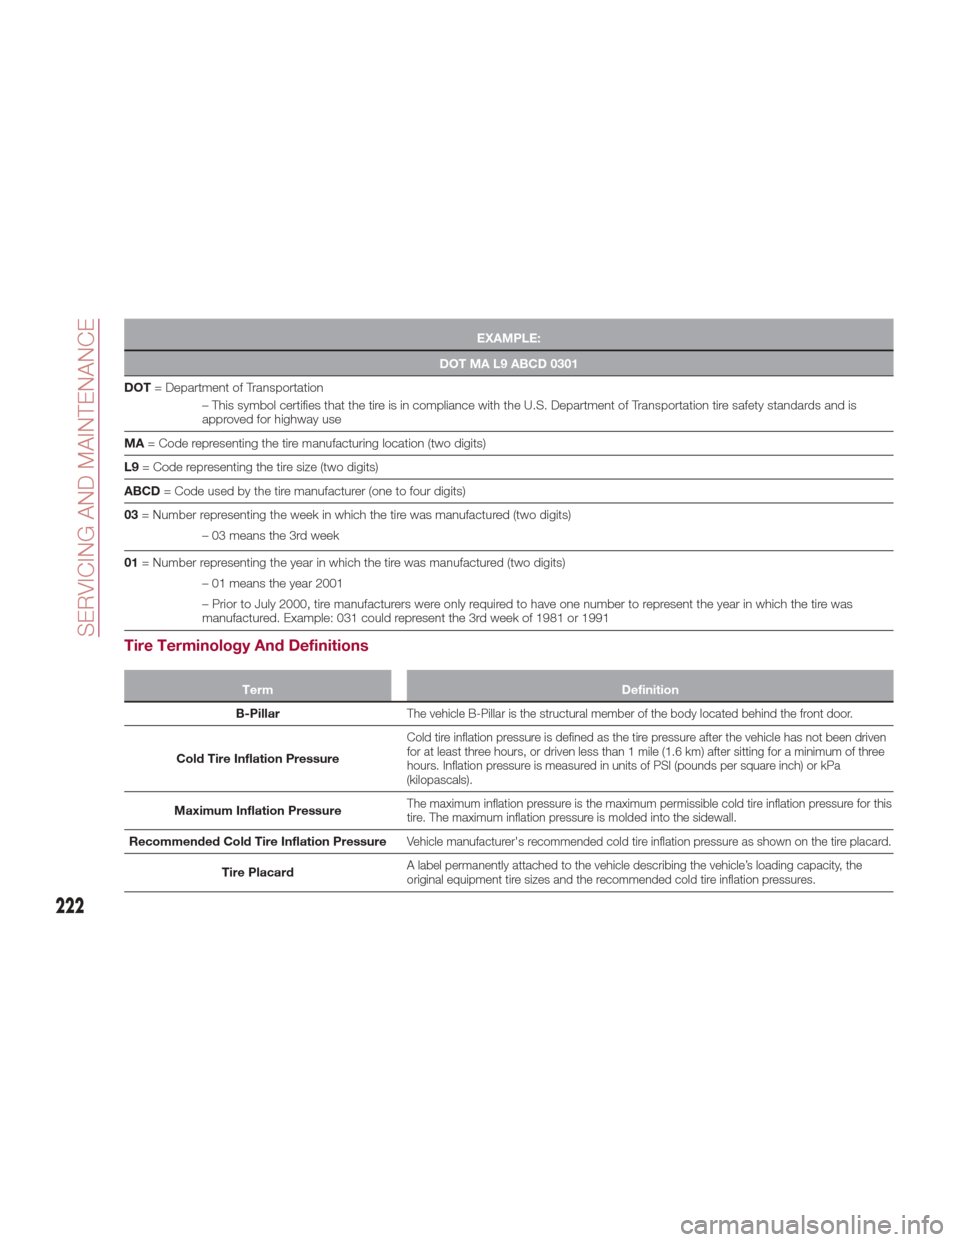
EXAMPLE:
DOT MA L9 ABCD 0301
DOT =
Department of Transportation
– This symbol certifies that the tire is in compliance with the U.S. Department of Transportation tire safety standards and is
approved for highway use
MA = Code representing the tire manufacturing location (two digits)
L9 = Code representing the tire size (two digits)
ABCD = Code used by the tire manufacturer (one to four digits)
03 = Number representing the week in which the tire was manufactured (two digits)
– 03 means the 3rd week
01 = Number representing the year in which the tire was manufactured (two digits)
– 01 means the year 2001
– Prior to July 2000, tire manufacturers were only required to have one number to represent the year in which the tire was
manufactured. Example: 031 could represent the 3rd week of 1981 or 1991
Tire Terminology And Definitions
Term Definition
B-Pillar
The vehicle B-Pillar is the structural member of the body located behind the front door.
Cold Tire Inflation Pressure
Cold tire inflation pressure is defined as the tire pressure after the vehicle has not been driven
for at least three hours, or driven less than 1 mile (1.6 km) after sitting for a minimum of three
hours. Inflation pressure is measured in units of PSI (pounds per square inch) or kPa
(kilopascals).
Maximum Inflation PressureThe maximum inflation pressure is the maximum permissible cold tire inflation pressure for this
tire. The maximum inflation pressure is molded into the sidewall.
Recommended Cold Tire Inflation PressureVehicle manufacturer's recommended cold tire inflation pressure as shown on the tire placard.
Tire PlacardA label permanently attached to the vehicle describing the vehicle’s loading capacity, the
original equipment tire sizes and the recommended cold tire inflation pressures.
222
SERVICING AND MAINTENANCE
Page 225 of 268
Tire Loading And Tire Pressure
Note:
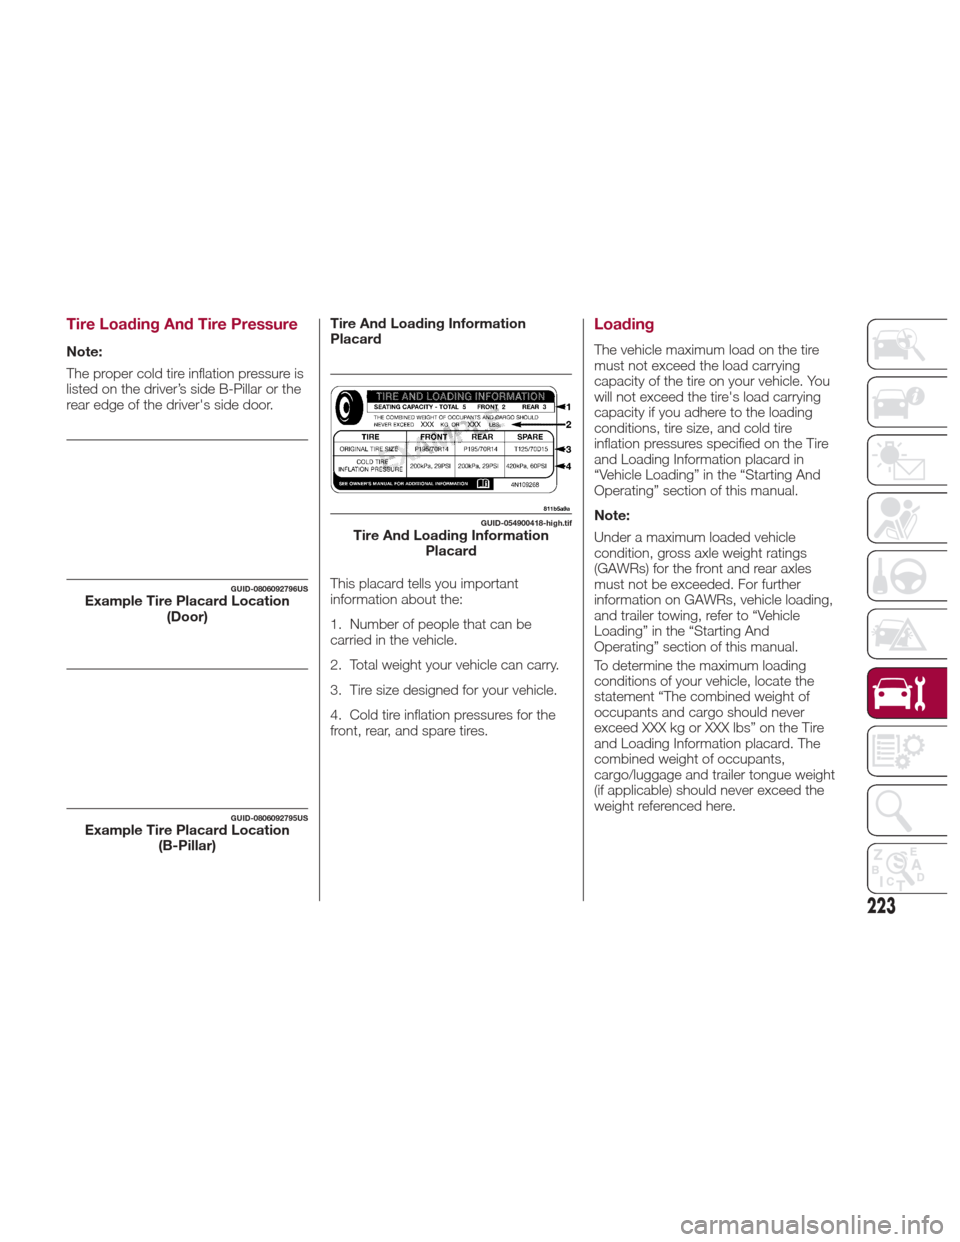
The proper cold tire inflation pressure is
listed on the driver’s side B-Pillar or the
rear edge of the driver's side door.Tire And Loading Information
Placard
This placard tells you important
information about the:
1. Number of people that can be
carried in the vehicle.
2. Total weight your vehicle can carry.
3. Tire size designed for your vehicle.
4. Cold tire inflation pressures for the
front, rear, and spare tires.
Loading
The vehicle maximum load on the tire
must not exceed the load carrying
capacity of the tire on your vehicle. You
will not exceed the tire's load carrying
capacity if you adhere to the loading
conditions, tire size, and cold tire
inflation pressures specified on the Tire
and Loading Information placard in
“Vehicle Loading” in the “Starting And
Operating” section of this manual.
Note:
Under a maximum loaded vehicle
condition, gross axle weight ratings
(GAWRs) for the front and rear axles
must not be exceeded. For further
information on GAWRs, vehicle loading,
and trailer towing, refer to “Vehicle
Loading” in the “Starting And
Operating” section of this manual.
To determine the maximum loading
conditions of your vehicle, locate the
statement “The combined weight of
occupants and cargo should never
exceed XXX kg or XXX lbs” on the Tire
and Loading Information placard. The
combined weight of occupants,
cargo/luggage and trailer tongue weight
(if applicable) should never exceed the
weight referenced here.
GUID-0806092796USExample Tire Placard Location
(Door)
GUID-0806092795USExample Tire Placard Location(B-Pillar)
GUID-054900418-high.tifTire And Loading InformationPlacard
223
Page 226 of 268
Steps For Determining Correct
Load Limit—
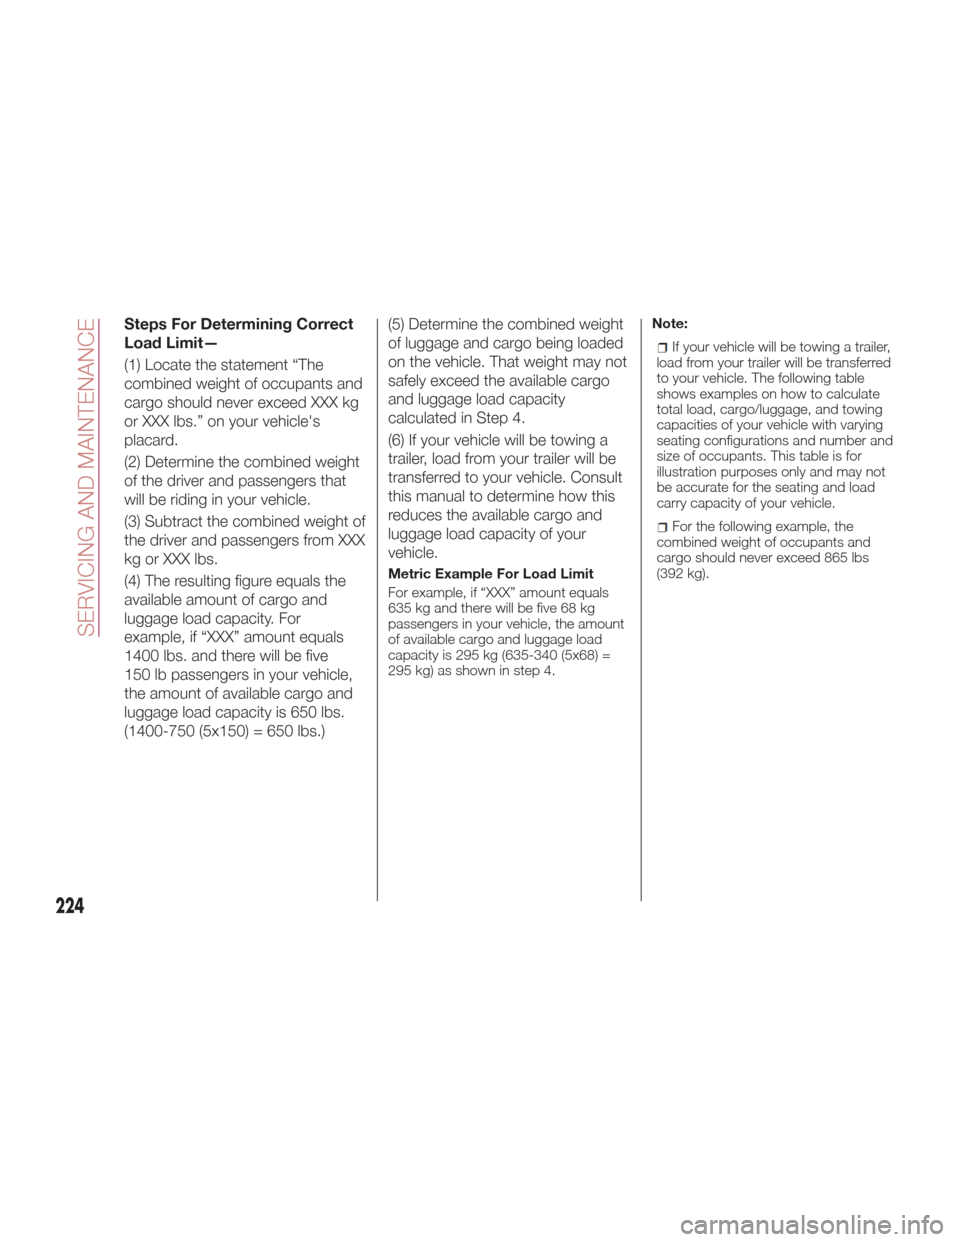
(1) Locate the statement “The
combined weight of occupants and
cargo should never exceed XXX kg
or XXX lbs.” on your vehicle's
placard.
(2) Determine the combined weight
of the driver and passengers that
will be riding in your vehicle.
(3) Subtract the combined weight of
the driver and passengers from XXX
kg or XXX lbs.
(4) The resulting figure equals the
available amount of cargo and
luggage load capacity. For
example, if “XXX” amount equals
1400 lbs. and there will be five
150 lb passengers in your vehicle,
the amount of available cargo and
luggage load capacity is 650 lbs.
(1400-750 (5x150) = 650 lbs.)(5) Determine the combined weight
of luggage and cargo being loaded
on the vehicle. That weight may not
safely exceed the available cargo
and luggage load capacity
calculated in Step 4.
(6) If your vehicle will be towing a
trailer, load from your trailer will be
transferred to your vehicle. Consult
this manual to determine how this
reduces the available cargo and
luggage load capacity of your
vehicle.
Metric Example For Load Limit
For example, if “XXX” amount equals
635 kg and there will be five 68 kg
passengers in your vehicle, the amount
of available cargo and luggage load
capacity is 295 kg (635-340 (5x68) =
295 kg) as shown in step 4.
Note:
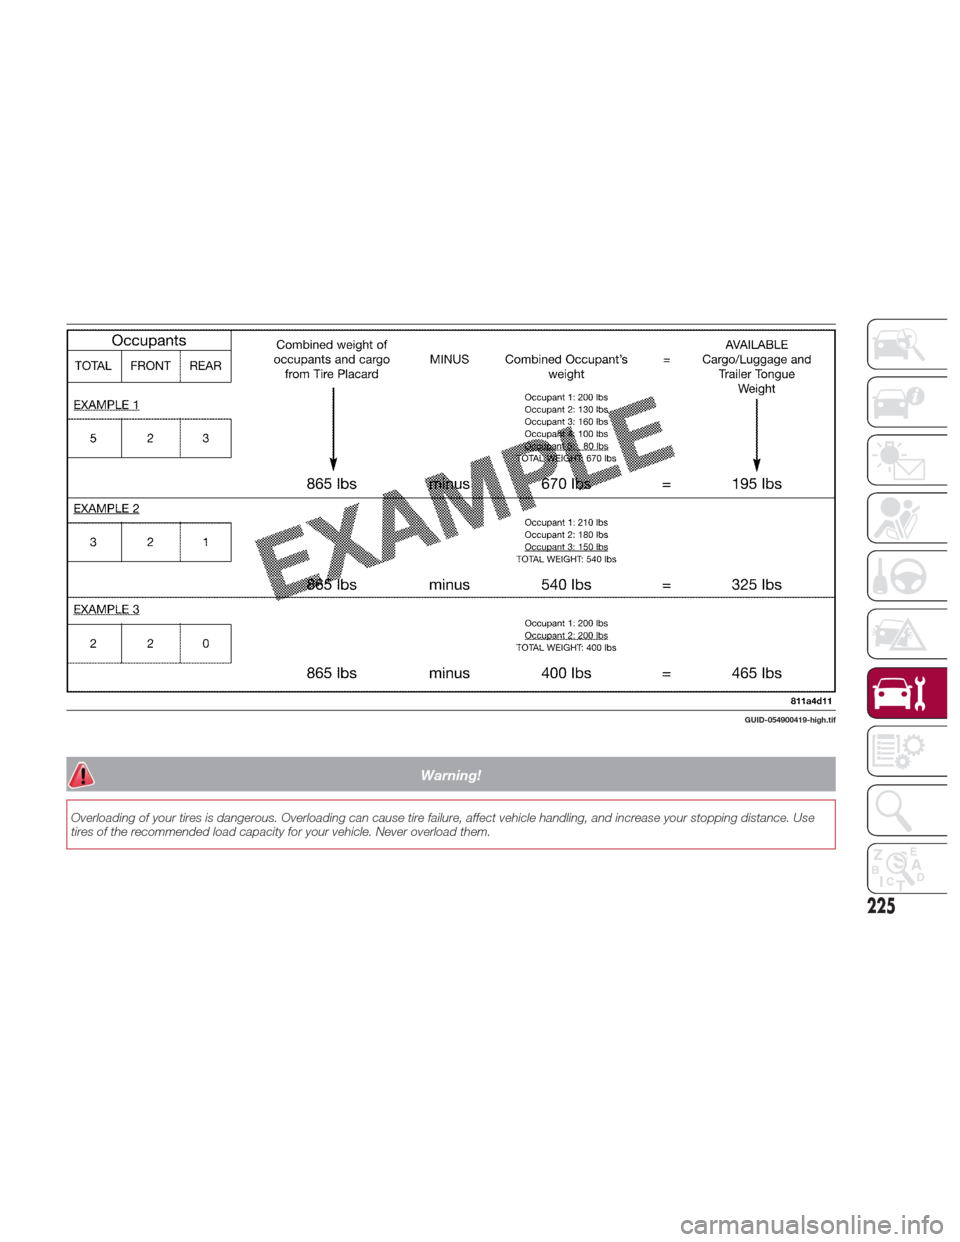
If your vehicle will be towing a trailer,
load from your trailer will be transferred
to your vehicle. The following table
shows examples on how to calculate
total load, cargo/luggage, and towing
capacities of your vehicle with varying
seating configurations and number and
size of occupants. This table is for
illustration purposes only and may not
be accurate for the seating and load
carry capacity of your vehicle.
For the following example, the
combined weight of occupants and
cargo should never exceed 865 lbs
(392 kg).
224
SERVICING AND MAINTENANCE
Page 227 of 268
Warning!
Overloading of your tires is dangerous. Overloading can cause tire failure, affect vehicle handling, and increase your stopping distance. Use
tires of the recommended load capacity for your vehicle. Never overload them.
GUID-054900419-high.tif
225
Page 228 of 268
Spare Tires — If
Equipped
Note:
For vehicles equipped with Tire Repair
Kit instead of a spare tire, please refer
to “Tire Repair Kit” in “In Case Of
Emergency” for further information.
Caution!
Because of the reduced ground clearance,
do not take your vehicle through an
automatic car wash with a compact or
limited use temporary spare installed.
Damage to the vehicle may result.
Spare Tire Matching Original
Equipped Tire And Wheel — If
Equipped
Your vehicle may be equipped with a
spare tire and wheel equivalent in look
and function to the original equipment
tire and wheel found on the front or rear
axle of your vehicle. This spare tire may
be used in the tire rotation for your
vehicle. If your vehicle has this option,
refer to an authorized tire dealer for the
recommended tire rotation pattern.
Compact Spare Tire — If
Equipped
The compact spare is for temporary
emergency use only. You can identify if
your vehicle is equipped with a
compact spare by looking at the spare
tire description on the Tire and Loading
Information Placard located on the
driver’s side door opening or on the
sidewall of the tire. Compact spare tire
descriptions begin with the letter “T” or
“S” preceding the size designation.
Example: T145/80D18 103M.
T,S=Temporary Spare Tire
Since this tire has limited tread life, the
original equipment tire should be
repaired (or replaced) and reinstalled on
your vehicle at the first opportunity.
Do not install a wheel cover or attempt
to mount a conventional tire on the
compact spare wheel, since the wheel
is designed specifically for the compact
spare tire. Do not install more than one
compact spare tire and wheel on the
vehicle at any given time.
Warning!
Compact and collapsible spares are for
temporary emergency use only. With these
spares, do not drive more than 50 mph
(80 km/h). Temporary use spares have
limited tread life. When the tread is worn to
the tread wear indicators, the temporary
use spare tire needs to be replaced. Be
sure to follow the warnings, which apply to
your spare. Failure to do so could result in
spare tire failure and loss of vehicle control.
Full Size Spare — If Equipped
The full size spare is for temporary
emergency use only. This tire may look
like the originally equipped tire on the
front or rear axle of your vehicle, but it is
not. This spare tire may have limited
tread life. When the tread is worn to the
tread wear indicators, the temporary
use full size spare tire needs to be
replaced. Since it is not the same as
your original equipment tire, replace (or
repair) the original equipment tire and
reinstall on the vehicle at the first
opportunity.
226
SERVICING AND MAINTENANCE
Page 229 of 268
Limited Use Spare — If
Equipped
The limited use spare tire is for
temporary emergency use only. This tire
is identified by a label located on the
limited use spare wheel. This label
contains the driving limitations for this
spare. This tire may look like the original
equipped tire on the front or rear axle of
your vehicle, but it is not. Installation of
this limited use spare tire affects vehicle
handling. Since it is not the same as
your original equipment tire, replace (or
repair) the original equipment tire and
reinstall on the vehicle at the first
opportunity.
Warning!
Limited use spares are for emergency use
only. Installation of this limited use spare
tire affects vehicle handling. With this tire,
do not drive more than the speed listed on
the limited use spare wheel. Keep inflated
to the cold tire inflation pressures listed on
your Tire and Loading Information Placard
located on the driver’s side B-Pillar or the
rear edge of the driver’s side door. Replace
(or repair) the original equipment tire at the
first opportunity and reinstall it on your
vehicle. Failure to do so could result in loss
of vehicle control.
Wheel And Wheel Trim
Care
All wheels and wheel trim, especially
aluminum and chrome plated wheels,
should be cleaned regularly using mild
(neutral Ph) soap and water to maintain
their luster and to prevent corrosion.
Wash wheels with the same soap
solution recommended for the body of
the vehicle.
Your wheels are susceptible to
deterioration caused by salt, sodium
chloride, magnesium chloride, calcium
chloride, etc., and other road chemicals
used to melt ice or control dust on dirt
roads. Use a soft cloth or sponge and
mild soap to wipe away promptly. Do
not use harsh chemicals or a stiff brush.
They can damage the wheel’s
protective coating that helps keep them
from corroding and tarnishing.
Note:
Many aftermarket wheel cleaners
contain strong acids or strong alkaline
additives that can harm the wheel
surface.
Caution!
Avoid products or automatic car washes
that use acidic solutions or strong alkaline
additives or harsh brushes. These products
and automatic car washes may damage
the wheel's protective finish. Such damage
is not covered by the New Vehicle Limited
Warranty. Only car wash soap, MOPAR
Wheel Cleaner or equivalent is
recommended.
When cleaning extremely dirty wheels
including excessive brake dust, care
must be taken in the selection of tire
and wheel cleaning chemicals and
equipment to prevent damage to the
wheels. Mopar Wheel Treatment or
Mopar Chrome Cleaner or their
equivalent is recommended or select a
non-abrasive, non-acidic cleaner for
aluminum or chrome wheels. Do not
use any products on Dark Vapor or
Black Satin Chrome Wheels. They will
permanently damage this finish and
such damage is not covered by the
New Vehicle Limited Warranty.
227
Page 230 of 268
Caution!
Do not use scouring pads, steel wool, a
bristle brush, metal polishes or oven cleaner.
These products may damage the wheel's
protective finish. Such damage is not covered
by the New Vehicle Limited Warranty. Only
car wash soap, MOPAR Wheel Cleaner or
equivalent is recommended.
Note:
If you intend parking or storing your
vehicle for an extended period after
cleaning the wheels with wheel cleaner,
drive your vehicle for a few minutes
before doing so. Driving the vehicle and
applying the brakes when stopping will
reduce the risk of brake rotor corrosion.
Dark Vapor Or Black Satin Chrome
Wheels
Caution!
If your vehicle is equipped with Dark Vapor
or Black Satin Chrome wheels DO NOT USE
wheel cleaners, abrasives or polishing
compounds. They will permanently damage
this finish and such damage is not covered
by the New Vehicle Limited Warranty. USE
ONLY MILD SOAP AND WATER WITH A
SOFT CLOTH. Used on a regular basis; this
is all that is required to maintain this finish.
Tire Types
All Season Tires — If Equipped
All Season tires provide traction for all
seasons (Spring, Summer, Fall, and
Winter). Traction levels may vary
between different all season tires. All
season tires can be identified by the
M+S, M&S, M/S or MS designation on
the tire sidewall. Use all season tires
only in sets of four; failure to do so may
adversely affect the safety and handling
of your vehicle.
Summer Or Three Season Tires
— If Equipped
Summer tires provide traction in both
wet and dry conditions, and are not
intended to be driven in snow or on ice.
If your vehicle is equipped with Summer
tires, be aware these tires are not
designed for Winter or cold driving
conditions. Install Winter tires on your
vehicle when ambient temperatures are
less than 40°F (5°C) or if roads are
covered with ice or snow. For more
information, contact an authorized
dealer.
Summer tires do not contain the all
season designation or mountain/
snowflake symbol on the tire sidewall.
Use Summer tires only in sets of four;
failure to do so may adversely affect the
safety and handling of your vehicle.
Warning!
Do not use Summer tires in snow/ice
conditions. You could lose vehicle control,
resulting in severe injury or death. Driving
too fast for conditions also creates the
possibility of loss of vehicle control.
Snow Tires
Some areas of the country require the
use of snow tires during the Winter.
Snow tires can be identified by a
“mountain/snowflake” symbol on the
tire sidewall.If you need snow tires,
select tires equivalent
in size and type to the
original equipment
tires. Use snow tires
only in sets of four;
failure to do so may
adversely affect the safety and handling
of your vehicle.
Snow tires generally have lower speed
ratings than what was originally
equipped with your vehicle and should
not be operated at sustained speeds
over 75 mph (120 km/h). For speeds
above 75 mph (120 km/h) refer to
original equipment or an authorized tire
dealer for recommended safe operating
speeds, loading and cold tire inflation
pressures.
228
SERVICING AND MAINTENANCE