active ALFA ROMEO GIULIA 2022 User Guide
[x] Cancel search | Manufacturer: ALFA ROMEO, Model Year: 2022, Model line: GIULIA, Model: ALFA ROMEO GIULIA 2022Pages: 248, PDF Size: 9.71 MB
Page 54 of 248
GETTING TO KNOW YOUR VEHICLE
52
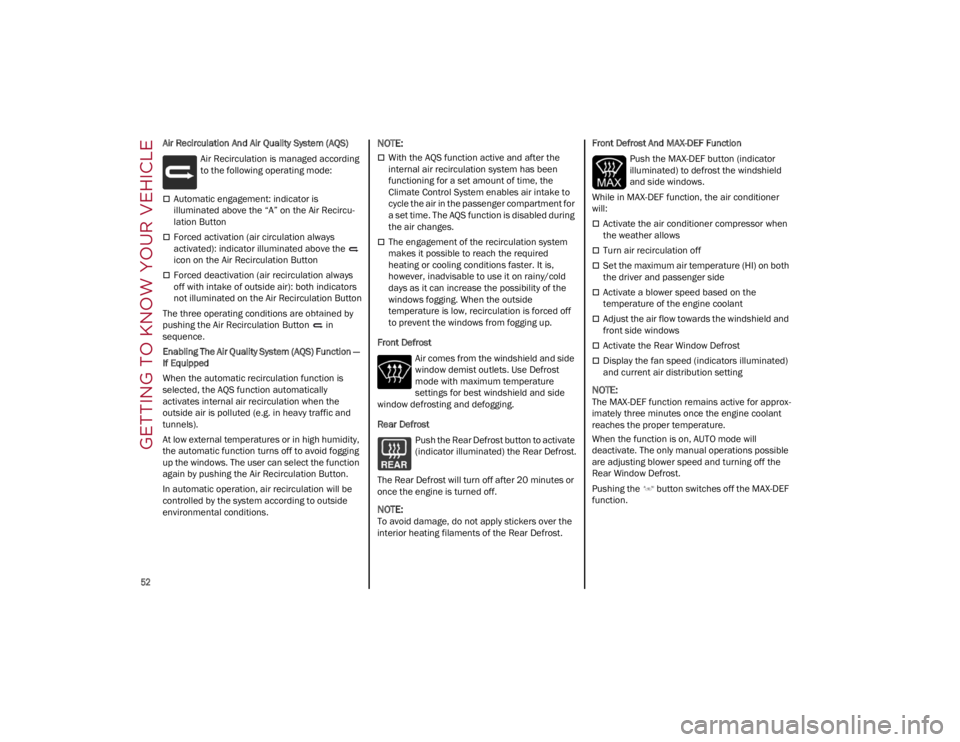
Air Recirculation And Air Quality System (AQS)Air Recirculation is managed according
to the following operating mode:
Automatic engagement: indicator is
illuminated above the “A” on the Air Recircu -
lation Button
Forced activation (air circulation always
activated): indicator illuminated above the
icon on the Air Recirculation Button
Forced deactivation (air recirculation always
off with intake of outside air): both indicators
not illuminated on the Air Recirculation Button
The three operating conditions are obtained by
pushing the Air Recirculation Button in
sequence.
Enabling The Air Quality System (AQS) Function —
If Equipped
When the automatic recirculation function is
selected, the AQS function automatically
activates internal air recirculation when the
outside air is polluted (e.g. in heavy traffic and
tunnels).
At low external temperatures or in high humidity,
the automatic function turns off to avoid fogging
up the windows. The user can select the function
again by pushing the Air Recirculation Button.
In automatic operation, air recirculation will be
controlled by the system according to outside
environmental conditions.
NOTE:
With the AQS function active and after the
internal air recirculation system has been
functioning for a set amount of time, the
Climate Control System enables air intake to
cycle the air in the passenger compartment for
a set time. The AQS function is disabled during
the air changes.
The engagement of the recirculation system
makes it possible to reach the required
heating or cooling conditions faster. It is,
however, inadvisable to use it on rainy/cold
days as it can increase the possibility of the
windows fogging. When the outside
temperature is low, recirculation is forced off
to prevent the windows from fogging up.
Front Defrost Air comes from the windshield and side
window demist outlets. Use Defrost
mode with maximum temperature
settings for best windshield and side
window defrosting and defogging.
Rear Defrost
Push the Rear Defrost button to activate
(indicator illuminated) the Rear Defrost.
The Rear Defrost will turn off after 20 minutes or
once the engine is turned off.
NOTE:
To avoid damage, do not apply stickers over the
interior heating filaments of the Rear Defrost. Front Defrost And MAX-DEF Function
Push the MAX-DEF button (indicator
illuminated) to defrost the windshield
and side windows.
While in MAX-DEF function, the air conditioner
will:
Activate the air conditioner compressor when
the weather allows
Turn air recirculation off
Set the maximum air temperature (HI) on both
the driver and passenger side
Activate a blower speed based on the
temperature of the engine coolant
Adjust the air flow towards the windshield and
front side windows
Activate the Rear Window Defrost
Display the fan speed (indicators illuminated)
and current air distribution setting
NOTE:
The MAX-DEF function remains active for approx -
imately three minutes once the engine coolant
reaches the proper temperature.
When the function is on, AUTO mode will
deactivate. The only manual operations possible
are adjusting blower speed and turning off the
Rear Window Defrost.
Pushing the button switches off the MAX-DEF
function.
22_GA_OM_EN_USC_t.book Page 52
Page 56 of 248

GETTING TO KNOW YOUR VEHICLE
54
Mix ModeAir is directed through the floor, defrost,
and side window demister outlets. This
setting works best in cold or snowy
conditions that require extra heat to the
windshield. This setting is good for maintaining
comfort while reducing moisture on the
windshield.
Front Defrost And Panel Mode
Air flow is distributed between the
windshield demisting/defrosting vents
and side/central dashboard vents. This
setting allows air to flow to the
windshield on sunny days.
Front Defrost And Bi-Level Mode
Air flow is distributed to all vents.
Switching The Climate Control System On/Off
To Turn Off The Climate Control System
Rotate the Air Speed Adjustment Knob
completely counterclockwise to turn off the
Climate Control system.
With the air conditioner is off:
Air recirculation is on
The A/C compressor is off
The fan is off
The heated rear window can be activated/
deactivated
NOTE:
The climate control system stores the previously
set temperatures and resumes operation when
any button on the system is pushed.
To Turn On The Climate Control System
To switch the climate control system on in
automatic mode, push the AUTO button.
Operating Mode
The Climate Control system can be activated in
different ways. It is recommended to use the
automatic function. Push the AUTO button and
set the desired temperatures.
The automatic system adjusts the temperature,
quantity, and distribution of air introduced into
the passenger compartment. It also controls air
recirculation and the activation of the air
conditioner.
At any time during automatic operation, you can
change the temperature, activate or deactivate
the Rear Defrost, activate SYNC, activate or
deactivate the air conditioner, and activate or
deactivate air recirculation. The system will
automatically adjust to the new settings.
Climate Control Display Settings
The Climate Control settings are visible on the
radio screen.
The display on the radio system is a pop up
window, which is activated by pushing the
buttons or turning the knobs on the Climate
Control system. The indicator lights located on
the number of buttons and knobs indicate that
the selected feature is on/off. If no operation is
performed for a predetermined time, the pop-up
will close on the display.
Humidity Sensor
The Humidity Sensor helps prevent the windows
from fogging up. The AUTO function (indicator
illuminated) must be on for the Humidity Sensor
to function.
When outside temperature is low, the system
may turn the compressor on and turn air recircu -
lation off for safer driving.
Stop/Start
The Stop/Start system shuts off the engine when
the vehicle speed is 0 mph (0 km/h), as a fuel
conservation measure.
In order to maintain comfort in the cabin, the
Stop/Start feature will not activate if any of the
following conditions exist:
The climate control system is in AUTO mode
(indicator illuminated), and the vehicle has yet
to reach the set temperature
The climate control system is in LO maximum
cooling
The climate control system is in HI maximum
heating
The climate control system is in the MAX-DEF
status
When the Stop/Start system is active, the engine
will restart if the inside temperature changes
significantly, or if the LO setting, or MAX-DEF
setting, is activated.
With the Stop/Start system on (engine is off), air
flow is reduced to keep the compartment comfort
conditions for longer.
22_GA_OM_EN_USC_t.book Page 54
Page 65 of 248
63
ENVIRONMENTAL
PROTECTION SYSTEMS
The following systems are used for reducing
engine emissions:
Catalytic Converter
Oxygen Sensors
Evaporation Control System
ACTIVE AERODYNAMIC
SPOILER
(QUADRIFOGLIO VEHICLES)
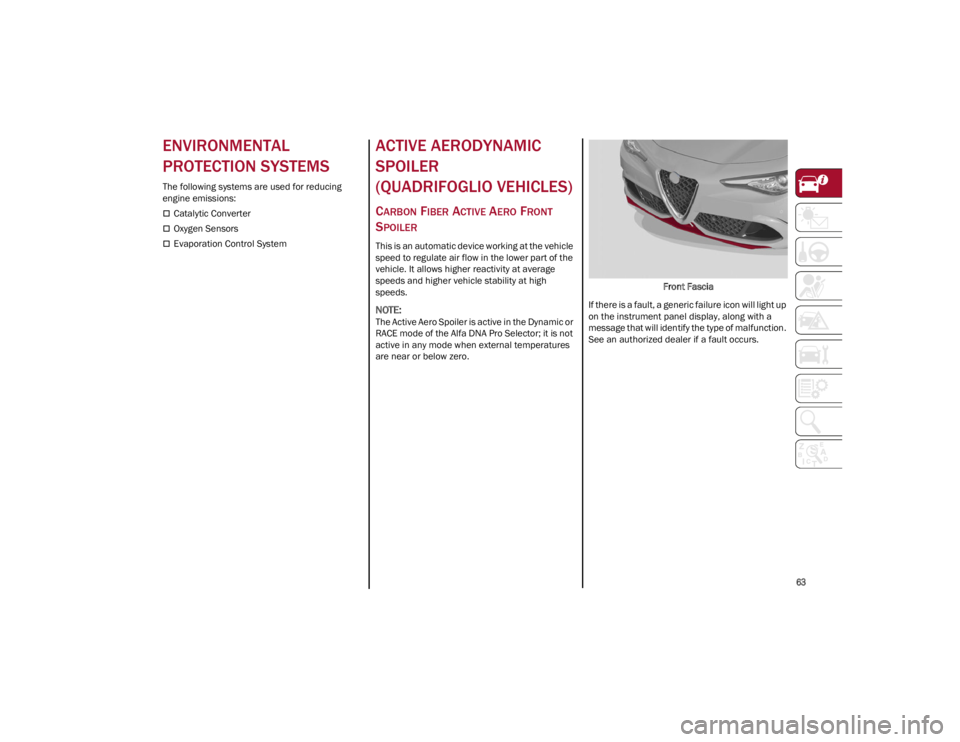
CARBON FIBER ACTIVE AERO FRONT
S
POILER
This is an automatic device working at the vehicle
speed to regulate air flow in the lower part of the
vehicle. It allows higher reactivity at average
speeds and higher vehicle stability at high
speeds.
NOTE:
The Active Aero Spoiler is active in the Dynamic or
RACE mode of the Alfa DNA Pro Selector; it is not
active in any mode when external temperatures
are near or below zero. Front Fascia
If there is a fault, a generic failure icon will light up
on the instrument panel display, along with a
message that will identify the type of malfunction.
See an authorized dealer if a fault occurs.
22_GA_OM_EN_USC_t.book Page 63
Page 67 of 248
65
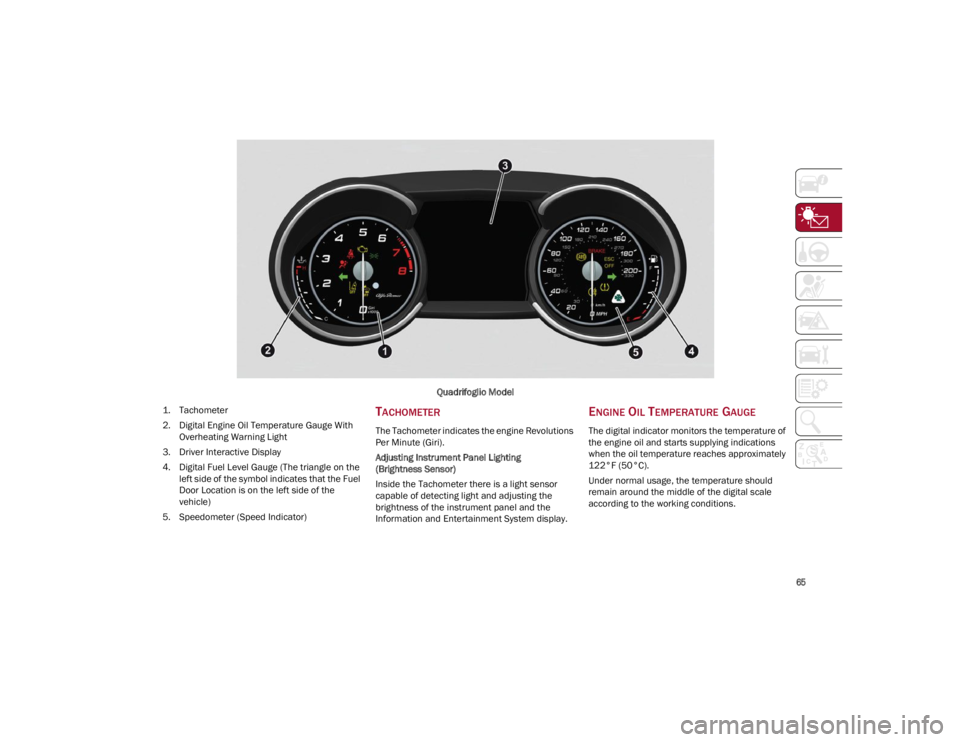
Quadrifoglio Model
1. T
achometer
2. Digital Engine Oil Temperature Gauge With Overheating Warning Light
3. Driver Interactive Display
4. Digital Fuel Level Gauge (The triangle on the left side of the symbol indicates that the Fuel
Door Location is on the left side of the
vehicle)
5. Speedometer (Speed Indicator)
TACHOMETER
The Tachometer indicates the engine Revolutions
Per Minute (Giri).
Adjusting Instrument Panel Lighting
(Brightness Sensor)
Inside the Tachometer there is a light sensor
capable of detecting light and adjusting the
brightness of the instrument panel and the
Information and Entertainment System display.
ENGINE OIL TEMPERATURE GAUGE
The digital indicator monitors the temperature of
the engine oil and starts supplying indications
when the oil temperature reaches approximately
122°F (50°C).
Under normal usage, the temperature should
remain around the middle of the digital scale
according to the working conditions.
22_GA_OM_EN_USC_t.book Page 65
Page 68 of 248
GETTING TO KNOW YOUR INSTRUMENT PANEL
66
The Engine Oil Temperature warning light will
turn on to signal the excessive increase of the
engine oil temperature.
In the event of excessive engine oil temperature,
stop the engine immediately and contact an
authorized dealer.
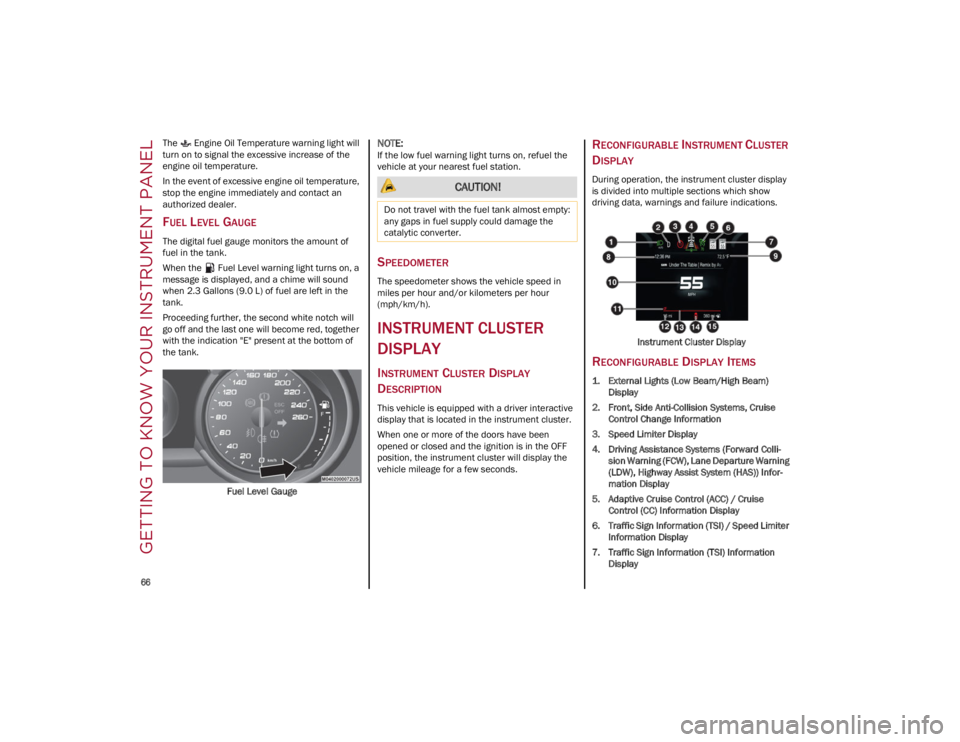
FUEL LEVEL GAUGE
The digital fuel gauge monitors the amount of
fuel in the tank.
When the Fuel Level warning light turns on, a
message is displayed, and a chime will sound
when 2.3 Gallons (9.0 L) of fuel are left in the
tank.
Proceeding further, the second white notch will
go off and the last one will become red, together
with the indication "E" present at the bottom of
the tank.Fuel Level Gauge
NOTE:
If the low fuel warning light turns on, refuel the
vehicle at your nearest fuel station.
SPEEDOMETER
The speedometer shows the vehicle speed in
miles per hour and/or kilometers per hour
(mph/km/h).
INSTRUMENT CLUSTER
DISPLAY
INSTRUMENT CLUSTER DISPLAY
D
ESCRIPTION
This vehicle is equipped with a driver interactive
display that is located in the instrument cluster.
When one or more of the doors have been
opened or closed and the ignition is in the OFF
position, the instrument cluster will display the
vehicle mileage for a few seconds.
RECONFIGURABLE INSTRUMENT CLUSTER
D
ISPLAY
During operation, the instrument cluster display
is divided into multiple sections which show
driving data, warnings and failure indications.
Instrument Cluster Display
RECONFIGURABLE DISPLAY ITEMS
1. External Lights (Low Beam/High Beam)Display
2. Front, Side Anti-Collision Systems, Cruise Control Change Information
3. Speed Limiter Display
4. Driving Assistance Systems (Forward Colli -
sion Warning (FCW), Lane Departure Warning
(LDW), Highway Assist System (HAS)) Infor -
mation Display
5. Adaptive Cruise Control (ACC) / Cruise Control (CC) Information Display
6. Traffic Sign Information (TSI) / Speed Limiter Information Display
7. Traffic Sign Information (TSI) Information Display
CAUTION!
Do not travel with the fuel tank almost empty:
any gaps in fuel supply could damage the
catalytic converter.
22_GA_OM_EN_USC_t.book Page 66
Page 69 of 248
67
8. Time
9. External Temperature
10. Main Display: Vehicle Speed Display, Trip Computer Information, etc.
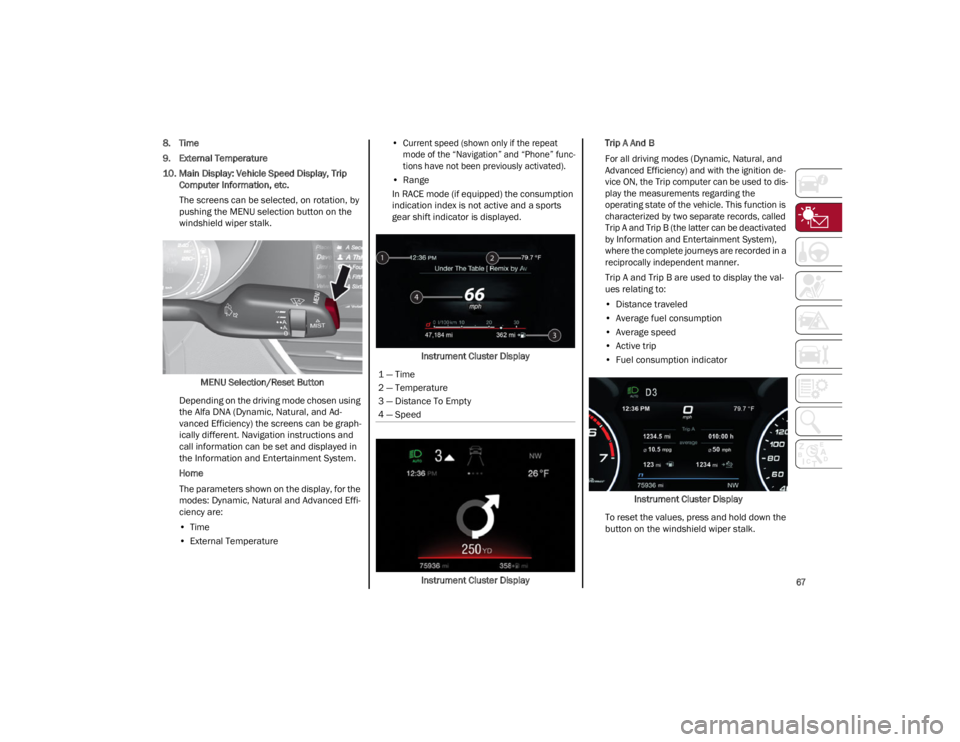
The screens can be selected, on rotation, by
pushing the MENU selection button on the
windshield wiper stalk.
MENU Selection/Reset Button
Depending on the driving mode chosen using
the Alfa DNA (Dynamic, Natural, and Ad -
vanced Efficiency) the screens can be graph -
ically different. Navigation instructions and
call information can be set and displayed in
the Information and Entertainment System.
Home
The parameters shown on the display, for the
modes: Dynamic, Natural and Advanced Effi -
ciency are:
• Time
• External Temperature
•
Current speed (shown only if the repeat
mode of the “Navigation” and “Phone” func -
tions have not been previously activated).
• Range
In RACE mode (if equipped) the consumption
indication index is not active and a sports
gear shift indicator is displayed.
Instrument Cluster Display
Instrument Cluster Display Trip A And B
For all driving modes (Dynamic, Natural, and
Advanced Efficiency) and with the ignition de
-
vice ON, the Trip computer can be used to dis -
play the measurements regarding the
operating state of the vehicle. This function is
characterized by two separate records, called
Trip A and Trip B (the latter can be deactivated
by Information and Entertainment System),
where the complete journeys are recorded in a
reciprocally independent manner.
Trip A and Trip B are used to display the val -
ues relating to:
• Distance traveled
• Average fuel consumption
• Average speed
• Active trip
• Fuel consumption indicator
Instrument Cluster Display
To reset the values, press and hold down the
button on the windshield wiper stalk.
1 — Time
2 — Temperature
3 — Distance To Empty
4 — Speed
22_GA_OM_EN_USC_t.book Page 67
Page 70 of 248
GETTING TO KNOW YOUR INSTRUMENT PANEL
68
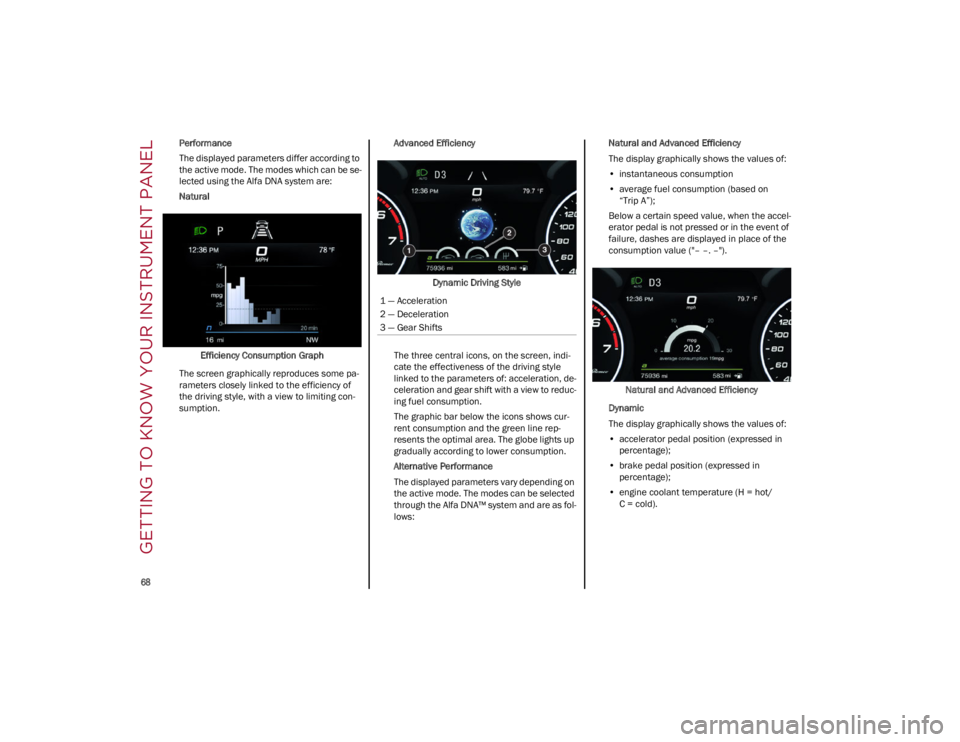
Performance
The displayed parameters differ according to
the active mode. The modes which can be se-
lected using the Alfa DNA system are:
Natural
Efficiency Consumption Graph
The screen graphically reproduces some pa -
rameters closely linked to the efficiency of
the driving style, with a view to limiting con -
sumption. Advanced Efficiency
Dynamic Driving Style
The three central icons, on the screen, indi -
cate the effectiveness of the driving style
linked to the parameters of: acceleration, de -
celeration and gear shift with a view to reduc -
ing fuel consumption.
The graphic bar below the icons shows cur -
rent consumption and the green line rep -
resents the optimal area. The globe lights up
gradually according to lower consumption.
Alternative Performance
The displayed parameters vary depending on
the active mode. The modes can be selected
through the Alfa DNA™ system and are as fol -
lows: Natural and Advanced Efficiency
The display graphically shows the values of:
• instantaneous consumption
• average fuel consumption (based on
“Trip A”);
Below a certain speed value, when the accel -
erator pedal is not pressed or in the event of
failure, dashes are displayed in place of the
consumption value ("– –. –").
Natural and Advanced Efficiency
Dynamic
The display graphically shows the values of:
• accelerator pedal position (expressed in
percentage);
• brake pedal position (expressed in
percentage);
• engine coolant temperature (H = hot/
C = cold).
1 — Acceleration
2 — Deceleration
3 — Gear Shifts
22_GA_OM_EN_USC_t.book Page 68
Page 74 of 248
GETTING TO KNOW YOUR INSTRUMENT PANEL
72
Electronic Brake Force Distribution (EBD)
Failure
The simultaneous turning on of the
BRAKE (red) and (amber) warning
lights with the engine on indicates
either a failure of the EBD system or
that the system is not available. In this case, the
rear wheels may suddenly lock and the vehicle
may swerve when braking abruptly.
Drive very carefully to the nearest authorized
dealer to have the system inspected
immediately.
Oil Temperature Warning Light
This telltale indicates engine oil
temperature is high.
Stop the vehicle and shut off the engine as soon
as possible. If the problem persists, contact an
authorized dealer.
AMBER WARNING LIGHTS
Anti-Lock Brake System (ABS) Warning
Light
This light monitors the ABS. The light will
turn on when the ignition is placed in
the ON/RUN position and may stay on
for as long as four seconds.
If the ABS light remains on or turns on while
driving, then the Anti-Lock portion of the brake
system is not functioning and service is required.
However, the conventional brake system will
continue to operate normally if the brake
indicator light is not on. If the ABS light is on, the brake system should be
serviced as soon as possible to restore the
benefits of Anti-Lock Brakes. If the ABS light does
not turn on when the ignition is placed in the ON/
RUN position, have the light inspected by an
authorized dealer.
Electronic Stability Control (ESC)
Indicator Light — If Equipped
When the ignition is cycled to ON, the
indicator light illuminates, but should
turn off as soon as the engine is started.
ESC System Intervention : Intervention by the
system is indicated by the flashing of the
indicator light: it indicates that the vehicle is in
critical stability and grip conditions.
ESC System Failure: If the indicator light does not
turn off, or if it stays on with the engine running,
a failure was found in the ESC system.
Hill Start Assist System Failure : The illumination
of the indicator light indicates a Hill Start Assist
system failure.
In these cases, contact an authorized dealer as
soon as possible.
Electronic Stability Control (ESC) OFF
Indicator Light — If Equipped
When the ignition is cycled to ON, the
indicator light illuminates, but should
turn off as soon as the engine is started.
The indicator light illuminates to indicate that
some active safety systems have been partially or
totally deactivated
Ú
page 129.
When the active safety systems are reactivated,
the indicator light turns off.
Tire Pressure Low Warning Light
The indicator light will illuminate to
indicate that the tire pressure is lower
than the recommended value and/or
that slow pressure loss is occurring. In
these cases, optimal tire duration and fuel
consumption may not be guaranteed.
In any situation in which the message on the
display is “See Manual”
Ú
page 142.
Tire Pressure Monitoring System (TPMS)
Warning Light
The warning light switches on and a
message is displayed to indicate that
the tire pressure is lower than the
recommended value and/or that slow
pressure loss is occurring. In these cases,
optimal tire duration and fuel consumption may
not be guaranteed.
Should one or more tires be in the condition
mentioned above, the display will show the
indications corresponding to each tire.
CAUTION!
Do not continue driving with one or more flat
tires as handling may be compromised. Stop
the vehicle, avoiding sharp braking and
steering. If a tire puncture occurs, repair
immediately using the dedicated tire repair kit
and contact an authorized dealer as soon as
possible.
22_GA_OM_EN_USC_t.book Page 72
Page 83 of 248
81
STARTING THE ENGINE
Before starting the engine, be sure to adjust the
seat, the interior rearview mirror, the door
mirrors, and fasten the seat belt correctly.
Never press the accelerator pedal before starting
the engine.
If necessary, messages indicating the starting
procedure will be shown in the display.
STARTING PROCEDURE
Proceed as follows:
1. Apply the Electric Park Brake and set the gear selector to PARK (P) or NEUTRAL (N).
2. Fully press the brake pedal without touching the accelerator.
3. Briefly push the ignition button.
4. If the engine doesn't start within a few seconds, you need to repeat the procedure.
If the problem persists, contact an authorized
dealer.
REMOTE STARTING SYSTEM
This system uses the key fob to start the engine
conveniently from outside the vehicle while still
maintaining security. The system has a range of
at least 300 feet (91 meters).
The remote starting system also activates the
climate control, the heated seats (if equipped),
and the heated steering wheel (if equipped),
depending on temperatures outside and inside of
the vehicle.
NOTE:
Obstructions between the vehicle and key fob
may reduce this range.
How to use Remote Start
All of the following conditions must be met before
the engine will remote start:
Gear selector in PARK (P).
Doors closed.
Hood closed.
Trunk closed.
Hazard switch off.
Brake switch inactive (brake pedal not
pressed).
WARNING!
When leaving the vehicle, always remove the
key fob from the vehicle and lock your
vehicle.
Never leave children alone in a vehicle, or
with access to an unlocked vehicle.
Allowing children to be in a vehicle
unattended is dangerous for a number of
reasons. A child or others could be seriously
or fatally injured. Children should be warned
not to touch the parking brake, brake pedal
or the transmission gear selector.
Do not leave the key fob in or near the
vehicle, or in a location accessible to
children. A child could operate power
windows, other controls, or move the vehicle.
Do not leave children or animals inside
parked vehicles in hot weather. Interior heat
buildup may cause serious injury or death.
WARNING!
Never pour fuel or other flammable liquid
into the throttle body air inlet opening in an
attempt to start the vehicle. This could result
in flash fire causing serious personal injury.
Do not attempt to push or tow your vehicle to
get it started. Vehicles equipped with an
automatic transmission cannot be started
this way. Unburned fuel could enter the
catalytic converter and once the engine has
started, ignite and damage the converter
and vehicle.
If the vehicle has a discharged battery,
booster cables may be used to obtain a start
from a booster battery or the battery in
another vehicle
Ú
page 177. This type of
start can be dangerous if done improperly.
CAUTION!
To prevent damage to the starter, do not
continuously crank the engine for more than
25 seconds at a time. Wait 60 seconds before
trying again.
22_GA_OM_EN_USC_t.book Page 81
Page 84 of 248
STARTING AND OPERATING
82
Battery at an acceptable charge level.
PANIC button not pushed.
System not disabled from previous remote
start event.
Vehicle alarm system indicator flashing.
Ignition in the OFF position.
Fuel level meets minimum requirement.
Remote Start Comfort Systems — If Equipped
When Remote Start is activated, the heated
steering wheel and driver heated seat features
will automatically turn on in cold weather.
These features will stay on through the duration
of remote start until the ignition is placed in the
ON/RUN position.
Remote Start Windshield Wiper De-Icer
Activation — If Equipped
When remote start is active and the outside
ambient temperature is less than 39°F (4°C),
the Windshield Wiper De-Icer will be enabled.
Exiting remote start will resume previous
operation, except if the Windshield Wiper De-Icer
is active.
The Windshield Wiper De-Icer timer and
operation will continue.
COLD WEATHER OPERATION
To prevent possible engine damage while starting
at low temperatures, this vehicle will inhibit
engine cranking when the ambient temperature
is less than –22°F (–30°C) and the oil
temperature sensor reading indicates an engine
block heater has not been used. An
externally-powered electric engine block heater is
available as optional equipment or from an
authorized dealer. The message “Plug In Engine Heater” will be
displayed in the instrument cluster when the
ambient temperature is below 5°F (–15°C) at
the time the engine is shut off as a reminder to
avoid possible crank delays at the next cold start.
EXTENDED PARK STARTING
If the vehicle has not been started or driven for at
least 30 days, it is advisable to follow the
instructions below.
To start the engine, proceed as follows:
1. Briefly push the ignition button
2. If the engine does not start, wait five seconds
and let the starter cool down and then repeat
the starting procedure
3. If the engine does not start after eight attempts, let the starter cool down for at least
10 seconds, and then repeat the starting
procedure
If the problem persists, contact an authorized
dealer.
NOTE:
After prolonged vehicle inactivity, very difficult
starting, that can be noticed through rapid fatigue
of the starter, might also be due to a discharged
battery. In this case you may jump start the
vehicle
Ú
page 177.
IF ENGINE FAILS TO START
Starting the Engine with Key Fob Battery Run
Down or Drained
If the ignition does not respond when the button
is pushed, the key fob battery might be run down
or drained. Therefore, the system does not detect
the presence of the key fob in the vehicle, and will
display a dedicated message.
For more information on starting with a
discharged key fob battery
Ú
page 22.
CAUTION!
Use of the recommended oil and adhering to
the prescribed oil change intervals is
important to prevent engine damage and
ensure satisfactory starting in cold conditions.
WARNING!
Never pour fuel or other flammable liquid into
the throttle body air inlet opening in an attempt
to start the vehicle. This could result in flash fire
causing serious personal injury.
Do not attempt to push or tow your vehicle to
get it started. Vehicles equipped with an
automatic transmission cannot be started this
way. Unburned fuel could enter the catalytic
converter and once the engine has started,
ignite and damage the converter and vehicle.
If the vehicle has a discharged battery, booster
cables may be used to obtain a start from a
booster battery or the battery in another vehicle
Ú
page 177. This type of start can be
dangerous if done improperly.
CAUTION!
To prevent damage to the starter, do not
continuously crank the engine for more than
25 seconds at a time. Wait 60 seconds before
trying again.
22_GA_OM_EN_USC_t.book Page 82