rear view mirror Alfa Romeo Giulietta 2012 Owner handbook (in English)
[x] Cancel search | Manufacturer: ALFA ROMEO, Model Year: 2012, Model line: Giulietta, Model: Alfa Romeo Giulietta 2012Pages: 297, PDF Size: 9.37 MB
Page 59 of 297

55
GETTING
TO KNOW
YOUR CAR
SAFETY
STARTING
AND DRIVING
IN AN
EMERGENCY
SERVICING AND
MAINTENANCE
TECHNICAL
SPECIFICATIONS
CONTENTS
fig. 29A0K0079m
REARVIEW MIRRORS
INTERNAL REARVIEW MIRROR
Operate A lever fig. 29 to adjust the mirror into two different po-
sitions: normal or anti-glare.
Electrochromic internal mirror
(for versions/markets, where provided)
Some versions are equipped with an electrochromic mirror fig. 30.
The mirror will always be set to day use when reverse gear is en-
gaged.
fig. 30A0K0119m
Page 60 of 297

56
GETTING
TO KNOW
YOUR CAR
SAFETY
STARTING
AND DRIVING
IN AN
EMERGENCY
SERVICING AND
MAINTENANCE
TECHNICAL
SPECIFICATIONS
CONTENTS
Rear view mirror electric folding
(for versions/markets where provided)
To fold back the mirrors press C button fig. 31. Press the button
once again to turn the mirrors back to the driving position.
Manual rear view mirror folding fig. 32
If required, the mirrors can be folded back manually from posi-
tion 1 to position 2.
IMPORTANT When driving, the mirrors should always be in posi-
tion 1.Adjusting the mirror
The mirrors can be adjusted/folded only if the ignition key is in
MAR position.
Select the mirror you wish to adjust using A device fig. 31:
❍device in position 1: left mirror selected;
❍device in position 2: right mirror selected.
To adjust the selected mirror, press B button in the four directions
shown by the arrows.
IMPORTANT Once adjustment is complete, turn A device to position
0 to prevent accidental movements.
fig. 31A0K0066mfig. 32A0K0052m
EXTERNAL REARVIEW MIRRORS
As the driver’s external rearview mirror is curved,
it may slightly alter the perception of distance.
Page 66 of 297
62
GETTING
TO KNOW
YOUR CAR
SAFETY
STARTING
AND DRIVING
IN AN
EMERGENCY
SERVICING AND
MAINTENANCE
TECHNICAL
SPECIFICATIONS
CONTENTS
AUTOMATIC DEMISTING/DEFROSTING
(MAX-DEF function)
This function automatically demists/defrosts the following: wind-
screen and front side windows, heated spray nozzles, heater ex-
ternal rearview mirrors.
To activate the function on, turn the E knob to the “Defrosting”
symbol identified by the
-symbol. The manual climate control
system will automatically set itself to the following configuration:
❍demisting symbol -from red to orange (to indicate that the
function is on);
❍the heated rear windscreen (and all the installed defrosting
devices) will be turned on. The circular LED around the button
(will light up to indicate that the function is on;
❍the air flow will go to maximum speed (6);
❍air circulation will be opened, if it was closed (the circular LED
about the corresponding button will be off);
❍air mixing to maximum heating;
❍additional electric heater (for versions/markets, where pro-
vided) will be turned on;
❍the compressor will be activated (the circular LED will stay on
to indicate that the AC function is on).
Window demisting
The climate control system is very useful in preventing the windows
from misting up in the event of high levels of humidity.
In the event of considerable outside moisture and/or rain and/or
considerable differences in temperature inside and outside the pas-
senger compartment, proceed as follows to demist the windows:
❍turn A knob to the red section;
❍press F button to disable the air recirculation system (the LED
on the button should be off);
❍turn E knob to -and move it to position u(B-fig. 38a) if
demisting does not take place;
❍turn C knob to the 2ndspeed.
Page 67 of 297
63
GETTING
TO KNOW
YOUR CAR
SAFETY
STARTING
AND DRIVING
IN AN
EMERGENCY
SERVICING AND
MAINTENANCE
TECHNICAL
SPECIFICATIONS
CONTENTS
DEMISTING/DEFROSTING
HEATED REAR WINDSCREEN
Press D button (() to turn the function on/off. The function is au-
tomatically deactivated after 20 minutes.
For versions/markets, where provided, pressing the
(button
also defrost/demist the external rearview mirrors and the heated
spray nozzles (for versions/markets, where provided).
IMPORTANT Do not affix stickers to the inside of the heated rear
windscreen over the heating filaments, to avoid damage that might
cause them to stop working properly.
AIR RECIRCULATION
Press F (v) button so that the LED on the button lights up. It
is advisable to switch air recirculation on while standing in traffic
or in tunnels to prevent the introduction of polluted air.
Do not use the function for a long time, particularly if there are many
passengers on board, to prevent the windows from misting up.
IMPORTANT The air recirculation system makes it possible to reach
the required heating or cooling conditions faster. Do not use the air
recirculation function on rainy/cold days as it would considerably
increase the possibility of the windows misting.
AIR DISTRIBUTION SELECTION
Turn E knob fig. 38 to manually select one of the four possible
air distribution settings in the passenger compartment:
xAir flow to the windscreen and front side window vents to
demist/defrost them.
sAir flow to the front and rear footwell vents. This air distrib-
ution allows the passenger compartment to be warmed up
quickly.
yAir flow distribution between front and rear vents, centre/side
dashboard vents, rear vent and windscreen and front side win-
dow demisting/defrosting vents.
rAir flow distribution to centre/side dashboard vents (pas-
senger’s body).
Page 70 of 297
66
GETTING
TO KNOW
YOUR CAR
SAFETY
STARTING
AND DRIVING
IN AN
EMERGENCY
SERVICING AND
MAINTENANCE
TECHNICAL
SPECIFICATIONS
CONTENTS
You can adjust one function automatically and have the automat-
ic system control all the others. The amount of air introduced into
the passenger compartment is not affected by vehicle speed; it is
electronically controlled by a fan. The air temperature is always au-
tomatically controlled according to the temperature shown on the
display (except for when the system is off or in certain conditions
when the compressor is not running).
The system can manually programme and adjuste:
❍air temperature on driver’s/passenger’s side;
❍fan speed (continuous variation);
❍air distribution to 7 positions;
❍climate control compressor enabled;
❍fast demisting/defrosting function;
❍air recirculation;
❍heated rear windscreen;
❍turning the system off.
DESCRIPTION
The automatic dual zone climate control system regulates the tem-
perature in the passenger compartment in two areas. The system
keeps the comfort in the passenger compartment constant and
compensates for variable external conditions.
NOTEThe reference temperature is 22°C for optimal comfort man-
agement.
The automatically controlled parameters and functions are:
❍air temperature delivered to driver/front passenger vents;
❍air distribution to driver/front passenger vents;
❍fan speed (continuous air flow variation);
❍switching the compressor fan on (for cooling/dehumidifying
the air);
❍air recirculation.
All these functions can be manually adjusted by operating the sys-
tem and selecting one or more functions and modifying their pa-
rameters. Automatic control of the manually changed functions will
be suspended: the system will only override your settings for safe-
ty reasons.
Manual selections will always have higher priority over automatic
settings and will be stored until the AUTO button is pressed, except
for the cases in which the system will intervene for particular, safe-
ty-related reasons.
The climate control system uses an average radi-
ating temperature sensor installed under a cover
below the inner rearview mirror. To ensure opti-
mal operation of the climate control system, do not ob-
struct the detection cone of this sensor with any object.
Page 76 of 297

72
GETTING
TO KNOW
YOUR CAR
SAFETY
STARTING
AND DRIVING
IN AN
EMERGENCY
SERVICING AND
MAINTENANCE
TECHNICAL
SPECIFICATIONS
CONTENTS
DEMISTING/DEFROSTING
HEATED REAR WINDSCREEN
Press(to turn heated rear windscreen demisting/defrosting func-
tion on (LED on button lit). This function switches off automatically
after about 20 minutes or when the engine is turned off. It is not
switched on automatically the next time the engine is started. For
versions/markets, where provided, pressing the
(button it is al-
so possible to defrost/demist the external rearview mirrors (for
versions/markets, where provided) and the heated spray nozzles
(for versions/markets, where provided).
IMPORTANT Do not affix stickers to the inside of the heated rear
windscreen on the heating filaments, to avoid damage that might
cause them to stop working properly.
Thermal comfort windscreen
(for versions/markets, where provided)
Some versions feature a thermal comfort windscreen which, with
the car exposed to the sun, limits the extent of temperature in-
crease inside the passenger compartment, thus ensuring greater
comfort.
Humidity sensor (for versions/markets, where provided)
The humidity sensor prevents the windows from misting up. For
full operation, it is advisable to turn the AUTO on (LED N on). When
the outside temperature is low, the system could automatically turn
the compressor on and turn air recirculation off for safer driving.
TURNING THE CLIMATE CONTROL SYSTEM OFF
Pressgbutton (LED on button off):
❍air recirculation is on, thus isolating the passenger compartment
from the outside;
❍the compressor is off;
❍the fan is off.
❍the heated rear windscreen can be switched on or off.
❍the AQS (Air Quality System) function cannot be turned on.
IMPORTANT The climate control system control unit stores the tem-
peratures set before the system was switched off and restores
the same conditions when any button of the system is pressed (ex-
cept for D button).
Press AUTO button to restart the climate control system in fully
automatic mode.
Page 95 of 297
91
GETTING
TO KNOW
YOUR CAR
SAFETY
STARTING
AND DRIVING
IN AN
EMERGENCY
SERVICING AND
MAINTENANCE
TECHNICAL
SPECIFICATIONS
CONTENTS
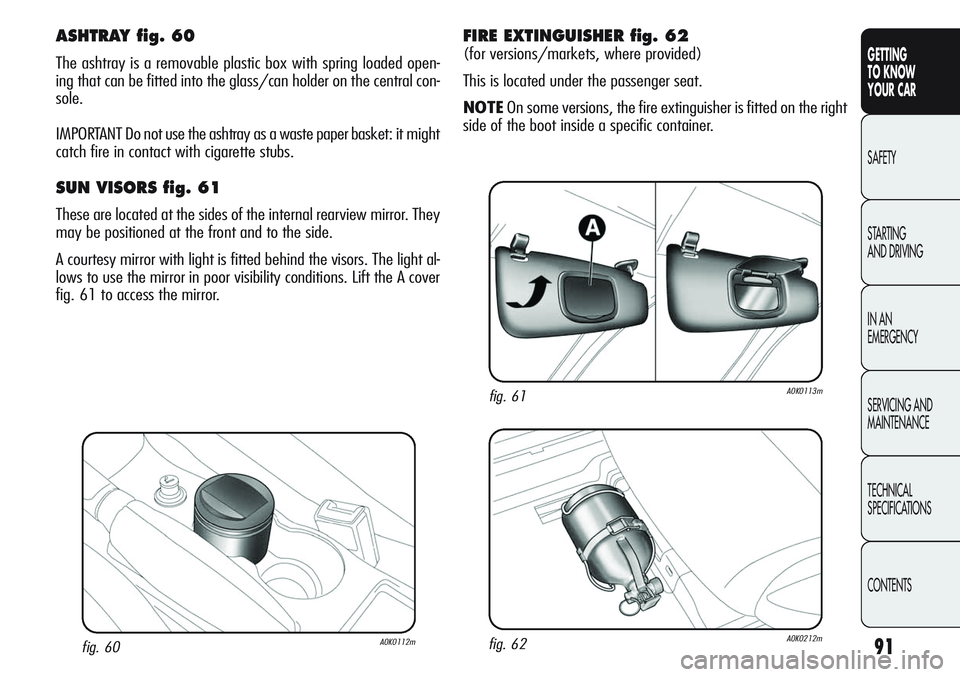
fig. 60A0K0112m
ASHTRAY fig. 60
The ashtray is a removable plastic box with spring loaded open-
ing that can be fitted into the glass/can holder on the central con-
sole.
IMPORTANT Do not use the ashtray as a waste paper basket: it might
catch fire in contact with cigarette stubs.
SUN VISORS fig. 61
These are located at the sides of the internal rearview mirror. They
may be positioned at the front and to the side.
A courtesy mirror with light is fitted behind the visors. The light al-
lows to use the mirror in poor visibility conditions. Lift the A cover
fig. 61 to access the mirror.
fig. 61A0K0113m
fig. 62A0K0212m
FIRE EXTINGUISHER fig. 62
(for versions/markets, where provided)
This is located under the passenger seat.
NOTEOn some versions, the fire extinguisher is fitted on the right
side of the boot inside a specific container.
Page 137 of 297
133
GETTING
TO KNOW
YOUR CAR
SAFETY
STARTING
AND DRIVING
IN AN
EMERGENCY
SERVICING AND
MAINTENANCE
TECHNICAL
SPECIFICATIONS
CONTENTS
SBR SYSTEM
(Seat Belt Reminder)
This system comprises of an acoustic signal, which in conjunction
with the
been fastened.
fig. 95A0K0075m
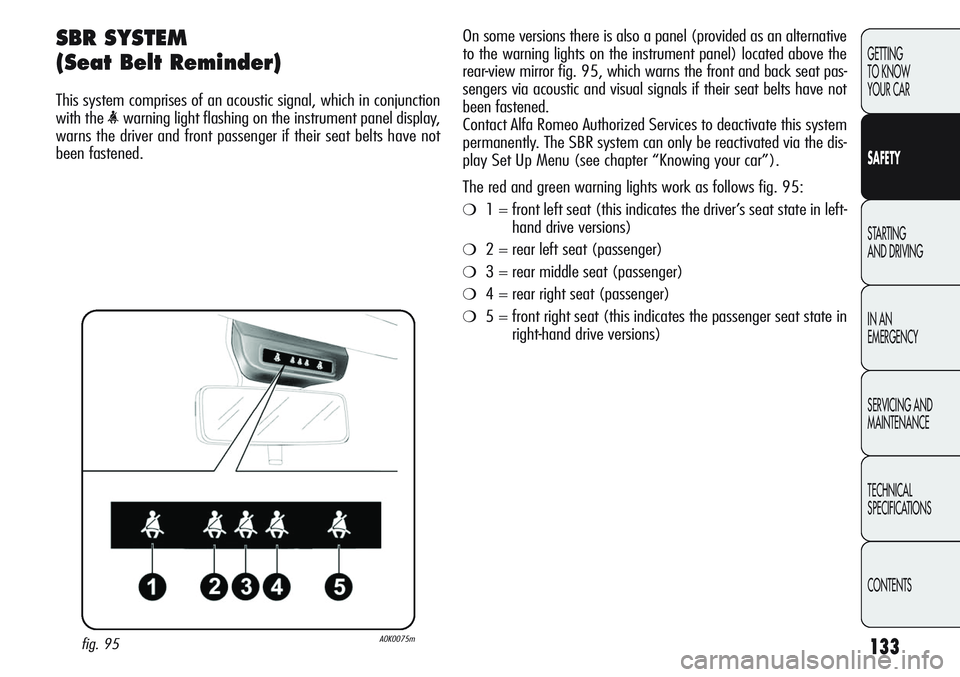
On some versions there is also a panel (provided as an alternative
to the warning lights on the instrument panel) located above the
rear-view mirror fig. 95, which warns the front and back seat pas-
sengers via acoustic and visual signals if their seat belts have not
been fastened.
Contact Alfa Romeo Authorized Services to deactivate this system
permanently. The SBR system can only be reactivated via the dis-
play Set Up Menu (see chapter “Knowing your car”).
The red and green warning lights work as follows fig. 95:
❍1 = front left seat (this indicates the driver’s seat state in left-
hand drive versions)
❍2 = rear left seat (passenger)
❍3 = rear middle seat (passenger)
❍4 = rear right seat (passenger)
❍5 = front right seat (this indicates the passenger seat state in
right-hand drive versions)
Page 161 of 297
157
GETTING
TO KNOW
YOUR CAR
SAFETY
STARTING
AND DRIVING
IN AN
EMERGENCY
SERVICING AND
MAINTENANCE
TECHNICAL
SPECIFICATIONS
CONTENTS
TOWING TRAILERS
IMPORTANT
The car must be provided with a type-approved tow hook and ad-
equate electric system to tow caravans or trailers. Installation must
be carried out by a specialist.
Install any specific and/or additional rear-view mirrors in accor-
dance with the highway code of the country in which you are trav-
elling.
Remember that when towing a trailer, steep hills are harder to climb,
braking distances increase and overtaking takes longer depending
on the overall weight.
Engage a low gear when driving downhill, rather than constantly
using the brake.
The weight of the trailer reduces the load capacity of the car by the
same amount. Consider the weight at full load, including acces-
sories and luggage, to make sure you do not exceed the maximum
towable weight (shown in the registration document).
Respect the speed limits specific to each country for vehicles tow-
ing trailers. In any event do not exceed 100 km/h.
INSTALLING A TOW HOOK
Contact Alfa Romeo Authorized Services to install a tow hook.
The ABS with which the car is equipped will not con-
trol the braking system of the trailer. Take extra
care when travelling on slippery roads.
Never modify the braking system of the car to con-
trol the trailer brake. The trailer braking system
must be fully independent from the hydraulic sys-
tem of the car.
Page 293 of 297
289
GETTING
TO KNOW
YOUR CAR
SAFETY
STARTING
AND DRIVING
IN AN
EMERGENCY
SERVICING AND
MAINTENANCE
TECHNICAL
SPECIFICATIONS
CONTENTS
Pretensioners ......................... 135
Protecting the environment ....... 129
Puddle lights .......................... 84
– bulb replacement ................ 185
Quick tyre repair kit -
“Fix&Go Automatic”............. 169
RAB system ........................... 112
Radio (wiring set-up)............... 122
Radio transmitters and
mobile phones...................... 124
Raising the car ....................... 196
Rear ceiling light ..................... 83
– bulb replacement ................ 182
Rear fog lights
– bulb replacement ................ 180
– control............................... 85
Rear view mirrors .............. 55-56
Rear window washer
– checking liquid – seat belts .......................... 131
SBR system ........................... 133
Scheduled .............................. 200
Seat belts
– load limiters ...................... 135
– maintenance ..................... 137
– pretensioners ..................... 135
– SBR system........................ 133
– using the seat belts ............ 131
Seats ..................................... 50
– adjusting ..................... 50-51
– heating ....................... 51-52
Sensors
– automatic headlights
(dusk sensor) ..................... 74
– parking ............................. 124
– rain................................... 78
Servicing and maintenance199
– demanding use of the car .... 206
– regular checks ................... 206
– scheduled servicing ............. 199 level ..........208-209-210-211
Rear window wiper
– blades .............................. 79
– checking liquid
level ..........208-209-210-211
– control............................... 77
– nozzles ............................ 219
Rev counter ........................... 6
Reverse lights
– bulb replacement ................ 180
Right - hand drive versions281
Rim protector ......................... 233
Roof bars (set-up) ................... 108
Roof rack/ski rack .................. 107
Safe Lock device ..................... 45
Safety................................ 131
– carrying children safely ........ 138
– child safety lock ................. 96
– “Isofix” child seat
(assembly) ....................... 143