boot Alfa Romeo Giulietta 2013 Owner handbook (in English)
[x] Cancel search | Manufacturer: ALFA ROMEO, Model Year: 2013, Model line: Giulietta, Model: Alfa Romeo Giulietta 2013Pages: 292, PDF Size: 13.06 MB
Page 152 of 292

Subwoofer and "Fix&Go Automatic Kit"
Locating the Automatic Fix&Go Kit:
❒open the luggage compartment, pull tab A fig. 121 and lift up the
mat;
❒take the “Fix&Go Automatic Kit” located on the left side of the
luggage compartment ( fig. 130);
❒inflate the wheel (see paragraph entitled “Fix&Go Automatic Kit”).
IMPORTANT If you need to remove the subwoofer follow the
indications shown on the adhesive label fig. 130 over the subwoofer
itself to reposition it correctly.
REFITTING THE WHEELFollowing the procedure described previously, raise the car and
remove the small spare wheel.
Proceed as follows:
❒make sure the contact surfaces between standard wheel and hub are
clean so that the fastening bolts will not come loose;
❒for versions with steel rims: fix the hub cap on the rim,
aligning the crescent hole with the bolt you have fitted, then insert
the other 4 bolts;
❒tighten the retaining bolts using wrench A fig. 123;
❒lower the car and remove the jack;
❒use wrench A fig. 123 to fully tighten the bolts, following the
sequence shown in fig. 126
At the end of operation
❒stow the space-saver spare wheel in the compartment provided in
the boot;
❒insert the jack and the other tools in the container;
❒arrange the container and tools on the space-saver wheel;
❒correctly reposition the boot mat.
fig. 130
A0K0178
148GETTING TO KNOW
YOUR CAR
SAFETY
STARTING AND
DRIVING
IN AN
EMERGENCY
SERVICING AND
MAINTENANCE
TECHNICAL
SPECIFICATIONS
INDEX
Page 163 of 292
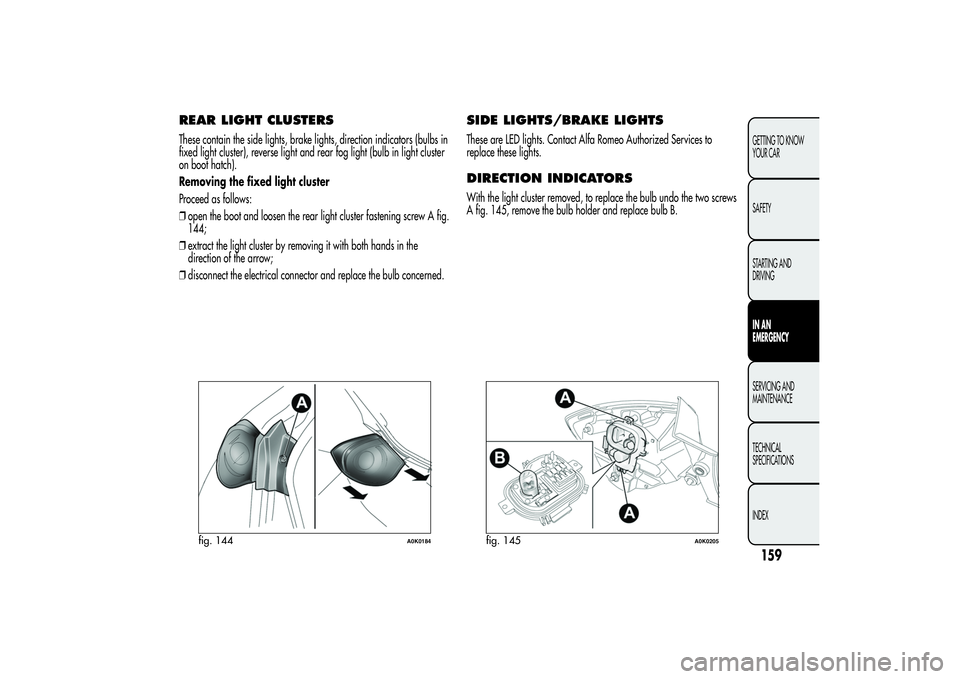
REAR LIGHT CLUSTERSThese contain the side lights, brake lights, direction indicators (bulbs in
fixed light cluster), reverse light and rear fog light (bulb in light cluster
on boot hatch).
Removing the fixed light cluster
Proceed as follows:
❒open the boot and loosen the rear light cluster fastening screw A fig.
144;
❒extract the light cluster by removing it with both hands in the
direction of the arrow;
❒disconnect the electrical connector and replace the bulb concerned.
SIDE LIGHTS/BRAKE LIGHTSThese are LED lights. Contact Alfa Romeo Authorized Services to
replace these lights.DIRECTION INDICATORSWith the light cluster removed, to replace the bulb undo the two screws
A fig. 145, remove the bulb holder and replace bulb B.
fig. 144
A0K0184
fig. 145
A0K0205
159GETTING TO KNOW
YOUR CAR
SAFETY
STARTING AND
DRIVINGIN AN
EMERGENCYSERVICING AND
MAINTENANCE
TECHNICAL
SPECIFICATIONS
INDEX
Page 164 of 292
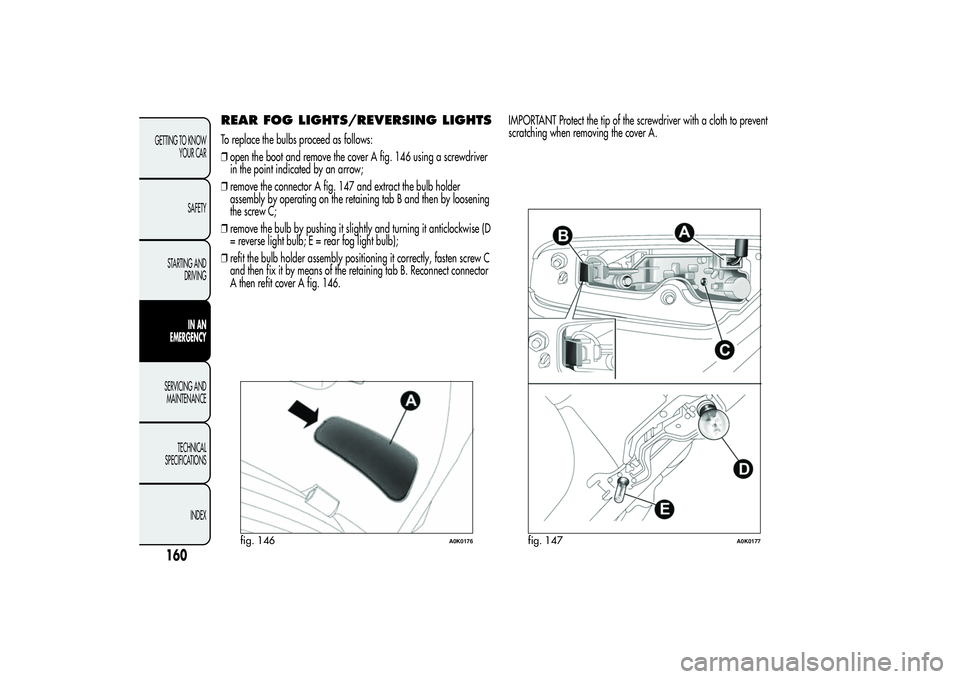
REAR FOG LIGHTS/REVERSING LIGHTSTo replace the bulbs proceed as follows:
❒open the boot and remove the cover A fig. 146 using a screwdriver
in the point indicated by an arrow;
❒remove the connector A fig. 147 and extract the bulb holder
assembly by operating on the retaining tab B and then by loosening
the screw C;
❒remove the bulb by pushing it slightly and turning it anticlockwise (D
= reverse light bulb; E = rear fog light bulb);
❒refit the bulb holder assembly positioning it correctly, fasten screw C
and then fix it by means of the retaining tab B. Reconnect connector
A then refit cover A fig. 146.IMPORTANT Protect the tip of the screwdriver with a cloth to prevent
scratching when removing the cover A.
fig. 146
A0K0176
fig. 147
A0K0177
160GETTING TO KNOW
YOUR CAR
SAFETY
STARTING AND
DRIVING
IN AN
EMERGENCY
SERVICING AND
MAINTENANCE
TECHNICAL
SPECIFICATIONS
INDEX
Page 173 of 292

ENGINE COMPARTMENT FUSE BOXfig. 160DEVICE PROTECTEDFUSE AMPS
Headlamp washer pump power supply F09 30
HornF10 15
AC compressorF19 7,5
Heated rear windowF20 30
Fuel pumpF21 15
Fuel pump (1750 Turbo Petrol version) F21 20
Cigar lighter/power socketF85 15
12 V boot power socketF86 15
IBS Battery charge status sensor for Start&Stop system F87 5
External mirror defrostersF88 7,5
169GETTING TO KNOW
YOUR CAR
SAFETY
STARTING AND
DRIVINGIN AN
EMERGENCYSERVICING AND
MAINTENANCE
TECHNICAL
SPECIFICATIONS
INDEX
Page 179 of 292
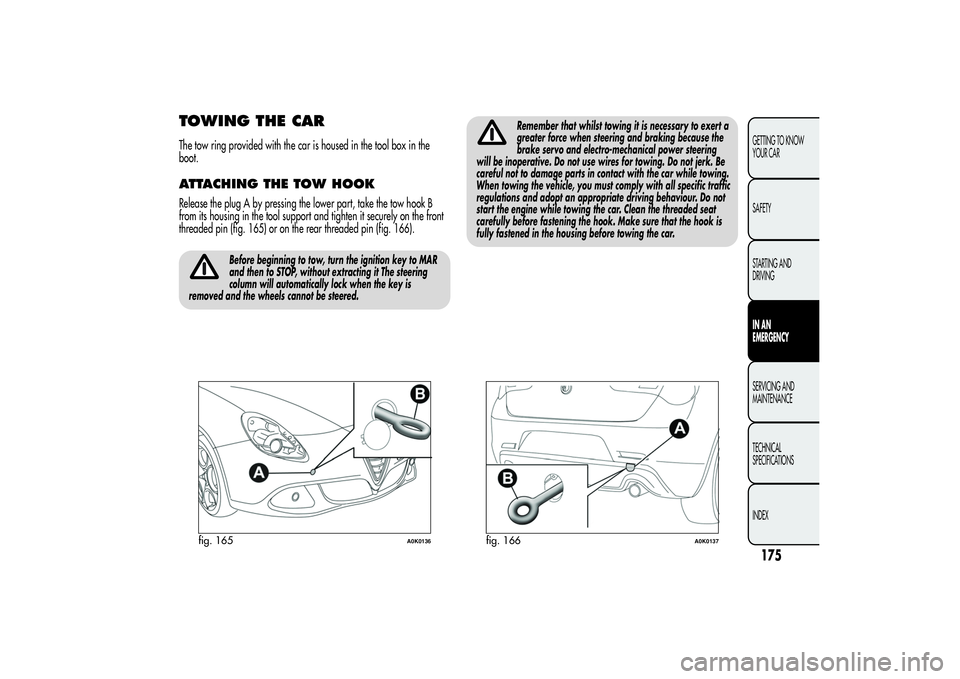
TOWING THE CARThe tow ring provided with the car is housed in the tool box in the
boot.ATTACHING THE TOW HOOKRelease the plug A by pressing the lower part, take the tow hook B
from its housing in the tool support and tighten it securely on the front
threaded pin (fig. 165) or on the rear threaded pin (fig. 166).
Before beginning to tow, turn the ignition key to MAR
and then to STOP, without extracting it The steering
column will automatically lock when the key is
removed and the wheels cannot be steered.
Remember that whilst towing it is necessary to exert a
greater force when steering and braking because the
brake servo and electro-mechanical power steering
will be inoperative. Do not use wires for towing. Do not jerk. Be
careful not to damage parts in contact with the car while towing.
When towing the vehicle, you must comply with all specific traffic
regulations and adopt an appropriate driving behaviour. Do not
start the engine while towing the car. Clean the threaded seat
carefully before fastening the hook. Make sure that the hook is
fully fastened in the housing before towing the car.
fig. 165
A0K0136
fig. 166
A0K0137
175GETTING TO KNOW
YOUR CAR
SAFETY
STARTING AND
DRIVINGIN AN
EMERGENCYSERVICING AND
MAINTENANCE
TECHNICAL
SPECIFICATIONS
INDEX
Page 182 of 292
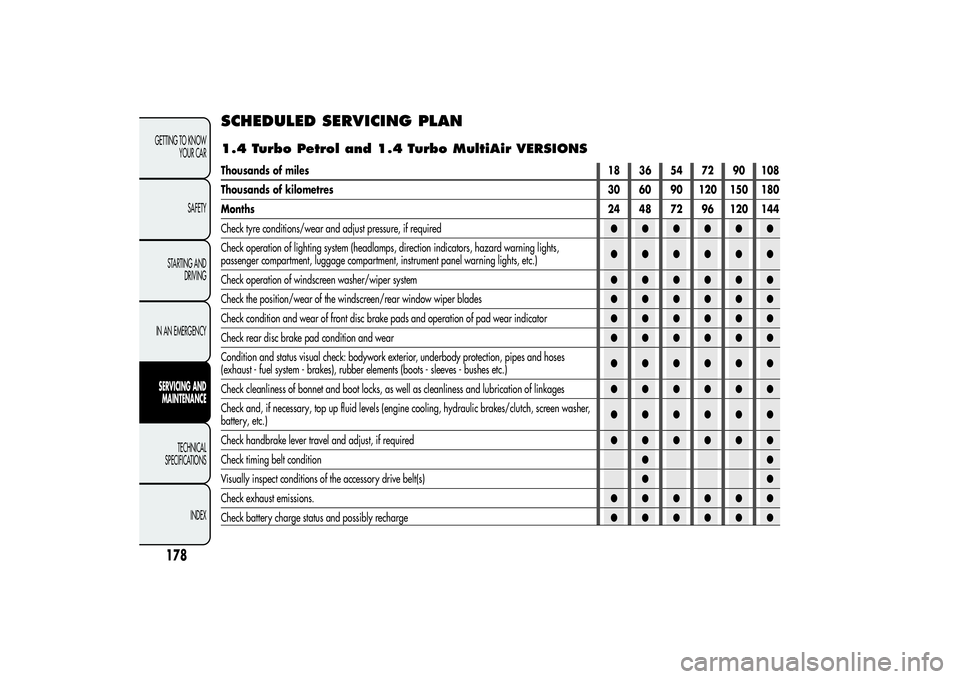
SCHEDULED SERVICING PLAN1.4 Turbo Petrol and 1.4 Turbo MultiAir VERSIONSThousands of miles18 36 54 72 90 108
Thousands of kilometres 30 60 90 120 150 180
Months24 48 72 96 120 144
Check tyre conditions/wear and adjust pressure, if required●●●●●●
Check operation of lighting system (headlamps, direction indicators, hazard warning lights,
passenger compartment, luggage compartment, instrument panel warning lights, etc.)●●●●●●
Check operation of windscreen washer/wiper system●●●●●●
Check the position/wear of the windscreen/rear window wiper blades●●●●●●
Check condition and wear of front disc brake pads and operation of pad wear indicator●●●●●●
Check rear disc brake pad condition and wear●●●●●●
Condition and status visual check: bodywork exterior, underbody protection, pipes and hoses
(exhaust - fuel system - brakes), rubber elements (boots - sleeves - bushes etc.)●●●●●●
Check cleanliness of bonnet and boot locks, as well as cleanliness and lubrication of linkages●●●●●●
Check and, if necessary, top up fluid levels (engine cooling, hydraulic brakes/clutch, screen washer,
battery, etc.)●●●●●●
Check handbrake lever travel and adjust, if required●●●●●●
Check timing belt condition●●
Visually inspect conditions of the accessory drive belt(s)●●
Check exhaust emissions.●●●●●●
Check battery charge status and possibly recharge●●●●●●
178GETTING TO KNOW
YOUR CAR
SAFETY
STARTING AND
DRIVING
IN AN EMERGENCYSERVICING AND
MAINTENANCE
TECHNICAL
SPECIFICATIONS
INDEX
Page 184 of 292
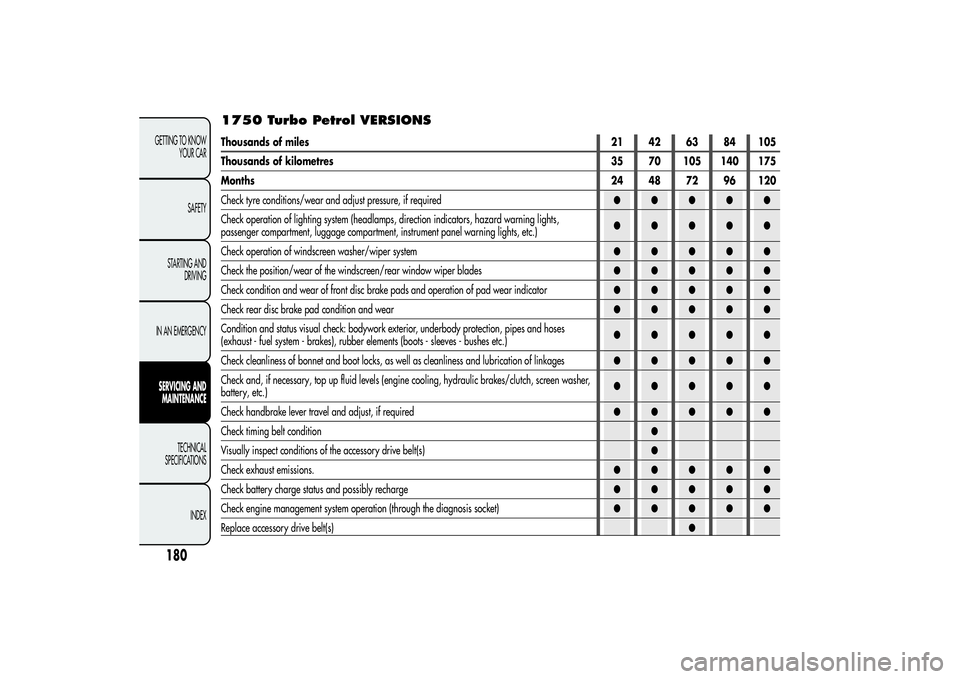
1750 Turbo Petrol VERSIONSThousands of miles21 42 63 84 105
Thousands of kilometres 35 70 105 140 175
Months24 48 72 96 120
Check tyre conditions/wear and adjust pressure, if required●●●●●
Check operation of lighting system (headlamps, direction indicators, hazard warning lights,
passenger compartment, luggage compartment, instrument panel warning lights, etc.)●●●●●
Check operation of windscreen washer/wiper system●●●●●
Check the position/wear of the windscreen/rear window wiper blades●●●●●
Check condition and wear of front disc brake pads and operation of pad wear indicator●●●●●
Check rear disc brake pad condition and wear●●●●●
Condition and status visual check: bodywork exterior, underbody protection, pipes and hoses
(exhaust - fuel system - brakes), rubber elements (boots - sleeves - bushes etc.)●●●●●
Check cleanliness of bonnet and boot locks, as well as cleanliness and lubrication of linkages●●●●●
Check and, if necessary, top up fluid levels (engine cooling, hydraulic brakes/clutch, screen washer,
battery, etc.)●●●●●
Check handbrake lever travel and adjust, if required●●●●●
Check timing belt condition●
Visually inspect conditions of the accessory drive belt(s)●
Check exhaust emissions.●●●●●
Check battery charge status and possibly recharge●●●●●
Check engine management system operation (through the diagnosis socket)●●●●●
Replace accessory drive belt(s)●
180GETTING TO KNOW
YOUR CAR
SAFETY
STARTING AND
DRIVING
IN AN EMERGENCYSERVICING AND
MAINTENANCE
TECHNICAL
SPECIFICATIONS
INDEX
Page 186 of 292
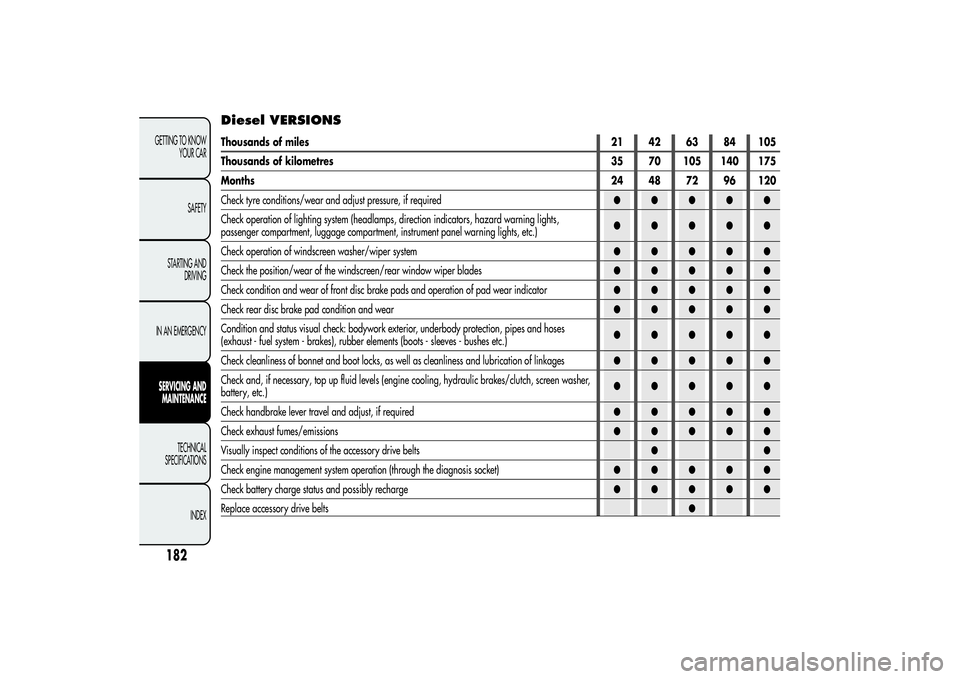
Diesel VERSIONSThousands of miles21 42 63 84 105
Thousands of kilometres 35 70 105 140 175
Months24 48 72 96 120
Check tyre conditions/wear and adjust pressure, if required●●●●●
Check operation of lighting system (headlamps, direction indicators, hazard warning lights,
passenger compartment, luggage compartment, instrument panel warning lights, etc.)●●●●●
Check operation of windscreen washer/wiper system●●●●●
Check the position/wear of the windscreen/rear window wiper blades●●●●●
Check condition and wear of front disc brake pads and operation of pad wear indicator●●●●●
Check rear disc brake pad condition and wear●●●●●
Condition and status visual check: bodywork exterior, underbody protection, pipes and hoses
(exhaust - fuel system - brakes), rubber elements (boots - sleeves - bushes etc.)●●●●●
Check cleanliness of bonnet and boot locks, as well as cleanliness and lubrication of linkages●●●●●
Check and, if necessary, top up fluid levels (engine cooling, hydraulic brakes/clutch, screen washer,
battery, etc.)●●●●●
Check handbrake lever travel and adjust, if required●●●●●
Check exhaust fumes/emissions●●●●●
Visually inspect conditions of the accessory drive belts●●
Check engine management system operation (through the diagnosis socket)●●●●●
Check battery charge status and possibly recharge●●●●●
Replace accessory drive belts●
182GETTING TO KNOW
YOUR CAR
SAFETY
STARTING AND
DRIVING
IN AN EMERGENCYSERVICING AND
MAINTENANCE
TECHNICAL
SPECIFICATIONS
INDEX
Page 188 of 292
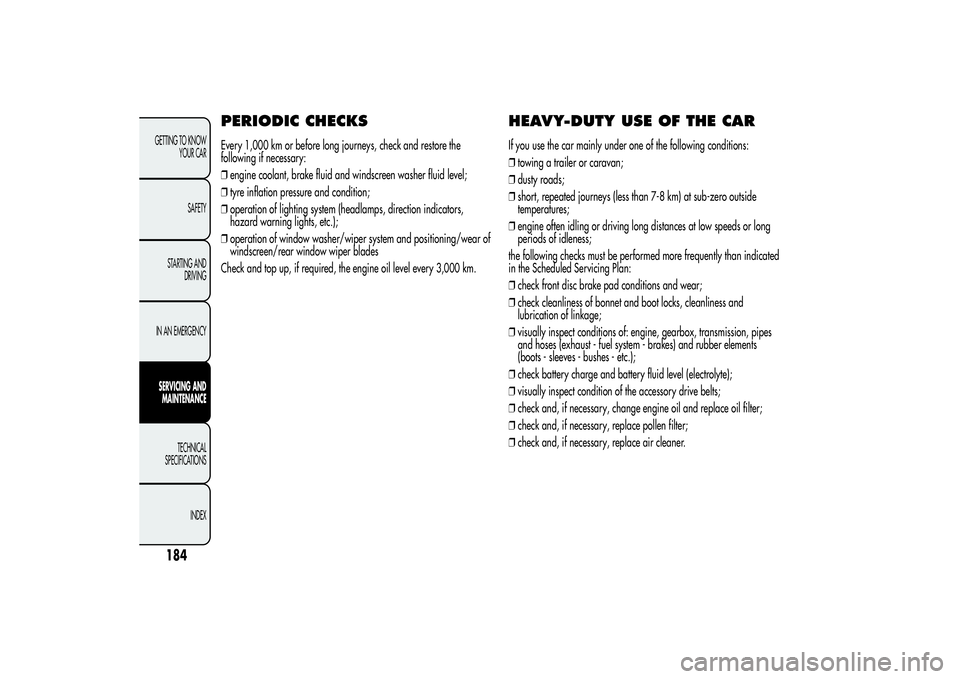
PERIODIC CHECKSEvery 1,000 km or before long journeys, check and restore the
following if necessary:
❒engine coolant, brake fluid and windscreen washer fluid level;
❒tyre inflation pressure and condition;
❒operation of lighting system (headlamps, direction indicators,
hazard warning lights, etc.);
❒operation of window washer/wiper system and positioning/wear of
windscreen/rear window wiper blades
Check and top up, if required, the engine oil level every 3,000 km.
HEAVY-DUTY USE OF THE CARIf you use the car mainly under one of the following conditions:
❒towing a trailer or caravan;
❒dusty roads;
❒short, repeated journeys (less than 7-8 km) at sub-zero outside
temperatures;
❒engine often idling or driving long distances at low speeds or long
periods of idleness;
the following checks must be performed more frequently than indicated
in the Scheduled Servicing Plan:
❒check front disc brake pad conditions and wear;
❒check cleanliness of bonnet and boot locks, cleanliness and
lubrication of linkage;
❒visually inspect conditions of: engine, gearbox, transmission, pipes
and hoses (exhaust - fuel system - brakes) and rubber elements
(boots - sleeves - bushes - etc.);
❒check battery charge and battery fluid level (electrolyte);
❒visually inspect condition of the accessory drive belts;
❒check and, if necessary, change engine oil and replace oil filter;
❒check and, if necessary, replace pollen filter;
❒check and, if necessary, replace air cleaner.
184GETTING TO KNOW
YOUR CAR
SAFETY
STARTING AND
DRIVING
IN AN EMERGENCYSERVICING AND
MAINTENANCE
TECHNICAL
SPECIFICATIONS
INDEX
Page 224 of 292

DIMENSIONSDimensions are expressed in mm and refer to the vehicle equipped with its original tyres. Height is measured with car unladen.
BOOT VOLUMEUnladen capacity (V.D.A. standards): = 350 dm
3
AB C D E FGH
4351 955 2634 762 1465 1554 1798 1554
Small variations in size are possible depending on the dimensions of the rims
fig. 182
A0K0133
220GETTING TO KNOW
YOUR CAR
SAFETY
STARTING AND
DRIVING
IN AN EMERGENCY
SERVICING AND
MAINTENANCE
TECHNICAL
SPECIFICATIONS
INDEX