stop Alfa Romeo Giulietta 2016 Owner's Manual
[x] Cancel search | Manufacturer: ALFA ROMEO, Model Year: 2016, Model line: Giulietta, Model: Alfa Romeo Giulietta 2016Pages: 288, PDF Size: 7.34 MB
Page 13 of 288
GETTING TO KNOW YOUR CAR
In-depth knowledge of your new car
starts here.
The booklet that you are reading simply
and directly explains how it is made
and how it works.
That’s why we advise you to read it
seated comfortably on board, so that
you can see what is described here for
yourself.SYMBOLS ...................................... 10
ALFA ROMEO CODE SYSTEM ....... 10
THE KEYS....................................... 11
ALARM ........................................... 14
IGNITION DEVICE ........................... 15
SEATS ............................................ 17
HEAD RESTRAINTS ........................ 18
STEERING WHEEL ......................... 19
REAR VIEW MIRRORS .................... 20
CLIMATE CONTROL ....................... 22
CLIMATIC COMFORT ..................... 23
MANUAL CLIMATE CONTROL........ 24
AUTOMATIC DUAL ZONE
CLIMATE CONTROL ....................... 28
EXTERNAL LIGHTS......................... 35
WINDOW CLEANING ...................... 38
CRUISE CONTROL ......................... 40
ROOF LIGHTS ................................ 42
CONTROLS .................................... 44
INTERIOR FITTINGS ....................... 46
ELECTRIC SUN ROOF .................... 49
DOORS ........................................... 51
ELECTRIC WINDOWS .................... 53
LUGGAGE COMPARTMENT ........... 56
BONNET ......................................... 59
ROOF RACK/SKI RACK .................. 60
HEADLIGHTS.................................. 61ESC SYSTEM ................................. 62
“ALFA DNA” SYSTEM (CAR
DYNAMIC CONTROL SYSTEM) ...... 66
START&STOP SYSTEM .................. 69
ITPMS (INDIRECT TYRE
PRESSURE MONITORING
SYSTEM) ........................................ 72
EOBD SYSTEM (EUROPEAN ON
BOARD DIAGNOSIS) ...................... 74
DUAL PINION ACTIVE STEERING... 74
WIRING FOR RADIO SYSTEM ........ 75
ACCESSORIES PURCHASED BY
THE OWNER .................................. 76
PARKING SENSORS....................... 77
REFUELLING THE CAR .................. 80
PROTECTING THE
ENVIRONMENT .............................. 81
9
Page 14 of 288
SYMBOLS
Some car components have coloured
labels whose symbols indicate
precautions to be observed when using
this component. Under the bonnet
there is also a label that summarises all
the symbols.
ALFA ROMEO CODE
SYSTEM
IN BRIEF
This is an electronic engine locking
system which increases protection
against attempted thefts of the car. It
is automatically activated when the
ignition key is removed.
There is an electronic device in each
key which can identify the signal
emitted, when the engine is started,
from an aerial built into the ignition
switch. The signal, which changes
each time the engine is started, is the
“password” by means of which the
control unit recognises the key and
enables starting.
1)
Operation
Each time the car is started by turning
the ignition key to MAR-ON, the Alfa
Romeo CODE system control unit
sends an acknowledgement code to
the engine management control unit to
deactivate the inhibitor.
The code is sent only if the Alfa Romeo
CODE system control unit has
recognised the code transmitted by the
key.Each time the ignition key is turned to
STOP, the Alfa Romeo CODE system
deactivates the functions of the engine
management control unit.
Irregular operation
If, during starting, the code is not
correctly recognised, the
warning
light (on some versions a message
together with a symbol is shown on the
display) switches on in the instrument
panel.
In this case, turn the key to STOP and
then to MAR-ON; if it is still locked,
try again with the other keys that come
with the car. If it is still not possible to
start the engine, contact an Alfa Romeo
Dealership.
Activation of warning
light while driving
❒If the
warning light (or symbol on
the display) switches on, this means
that the system is running self-
diagnosis (caused, for example, by a
voltage drop).
❒If the
warning light (or symbol on
the display) stays on, contact an Alfa
Romeo Dealership.
10
GETTING TO KNOW YOUR CAR
Page 18 of 288
ALARM
(for versions/markets, where provided)
ALARM ACTIVATION
The alarm activates in the following
cases:
❒wrongful opening of a door/bonnet/
luggage compartment (perimeter
protection);
❒wrongful operation of the ignition
switch (ignition key turned to
MAR-ON);
❒cutting of the battery cables;
❒movement inside the passenger
compartment (volumetric protection);
❒anomalous lifting/tilting of the car (for
versions/markets, where provided).
Operation of the alarm is indicated by
an acoustic and visual signal (flashing of
the direction indicators for several
seconds). The alarm activation modes
may vary according to the market.
There is a maximum number of
acoustic/visual cycles. When this is
reached the system returns to normal
operation.IMPORTANT The engine locking
function is guaranteed by the Alfa
Romeo CODE, which is automatically
activated when the ignition key is
extracted from the ignition switch.
IMPORTANT The alarm is adapted to
meet requirements in various countries.
SWITCHING ON THE
ALARM
With the doors, bonnet and tailgate
closed and the ignition key either
turned to STOP or removed, point the
key with remote control towards the car
and press and release the
button.
Except for specific markets, the system
emits a visual and acoustic signal and
enables door locking.
A self-diagnosis stage precedes the
switching on of the alarm: in the event
of faults, the system will generate a
further acoustic and/or visual signal
through the LED on the dashboard.
If after the alarm is switched on, a
second acoustic signal is emitted
and/or a visual signal via the LED on
the dashboard, wait about 4 seconds
and switch off the alarm by pressing the
button, check that the doors,
bonnet and luggage compartment are
closed correctly and then reactivate the
system by pressing the
button.If the alarm emits an acoustic signal
even when the doors, bonnet and
luggage compartment are correctly
closed, a fault has occurred in system
operation: in this case, contact an
Alfa Romeo Dealership.
ALARM SELF-ACTIVATION
(for versions/markets, where provided)
If the alarm has not been activated
using the remote control, once about
30 seconds have elapsed from when
the ignition key was turned to STOP
and a door or the tailgate was last
opened and then closed, the alarm
activates automatically.
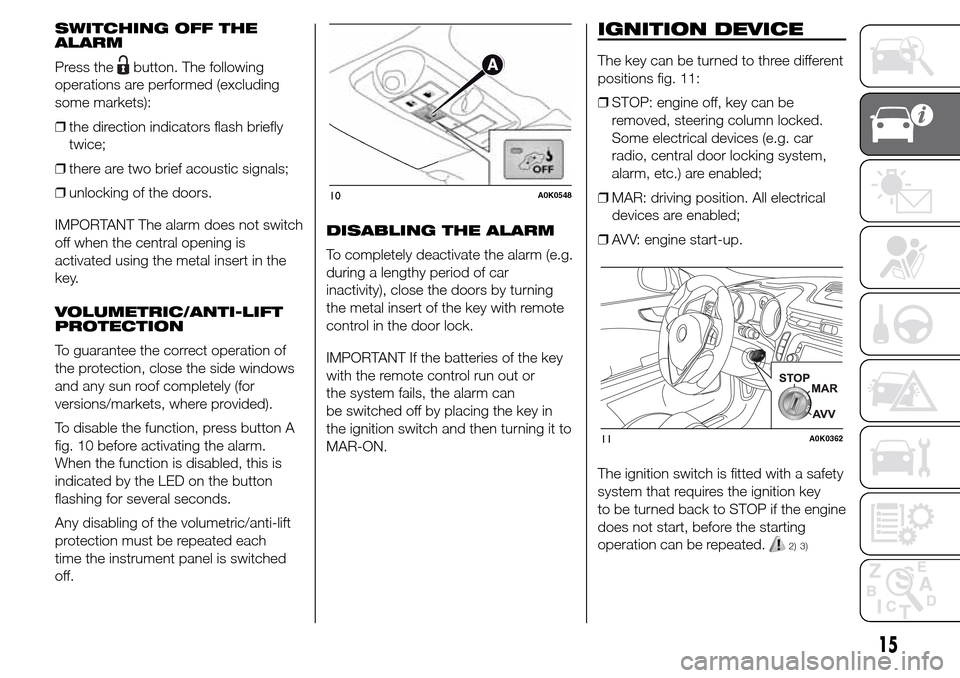
This is indicated by the LED on the
button A fig. 10 lighting up intermittently
and the indications of activation
described previously.
To deactivate the alarm, press the
button on the remote control.
The alarm also activates when the
doors are closed by turning the metal
insert of the key in the driver side door
latch. If the system self-activates, the
doors are not locked.
14
GETTING TO KNOW YOUR CAR
Page 19 of 288
SWITCHING OFF THE
ALARM
Press the
button. The following
operations are performed (excluding
some markets):
❒the direction indicators flash briefly
twice;
❒there are two brief acoustic signals;
❒unlocking of the doors.
IMPORTANT The alarm does not switch
off when the central opening is
activated using the metal insert in the
key.
VOLUMETRIC/ANTI-LIFT
PROTECTION
To guarantee the correct operation of
the protection, close the side windows
and any sun roof completely (for
versions/markets, where provided).
To disable the function, press button A
fig. 10 before activating the alarm.
When the function is disabled, this is
indicated by the LED on the button
flashing for several seconds.
Any disabling of the volumetric/anti-lift
protection must be repeated each
time the instrument panel is switched
off.DISABLING THE ALARM
To completely deactivate the alarm (e.g.
during a lengthy period of car
inactivity), close the doors by turning
the metal insert of the key with remote
control in the door lock.
IMPORTANT If the batteries of the key
with the remote control run out or
the system fails, the alarm can
be switched off by placing the key in
the ignition switch and then turning it to
MAR-ON.
IGNITION DEVICE
The key can be turned to three different
positions fig. 11:
❒STOP: engine off, key can be
removed, steering column locked.
Some electrical devices (e.g. car
radio, central door locking system,
alarm, etc.) are enabled;
❒MAR: driving position. All electrical
devices are enabled;
❒AVV: engine start-up.
The ignition switch is fitted with a safety
system that requires the ignition key
to be turned back to STOP if the engine
does not start, before the starting
operation can be repeated.
2) 3)
10A0K0548
11A0K0362
15
Page 20 of 288
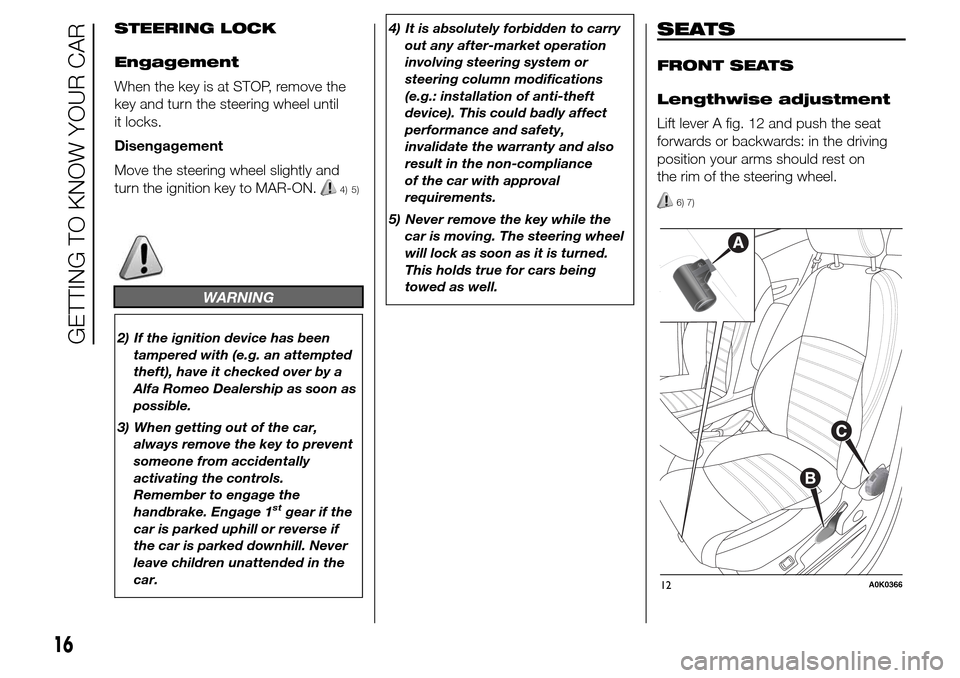
STEERING LOCK
Engagement
When the key is at STOP, remove the
key and turn the steering wheel until
it locks.
Disengagement
Move the steering wheel slightly and
turn the ignition key to MAR-ON.
4) 5)
WARNING
2) If the ignition device has been
tampered with (e.g. an attempted
theft), have it checked over by a
Alfa Romeo Dealership as soon as
possible.
3) When getting out of the car,
always remove the key to prevent
someone from accidentally
activating the controls.
Remember to engage the
handbrake. Engage 1
stgear if the
car is parked uphill or reverse if
the car is parked downhill. Never
leave children unattended in the
car.4) It is absolutely forbidden to carry
out any after-market operation
involving steering system or
steering column modifications
(e.g.: installation of anti-theft
device). This could badly affect
performance and safety,
invalidate the warranty and also
result in the non-compliance
of the car with approval
requirements.
5) Never remove the key while the
car is moving. The steering wheel
will lock as soon as it is turned.
This holds true for cars being
towed as well.
SEATS
FRONT SEATS
Lengthwise adjustment
Lift lever A fig. 12 and push the seat
forwards or backwards: in the driving
position your arms should rest on
the rim of the steering wheel.
6) 7)
12A0K0366
16
GETTING TO KNOW YOUR CAR
Page 21 of 288
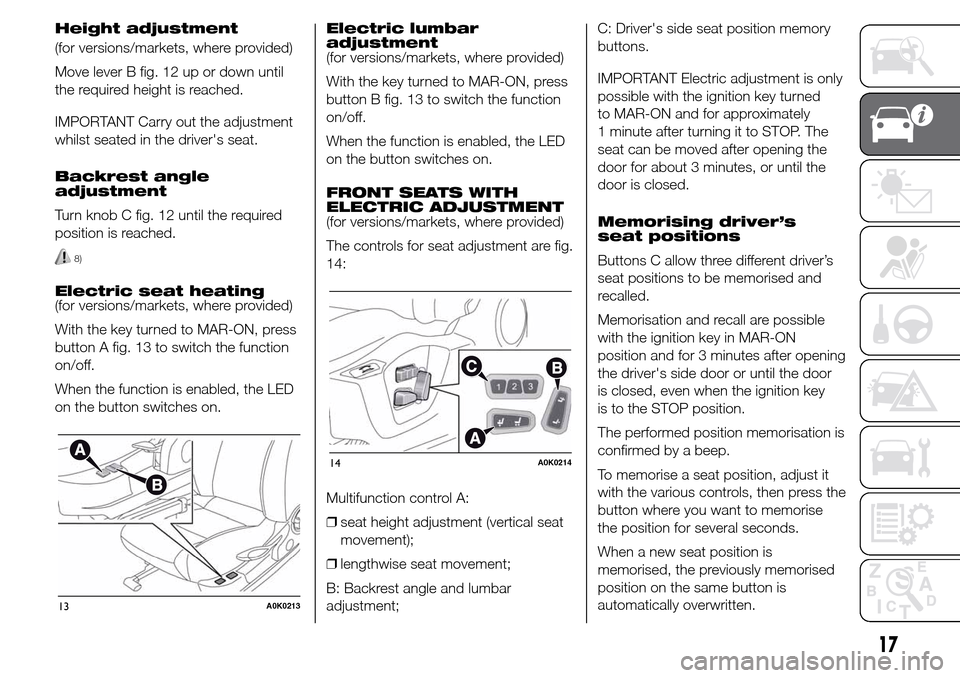
Height adjustment
(for versions/markets, where provided)
Move lever B fig. 12 up or down until
the required height is reached.
IMPORTANT Carry out the adjustment
whilst seated in the driver's seat.
Backrest angle
adjustment
Turn knob C fig. 12 until the required
position is reached.
8)
Electric seat heating
(for versions/markets, where provided)
With the key turned to MAR-ON, press
button A fig. 13 to switch the function
on/off.
When the function is enabled, the LED
on the button switches on.Electric lumbar
adjustment
(for versions/markets, where provided)
With the key turned to MAR-ON, press
button B fig. 13 to switch the function
on/off.
When the function is enabled, the LED
on the button switches on.
FRONT SEATS WITH
ELECTRIC ADJUSTMENT
(for versions/markets, where provided)
The controls for seat adjustment are fig.
14:
Multifunction control A:
❒seat height adjustment (vertical seat
movement);
❒lengthwise seat movement;
B: Backrest angle and lumbar
adjustment;C: Driver's side seat position memory
buttons.
IMPORTANT Electric adjustment is only
possible with the ignition key turned
to MAR-ON and for approximately
1 minute after turning it to STOP. The
seat can be moved after opening the
door for about 3 minutes, or until the
door is closed.
Memorising driver’s
seat positions
Buttons C allow three different driver’s
seat positions to be memorised and
recalled.
Memorisation and recall are possible
with the ignition key in MAR-ON
position and for 3 minutes after opening
the driver's side door or until the door
is closed, even when the ignition key
is to the STOP position.
The performed position memorisation is
confirmed by a beep.
To memorise a seat position, adjust it
with the various controls, then press the
button where you want to memorise
the position for several seconds.
When a new seat position is
memorised, the previously memorised
position on the same button is
automatically overwritten.
13A0K0213
14A0K0214
17
Page 22 of 288
Recalling a memorised position is also
possible for about 3 minutes after
the doors are opened and about 1
minute after the ignition key is turned to
the STOP position.
To recall a memorised position, press
the relevant button briefly.
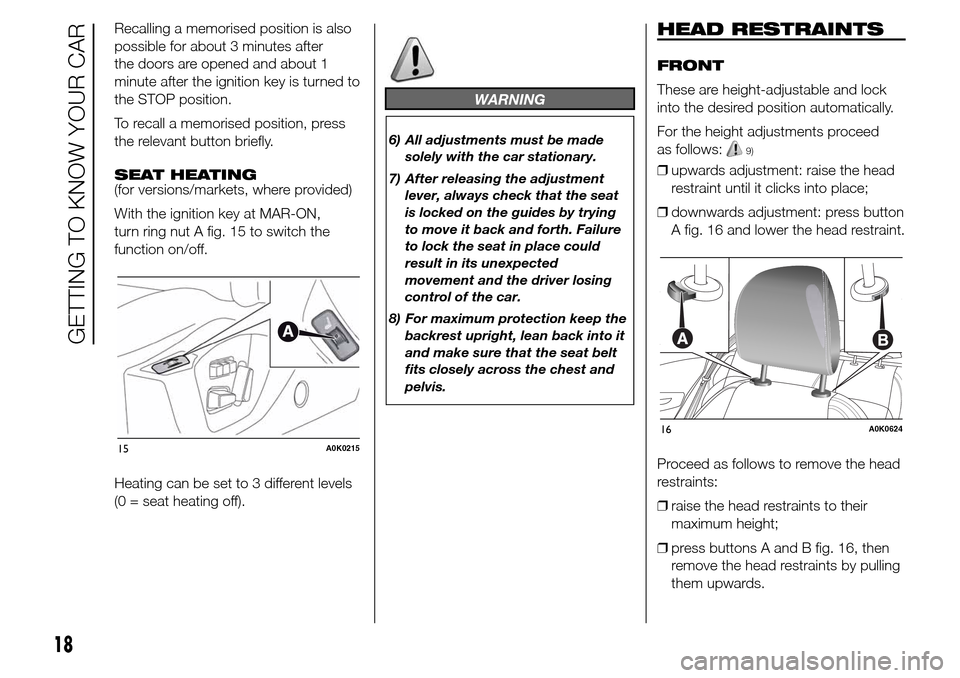
SEAT HEATING
(for versions/markets, where provided)
With the ignition key at MAR-ON,
turn ring nut A fig. 15 to switch the
function on/off.
Heating can be set to 3 different levels
(0 = seat heating off).
WARNING
6) All adjustments must be made
solely with the car stationary.
7) After releasing the adjustment
lever, always check that the seat
is locked on the guides by trying
to move it back and forth. Failure
to lock the seat in place could
result in its unexpected
movement and the driver losing
control of the car.
8) For maximum protection keep the
backrest upright, lean back into it
and make sure that the seat belt
fits closely across the chest and
pelvis.
HEAD RESTRAINTS
FRONT
These are height-adjustable and lock
into the desired position automatically.
For the height adjustments proceed
as follows:
9)
❒upwards adjustment: raise the head
restraint until it clicks into place;
❒downwards adjustment: press button
A fig. 16 and lower the head restraint.
Proceed as follows to remove the head
restraints:
❒raise the head restraints to their
maximum height;
❒press buttons A and B fig. 16, then
remove the head restraints by pulling
them upwards.
15A0K0215
16A0K0624
18
GETTING TO KNOW YOUR CAR
Page 30 of 288
❒press button F to turn internal air
recirculation off (circular LED around
the button off);
❒turn knob E to
with the possibility
of moving it to position
(B) if
demisting does not occur;
❒turn knob C to the 2nd speed.
HEATED REAR WINDOW
DEMISTING/DEFROSTING
Press button D (
) to activate/
deactivate the function. The function is
automatically deactivated after 20
minutes.
For versions/markets where provided,
press the
button to activate
demisting/defrosting of exterior rear
view mirrors and heated nozzles (for
versions/markets, where provided).
IMPORTANT Do not affix stickers to the
inside of the heated rear window over
the heating filaments, to avoid damage
that might cause them to stop working
properly.INTERNAL AIR
RECIRCULATION
Press button F (
) so that the LED
around the button turns on. It is
advisable to switch internal air
recirculation on while standing in traffic
or in tunnels to prevent the introduction
of polluted air.
Do not use the function for a long time,
particularly if there are many
passengers on board, to prevent the
windows from misting up.
IMPORTANT Internal air recirculation
makes it possible to reach the required
heating or cooling conditions more
quickly depending on the mode
selected. Do not use the air
recirculation function on rainy/cold days
as it would considerably increase the
possibility of the windows misting.
SETTING THE AIR
DISTRIBUTION
Turn knob E to manually select one of
the four possible air distribution settings
in the passenger compartment:
Air flow to the windscreen and front
side window diffusers to demist/
defrost them.
Air flow to the front/rear footwell
diffusers. This air distribution allows
the passenger compartment to
be warmed up quickly.
Air flow distribution between front
and rear diffusers, centre/side
dashboard diffusers, rear diffuser
and windscreen and front side
window demisting/defrosting
diffusers.
Air flow distribution to centre/side
dashboard diffusers (passenger's
body).
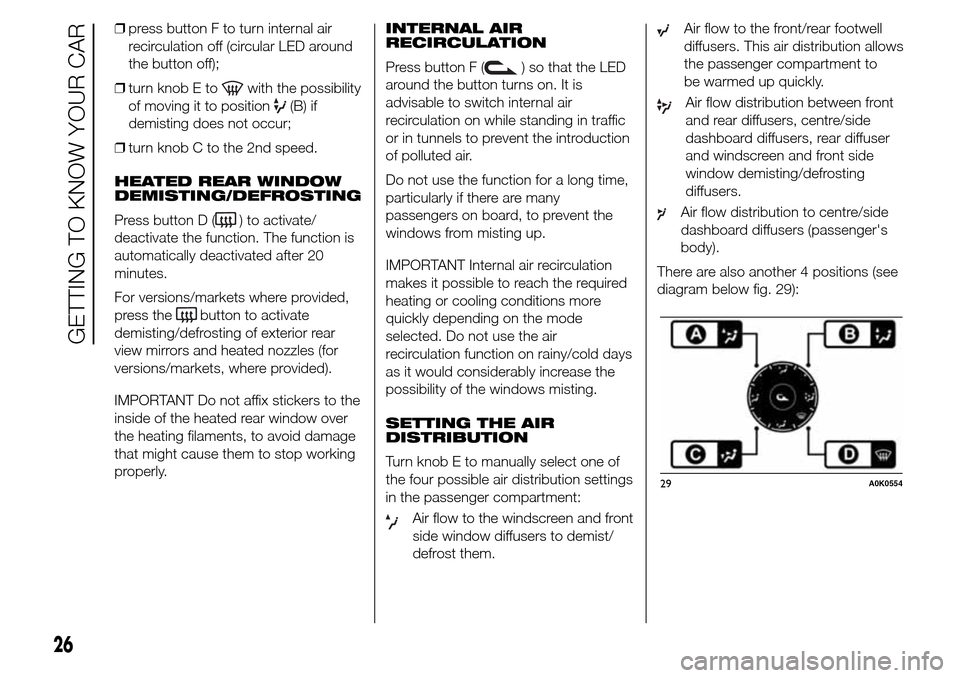
There are also another 4 positions (see
diagram below fig. 29):
29A0K0554
26
GETTING TO KNOW YOUR CAR
Page 31 of 288
Position A: Air flow distribution
between centre/side dashboard
vents, rear diffuser and windscreen
and front side window demisting/
defrosting diffusers. This
distribution setting ventilates the
passenger compartment well and
prevents the windows from misting
up.
Position B: Air flow distributed
between footwell diffusers and
windscreen and front side window
defrosting/demisting diffusers.
This distribution setting allows the
passenger compartment to warm
up efficiently and prevents the
windows from misting up.
Position C: Air flow distribution
between footwell diffusers (hotter
air) and centre/side dashboard
diffusers and rear diffuser (cooler
air).
Position D: Automatic
demisting/defrosting activation
(see description in previous
pages).START&STOP
Manual climate control
If the Start&Stop function is activated
(engine off when the car speed is
0 km/h), the system keeps the air flow
selected by the user.
In these conditions, the compartment
cooling and heating cannot be
guaranteed, as the compressor stops
with the engine coolant pump.
The Start&Stop function can be
deactivated to enhance the operation of
the climate control system by pressing
the dedicated button on the
dashboard.
SERVICING
MAINTENANCE
In winter, the climate control system
must be turned on at least once a
month for about 10 minutes.
Have the system inspected at an Alfa
Romeo Dealership before the summer.
27
Page 36 of 288
❒forced deactivation (air recirculation
always off, air drawn in from the
outside): indicated by the LED on
buttons
switching off and text A
on button B off.
Forced activation/deactivation can be
selected by pressing button
.
When the
button is pressed (button
E off), the climate control system
automatically activates internal air
recirculation (LED on
button A
on). It is still possible to activate outside
air recirculation (LED on the button off)
and vice versa, by pressing button
.
The AQS (Air Quality System) function
(for versions/markets, where provided)
cannot be activated when the
button
is pressed (LED on button E off).
AQS (Air Quality System)
function activation
(for versions/markets, where provided)
The AQS function automatically
activates internal air recirculation when
the outside air is polluted (e.g. in traffic
queues and tunnels).IMPORTANT With the AQS function
active, after a preset time interval of the
internal air recirculation system
functioning, the climate control system
enables the intake of outside air for
approximately one minute to change
the air in the passenger compartment.
This takes place regardless of the
pollution level of the outside air.
IMPORTANT The engagement of the
recirculation system makes it possible
to reach the required heating/cooling
conditions faster. It is, however,
inadvisable to use it on rainy/cold days
as it would considerably increase the
possibility of the windows misting
up inside (especially if the climate
control system is off). When the outside
temperature is low, recirculation is
forced off (air drawn in from the outside)
to prevent the windows from misting
up.
In automatic operation, recirculation is
managed automatically by the system
according to outside environmental
conditions.
IMPORTANT It is advisable not to use
the air recirculation function when
the outside temperature is low to
prevent the windows from rapidly
misting up.CLIMATE CONTROL
COMPRESSOR
Press button C to activate/deactivate
the compressor (activation is indicated
by the lit LED on the button). The
system remembers that the
compressor has been switched off,
even after the engine has stopped.
When the compressor is switched off
the system deactivates air recirculation
to prevent the windows from misting
up and deactivates the AQS function
(for versions/markets, where provided).
In this case, although the climate
control system is capable of
maintaining the required temperature,
the AUTO LED switches off. The
temperatures will flash for a few
seconds if the required temperature
cannot be maintained.
To restore automatic control of
compressor engagement, press again
button C or the AUTO button.
With compressor off:
❒if the outside temperature is higher
than the set one, the system will
not be able to satisfy the request.
The temperature values will then flash
on the display for a few seconds to
indicate this;
❒the fan speed can be reset manually.
32
GETTING TO KNOW YOUR CAR