sensor Alfa Romeo Giulietta 2017 Owner's Manual
[x] Cancel search | Manufacturer: ALFA ROMEO, Model Year: 2017, Model line: Giulietta, Model: Alfa Romeo Giulietta 2017Pages: 212, PDF Size: 4.56 MB
Page 19 of 212
Electrical mirror folding
(for versions/markets, where provided)
To fold the mirrors, press button 3 fig. 17.
Press the button again to restore the
mirrors to the driving position.
Manual mirror folding
When required, fold the mirrors in
towards the vehicle.
IMPORTANT When driving, the mirrors
must always be open.
WARNING
12)As the driver's door mirror is curved, it
may slightly alter the perception of distance.
EXTERNAL LIGHTS
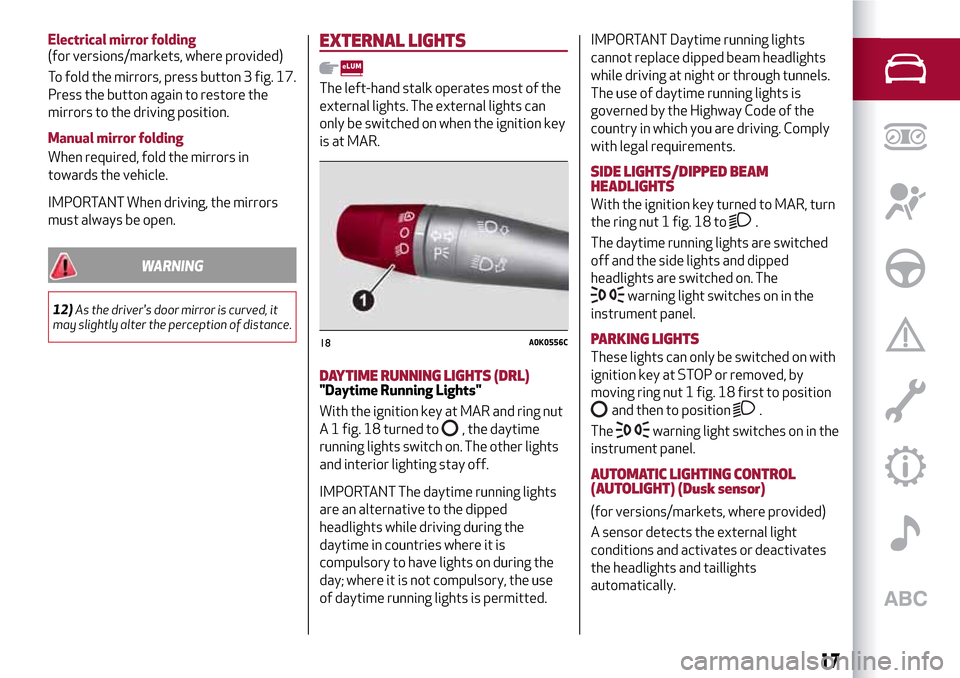
The left-hand stalk operates most of the
external lights. The external lights can
only be switched on when the ignition key
is at MAR.
DAYTIME RUNNING LIGHTS (DRL)"Daytime Running Lights"
With the ignition key at MAR and ring nut
A 1 fig. 18 turned to
, the daytime
running lights switch on. The other lights
and interior lighting stay off.
IMPORTANT The daytime running lights
are an alternative to the dipped
headlights while driving during the
daytime in countries where it is
compulsory to have lights on during the
day; where it is not compulsory, the use
of daytime running lights is permitted.IMPORTANT Daytime running lights
cannot replace dipped beam headlights
while driving at night or through tunnels.
The use of daytime running lights is
governed by the Highway Code of the
country in which you are driving. Comply
with legal requirements.
SIDE LIGHTS/DIPPED BEAM
HEADLIGHTS
With the ignition key turned to MAR, turn
the ring nut 1 fig. 18 to
.
The daytime running lights are switched
off and the side lights and dipped
headlights are switched on. The
warning light switches on in the
instrument panel.
PARKING LIGHTS
These lights can only be switched on with
ignition key at STOP or removed, by
moving ring nut 1 fig. 18 first to position
and then to position.
The
warning light switches on in the
instrument panel.
AUTOMATIC LIGHTING CONTROL
(AUTOLIGHT) (Dusk sensor)
(for versions/markets, where provided)
A sensor detects the external light
conditions and activates or deactivates
the headlights and taillights
automatically.
18A0K0556C
17
Page 22 of 212
INTERIOR LIGHTS
FRONT CEILING LIGHT
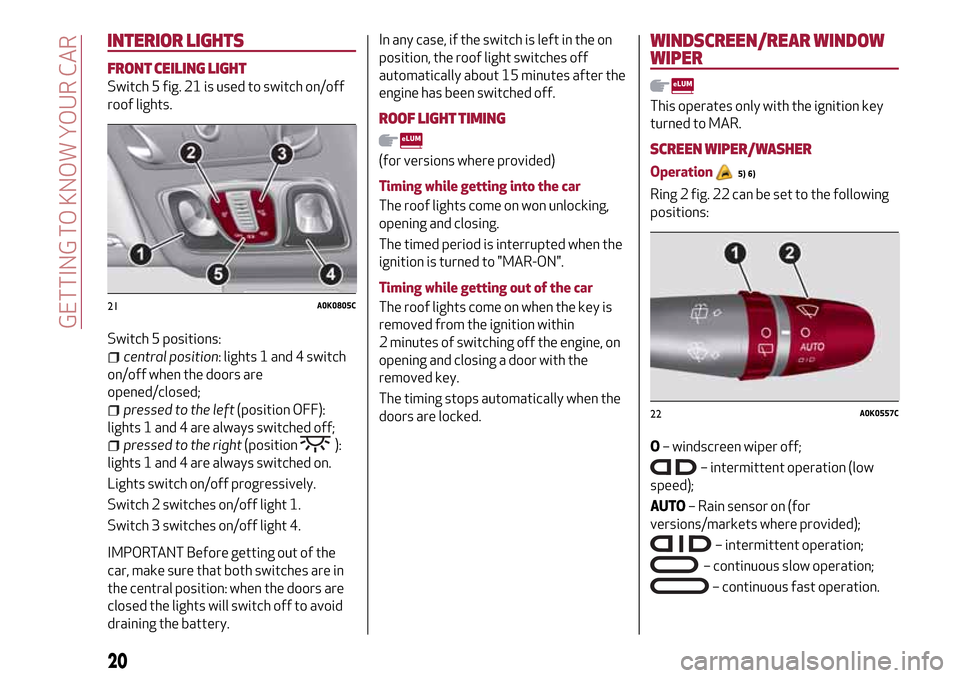
Switch 5 fig. 21 is used to switch on/off
roof lights.
Switch 5 positions:
central position: lights 1 and 4 switch
on/off when the doors are
opened/closed;
pressed to the left(position OFF):
lights 1 and 4 are always switched off;
pressed to the right(position):
lights 1 and 4 are always switched on.
Lights switch on/off progressively.
Switch 2 switches on/off light 1.
Switch 3 switches on/off light 4.
IMPORTANT Before getting out of the
car, make sure that both switches are in
the central position: when the doors are
closed the lights will switch off to avoid
draining the battery.
In any case, if the switch is left in the on
position, the roof light switches off
automatically about 15 minutes after the
engine has been switched off.
ROOF LIGHT TIMING
(for versions where provided)
Timing while getting into the car
The roof lights come on won unlocking,
opening and closing.
The timed period is interrupted when the
ignition is turned to "MAR-ON".
Timing while getting out of the car
The roof lights come on when the key is
removed from the ignition within
2 minutes of switching off the engine, on
opening and closing a door with the
removed key.
The timing stops automatically when the
doors are locked.
WINDSCREEN/REAR WINDOW
WIPER
This operates only with the ignition key
turned to MAR.
SCREEN WIPER/WASHER
Operation5) 6)
Ring 2 fig. 22 can be set to the following
positions:
O– windscreen wiper off;
– intermittent operation (low
speed);
AUTO– Rain sensor on (for
versions/markets where provided);
– intermittent operation;
– continuous slow operation;
– continuous fast operation.
21A0K0805C
22A0K0557C
20
GETTING TO KNOW YOUR CAR
Page 23 of 212
Move the stalk upwards (unstable
position) to limit operation to the time
for which the stalk is held in this position.
When released, the stalk will return to its
default position and the windscreen
wiper will be automatically stopped.
“Smart washing” function
Pull the stalk towards the steering wheel
(unstable position) to operate the
windscreen washer. Keep the stalk pulled
for more than half a second to operate
the windscreen washer jet and wiper
automatically with a single movement.
The windscreen wiper stops working
three strokes after the stalk is released.
A further stroke after approx. 6 seconds
completes the wiping cycle.
RAIN SENSOR
(for versions/markets, where provided)
It can detect the presence of rain and
consequently manage windscreen wiping
in accordance with the amount of water
on the windscreen.
The sensor is activated when the ring 2
fig. 22 is turned to "automatic" position
("AUTO" control): the windscreen wiper
stroke frequency is thus adjusted in
accordance with the amount of water on
the windscreen.
If no rain is detected, the wiper will not
carry out any strokes.If the engine is switched off with the
lever in the automatic position, when the
car is next started, no wiping cycle will
take place even if it is raining. This is to
prevent unwanted activation of the rain
sensor when the engine is started (i.e.
when the windscreen is being washed by
hand or the wiper blades are stuck to the
windscreen by ice).
To restore automatic operation of the
rain sensor, turn the ring on the right stalk
2 fig. 22 from automatic position (AUTO)
to positionOand then turn ring 2 back to
the AUTO position.
When the rain sensor is reactivated using
any of the manoeuvres described above,
reactivation is indicated by a single
stroke of the windscreen wipers,
regardless of the condition of the
windscreen.
REAR WINDOW WIPER/WASHER
(for versions/markets, where provided)
This operates only with the ignition key
turned to MAR.
Turn ring 1 fig. 22 from positionOto
position
to operate the rear window
wiper as follows:
in intermittent mode when the
windscreen wiper is not operating;
in synchronous mode (at half the
speed of the windscreen wiper) when the
windscreen wiper is operating;
in continuous mode with reverse gear
engaged and the control active.
Pushing the stalk towards the dashboard
(rocking position) will activate the rear
window washer jet. Keep the stalk pushed
for more than half a second to activate
the rear window wiper as well. Releasing
the stalk will activate the smart washing
function, as described for the windscreen
wiper.
IMPORTANT
5)Never use the windscreen wipers to
remove layers of snow or ice from the
windscreen. In such conditions, the
windscreen wiper may be subjected to
excessive stress and the motor cut-out
switch, which prevents operation for a few
seconds, may intervene. If operation is not
restored (even after restarting that car with
the key), contact an Alfa Romeo Dealership.
6)Do not operate the windscreen wiper with
the blades lifted from the windscreen.
21
Page 41 of 212
within the menu, they allow you to
scroll up or down through the options;
during setting operations, they
increase or decrease values.
MAIN MENU
The menu comprises a series of options
which can be selected using the buttons
andto access the different
selection and setting (Setup) operations
indicated below.
Some options have a submenu. The menu
can be activated by briefly pressing the
SET/ button
.
The menu includes the following items:
MENU
LIGHTING
SPEED WARNING
HEADLIGHT SENSOR (for
versions/markets where provided)
RAIN SENSOR (for versions/markets,
where provided)
TRIP B ACTIVATION
SET TIME
SET DATE
FIRST PAGE (for versions/markets,
where provided)
AUTOCLOSE
MEASUREMENT UNIT
LANGUAGE
BUZZER VOLUME
SEAT BELT BEEP
SERVICE
PASSENGER AIRBAG
DAYTIME RUNNING LIGHTS
ADAPTIVE LIGHTS (for
versions/markets, where provided)
COURTESY LIGHTS
EXIT MENU
Some menu items are shown on the
navigator display in models equipped
with radio-navigation systems (for
versions/markets, where provided).
Selecting an option from the main
menu without a submenu:
press the SET/ buttonbriefly to
select the main menu setting you wish to
change;
press the buttonsor
(with single presses) to select the
new setting;
press the SET/ buttonbriefly to
save the new setting and go back to the
previous main menu option.
Selecting an option from the main
menu with a submenu:
briefly press the SET/ buttonto
display the first submenu option;
press the buttonsor
(with single presses) to scroll
through all the submenu options;
press the SET/ buttonbriefly to
select the displayed submenu option and
to open the relevant settings menu;
press the buttonsor
(with single presses) to select the
new setting for this submenu option;
press the SET/ buttonbriefly to
store the new setting and go back to the
previous submenu option.
39
Page 42 of 212
MENU ITEMS
IMPORTANT If there is anUconnect™
system, some menu items are displayed
and managed by the latter and not the
instrument panel (refer to the
description in the Multimedia chapter or
in the supplements available online).
Menu
Access to the Setup Menu.
Lights
(only with side lights on)
Adjustment (8 levels) of the brightness of
the instrument panel, theUconnect™
system controls (for versions/markets
where provided) and the automatic
climate control system controls (for
versions/markets where provided).
Speed warning
Vehicle speed limit setting (km/h or mph).
When this is exceeded, the driver is
notified by an audible warning signal.
Headlight sensor
(for versions/markets, where provided)
Automatic switch on/off of lights
according to external light conditions.
The dusk sensor sensitivity can be
adjusted according to 3 levels (level
1=minimum sensitivity, level 2=average
sensitivity, level 3=maximum sensitivity).Rain sensor
(for versions/markets, where provided)
Adjustment (4 levels) of the sensitivity of
the rain sensor.
TripB activation
Activation (On) and deactivation (Off) of
Trip B display (partial trip counter). For
more information see the "Trip computer"
section.
Set time
Clock setting through two sub-menus:
“Time” and “Format”.
Set date
Date setting (day - month - year).
First page
(for versions/markets, where provided)
Selection of the information you would
like to see on the main screen. You can
view the date or the trip distance.
Autoclose
Activation of the automatic locking of the
doors on exceeding the speed of
20 km/h.Measurement unit
Unit of measurement setting via three
submenus: “Distances”, “Fuel
consumption” and “Temperature”.
If the set distance unit is "km", the display
allows the fuel consumption unit to be set
as km/l or l/100km. If the set distance
unit is “mi” the fuel consumption unit will
be displayed in “mpg”.
Language
Display language selection.
Warning volume
Adjustment (8 levels) of the volume of
the buzzer which accompanies the
display of failures/warnings.
Seat belt beep
This function can be displayed only after
an Alfa Romeo Dealership has
deactivated the SBR system (see
paragraph “SBR system” in the “Safety”
chapter).
Service
Display of information about km/mileage
intervals or, for versions/markets, where
provided, time intervals for car servicing.
Passenger airbag
Activation/deactivation of front
passenger side airbag and side air bag for
pelvis, chest and shoulder protection -
Side bag
40
KNOWING THE INSTRUMENT PANEL
Page 57 of 212
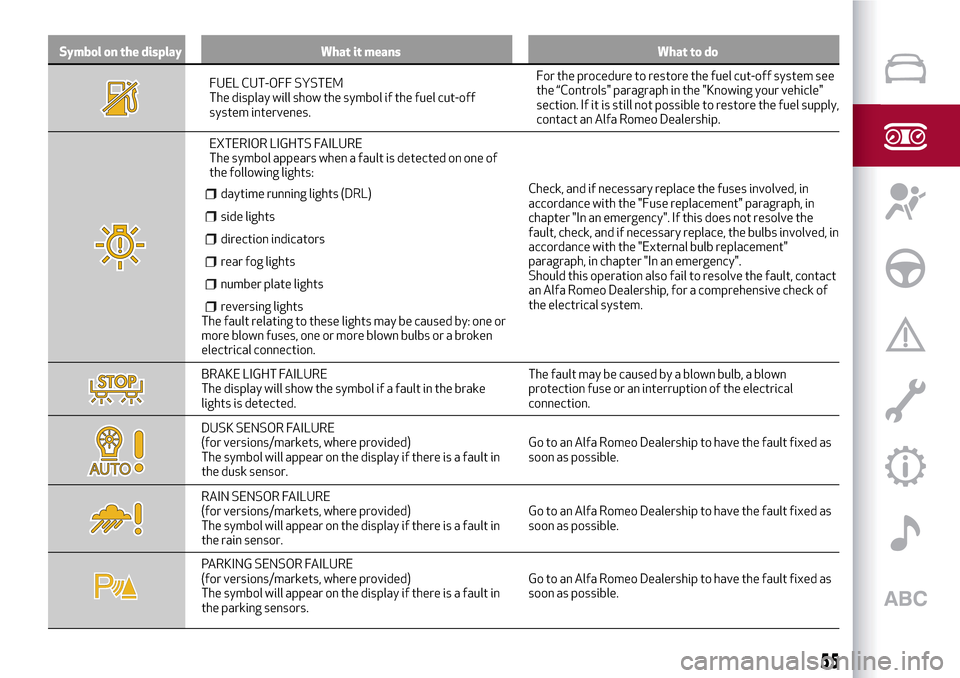
Symbol on the display What it means What to do
FUEL CUT-OFF SYSTEM
The display will show the symbol if the fuel cut-off
system intervenes.For the procedure to restore the fuel cut-off system see
the “Controls" paragraph in the "Knowing your vehicle"
section. If it is still not possible to restore the fuel supply,
contact an Alfa Romeo Dealership.
EXTERIOR LIGHTS FAILURE
The symbol appears when a fault is detected on one of
the following lights:
daytime running lights (DRL)
side lights
direction indicators
rear fog lights
number plate lights
reversing lightsThe fault relating to these lights may be caused by: one or
more blown fuses, one or more blown bulbs or a broken
electrical connection.Check, and if necessary replace the fuses involved, in
accordance with the "Fuse replacement" paragraph, in
chapter "In an emergency". If this does not resolve the
fault, check, and if necessary replace, the bulbs involved, in
accordance with the "External bulb replacement"
paragraph, in chapter "In an emergency".
Should this operation also fail to resolve the fault, contact
an Alfa Romeo Dealership, for a comprehensive check of
the electrical system.
BRAKE LIGHT FAILURE
The display will show the symbol if a fault in the brake
lights is detected.The fault may be caused by a blown bulb, a blown
protection fuse or an interruption of the electrical
connection.
DUSK SENSOR FAILURE
(for versions/markets, where provided)
The symbol will appear on the display if there is a fault in
the dusk sensor.Go to an Alfa Romeo Dealership to have the fault fixed as
soon as possible.
RAIN SENSOR FAILURE
(for versions/markets, where provided)
The symbol will appear on the display if there is a fault in
the rain sensor.Go to an Alfa Romeo Dealership to have the fault fixed as
soon as possible.
PARKING SENSOR FAILURE
(for versions/markets, where provided)
The symbol will appear on the display if there is a fault in
the parking sensors.Go to an Alfa Romeo Dealership to have the fault fixed as
soon as possible.
55
Page 58 of 212
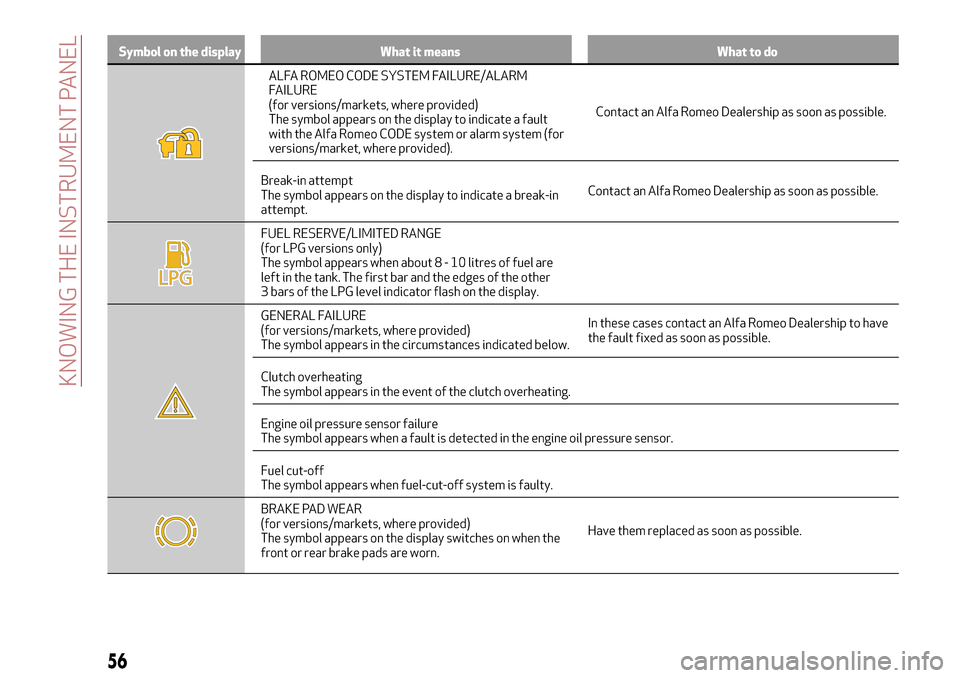
Symbol on the display What it means What to do
ALFA ROMEO CODE SYSTEM FAILURE/ALARM
FAILURE
(for versions/markets, where provided)
The symbol appears on the display to indicate a fault
with the Alfa Romeo CODE system or alarm system (for
versions/market, where provided).Contact an Alfa Romeo Dealership as soon as possible.
Break-in attempt
The symbol appears on the display to indicate a break-in
attempt.Contact an Alfa Romeo Dealership as soon as possible.
FUEL RESERVE/LIMITED RANGE
(for LPG versions only)
The symbol appears when about8-10litres of fuel are
left in the tank. The first bar and the edges of the other
3 bars of the LPG level indicator flash on the display.
GENERAL FAILURE
(for versions/markets, where provided)
The symbol appears in the circumstances indicated below.In these cases contact an Alfa Romeo Dealership to have
the fault fixed as soon as possible.
Clutch overheating
The symbol appears in the event of the clutch overheating.
Engine oil pressure sensor failure
The symbol appears when a fault is detected in the engine oil pressure sensor.
Fuel cut-off
The symbol appears when fuel-cut-off system is faulty.
BRAKE PAD WEAR
(for versions/markets, where provided)
The symbol appears on the display switches on when the
front or rear brake pads are worn.Have them replaced as soon as possible.
56
KNOWING THE INSTRUMENT PANEL
Page 59 of 212
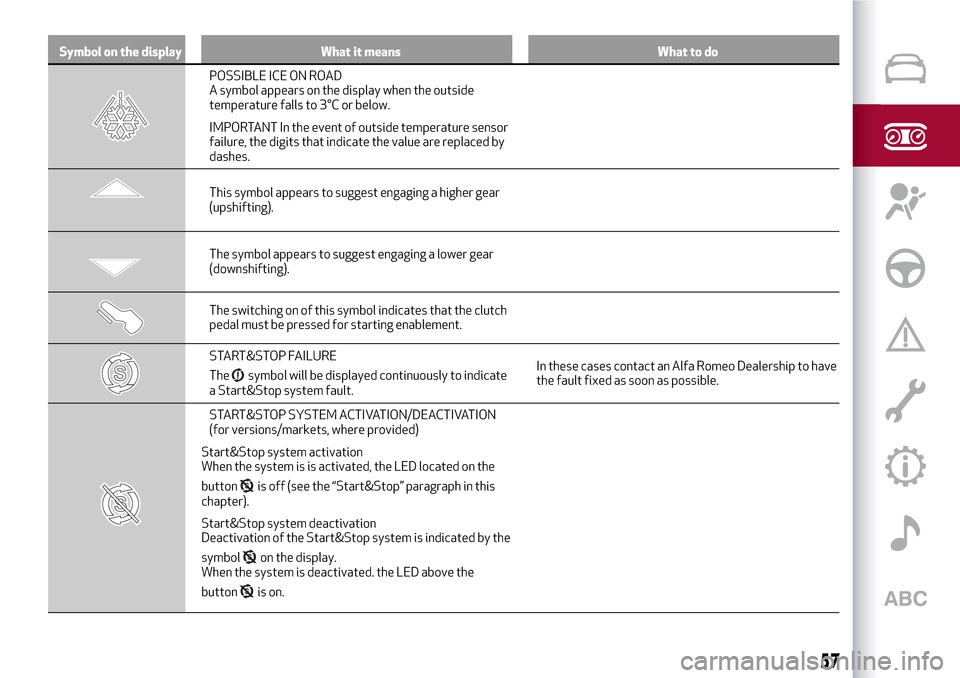
Symbol on the display What it means What to do
POSSIBLE ICE ON ROAD
A symbol appears on the display when the outside
temperature falls to 3°C or below.
IMPORTANT In the event of outside temperature sensor
failure, the digits that indicate the value are replaced by
dashes.
This symbol appears to suggest engaging a higher gear
(upshifting).
The symbol appears to suggest engaging a lower gear
(downshifting).
The switching on of this symbol indicates that the clutch
pedal must be pressed for starting enablement.
START&STOP FAILURE
The
symbol will be displayed continuously to indicate
a Start&Stop system fault.In these cases contact an Alfa Romeo Dealership to have
the fault fixed as soon as possible.
START&STOP SYSTEM ACTIVATION/DEACTIVATION
(for versions/markets, where provided)
Start&Stop system activation
When the system is is activated, the LED located on the
button
is off (see the “Start&Stop” paragraph in this
chapter).
Start&Stop system deactivation
Deactivation of the Start&Stop system is indicated by the
symbol
on the display.
When the system is deactivated. the LED above the
button
is on.
57
Page 64 of 212
33)When the ABS intervenes and you feel
the brake pedal pulsating, do not reduce the
pressure, but hold it down firmly and
confidently; in doing so you will brake in the
shortest distance possible, depending on the
current road conditions.
34)To obtain the maximum efficiency of the
braking system, a bedding-in period of about
500 km is needed: during this period it is
better to avoid sharp, repeated and
prolonged braking.
35)If the ABS intervenes, this indicates that
the grip of the tyres on the road is nearing its
limit: you must slow down to a speed
compatible with the available grip.
36)The ABS cannot overrule the natural
laws of physics, and cannot increase the grip
available according to the condition of the
road.
37)The ABS cannot prevent accidents,
including those due to excessive speed on
corners, driving on low-grip surfaces or
aquaplaning.
38)The capability of the ABS must never be
tested irresponsibly and dangerously, in
such a way as to compromise personal
safety and the safety of others.
39)For the correct operation of the ABS, the
tyres must of necessity be the same make
and type on all wheels, in perfect condition
and, above all, of the prescribed type and
dimensions.
40)The ASR cannot overrule the natural
laws of physics, and cannot increase the grip
available according to the condition of the
road.
41)The ASR system cannot prevent
accidents, including those due to excessive
speed on corners, driving on low-grip
surfaces or aquaplaning.42)The capability of the ASR must never be
tested irresponsibly and dangerously, in
such a way as to compromise personal
safety and the safety of others.
43)The HBA system can’t overrule the
natural laws of physics, and can’t increase
the grip available according to the condition
of the road.
44)The HBA system cannot prevent
accidents, including those due to excessive
speed on corners, driving on low-grip
surfaces or aquaplaning.
45)The features of the HBA system must
never be tested in imprudent or dangerous
ways, with the possibility of putting the
safety of the driver, occupants or other road
users at risk.
46)DST is an aid for driving and does not
relieve the driver of responsibility for driving
the vehicle.iTPMS System (indirect Tyre
Pressure Monitoring System)
(for versions/markets, where provided)
DESCRIPTION
The car can be equipped with the iTPMS
(indirect Tyre Pressure Monitoring
System) which monitors the tyre inflation
status thanks to wheel speed sensors.
The system warns the driver if one or
more tyres are flat by the dedicated
warning light
continuously on and a
warning message on the display.
If one tyre only is flat, the system can
indicate its position: it is in any case
recommended to check the pressure on
all four tyres.
This indication is displayed also when
turning the engine off and on again until
the RESET procedure is carried out.
RESET PROCEDURE
The iTPMS needs an initial "self-learning"
phase (with length depending on the
driving style and road conditions: optimal
conditions being driving on a straight
road at 80 km/h for at least 20 minutes)
which starts when the RESET procedure
is carried out.
The Reset procedure must be carried out:
each time tyre pressure is modified;
when even only one tyre is changed;
when tyres are rotated/inverted;
62
SAFETY
Page 83 of 212
Let’s get to the core of the vehicle: seeing how you can exploit all
of its potential to the full.
We’ll look at how to drive it safely in any situation, so that it can be
a welcome companion, with our comfort and our wallets in mind.
STARTING AND DRIVING
STARTING THE ENGINE . .........................82
WHEN PARKED................................83
TWIN CLUTCH TRANSMISSION......................83
MANUAL TRANSMISSION . . .......................86
START&STOP SYSTEM...........................87
CRUISE CONTROL ..............................89
PARKING SENSORS.............................90
TOWING TRAILERS.............................92
REFUELLING THE CAR...........................92