ESP Alfa Romeo GT 2005 Owner handbook (in English)
[x] Cancel search | Manufacturer: ALFA ROMEO, Model Year: 2005, Model line: GT, Model: Alfa Romeo GT 2005Pages: 307, PDF Size: 6.05 MB
Page 202 of 307

CORRECT USE OF THE CAR
200
STARTING PROCEDURE
FOR PETROL VERSIONS
IMPORTANTIt is important never to
press the accelerator before the engine
has started.
1) Make sure the handbrake is engaged.
2) Move the gear lever to neutral.
3) Fully depress the clutch pedal, so that
the starter motor is not forced to crank the
gears.
4) Ensure that the electric systems and
devices, especially if they absorb high
quantities of energy (e.g. heated
rearscreen), are switched off.
5) Turn the ignition key to the AV V
position and release it as soon as the
engine starts.
6) If the engine does not start, return
the key to STOP,then repeat the proce-
dure.
IMPORTANTIf it is difficult to start
the engine do not insist with extended
attempts which may damage the catalyst,
but contact Alfa Romeo Authorised
Services. The ignition switch is fitted with a safety
device which obliges the driver to return
the key to the STOPposition before
repeating the starting operation if the
engine does not start immediately.
Similarly, when the engine is running,
the device prevents the key being moved
from the MARto the AV Vposition.
STARTING
THE ENGINE
IMPORTANTThe car is fitted with an
electronic engine lock device. If the engine
fails to start, see the “Alfa Romeo CODE
system”.
C C
O O
R R
R R
E E
C C
T T
U U
S S
E E
O O
F F
T T
H H
E E
C C
A A
R R
We recommend that dur-
ing the initial period you
do not drive to full vehicle
performance (for example exces-
sive acceleration, long journeys
at top speed, hard braking etc.).
Running the engine in
confined areas is
extremely dangerous. The
engine consumes oxygen and
produces carbon monoxide which
is a highly toxic and lethal gas.
When the engine is
switched off never leave
the ignition key in the
MAR position to prevent point-
less current absorption from
draining the battery.
Page 205 of 307

Never leave children
unattended in the vehicle.
Always remove the igni-
tion key when leaving the vehicle
and take it with you.To avoid useless con-
sumption of power and
possible draining of the
battery, never leave the ignition
key in the MAR position when
the engine is not running.
CORRECT USE OF THE CAR
203
PARKING
When the vehicle is parked, proceed as
follows:
– Switch off the engine.
– Engage the handbrake.
– Engage first gear if the vehicle is faced
uphill or reverse if the vehicle is facing
downhill.
– Turn the front wheels so that the vehi-
cle will immediately come to a halt if the
handbrake slips.
REDUCING RUNNING
COSTS AND
ENVIRONMENT
POLLUTION
By following a few simple guidelines, it
is possible to save vehicle running costs
and reduce harmful emissions.
GENERAL CONSIDERATIONS
Vehicle maintenance
To take care of the car maintenance
have the checks and adjustments carried
out in accordance with the “Scheduled
Maintenance Programme”.
Tyres
Check the pressure of the tyres routinely
at an interval of no more than 4 weeks: if
the pressure is too low consumption levels
increase as resistance to rolling is higher.
Useless loads
Never travel with an overload in the
boot. The weight of the vehicle (especial-
ly in urban traffic), and its geometry heav-
ily affect consumption levels and stability.Electric services
Use electric devices only for the amount
of time needed. Rearscreen heating, addi-
tional headlights, windscreen wipers and
heater fan need a considerable amount of
energy, therefore increasing the require-
ment of current increases fuel consump-
tion (up to +25% in the urban cycle).
Climate control system
The climate control system is a further
load bearing heavily on the engine induc-
ing higher consumption levels(up to
+20% on average). Outside temperature
permitting, preferably use the air vents.
Aerodynamic items
The use of non-certified aerodynamic
items may adversely affect air drag and
consumption levels.
Page 212 of 307

IN AN EMERGENCY
210
3) Fully depress the accelerator pedal
and keep it pressed. The
Uwarning light
will come on for eight seconds and then
go off, now release the accelerator pedal.
4) The
Uwarning light begins to flash:
after it has flashed the same number of
times as the first digit on the CODE card,
press the accelerator pedal and keep it
pressed until the
Uwarning light turns
on (for four seconds) and then goes off;
now release the accelerator pedal.
5) The
Uwarning light starts to flash:
after the number of flashes corresponding
to the second digit on the CODE card,
press the accelerator pedal and keep it
pressed.
6) Repeat this procedure for the remain-
ing digits on the CODE card.
7) After entering the last figure, keep
the accelerator pedal pressed. The
U
warning light turns on (for four seconds)
and then goes off; now release the accel-
erator pedal.8) A quick flash of the
Uwarning light
(for about four seconds) confirms that the
operation has been carried out correctly.
9) Start the engine turning the ignition
key from MARtoAV Vwithout return-
ing the key to the STOPposition.
Conversely, if the
Uwarning light stays
on, turn the key to STOPand repeat the
procedure starting from point 1).
IMPORTANTAfter emergency starting
it is advisable to contact Alfa Romeo
Authorised Services, because the emer-
gency procedure must be repeated each
time the engine is started.
EMERGENCY
STARTING
If it is not possible to deactivate the
engine inhibitor with the Alfa Romeo
CODE system, the
YandUwarning
lights stay on and the engine will not
start. Emergency starting is needed to
start the engine.
IMPORTANTYou are advised to care-
fully read the entire procedure before car-
rying it out.
If a mistake is made during the emer-
gency procedure, the ignition key should
be turned to STOPand the operations
must be repeated from the start (point 1).
1) Read the 5-figure electronic code on
the CODE card.
2) Turn the ignition key to MAR.
I I
N N
A A
N N
E E
M M
E E
R R
G G
E E
N N
C C
Y Y
Page 217 of 307

IN AN EMERGENCY
215
– Using the wrench provided (A-
fig. 5), loosen the fastening bolts by
about one turn.
– Set the jack under the car, near the
wheel to be changed taking care not to
damage the plastic streamlined guard.
– Work the jack crank (A-fig. 6), to
extend it until the groove (B) on the
upper part of jack is correctly inserted on
the lower profile of the body (C) approx.
40 cm from the profile of the wheelhouse.
– Work the jack and raise the car until
the wheel is a few centimetres from the
ground.
– Completely unscrew the fastening
bolts and remove the wheel.– Make sure that the contact surfaces of
the spare wheel with the hub are clean
and free of impurities which may later
cause the fastening bolts to slacken.
– Install the spare wheel matching the
hole (A-fig. 7) with the corresponding
pin (B).
– Using the wrench provided, fasten the
five bolts.
– Lower the car and remove the jack.
– Using the wrench provided, fully tighten
the bolts in the sequence shown in fig. 8.REFITTING A NORMAL WHEEL
– Following the procedure described
previously, raise the car and remove the
spare wheel.
For versions with steel rims:
– Fit the normal wheel matching the
hole (A-fig. 7) with the corresponding
pin (B).
– Make sure that the contact surfaces of
the wheel with the hub are clean and free
of impurities which may later cause the
fastening bolts to slacken.
fig. 5
A0A0694b
fig. 6
A0A0695b
Page 226 of 307

IN AN EMERGENCY
224
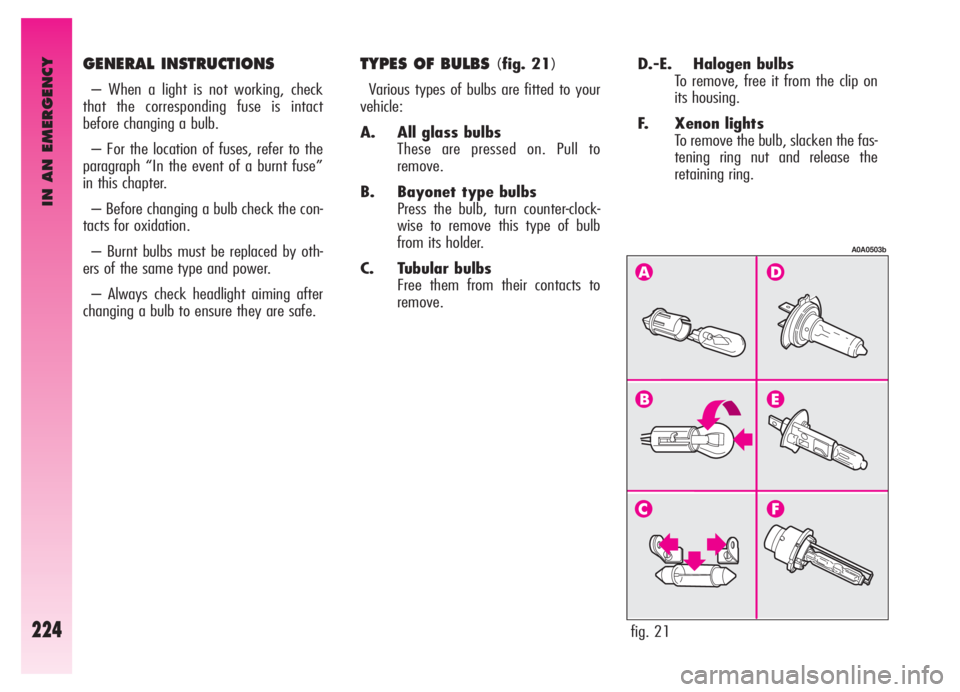
D.-E. Halogen bulbs
To remove, free it from the clip on
its housing.
F. Xenon lights
To remove the bulb, slacken the fas-
tening ring nut and release the
retaining ring. GENERAL INSTRUCTIONS
– When a light is not working, check
that the corresponding fuse is intact
before changing a bulb.
– For the location of fuses, refer to the
paragraph “In the event of a burnt fuse”
in this chapter.
– Before changing a bulb check the con-
tacts for oxidation.
– Burnt bulbs must be replaced by oth-
ers of the same type and power.
– Always check headlight aiming after
changing a bulb to ensure they are safe.
TYPES OF BULBS (fig. 21)
Various types of bulbs are fitted to your
vehicle:
A. All glass bulbs
These are pressed on. Pull to
remove.
B. Bayonet type bulbs
Press the bulb, turn counter-clock-
wise to remove this type of bulb
from its holder.
C. Tubular bulbs
Free them from their contacts to
remove.
fig. 21
A0A0503b
Page 232 of 307

IN AN EMERGENCY
230
REVERSING LIGHT
AND REAR FOG GUARDS
(fig. 31-32)
The reversing light and rear fog guard are
in the tail light unit fastened to the tailgate;
they are to be found respectively one on the
right and the other on the left of the vehicle
facing forwards.
To change the bulb, proceed as follows:
– from the bumper lower side (fig. 31),
operate on the bulb holder (A-fig 32) turn-
ing it counter-clockwise and remove it. Take
care not to get burnt if the muffler is still hot;
fig. 31
A0A0627b
fig. 33
A0A0629b
– Remove the bulb pushing gently and
turning counter-clockwise;
– Replace the bulb, then refit the bulb
holder.
Anyway, you are advised to have this
operation carried out by Alfa Romeo
Authorised Services.REAR DIRECTION INDICATORS
AND REAR SIDELIGHTS-
BRAKING LIGHTS
(fig. 33-34)
The rear direction indicators and the side-
lights-braking lights are in the tail light
unit fastened to the body.
To change the bulb, proceed as follows:
– From inside the boot, open the com-
partment (A-fig. 33) and then the door
(B) through the tab (C);
– Turn the bulb for sidelight and braking
light counter-clockwise (D-fig. 34),
or the bulb for the direction indicator (E-
fig. 34) and remove it;
fig. 32
A0A0628b
Page 235 of 307

IN AN EMERGENCY
233
REAR ROOF LIGHT
(fig. 41-42)
To change the bulb, proceed as follows:
– Remove the light unit (A) levering in
the point shown by the arrow.
– Replace the bulb releasing it from the
side contacts making sure that the new
bulb is correctly clamped between the con-
tacts.– Refit the light unit in the correct posi-
tion inserting first the side with the con-
nector, then pressing the other side until
the catch clicks into place (B).
fig. 41
A0A0177b
fig. 42
A0A0178b
– Close the protective cover (B).
– Refit the light unit pressing gently in
correspondence with the retainer catches,
until hearing the click.
fig. 40
A0A0176b
Page 241 of 307

IN AN EMERGENCY
239
30
30
10
7.5
15
7.5
7.5 F03 (MAXI-FUSE)
F73 (MAXI-FUSE)
F13
F31
F39
F19
F31
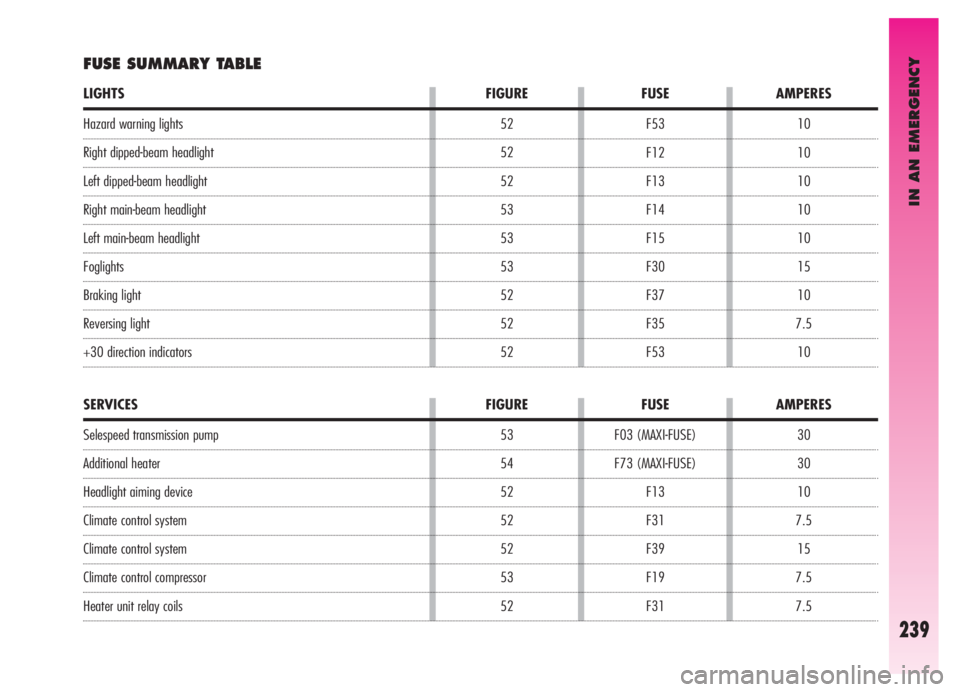
SERVICES FIGURE FUSE AMPERES
Hazard warning lights
Right dipped-beam headlight
Left dipped-beam headlight
Right main-beam headlight
Left main-beam headlight
Foglights
Braking light
Reversing light
+30 direction indicators10
10
10
10
10
15
10
7.5
10 F53
F12
F13
F14
F15
F30
F37
F35
F53
LIGHTS FIGURE FUSE AMPERES
FUSE SUMMARY TABLE
Selespeed transmission pump
Additional heater
Headlight aiming device
Climate control system
Climate control system
Climate control compressor
Heater unit relay coils52
52
52
53
53
53
52
52
52
53
54
52
52
52
53
52
Page 242 of 307

IN AN EMERGENCY
240
15
15
7.5
15
15
30
30
20
15
7.5
7.5
20
20
15
7.5
15
7.5 F32
F32
F51
F39
F39
F40
F43
F44
F45
F41
F35
F38
F09
F39
F39
F42
F42
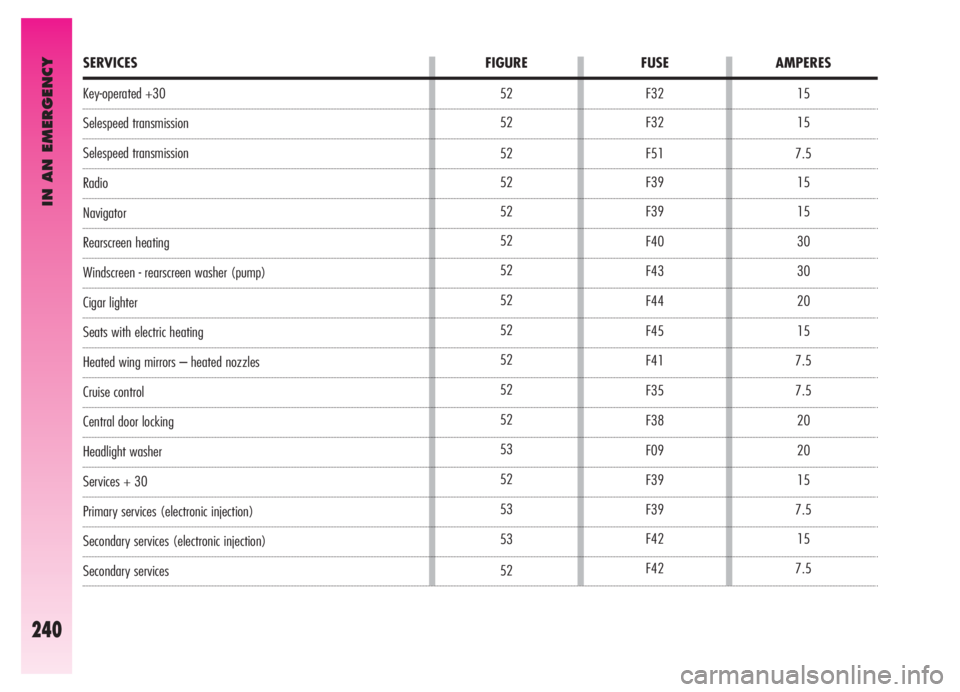
SERVICES FIGURE FUSE AMPERES
Key-operated +30
Selespeed transmission
Selespeed transmission
Radio
Navigator
Rearscreen heating
Windscreen - rearscreen washer (pump)
Cigar lighter
Seats with electric heating
Heated wing mirrors – heated nozzles
Cruise control
Central door locking
Headlight washer
Services + 30
Primary services (electronic injection)
Secondary services (electronic injection)
Secondary services52
52
52
52
52
52
52
52
52
52
52
52
53
52
53
53
52
Page 243 of 307

IN AN EMERGENCY
241
Volumetric sensors
ESP system sensor
Steering angle sensor
EOBD system diagnosis socket
Cell phone provision
Driver’s door control unit supply
Passenger’s door control unit supply
Control lighting
Climate control system control lighting
Instrument cluster
Instrument cluster
Driver’s door control unit
ABS control unit
ABS control unit
Dashboard control unit
Air - bag control unit
Electronic injection control unit +30
Engine compartment control box (petrol versions)
Dashboard control unit
Trailer control unit15
7.5
7.5
15
15
20
20
7.5
7.5
10
10
15
7.5
50
50
7.5
7.5
125
70
10 F39
F42
F42
F39
F39
F47
F48
F49
F35
F37
F53
F39
F42
F04 (MAXI-FUSE)
F02 (MAXI-FUSE)
F50
F18
F70 (MEGA-FUSE)
F71 (MAXI-FUSE)
F36 52
52
52
52
52
52
52
52
52
52
52
52
52
53
53
52
53
54
54
52
SERVICES FIGURE FUSE AMPERES