Alfa Romeo MiTo 2009 Owner handbook (in English)
Manufacturer: ALFA ROMEO, Model Year: 2009, Model line: MiTo, Model: Alfa Romeo MiTo 2009Pages: 250, PDF Size: 4.61 MB
Page 171 of 250
170IN AN EMERGENCY
The kit cannot be used to repair damage to the tyre
sidewall. Do not use the fast repair kit on tyres
damaged by the vehicle running with a flat tyre.
If the wheel rim is damaged (the channel is so de-
formed as to cause an air leakage) it cannot be re-
paired. Do not remove the foreign body (screw
or nail) from the tyre.
Do not operate the compressor for longer than 20
minutes consecutively. Risk of overheating. The kit
is not suitable for permanent repairs. The tyres
may only be repaired temporarily.
Do not dispose of the cylinder and contained sealant
in the environment. Dispose of them according to the
national and local laws in force.
The cylinder contains ethylene and latex: may
cause an allergic reaction. Harmful if swallowed.
Irritates the eyes. May cause sensitisation by in-
halation or contact. Avoid contact with the eyes, skin and
clothes. In the event of contact, wash immediately with
plenty of water. Do not induce vomiting if swallowed. Rinse
your mouth and drink plenty of water. Call a doctor im-
mediately. Keep away from children. The product must
not be used by asthmatics. Do not breath in the vapours
during insertion and suction. Call a doctor immediately if
allergic reactions are noted. Store the cylinder in the spe-
cific compartment, away from sources of heat. The seal-
ing fluid will expire. Replace the cylinder containing the
sealant after the expiry date.
159-196 Alfa MiTo GB 12-11-2008 15:45 Pagina 170
Page 172 of 250
IN AN EMERGENCY171
4
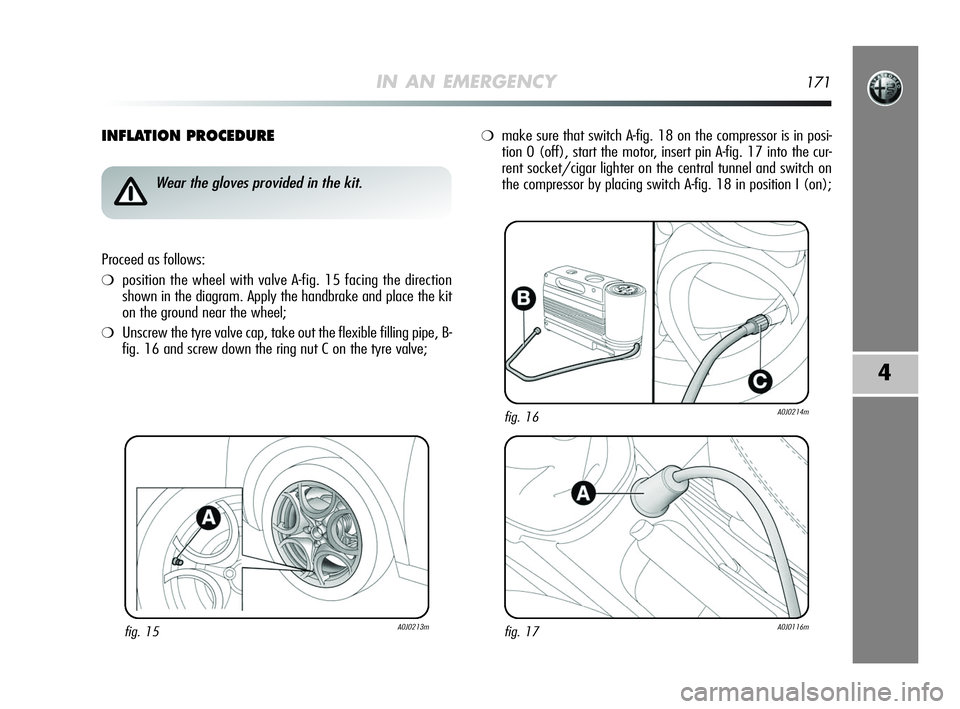
INFLATION PROCEDURE
fig. 15A0J0213m
Wear the gloves provided in the kit.
Proceed as follows:
❍position the wheel with valve A-fig. 15 facing the direction
shown in the diagram. Apply the handbrake and place the kit
on the ground near the wheel;
❍Unscrew the tyre valve cap, take out the flexible filling pipe, B-
fig. 16 and screw down the ring nut C on the tyre valve;
❍make sure that switch A-fig. 18 on the compressor is in posi-
tion 0 (off), start the motor, insert pin A-fig. 17 into the cur-
rent socket/cigar lighter on the central tunnel and switch on
the compressor by placing switch A-fig. 18 in position I (on);
fig. 17A0J0116m
fig. 16A0J0214m
159-196 Alfa MiTo GB 12-11-2008 15:45 Pagina 171
Page 173 of 250

172IN AN EMERGENCY
❍inflate the tyre to the pressure shown in the paragraph entitled
“Wheels” in chapter 6. In order to obtain a precise reading,
check the pressure on pressure gauge B-fig. 18 with the com-
pressor off;
❍if a pressure value of a least 1.5 bars is not reached within 5
minutes, disconnect the compressor from the valve and current
socket, move the vehicle forwards by about 10 metres to dis-
tribute the sealant fluid in the tyre and repeat the inflation
procedure;
fig. 18A0J0114m
❍if a pressure value of a least 1.8 bars is not reached within 5
minutes of switching on the compressor, do not continue dri-
ving. Contact an Alfa Romeo Authorised Services;
❍after having driven for about 10 minutes, stop the car and check
the tyre pressure once more: remember to engage the hand-
brake;
❍if a pressure value of at least 1.8 bars is detected, restore the
correct pressure (with the engine running and the handbrake
engaged), and drive with care to an Alfa Romeo Authorised
Services.
159-196 Alfa MiTo GB 12-11-2008 15:45 Pagina 172
Page 174 of 250
IN AN EMERGENCY173
4
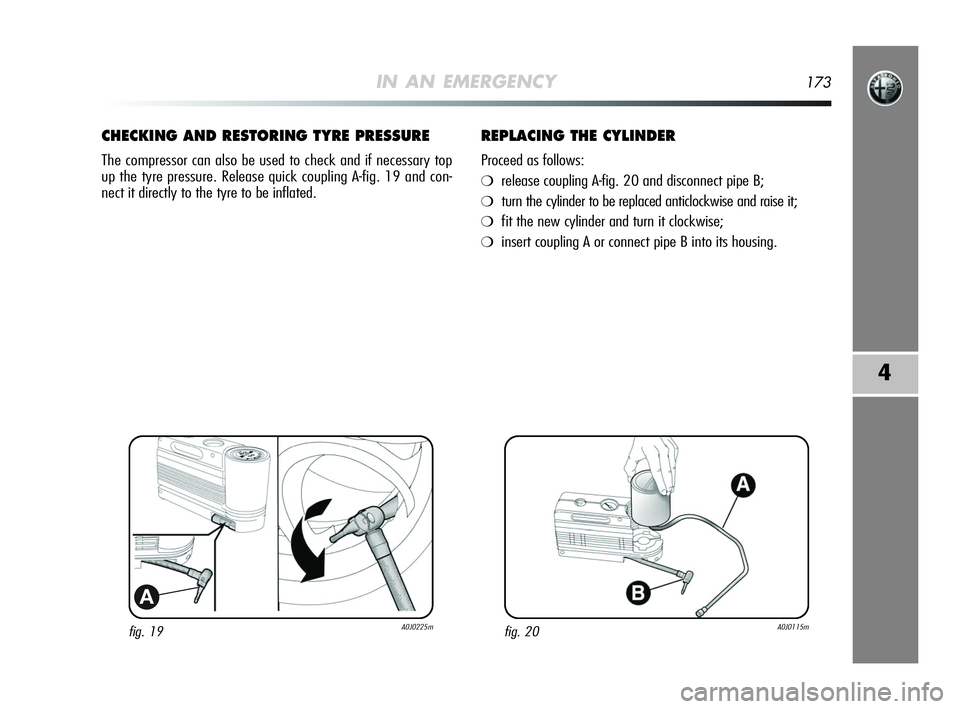
fig. 19A0J0225m
A
CHECKING AND RESTORING TYRE PRESSURE
The compressor can also be used to check and if necessary top
up the tyre pressure. Release quick coupling A-fig. 19 and con-
nect it directly to the tyre to be inflated.
REPLACING THE CYLINDER
Proceed as follows:
❍release coupling A-fig. 20 and disconnect pipe B;
❍turn the cylinder to be replaced anticlockwise and raise it;
❍fit the new cylinder and turn it clockwise;
❍insert coupling A or connect pipe B into its housing.
fig. 20A0J0115m
159-196 Alfa MiTo GB 12-11-2008 15:45 Pagina 173
Page 175 of 250
174IN AN EMERGENCY
CHANGING A BULB
GENERAL INSTRUCTIONS
❍Before changing a bulb check the contacts for oxidation;
❍blown bulbs must be replaced with others of the same type and
power:
❍After replacing a headlight bulb, always check its alignment;
❍When a bulb is not working, check that the corresponding fuse
is intact before replacing it: refer to the “Replacing fuses” para-
graph in this section for the location of fuses.
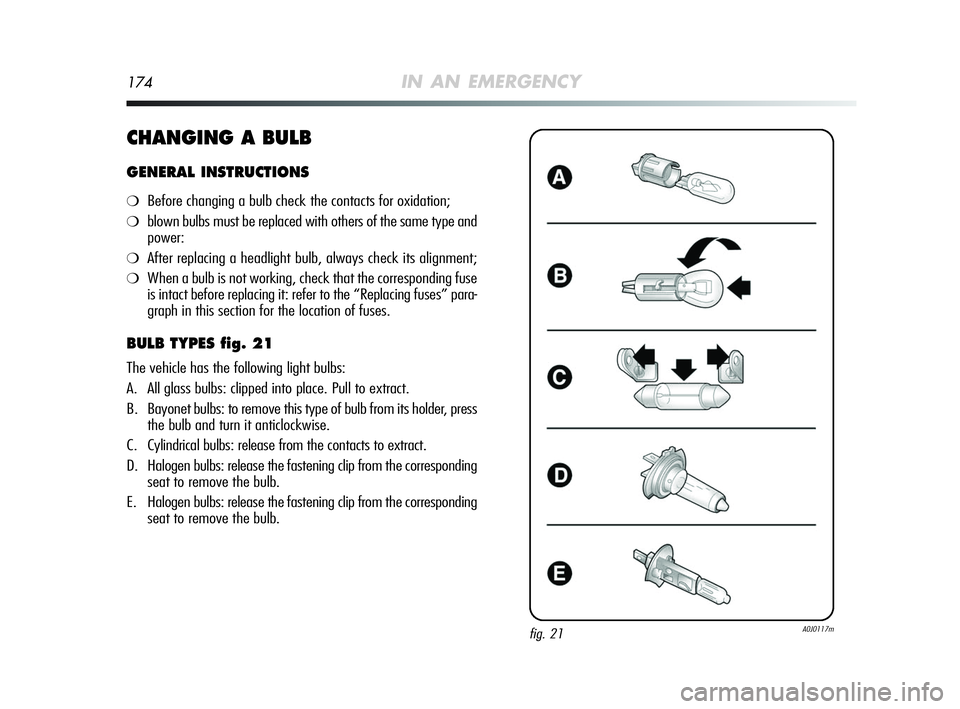
BULB TYPES fig. 21
The vehicle has the following light bulbs:
A. All glass bulbs: clipped into place. Pull to extract.
B. Bayonet bulbs: to remove this type of bulb from its holder, press
the bulb and turn it anticlockwise.
C. Cylindrical bulbs: release from the contacts to extract.
D. Halogen bulbs: release the fastening clip from the corresponding
seat to remove the bulb.
E. Halogen bulbs: release the fastening clip from the corresponding
seat to remove the bulb.
fig. 21A0J0117m
159-196 Alfa MiTo GB 12-11-2008 15:45 Pagina 174
Page 176 of 250
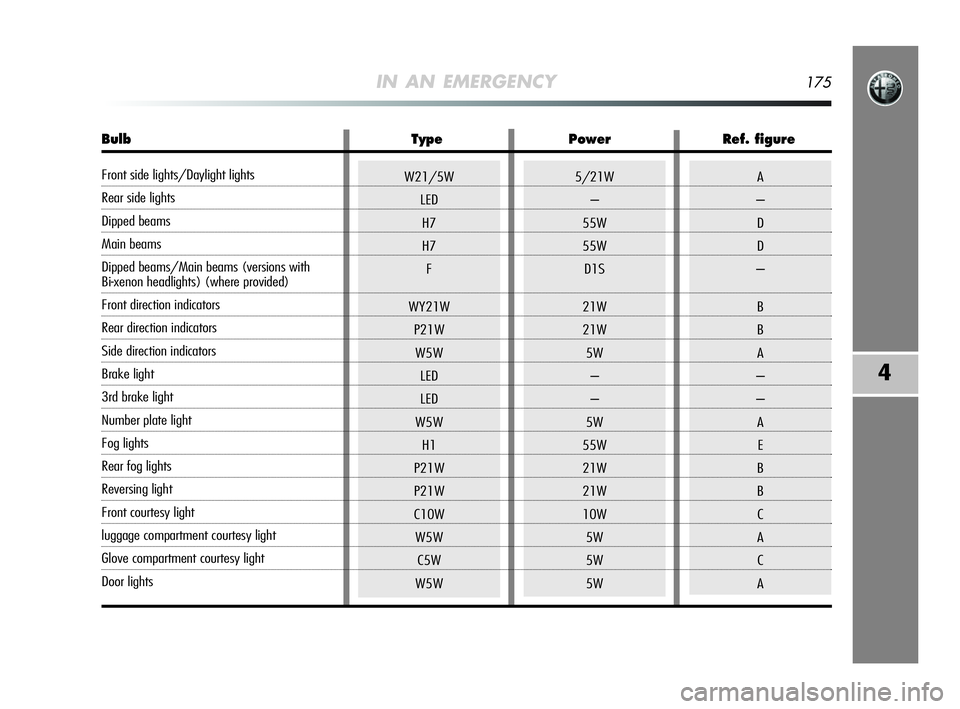
5/21W
–
55W
55W
D1S
21W
21W
5W
–
–
5W
55W
21W
21W
10W
5W
5W
5WA
–
D
D
–
B
B
A
–
–
A
E
B
B
C
A
C
A
IN AN EMERGENCY175
4
W21/5W
LED
H7
H7
F
WY21W
P21W
W5W
LED
LED
W5W
H1
P21W
P21W
C10W
W5W
C5W
W5W
Bulb Type Power Ref. figure
Front side lights/Daylight lights
Rear side lights
Dipped beams
Main beams
Dipped beams/Main beams (versions with
Bi-xenon headlights) (where provided)
Front direction indicators
Rear direction indicators
Side direction indicators
Brake light
3rd brake light
Number plate light
Fog lights
Rear fog lights
Reversing light
Front courtesy light
luggage compartment courtesy light
Glove compartment courtesy light
Door lights
159-196 Alfa MiTo GB 12-11-2008 15:45 Pagina 175
Page 177 of 250
176IN AN EMERGENCY
REPLACING EXTERIOR BULBS
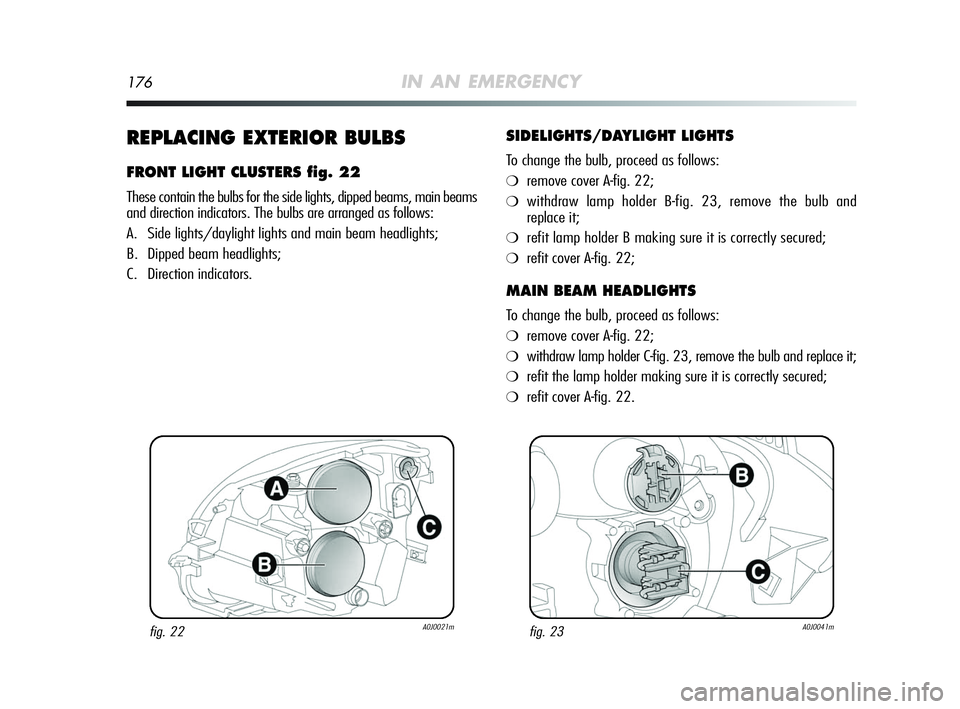
FRONT LIGHT CLUSTERS fig. 22
These contain the bulbs for the side lights, dipped beams, main beams
and direction indicators. The bulbs are arranged as follows:
A. Side lights/daylight lights and main beam headlights;
B. Dipped beam headlights;
C. Direction indicators.
SIDELIGHTS/DAYLIGHT LIGHTS
To change the bulb, proceed as follows:
❍remove cover A-fig. 22;
❍withdraw lamp holder B-fig. 23, remove the bulb and
replace it;
❍refit lamp holder B making sure it is correctly secured;
❍refit cover A-fig. 22;
MAIN BEAM HEADLIGHTS
To change the bulb, proceed as follows:
❍remove cover A-fig. 22;
❍withdraw lamp holder C-fig. 23, remove the bulb and replace it;
❍refit the lamp holder making sure it is correctly secured;
❍refit cover A-fig. 22.
fig. 22A0J0021mfig. 23A0J0041m
159-196 Alfa MiTo GB 12-11-2008 15:45 Pagina 176
Page 178 of 250
IN AN EMERGENCY177
4
DIPPED BEAM HEADLIGHTS
With incandescent bulb
To change the bulb, proceed as follows:
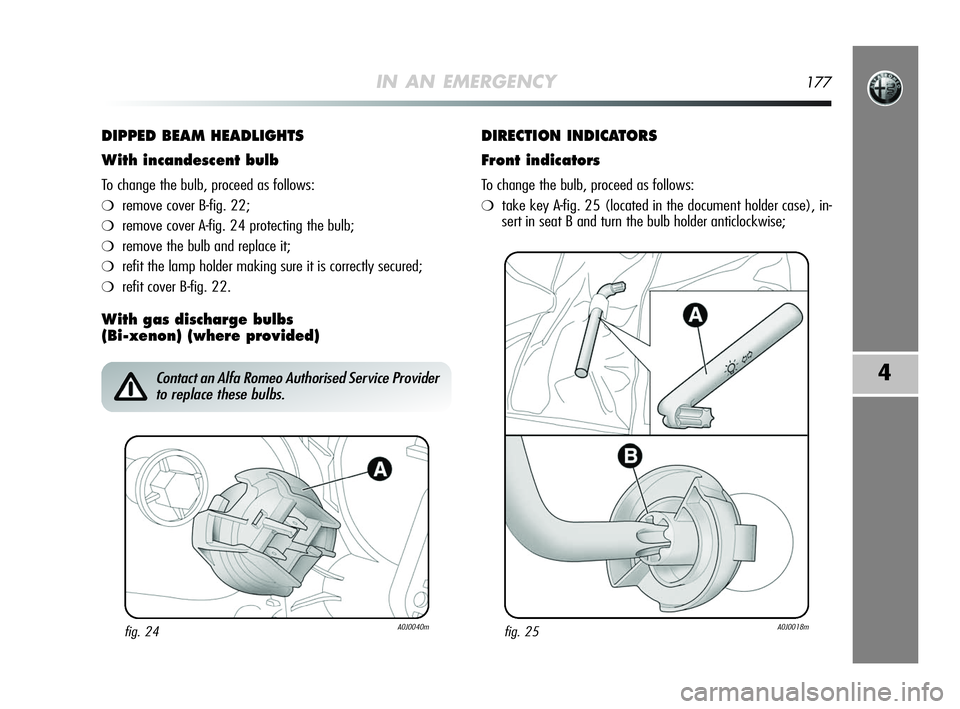
❍remove cover B-fig. 22;
❍remove cover A-fig. 24 protecting the bulb;
❍remove the bulb and replace it;
❍refit the lamp holder making sure it is correctly secured;
❍refit cover B-fig. 22.
With gas discharge bulbs
(Bi-xenon) (where provided)DIRECTION INDICATORS
Front indicators
To change the bulb, proceed as follows:
❍take key A-fig. 25 (located in the document holder case), in-
sert in seat B and turn the bulb holder anticlockwise;
fig. 24A0J0040m
Contact an Alfa Romeo Authorised Service Provider
to replace these bulbs.
fig. 25A0J0018m
159-196 Alfa MiTo GB 12-11-2008 15:45 Pagina 177
Page 179 of 250
178IN AN EMERGENCY
❍remove the bulb and replace it.
Side indicators
To change the bulb, proceed as follows:
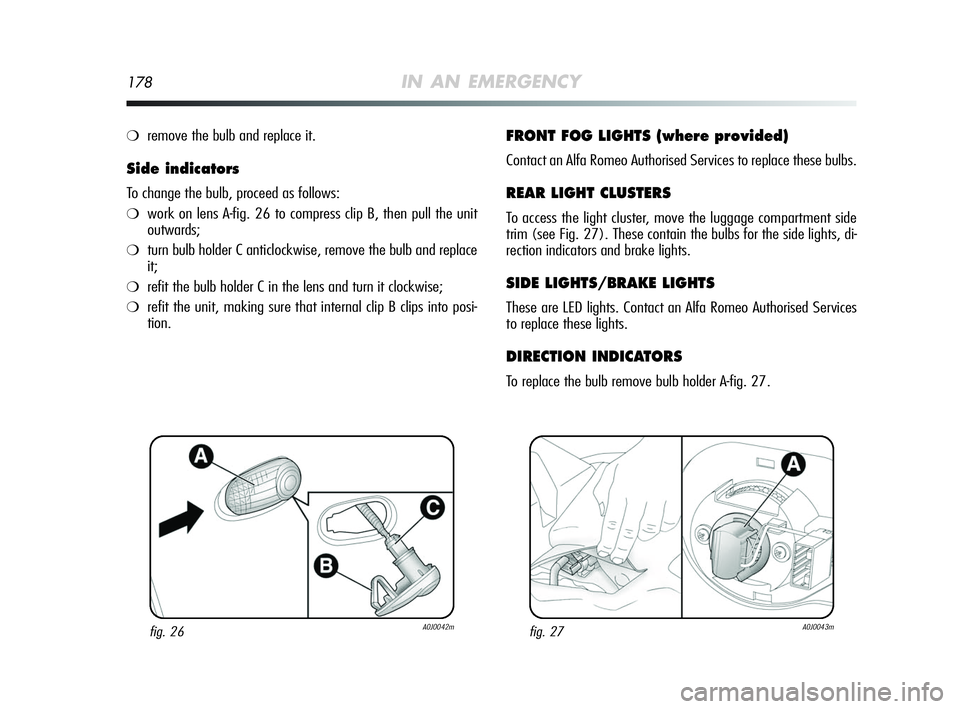
❍work on lens A-fig. 26 to compress clip B, then pull the unit
outwards;
❍turn bulb holder C anticlockwise, remove the bulb and replace
it;
❍refit the bulb holder C in the lens and turn it clockwise;
❍refit the unit, making sure that internal clip B clips into posi-
tion.
FRONT FOG LIGHTS (where provided)
Contact an Alfa Romeo Authorised Services to replace these bulbs.
REAR LIGHT CLUSTERS
To access the light cluster, move the luggage compartment side
trim (see Fig. 27). These contain the bulbs for the side lights, di-
rection indicators and brake lights.
SIDE LIGHTS/BRAKE LIGHTS
These are LED lights. Contact an Alfa Romeo Authorised Services
to replace these lights.
DIRECTION INDICATORS
To replace the bulb remove bulb holder A-fig. 27.
fig. 26A0J0042mfig. 27A0J0043m
159-196 Alfa MiTo GB 12-11-2008 15:45 Pagina 178
Page 180 of 250
IN AN EMERGENCY179
4
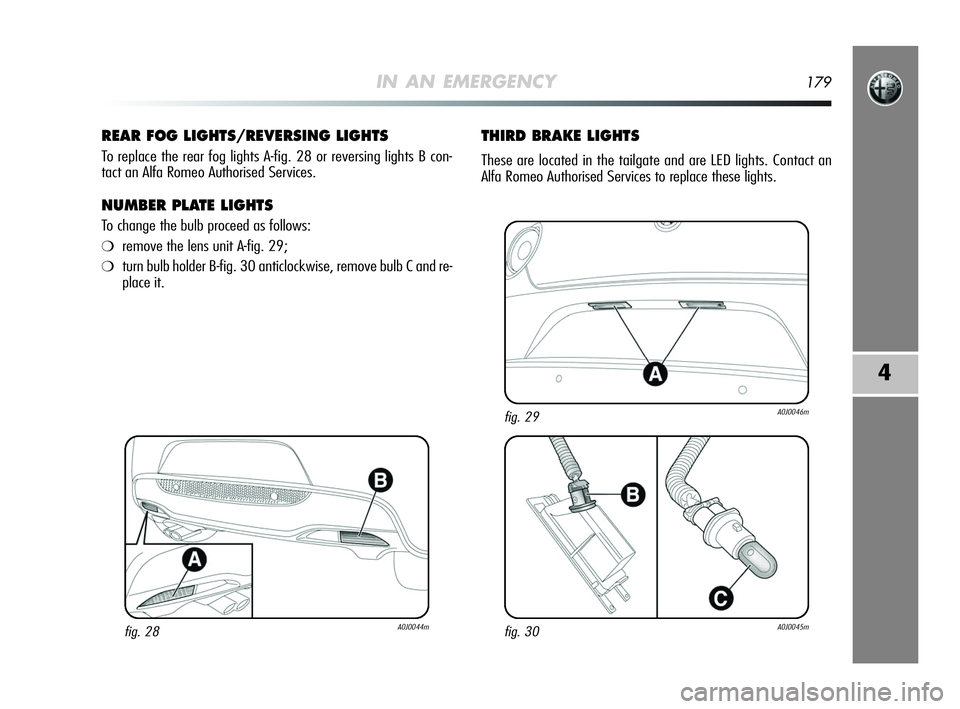
REAR FOG LIGHTS/REVERSING LIGHTS
To replace the rear fog lights A-fig. 28 or reversing lights B con-
tact an Alfa Romeo Authorised Services.
NUMBER PLATE LIGHTS
To change the bulb proceed as follows:
❍remove the lens unit A-fig. 29;
❍turn bulb holder B-fig. 30 anticlockwise, remove bulb C and re-
place it.
THIRD BRAKE LIGHTS
These are located in the tailgate and are LED lights. Contact an
Alfa Romeo Authorised Services to replace these lights.
fig. 28A0J0044mfig. 30A0J0045m
fig. 29A0J0046m
159-196 Alfa MiTo GB 12-11-2008 15:45 Pagina 179