ABS ALFA ROMEO STELVIO 2022 Owners Manual
[x] Cancel search | Manufacturer: ALFA ROMEO, Model Year: 2022, Model line: STELVIO, Model: ALFA ROMEO STELVIO 2022Pages: 256, PDF Size: 10.17 MB
Page 7 of 256
5
HOW TO USE THIS MANUAL
Operating Instructions
Each time an instruction is given that concerns direction (left/right or forward/backward), it is written to be read from the perspective of an occupant in the
driver's seat. If a direction is written from a different perspective, it will be specified as such in the text as appropriate.
The figures in the manual are only examples: this might imply that some details of the image do not correspond to the actual arrangement of your vehicle.
To identify the chapter with the information necessary, you can consult the Index at the end of this manual.
Chapters can be rapidly identified with dedicated graphic tabs, located at the side of each odd page. There is also a key for getting to know the chapter
order and the relevant symbols in the tabs. Additionally, there is a textual indication of each current chapter at the side of each even page.
Warnings And Cautions
While reading this Owner’s Manual you will find a series of WARNINGS that must be carefully followed to prevent incorrect use of the components of the
vehicle, which could cause accidents or injuries.
There are also CAUTIONS to prevent procedures that could damage your vehicle.
Therefore all WARNINGS and CAUTIONS must always be carefully followed.
WARNINGS and CAUTIONS are recalled in the text with the following symbols:
Personal Safety:
Vehicle Safety:
NOTE:
This Owner’s Manual describes all vehicle models. Optional equipment meant for specific markets or particular models are not identified as such in the
text: you need to consider only the information related to the model you own. Any content introduced throughout the production of the model, outside the
specific request of options at the time of purchase, will be identified by the indicator: — if equipped.
The data contained in this publication is intended to help you use your vehicle in the best possible way. FCA US LLC aims for constant improvement of the
vehicles produced. For this reason, it reserves the right to make changes to the model described for technical and/or commercial reasons.
For further information, contact an authorized dealer.
22_GU_OM_EN_USC_t.book Page 5
Page 13 of 256
11
LANE KEEPING ASSIST (LKA) SYSTEM —
IF EQUIPPED .......................................... 119
Turning Lane Keeping Assist On
Or Off .................................................... 120 Lane Keeping Assist Warning
Message ...............................................120
REAR BACK UP CAMERA / DYNAMIC
GRIDLINES ............................................ 122
REFUELING THE VEHICLE ..................... 124
Refueling Capacity ............................... 124
Refueling Procedure ...........................124
VEHICLE LOADING ................................. 126
Certification Label................................ 126
TRAILER TOWING................................... 127
Common Towing Definitions ...............127
Trailer Hitch Classification .................. 128
Trailer Towing Weights (Maximum
Trailer Weight Ratings) ........................ 128 Trailer And Tongue Weight ................. 129
Towing Requirements..........................129
Towing Tips ..........................................131
Installing The Receiver ........................ 131
Connecting The Electrical System ......132
Removing The Receiver ....................... 132
SUGGESTIONS FOR DRIVING................ 132
Saving Fuel ...........................................132
Driving Style .........................................132
Conditions Of Use ................................ 133
Performance — Quadrifoglio ...............133
SAFETY
ACTIVE SAFETY SYSTEMS ..................... 135
Anti-Lock Brake System (ABS) ........... 135
Active Torque Vectoring (ATV)
System — If Equipped ......................... 135 Dynamic Steering Torque (DST)
System ................................................. 136 Drive Train Control (DTC) System....... 136
Electronic Stability Control (ESC)
System ................................................. 136 Hill Descent Control (HDC) System —
If Equipped .......................................... 137 Hill Start Assist (HSA) System ............ 138
Panic Brake Assist (PBA) System ....... 138
Traction Control System (TCS)............ 139
AUXILIARY DRIVING SYSTEMS .............. 139
Blind Spot Monitoring (BSM)
System — If Equipped ......................... 139 Active Blind Spot Assist (ABSA)
System — If Equipped ........................ 141 Driver Attention Assist (DAA)
System — If Equipped ......................... 144 Forward Collision Warning Plus
(FCW+) System — If Equipped ........... 145 Tire Pressure Monitoring System
(TPMS).................................................. 149
OCCUPANT RESTRAINT SYSTEMS ....... 151
Occupant Restraint Systems
Features .............................................. 151 Important Safety Precautions............. 151
Seat Belt Systems .............................. 152
Supplemental Restraint Systems
(SRS)..................................................... 156 Child Restraints ................................... 164
SAFETY TIPS ........................................... 173
Transporting Passengers .................... 173
Transporting Pets ................................ 173
Connected Vehicles ............................. 173
Safety Checks You Should Make
Inside The Vehicle .............................. 173 Periodic Safety Checks You Should
Make Outside The Vehicle .................. 174 Exhaust Gas ........................................ 174
Carbon Monoxide Warnings................ 175
IN CASE OF EMERGENCY
HAZARD WARNING FLASHERS ............ 176
SOS — EMERGENCY CALL ..................... 176JACKING AND TIRE CHANGING ............. 178
General Instructions............................ 179
Jack Information And Usage
Precautions .......................................... 179 Changing Procedure ............................ 179
TIRE SERVICE KIT — IF EQUIPPED ....... 181
Description ........................................... 181
Inflation Procedure .............................. 182
Checking And Restoring Tire
Pressure ............................................... 184
22_GU_OM_EN_USC_t.book Page 11
Page 16 of 256
SYMBOL GLOSSARY
14
SYMBOL GLOSSARY
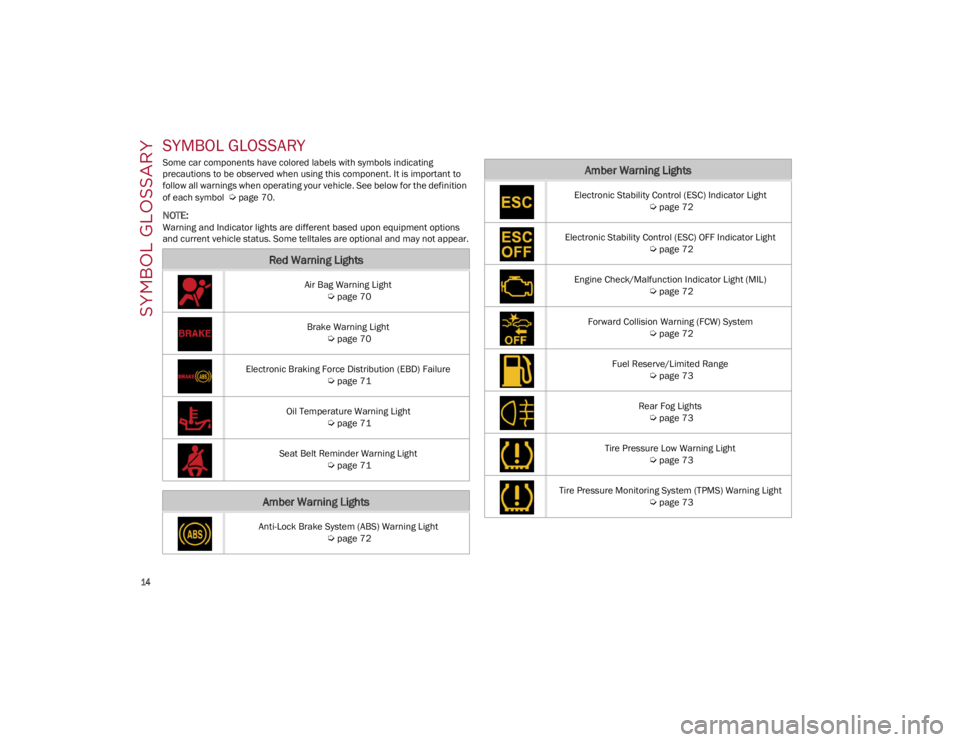
Some car components have colored labels with symbols indicating
precautions to be observed when using this component. It is important to
follow all warnings when operating your vehicle. See below for the definition
of each symbol
Ú
page 70.
NOTE:
Warning and Indicator lights are different based upon equipment options
and current vehicle status. Some telltales are optional and may not appear.
Red Warning Lights
Air Bag Warning Light
Ú
page 70
Brake Warning Light
Ú
page 70
Electronic Braking Force Distribution (EBD) Failure
Ú
page 71
Oil Temperature Warning Light
Ú
page 71
Seat Belt Reminder Warning Light
Ú
page 71
Amber Warning Lights
Anti-Lock Brake System (ABS) Warning Light
Ú
page 72
Electronic Stability Control (ESC) Indicator Light
Ú
page 72
Electronic Stability Control (ESC) OFF Indicator Light
Ú
page 72
Engine Check/Malfunction Indicator Light (MIL)
Ú
page 72
Forward Collision Warning (FCW) System
Ú
page 72
Fuel Reserve/Limited Range
Ú
page 73
Rear Fog Lights
Ú
page 73
Tire Pressure Low Warning Light
Ú
page 73
Tire Pressure Monitoring System (TPMS) Warning Light
Ú
page 73
Amber Warning Lights
22_GU_OM_EN_USC_t.book Page 14
Page 18 of 256
SYMBOL GLOSSARY
16
Amber Symbols
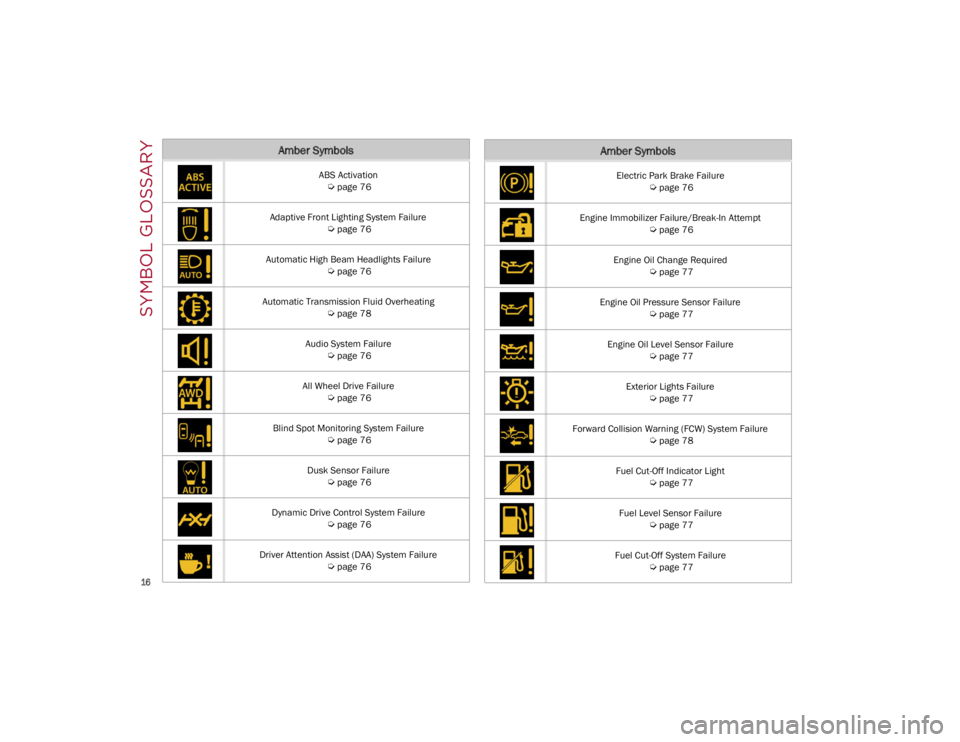
ABS Activation
Ú
page 76
Adaptive Front Lighting System Failure
Ú
page 76
Automatic High Beam Headlights Failure
Ú
page 76
Automatic Transmission Fluid Overheating
Ú
page 78
Audio System Failure
Ú
page 76
All Wheel Drive Failure
Ú
page 76
Blind Spot Monitoring System Failure
Ú
page 76
Dusk Sensor Failure
Ú
page 76
Dynamic Drive Control System Failure
Ú
page 76
Driver Attention Assist (DAA) System Failure
Ú
page 76
Electric Park Brake Failure
Ú
page 76
Engine Immobilizer Failure/Break-In Attempt
Ú
page 76
Engine Oil Change Required
Ú
page 77
Engine Oil Pressure Sensor Failure
Ú
page 77
Engine Oil Level Sensor Failure
Ú
page 77
Exterior Lights Failure
Ú
page 77
Forward Collision Warning (FCW) System Failure
Ú
page 78
Fuel Cut-Off Indicator Light
Ú
page 77
Fuel Level Sensor Failure
Ú
page 77
Fuel Cut-Off System Failure
Ú
page 77
Amber Symbols
22_GU_OM_EN_USC_t.book Page 16
Page 19 of 256
17
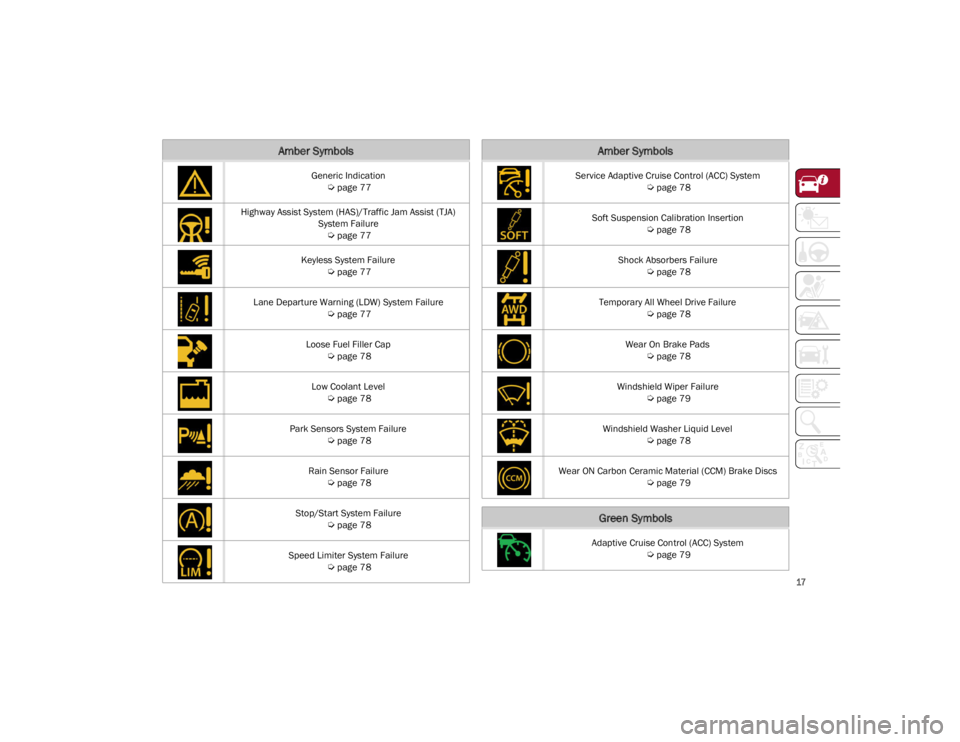
Generic Indication
Ú
page 77
Highway Assist System (HAS)/Traffic Jam Assist (TJA) System Failure
Ú
page 77
Keyless System Failure
Ú
page 77
Lane Departure Warning (LDW) System Failure
Ú
page 77
Loose Fuel Filler Cap
Ú
page 78
Low Coolant Level
Ú
page 78
Park Sensors System Failure
Ú
page 78
Rain Sensor Failure
Ú
page 78
Stop/Start System Failure
Ú
page 78
Speed Limiter System Failure
Ú
page 78
Amber Symbols
Service Adaptive Cruise Control (ACC) System
Ú
page 78
Soft Suspension Calibration Insertion
Ú
page 78
Shock Absorbers Failure
Ú
page 78
Temporary All Wheel Drive Failure
Ú
page 78
Wear On Brake Pads
Ú
page 78
Windshield Wiper Failure
Ú
page 79
Windshield Washer Liquid Level
Ú
page 78
Wear ON Carbon Ceramic Material (CCM) Brake Discs
Ú
page 79
Green Symbols
Adaptive Cruise Control (ACC) System
Ú
page 79
Amber Symbols
22_GU_OM_EN_USC_t.book Page 17
Page 31 of 256
29
NOTE:
Always use this device when carrying children.
After engaging the child lock on both rear doors,
check for effective engagement by trying to open
a door with the internal handle. Once the
Child-Protection Door Lock system is engaged, it
is impossible to open the doors from inside the
vehicle. Before getting out of the vehicle, be sure
to check that there is no one left inside.
STEERING WHEEL
MANUAL TILT/TELESCOPING STEERING
C
OLUMN
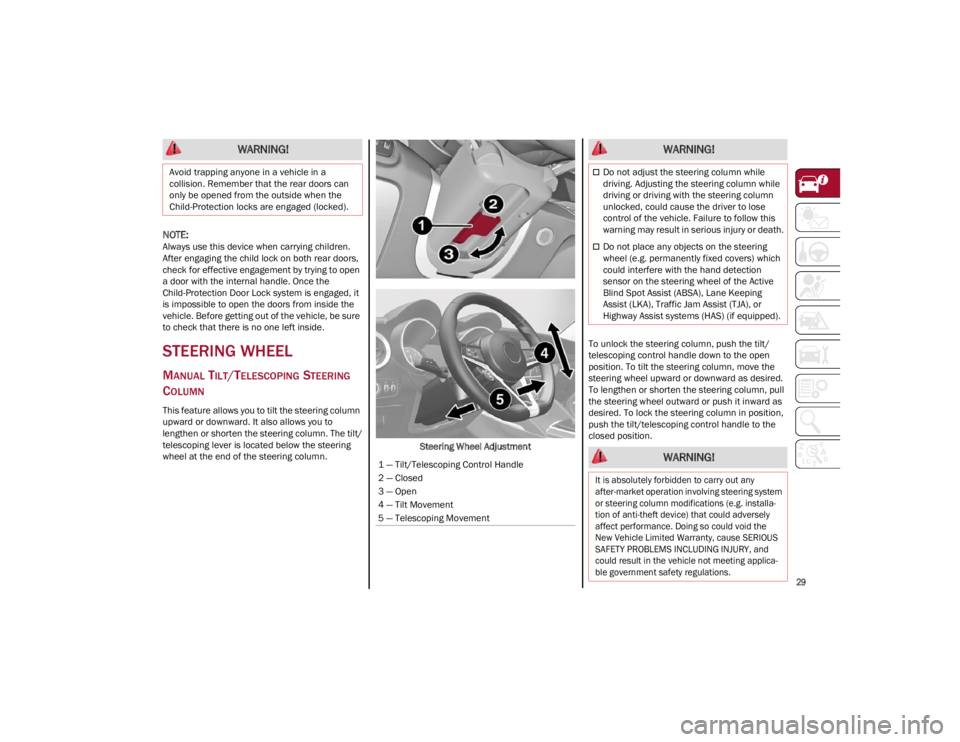
This feature allows you to tilt the steering column
upward or downward. It also allows you to
lengthen or shorten the steering column. The tilt/
telescoping lever is located below the steering
wheel at the end of the steering column. Steering Wheel AdjustmentTo unlock the steering column, push the tilt/
telescoping control handle down to the open
position. To tilt the steering column, move the
steering wheel upward or downward as desired.
To lengthen or shorten the steering column, pull
the steering wheel outward or push it inward as
desired. To lock the steering column in position,
push the tilt/telescoping control handle to the
closed position.
WARNING!
Avoid trapping anyone in a vehicle in a
collision. Remember that the rear doors can
only be opened from the outside when the
Child-Protection locks are engaged (locked).
1 — Tilt/Telescoping Control Handle
2 — Closed
3 — Open
4 — Tilt Movement
5 — Telescoping Movement
WARNING!
Do not adjust the steering column while
driving. Adjusting the steering column while
driving or driving with the steering column
unlocked, could cause the driver to lose
control of the vehicle. Failure to follow this
warning may result in serious injury or death.
Do not place any objects on the steering
wheel (e.g. permanently fixed covers) which
could interfere with the hand detection
sensor on the steering wheel of the Active
Blind Spot Assist (ABSA), Lane Keeping
Assist (LKA), Traffic Jam Assist (TJA), or
Highway Assist systems (HAS) (if equipped).
WARNING!
It is absolutely forbidden to carry out any
after-market operation involving steering system
or steering column modifications (e.g. installa -
tion of anti-theft device) that could adversely
affect performance. Doing so could void the
New Vehicle Limited Warranty, cause SERIOUS
SAFETY PROBLEMS INCLUDING INJURY, and
could result in the vehicle not meeting applica -
ble government safety regulations.
22_GU_OM_EN_USC_t.book Page 29
Page 71 of 256
69
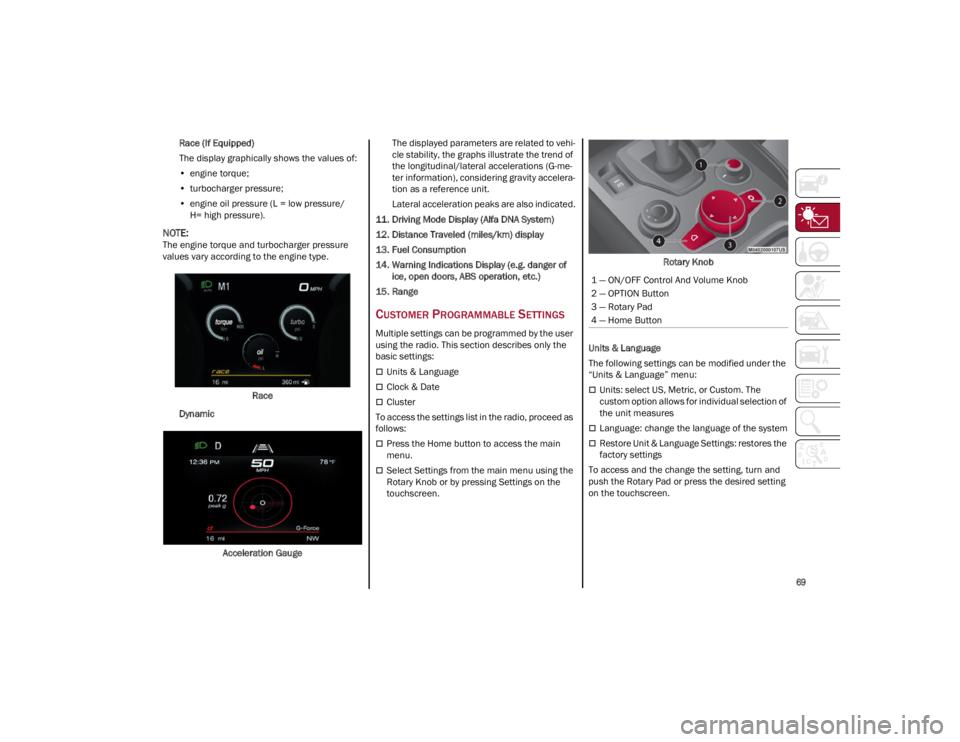
Race (If Equipped)
The display graphically shows the values of:
• engine torque;
• turbocharger pressure;
• engine oil pressure (L = low pressure/
H= high pressure).
NOTE:
The engine torque and turbocharger pressure
values vary according to the engine type.
Race
Dynamic
Acceleration Gauge The displayed parameters are related to vehi
-
cle stability, the graphs illustrate the trend of
the longitudinal/lateral accelerations (G-me -
ter information), considering gravity accelera -
tion as a reference unit.
Lateral acceleration peaks are also indicated.
11. Driving Mode Display (Alfa DNA System)
12. Distance Traveled (miles/km) display
13. Fuel Consumption
14. Warning Indications Display (e.g. danger of ice, open doors, ABS operation, etc.)
15. Range
CUSTOMER PROGRAMMABLE SETTINGS
Multiple settings can be programmed by the user
using the radio. This section describes only the
basic settings:
Units & Language
Clock & Date
Cluster
To access the settings list in the radio, proceed as
follows:
Press the Home button to access the main
menu.
Select Settings from the main menu using the
Rotary Knob or by pressing Settings on the
touchscreen. Rotary Knob
Units & Language
The following settings can be modified under the
“Units & Language” menu:
Units: select US, Metric, or Custom. The
custom option allows for individual selection of
the unit measures
Language: change the language of the system
Restore Unit & Language Settings: restores the
factory settings
To access and the change the setting, turn and
push the Rotary Pad or press the desired setting
on the touchscreen.
1 — ON/OFF Control And Volume Knob
2 — OPTION Button
3 — Rotary Pad
4 — Home Button
22_GU_OM_EN_USC_t.book Page 69
Page 73 of 256
71
(Continued)
If the light remains on when the parking brake has
been disengaged, and the fluid level is at the full
mark on the master cylinder reservoir, it indicates
a possible brake hydraulic system malfunction or
that a problem with the Brake Booster has been
detected by the Anti-Lock Brake System (ABS) /
Electronic Stability Control (ESC) system. In this
case, the light will remain on until the condition
has been corrected. If the problem is related to the
brake booster, the ABS pump will run when
applying the brake, and a brake pedal pulsation
may be felt during each stop.
The dual brake system provides a reserve braking
capacity in the event of a failure to a portion of the
hydraulic system. A leak in either half of the dual
brake system is indicated by the Brake Warning
Light, which will turn on when the brake fluid level
in the master cylinder has dropped below a
specified level.
The light will remain on until the cause is corrected.
NOTE:
The light may flash momentarily during sharp
cornering maneuvers, which change fluid level
conditions. The vehicle should have service
performed, and the brake fluid level checked.
If brake failure is indicated, immediate repair is
necessary.
Vehicles equipped with the Anti-Lock Brake
System (ABS) are also equipped with Electronic
Brake Force Distribution (EBD). In the event of an
EBD failure, the Brake Warning Light will turn on
along with the ABS Light. Immediate repair to the
ABS system is required.
Operation of the Brake Warning Light can be
checked by turning the ignition switch from the
OFF position to the ON/RUN position. The light
should illuminate for approximately two seconds.
The light should then turn off unless the parking
brake is applied or a brake fault is detected. If the
light does not illuminate, have the light inspected
by an authorized dealer.
The light also will turn on when the parking brake
is applied with the ignition switch in the ON/RUN
position.
NOTE:
This light shows only that the parking brake is
applied. It does not show the degree of brake
application.
Electronic Brake Force Distribution (EBD)
Failure
The simultaneous turning on of the
BRAKE (red) and (amber) warning
lights with the engine on indicates either
a failure of the EBD system or that the
system is not available. In this case, the rear
wheels may suddenly lock and the vehicle may
swerve when braking abruptly.
Drive very carefully to the nearest authorized
dealer to have the system inspected immediately.
Oil Temperature Warning Light
This telltale indicates engine oil
temperature is high.
Stop the vehicle and shut off the engine as soon
as possible. If the problem persists, contact an
authorized dealer.
Seat Belt Reminder Warning Light
When the ignition is first placed in the
ON/RUN position, if the driver’s seat
belt is unbuckled, a chime will sound
and the light will turn on. When driving,
if the driver or front passenger seat belt remains
unbuckled, the Seat Belt Reminder Light will flash
or remain on continuously and a chime will sound
Ú
page 151. WARNING!
The fault of the warning light is signaled by the
turning on of the icon on the instrument panel.
In this case, the warning light may not indicate
any faults with the restraint systems. Before
proceeding, contact an authorized dealer to
have the system checked immediately.
If the warning light does not turn on when the
ignition device is moved to ON or if it stays on
when driving (together with the message on the
display), there might be a fault in the restraint
systems; in this case, the air bags or preten -
sioners may not deploy in the event of an
accident or, in a lower number of cases, they
could deploy erroneously. Before proceeding,
contact an authorized dealer to have the
system checked immediately.
WARNING!
22_GU_OM_EN_USC_t.book Page 71
Page 74 of 256
GETTING TO KNOW YOUR INSTRUMENT PANEL
72
AMBER WARNING LIGHTS
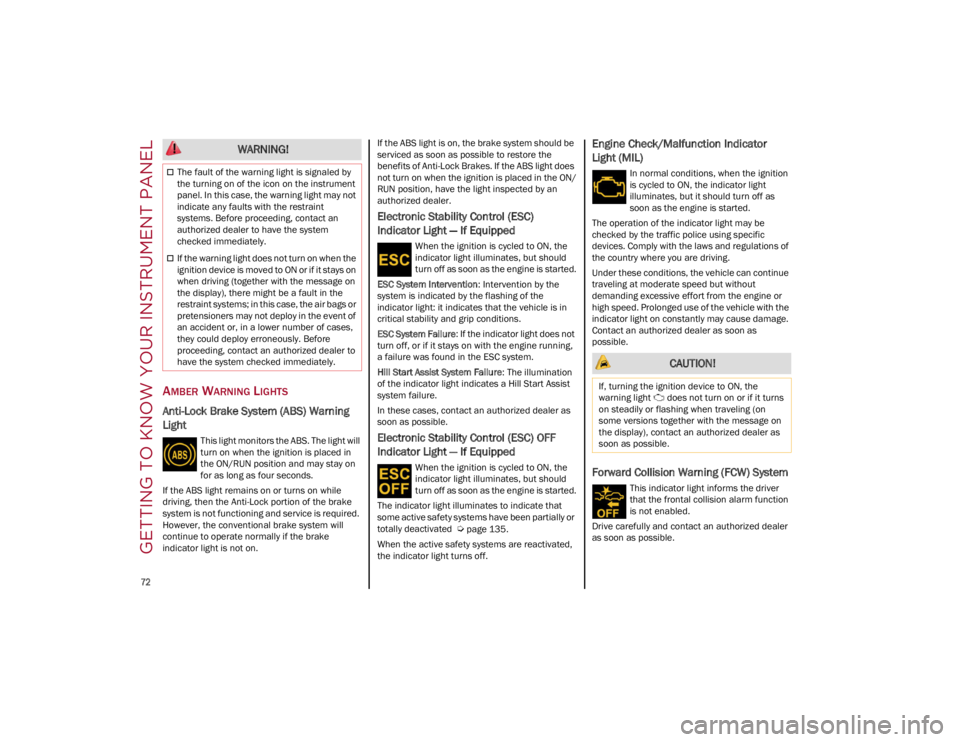
Anti-Lock Brake System (ABS) Warning
Light
This light monitors the ABS. The light will
turn on when the ignition is placed in
the ON/RUN position and may stay on
for as long as four seconds.
If the ABS light remains on or turns on while
driving, then the Anti-Lock portion of the brake
system is not functioning and service is required.
However, the conventional brake system will
continue to operate normally if the brake
indicator light is not on. If the ABS light is on, the brake system should be
serviced as soon as possible to restore the
benefits of Anti-Lock Brakes. If the ABS light does
not turn on when the ignition is placed in the ON/
RUN position, have the light inspected by an
authorized dealer.
Electronic Stability Control (ESC)
Indicator Light — If Equipped
When the ignition is cycled to ON, the
indicator light illuminates, but should
turn off as soon as the engine is started.
ESC System Intervention : Intervention by the
system is indicated by the flashing of the
indicator light: it indicates that the vehicle is in
critical stability and grip conditions.
ESC System Failure: If the indicator light does not
turn off, or if it stays on with the engine running,
a failure was found in the ESC system.
Hill Start Assist System Failure : The illumination
of the indicator light indicates a Hill Start Assist
system failure.
In these cases, contact an authorized dealer as
soon as possible.
Electronic Stability Control (ESC) OFF
Indicator Light — If Equipped
When the ignition is cycled to ON, the
indicator light illuminates, but should
turn off as soon as the engine is started.
The indicator light illuminates to indicate that
some active safety systems have been partially or
totally deactivated
Ú
page 135.
When the active safety systems are reactivated,
the indicator light turns off.
Engine Check/Malfunction Indicator
Light (MIL)
In normal conditions, when the ignition
is cycled to ON, the indicator light
illuminates, but it should turn off as
soon as the engine is started.
The operation of the indicator light may be
checked by the traffic police using specific
devices. Comply with the laws and regulations of
the country where you are driving.
Under these conditions, the vehicle can continue
traveling at moderate speed but without
demanding excessive effort from the engine or
high speed. Prolonged use of the vehicle with the
indicator light on constantly may cause damage.
Contact an authorized dealer as soon as
possible.
Forward Collision Warning (FCW) System
This indicator light informs the driver
that the frontal collision alarm function
is not enabled.
Drive carefully and contact an authorized dealer
as soon as possible.
WARNING!
The fault of the warning light is signaled by
the turning on of the icon on the instrument
panel. In this case, the warning light may not
indicate any faults with the restraint
systems. Before proceeding, contact an
authorized dealer to have the system
checked immediately.
If the warning light does not turn on when the
ignition device is moved to ON or if it stays on
when driving (together with the message on
the display), there might be a fault in the
restraint systems; in this case, the air bags or
pretensioners may not deploy in the event of
an accident or, in a lower number of cases,
they could deploy erroneously. Before
proceeding, contact an authorized dealer to
have the system checked immediately.
CAUTION!
If, turning the ignition device to ON, the
warning light does not turn on or if it turns
on steadily or flashing when traveling (on
some versions together with the message on
the display), contact an authorized dealer as
soon as possible.
22_GU_OM_EN_USC_t.book Page 72
Page 78 of 256
GETTING TO KNOW YOUR INSTRUMENT PANEL
76
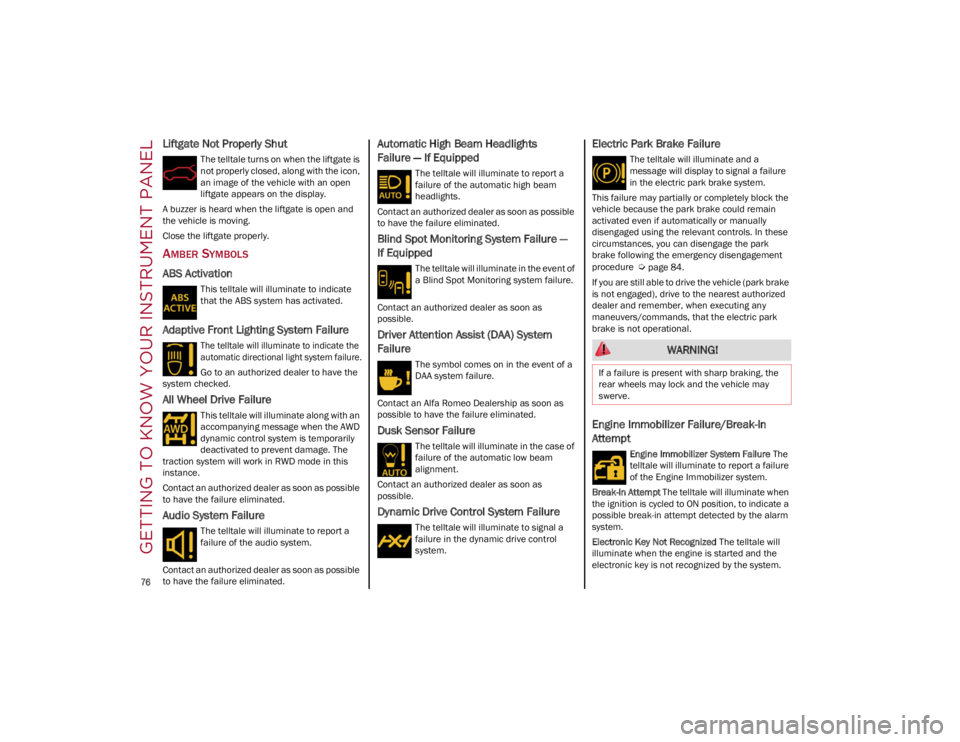
Liftgate Not Properly Shut
The telltale turns on when the liftgate is
not properly closed, along with the icon,
an image of the vehicle with an open
liftgate appears on the display.
A buzzer is heard when the liftgate is open and
the vehicle is moving.
Close the liftgate properly.
AMBER SYMBOLS
ABS Activation
This telltale will illuminate to indicate
that the ABS system has activated.
Adaptive Front Lighting System Failure
The telltale will illuminate to indicate the
automatic directional light system failure.
Go to an authorized dealer to have the
system checked.
All Wheel Drive Failure
This telltale will illuminate along with an
accompanying message when the AWD
dynamic control system is temporarily
deactivated to prevent damage. The
traction system will work in RWD mode in this
instance.
Contact an authorized dealer as soon as possible
to have the failure eliminated.
Audio System Failure
The telltale will illuminate to report a
failure of the audio system.
Contact an authorized dealer as soon as possible
to have the failure eliminated.
Automatic High Beam Headlights
Failure — If Equipped
The telltale will illuminate to report a
failure of the automatic high beam
headlights.
Contact an authorized dealer as soon as possible
to have the failure eliminated.
Blind Spot Monitoring System Failure —
If Equipped
The telltale will illuminate in the event of
a Blind Spot Monitoring system failure.
Contact an authorized dealer as soon as
possible.
Driver Attention Assist (DAA) System
Failure
The symbol comes on in the event of a
DAA system failure.
Contact an Alfa Romeo Dealership as soon as
possible to have the failure eliminated.
Dusk Sensor Failure
The telltale will illuminate in the case of
failure of the automatic low beam
alignment.
Contact an authorized dealer as soon as
possible.
Dynamic Drive Control System Failure
The telltale will illuminate to signal a
failure in the dynamic drive control
system.
Electric Park Brake Failure
The telltale will illuminate and a
message will display to signal a failure
in the electric park brake system.
This failure may partially or completely block the
vehicle because the park brake could remain
activated even if automatically or manually
disengaged using the relevant controls. In these
circumstances, you can disengage the park
brake following the emergency disengagement
procedure
Ú
page 84.
If you are still able to drive the vehicle (park brake
is not engaged), drive to the nearest authorized
dealer and remember, when executing any
maneuvers/commands, that the electric park
brake is not operational.
Engine Immobilizer Failure/Break-In
Attempt
Engine Immobilizer System Failure The
telltale will illuminate to report a failure
of the Engine Immobilizer system.
Break-In Attempt The telltale will illuminate when
the ignition is cycled to ON position, to indicate a
possible break-in attempt detected by the alarm
system.
Electronic Key Not Recognized The telltale will
illuminate when the engine is started and the
electronic key is not recognized by the system.
WARNING!
If a failure is present with sharp braking, the
rear wheels may lock and the vehicle may
swerve.
22_GU_OM_EN_USC_t.book Page 76