fold seats ALFA ROMEO STELVIO 2022 Owners Manual
[x] Cancel search | Manufacturer: ALFA ROMEO, Model Year: 2022, Model line: STELVIO, Model: ALFA ROMEO STELVIO 2022Pages: 256, PDF Size: 10.17 MB
Page 10 of 256
8
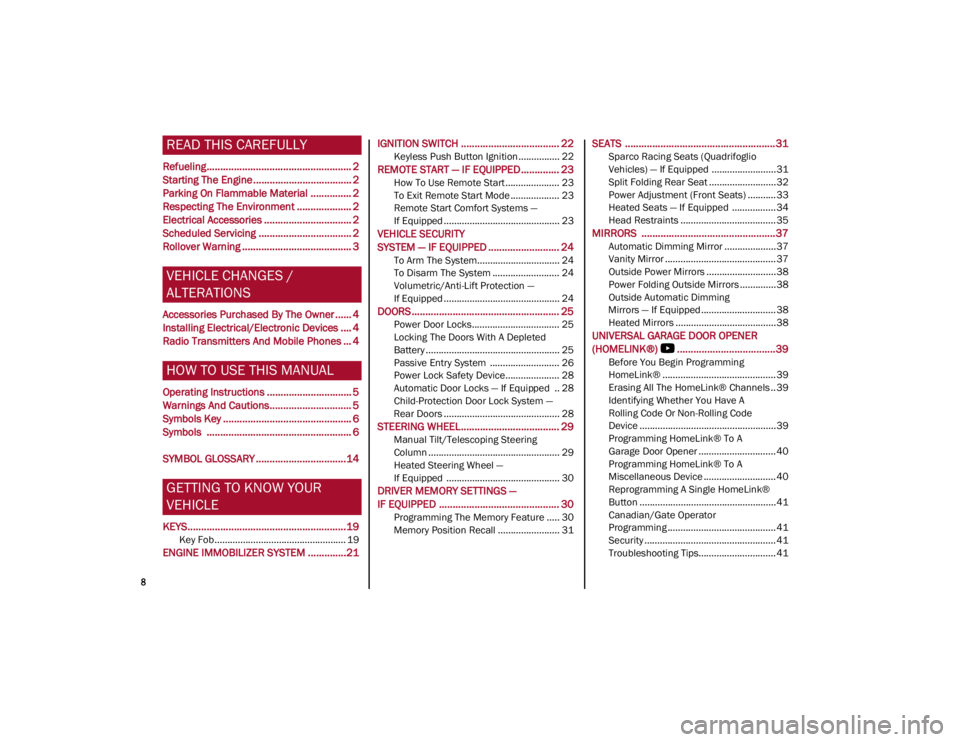
READ THIS CAREFULLY
Refueling..................................................... 2
Starting The Engine .................................... 2
Parking On Flammable Material ............... 2
Respecting The Environment .................... 2
Electrical Accessories ................................ 2
Scheduled Servicing .................................. 2
Rollover Warning ........................................ 3
VEHICLE CHANGES /
ALTERATIONS
Accessories Purchased By The Owner ...... 4
Installing Electrical/Electronic Devices .... 4
Radio Transmitters And Mobile Phones ... 4
HOW TO USE THIS MANUAL
Operating Instructions ............................... 5
Warnings And Cautions.............................. 5
Symbols Key ............................................... 6
Symbols ..................................................... 6
SYMBOL GLOSSARY .................................14
GETTING TO KNOW YOUR
VEHICLE
KEYS..........................................................19
Key Fob................................................... 19
ENGINE IMMOBILIZER SYSTEM ..............21 IGNITION SWITCH .................................... 22
Keyless Push Button Ignition ................ 22
REMOTE START — IF EQUIPPED .............. 23
How To Use Remote Start ..................... 23
To Exit Remote Start Mode ................... 23
Remote Start Comfort Systems —
If Equipped ............................................. 23
VEHICLE SECURITY
SYSTEM — IF EQUIPPED .......................... 24
To Arm The System................................ 24
To Disarm The System .......................... 24
Volumetric/Anti-Lift Protection —
If Equipped ............................................. 24
DOORS ...................................................... 25
Power Door Locks.................................. 25
Locking The Doors With A Depleted
Battery .................................................... 25 Passive Entry System ........................... 26
Power Lock Safety Device..................... 28
Automatic Door Locks — If Equipped .. 28
Child-Protection Door Lock System —
Rear Doors ............................................. 28
STEERING WHEEL.................................... 29
Manual Tilt/Telescoping Steering
Column ................................................... 29 Heated Steering Wheel —
If Equipped ............................................ 30
DRIVER MEMORY SETTINGS —
IF EQUIPPED ............................................ 30
Programming The Memory Feature ..... 30
Memory Position Recall ........................ 31
SEATS .......................................................31
Sparco Racing Seats (Quadrifoglio
Vehicles) — If Equipped .........................31 Split Folding Rear Seat ..........................32
Power Adjustment (Front Seats) ...........33
Heated Seats — If Equipped .................34
Head Restraints .....................................35
MIRRORS .................................................37
Automatic Dimming Mirror ....................37
Vanity Mirror ...........................................37
Outside Power Mirrors ...........................38
Power Folding Outside Mirrors ..............38
Outside Automatic Dimming
Mirrors — If Equipped............................. 38 Heated Mirrors .......................................38
UNIVERSAL GARAGE DOOR OPENER
(HOMELINK®)
S....................................39
Before You Begin Programming
HomeLink® ............................................39 Erasing All The HomeLink® Channels ..39
Identifying Whether You Have A
Rolling Code Or Non-Rolling Code
Device .....................................................39 Programming HomeLink® To A
Garage Door Opener ..............................40 Programming HomeLink® To A
Miscellaneous Device ............................ 40 Reprogramming A Single HomeLink®
Button .....................................................41 Canadian/Gate Operator
Programming .......................................... 41 Security ...................................................41
Troubleshooting Tips..............................41
22_GU_OM_EN_USC_t.book Page 8
Page 34 of 256
GETTING TO KNOW YOUR VEHICLE
32
SPLIT FOLDING REAR SEAT
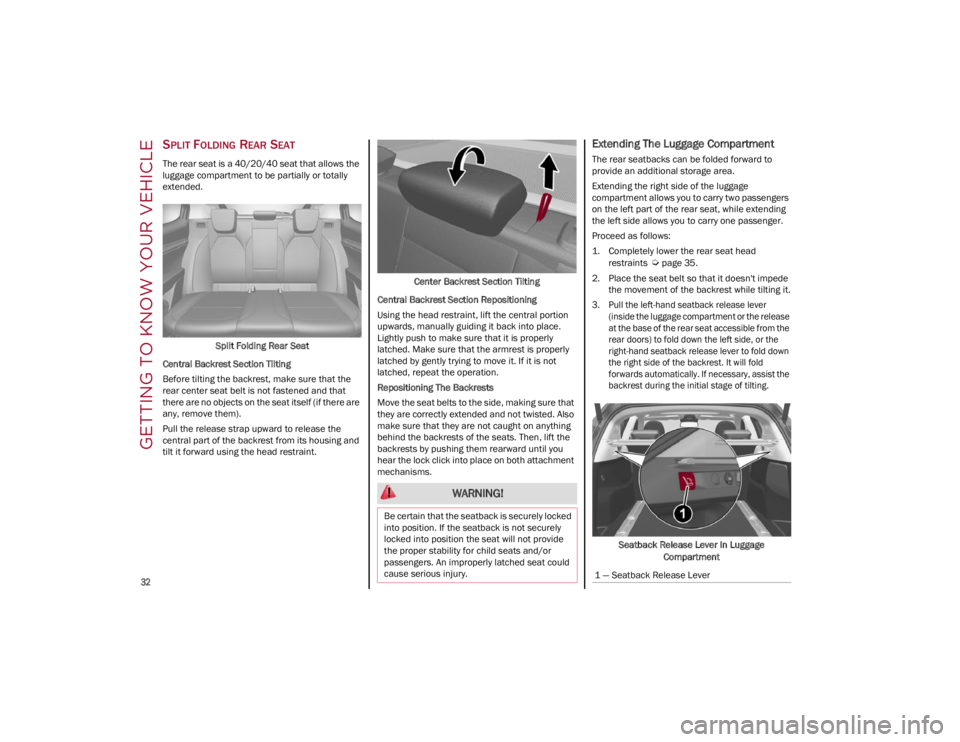
The rear seat is a 40/20/40 seat that allows the
luggage compartment to be partially or totally
extended.Split Folding Rear Seat
Central Backrest Section Tilting
Before tilting the backrest, make sure that the
rear center seat belt is not fastened and that
there are no objects on the seat itself (if there are
any, remove them).
Pull the release strap upward to release the
central part of the backrest from its housing and
tilt it forward using the head restraint. Center Backrest Section Tilting
Central Backrest Section Repositioning
Using the head restraint, lift the central portion
upwards, manually guiding it back into place.
Lightly push to make sure that it is properly
latched. Make sure that the armrest is properly
latched by gently trying to move it. If it is not
latched, repeat the operation.
Repositioning The Backrests
Move the seat belts to the side, making sure that
they are correctly extended and not twisted. Also
make sure that they are not caught on anything
behind the backrests of the seats. Then, lift the
backrests by pushing them rearward until you
hear the lock click into place on both attachment
mechanisms.
Extending The Luggage Compartment
The rear seatbacks can be folded forward to
provide an additional storage area.
Extending the right side of the luggage
compartment allows you to carry two passengers
on the left part of the rear seat, while extending
the left side allows you to carry one passenger.
Proceed as follows:
1. Completely lower the rear seat head restraints
Ú
page 35.
2. Place the seat belt so that it doesn't impede the movement of the backrest while tilting it.
3. Pull the left-hand seatback release lever (inside the luggage compartment or the release
at the base of the rear seat accessible from the
rear doors) to fold down the left side, or the
right-hand seatback release lever to fold down
the right side of the backrest. It will fold
forwards automatically. If necessary, assist the
backrest during the initial stage of tilting.
Seatback Release Lever In Luggage Compartment
WARNING!
Be certain that the seatback is securely locked
into position. If the seatback is not securely
locked into position the seat will not provide
the proper stability for child seats and/or
passengers. An improperly latched seat could
cause serious injury.
1 — Seatback Release Lever
22_GU_OM_EN_USC_t.book Page 32
Page 35 of 256
33
NOTE:
Pull both seatback release levers to fold down
both backrests. Tilting the rear seat completely
forward allows for maximum loading volume.
You may need to move the front seats forward
in order for the rear seats to fold forward
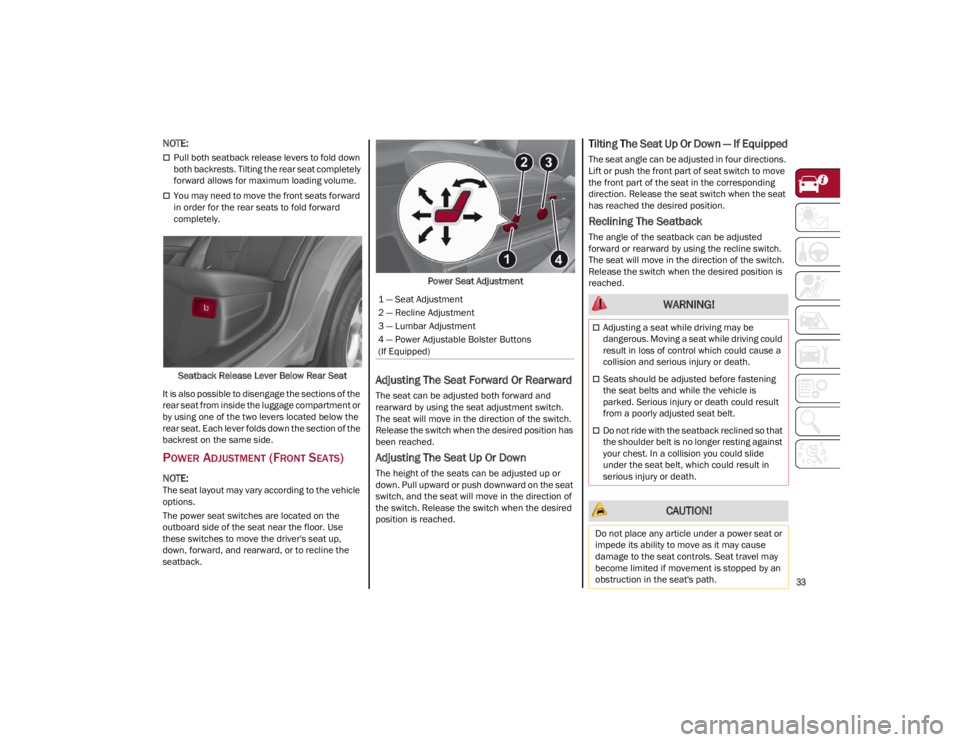
completely.Seatback Release Lever Below Rear Seat
It is also possible to disengage the sections of the
rear seat from inside the luggage compartment or
by using one of the two levers located below the
rear seat. Each lever folds down the section of the
backrest on the same side.
POWER ADJUSTMENT (FRONT SEATS)
NOTE:
The seat layout may vary according to the vehicle
options.
The power seat switches are located on the
outboard side of the seat near the floor. Use
these switches to move the driver's seat up,
down, forward, and rearward, or to recline the
seatback. Power Seat Adjustment
Adjusting The Seat Forward Or Rearward
The seat can be adjusted both forward and
rearward by using the seat adjustment switch.
The seat will move in the direction of the switch.
Release the switch when the desired position has
been reached.
Adjusting The Seat Up Or Down
The height of the seats can be adjusted up or
down. Pull upward or push downward on the seat
switch, and the seat will move in the direction of
the switch. Release the switch when the desired
position is reached.
Tilting The Seat Up Or Down — If Equipped
The seat angle can be adjusted in four directions.
Lift or push the front part of seat switch to move
the front part of the seat in the corresponding
direction. Release the seat switch when the seat
has reached the desired position.
Reclining The Seatback
The angle of the seatback can be adjusted
forward or rearward by using the recline switch.
The seat will move in the direction of the switch.
Release the switch when the desired position is
reached.
1 — Seat Adjustment
2 — Recline Adjustment
3 — Lumbar Adjustment
4 — Power Adjustable Bolster Buttons
(If Equipped) WARNING!
Adjusting a seat while driving may be
dangerous. Moving a seat while driving could
result in loss of control which could cause a
collision and serious injury or death.
Seats should be adjusted before fastening
the seat belts and while the vehicle is
parked. Serious injury or death could result
from a poorly adjusted seat belt.
Do not ride with the seatback reclined so that
the shoulder belt is no longer resting against
your chest. In a collision you could slide
under the seat belt, which could result in
serious injury or death.
CAUTION!
Do not place any article under a power seat or
impede its ability to move as it may cause
damage to the seat controls. Seat travel may
become limited if movement is stopped by an
obstruction in the seat's path.
22_GU_OM_EN_USC_t.book Page 33
Page 56 of 256
GETTING TO KNOW YOUR VEHICLE
54
INTERIOR STORAGE AND
EQUIPMENT
GLOVE COMPARTMENT
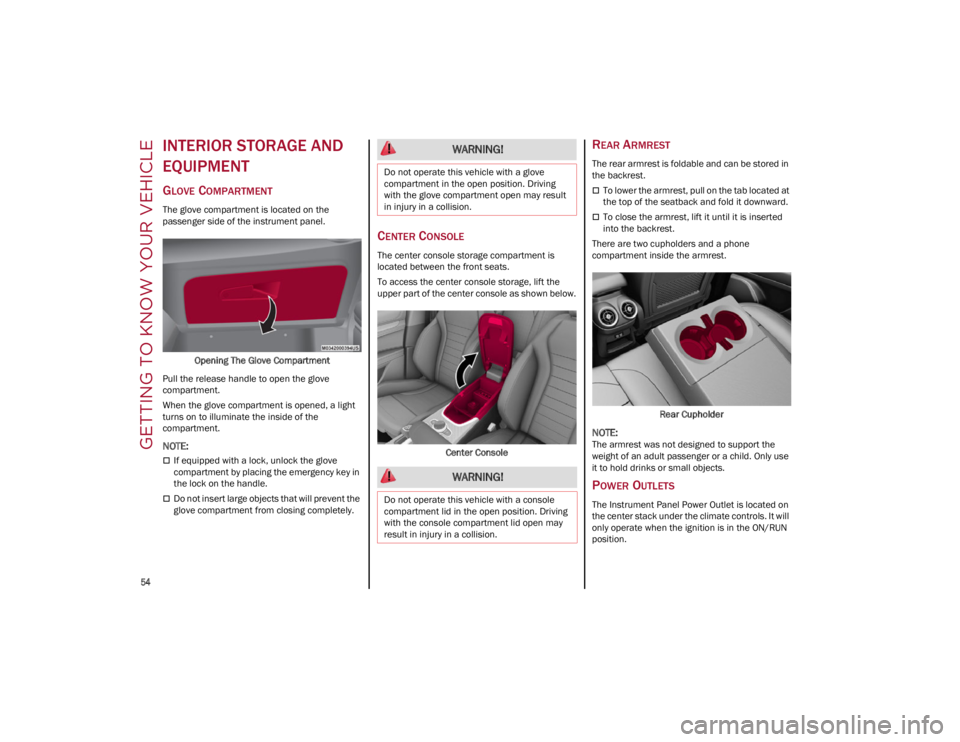
The glove compartment is located on the
passenger side of the instrument panel.Opening The Glove Compartment
Pull the release handle to open the glove
compartment.
When the glove compartment is opened, a light
turns on to illuminate the inside of the
compartment.
NOTE:
If equipped with a lock, unlock the glove
compartment by placing the emergency key in
the lock on the handle.
Do not insert large objects that will prevent the
glove compartment from closing completely.
CENTER CONSOLE
The center console storage compartment is
located between the front seats.
To access the center console storage, lift the
upper part of the center console as shown below.
Center Console
REAR ARMREST
The rear armrest is foldable and can be stored in
the backrest.
To lower the armrest, pull on the tab located at
the top of the seatback and fold it downward.
To close the armrest, lift it until it is inserted
into the backrest.
There are two cupholders and a phone
compartment inside the armrest.
Rear Cupholder
NOTE:
The armrest was not designed to support the
weight of an adult passenger or a child. Only use
it to hold drinks or small objects.
POWER OUTLETS
The Instrument Panel Power Outlet is located on
the center stack under the climate controls. It will
only operate when the ignition is in the ON/RUN
position.
WARNING!
Do not operate this vehicle with a glove
compartment in the open position. Driving
with the glove compartment open may result
in injury in a collision.
WARNING!
Do not operate this vehicle with a console
compartment lid in the open position. Driving
with the console compartment lid open may
result in injury in a collision.
22_GU_OM_EN_USC_t.book Page 54
Page 156 of 256
SAFETY
154
Lap/Shoulder Belt Operating Instructions
1. Enter the vehicle and close the door. Sit backand adjust the seat.
2. The seat belt latch plate is above the back of the front seat, and next to your arm in the
rear seat (for vehicles equipped with a rear
seat). Grab the latch plate and pull out the
seat belt. Slide the latch plate up the webbing
as far as necessary to allow the seat belt to
go around your lap.
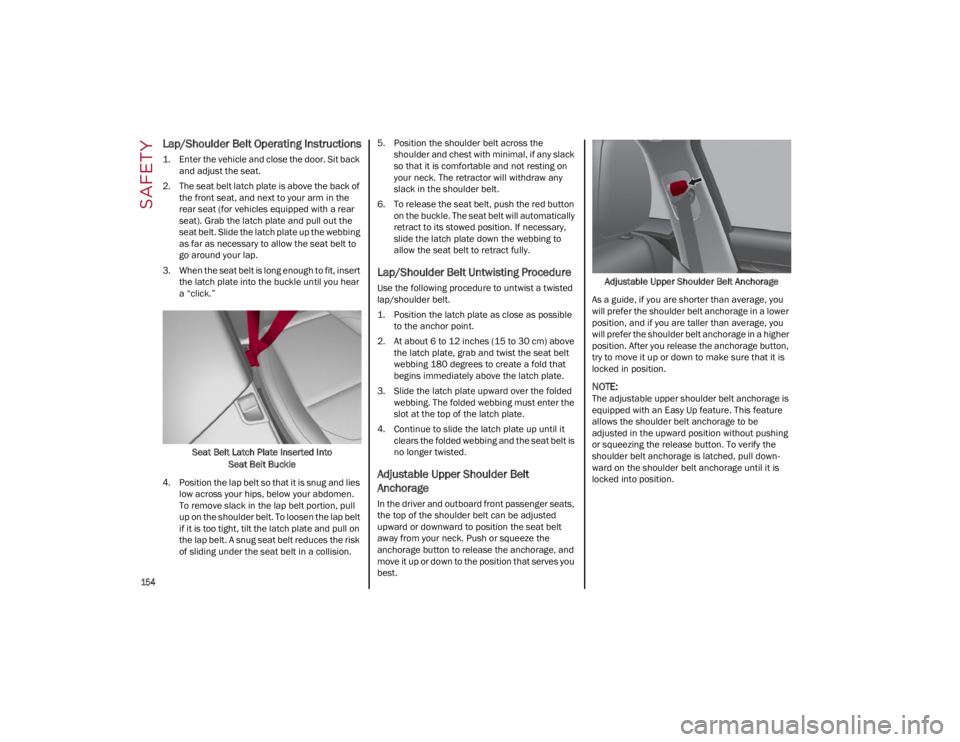
3. When the seat belt is long enough to fit, insert the latch plate into the buckle until you hear
a “click.”
Seat Belt Latch Plate Inserted Into Seat Belt Buckle
4. Position the lap belt so that it is snug and lies low across your hips, below your abdomen.
To remove slack in the lap belt portion, pull
up on the shoulder belt. To loosen the lap belt
if it is too tight, tilt the latch plate and pull on
the lap belt. A snug seat belt reduces the risk
of sliding under the seat belt in a collision. 5. Position the shoulder belt across the
shoulder and chest with minimal, if any slack
so that it is comfortable and not resting on
your neck. The retractor will withdraw any
slack in the shoulder belt.
6. To release the seat belt, push the red button on the buckle. The seat belt will automatically
retract to its stowed position. If necessary,
slide the latch plate down the webbing to
allow the seat belt to retract fully.
Lap/Shoulder Belt Untwisting Procedure
Use the following procedure to untwist a twisted
lap/shoulder belt.
1. Position the latch plate as close as possible to the anchor point.
2. At about 6 to 12 inches (15 to 30 cm) above the latch plate, grab and twist the seat belt
webbing 180 degrees to create a fold that
begins immediately above the latch plate.
3. Slide the latch plate upward over the folded webbing. The folded webbing must enter the
slot at the top of the latch plate.
4. Continue to slide the latch plate up until it clears the folded webbing and the seat belt is
no longer twisted.
Adjustable Upper Shoulder Belt
Anchorage
In the driver and outboard front passenger seats,
the top of the shoulder belt can be adjusted
upward or downward to position the seat belt
away from your neck. Push or squeeze the
anchorage button to release the anchorage, and
move it up or down to the position that serves you
best. Adjustable Upper Shoulder Belt Anchorage
As a guide, if you are shorter than average, you
will prefer the shoulder belt anchorage in a lower
position, and if you are taller than average, you
will prefer the shoulder belt anchorage in a higher
position. After you release the anchorage button,
try to move it up or down to make sure that it is
locked in position.
NOTE:
The adjustable upper shoulder belt anchorage is
equipped with an Easy Up feature. This feature
allows the shoulder belt anchorage to be
adjusted in the upward position without pushing
or squeezing the release button. To verify the
shoulder belt anchorage is latched, pull down -
ward on the shoulder belt anchorage until it is
locked into position.
22_GU_OM_EN_USC_t.book Page 154
Page 161 of 256
159
Seat belts are necessary for your protection in all
collisions, and also are needed to help keep you
in position, away from an inflating air bag.
When the Occupant Restraint Controller (ORC)
detects a collision requiring the front air bags, it
signals the inflator units. A large quantity of
non-toxic gas is generated to inflate the front air
bags.
The steering wheel hub trim cover and the upper
passenger side of the instrument panel separate
and fold out of the way as the air bags inflate to
their full size. The front air bags fully inflate in less
time than it takes to blink your eyes. The front air
bags then quickly deflate while helping to restrain
the driver and front passenger.
Knee Impact Bolsters
The Knee Impact Bolsters help protect the knees
of the driver and front passenger, and position
the front occupants for improved interaction with
the front air bags.
Supplemental Driver And Front
Passenger Knee Air Bags
This vehicle is equipped with a Supplemental
Driver Knee Air Bag mounted in the instrument
panel below the steering column and a Supple-
mental Passenger Knee Air Bag mounted in the
instrument panel below the glove compartment. The Supplemental Knee Air Bags provide
enhanced protection during a frontal impact by
working together with the seat belts, preten
-
sioners, and front air bags.
Supplemental Side Air Bags
Supplemental Seat-Mounted Side Air Bags
(SABs)
This vehicle is equipped with Supplemental
Seat-Mounted Side Air Bags (SABs).
Supplemental Seat-Mounted Side Air Bags (SABs)
are located in the outboard side of the front
seats. The SABs are marked with “SRS AIRBAG”
or “AIRBAG” on a label or on the seat trim on the
outboard side of the seats.
The SABs may help to reduce the risk of occupant
injury during certain side impacts, in addition to
the injury reduction potential provided by the seat
belts and body structure.
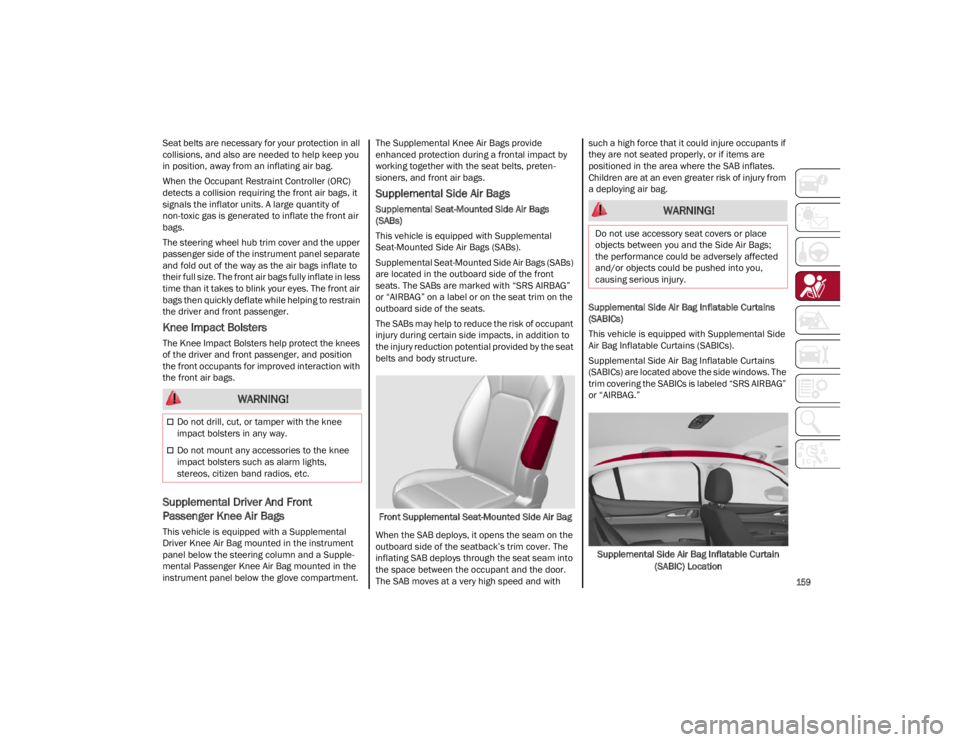
Front Supplemental Seat-Mounted Side Air Bag
When the SAB deploys, it opens the seam on the
outboard side of the seatback’s trim cover. The
inflating SAB deploys through the seat seam into
the space between the occupant and the door.
The SAB moves at a very high speed and with such a high force that it could injure occupants if
they are not seated properly, or if items are
positioned in the area where the SAB inflates.
Children are at an even greater risk of injury from
a deploying air bag.
Supplemental Side Air Bag Inflatable Curtains
(SABICs)
This vehicle is equipped with Supplemental Side
Air Bag Inflatable Curtains (SABICs).
Supplemental Side Air Bag Inflatable Curtains
(SABICs) are located above the side windows. The
trim covering the SABICs is labeled “SRS AIRBAG”
or “AIRBAG.”
Supplemental Side Air Bag Inflatable Curtain (SABIC) Location
WARNING!
Do not drill, cut, or tamper with the knee
impact bolsters in any way.
Do not mount any accessories to the knee
impact bolsters such as alarm lights,
stereos, citizen band radios, etc.
WARNING!
Do not use accessory seat covers or place
objects between you and the Side Air Bags;
the performance could be adversely affected
and/or objects could be pushed into you,
causing serious injury.
22_GU_OM_EN_USC_t.book Page 159
Page 175 of 256
173
(Continued)
SAFETY TIPS
TRANSPORTING PASSENGERS
NEVER TRANSPORT PASSENGERS IN THE CARGO
AREA.
TRANSPORTING PETS
Air Bags deploying in the front seat could harm
your pet. An unrestrained pet will be thrown about
and possibly injured, or injure a passenger during
panic braking or in a collision.
Pets should be restrained in the rear seat (if
equipped) in pet harnesses or pet carriers that
are secured by seat belts.
CONNECTED VEHICLES
Privacy of any wireless and wired communi-
cations cannot be assured. Third parties may
unlawfully intercept information and private
communications without your consent. For further information, refer to “Data Collection &
Privacy” in your Uconnect Owner’s Manual
Supplement or “Onboard Diagnostic System
(OBD II) Cybersecurity”
Ú
page 79.
SAFETY CHECKS YOU SHOULD MAKE
I
NSIDE THE VEHICLE
Seat Belts
Inspect the seat belt system periodically,
checking for cuts, frays, and loose parts.
Damaged parts must be replaced immediately.
Do not disassemble or modify the system.
If your vehicle is involved in a collision, or if you
have questions regarding the seat belt or
retractor conditions, take your vehicle to an
authorized FCA dealer or authorized FCA Certified
Collision Care Program facility for inspection.
Air Bag Warning Light
The Air Bag Warning Light will turn on for
four to eight seconds as a bulb check
when the ignition switch is first turned to
ON/RUN. If the light is either not on
during starting, stays on, or turns on while driving,
have the system inspected at an authorized
dealer as soon as possible. After the bulb check,
this light will illuminate with a single chime when a fault with the Air Bag System has been
detected. It will stay on until the fault is removed.
If the light comes on intermittently or remains on
while driving, have an authorized dealer service
the vehicle immediately
Ú
page 151.
Defroster
Check operation by selecting the defrost mode
and place the blower control on high speed. You
should be able to feel the air directed against the
windshield. See an authorized dealer for service if
your defroster is inoperable.
Floor Mat Safety Information
Always use floor mats designed to fit your vehicle.
Only use a floor mat that does not interfere with
the operation of the accelerator, brake or clutch
pedals. Only use a floor mat that is securely
attached using the floor mat fasteners so it
cannot slip out of position and interfere with the
accelerator, brake or clutch pedals or impair safe
operation of your vehicle in other ways.
WARNING!
Do not leave children or animals inside
parked vehicles in hot weather. Interior heat
build-up may cause serious injury or death.
It is extremely dangerous to ride in a cargo
area, inside or outside of a vehicle. In a
collision, people riding in these areas are
more likely to be seriously injured or killed.
Do not allow people to ride in any area of your
vehicle that is not equipped with seats and
seat belts.
Be sure everyone in your vehicle is in a seat
and using a seat belt properly.
WARNING!
It is not possible to know or to predict all of the
possible outcomes if your vehicle’s systems
are breached. It may be possible that vehicle
systems, including safety related systems,
could be impaired or a loss of vehicle control
could occur that may result in an accident
involving serious injury or death.
WARNING!
An improperly attached, damaged, folded, or
stacked floor mat, or damaged floor mat
fasteners may cause your floor mat to
interfere with the accelerator, brake, or clutch
pedals and cause a loss of vehicle control. To
prevent SERIOUS INJURY or DEATH:
ALWAYS securely attach your floor
mat using the floor mat fasteners. DO
NOT install your floor mat upside down
or turn your floor mat over. Lightly pull
to confirm mat is secured using the floor mat
fasteners on a regular basis.
22_GU_OM_EN_USC_t.book Page 173
Page 240 of 256
TECHNICAL SPECIFICATIONS
238
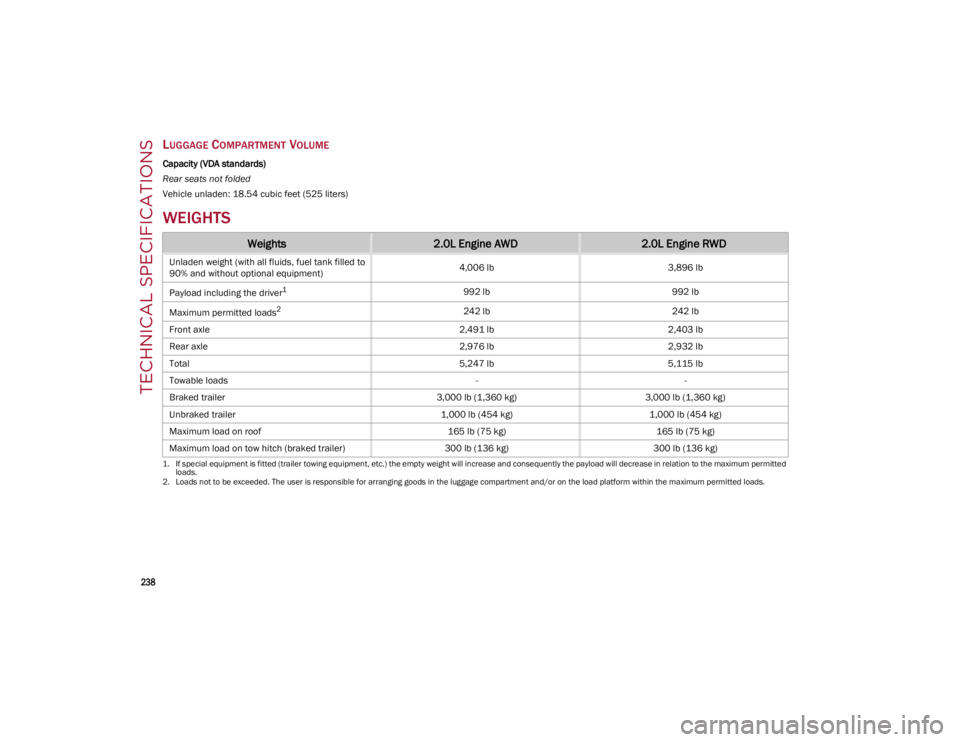
LUGGAGE COMPARTMENT VOLUME
Capacity (VDA standards)
Rear seats not folded
Vehicle unladen: 18.54 cubic feet (525 liters)
WEIGHTS
Weights2.0L Engine AWD2.0L Engine RWD
Unladen weight (with all fluids, fuel tank filled to
90% and without optional equipment) 4,006 lb
3,896 lb
Payload including the driver
1
1. If special equipment is fitted (trailer towing equipment, etc.) the empty weight will increase and consequently the payload will decrease in relation to the maximum permitted loads.
992 lb 992 lb
Maximum permitted loads
2
2. Loads not to be exceeded. The user is responsible for arranging goods in the luggage compartment and/or on the load platform within the maximum permitted loads.
242 lb 242 lb
Front axle 2,491 lb2,403 lb
Rear axle 2,976 lb2,932 lb
Total 5,247 lb5,115 lb
Towable loads --
Braked trailer 3,000 lb (1,360 kg)3,000 lb (1,360 kg)
Unbraked trailer 1,000 lb (454 kg)1,000 lb (454 kg)
Maximum load on roof 165 lb (75 kg)165 lb (75 kg)
Maximum load on tow hitch (braked trailer) 300 lb (136 kg)300 lb (136 kg)
22_GU_OM_EN_USC_t.book Page 238