display ALFA ROMEO STELVIO 2023 Repair Manual
[x] Cancel search | Manufacturer: ALFA ROMEO, Model Year: 2023, Model line: STELVIO, Model: ALFA ROMEO STELVIO 2023Pages: 268, PDF Size: 10.36 MB
Page 153 of 268
151
FORWARD COLLISION WARNING PLUS
(FCW+) S
YSTEM — IF EQUIPPED
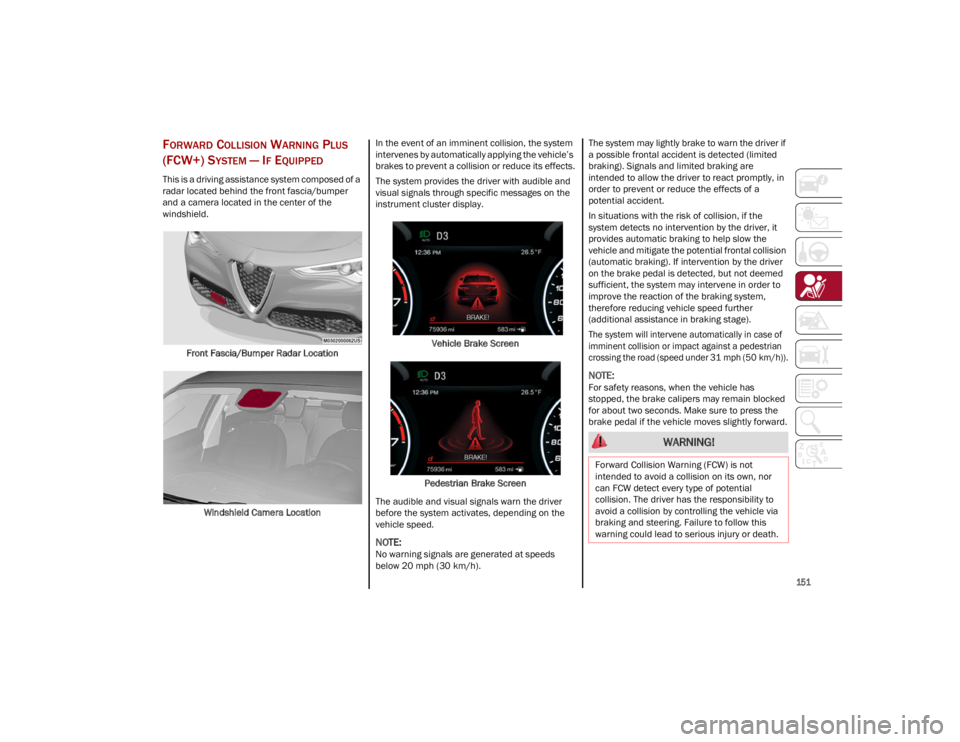
This is a driving assistance system composed of a
radar located behind the front fascia/bumper
and a camera located in the center of the
windshield.
Front Fascia/Bumper Radar Location
Windshield Camera Location In the event of an imminent collision, the system
intervenes by automatically applying the vehicle’s
brakes to prevent a collision or reduce its effects.
The system provides the driver with audible and
visual signals through specific messages on the
instrument cluster display.
Vehicle Brake Screen
Pedestrian Brake Screen
The audible and visual signals warn the driver
before the system activates, depending on the
vehicle speed.
NOTE:
No warning signals are generated at speeds
below 20 mph (30 km/h). The system may lightly brake to warn the driver if
a possible frontal accident is detected (limited
braking). Signals and limited braking are
intended to allow the driver to react promptly, in
order to prevent or reduce the effects of a
potential accident.
In situations with the risk of collision, if the
system detects no intervention by the driver, it
provides automatic braking to help slow the
vehicle and mitigate the potential frontal collision
(automatic braking). If intervention by the driver
on the brake pedal is detected, but not deemed
sufficient, the system may intervene in order to
improve the reaction of the braking system,
therefore reducing vehicle speed further
(additional assistance in braking stage).
The system will intervene automatically in case of
imminent collision or impact against a pedestrian
crossing the road (speed under 31 mph (50 km/h)).
NOTE:
For safety reasons, when the vehicle has
stopped, the brake calipers may remain blocked
for about two seconds. Make sure to press the
brake pedal if the vehicle moves slightly forward.
WARNING!
Forward Collision Warning (FCW) is not
intended to avoid a collision on its own, nor
can FCW detect every type of potential
collision. The driver has the responsibility to
avoid a collision by controlling the vehicle via
braking and steering. Failure to follow this
warning could lead to serious injury or death.
23_GU_OM_EN_USC_t.book Page 151
Page 154 of 268

SAFETY
152
Engagement/Disengagement
The system may be disengaged (and engaged
again) in the “Driver Assistance” menu of the
Information and Entertainment system.
The system can be deactivated even with the
ignition device in the ON position.
NOTE:
The system status can be changed with car at a
standstill only.
Select from three operating modes:
Warning And Braking: the system (if active), in
addition to the visual and audible warnings,
provides limited braking, automatic braking
and additional assistance in the braking stage,
where the driver does not brake sufficiently in
the event of a potential frontal impact.
Only Warning : the system (if active), does not
provide limited braking, but guarantees
automatic braking or additional assistance in
the braking stage, where the driver does not
brake at all or not sufficiently in the event of a
potential frontal impact.
Disabled : the system does not provide visual
and audible warnings, limited braking,
automatic braking or additional assistance in
the braking stage. The system will therefore
provide no indication of a possible collision.
Activation/Deactivation
The Forward Collision Warning system is
activated whenever the engine is started
regardless of what is shown on the radio system.
Following a deactivation, the system will not warn
the driver about the possible collision with a
preceding vehicle, regardless of the setting
selected in the radio system.
NOTE:
Each time the engine is started, the system is
activated regardless of what setting was selected
when the engine was turned off.
This function is not active at a speed lower than
4 mph (7 km/h) or higher than 124 mph
(200 km/h).
The system is active:
Each time the engine is started
When feature is selected within the radio
system
When the ignition is in the ON position
When the vehicle speed is between 2 mph
(4 km/h) and 124 mph (200 km/h)
When the front seat belts are fastened
The Alfa DNA selector is not in RACE position
(if equipped)
NOTE:
If the seat belts of the front seats are not correctly
fastened, the system will not intervene on the
braking system (only audible and visual signals
will be provided).
Changing The System Sensitivity
The sensitivity of the system can be changed
through the Information and Entertainment
system menu, choosing from one of the following
three options: "Near", "Medium" or "Far".
Refer to the description in the Information and
Entertainment system Supplement for how to
change the settings.
The default setting is "Medium". With this setting,
the system warns the driver of a possible collision
with the vehicle in front when that vehicle is at a
standard distance, between that of the other two
settings. With the system sensitivity set to "Far", the
system will warn the driver of a possible collision
with the vehicle in front when that vehicle is at a
greater distance, thus providing the possibility of
acting on the brakes more lightly and gradually.
This setting provides the driver with the maximum
possible reaction time to prevent a potential
collision.
NOTE:
The “Far” setting may result in a greater number
of FCW possible collision warnings experienced.
With the option set to "Near", the system will alert
the driver of a possible collision with the vehicle
in front when that vehicle is close. This setting
offers the driver a lower reaction time compared
to the "Medium" and "Far" settings, in the event of
a potential collision, but permits more dynamic
driving of the vehicle.
NOTE:
The “Near” setting may result in a lesser number
of FCW possible collision warnings experienced.
The system sensitivity setting is kept in the
memory when the engine is turned off.
System Limited Operation Warning
If a dedicated message is displayed, a condition
limiting the system operation may have occurred.
The possible reasons of this limitation are
something is blocking the camera view or a fault.
If an obstruction is signaled, clean the area of the
radar on the front fascia/bumper, and the
camera area on the windshield.
If a fault in the system is occurring, it will still be
possible to drive the vehicle normally, but
automatic braking will not be available in the
event of an impending collision.
23_GU_OM_EN_USC_t.book Page 152
Page 155 of 268

153
When the conditions limiting the system
functions end, this will go back to normal and
complete operation. Should the fault persist,
contact an authorized dealer.
System Failure Signaling
If the system turns off and a dedicated message
is shown on the display, it means that there is a
fault with the system.
In this case, it is still possible to drive the vehicle,
but you are advised to contact an authorized
dealer as soon as possible.
Radar Indication Not Available
If conditions are such that the radar cannot
detect obstacles correctly, the system is
deactivated and a dedicated message appears
on the display. This generally occurs in the event
of poor visibility, such as when it is snowing or
raining heavily.
The function of this system can also be
temporarily reduced due to obstructions such as
mud, dirt or ice on the fascia/bumper. In such
cases, a dedicated message will be shown on the
display and the system will be deactivated. This
message can sometimes appear in conditions of
high reflectivity (e.g. tunnels with reflective tiles or
ice or snow). When the conditions limiting the
system functions end, it will go back to normal
and complete operation.
In certain cases, this dedicated message could
be displayed when the radar is not detecting any
vehicles or objects within its view range.
If atmospheric conditions are not the reason
behind this message, check if the sensor is dirty.
It could be necessary to clean or remove any
obstructions in the area.If the message appears frequently, even in the
absence of atmospheric conditions such as snow,
rain, mud or other obstructions, contact an
authorized dealer for a sensor alignment check.
In the absence of visible obstructions, manually
removing the decorative cover trim and cleaning
the radar surface could be required. Have this
operation performed at an authorized dealer.
NOTE:
It is recommended that you do not install devices,
accessories or aerodynamic attachments in front
of the sensor or darken it in any way, as this can
compromise the correct functioning of the
system.
Frontal Collision Alarm With Active Braking —
If Equipped
If this function is selected, the brakes are
operated to reduce the speed of the vehicle in the
event of potential frontal impact.
This function applies an additional braking
pressure if the braking pressure applied by the
driver does not suffice to prevent potential frontal
impact.
The function is active with speed above 2 mph
(4 km/h).
NOTE:
When using an automatic car wash it is recom
-
mended to deactivate the system through the
settings of the radio system. The system may
detect the presence of a car, a wall or another
obstacle and activate. Driving In Special Conditions
In certain driving conditions, system intervention
might be unexpected or delayed. The driver must
therefore be very careful, keeping control of the
vehicle to drive in complete safety.
Driving close to a bend.
The vehicle ahead is leaving a roundabout.
Vehicles with small dimensions and/or not
aligned in the driving lane.
Lane change by other vehicles.
Vehicles traveling at right angles to the vehicle.
NOTE:
In particularly complex traffic conditions, the
driver can deactivate the system manually
through the Information and Entertainment
system.
If the driver presses the brake pedal fully or
makes an excessive steering maneuver during
system operation, the automatic braking
function may deactivate (e.g. to allow a
possible maneuver to avoid the obstacle).
The FCW system is automatically deactivated
when operating in race mode and a warning
message will be displayed on the instrument
cluster.
23_GU_OM_EN_USC_t.book Page 153
Page 157 of 268
155
TIRE PRESSURE MONITORING SYSTEM
(TPMS)
The vehicle is equipped with a Tire Pressure
Monitoring System (TPMS) that sends the
inflation pressure information of each tire to the
control unit, and will signal the driver in the event
of insufficient tire pressure.
The TPMS uses wireless technology with wheel
rim mounted electronic sensors to monitor tire
pressure levels. Sensors, mounted to each wheel
as part of the valve stem, transmit tire pressure
readings to the receiver module.
Tire pressure will vary with temperature by
approximately 1 psi (7 kPa) for every 12°F
(6.5°C). This means that when the outside
temperature decreases, the tire pressure will also
decrease. Tire pressure should always be set
based on cold inflation tire pressure. This is
defined as the tire pressure after the vehicle has
not been driven for at least three hours, or driven
less than 1 mile (1.6 km) after a three hour
period. The cold tire inflation pressure must not
exceed the maximum inflation pressure molded
into the tire sidewall. The tire pressure will also
increase as the vehicle is driven. This is normal,
and there should be no adjustment for this
increased pressure.
See
Ú
page 224 for information on how to
properly inflate the vehicle’s tires.
The TPMS will signal the driver if pressure falls
below the warning limit for any reason, including
the effects of low temperature and normal loss of
pressure from the tire.
The TPMS will stop indicating insufficient tire
pressure when pressure is equal to or greater than
the prescribed cold inflation level. Therefore, if
insufficient tire pressure is indicated by the ( )
warning light displaying in the instrument cluster,
increase the inflation pressure up to the
prescribed cold inflation value.
The system will automatically update, and the
TPMS Warning Light will turn off once the system
receives the updated tire pressures. The vehicle
may need to be driven for up to 20 minutes above
15 mph (24 km/h) in order for the TPMS to
receive this information.
NOTE:
The TPMS cannot indicate sudden tire pressure
drops (e.g. if a tire bursts). In this case, proceed
with caution and avoid abrupt steering.
Operating Example
For example, your vehicle may have a
recommended cold (parked for more than three
hours) placard pressure of 33 psi (227 kPa). If the
ambient temperature is 68°F (20°C), and the
measured tire pressure is 28 psi (193 kPa), a
temperature drop to 20°F (-7°C) will decrease
the tire pressure to approximately 24 psi
(165 kPa). This tire pressure is low enough to turn
on the Tire Pressure Monitoring Warning Light.
Driving the vehicle may cause the tire pressure to
rise to approximately 28 psi (193 kPa), but the
TPMS Warning Light will still be on. In this
situation, the TPMS Warning Light will turn off
only after the tires are inflated to the vehicle’s
recommended cold placard pressure value.
WARNING!
The system has not been designed to
prevent impacts and cannot detect possible
conditions leading to an accident in
advance. Failure to take into account this
warning may lead to serious or fatal injuries.
The system may activate, assessing the
trajectory of the vehicle, for the presence of
reflecting metal objects different from other
vehicles, such as safety barriers, road signs,
barriers before parking lots, tollgates, level
crossings, gates, railways, objects near road
constructions sites or higher than the vehicle
(e.g. a fly-over). In the same way, the system
may intervene inside multi-story parking lots
or tunnels, or due to a glare on the road
surface. These possible activations are a
consequence of the real driving scenario
coverage by the system and must not be
regarded as faults.
The system has been designed for road use
only. If the vehicle is driven on a track, the
system must be deactivated to avoid
unnecessary warnings. Automatic deacti
-
vation is signaled by the dedicated warning
light/symbol switching on in the instrument
panel
Ú
page 74.
23_GU_OM_EN_USC_t.book Page 155
Page 158 of 268
SAFETY
156
Insufficient Tire Pressure Indication
If an insufficient pressure value is detected on
one or more tires, the warning light in the
instrument cluster will display alongside the
dedicated messages, the system will highlight the
tire or tires with insufficient pressure graphically,
and an acoustic signal will be emitted.In this case, stop the vehicle, check the inflation
pressure of each tire, and inflate the necessary
tire or tires to the correct cold inflation pressure
value, shown on the display or in the dedicated
TPMS menu.
TPMS Temporarily Disabled:
TPMS Check Message
When a system fault is detected, the TPMS
Warning Light will flash on and off for 75 seconds,
and then remain on solid. The system fault will
also sound a chime. If the ignition is cycled, this
sequence will repeat, provided that the system
fault still exists. The TPMS Warning Light will turn
off when the fault condition no longer exists. A
system fault can occur due to any of the following:
Jamming due to electronic devices or driving
next to facilities emitting the same radio
frequencies as the TPMS sensors.
Installing some form of aftermarket window
tinting that affects radio wave signals.
Packed snow or ice around the wheels or
wheel housings.
Using tire chains on the vehicle.
Using wheels/tires not equipped with
TPMS sensors.
After the punctured tire has been repaired with
the original tire sealant contained in the tire kit,
the previous condition must be restored so that
the warning light is off during normal driving.
TPMS Deactivation
The TPMS can be deactivated by replacing all
four wheel and tire assemblies (road tires) with
wheel and tire assemblies that do not have TPMS
sensors, such as when installing winter wheel
and tire assemblies on your vehicle. To deactivate the TPMS, first replace all four
wheel and tire assemblies (road tires) with tires
not equipped with Tire Pressure Monitoring
System (TPMS) sensors. Then, drive the vehicle
for 20 minutes above 15 mph (24 km/h). The
TPMS will chime, the TPMS Warning Light will
flash on and off for 75 seconds and then remain
on. The instrument cluster will display the
“SERVICE TPM SYSTEM” message and then
display dashes (--) in place of the pressure values.
Beginning with the next ignition switch cycle, the
TPMS will no longer chime or display the
“SERVICE TPM SYSTEM” message in the
instrument cluster. Instead, dashes (--) will
remain in place of the pressure values.
To reactivate the TPMS, replace all four wheel
and tire assemblies (road tires) with tires
equipped with TPMS sensors. Then, drive the
vehicle for up to 20 minutes above 15 mph
(24 km/h). The TPMS will chime, the TPMS
Warning Light will flash on and off for 75 seconds
and then turn off. The instrument cluster will
display the “SERVICE TPM SYSTEM” message
and then display pressure values in place of the
dashes. On the next ignition switch cycle the
“SERVICE TPM SYSTEM” message will no longer
be displayed, as long as no system fault exists.
NOTE:
The TPMS is not intended to replace normal
tire care and maintenance, or to provide
warning of a tire failure or condition.
The TPMS should not be used as a tire
pressure gauge while adjusting your tire
pressure.
CAUTION!
The TPMS has been optimized for the original
equipment tires and wheels. TPMS
pressures and warning have been
established for the tire size equipped on your
vehicle. Undesirable system operation or
sensor damage may result when using
replacement equipment that is not of the
same size, type, and/or style. The TPMS
sensor is not designed for use on
aftermarket wheels and may contribute to a
poor overall system performance or sensor
damage. Customers are encouraged to use
Original Equipment Manufacturer (OEM)
wheels to ensure proper TPMS feature
operation.
Using aftermarket tire sealants may cause
the Tire Pressure Monitoring System (TPMS)
sensor to become inoperable. After using an
aftermarket tire sealant it is recommended
that you take your vehicle to an authorized
dealer to have your sensor function checked.
After inspecting or adjusting the tire pressure
always reinstall the valve stem cap. This will
prevent moisture and dirt from entering the
valve stem, which could damage the TPMS
sensor.
23_GU_OM_EN_USC_t.book Page 156
Page 170 of 268
SAFETY
168
Do not drive your vehicle after the air bags have
deployed. If you are involved in another collision,
the air bags will not be in place to protect you.
NOTE:
Air bag covers may not be obvious in the
interior trim, but they will open during air bag
deployment.
After any collision, the vehicle should be taken
to an authorized dealer immediately.
Enhanced Accident Response System
In the event of an impact, if the communication
network remains intact, and the power remains
intact, depending on the nature of the event, the
Occupant Restraint Controller (ORC) will
determine whether to have the Enhanced
Accident Response System perform the following
functions:
Cut off fuel to the engine (if equipped)
Cut off battery power to the electric motor
(if equipped)
Flash hazard lights as long as the battery has
power
Turn on the interior lights, which remain on as
long as the battery has power or for
15 minutes from the intervention of the
Enhanced Accident Response System
Unlock the power door locks
Your vehicle may also be designed to perform any
of these other functions in response to the
Enhanced Accident Response System:
Turn off the Fuel Filter Heater, Turn off the
HVAC Blower Motor, Close the HVAC
Circulation Door
Cut off battery power to the: • Engine
• Electric Motor (if equipped)
• Electric power steering
• Brake booster
• Electric park brake
• Automatic transmission gear selector
• Horn
• Front wiper
• Headlamp washer pump (if equipped)
NOTE:
After an accident, remember to cycle the ignition
to the OFF position and remove the key from the
ignition switch to avoid draining the battery. Care -
fully check the vehicle for fuel leaks in the engine
compartment and on the ground near the engine
compartment and fuel tank before resetting the
system and starting the engine. If there are no
fuel leaks or damage to the vehicle electrical
devices (e.g. headlights) after an accident, reset
the system by following the procedure described
below. If you have any doubt, contact an autho -
rized dealer.
Enhanced Accident Response System
Reset Procedure
After the event occurs, when the system is active,
a message regarding fuel cutoff is displayed. Turn
the ignition switch from ignition ACC or ON/RUN
to ignition OFF. Carefully check the vehicle for
fuel leaks in the engine compartment and on the
ground near the engine compartment and fuel
tank before resetting the system and starting
the engine.
Depending on the nature of the event the left and
right turn signal lights, located in the instrument
panel, may both be blinking and will continue to
blink. In order to move your vehicle to the side of
the road, you must follow the system reset
procedure.
WARNING!
Deployed air bags and seat belt pretensioners
cannot protect you in another collision. Have
the air bags, seat belt pretensioners, and the
seat belt retractor assemblies replaced by an
authorized dealer immediately. Also, have the
Occupant Restraint Controller System serviced
as well.
23_GU_OM_EN_USC_t.book Page 168
Page 186 of 268
IN CASE OF EMERGENCY
184
To Use SOS Emergency Call
Push and hold the SOS Emergency Call button for
a few seconds. The LED, located next to the SOS
button, will blink once and then stay on indicating
a call has been placed.
NOTE:
If the SOS Emergency Call button is accidentally
pushed, there is a 10 second delay before the call
is placed. The system will issue a verbal alert that
a call is about to be made. To cancel the call
connection, push the SOS Emergency Call button
again.
Once a connection between the vehicle and an
emergency service operator is made, the SOS
Emergency Call system will transmit the following
important vehicle information to the operator:
Indication that the occupant placed an
SOS Emergency Call.
The Vehicle Identification Number (VIN).
The last known GPS coordinates of the vehicle.
You will then be able to speak with the emergency
service operator to determine if additional help is
needed.
The SOS Emergency Call has priority over other
audio sources, which will be muted. If you have a
phone connected via Bluetooth®, it is discon -
nected and reconnected at the end of the SOS
Emergency Call. Voice prompts will guide you
during the SOS Emergency Call. If a connection is
made between an emergency service operator
and your vehicle, emergency service operators
may record conversations and sounds within your vehicle once a connection is made, and by using
the service you consent to having this information
shared.
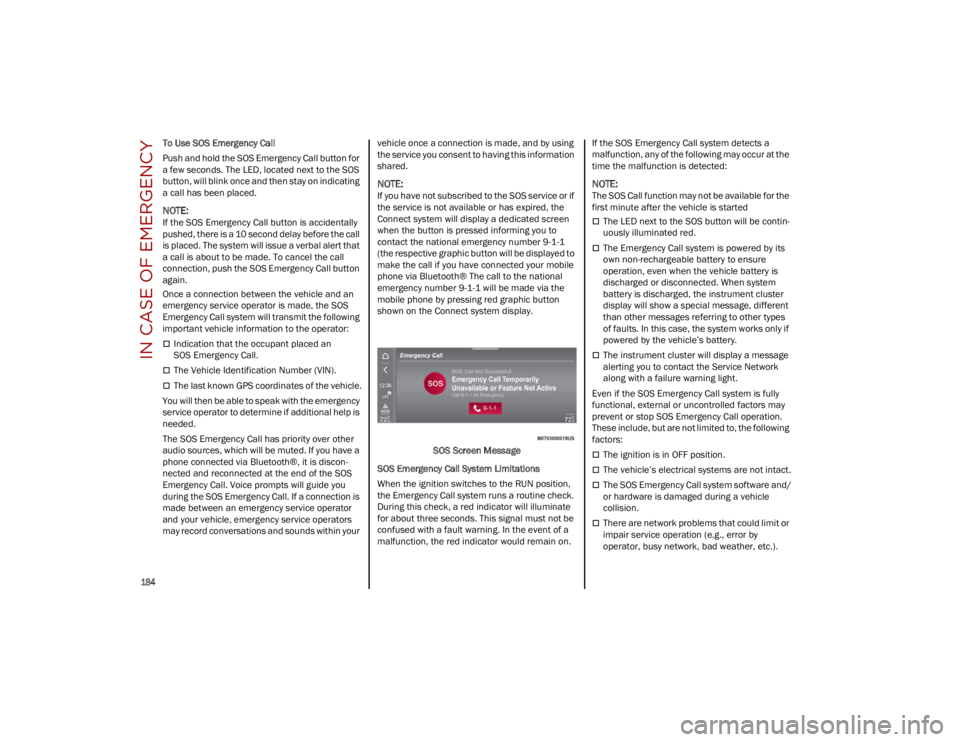
NOTE:
If you have not subscribed to the SOS service or if
the service is not available or has expired, the
Connect system will display a dedicated screen
when the button is pressed informing you to
contact the national emergency number 9-1-1
(the respective graphic button will be displayed to
make the call if you have connected your mobile
phone via Bluetooth® The call to the national
emergency number 9-1-1 will be made via the
mobile phone by pressing red graphic button
shown on the Connect system display.
SOS Screen Message
SOS Emergency Call System Limitations
When the ignition switches to the RUN position,
the Emergency Call system runs a routine check.
During this check, a red indicator will illuminate
for about three seconds. This signal must not be
confused with a fault warning. In the event of a
malfunction, the red indicator would remain on. If the SOS Emergency Call system detects a
malfunction, any of the following may occur at the
time the malfunction is detected:
NOTE:
The SOS Call function may not be available for the
first minute after the vehicle is started
The LED next to the SOS button will be contin
-
uously illuminated red.
The Emergency Call system is powered by its
own non-rechargeable battery to ensure
operation, even when the vehicle battery is
discharged or disconnected. When system
battery is discharged, the instrument cluster
display will show a special message, different
than other messages referring to other types
of faults. In this case, the system works only if
powered by the vehicle’s battery.
The instrument cluster will display a message
alerting you to contact the Service Network
along with a failure warning light.
Even if the SOS Emergency Call system is fully
functional, external or uncontrolled factors may
prevent or stop SOS Emergency Call operation.
These include, but are not limited to, the following
factors:
The ignition is in OFF position.
The vehicle’s electrical systems are not intact.
The SOS Emergency Call system software and/
or hardware is damaged during a vehicle
collision.
There are network problems that could limit or
impair service operation (e.g., error by
operator, busy network, bad weather, etc.).
23_GU_OM_EN_USC_t.book Page 184
Page 207 of 268
205
CHECKING LEVELS — 2.9L ENGINE
ENGINE OIL
The engine oil level can be seen on the
instrument cluster display every time the engine
is started, or on the Information and
Entertainment system display by activating on the
main menu (MENU button) the following
functions in sequence:
1. “Vehicle Information”
2. “Engine Oil”
Check that the oil level is between the MIN and
MAX level on the instrument cluster display using
the 6 notches shown. 1 notch displays the MIN
level and 6 notches displays the MAX level.
NOTE:
Use care when filling under hood fluids such as
engine oil, windshield washer fluid, antifreeze
etc. to minimize spillage onto top of engine. Any
excess fluid that is spilled onto the top of the
engine should be removed using compressed air
or absorbent cloth.
If the oil level is close to or below the MIN mark,
add oil gradually through the filler, (refer to
“Top-Up And Oil Level Indication Update On
Display” in this section) considering that each
notch shown on the display corresponds to
approximately 8.8 fl oz (250 ml).The oil level can also be checked manually on
2.9L Quadrifoglio models.
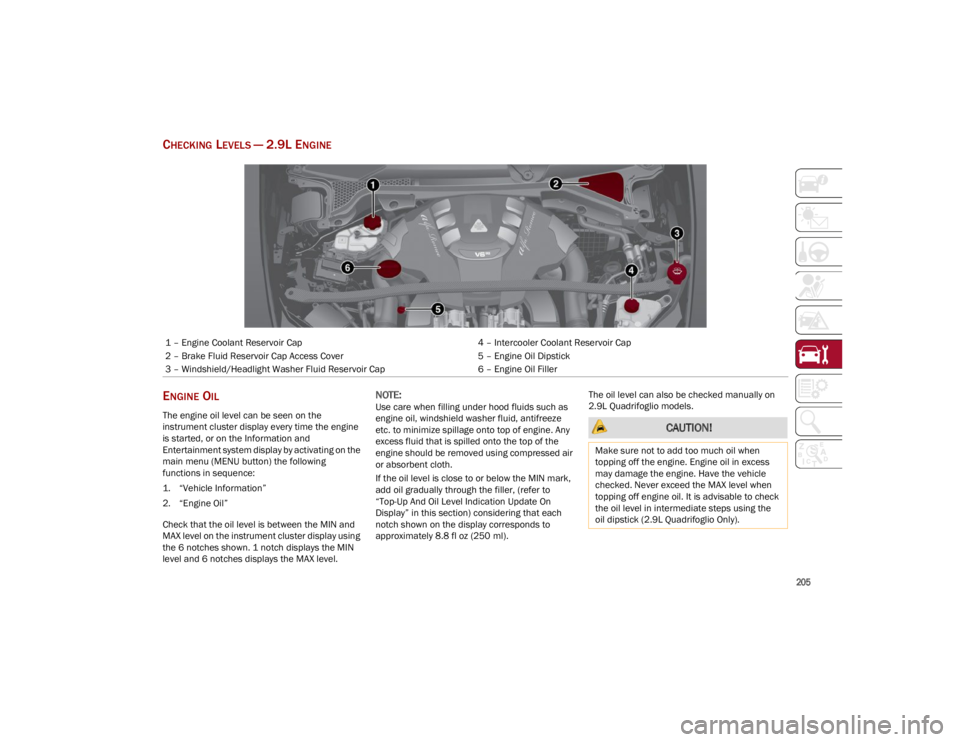
1 – Engine Coolant Reservoir Cap
4 – Intercooler Coolant Reservoir Cap
2 – Brake Fluid Reservoir Cap Access Cover 5 – Engine Oil Dipstick
3 – Windshield/Headlight Washer Fluid Reservoir Cap 6 – Engine Oil Filler
CAUTION!
Make sure not to add too much oil when
topping off the engine. Engine oil in excess
may damage the engine. Have the vehicle
checked. Never exceed the MAX level when
topping off engine oil. It is advisable to check
the oil level in intermediate steps using the
oil dipstick (2.9L Quadrifoglio Only).
23_GU_OM_EN_USC_t.book Page 205
Page 208 of 268
SERVICING AND MAINTENANCE
206
NOTE:
Always reinstall the oil cap and tighten to proper
torque whenever it is removed to add oil to
engine. Never run the engine with cap removed
as this could cause oil to leak from engine.
Manual Oil Level Checking Procedure —
2.9L Quadrifoglio
Check that the oil level is between the MIN and
MAX marks on dipstick, clean it with a lint-free
cloth and reinsert it. Extract the dipstick again
and check that the level is between the MIN and
MAX marks.
Top-Up And Oil Level Indication Update On
Display — 2.9L Quadrifoglio
If an engine oil top-off is needed, in order to
ensure the correct indication of the oil level on
the display, proceed with the following process:
Leave the car on flat ground with the engine
running for approximately five minutes
(temperature higher than 198°F (90°C) and
shut the engine off.
Wait for five minutes, turn the ignition to the
ACC mode without starting the engine and wait
for a few seconds.
NOTE:
If the level indication is not updated after the
previously described procedure, repeat the
engine adjustment, shut the engine off and wait
another five minutes before starting it again. If
the indication is not updated after the second
start, contact an authorized dealer.
Top-Up And Oil Level Indication Update On
Display — 2.0L
If an engine oil top-off is needed, in order to
ensure the correct indication of the oil level on
the display, proceed with the following process:
Leave the car on flat ground with the engine
running for approximately five minutes
(temperature higher than 176°F (80°C) and
shut the engine off.
Start the engine again and idle it for about
two minutes.
NOTE:
If you have added the specified amount of oil and
the indicator is not reading “Full”, please contact
an authorized dealer.
ENGINE COOLANT FLUID
If the level is too low, unscrew the cap of the
reservoir and add the fluid described
Ú
page 252.
WASHER FLUID FOR WINDSHIELD/
H
EADLIGHTS
The windshield and headlight (if equipped)
washer fluid reservoir is equipped with a
telescopic filler neck.
If the level is too low, remove reservoir cap and lift
the filler neck. Then, add the fluid described
Ú
page 252. After filling the reservoir, lower the
filler neck and install the reservoir cap until you
hear it click.
CAUTION!
The oil level is not refreshed immediately on
the display after topping off. Consequently,
wait for the oil level to be refreshed on the
display and follow the procedure below.
WARNING!
If the engine oil is being topped up, wait for the
engine to cool down before loosening the filler
cap, particularly for vehicles with aluminum
cap (if equipped). WARNING: risk of burns!
CAUTION!
The oil level must never exceed the MAX mark.
If the MAX mark is exceeded (last notch on
the right turns red) after the fill-up, go to an
authorized dealer as soon as possible to have
the oil in excess removed.
Do not add oil with specifications different
from those of the oil already in the engine.
Used engine oil and oil filters contain
substances which are harmful to the
environment. To change the oil and filters, we
advise you to contact an authorized dealer.
23_GU_OM_EN_USC_t.book Page 206
Page 209 of 268
207
NOTE:
Use care when filling under hood fluids such as
engine oil, windshield washer fluid, antifreeze
etc. to minimize spillage onto top of engine.
Any excess fluid that is spilled onto the top of
the engine should be removed using compressed
air or absorbent cloth.
NOTE:
The headlight washers are activated every
10 activations of the windshield washer.
NOTE:
The headlight washing system will not work if the
liquid level is low (situation indicated by the
symbol on the instrument cluster display
Ú
page 70). The windshield washer will keep
working.
On vehicles equipped with headlight washers,
there is a reference notch on the dipstick:
ONLY the windshield/rear window washer oper -
ates with the level below this reference.
BRAKE FLUID
Check that the fluid is at the maximum level. If the
fluid level in the tank is low, contact an authorized
dealer to have the system checked.
AUTOMATIC TRANSMISSION ACTIVATION
S
YSTEM OIL
The transmission control oil level should only be
checked at an authorized dealer.
USEFUL ADVICE FOR EXTENDING THE LIFE
O
F YOUR BATTERY
To avoid draining your battery and make it last
longer, observe the following instructions:
When you park the vehicle, ensure that the
doors and liftgate are closed properly to
prevent any lights from remaining on inside the
passenger's compartment.
Do not keep accessories (e.g. radio, hazard
warning lights, etc.) switched on for a long time
when the engine is not running.
Before performing any operation on the
electrical system, disconnect the negative
battery cable.
If you wish to install electrical accessories after
purchasing the vehicle that require permanent
electrical supply (e.g. alarm, etc.), or accessories
which influence the electrical supply
requirements, contact an authorized dealer,
who’s qualified staff will evaluate the overall
electrical consumption.
NOTE:
After the battery is disconnected, the steering
must be initialized. The Power Steering
Warning Light on the instrument cluster display
switches on to indicate this. To carry out this
procedure, simply turn the steering wheel all the
way from one end to the other, and then turn it
back to the central position.
BATTERY
The battery does not require the electrolyte to be
topped up with distilled water. A periodic check
carried out at an authorized dealer, however, is
necessary to check efficiency.
CAUTION!
If the charge level remains under 50% for a
long time, the battery may be damaged by
sulfation, reducing its capacity and efficiency
during the vehicle start. The battery is also
more prone to the risk of freezing (at
temperatures as high as 14°F (-10°C).
WARNING!
Battery acid is a corrosive solution and can
burn or even blind you. Do not allow battery
acid to contact your eyes, skin, or clothing.
Do not lean over a battery when attaching
clamps. If acid splashes in eyes or on skin,
flush the area immediately with large
amounts of water
Ú
page 192.
Battery gas is flammable and explosive.
Keep flame or sparks away from the battery.
Do not use a booster battery or any other
booster source with an output greater than
12 Volts. Do not allow cable clamps to touch
each other.
Battery posts, terminals, and related
accessories contain lead and lead
compounds. Wash hands after handling.
23_GU_OM_EN_USC_t.book Page 207