ASTON MARTIN DB AR1 Q 2003 Owners Guide
Manufacturer: ASTON MARTIN, Model Year: 2003, Model line: DB AR1 Q, Model: ASTON MARTIN DB AR1 Q 2003Pages: 279, PDF Size: 3.77 MB
Page 11 of 279

xi
Regular Checks
In the interests of safety and reliability, it is advisable to carry out the
following checks at the intervals suggested (more frequently if the vehicle is
heavily used or operating in adverse conditions), and always before starting
on a long journey. Refer to the Owner Maintenance section of this guide.
Each Day
Check that there is sufficient fuel for the intended journey, particularly at
night and before entering highways.
Weekly - (Daily if covering high mileage or touring)
Tyres - Check the tyres, including the spare (if fitted) for condition and
pressure. See the 'Specifications' section for the recommended tyre pressures.
Lights - Check that all exterior lights and direction indicators function
correctly and that the lenses are clean.
Engine Oil - With the vehicle standing on level ground, check the oil level
and top up if necessary with oil of the correct grade.
Engine Cooling System - With the engine cold, check the level of the engine
coolant. Top-up if necessary with coolant containing the required percentage
of anti-freeze. Any significant coolant loss should be investigated by your
Aston Martin Dealer.
Brake Fluid - Check the level of the fluid in the brake reservoir. Top-up if
necessary with the specified brake fluid from a new unopened container.
Power Steering Fluid - Check and top-up the level of fluid in the power
steering reservoir with fluid of the correct specification.
DB AR1 Owners Guide
Page 12 of 279

xii
DB AR1 Owner's Guide
Monthly
Windscreen Washer - Top-up with the recommended windscreen wash
fluid. Check the operation of the windscreen washers. Use the recommended
concentration of additives to prevent freezing in winter conditions. Check
the windscreen wash fluid level more frequently if the wash system is being
heavily used.
Safety Warning
Engine exhaust, some of its constituents, and certain vehicle components contain
or emit chemicals known to the state of California to cause cancer, and birth
defects or other reproductive harm. In addition, certain fluids contained in
vehicles and certain products of component wear contain or emit chemicals
known to the state of California to cause cancer, and birth defects or other
reproductive harm.
Glossary of Terms
The following glossary contains frequently used alternative names or
spellings for vehicle components mentioned in this Owner's Guide:
Bonnet Hood
Boot Trunk
Brake Disc Rotor
Handbrake Parking Brake
Petrol Gasoline
Tyre Tire
Wing Fender
Windscreen Windshield
Page 13 of 279

A - Before Driving
1-A-1
Contents
Vehicle Keys ....................................................................................... 1-A-2
The Security System and Door Locks .................................................. 1-A-3
Rain Cover ......................................................................................... 1-A-7
Adjustments Before Driving .............................................................. 1-A-10
Seat Belts .......................................................................................... 1-A-14
Airbags............................................................................................. 1-A-20
Interior Storage ................................................................................. 1-A-22
Page 14 of 279

A - Before Driving
1-A-2
Vehicle Keys
Your DB AR1 is supplied with two sets of keys. Each set contains the
following:
• One ignition/door key
• One key number tag
• One key for the centre armrest storage box
• One alarm key fob
Security of Keys and Alarm Key Fobs
It is important to keep your keys and alarm key fobs in a safe place at all
times. Leaving them in a conspicuous place is an invitation for a thief to steal
them and consequently your car and belongings. Keep your key sets secure
at all times.
Remove the key number tags from each key set and keep them secure. They
will be required if you wish to obtain replacement keys.
ASTON MARTIN
Page 15 of 279

A - Before Driving
1-A-3
The Security System and Door Locks
Your DB AR1 is fitted with sophisticated security systems which protect your
car against theft. The alarm system is linked to the central locking system.
The following two pages describe the basic operations required to turn on
or off the alarm and at the same time to lock or unlock the car. The systems
are fully described in section 'E - Security Systems'.
Alarm Key Fob
Basic alarm functions are controlled using the alarm key fob which sends
radio signals to the alarm unit aerial near the rear window when either the
left or right key fob button is pressed.
The left button is used for turning the alarm system on/off and locking/
unlocking the car. The right button is used for unlocking the boot.
The key fob has a range of about 10 metres (30 feet) when operating with
no intervening obstructions.
Page 16 of 279

A - Before Driving
1-A-4
Unlocking the Car / Turning off the Alarm
To unlock the car and turn the alarm system off, approach to within 10
metres (30 feet) of the car and point the key fob towards the rear window.
Press the left button on the alarm key fob.
The exterior direction indicators flash three times, indicating that the alarm
has been switched off. At the same time, the central locking system unlocks
the car doors and fuel filler flap. Alarm sensing on the boot lock is also
switched off so that the boot may be opened without triggering the alarm.
Locking the Car / Turning on the Alarm
To turn the alarm system on and lock the car, stand within 10 metres (30 feet)
of the car and point the key fob towards the rear window. Press the left
button on the alarm key fob.
The direction indicators flash once as the alarm is switched on. Alarm
sensing is then operative on the door locks, bonnet and boot. At the same
time, the car doors, boot and filler flap are locked by the central locking
system.
Engine Immobiliser
The engine is immobilised by the Passive Anti-Theft System (PATS) and may
not be started until a correctly coded key is inserted and turned in the
ignition switch (See 'Security Systems' for a full description of PATS). The
PATS system is fully automatic and requires no intervention from the driver.
Page 17 of 279

A - Before Driving
1-A-5
Door Locks
The door locks and fuel filler flap are centrally controlled and are normally
unlocked when the left button is pressed on the alarm key fob. The boot lock
is also enabled at this time but does not release until opened using the boot
release switch, ignition key or by pressing the right button on the key fob.
NOTE: If a door is unlocked and opened with the key whilst the alarm is switched
on, the alarm will sound.
If the alarm system is off, then locking or unlocking of either door with the
ignition key causes simultaneous locking or unlocking of the other door and
the fuel filler flap by means of the central locking system.
Door Sealing
Your DB AR1 is fitted with frameless door windows. A special door sealing
system is fitted to ensure a tight fit of the door glass to the seal along the 'A'
post.
When you open a door, the window glass is automatically lowered a few
millimetres to clear the door seal.
As you close a door, the window glass is automatically raised against the
body frame rubber seals.
WARNING: Ensure that all occupants are clear when the window mechanism is
operating.
Caution: Door Seal Damage - Reconnect the battery (see Battery Reconnect Switch
1-F-35) before opening the doors to avoid damage to the door seals.
Page 18 of 279

A - Before Driving
1-A-6
Interior Door Handles and Locks
To open either car door from inside, pull on the release lever and push
outwards on the door.
Locking the Doors when Inside the Car
If you wish to lock the car doors from inside the vehicle, push the lock tab
on the release lever towards the rear of the car. This will activate the central
locking system and lock both doors and the fuel filler flap.
WARNING: The interior door handle will also be disabled at this time.
Pushing the lock tab towards the front of the car will unlock the doors and
fuel filler flap.
Page 19 of 279

A - Before Driving
1-A-7
Rain Cover
To protect the interior of your DB AR1 during periods of inclement weather
a rain cover is provided.
WARNING. Aston Martin recommend that your DB AR1 is not to be driven while
the rain cover is installed.
If it is essential that your DB AR1 is to be moved with the rain cover installed, i.e.
to move to a safe parking area or into a covered area, do not exceed 5 m.p.h. and
only drive a very short distance. The front of the rain cover, over the windscreen,
can be rolled up, allowing the driver to have vision.
To Fit the Rain Cover
Before fitting the rain cover raise both door windows fully and remove the
ignition key from the ignition lock.
1. Remove the rain cover from its storage bag.
Place the rain cover over the windscreen,
black side up, with the two sucker
attachments towards the front of the vehicle.
Attach the suckers to the windscreen (one
in each bottom corner of the windscreen).
Note: Place the sucker attachments close to the
corners, this will enable the windscreen wipers to operate if required.
Page 20 of 279

A - Before Driving
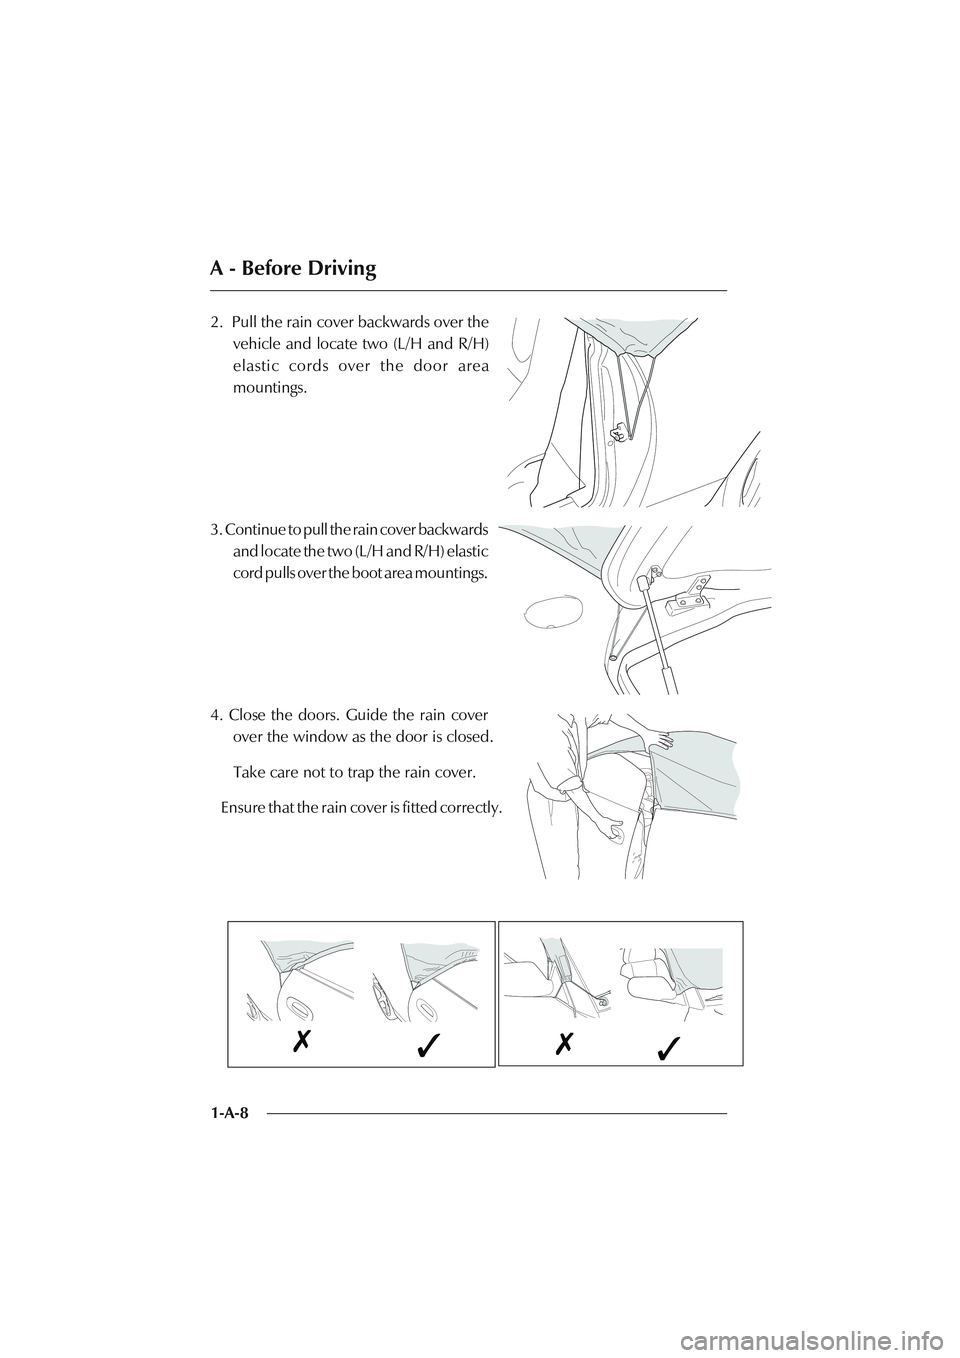
1-A-8 2. Pull the rain cover backwards over the
vehicle and locate two (L/H and R/H)
elastic cords over the door area
mountings.
3. Continue to pull the rain cover backwards
and locate the two (L/H and R/H) elastic
cord pulls over the boot area mountings.
4. Close the doors. Guide the rain cover
over the window as the door is closed.
Take care not to trap the rain cover.
Ensure that the rain cover is fitted correctly.