check engine ASTON MARTIN DB7 1997 User Guide
[x] Cancel search | Manufacturer: ASTON MARTIN, Model Year: 1997, Model line: DB7, Model: ASTON MARTIN DB7 1997Pages: 421, PDF Size: 9.31 MB
Page 318 of 421
=2?
Air Conditioning
System Checking with the Manifold Gauge Set
Pressure Temperature Relationship.
Note:
Pressures
shown are under exact conditions
(see
test
conditions) and
are
not
necessary
true for every
car
checked.
Ambient Temperature is given as the air
surrounding the
condenser
and
is
taken 5 cm in front of
the
condenser.
Test Conditions.
Use a large fan to substitute for normal ram air through the
condenser. Engine adjusted to fast idle speed.
All conditions equivalent to 30 m.p.h. or 48 km/h.
Ambient
Evaporator
Temp °C
16
18
21
24
27
29
32
35
38
41
43
46
49
High
Pressure
Gauge
Reading
Ibf/in2
95-115
105-125
115-125
130-150
1
50-170
165-185
175-195
185-205
210-230
230-250
250-270
265-285
280-310
Low
Pressure
Gauge
Reading
Ibf/in2
10
12
4
16
18
20
22
24
26
28
30
35
40
45
50
55
60
65
70
Ten
-16
-14
-12
-10
-8
-6
-5
-4
-3
-1
0
2
5
9
11
14
17
19
21
Normal operating ambient temperature range is:
-24 to 43°C.
Normal operating evaporator temperature range
is:-12toO°C.
Under normal running conditions system pressure
should be, as follows:
Lowside:1.05to2.10kgf/cm21.034to2.06bar15
to 30 ibf/in2
High side: 13.00 to 14.40 kgf/cm2 12.75 to 14.34
bar185to205lbf/in2
Manifold Gauge Set Check Procedures
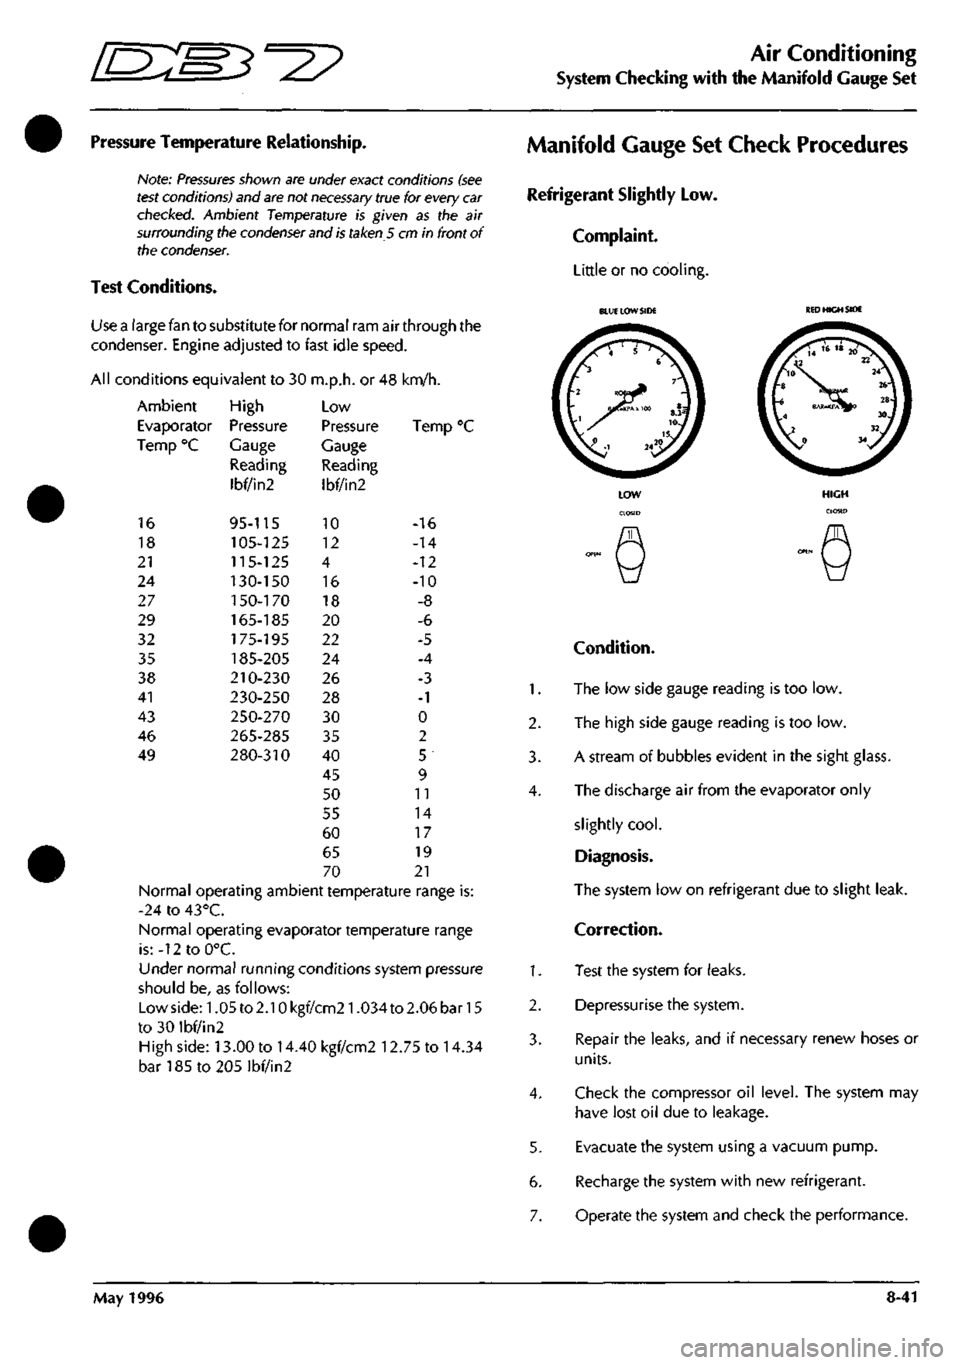
Refrigerant Slightly Low.
Complaint.
Little or no cooling.
1.
2.
3.
4.
1.
2.
3.
4.
5.
6.
7.
BLUE LOW SIDE
KED
HIGH SIDE
Condition.
The low side gauge reading is too low.
The high side gauge reading is too low.
A stream of bubbles evident in the sight glass.
The discharge air from the evaporator only
slightly
cool.
Diagnosis.
The system low on refrigerant due to slight leak.
Correction.
Test the system for leaks.
Depressurise the system.
Repair the leaks, and if necessary renew hoses or
units.
Check the compressor oil level. The system may
have lost oil due to leakage.
Evacuate the system using a vacuum pump.
Recharge the system with new refrigerant.
Operate the system and check the performance.
May 1996 8-41
Page 320 of 421
^2?
Air Conditioning
System Checking with the Manifold Gauge Set
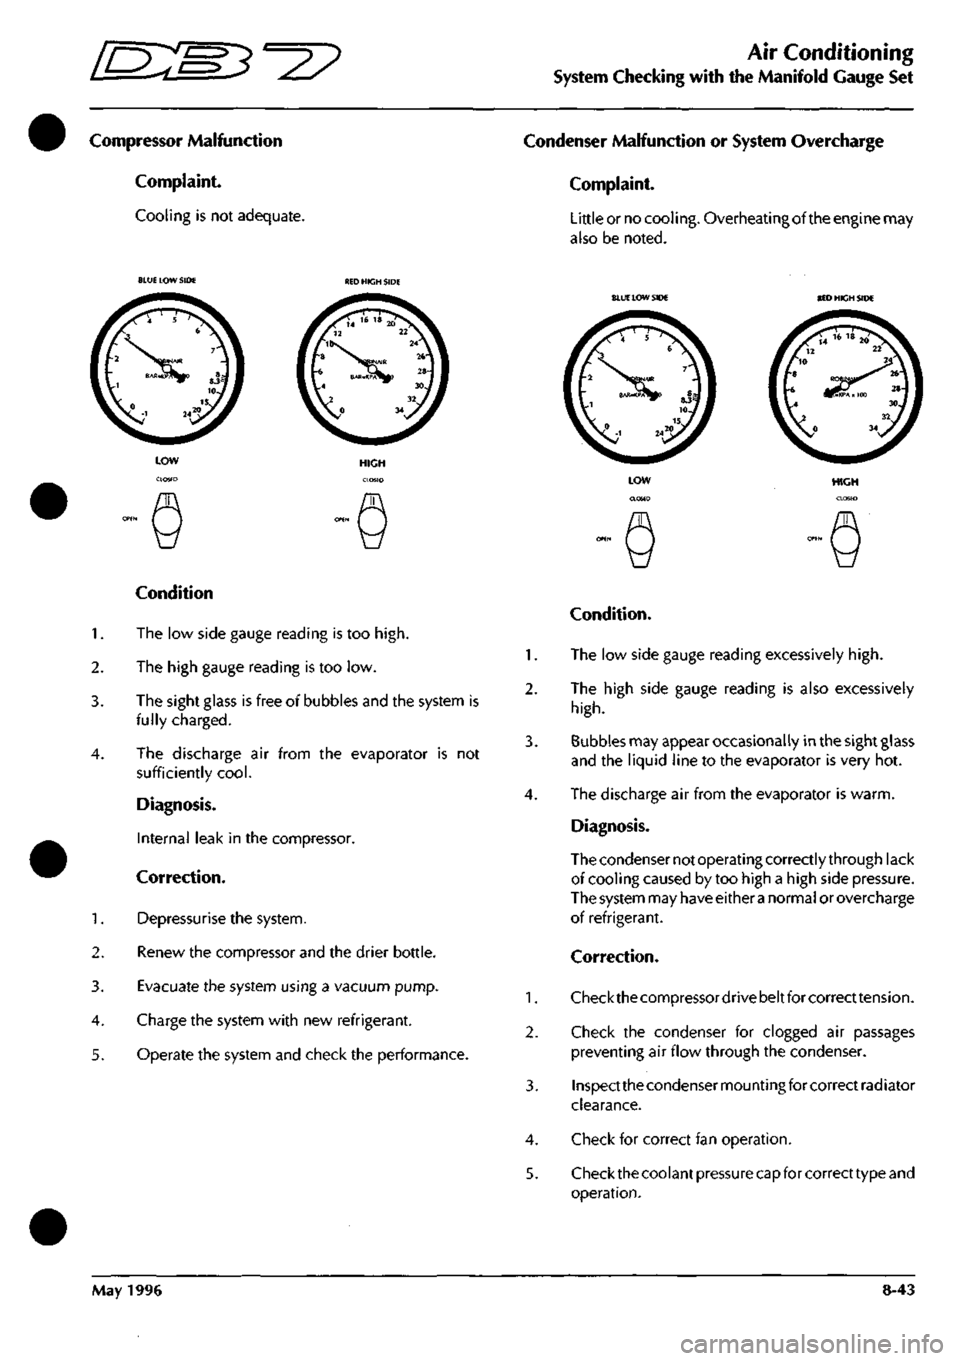
Compressor Malfunction
Complaint.
Cooling is not adequate.
Condenser Malfunction or System Overcharge
Complaint.
Little or no cooling. Overheating of the engine may
also be noted.
BLUE LOW SIDE
BLUE
LOW SIDE BED HICH SIDE
Condition
1.
The low side gauge reading is too
high.
2.
The high gauge reading is too low.
3. The sight glass is free of bubbles and the system is
fully charged.
4.
The discharge air from the evaporator is not
sufficiently
cool.
Diagnosis.
Internal leak in the compressor.
Correction.
1.
Depressurise the system.
2.
Renew the compressor and the drier bottle.
3. Evacuate the system using a vacuum pump.
4.
Charge the system with new refrigerant.
5. Operate the system and check the performance.
HIGH
Condition.
1.
The low side gauge reading excessively
high.
2.
The high side gauge reading is also excessively
high.
3. Bubbles may appear occasionally in the sight glass
and the liquid line to the evaporator is very hot.
4.
The discharge air from the evaporator is warm.
Diagnosis.
The condenser not operating correctly through lack
of cooling caused by too high a high side pressure.
The system may have either
a
normal or overcharge
of refrigerant.
Correction.
1.
Checkthecompressordrivebeltforcorrecttension.
2.
Check the condenser for clogged air passages
preventing air flow through the condenser.
3. Inspect the condenser mounting for correct radiator
clearance.
4.
Check for correct fan operation.
5. Check the coolant pressure capfor correct type and
operation.
May 1996 8-43
Page 324 of 421
^?
Air Conditioning
Torque Settings / Depressurising the System
Torque Levels for the Hose Connections
COMPONENT TORQUE Nm
Evaporator Hose
Hose to Expansion Valve 32.0 ± 4.0
Hose to Compressor 34.0 ± 2.0
Condenser Hose
Hose to Compressor 34.0 ± 2.0
Hose to Compressor 25.0 ± 4.0
Condenser Pipe
Pipe to Drier Bottle 6.0 ± 1.5
Evaporator Pipe
Pipe to Expansion Valve 16.0 ± 1.5
Air Conditioning Procedures
Depressurising
Note:
Observe
all
safety
precautions and do not smoke
while carrying out the following
procedures.
1.
With the engine switched off, remove the protective
caps from the schraeder valves.
2.
Ensure the manifold gauge set hand valves are in
the closed position, then by using the access valve
core remover connect the manifold gauge set to the
system with the red hose to the high pressure side
and the blue hose to the low pressure side.
3. Screw out the valve core to allow the refrigerant to
flow.
4.
Place the centre hose of the manifold set into a
suitable container.
5. Slowly open the high or low side manifold hand
valve and adjust the valve for a smooth refrigerant
flow. Watch the refrigerant for any signsof escaping
oil and adjust the hand valve to prevent any oil
escaping.
6. If oil islostduringthedischarge,thecompressoroil
level must be checked and if necessary topped up.
7. As the discharge rate slows down, open the other
manifold hand valve so that refrigerant flows from
both high and low pressure sides of the system.
8. Constantly adjust the hand valves to ensure that oil
does not flow. When a zero reading is shown on
both high and low pressure gauges the system is
discharged.
8. Close both manifold hand valves.
Recovering Refrigerant
Caution: The
Recovery-Recycle-Recharging
equipment
has
special fittings to avoid
cross
contamination with
R-
12
systems.
Do not attempt to adapt
this
unit for
R-12
as
system
failure will
result.
Warning: Follow the safety procedures
as
defined at the
beginning of the section.
Caution: The unit's overfill limitation mechanism has
been
calibrated specifically for
use
with
the 50
lb.
(23 Kg)
refillable refrigerant
tank.
As the refrigerant is recovered it is passed through
an oil separator and
a
filter drier before it is allowed
to enter the refrigerant tank. When it is dry the
moisture indicator turns green.
May 1996 8-47
Page 326 of 421
^2?
Air Conditioning
System Recharging / Compressor Oil Check
Recharging the System
1.
Open the high side valve on the unit control panel.
If the messages PROGRAM and CHARGE are not
displayed press the CHG key to enter PROGRAM
mode.
2.
Key in the amount of refrigerant needed to recharge
the system and press ENTER.
3. Press the CHG key; the message AUTOMATIC and
the entered amount of refrigerant wi
11
be displayed.
The display counts down to zero as the charging
process proceeds. When the charging is complete
the message CPL is displayed.
If the refrigerant transfer is too slow the charging
unit emits a signal. If the message CHECK
REFRIGERANT is not displayed, close the high side
valve,
open the low side valve and start the air
conditioning system to pull the remainder of the
charge into the system.
If the refrigerant transfer will not complete and the
message CHECK REFRIGERANT is displayed, press
the HOLD/CONT key to interrupt the cycle then
reset the unit by pressing the RESET key. Recover
the refrigerant already charged into the system by
following the procedure for recovering the
refrigerant, add new refrigerant to the tank and
return to Step 1 to recharge the system.
4.
If the air conditioning system is not running start it
and let it run until the gauge pressure readings
stabilize (compare the gauge readings with the
system manufacturer's specifications).
Note:
Ensure
that the
readings
are accurate by closing
both the high and low side
valves
on the unit's control
panel.
5. Check the evaporator outlet temperature to make
sure that the air conditioning system is operating
properly (refer to the system manufacturer's
specifications for the proper temperature).
Compressor Oil Checic
Data
Special Tools
Sanden oil dipstick JD 149
Torque Figures
Oil filler plug 8-12 Nm
Procedure
Whenever a component has been replaced in the
refrigerator system or there is an obvious oil leak, the
following procedure should be carried out.
A Sanden oil dipstick and angle gauge are required in
order to carry out the check.
1.
Run the compressor for 10 minutes at engine idle
speed.
2.
Depressurise the system.
3. Lay the angle gauge across the flat surfaces of the
two front mounting lobes. Centre the bubble and
note the mounting angle.
4.
Remove the compressor from the vehicle.
3. Remove the plug from the oil filler hole
(1
Fig. 1).
4.
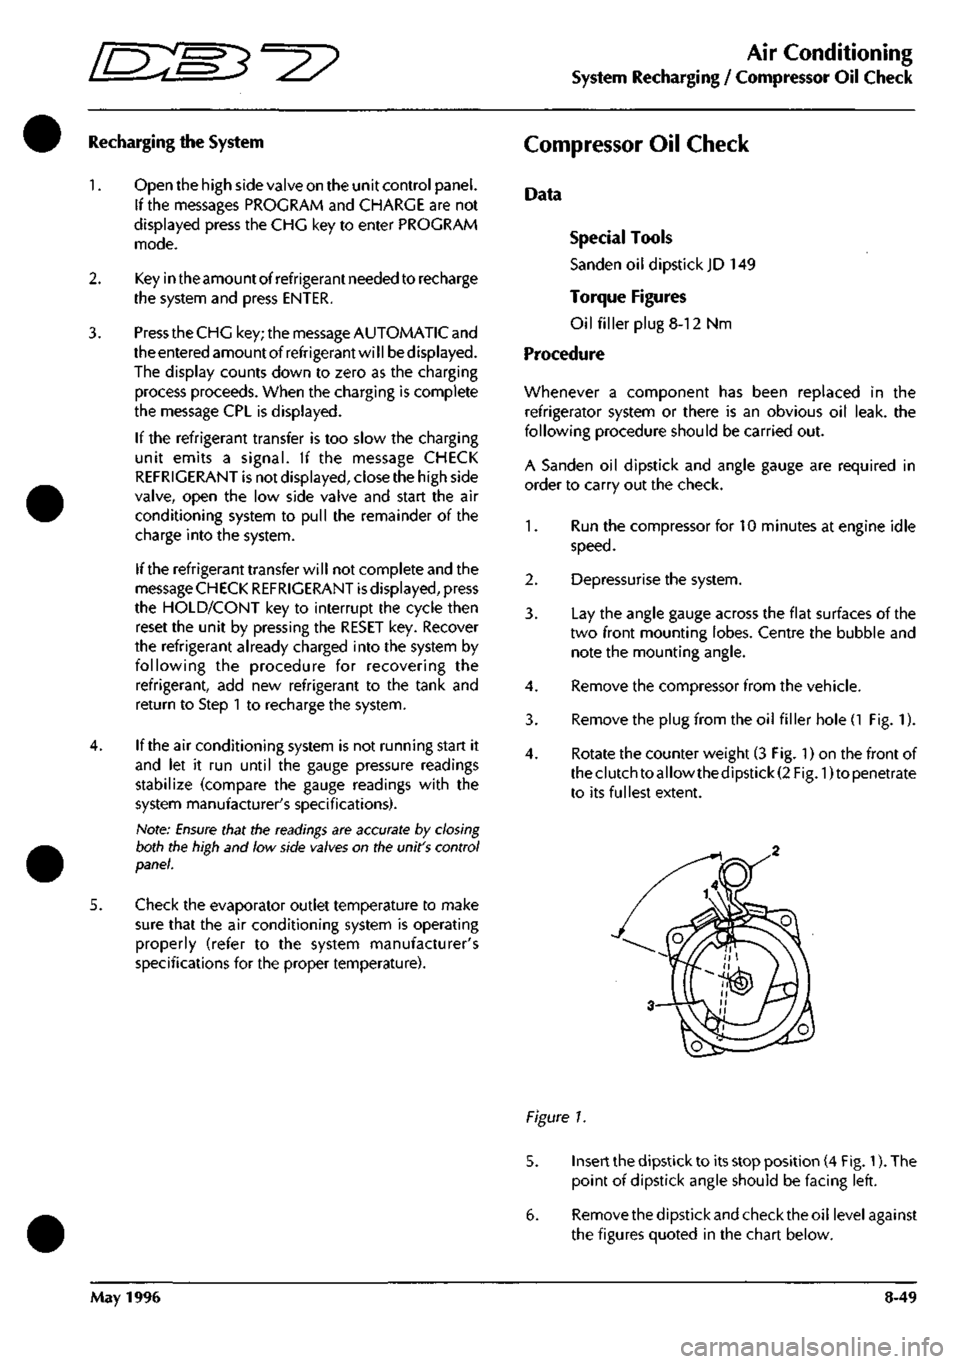
Rotate the counter weight (3 Fig. 1) on the front of
theclutchtoallowthedipstick(2 Fig. 1)to penetrate
to its fullest extent.
Figure 1.
5. Insert the dipstick to its stop position (4 Fig. 1). The
point of dipstick angle should be facing left.
6. Removethedipstickandchecktheoil levelagainst
the figures quoted in the chart below.
May 1996 8-49
Page 380 of 421
^=2?
The Aston Martin Lagonda Diagnostic System
Users Guide
Software
Software for the PDU system is supplied on CD ROM
discs and supports diagnosis on the following control
units:
Zytek Engine Management System (95 MY)
EEC-V Engine Management System (97 MY)
CM 4L80-E Transmission Controller
PATS - Passive Anti Theft System
Teves Mk II ABS System (95 MY)
Teves Mk IV ABS System (97 MY)
Valeo Air Conditioning System
PMC Airbag System
Megamoss Security System
Autoliv Drivers Seat Belt Pretensioner
(where fitted)
All of these systems are supported in English, French,
Italian,
German and Japanese.
In addition to the specific system software listed above,
thePDU isalsoequipped with general purpose software
to provides multimeter, printing and PDU training
options.
Software for 95 and 97 Model Year Vehicles
Software for both the 95 and 97 model year vehicles is
provided.
The PDU system requires a Vehicle Interface Adaptor
(VIA) to communicate with the control units of 95
model year vehicles.
Communication with 97 model year control units is
principally via an Aston Martin multi-protocol adaptor
to 2 inbuilt diagnostic sockets in the vehicle. Only the
air conditioning unit requires the VIA on 97 model year
vehicles.
If the multimeter function is used, the Vehicle Battery
Adaptor (VBA) will be required to provide the basic
supply and ground levels for the multimeter.
Software Loading and Selection
Ensure that the system is powered up and that the PDU is
correctly connected to the base station. Check and if
necessary load the DB7 software CD Revision 002. (see
the installation guide)
Switch 'on' the PDU which will run through two front
screens and then load the following initial PDU software.
Operating System
Main Menu
Selector
Digital Multimeter
Interactive Training
September 1996 9-29
Page 384 of 421
^27
The Aston Martin Lagonda Diagnostic System
Users Guide
Engine Diagnostics - 97 MY
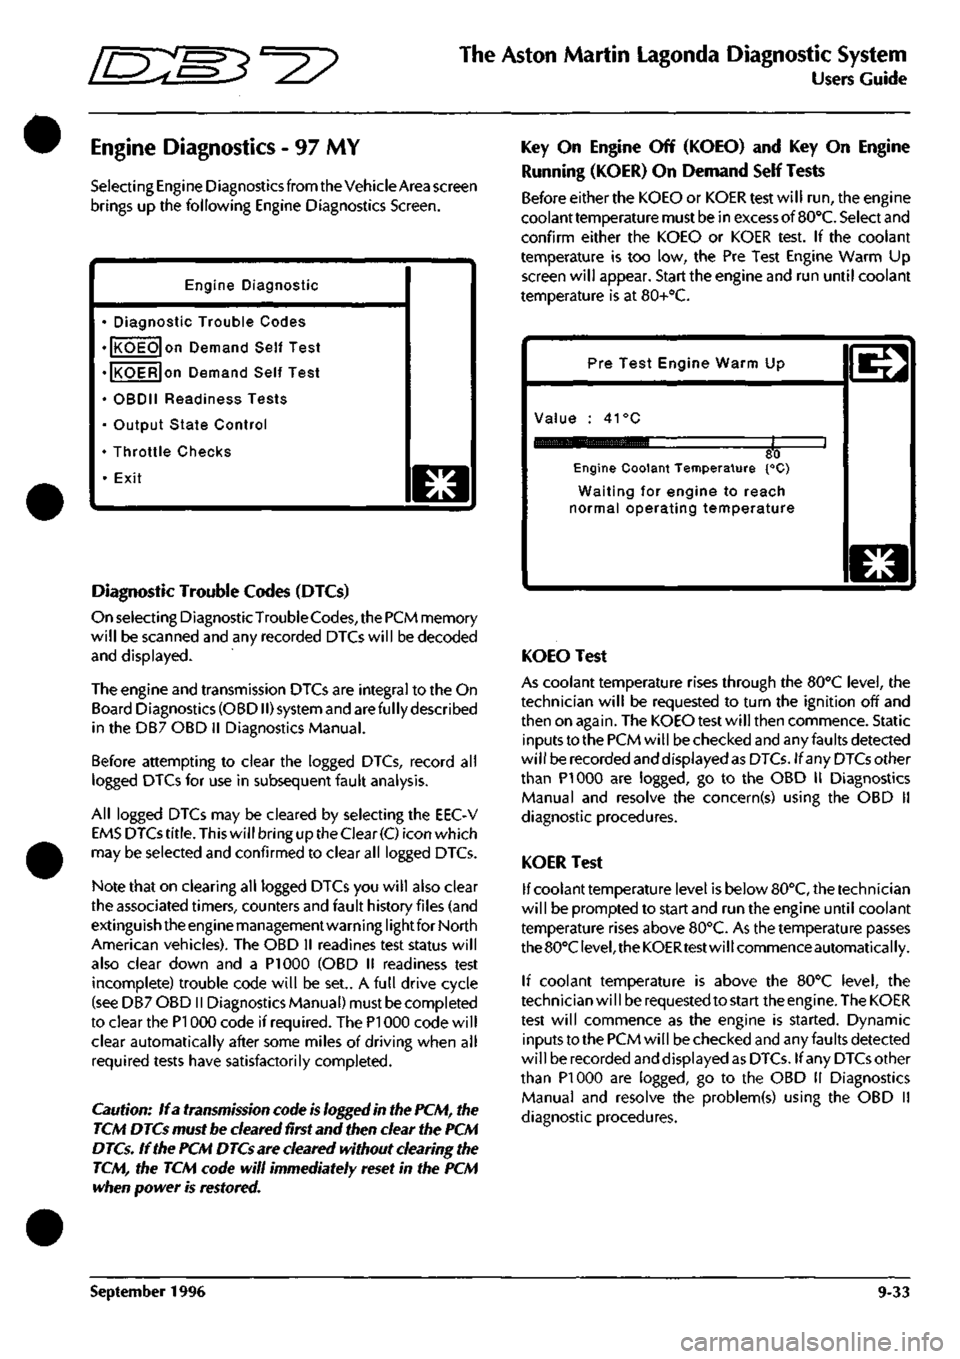
Selecting Engine Diagnostics from the Vehicle Area screen
brings up the following Engine Diagnostics Screen.
Engine Diagnostic
• Diagnostic Trouble Codes
• KOEO on Demand Self Test
• KOER on Demand Self Test
• OBDII Readiness Tests
• Output State Control
• Throttle Checks
• Exit
o
Diagnostic Trouble Codes (DTCs)
On selecting DiagnosticTrouble
Codes,
the PCM memory
will be scanned and any recorded DTCs will be decoded
and displayed.
The engine and transmission DTCs are integral to the On
Board Diagnostics (OBDII) system and are ful ly described
in the DB7 OBD II Diagnostics Manual.
Before attempting to clear the logged DTCs, record all
logged DTCs for use in subsequent fault analysis.
All logged DTCs may be cleared by selecting the EEC-V
EMS DTCs
title.
This will bring up the Clear
(C)
icon which
may be selected and confirmed to clear all logged DTCs.
Note that on clearing all logged DTCs you will also clear
the associated timers, counters and fault history files (and
extinguish the engine management warning lightfor North
American vehicles). The OBD II readines test status will
also clear down and a PI 000 (OBD II readiness test
incomplete) trouble code will be set.. A full drive cycle
(see DB7 OBD II Diagnostics Manual) must be completed
to clear the PI 000 code if required. The PI 000 code will
clear automatically after some miles of driving when all
required tests have satisfactorily completed.
Caution: If a transmission code is logged in the PCM, the
TCM DTCs must be cleared first and then clear the PCM
DTCs. If the PCM DTCs are cleared without clearing the
TCM, the TCM code will immediately reset in the PCM
when power is restored.
Key On Engine Off (KOEO) and Key On Engine
Running (KOER) On Demand Self Tests
Before either the KOEO or KOER test will run, the engine
coolant temperature must be in excess of
BO'C.
Select and
confirm either the KOEO or KOER test. If the coolant
temperature is too low, the Pre Test Engine Warm Up
screen will appear. Start the engine and run until coolant
temperature is at 80+°C.
Pre Test Engine Warm Up
Value : 41°C
80 Engine Coolant Temperature {°C)
Waiting for engine to reach
normal operating temperature
o
KOEO Test
As coolant temperature rises through the BO'C level, the
technician will be requested to turn the ignition off and
then on again. The KOEO test will then commence. Static
inputs to the PCM will be checked and any faults detected
will be recorded and displayed as DTCs. If any DTCs other
than PI 000 are logged, go to the OBD II Diagnostics
Manual and resolve the concern(s) using the OBD 11
diagnostic procedures.
KOER Test
If coolant temperature level is below 80°C, the technician
will be prompted to start and run the engine until coolant
temperature rises above 80°C. As the temperature passes
the 80°C
level,
the KOERtest will commence automatically.
If coolant temperature is above the 80°C level, the
technician wi
11
be requested to start the engine. The KOER
test will commence as the engine is started. Dynamic
inputs to the PCM will be checked and any faults detected
will be recorded and displayed as DTCs. If any DTCs other
than PI 000 are logged, go to the OBD 11 Diagnostics
Manual and resolve the problem(s) using the OBD II
diagnostic procedures.
September 1996 9-33
Page 385 of 421
The Aston Martin Lagonda Diagnostic System
Users Guide ^-^z?
OBD
II
Readiness Test Monitor
- 97 MY
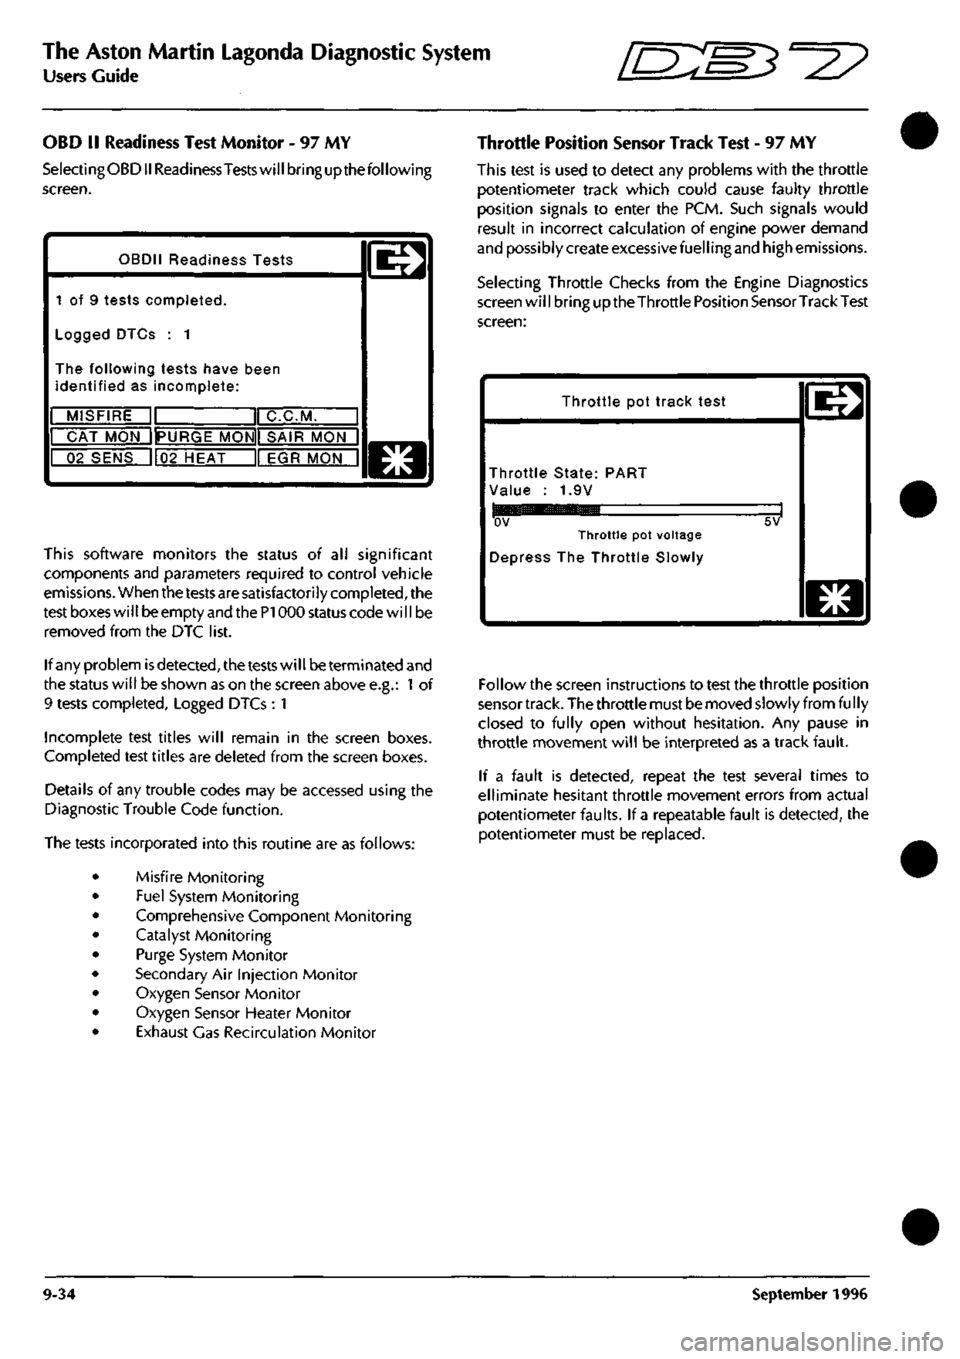
SelectingOBD II Readiness
Tests
will bring up the following
screen.
OBDII Readiness Tests
1
of 9
tests completed.
Logged DTCs
: 1
The following tests have been
identified
as
incomplete:
MISFIRE
ir
1 C.C.M.
CAT MON 1IPURGE
MONII SAIR
M"ONn
02 SENS
1l02
HEAT
II EGR
MONTI
@
This software monitors
the
status
of all
significant
components and parameters required
to
control vehicle
emissions. When the tests are satisfactorily completed, the
test boxes wi
11
be empty and the PI 000 status code wi
11
be
removed from
the DTC
list.
If any problem
is
detected,
the tests will be terminated and
the status will be shown as
on
the screen above e.g.:
1 of
9 tests completed. Logged DTCs
: 1
Incomplete test titles will remain
in the
screen boxes.
Completed test titles are deleted from
the
screen boxes.
Details
of any
trouble codes
may be
accessed using
the
Diagnostic Trouble Code function.
The tests incorporated into this routine are as follows:
Misfire Monitoring
Fuel System Monitoring
Comprehensive Component Monitoring
Catalyst Monitoring
Purge System Monitor
Secondary
Air
Injection Monitor
Oxygen Sensor Monitor
Oxygen Sensor Heater Monitor
Exhaust Gas Recirculation Monitor
Throttle Position Sensor Track Test
- 97 MY
This test
is
used
to
detect
any
problems with
the
throttle
potentiometer track which could cause faulty throttle
position signals
to
enter
the
PCM. Such signals would
result
in
incorrect calculation
of
engine power demand
and possibly create excessive fuelling and high emissions.
Selecting Throttle Checks from
the
Engine Diagnostics
screen will bring uptheThrottle Position Sensor Track Test
screen:
Throttle
pot
track test
Throttle State: PART
Value
: 1.9V
ov
Throttle
pot
voltage
Depress
The
Throttle Slowly
5V
o
Follow the screen instructions
to
test the throttle position
sensor track. The throttle must be moved slowly from fu
I
ly
closed
to
fully open without hesitation.
Any
pause
in
throttle movement will
be
interpreted
as a
track fault.
If
a
fault
is
detected, repeat
the
test several times
to
elliminate hesitant throttle movement errors from actual
potentiometer faults.
If
a repeatable fault
is
detected,
the
potentiometer must
be
replaced.
9-34 September
1996
Page 389 of 421
The Aston Martin Lagonda Diagnostic System
Users Guide ^?
Engine Setup
- 95 MY
Two adjustments
may
beset with the aid of the PDU
on 95
MY vehicles.
• Throttle Potentiometer
• Idle Fuelling Trim
From
the 95 MY
Main Menu, make
and
confirm
the
following sequence
of
selections:
Diagnostics
/
Manual
or
Auto Transmission
/
Engine
/
Engine Setup
/
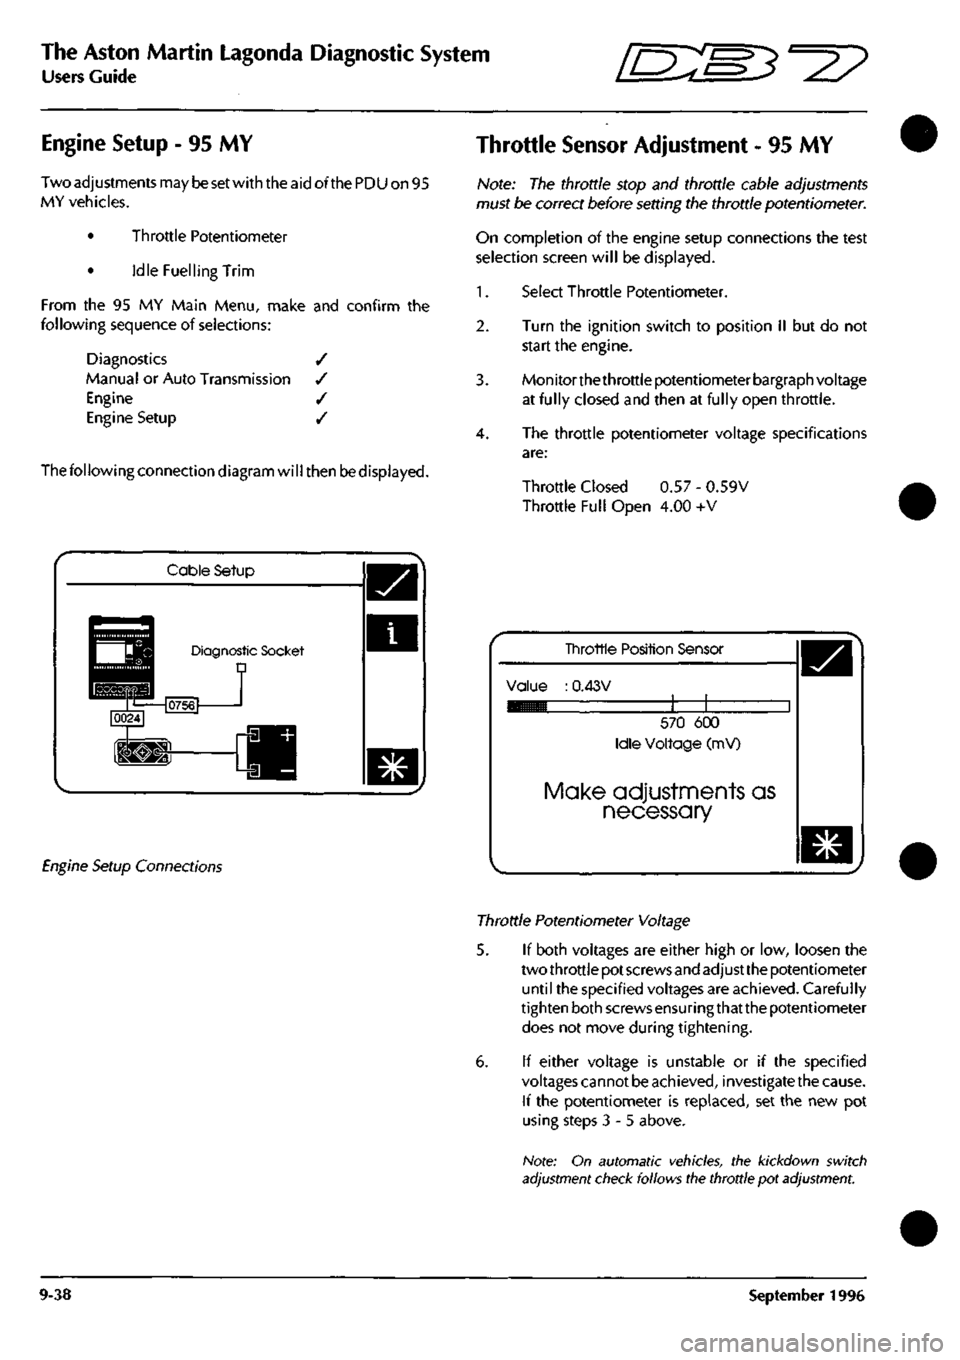
The following connection diagram will then be displayed.
Throttle Sensor Adjustment
- 95 MY
Note:
The
throttle stop
and
throttle cable adjustments
must
be
correct before setting
the
throttle potentiometer.
On completion
of the
engine setup connections
the
test
selection screen will
be
displayed.
1.
Select Throttle Potentiometer.
2.
Turn
the
ignition switch
to
position
II but do not
start
the
engine.
3. Monitorthethrottle potentiometer bargraph voltage
at fully closed
and
then
at
fully open throttle.
4.
The
throttle potentiometer voltage specifications
are:
Throttle Closed
0.57 -
0.59V
Throttle Full Open
4.00 +V
Cable Setup
Diagnostic Socket D
Engine Setup Connections
Tinrottle Position Sensor
Value
:
0.43V
570
600
Idle Voltage
(mV)
Make adjustments as
necessary
Throttle Potentiometer Voltage
5.
If
both voltages
are
either high
or low,
loosen
the
two throttle pot screws and adjust the potentiometer
until
the
specified voltages
are
achieved. Carefully
tighten both screws ensuringthat the potentiometer
does
not
move during tightening.
6.
If
either voltage
is
unstable
or if the
specified
voltages cannot
be
achieved, investigate the cause.
If
the
potentiometer
is
replaced,
set the new pot
using steps
3-5
above.
Note:
On
automatic vehicles,
the
kickdown switch
adjustment check follows the throttle
pot
adjustment.
9-38 September
1996
Page 390 of 421
ffi:
The Aston Martin Lagonda Diagnostic System
Users Guide
Idle Fuelling Trim - 95 MY
This program is used to check and if necessary reset the
fuelling level at idle to ensure that the specified idle speed
and emission levels are attainable. The throttle
potentiometer adjustment sequence must be completed
before the fuel trim sequence can be run.
Note: The throttle setup must be completed before
attempting to set the Idle Fuelling Trim. An error in
throttle
stop,
throttle cable or throttle pot
adjustments can
cause serious
difficulties in setting the Idle Fuelling.
Select Idle Fuelling Trim from the Engine Setup
Menu.
(The PDU connections are
as
fortheThrottle
Potentiometer Adjustment.)
1.
3.
StarttheDB7engineand allow itto warm to normal
operating temperature.
Followthescreeninstructionstorunthe idle fuelling
trim procedure.
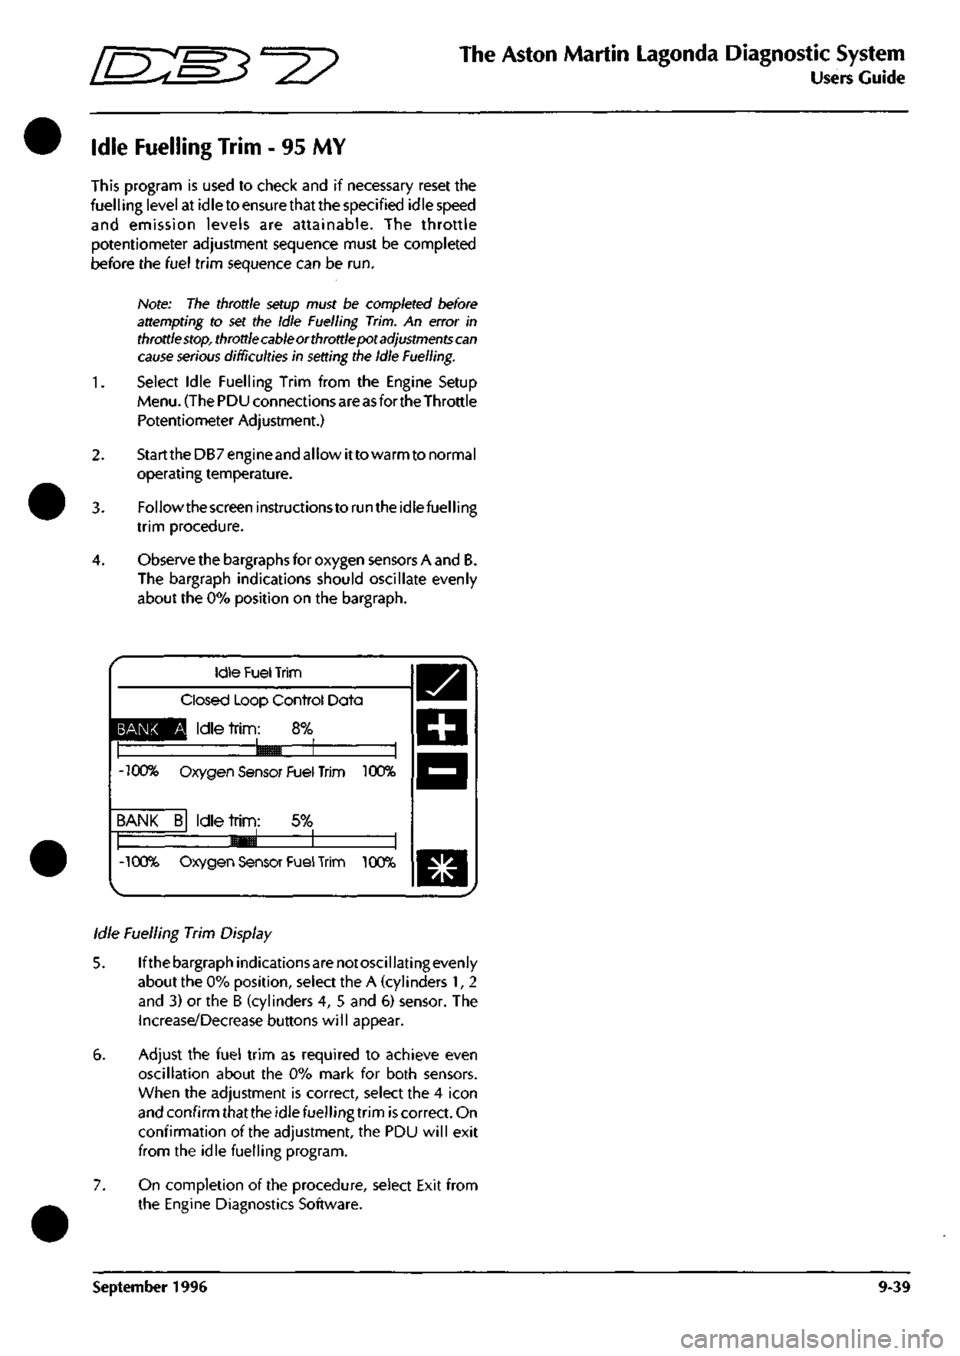
Observe the bargraphs for oxygen sensors A and B.
The bargraph indications should oscillate evenly
about the 0% position on the bargraph.
BANK
-100%
BANK
-100%
Idle
Fuel
Trim
Closed Loop Control Data
Q Idle
trim:
8%
9^B 1 1
Oxygen Sensor Fuel Trim 100%
B Idle
trim:
5% —1 1 1
«^
1 1 Oxygen Sensor Fuel
Trim
100%
Idle Fuelling Trim Display
5. Ifthebargraphindicationsarenotoscillatingevenly
about the 0% position, select the A (cylinders 1, 2
and 3) or the B (cylinders 4, 5 and 5) sensor. The
Increase/Decrease buttons will appear.
6. Adjust the fuel trim as required to achieve even
oscillation about the 0% mark for both sensors.
When the adjustment is correct, select the 4 icon
and confirm that the idle fuelling trim is correct. On
confirmation of the adjustment, the PDU will exit
from the idle fuelling program.
7. On completion of the procedure, select Exit from
the Engine Diagnostics Software.
September 1996 9-39