door lock ASTON MARTIN DB7 1997 User Guide
[x] Cancel search | Manufacturer: ASTON MARTIN, Model Year: 1997, Model line: DB7, Model: ASTON MARTIN DB7 1997Pages: 421, PDF Size: 9.31 MB
Page 176 of 421

NO COLOUR
PIN
ARE*
1222
BP I
22.CA-Z0A
1223 B 2 22*4-203 3
MICRO SWITCH
KO COLOUR
PIN
ARE* 9S2
OU I
22.B6
984
OR 2
22.B6 1224
B 3
22.B5-200 LOCK SWITCH
NO COLOUR 1207
6
1208
RN 1209 t 1210 TG 1211 YU
PIN 1 ? 3 4 5
AREA 22.A4-203 22.B4-202 22.85-196 22.C5-I97 22.85-198
NO COLOUR PIN AREA 391 OW I 22.B6 389
OG
2 22.86
in LOCK MOTOR g] [J
L.H DC NO COLOUR
1225
B
1226
RN
1227
Y
1228
YR 1229 YB
PIN 1 2 3 4 5
OR MIRROR AREA 22.A4-203 22.B4-202 22.85-196 22.C5-I99 22.84-201
R.H DOOR MIRROR
NO COLOUR AREA
1212
B
22.A4-203
1213 B 22.85-200
SHEET 12 ^2> C=. AREA C6 ^* 1**^
SPL 200 SPL 198
n n 'I "TT
SPL
201
SPL 199
¥mpD'
c
1"
1 13
D
D
D
a D 0 00=1 D 0 0 0 Q 0 Q Q DDC D 0 D 0 D 0
NO COLOUF 981
06
982
OU
983
OW
984
OR
986
B
987
BW
988
PO
989
PW
818
RG
819
CR
381
YG
382
YU
383
Y
1206
LC
990
LO
991
NU
992
8P
993
RN
994
B
1204
YR
1205
YB
PIN 1 2 3
4 5 6
1 8 9 10 II 12 13 14 15 16 17 18 19 20 21 22
AREA 22.BI 22.A2 22.BI 22.A2
22.C5 22.C5 22.02 22.02 22.03 22.03 22.C5-197 22.B5-I98 22.B5-I96 22.D3 22.D3 22.03 22.C4-204 22.C4-202 22.B5-200 22.C5-I99 22.C4-20I
NO COLOUR
PIN
AREA
986 8 I 22.B6 987
BW
2
22.B6
WINDOW ECU
REAR GUARD LAMP
NO COLOUR PIN 990 LG A
1221
BP B
818
R C
819
G D
220
B
991
NU
AREA 22.C6 22.C4-204 22.86 22.B6
22.B5-200 22.C6
DOOR MIRROR SWITCH
NO
1214 1215 1216 1217 1218
1206 1219
COLOUR YR YG Y LG YU B YB
PIN 1 ? 3 4 5 6 7 8
AREA 22.C5-I99 22.C5-I97 22.85-196 22.C6 22.A4-I98 22.B5-203 22.C4-20I
NO COLOUR PIN AREA 988 PG I 22.B6 989 PW 2 22.B6 3
[D:[B3-=2? Wiring Diagram
Model - Aston Martin DB7
Harness Title - Passengers Door
Part No. - B37-84647
Revision - 0 Sheet 22 of 26 - 97 MY
Page 188 of 421
Electrics
Airbag System =7?
Spillage and Leakage
If material is spilled or released, contact Aston
Martin Technical Support for advice on clean-up
procedures. All personnel must be kept away from
the contaminated area.
Do not dispose of contaminated propellant or
water into storm or sanitary sewers, ground water
or
soil.
Spills may be reportable to state and/or federal
authorities.
Materials must be disposed of by incineration or
chemical oxidation under carefully controlled
conditions by specially trained individuals and in
accordancewith local stateandfederal regulations.
Scrapping Vehicles with Live Airbags
when scrapping a vehicle with live airbags, first
deploy the airbags in accordance with the following
procedure. This procedure assumes that the airbag
wiring is undamaged
See Handling/Safety Information.
If the airbags are to be removed, see the airbag
module assembly/removal/servicing instructions.
Equipment required:
Four insulation displacement connectors
(scotch locks).
Charged 'slave' battery.
Two 10 metre lengths of
1
mm^ wire fitted with
crocodile clips on one end.
Procedure
WARNING: The deployment procedure must be
carried out outdoors away from other personnel.
1.
Remove any loose debris from around the airbag
modules and ensure that no flammable liquids are
present.
2.
Disconnect the vehicle battery.
WARNING: Always connect to the airbag
first,
as
the bag will deploy immediately on connection to
the battery.
3. Remove the passenger side airbag deployment
door and underscuttle panel.
4.
Remove the drivers side underscuttle panel.
5. Disconnect the airbag connector for the spiral
cassette under the fascia and at the wire (drivers
side).
6. Locate the harness connectors and cut the wires
leading from the airbag just above the mating plug
(passengers side).
Note: The harness connected between the driver's
airbag
and the connector
has
one red
feed
wire and
one
grey/orange return
wire.
The
harness
connected between
the
passenger's
airbag and the connector
has
one blue/
orange
feed wire and one
pinl
return wire.
6-72 September1996
Page 189 of 421
^^
Electrics
Airbag System
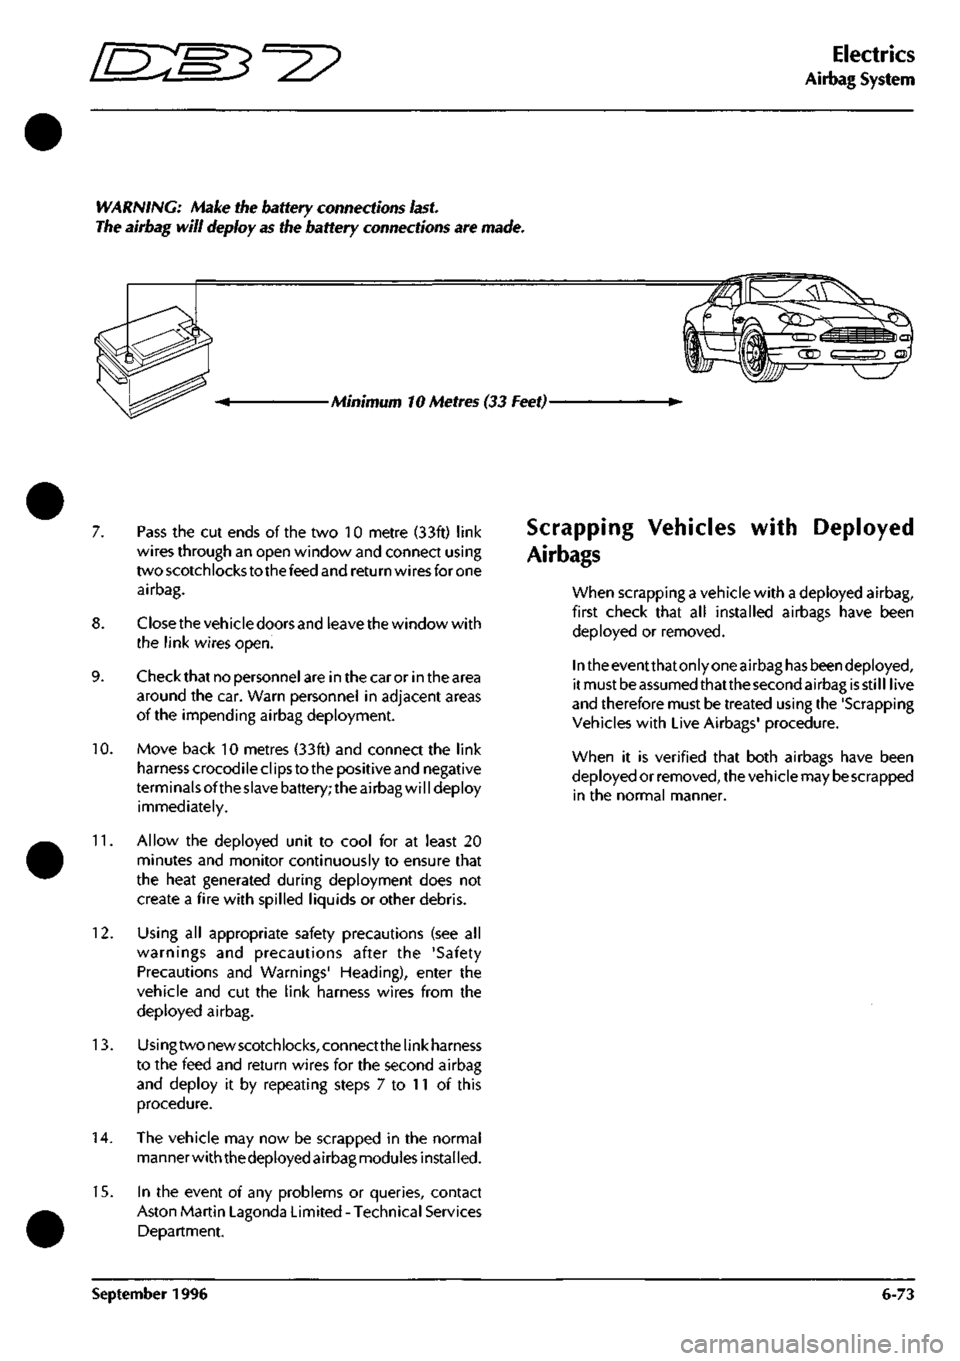
WARNING: Make the battery connections
last.
The airbag will deploy as the battery connections are made.
Minimum 10 Metres (33 Feet)-
7. Pass the cut ends of the two 10 metre (33ft) link
wires through an open window and connect using
two scotchlocks to the feed and return wires for one
airbag.
8. Closethe vehicle doors and leave the window with
the link wires open.
9. Check that no personnel are in the car or in the area
around the car. Warn personnel in adjacent areas
of the impending airbag deployment.
10.
Move back 10 metres (33ft) and connect the link
harness crocodile clips to the positive and negative
terminals ofthe slave battery; the airbag will deploy
immediately.
11.
Allow the deployed unit to cool for at least 20
minutes and monitor continuously to ensure that
the heat generated during deployment does not
create a fire with spilled liquids or other debris.
12.
Using all appropriate safety precautions (see all
warnings and precautions after the 'Safety
Precautions and Warnings' Heading), enter the
vehicle and cut the link harness wires from the
deployed airbag.
13.
Usingtwonewscotchlocks,connectthelinkharness
to the feed and return wires for the second airbag
and deploy it by repeating steps 7 to 11 of this
procedure.
14.
The vehicle may now be scrapped in the normal
manner with thedeployed airbag modules installed.
15.
In the event of any problems or queries, contact
Aston Martin Lagonda Limited - Technical Services
Department.
Scrapping Vehicles
Air bags
with Deployed
when scrapping a vehicle with a deployed airbag,
first check that all installed airbags have been
deployed or removed.
In the eventthatonly one airbag has beendeployed,
it must be assumed thatthe second airbag is still live
and therefore must be treated using the 'Scrapping
Vehicles with Live Airbags' procedure.
when it is verified that both airbags have been
deployed or removed, the vehicle may
be
scrapped
in the normal manner.
September 1996 6-73
Page 192 of 421
Electrics
Airbag System ^^?
7.8.02.6
Renew
Passenger's Airbag Module
Read and adhere to all warnings and safety
procedures quoted at the start of this section when
working on airbag modules.
Disconnect the battery and wait for at least one
minute before proceeding with the airbag removal.
Note:
The
vehicle battery
must
be disconnected within
12
seconds
of switchingoff
the
ignition
to
avoid the alarm
siren sounding.
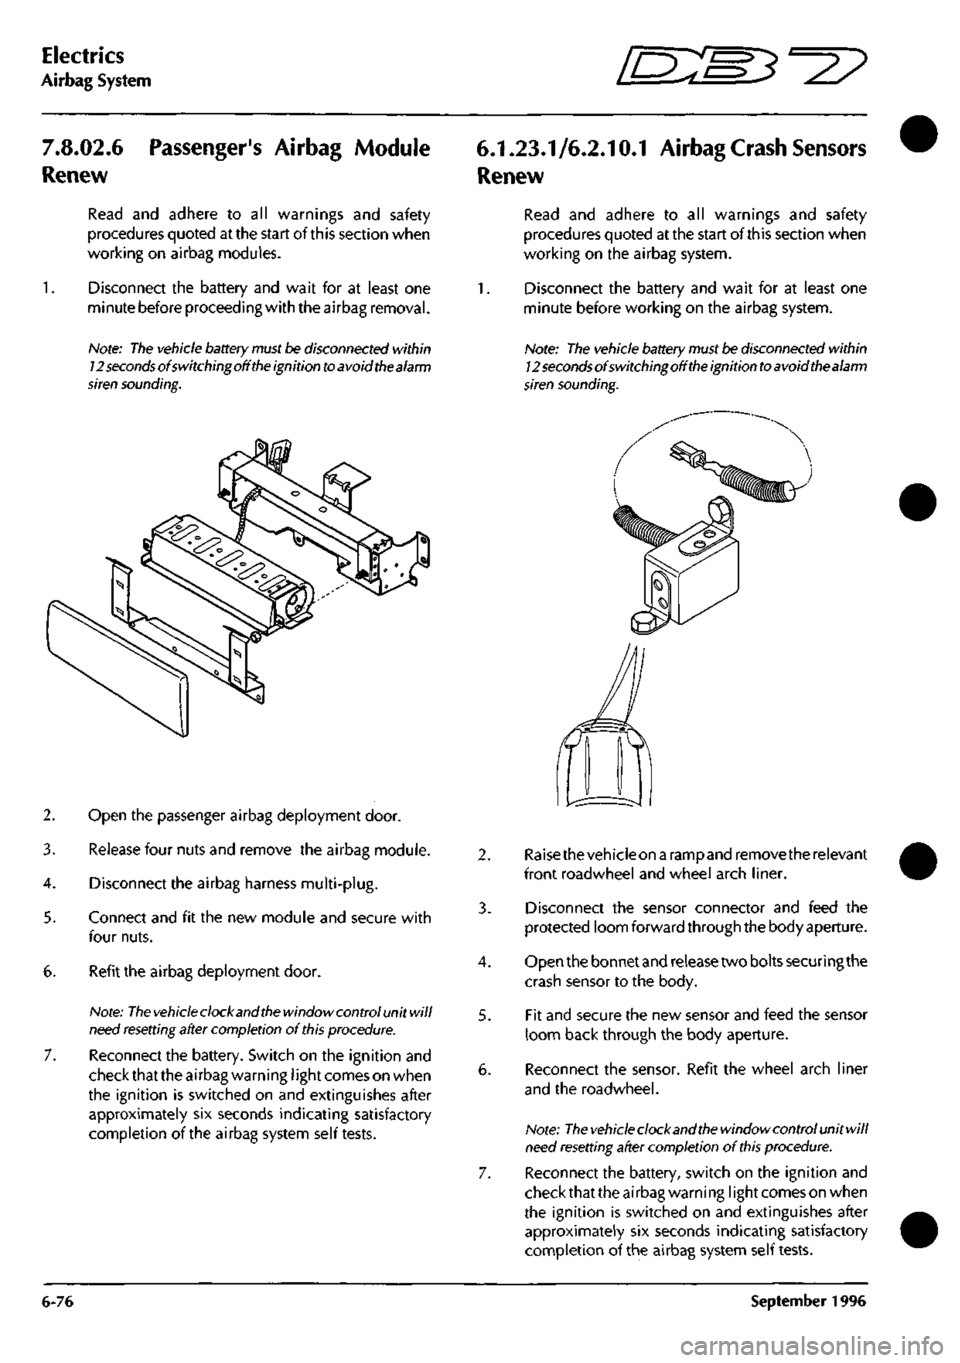
2. Open the passenger airbag deployment door.
3. Release four nuts and remove the airbag module.
4.
Disconnect the airbag harness multi-plug.
5. Connect and fit the new module and secure with
four nuts.
6. Refit the airbag deployment door.
Note:
The vehicle
clock and
the
window control unit will
need
resetting
after completion of
this
procedure.
7. Reconnect the battery. Switch on the ignition and
check that the airbag warning
I
ight comes on when
the ignition is switched on and extinguishes after
approximately six seconds indicating satisfactory
completion of the airbag system self tests.
6.1.23.1/6.2.10.1 Airbag
Crash
Sensors
Renew
Read and adhere to all warnings and safety
procedures quoted at the start of this section when
working on the airbag system.
1.
Disconnect the battery and wait for at least one
minute before working on the airbag system.
Note: The vehicle
battery
must be disconnected within
12
seconds
of switchingoff
the
ignition
to
avoid thealarm
siren sounding.
4.
5.
Raisethevehicleon a rampand remove the relevant
front roadwheel and wheel arch liner.
Disconnect the sensor connector and feed the
protected loom forward through the body aperture.
Open the bonnet and release two bolts securing the
crash sensor to the body.
Fit and secure the new sensor and feed the sensor
loom back through the body aperture.
Reconnect the sensor. Refit the wheel arch liner
and the roadwheel.
Note:
The vehicle
clock and
the
window control unit will
need
resetting
after completion of
this
procedure.
Reconnect the battery, switch on the ignition and
check that the airbag warning
I
ight comes on when
the ignition is switched on and extinguishes after
approximately six seconds indicating satisfactory
completion of the airbag system self tests.
6-76 September 1996
Page 193 of 421
^7
Electrics
Airbag System
6.4.21.2
Airbag 'Safing' Sensor Renew
Read and adhere to all warnings and safety
procedures quoted at the start of this section when
working on the airbag system.
1.
Disconnect the battery and wait for at least one
minute before working on the airbag system.
Note:
The
vehicle battery must be disconnected within
12 secondsofswitchingoffthe ignition to avoid the alarm
siren sounding.
^h
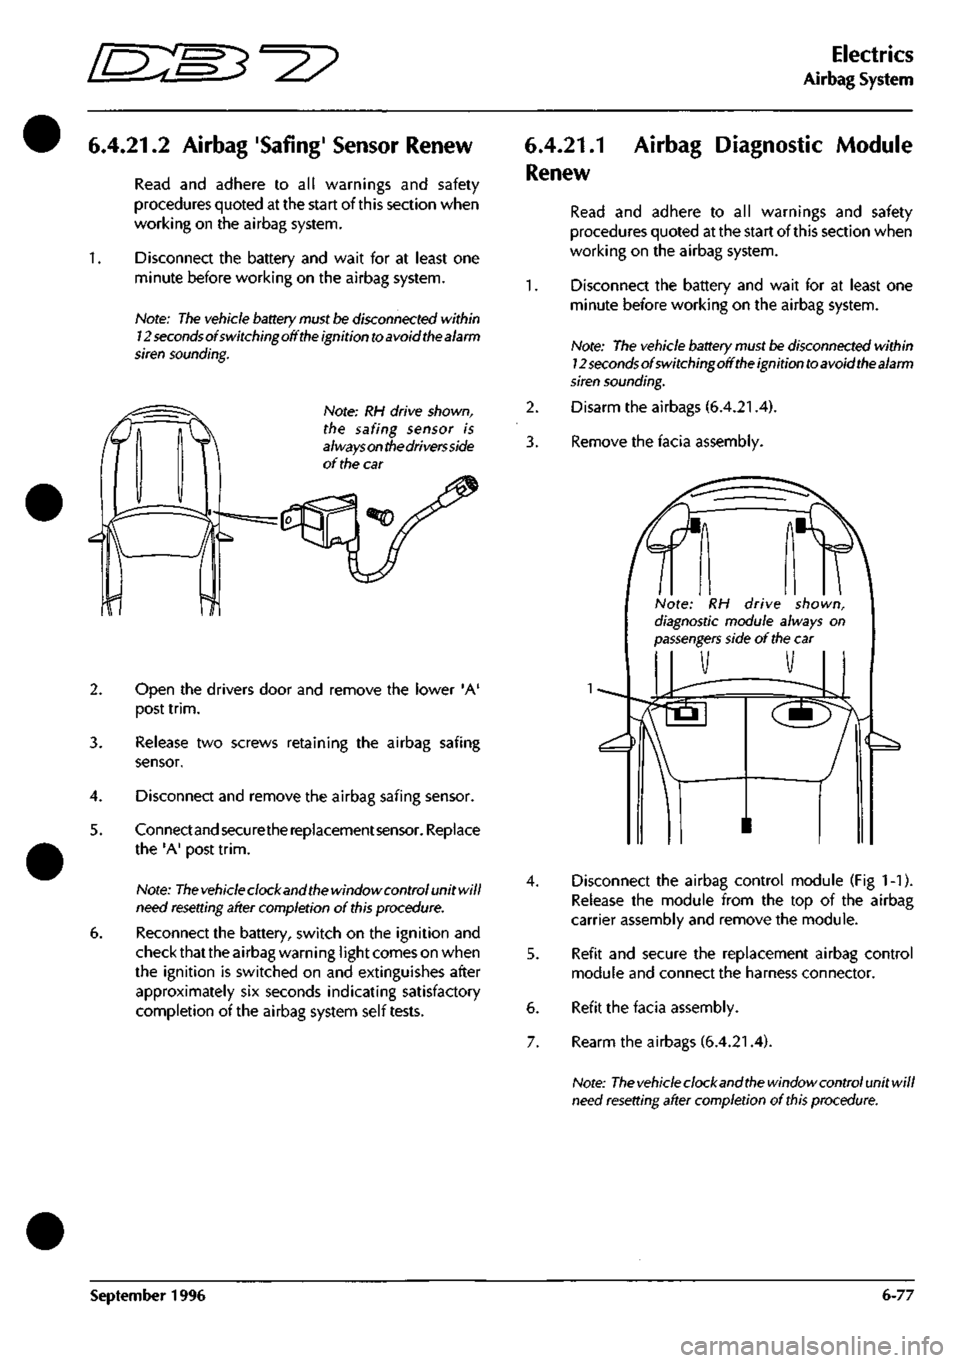
Note: RH drive shown,
the safing sensor is
always
on
the drivers side
of the car
2. Open the drivers door and remove the lower 'A'
post
trim.
3. Release two screws retaining the airbag safing
sensor.
4.
Disconnect and remove the airbag safing sensor.
5. Connectand securethe replacement sensor. Replace
the 'A' post
trim.
Note:
The
vehicle clock and
the
window control unit will
need
resetting
after completion of
this
procedure.
6. Reconnect the battery, switch on the ignition and
check that the airbag warning
I
ight comes on when
the ignition is switched on and extinguishes after
approximately six seconds indicating satisfactory
completion of the airbag system self tests.
6.4.21.1
Renew
Airbag Diagnostic Module
1.
2.
3.
4.
6.
7.
Read and adhere to all warnings and safety
procedures quoted at the start of this section when
working on the airbag system.
Disconnect the battery and wait for at least one
minute before working on the airbag system.
Note: The vehicle battery must
be
disconnected within
l2secondsofswitchingofftheignitiontoavoidthealarm
siren
sounding.
Disarm the airbags (6.4.21.4).
Remove the facia assembly.
Note: RH drive shown,
diagnostic module always on
passengers
side of
the
car
Disconnect the airbag control module (Fig 1-1).
Release the module from the top of the airbag
carrier assembly and remove the module.
Refit and secure the replacement airbag control
module and connect the harness connector.
Refit the facia assembly.
Rearm the airbags (6.4.21.4).
Note:
The
vehicle clock and
the
window control unit will
need
resetting
after completion of this procedure.
September 1996 6-77
Page 196 of 421
Electrics
Airbag System ^2?
6.4.21.4
Airbag Disarming/Arming
Procedures
WARNINGS AND CAUTIONS:
WARNINGS:
Disarm the airbags by disconnecting the battery
ground (black)
lead,
waiting one minute and then
removing the airbag modules before servicing of
any airbag or steering column component.
After disconnecting the battery ground
lead,
allow
a minimum of one minute delay for the back-up
power supply to discharge before servicing the
airbag system.
The system components are non-serviceable, if
faults are
suspected,
change components for new
items
only.
Failure to observe the above procedures may
result in accidental deployment of the airbags.
Always wear safety
glasses
when working on airbag
equipped vehicles.
Personnel carrying an airbag module must ensure
that the module and trim cover are pointing away
from the
body.
When positioning on a bench or
work surface, ensure that the airbag module and
trim cover face upwards to limit motion on
accidental deployment.
Always wear
gloves
when handling deployed airbag
modules. Deposits of sodium hydroxide may be
presenton the module surface. If sodium hydroxide
contacts any area of the skin, wash the affected
area immediately with mild soap and
water.
Dispose of the deployed airbag using the correct
procedures referred to in this section.
Cautions:
When scrapping vehicles,
ensure
that the
airbags
have
been deployed (see
Scrapping Vehicles
with Live
Airbags).
If a component
has been
renewed and the fault
does
not
clear,
refit the original item and repeat the diagnostic
procedure.
After
servicing,
repeatthe diagnostic
procedures
to ensure
correct
system
operation.
Renew
the airbag module if the surrounding trim
panels
are
damaged.
Do not attempt to repaint trim covers as
paint may
damage
cover material.
Disarming the Airbags
3.
4.
WARNING: Carry out the following disarming
procedure before attempting any work on the
vehicles electrical
systems.
Note: The battery ground (black) lead must be
disconnected within 12 seconds of switching off the
ignition to avoid the alarm siren sounding.
Disconnect the battery ground
lead.
Allow a
minimum of one minute delay for the back-up
power supply to discharge.
Remove the drivers side airbag module and replace
it with an airbag simulatorfrom the simulator kit (Pt
No.
43.27028).
Remove the passengers airbag module and replace
it with an airbag simulator from the simulator kit.
Reconnect the battery ground.
Rearming the Airbags
WARNING: Carry out the following procedure to
rearm and check the airbags after completing all
work on the vehicles electrical
systems.
Note: The vehicle battery
must be
disconnected within
12
seconds
of switching off
the
ignition
to
avoid the alarm
siren sounding.
^. Disconnect the battery ground
lead.
Allow a
minimum of one minute delay for the back-up
power supply to discharge.
2.
Removethedriverssideairbagsimulatorand replace
it with the drivers airbag module. Secure the airbag
module with the two captive torx screws.
3. Remove the passengers side airbag simulator and
replace it with the passenger side airbag module.
Secure the module with four nuts and washers.
Close the passenger side airbag door.
4.
Reconnect the battery ground.
5. Switch on the ignition and check for correct
indications from the SRS/AIRBAG warning light.
TheSRS/AIRBAC lamp should come on after
a
brief
delay and remain on for approximately six seconds
during the airbag system self check. The lamp will
extinguish upon satisfactory completion of the self
check, or will flash a diagnostic code if an airbag
system fault is detected. Continuous illumination of
the warning lamp may indicate a seatbelt
pretensioner fault
Note:
Reset the
clock and window
ECUs
on completion.
6-80 September 1996
Page 229 of 421
O" D^?
Body and Trim
Contents
Contents
Body and Trim
Body Repair
Potential Risks
Precautions
General Repair Notes
Steel Body Parts - Repair, Remove and Replace
RTM Body Parts
Body Panel and Trim Removal
Front Apron
Front Undertray
Wheel Arch Liners
Side Sills (top fixings)
Side Sills (bottom fixings)
Rear Bumper
Doors
Door Liners
Door Liner (components)
Steering Wheel
Column Switches
Instrument Panel (surround)
Instrument Panel
Facia Underscuttles
Glove Box
Facia Mountings (1)
Facia Mountings (2)
Console Instruments
Radio
Front Seats
Ashtray
Centre Console
Seat ECU Covers
Rear Console
Rear Seats and C Post Trim
Quarter Panels, B Post Panels, Parcel Shelf
Headlining
Roof System Description and Repair Procedures
Vol ante Roof
Roof and Rear Quarter Light Control
Roof Component Location
Roof Control System
9.0.02.1
Roof Removal/Replacement
9.0.02.3
Roof Hydrailic Control System
9.0.02.5
Bleeding the Roof Hydraulic System
9.1.01.1
Rear Quarter Window Renewal
9.1.01.2
Rear Quarter Glass Adjustment
9.1.01.4
Rear Quarter Window Lift Motor - LH
9.1.01.5
Rear Quarter Window Lift Motor - RH
Roof Sealing and Wind Noise
9.2.01.5
'A' Post/Header Sealing and Lock Adj
9.2.01.6
Roof Seals - Adjustment
9.2.01.7
Cheater Plate Seals - Adjust/Renew
9.2.01.8
Door Glass Adjustment
Alcantara Cleaning
7-1
7-2
7-2
7-3
7-3
7-4
7-5
7-6
Sheet 1
Sheet 2
Sheet 3
Sheet 4
Sheet 5
Sheet 6
Sheet 7
Sheet 8
Sheet 9
Sheet 10
Sheet 11
Sheet 12
Sheet 13
Sheet 14
Sheet 15
Sheet 16
Sheet 17
Sheet 18
Sheet 19
Sheet 20
Sheet 21
Sheet 22
Sheet 23
Sheet 24
Sheet 25
Sheet 26
Sheet 27
7-7
7-7
7-8
7-9
7-10
7-11
7-12
7-13
7-14
7-15
7-16
7-17
7-17
7-18
7-19
7-20
7-21
May 1996 7-1
Page 268 of 421
•=2?
Body and Trim
Rear Quarter Window Renewal
9.1.01.1 -
Rear
Quarter Window Renewal
Procedure
1.
Move the front seat forward to gain access.
2.
Switch on the ignition, release the roof locking
latches and lower the roof to approximately the
midway position. Switch off the ignition.
3. Remove the rear seat squab and cushion. Remove
the rear quarter trim panel.
4.
Remove the roof cylinder support bracket securing
bolts.
5. Support the roof, removethecylindertoroofsecuring
bolt. Remove the cylinder bracket.
6. Disconnectthecylinderfromthepivotand carefully
lower the roof.
7. Remove the window motor cover. Disconnect the
window motor feed wires.
Reassembly
Reassembly is the reverse of the removal procedure.
On reconnection of the motor, check the window
height as follows:
1.
Switch on the ignition and raise the rear quarter
windows.
2.
Check that the top of the glass is exactly level with
the top edge of the fully raised door window.
3. Check for
a
complete vertical seal between the rear
quarter window and the door window.
4.
If the rear window alignment is not correct, adjust
it using the procedure in the Wind Noise and
Sealing section.
5. Switch off the ignition and complete the reassembly.
6. Switch on the ignition, raise the roof and recheck
for complete sealing at the rear window top edge.
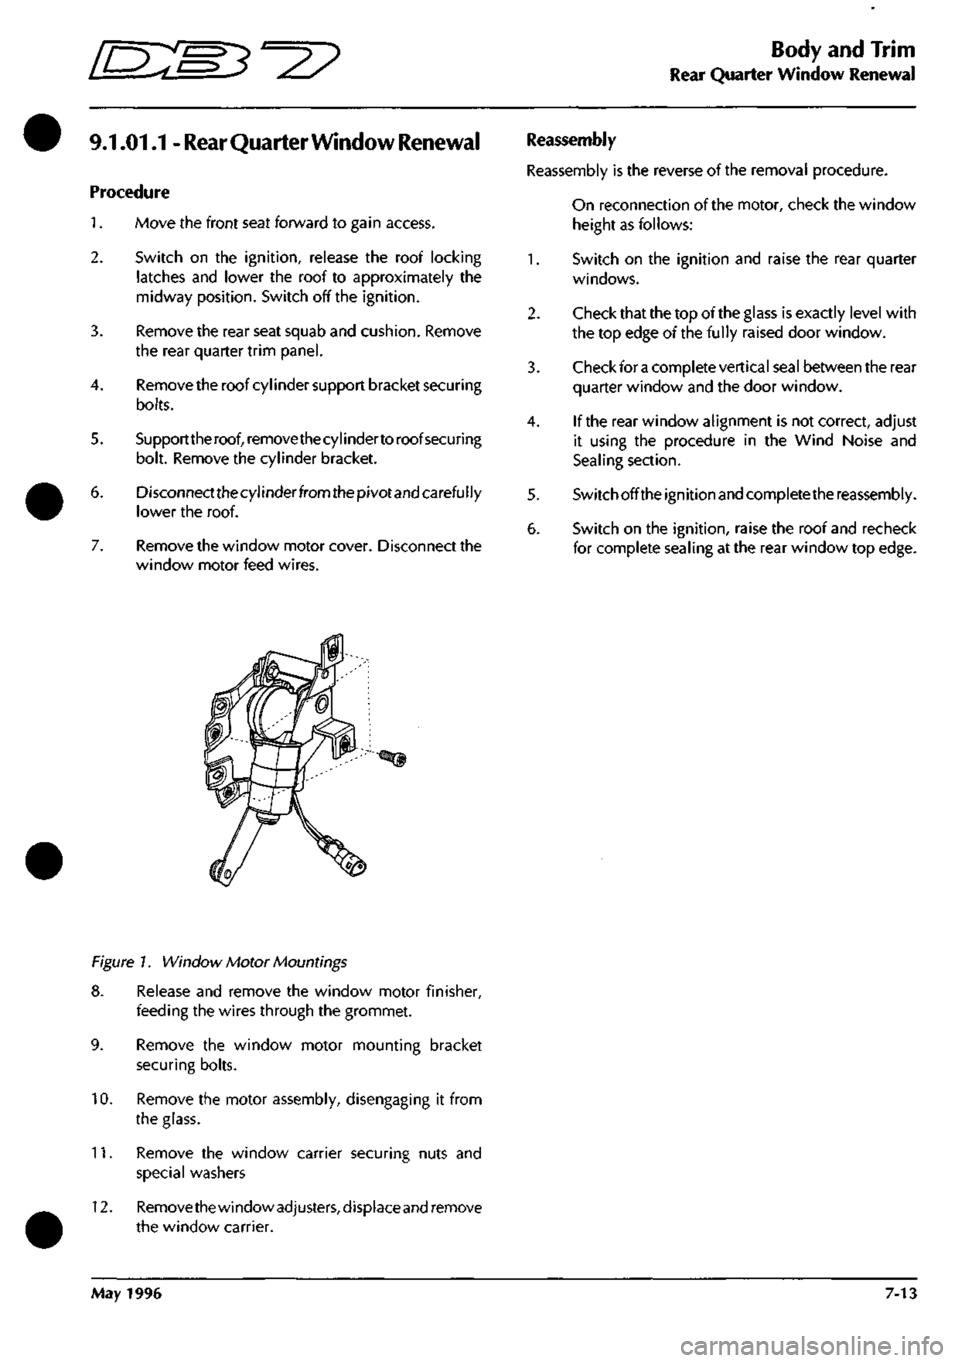
Figure 1. Window Motor Mountings
8. Release and remove the window motor finisher,
feeding the wires through the grommet.
9. Remove the window motor mounting bracket
securing bolts.
10.
Remove the motor assembly, disengaging it from
the glass.
11.
Remove the window carrier securing nuts and
special washers
12.
Remove the window
adjusters,
d isplace and remove
the window carrier.
May 1996 7-13
Page 269 of 421
Body and Trim
Rear Quarter Glass Adjustment "^^
9.1.01.2
-
Rear Quarter Glass Adjustment
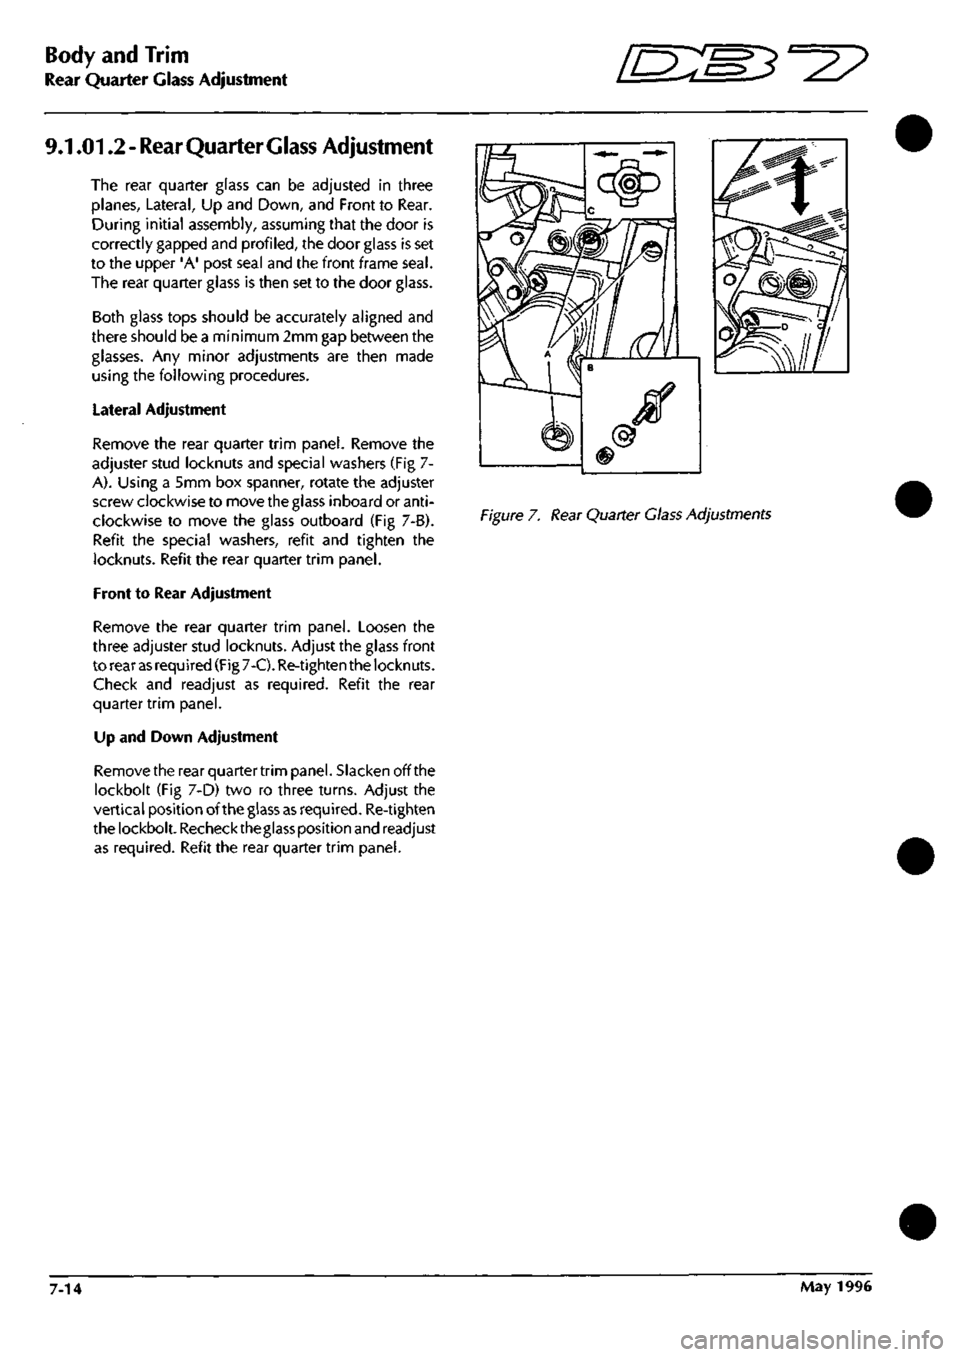
The rear quarter glass can be adjusted in three
planes, Lateral, Up and Down, and Front to Rear.
During initial assembly, assuming that the door is
correctly gapped and profiled, the door glass is set
to the upper 'A' post seal and the front frame
seal.
The rear quarter glass is then set to the door glass.
Both glass tops should be accurately aligned and
there should be a minimum 2mm gap between the
glasses. Any minor adjustments are then made
using the following procedures.
Lateral Adjustment
Remove the rear quarter trim panel. Remove the
adjuster stud locknuts and special washers (Fig 7-
A).
Using a 5mm box spanner, rotate the adjuster
screw clockwise to move the glass inboard or
anti
clockwise to move the glass outboard (Fig 7-B).
Refit the special washers, refit and tighten the
locknuts. Refit the rear quarter trim panel.
Front to Rear Adjustment
Remove the rear quarter trim panel. Loosen the
three adjuster stud locknuts. Adjust the glass front
to rear
as
required (Fig 7-C). Re-tighten the locknuts.
Check and readjust as required. Refit the rear
quarter trim panel.
Up and Down Adjustment
Remove the rear quarter trim panel. Slacken off the
lockbolt (Fig 7-D) two ro three turns. Adjust the
vertical position of the glass
as
required. Re-tighten
the lockbolt. Rechecktheglass position and readjust
as required. Refit the rear quarter trim panel.
Figure 7. Rear Quarter Class Adjustments
7-14 May 1996
Page 270 of 421
^^7
Body and Trim
Rear Quarter Window Lift Motor
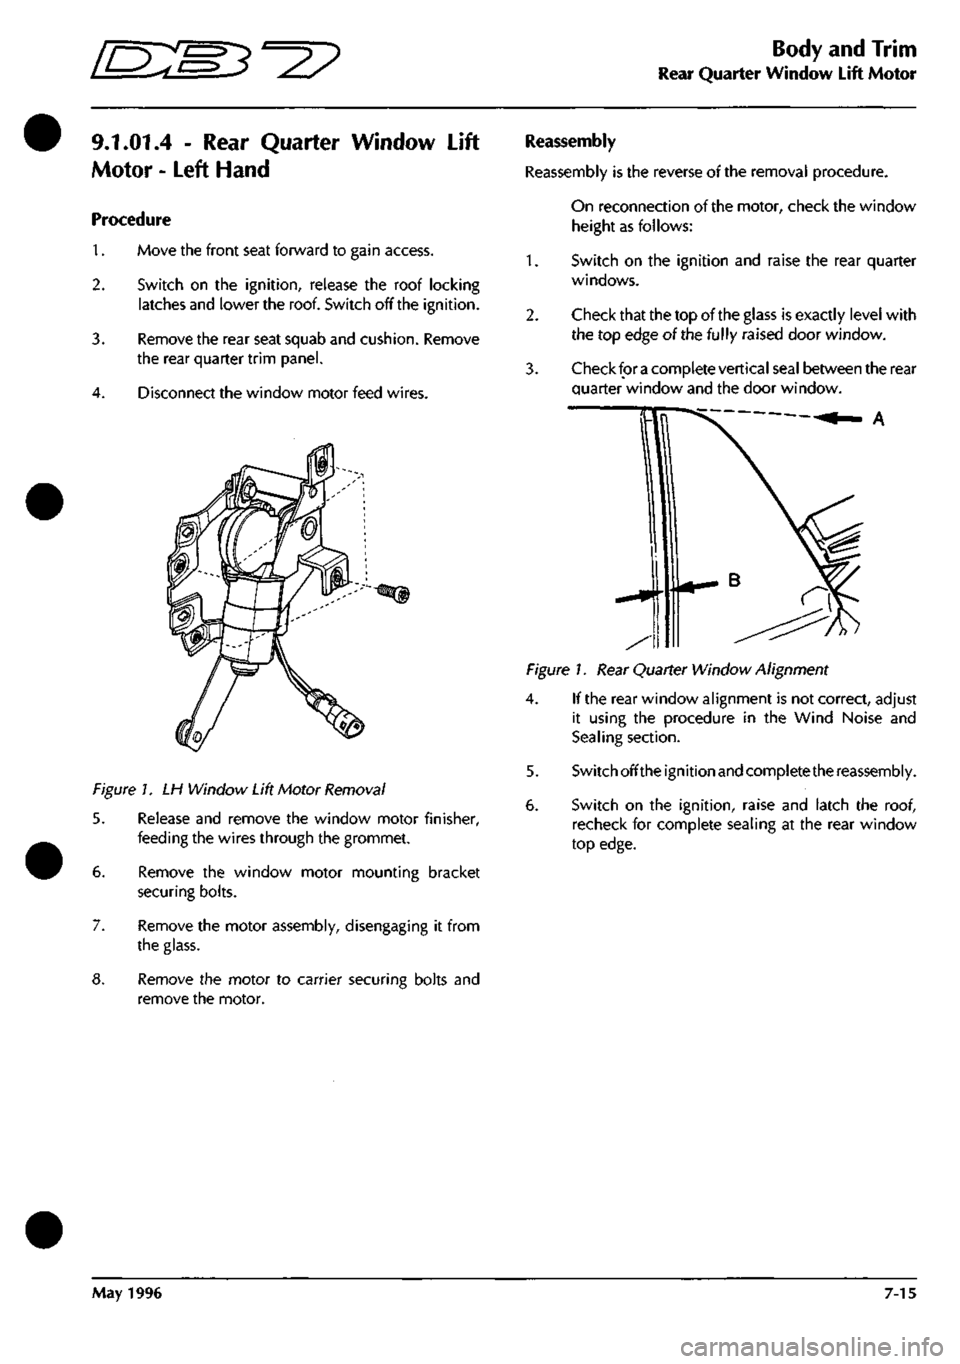
9.1.01.4 - Rear Quarter Window Lift
Motor - Left Hand
Procedure
1.
Move the front seat forward to gain access.
2.
Switch on the ignition, release the roof locking
latches and lower the roof. Switch off the ignition.
Remove the rear seat squab and cushion. Remove
the rear quarter trim panel.
Disconnect the window motor feed wires.
Figure 1. LH Window Lift Motor Removal
5. Release and remove the window motor finisher,
feeding the wires through the grommet.
6. Remove the window motor mounting bracket
securing bolts.
7. Remove the motor assembly, disengaging it from
the glass.
8. Remove the motor to carrier securing bolts and
remove the motor.
Reassembly
Reassembly is the reverse of the removal procedure.
On reconnection of the motor, check the window
height as follows:
1.
2.
Switch on the ignition and raise the rear quarter
windows.
Check that the top of the glass is exactly level with
the top edge of the fully raised door window.
Check for
a
complete vertical seal between the rear
quarter window and the door window.
Figure 1. Rear Quarter Window Alignment
4.
If the rear window alignment is not correct, adjust
it using the procedure in the Wind Noise and
Sealing section.
5. Switch off the ignition and complete the reassembly.
6. Switch on the ignition, raise and latch the roof,
recheck for complete sealing at the rear window
top edge.
May 1996 7-15