ECU ASTON MARTIN DB7 1997 Workshop Manual
[x] Cancel search | Manufacturer: ASTON MARTIN, Model Year: 1997, Model line: DB7, Model: ASTON MARTIN DB7 1997Pages: 421, PDF Size: 9.31 MB
Page 5 of 421
//—-^
^^^^5~^
' -^ ^ Introduction
Safety Precautions
Safety Precautions (continued)
Electrical Equipment
1.
Ensure that electrical equipment is in safe working order before use.
2.
Inspect power leads of all mains electrical equipment for damage and security, and check that it is properly
earthed.
3. Ensure that electrical equipment is protected by a fuse of the correct current rating.
4.
Disconnect the battery before commencing repair operations to the electrical system, fuel system and engine
or when working beneath the vehicle.
Exhaust Fumes
Engines should not be run in confined spaces, exhaust fumes contain harmful and toxic substances including carbon
monoxide which can prove fatal if inhaled. Engines must only be run where there is fume extraction equipment in
operation or where there is adequate ventilation.
Fire Precautions
1.
Ensure that a suitable form of fire extinguisher is conveniently located near the work area.
2.
Keep oils, solvents and combustible materials away from naked flames and other sources of ignition.
3. Ensure that NO SMOKING signs are posted around areas where combustible materials and vapour may be
present and ensure that the warnings are strictly observed.
4.
Ensure that dry sand is available to soak up any spillage of fuel or other flammable solutions.
5. Fume extraction equipment must be available and in full working order to remove combustible and toxic
vapours.
6. All personnel should be aware of the fire drill procedures and precautions.
Jacking and Lifting
1.
The recommended procedures for lifting, jacking and towing are included latefin this seetion-and must be
strictly observed to ensure personal safety.
2.
Always use a vehicle hoist, ramp or pit for working beneath the car in preferencetd^&^cking
3. Never rely on a jack to support a car independently, use axle stands or blocks carefully pJaQed at the jacking
points to provide rigid support.
4.
When working beneath a vehicle, chock the wheels as well as applying the handbrake.
5. Ensure that the vehicle is standing on firm level ground before jacking or lifting.
5. Check any lifting equipment used has adequate capacity for the load being lifted and is ih"fdll working order.
Tools and Equipment
1.
Do not leave tools, equipment, spilt oil, etc. around or on the work area.
2.
Ensure that tools and equipment used are in good condition; do not use damaged or defective tools or
equipment.
3. Do not apply heat in an attempt to free stiff nuts or fittings; as well as causing damage to protective coatings,
there is a risk of damage to electronic equipment and brake lines from stray heat.
4.
Use the recommended service tool where instructed to do so.
April 1997 v
Page 10 of 421
Electrics
Electrical Component Location and Wiring Information - Up to 97 MY
Component Index 6-19
Component Location Diagrams 6-23
Electronic Control Unit Location Diagram 6-38
Relay Panel, Fusebox and Earth Point Location Diagram 6-39
Loom Location Diagrams 6-40
Wiring Diagrams and Splice Lists 6-42
Electrical Component Location and Wiring Information - 97 MY
Component Index 6-43
Component Location Diagrams 6-47
Relay Location Diagrams 6-64
Wiring Diagrams and Splice Lists 6-68
Airbag System - Repair and Diagnostic Procedures 6-69
Seat Belt Pretensioner System - Repair and Diagnostic Procedures 6-101
Security System (Restricted Circulation) 6-111
PATS System (Restricted Circulation) 6-121
97.5 Model Year
6.6.03 Seat Removal (97.5 MY)
6.6.08 Seat Control Module (97.5 MY)
6-127
6-128
6-2 April! 997
Page 11 of 421
ES^^^?
Electrics
Headlamp Unit / Headlamp Alignment
6.1.01 Headlamp Unit
Procedure
1.
Remove the front apron undertray and remove the
complete nose assembly.
2.
Release the headlamp plug from the body clip and
disconnect the
plug.
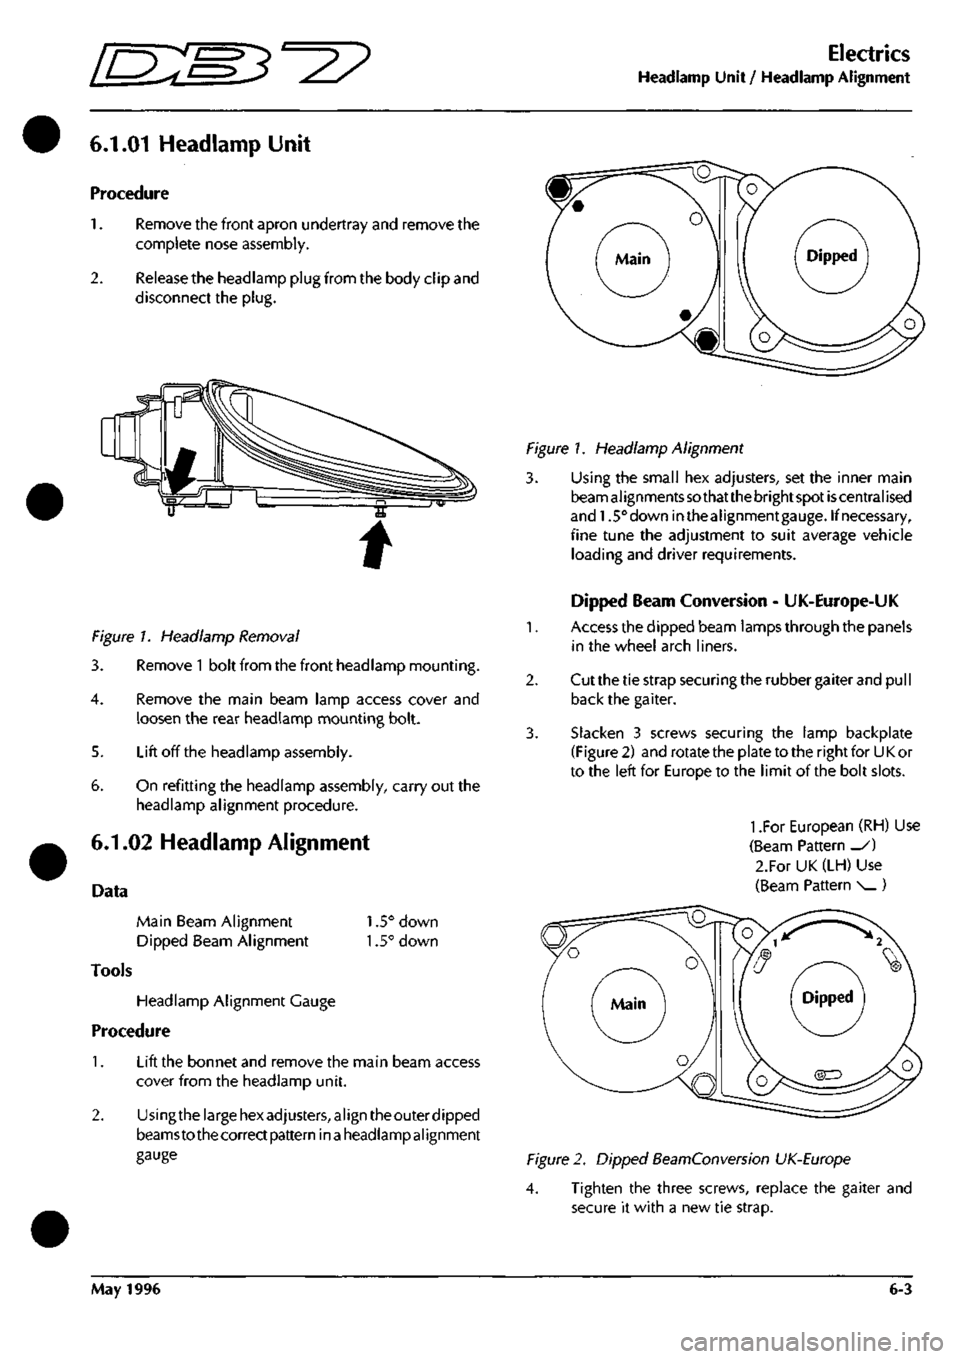
Figure 7. Headlamp Removal
3. Remove
1
bolt from the front headlamp mounting.
4.
Remove the main beam lamp access cover and
loosen the rear headlamp mounting bolt.
5. Lift off the headlamp assembly.
5. On refitting the headlamp assembly, carry out the
headlamp alignment procedure.
6.1.02 Headlamp Alignment
Data
Main Beam Alignment 1.5° down
Dipped Beam Alignment 1.5° down
Tools
Headlamp Alignment Gauge
Procedure
1.
Lift the bonnet and remove the main beam access
cover from the headlamp unit.
2.
Usingthe large hex adjusters, align theouter dipped
beamsto thecorrect pattern in
a
headlampalignment
gauge
Figure 1. Headlamp Alignment
3. Using the small hex adjusters, set the inner main
beam al ignments
so
that the bright spot
is
central ised
and 1.5° down inthealignmentgauge. If necessary,
fine tune the adjustment to suit average vehicle
loading and driver requirements.
Dipped Beam Conversion - UK-Europe-UK
1.
Access the dipped beam lamps through the panels
in the wheel arch liners.
2.
Cut the tie strap securing the rubber gaiter and pull
back the gaiter.
3. Slacken 3 screws securing the lamp backplate
(Figure 2) and rotate the plate to the right for U
K
or
to the left for Europe to the limit of the bolt slots.
1
.For European (RH) Use
(Beam Pattern _/)
2.For UK (LH) Use
(Beam Pattern ^^)
Figure 2. Dipped BeamConversion UK-Europe
4. Tighten the three screws, replace the gaiter and
secure it with a new tie strap.
May 1996 6-3
Page 14 of 421
Electrics
Starter Motor / Steering Wheel - Removal Procedures ^n:M3^^2?
6.3.02 Starter Motor
Procedure
1.
Disconnect the battery.
2.
Remove the inlet air trunkins
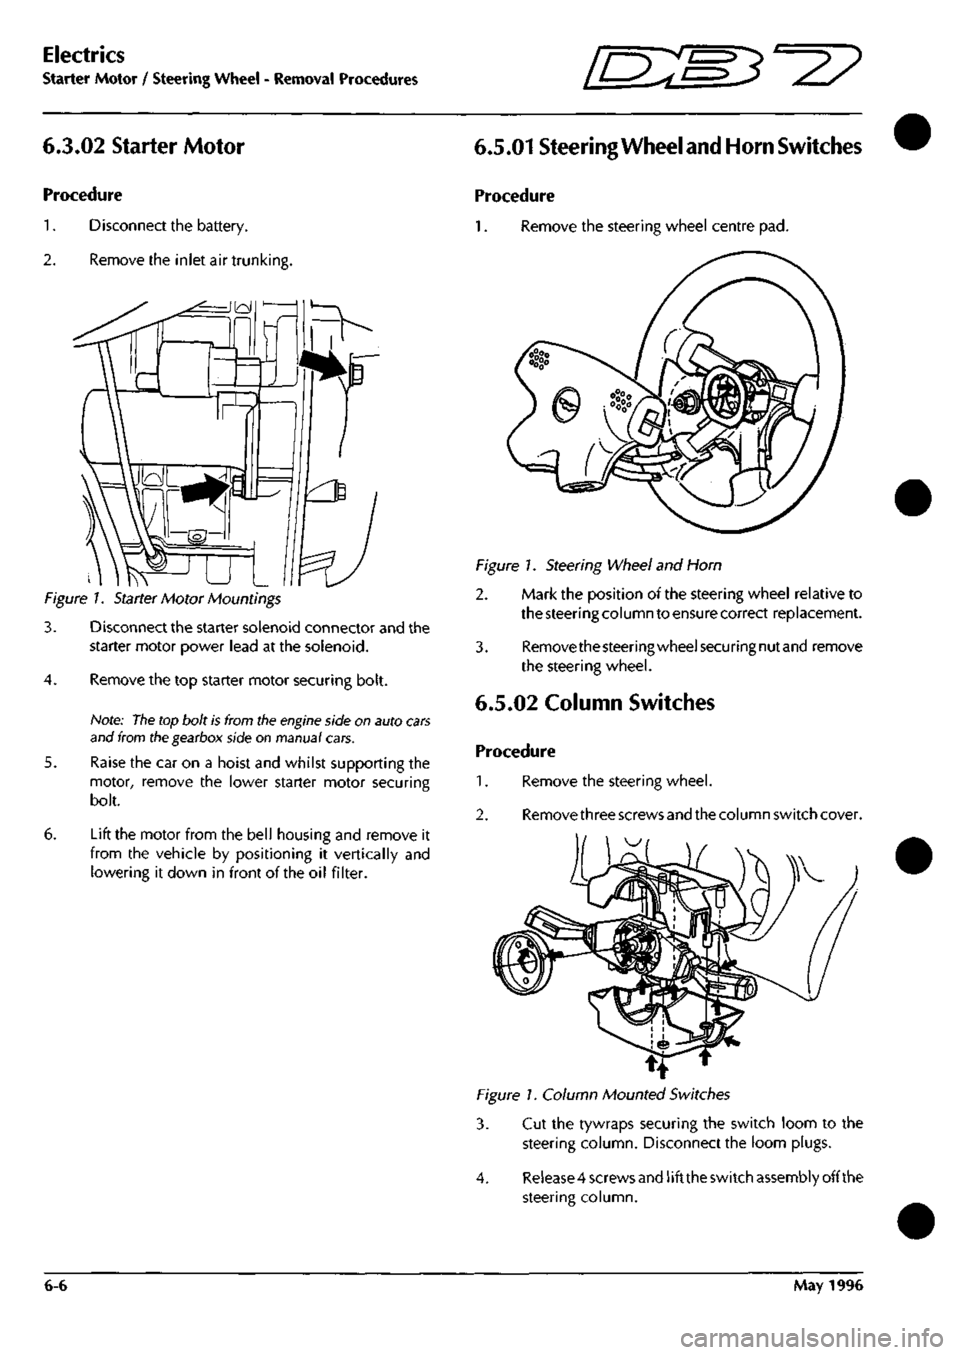
Figure 1. Starter Motor Mountings
3. Disconnect the starter solenoid connector and the
starter motor power lead at the solenoid.
4.
Remove the top starter motor securing bolt.
Note:
The
top bolt is from tlie
engine
side on auto
cars
and from ttie gearbox side on manual cars.
5. Raise the car on a hoist and whilst supporting the
motor, remove the lower starter motor securing
bolt.
6. Lift the motor from the bell housing and remove it
from the vehicle by positioning it vertically and
lowering it down in front of the oil filter.
6.5.01 Steering
Wheel and Horn
Switches
Procedure
1.
Remove the steering wheel centre pad.
Figure 1. Steering Wheel and Horn
2. Mark the position of the steering wheel relative to
the steering column to ensure correct replacement.
3. Removethesteeringwheelsecuringnutand remove
the steering wheel.
6.5.02 Column Switches
Procedure
1.
Remove the steering wheel.
2.
Remove three screws and the column switch cover.
1^
Figure 1. Column Mounted Switches
3. Cut the tywraps securing the switch loom to the
steering column. Disconnect the loom plugs.
4.
Release 4 screws and
1
ift the switch assembly off the
steering column.
6-6 May 1996
Page 15 of 421
Em3^^^
Electrics
Ignition Switch / Instrument Panel - Removal Procedures
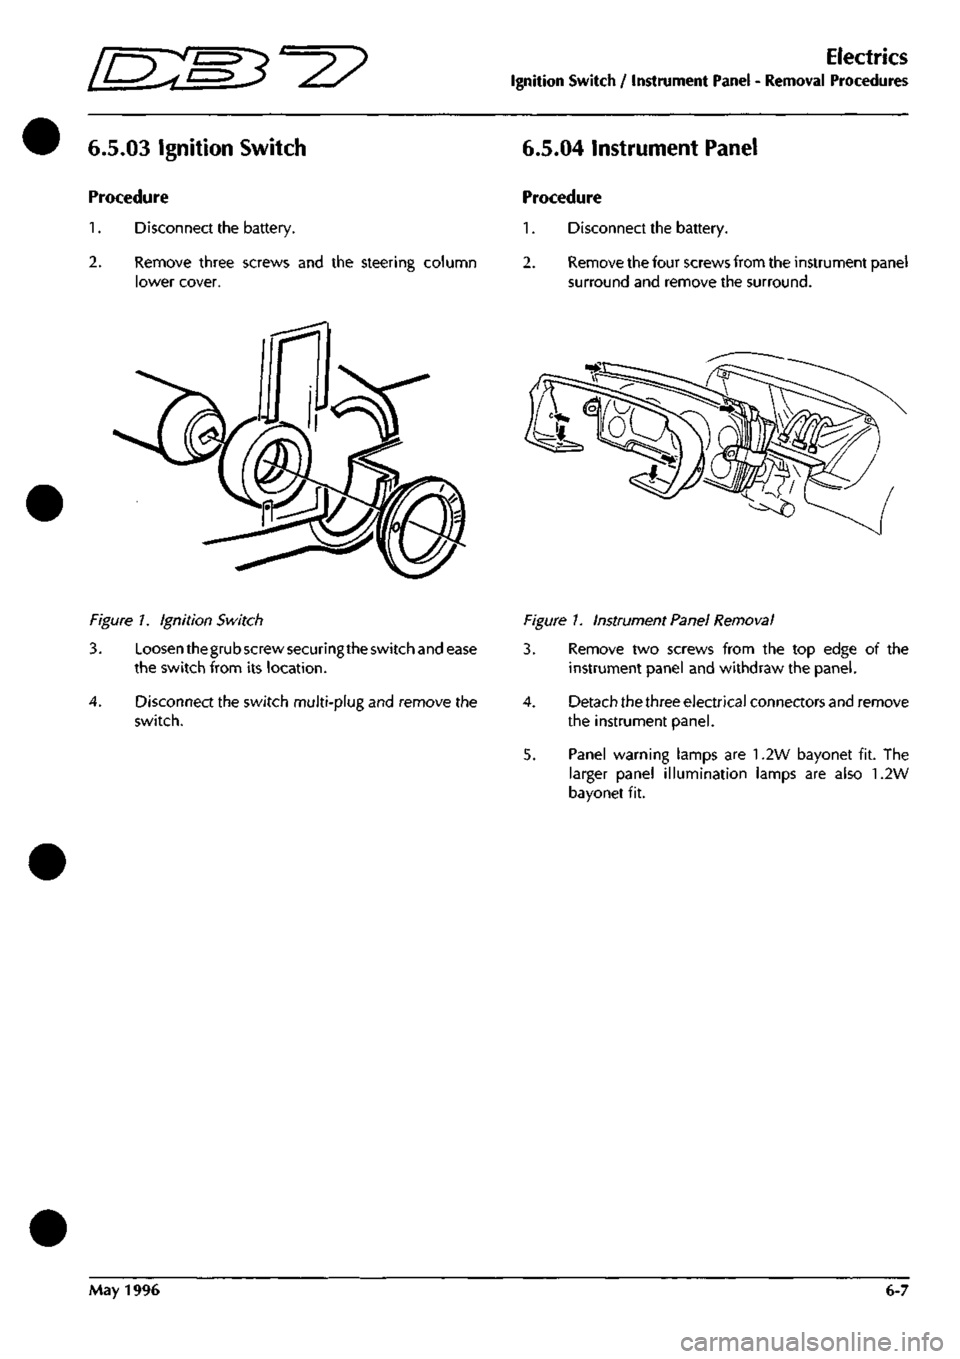
6.5.03 Ignition Switch 6.5.04 Instrument Panel
Procedure
1.
Disconnect the battery.
2.
Remove three screws and the steering column
lower cover.
Procedure
1.
Disconnect the battery.
2.
Remove the four screws from the instrument pane!
surround and remove the surround.
Figure 7. Ignition Switch
3.
4.
Loosen thegrub screw securing the switch and ease
the switch from its location.
Disconnect the switch multi-plug and remove the
switch.
Figure 1. Instrument Panel Removal
3. Remove two screws from the top edge of the
instrument panel and withdraw the panel.
4.
Detach the three electrical connectors and remove
the instrument panel.
5. Panel warning lamps are 1.2W bayonet fit. The
larger panel illumination lamps are also 1.2W
bayonet fit.
May 1996 6-7
Page 17 of 421
lEM^-^?
Electrics
Control Switch - Removal Procedures
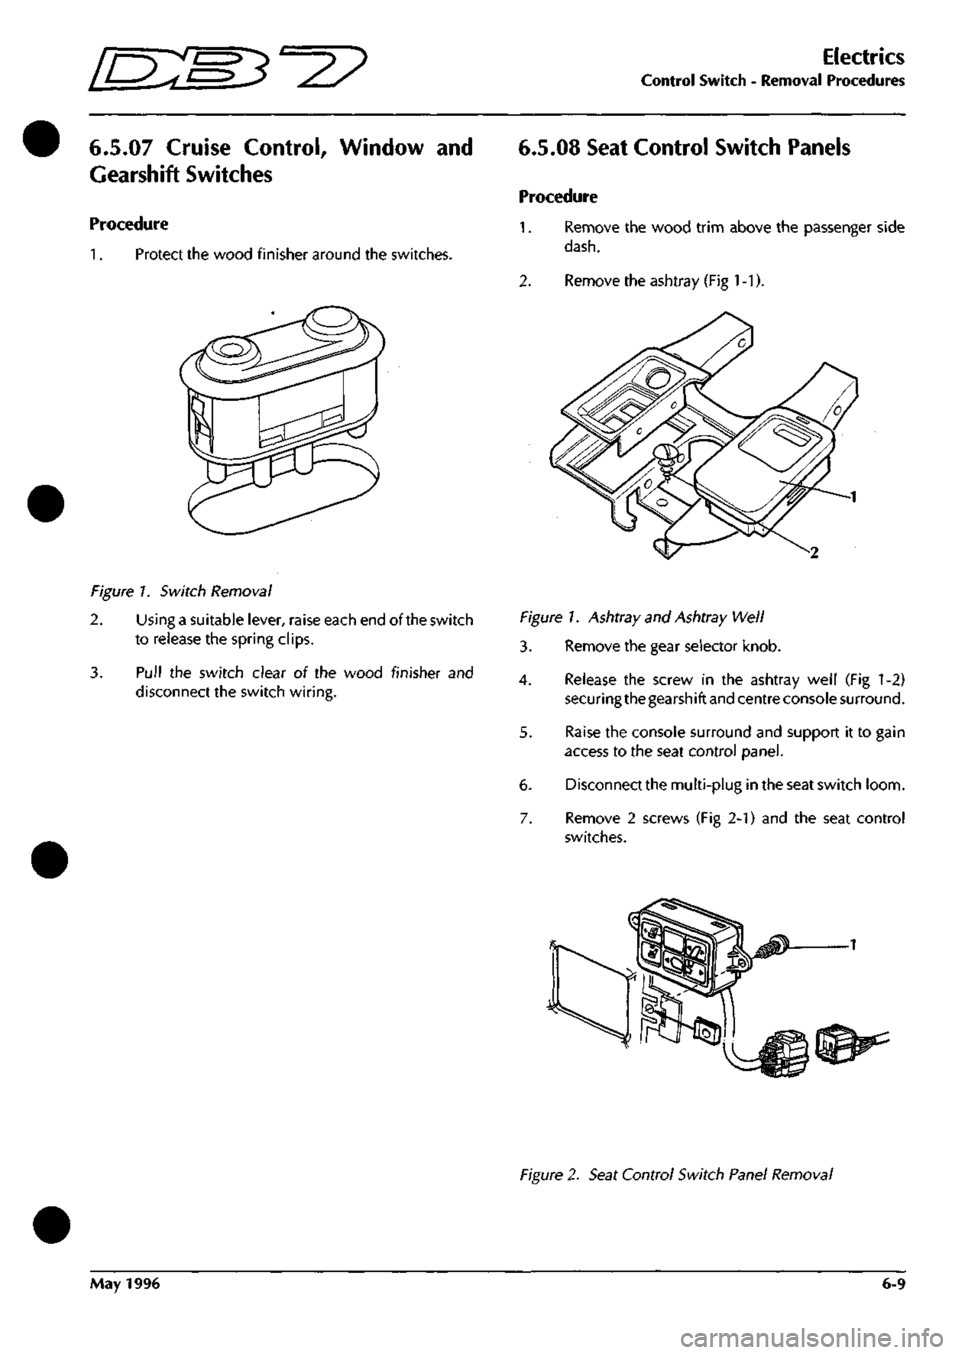
6.5.07 Cruise Control, Window and
Gearshift Switches
Procedure
1.
Protect the wood finisher around the switches.
6.5.08 Seat Control Switch Panels
Procedure
1.
Remove the wood trim above the passenger side
dash.
2.
Remove the ashtray (Fig
1
-1).
Figure 7. Switch Removal
2.
Using a suitable lever, raise each end of the switch
to release the spring clips.
3. Pull the switch clear oi the wood finisher and
disconnect the switch wiring.
Figure!. Ashtray and Ashtray Well
3. Remove the gear selector knob.
4.
Release the screw in the ashtray well (Fig 1-2)
securing the gearshift and centre console surround.
5. Raise the console surround and support it to gain
access to the seat control panel.
6. Disconnect the multi-plug in the seat switch loom.
7. Remove 2 screws (Fig 2-1) and the seat control
switches.
Figure 2. Seat Control Switch Panel Removal
May 1996 6-9
Page 18 of 421
Electrics
Interior Lamps and Front Seat - Removal Procedures EM^^^
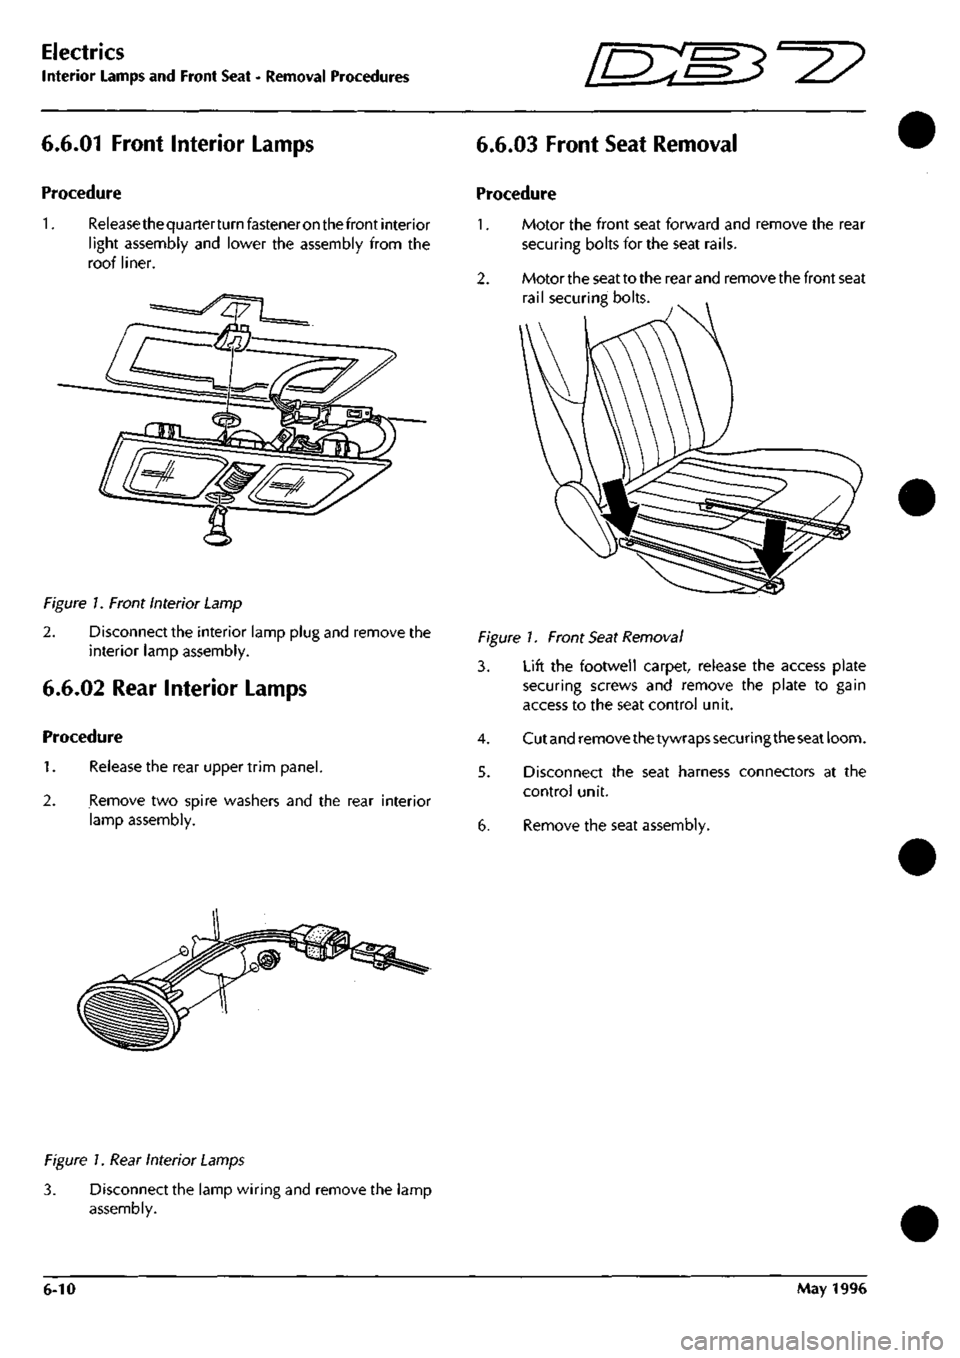
6.6.01 Front Interior Lamps
Procedure
1.
Releasethequarterturnfasteneronthefrontinterior
light assembly and lower the assembly from the
roof liner.
Figure 7. Front Interior Lamp
2. Disconnect the interior lamp plug and remove the
interior lamp assembly.
6.6.02 Rear Interior Lamps
Procedure
1.
Release the rear upper trim panel.
2.
Remove two spire washers and the rear interior
lamp assembly.
6.6.03 Front Seat Removal
Procedure
1.
2.
Motor the front seat forward and remove the rear
securing bolts for the seat rails.
Motor the seat to the rear and remove the front seat
rail securing bolts.
Figure 1. Front Seat Removal
3. Lift the footweil carpet, release the access plate
securing screws and remove the plate to gain
access to the seat control unit.
4.
Cutand remove thetywrapssecuringtheseat loom.
5. Disconnect the seat harness connectors at the
control unit.
6. Remove the seat assembly.
Figure 7. Rear Interior Lamps
3. Disconnect the lamp wiring and remove the lamp
assembly.
6-10 May 1996
Page 19 of 421
Em3^^
Electrics
Front Seat Runner and Rail Motor - Removal Procedures
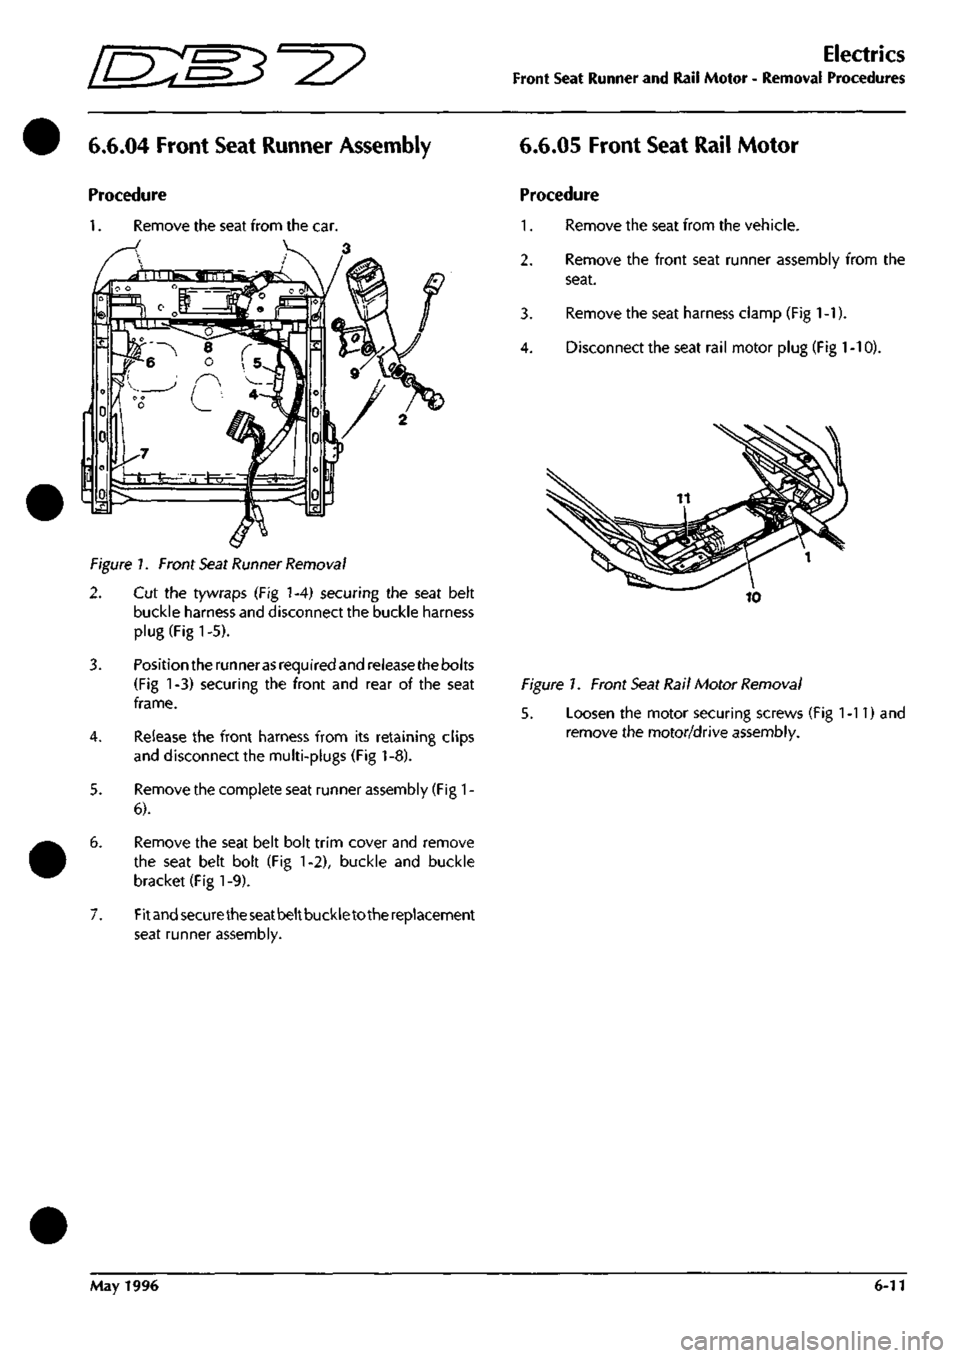
6.6.04 Front Seat Runner Assembly
Procedure
1.
Remove the seat from the car.
7>
Figure 1. Front Seat Runner Removal
2. Cut the tywraps (Fig 1-4) securing the seat belt
buckle harness and disconnect the buckle harness
plug (Fig 1-5).
3. Position the runneras required and release the bolts
(Fig 1-3) securing the front and rear of the seat
frame.
4.
Release the front harness from its retaining clips
and disconnect the multi-plugs (Fig 1-8).
5. Remove the complete seat runner assembly (Fig
1
-
6).
6. Remove the seat belt bolt trim cover and remove
the seat belt bolt (Fig 1-2), buckle and buckle
bracket (Fig 1-9).
7. Fitandsecuretheseatbeltbuckletothereplacement
seat runner assembly.
6.6.05 Front Seat Rail Motor
Procedure
1.
Remove the seat from the vehicle.
2.
Remove the front seat runner assembly from the
seat.
3. Remove the seat harness clamp (Fig
1
-1).
4.
Disconnect the seat rail motor plug (Fig
1
-10).
Figure 1. Front Seat Rail Motor Removal
5. Loosen the motor securing screws (Fig 1-11) and
remove the motor/drive assembly.
May 1996 6-11
Page 20 of 421
Electrics
Lumbar Support, Recline Motor and Seat Control Unit - Removal Procedures
6.6.06 Lumbar Support Motor
Procedure
1.
Remove the seat from the car and remove the seat
back finisher panel.
2.
Disconnect the lumbar motor plug and the lumbar
diaphragm air line (Fig 1) and remove the motor.
Figure /. Lumbar Support Motor Removal
6.6.07 Seat Recline Motor
6.6.08 Seat Control Unit
Procedure
1.
Lift the footwell carpet, release the access plate
securing screws and remove the plate to gain
access to the seat control unit.
Figure 1. Seat Control Unit Removal
2. Disconnect the multiplug from the control unit.
3. Release the securing screws and remove the seat
control unit.
Procedure
1.
Remove the seat from the car and remove the seat
back finisher panel.
2.
Disconnect the recline motor connector.
Figure 1. Seat Recline Motor Removal
3. Disconnect the trigger cable from the motor.
4.
Loosen two screws and remove the recline motor
from its bracket.
6.7.01 Door Edge Lamps
Procedure
1.
Lever the lamp assembly from the door
edge,
taking
precautions to protect the door paintwork.
Figure 1. Door Edge Lamp Removal
2. Disconnect the lamp wiring and remove the door
edge lamp assembly.
6-12 May 1996
Page 21 of 421
3^?
Electrics
Rear Lamp Cluster / Central Locking System / Door Lock Motors
6.7.02 Rear Lamp Cluster Door Mounted Components
Procedure
1.
Remove the rear lamp cluster inner cover.
2.
Release the boot rear liner
3. Release the two nuts and one screw securing the
rear lamp surround and remove the surround.
Figure 7. Rear Lamp Cluster
4.
Disconnect the rear lamp cluster multi-plug.
5. Remove six nuts from the rear of the assembly and
lift out the lamp cluster.
Central Locking System
Description
Thecentral locking system consistsofmotoroperated lock
actuators in both doors, the boot and the fuel flap
mechanism. The central locking control module is located
inside the drivers side 'A' post.
Each motordriven lock actuator incorporatesa microswitch
which will signal a change of state when any motor runs
to drive the actuator. The microswitches are of the
changeover type and provide an earth for the lock or
unlock signals to the control unit.
The two door lock inputs to the control unit are connected
together so that operation of either door lock with the
ignition key will simultaneously operate the other door
lock. Similarly, the unlock inputs to the control unit are
also connected together for simultaneous operation.
The boot will remain locked or will be unlocked
simultaneously with the doors dependant on the boot lock
position.
With the boot key turned clockwise, the boot
lock operates in unison with the doors. With the boot key
turned anticlockwise, the boot lock cannot be unlocked
using the central locking system.
The boot can be opened at any time using the ignition key
irrespective of the central locking status.
6.7.03 Door Central Locking Motors
Procedure
1.
Remove the door inner panel.
2.
Disconnect two plugs on the central locking motor
unit and one plug on the door closed switch.
3. Release the interior door catch operating rod from
its guide clips and detach it from the lock
mechanism.
4.
Disconnect the outer lock operating rod.
5. Remove three lock securing screws from the door
rear edge.
6. Remove the motor and lock through the access
hole.
7. Remove the motor securing screws and remove the
motor from the lock assembly.
May 1996 6-13