belt ASTON MARTIN DB7 1997 Workshop Manual
[x] Cancel search | Manufacturer: ASTON MARTIN, Model Year: 1997, Model line: DB7, Model: ASTON MARTIN DB7 1997Pages: 421, PDF Size: 9.31 MB
Page 10 of 421
Electrics
Electrical Component Location and Wiring Information - Up to 97 MY
Component Index 6-19
Component Location Diagrams 6-23
Electronic Control Unit Location Diagram 6-38
Relay Panel, Fusebox and Earth Point Location Diagram 6-39
Loom Location Diagrams 6-40
Wiring Diagrams and Splice Lists 6-42
Electrical Component Location and Wiring Information - 97 MY
Component Index 6-43
Component Location Diagrams 6-47
Relay Location Diagrams 6-64
Wiring Diagrams and Splice Lists 6-68
Airbag System - Repair and Diagnostic Procedures 6-69
Seat Belt Pretensioner System - Repair and Diagnostic Procedures 6-101
Security System (Restricted Circulation) 6-111
PATS System (Restricted Circulation) 6-121
97.5 Model Year
6.6.03 Seat Removal (97.5 MY)
6.6.08 Seat Control Module (97.5 MY)
6-127
6-128
6-2 April! 997
Page 13 of 421
[EM^^^
Electrics
Wiper Motor / Alternator - Removal Procedures
6.2.01 Windscreen Wiper Motor 6.3.01 Alternator
Procedure
1.
Disconnect the battery.
2.
Disconnect the wiper motor multi-plug.
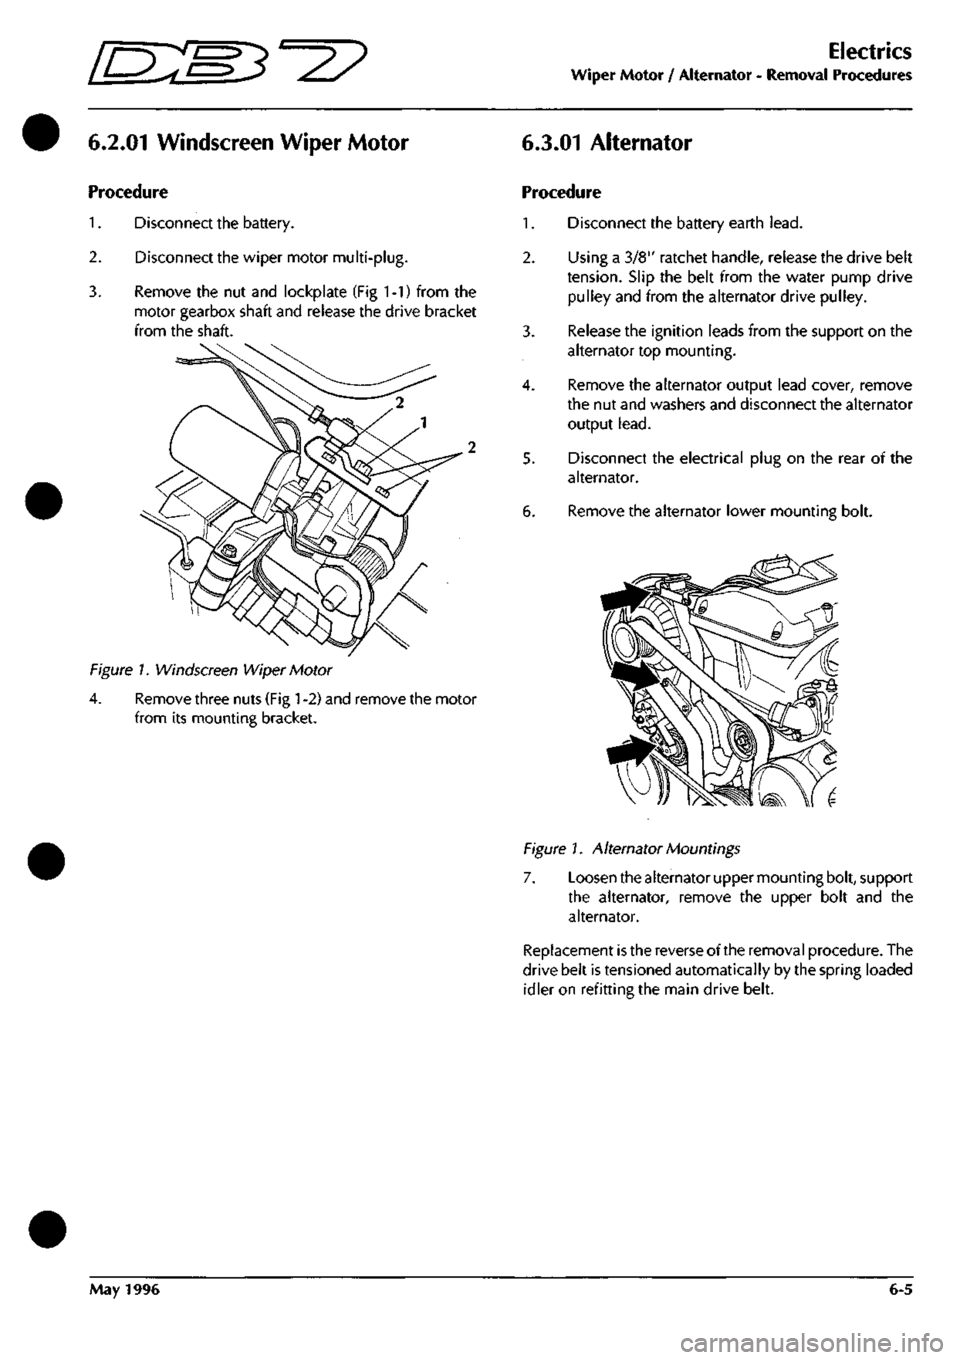
3. Remove the nut and lockplate (Fig 1-1) from the
motor gearbox shaft and release the drive bracket
from the shaft.
Figure 1. Windscreen Wiper Motor
4.
Remove three nuts (Fig
1
-2) and remove the motor
from its mounting bracket.
Procedure
1.
Disconnect the battery earth
lead.
2.
Using a 3/8" ratchet handle, release the drive belt
tension.
Slip the belt from the water pump drive
pulley and from the alternator drive pulley.
3. Release the ignition leads from the support on the
alternator top mounting.
4.
Remove the alternator output lead cover, remove
the nut and washers and disconnect the alternator
output
lead.
5. Disconnect the electrical plug on the rear of the
alternator.
6. Remove the alternator lower mounting bolt.
Figure 1. Alternator Mountings
7. Loosen the alternator upper mounting bolt, support
the alternator, remove the upper bolt and the
alternator.
Replacement is the reverse of the removal procedure. The
drive belt is tensioned automatically by the spring loaded
idler on refitting the main drive belt.
May 1996 6-5
Page 19 of 421
Em3^^
Electrics
Front Seat Runner and Rail Motor - Removal Procedures
6.6.04 Front Seat Runner Assembly
Procedure
1.
Remove the seat from the car.
7>
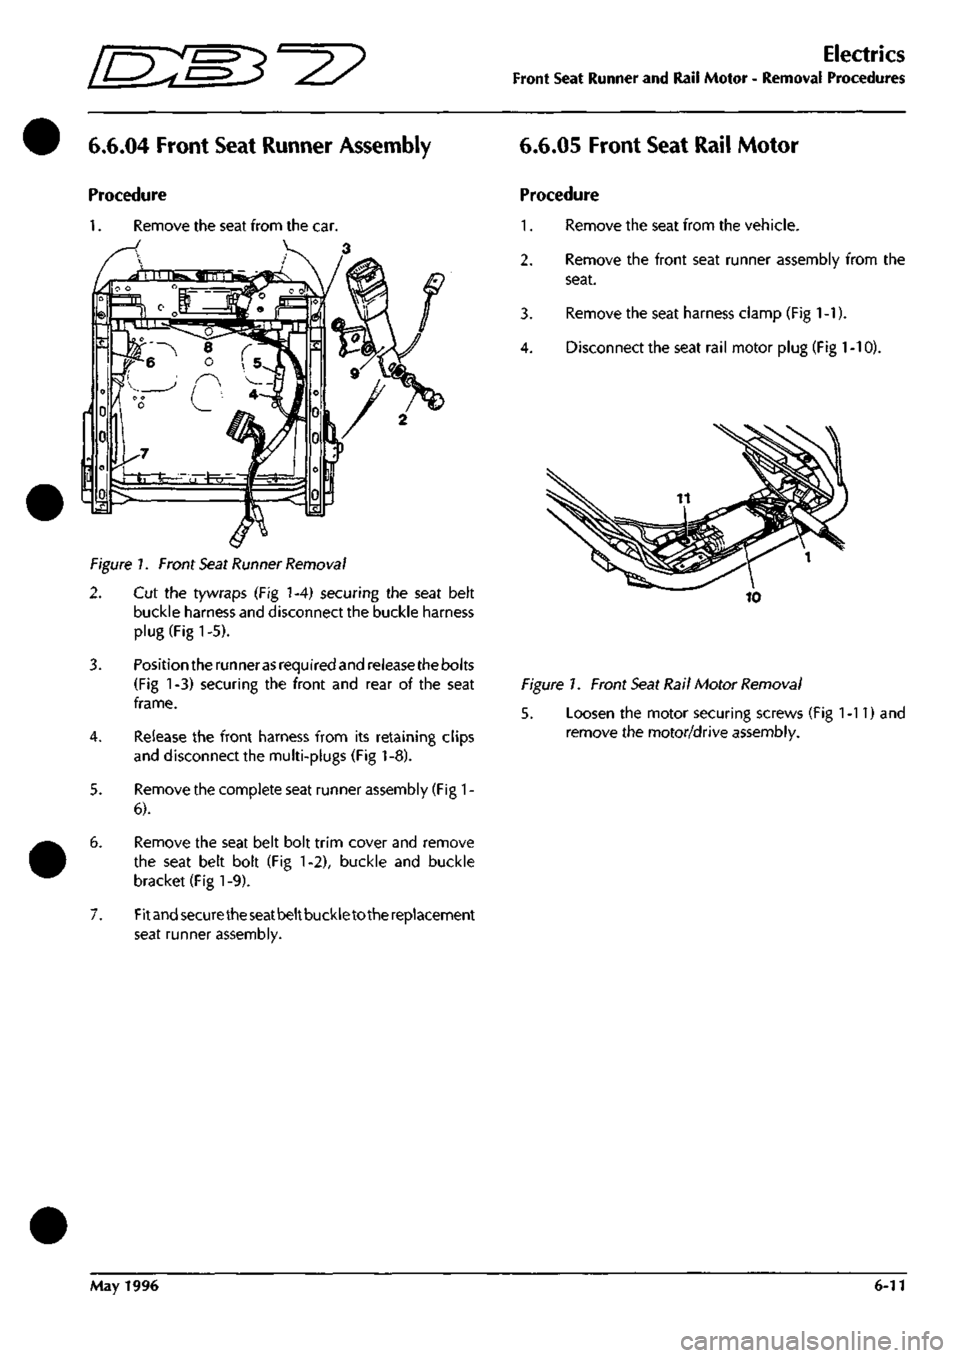
Figure 1. Front Seat Runner Removal
2. Cut the tywraps (Fig 1-4) securing the seat belt
buckle harness and disconnect the buckle harness
plug (Fig 1-5).
3. Position the runneras required and release the bolts
(Fig 1-3) securing the front and rear of the seat
frame.
4.
Release the front harness from its retaining clips
and disconnect the multi-plugs (Fig 1-8).
5. Remove the complete seat runner assembly (Fig
1
-
6).
6. Remove the seat belt bolt trim cover and remove
the seat belt bolt (Fig 1-2), buckle and buckle
bracket (Fig 1-9).
7. Fitandsecuretheseatbeltbuckletothereplacement
seat runner assembly.
6.6.05 Front Seat Rail Motor
Procedure
1.
Remove the seat from the vehicle.
2.
Remove the front seat runner assembly from the
seat.
3. Remove the seat harness clamp (Fig
1
-1).
4.
Disconnect the seat rail motor plug (Fig
1
-10).
Figure 1. Front Seat Rail Motor Removal
5. Loosen the motor securing screws (Fig 1-11) and
remove the motor/drive assembly.
May 1996 6-11
Page 30 of 421
Electrics
Electrical Component Location Index - Up to 97 MY
Component Name
Seat Belt Switch
Seat ECU - Driver
Seat ECU - Passenger
Seat Heater - Cushion Element
Seat Heater - Squab Element
Seat Heater Control Module
Seat Motor Potentiometer
Seat Pressure Pad
Seat Switch Pack - Driver
Seat Switch Pack - Passenger
Security System Aerial
Security System ECU
Side Marker Lamp - LH Front
Side Marker Lamp - RH Front
Speaker - Rear LH
Speaker - Rear RH
Speed Control Dump Valve
Start Inhibit Switch
Starter Motor Solenoid
Stop Lamp Fail
Stop Lamp/Cruise Disable Switch
Thermal Breaker - Window Lift
Throttle Potentiometer
Water Temp Sensor - Engine ECU
Water Temp Sensor - Temp Gauge
Wheel Speed Sensor - Front RH
Wheel Speed Sensor - Front LH
Wheel Speed Sensor - Rear RH
Wheel Speed Sensor - Rear LH
Window ECU - LH
Window ECU - RH
Window Switch - RH
Window Switch LH
Wiper Logic Module
Wiper Motor
Window Lift Motor
Location
Reference
13-2
6-2
6-2
12-5
12-4
6-3
9-7
12-6
6-8
6-8
2-12
15-2
5-5
5-5
6-10
6-10
1-4
10-9
3-14
15-10
11-8
4-7
3-15
3-5
3-4
13-4
13-4
13-1
13-1
12-11
12-11
2-5
2-5
4-5
1-1
12-10
Wiring Diag.
Reference
22-A3
16-A1
15-A1
22-A2
15/16-A4
22-A5
22-C2
22-D3
16-B1
15-B1
24-C2
26-B6
1-C2
1-A3
24-B2
24-C2
2-A2
21-C3
3-C2
25-A3
12-C5
9-C3
5-A3
5-C2
5-C2
29-C3
28-D4
28-D3
28-D2
17-D3
18-D3
19-A2
19-D2
9-A3
8-C3
Rep.
Op.
Reference
6.6.16.1
6.6.17.1
6.6.17.2
6.6.18.1
6.6.18.2
6.6.18.3
6.6.19.1
6.6.20.1
6.6.21.1
6.6.21.1
6.6.22.1
6.6.22.3
6.1.18.1
6.1.18.1
6.6.23.1
6.6.23.1
6.1.19.1
6.1.20.1
6.3.02.2
6.9.15.1
6.4.02.1
6.1.21.1
2.5.02.2
6.3.07.1
8.2.12.1
5.1.12.1
5.1.12.1
5.2.01.1
5.2.01.1
6.1.22.1
6.1.22.1
6.5.03.1
6.5.03.1
6.2.01.1
6.1.21.3
Notes
6-22 May 1996
Page 93 of 421
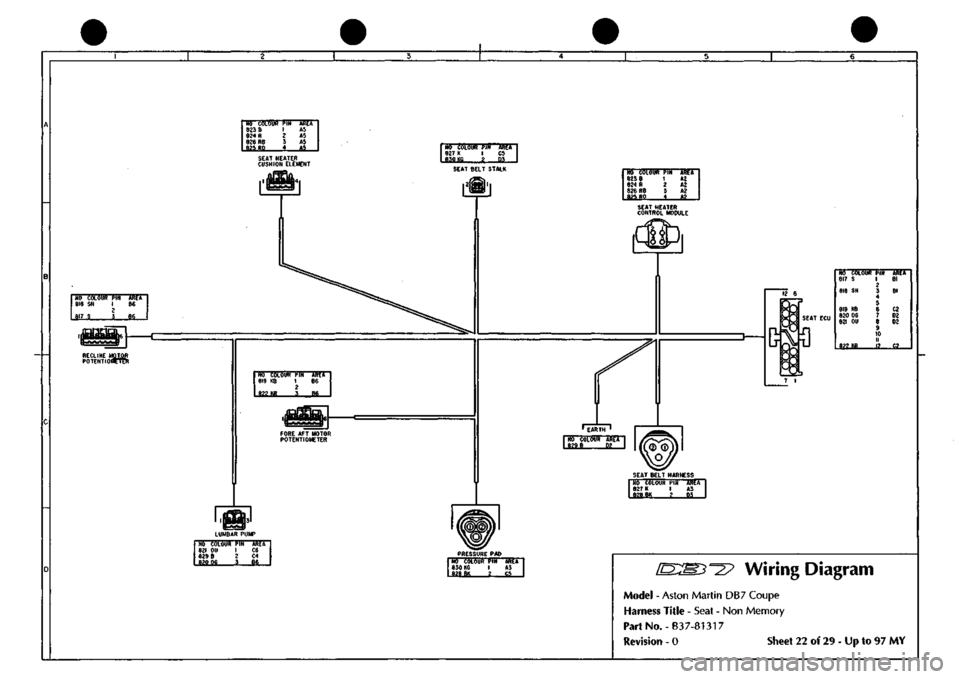
N6
WLdUlt PIN 823 8 I 824
R
2 826
R8
3 825
RO
1
Mi AS AJ AJ A5 SEAT HEATER CUSHION ELEMENT
NO COLOUR PIN 827
K
I 630 KG g
MET CS
SEAT BELT STALK NO COLOUR I^IN 823 8 1 824
R
2 826
R8
3 a?f,
RO
4
HdU A2 A2 A2
AJ
„
SEAT HEATER CONTROL MODULE
NO COLOUR
PIN
AREA 818
SN 1 B6
2 817
S 3 86
>iinBBU|6
RECLINE MOTOR POTENTIOBPTn!
NO COLOUI 817
S
818
SN
819
KB
820
06
821
OU
m
m
TUT 1 2
5 6 7
• li 12
-KKtr Bl
Bl
02 D2 02
C2
SEAT BELT HARNESS NO COLOUR
PIN 827 K 1 828
BK
2
ASA A3
ti
NO COLOUR
PIN
ARET
821
OU I C6
829
8 2 C4
620 06
I SSi.
PRESSURE
PAD
NO COLOUR
PIN
830 K6
I £iiM 2
AREA A3 i5_
[D:My^^2?
Wiring Diagram
Model - Aston Martin DB7 Coupe
Harness Title - Seat - Non Memory
PartNo.-B37-81317
Revision - 0 Sheet 22 of 29 - Up to 97 MY
Page 95 of 421
wmm-m—im: 383 K I a S3I BK 2 C3-I72 i
SHEET 10 AREA B2
NO
iii.m
M 482 BR 476 BR 483 LCK 484 RIN 483 WS 486 RN 487 GR 474 YG
481 B 475 B 489 UIN
490 R
49r W
1 2 3 4 3 6 7 8 9 10 II 12 13 14 15
...If...
mi B6 B6 B6 B6 B3-I73 86 86 86
86 B6 86
C4-I74 86 B6
NO COLOUR
492
YW
493 KB
5 YS
829
NO
261 NR 494 BR
495 OR 496 OU
PIN
2 3 4 5 6 7 8 9 10 II 12
.1?..
AitU
86 B6
B6
86 B6 86
86 B6
NO COLOUF 497 SLO 498 P 499 PK 459 0 500 KB 259
OR
SOI GB 383 K 455 NP 502
RU
503 BW 504
OW
260 0 505 LCO 506
OW
507
OP
508 015
509 WK
479
S
175 PY
PIN 1 2 3 4 5 6 7 8 9 10 II 1? 13 14 15 16 17 18 19 20 21 2? 23 21
AREA 86 C4-I76 85-177
84-17;
B6 B6 C6 A3 C5-I78 c5-ieo C6 C6 86 C6 C6 C6 86
85-179
86
86
SEAT BELT HARNESS
NO COLOUR PIN 834 NS 1 835 NY 2 836 U 3
AREA B6 B6 B6
NO COLOUR 5 YS 175 PY 259 OR 260 0 261 NR 474 YG 475 8 476 BR 479 S 481 8 482 BR 483 LGK 484 RIN 486 RN 487 6R 489 UIN 491 W 492 YW 493 KB 494 BR 495 OR 496 OU 497 SLG 500 KB 501 08 503 BW 504 «W 505 LGO 506 OW 507 GP
AREA Bl 01 CI CI CI Bl 81 Al 01 81 Al AI 81 81 81 81 81 Bl 81 CI CI CI CI CI CI a CI CI 01 Dl
NO 508 S?9 833 834 833 836 R4I 842 850 851 B55 838 872 873 875 893 894 896
89'
902 904 907 930
COLOUR OG NO PS NS NY U P PK P PK NP RU 8RD NP RU R WS R WS G 6 WK WK
arr a a C3 D3 D3 03 04-176 85-177 04-176 85-177 C5-I78 C5-I8C 83-171 05-178 C5-I8C C4-I74
83-17!
C4-I74
83-17!
B4-I7S
84-17!
85-179 B5-I79
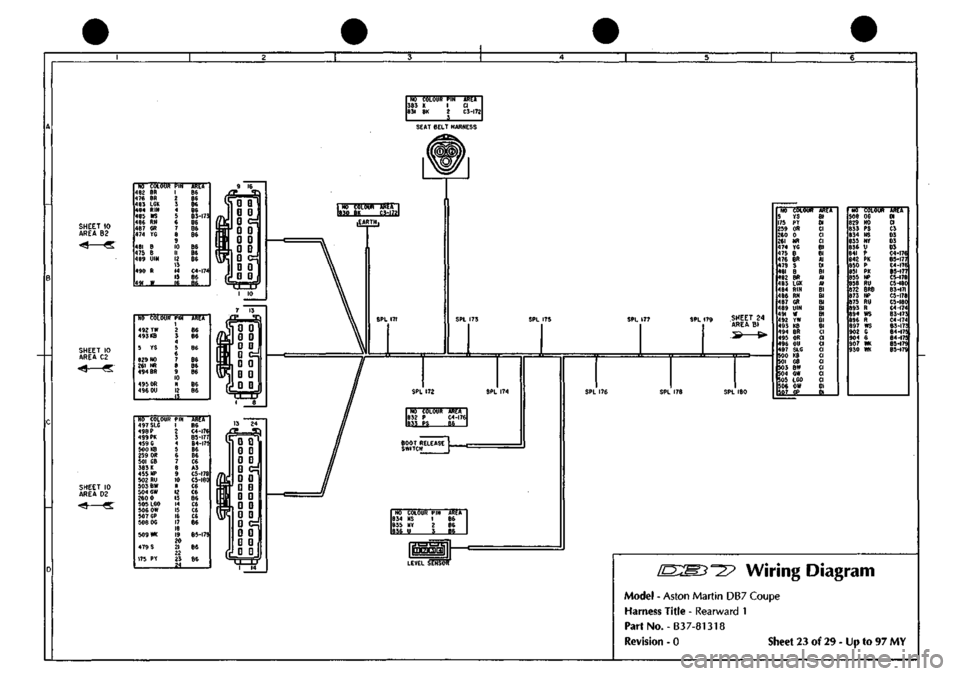
Wiring Diagram
Model - Aston Martin DB7 Coupe
Harness Title - Rearward 1
PartNo.-B37-81318
Revision - 0 Sheet 23 of 29 - Up to 97 MY
Page 111 of 421
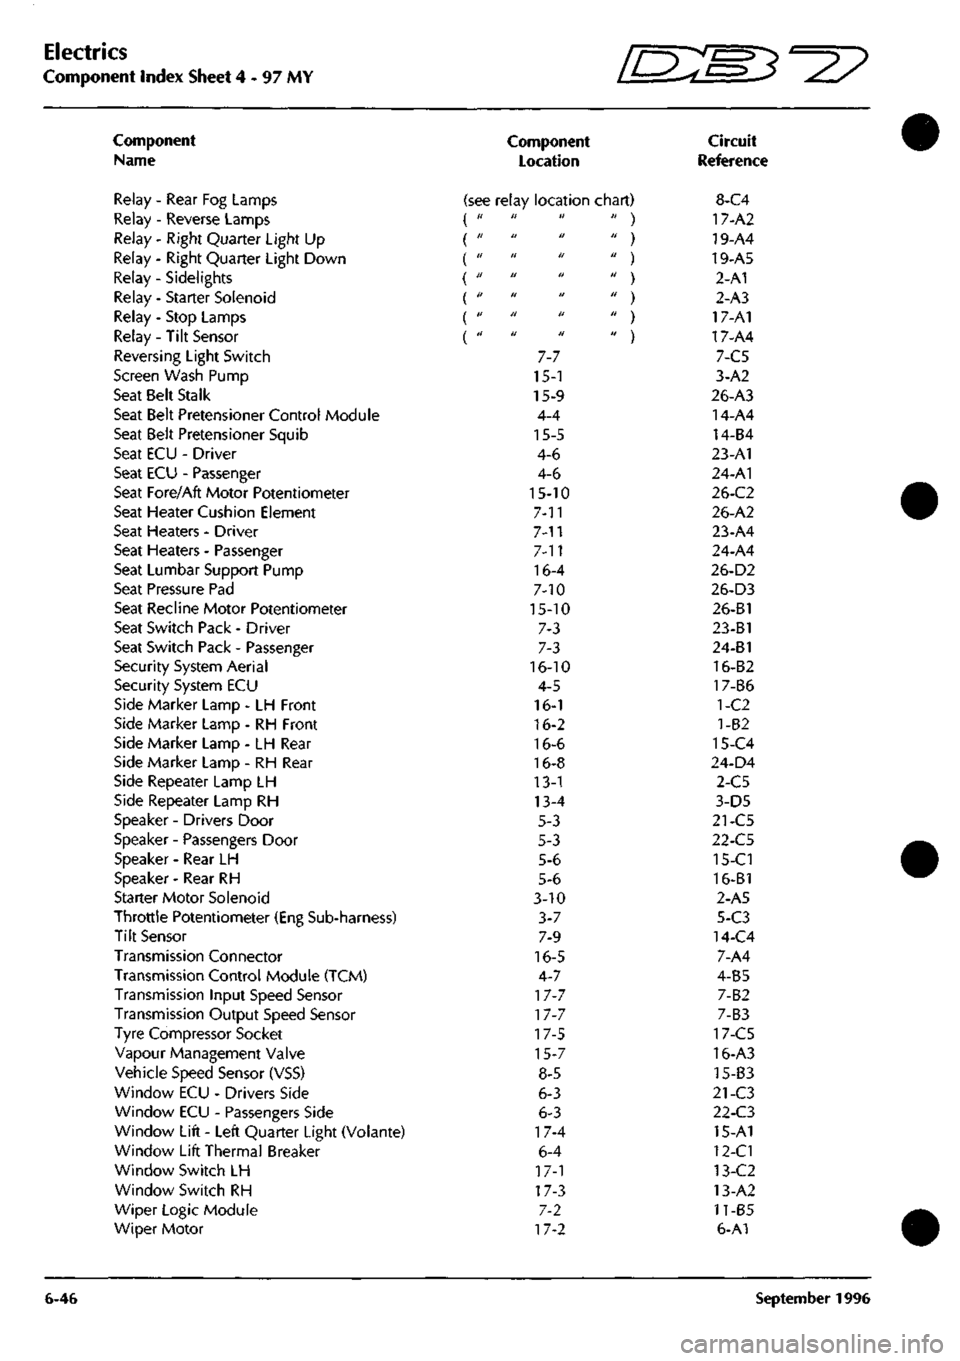
Electrics
Component Index Sheet 4-97 MY ^7
Component
Name
Relay - Rear Fog Lamps
Relay - Reverse Lamps
Relay - Right Quarter Light Up
Relay - Right Quarter Light Down
Relay - Sidelights {
Relay - Starter Solenoid
Relay - Stop Lamps
Relay- Tilt Sensor
Reversing Light Switch
Screen Wash Pump
Seat Belt Stalk
Seat Belt Pretensioner Control Module
Seat Belt Pretensioner Squib
Seat ECU - Driver
Seat ECU - Passenger
Seat Fore/Aft Motor Potentiometer
Seat Heater Cushion Element
Seat Heaters - Driver
Seat Heaters - Passenger
Seat Lumbar Support Pump
Seat Pressure Pad
Seat Recline Motor Potentiometer
Seat Switch Pack - Driver
Seat Switch Pack - Passenger
Security System Aerial
Security System ECU
Side Marker Lamp - LH Front
Side Marker Lamp - RH Front
Side Marker Lamp - LH Rear
Side Marker Lamp - RH Rear
Side Repeater Lamp LH
Side Repeater Lamp RH
Speaker - Drivers Door
Speaker - Passengers Door
Speaker - Rear LH
Speaker - Rear RH
Starter Motor Solenoid
Throttle Potentiometer (Eng Sub-harness)
Tilt Sensor
Transmission Connector
Transmission Control Module (TCM)
Transmission Input Speed Sensor
Transmission Output Speed Sensor
Tyre Compressor Socket
Vapour Management Valve
Vehicle Speed Sensor (VSS)
Window ECU - Drivers Side
Window ECU - Passengers Side
Window Lift - Left Quarter Light (Volante)
Window Lift Thermal Breaker
Window Switch LH
Window Switch RH
Wiper Logic Module
Wiper Motor
6-46
Component
Location
Circuit
Reference
(see relay location chart) 8-C4 it ti It
II H U
tl 11 U
a II 11
II II II
II Ji II
II II II
7-7
15-1
15-9
4-4
15-5
4-6
4-6
15-10
7-11
7-n
7-11
16-4
7-10
15-10
7-3
7-3
16-10
4-5
16-1
16-2
16-6
16-8
13-1
13-4
5-3
5-3
5-6
5-6
3-10
3-7
7-9
16-5
4-7
17-7
17-7
17-5
15-7
8-5
6-3
6-3
17-4
6-4
17-1
17-3
7-2
17-2
' ) 17-A2
' ) 19-A4
' ) 19-A5
' ) 2-A1
' ) 2-A3
' ) 17-A1
' ) 17-A4
7-C5
3-A2
26-A3
14-A4
14-B4
23-A1
24-A1
26-C2
26-A2
23-A4
24-A4
26-D2
26-D3
26-B1
23-B1
24-B1
16-B2
17-B6
1-C2
1-82
15-C4
24-D4
2-C5
3-D5
21-C5
22-C5
15-Cl
16-B1
2-A5
5-C3
14-C4
7-A4
4-B5
7-B2
7-B3
17-C5
16-A3
15-B3
21-C3
22-C3
15-A1
12-Cl
13-C2
13-A2
11-B5
6-A1
September 1996
Page 160 of 421
SHEET 10 AREA C5 NO COLOUR PIN AREA 808 K I I4.CI 1018 BK 2 I4.C3-I53 3
NO COLOUR PIN AREA 1300 B I I4.A4 1304 rK 2 I4.A4 177 YK 3 I4.BI
NO COLOUF 799 BR 794 BR 724 LCK 736 RIN
823 GR 792 YG 824 SR 800 B 793 B 757 UIN 826 SW 827 R 828 80
629 RN 374 0 723 LGS 822 0 177 YK
PIN 1 2 3 4 5 6 7 8 9 10 II 1? 13 14 IS 16 17 m 19 20 21 22 23
AREA le.ci I5.CI 15.81-154 15.63
15.81-163 16.CI I6.A4 I6.CI I5.CI I5.B3 16.A4 I4.C4-155 I6.A4
I6.A2 I7C6 15.84 IS.A4 I5.A3
12 23
Cool
!f
f;
w
(
D Dj
D
a]
Q
D
I
a D
St
' D D
a
D
a
D
M
In
D
D
D
D
SEAT BELT HARNESS
SHEET 10 AREA Dl
NO COLOUR 767
KB
338
OY
769
KB
3 YS 340 OG
771 BR
772 OR 773 OU
PIN 1 2 3 4 5 6 7 8 9 10 11 12 13
AREA I7.B3-I79
I5.B4 I4.B6 I7.B6 I6.A3
16.86-178
I7.B6 I7.C6
NO COLOUf 803 SLG 804 PG 805 PW 667 G 1 LG 335 OR 807 CB 808 X 809 YN 621 RU 810 BW 811 OW 336 0 813 LGO 814 OW 815 GP eie OG 294
R
652
WU
330 GO 797 S 304
YB
337 RN
PIN 1 2 3 4 5 6 7 8 9 10 II P? 13 14 15 16 17 18 19 20 21 22 23 24
AREA I7.A2 I4.B4-I56 I4.C5-I57 I6.B6-177 I7.C6 I7A2 I7.AI I4.A3 I7.A3 I4.C5-I59 I4.C3 16.81-167 I7.A3 I6.C4 I5.A2 I6.B5-I74 I5.A2 I5.C3 I6.C5 I5.C3 I6.C5 I5.C3
17A2 SHEET 10 AREA D4
NO COLOUR PIN 1300 B U 1301 B W
AREA 14.A4 I4.A3
PBP CONTROL MODULE
LAMBDA SENSOf? 22 NO 353 355 303 354
COLOUR NS YO UIN RIN
PIN 1 ? 3 4
AREA 14.03 14.03 14.D3 I4.D3
CDDDDDnaDDDDDDDH
cziizz)cr3cz]ciDEinBnn
LAM8DA SENSOR 12 NO 349 351 302 350
COLOUR NS YN UIN RIN
PIN 1 2 3 4
AREA 14.03 I4.D5 I4.D3 14.05
NO COLOUR PIN AREA 1302
BW
I 14.64 2 1303 PW 3 I4.B4
PCP SQUIB
NO COLOUr 1500 B 1304 YK
1303 PW 1302 BW
822 0 723 LGS
PIN 1 2 3 4 5 6 7 8 9 10 11 12 13 14 15 16 17 18
AREA I4.A4 I4.A4
I4.A4 I4.A4
I4.BI 14 .Bl
LEVEL SENSOR NO COLOUR 1021 UO 1022 NS 1023 BO
1024 BO
PIN 1 2 3 4 5 6
AREA I7.C6 I7.B5-I84 I4.C5-I58
I4.C5-156
NO COLOUf 349 NS 502 UIN 350 RIN 351 YN 552 BRO 353 NS 303 UIN 554 RIN 355 YO 356 BRO
PIN 1 2 i 4 5 6 7 8 9 10
AREA I4.A6 l4.Ae I4.A6 l4.Ae I4.A5-I6I I4.A5 I4.A5 I4.A5 14.A5 14.B5-I62
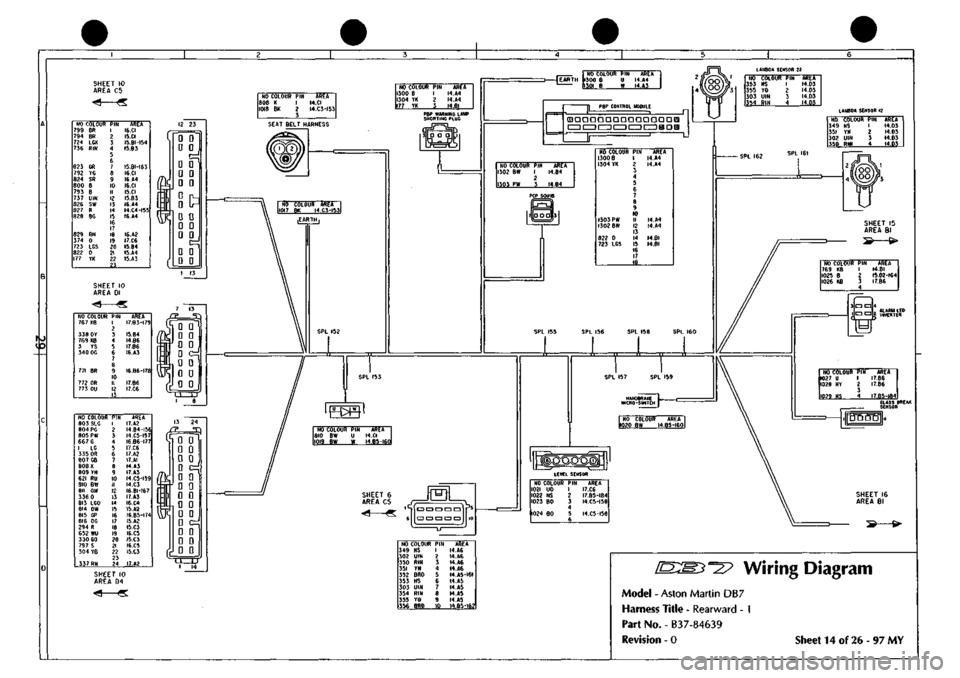
Wiring Diagram
Model - Aston Martin DB7
Harness Title - Rearward - 1
Part No. - B37-84639
Revision - 0 Sheet 14 of 26-97 MY
Page 187 of 421
^=2?
Electrics
Airbag System
Eye Protection
Chemical protective goggles are recommended
where there is a possibility of eye contact with the
propellant. Safety glasses with side shields are
recommended for all other operations.
Protective Clothing
Approved protective gloves, overalls and shoes/
boots should be worn.
Handling and Storage Precautions
Do not store airbag modules near live electrical
equipment or circuitry. Store in a dry environment
at ambient temperatures.
Good housekeeping and engineering practices
should be employed to prevent the generation and
accumulation of
dusts.
Store in compliance with all
local state and federal regulations.
Driver and Passenger Airbag Modules
Assembly/Removal/Service Instructions
WARNING: In the event of a vehicle impact where the
airbags and the seatbeltpretensioner (if fitted) are
deployed, the following actions MUST be
performed:
Check the condition of the seatbelts, steering
wheel,
steering column, all connections to airbags,
and the column switchgear connectors for integrity
and damage. If in any
doubt,
replace suspected
parts for new parts.
Replace both crash
sensors,
the
safing sensor
and
the seatbelt pretensioner module (if fitted).
On completion of all repair procedures, switch on
the ignition and check that the
Airbag/SRS
warning
light comes on when the ignition is switched on
and extinguishes after approximately six seconds
indicating satisfactory completion of the airbag
and pretensioner
system
self
tests.
WARNING: Before starting
work,
ensure
that the ignition
switch is in position 'O' and the ignition key is
removed.
Disconnect the battery negative lead
within 12 seconds of switching off the ignition to
prevent the alarm system triggering.
As the airbag control module is equipped with a
back-up power source and due to the risk of the
airbag being inadvertently deployed, wait one
minute or longer after disconnecting the battery
before starting work on the airbag module.
• Disconnectingthe battery negative cable cancels
the memory for the 'one-touch' window down
system and stops the vehicle clock. Reset the
window memory and the clock when work is
completed.
• Never use airbags from other vehicles, always
use new parts.
• After work is completed, reconnect the battery
and perform the airbag warning light check
• Never use electrical probes to check voltage or
electrical resistance of the airbag modules.
• Disconnect the airbag before carrying out any
work on, or in the vicinity of the module, or
when using electric welding equipment.
• Always ensure that the battery negative lead has
been disconnected for at least one minute before
commencing any removal procedure.
September 1996 6-71
Page 196 of 421
Electrics
Airbag System ^2?
6.4.21.4
Airbag Disarming/Arming
Procedures
WARNINGS AND CAUTIONS:
WARNINGS:
Disarm the airbags by disconnecting the battery
ground (black)
lead,
waiting one minute and then
removing the airbag modules before servicing of
any airbag or steering column component.
After disconnecting the battery ground
lead,
allow
a minimum of one minute delay for the back-up
power supply to discharge before servicing the
airbag system.
The system components are non-serviceable, if
faults are
suspected,
change components for new
items
only.
Failure to observe the above procedures may
result in accidental deployment of the airbags.
Always wear safety
glasses
when working on airbag
equipped vehicles.
Personnel carrying an airbag module must ensure
that the module and trim cover are pointing away
from the
body.
When positioning on a bench or
work surface, ensure that the airbag module and
trim cover face upwards to limit motion on
accidental deployment.
Always wear
gloves
when handling deployed airbag
modules. Deposits of sodium hydroxide may be
presenton the module surface. If sodium hydroxide
contacts any area of the skin, wash the affected
area immediately with mild soap and
water.
Dispose of the deployed airbag using the correct
procedures referred to in this section.
Cautions:
When scrapping vehicles,
ensure
that the
airbags
have
been deployed (see
Scrapping Vehicles
with Live
Airbags).
If a component
has been
renewed and the fault
does
not
clear,
refit the original item and repeat the diagnostic
procedure.
After
servicing,
repeatthe diagnostic
procedures
to ensure
correct
system
operation.
Renew
the airbag module if the surrounding trim
panels
are
damaged.
Do not attempt to repaint trim covers as
paint may
damage
cover material.
Disarming the Airbags
3.
4.
WARNING: Carry out the following disarming
procedure before attempting any work on the
vehicles electrical
systems.
Note: The battery ground (black) lead must be
disconnected within 12 seconds of switching off the
ignition to avoid the alarm siren sounding.
Disconnect the battery ground
lead.
Allow a
minimum of one minute delay for the back-up
power supply to discharge.
Remove the drivers side airbag module and replace
it with an airbag simulatorfrom the simulator kit (Pt
No.
43.27028).
Remove the passengers airbag module and replace
it with an airbag simulator from the simulator kit.
Reconnect the battery ground.
Rearming the Airbags
WARNING: Carry out the following procedure to
rearm and check the airbags after completing all
work on the vehicles electrical
systems.
Note: The vehicle battery
must be
disconnected within
12
seconds
of switching off
the
ignition
to
avoid the alarm
siren sounding.
^. Disconnect the battery ground
lead.
Allow a
minimum of one minute delay for the back-up
power supply to discharge.
2.
Removethedriverssideairbagsimulatorand replace
it with the drivers airbag module. Secure the airbag
module with the two captive torx screws.
3. Remove the passengers side airbag simulator and
replace it with the passenger side airbag module.
Secure the module with four nuts and washers.
Close the passenger side airbag door.
4.
Reconnect the battery ground.
5. Switch on the ignition and check for correct
indications from the SRS/AIRBAG warning light.
TheSRS/AIRBAC lamp should come on after
a
brief
delay and remain on for approximately six seconds
during the airbag system self check. The lamp will
extinguish upon satisfactory completion of the self
check, or will flash a diagnostic code if an airbag
system fault is detected. Continuous illumination of
the warning lamp may indicate a seatbelt
pretensioner fault
Note:
Reset the
clock and window
ECUs
on completion.
6-80 September 1996