fuse ASTON MARTIN DB7 1997 Workshop Manual
[x] Cancel search | Manufacturer: ASTON MARTIN, Model Year: 1997, Model line: DB7, Model: ASTON MARTIN DB7 1997Pages: 421, PDF Size: 9.31 MB
Page 5 of 421
//—-^
^^^^5~^
' -^ ^ Introduction
Safety Precautions
Safety Precautions (continued)
Electrical Equipment
1.
Ensure that electrical equipment is in safe working order before use.
2.
Inspect power leads of all mains electrical equipment for damage and security, and check that it is properly
earthed.
3. Ensure that electrical equipment is protected by a fuse of the correct current rating.
4.
Disconnect the battery before commencing repair operations to the electrical system, fuel system and engine
or when working beneath the vehicle.
Exhaust Fumes
Engines should not be run in confined spaces, exhaust fumes contain harmful and toxic substances including carbon
monoxide which can prove fatal if inhaled. Engines must only be run where there is fume extraction equipment in
operation or where there is adequate ventilation.
Fire Precautions
1.
Ensure that a suitable form of fire extinguisher is conveniently located near the work area.
2.
Keep oils, solvents and combustible materials away from naked flames and other sources of ignition.
3. Ensure that NO SMOKING signs are posted around areas where combustible materials and vapour may be
present and ensure that the warnings are strictly observed.
4.
Ensure that dry sand is available to soak up any spillage of fuel or other flammable solutions.
5. Fume extraction equipment must be available and in full working order to remove combustible and toxic
vapours.
6. All personnel should be aware of the fire drill procedures and precautions.
Jacking and Lifting
1.
The recommended procedures for lifting, jacking and towing are included latefin this seetion-and must be
strictly observed to ensure personal safety.
2.
Always use a vehicle hoist, ramp or pit for working beneath the car in preferencetd^&^cking
3. Never rely on a jack to support a car independently, use axle stands or blocks carefully pJaQed at the jacking
points to provide rigid support.
4.
When working beneath a vehicle, chock the wheels as well as applying the handbrake.
5. Ensure that the vehicle is standing on firm level ground before jacking or lifting.
5. Check any lifting equipment used has adequate capacity for the load being lifted and is ih"fdll working order.
Tools and Equipment
1.
Do not leave tools, equipment, spilt oil, etc. around or on the work area.
2.
Ensure that tools and equipment used are in good condition; do not use damaged or defective tools or
equipment.
3. Do not apply heat in an attempt to free stiff nuts or fittings; as well as causing damage to protective coatings,
there is a risk of damage to electronic equipment and brake lines from stray heat.
4.
Use the recommended service tool where instructed to do so.
April 1997 v
Page 10 of 421
Electrics
Electrical Component Location and Wiring Information - Up to 97 MY
Component Index 6-19
Component Location Diagrams 6-23
Electronic Control Unit Location Diagram 6-38
Relay Panel, Fusebox and Earth Point Location Diagram 6-39
Loom Location Diagrams 6-40
Wiring Diagrams and Splice Lists 6-42
Electrical Component Location and Wiring Information - 97 MY
Component Index 6-43
Component Location Diagrams 6-47
Relay Location Diagrams 6-64
Wiring Diagrams and Splice Lists 6-68
Airbag System - Repair and Diagnostic Procedures 6-69
Seat Belt Pretensioner System - Repair and Diagnostic Procedures 6-101
Security System (Restricted Circulation) 6-111
PATS System (Restricted Circulation) 6-121
97.5 Model Year
6.6.03 Seat Removal (97.5 MY)
6.6.08 Seat Control Module (97.5 MY)
6-127
6-128
6-2 April! 997
Page 22 of 421
Electrics
Electric Windows - Fault Analysis / Window Motor Removal
[n:m3^^
Electric Windows
Description
Power to the window wind circuits is available
when the ignition switch is on and is supplied
through a thermal cut-out to the left and right
window switches. The switches are double pole
plus earth so that the current through a window
motor may be switched in either direction to raise
or lower the window.
DB7 uses frameless door windows which seal
against rubber strips around the body shell door
opening.
To avoid damaging these seals during
door opening, the door glass must be lowered
before the door can be opened. This function is
controlled by the window control units. The units
are mounted on the inside of each door frame and
will sense if a door handle is pulled to open the
door. Before releasing the door lock, the control
unit will drive the window wind motor briefly to
lower the door window glass down until it clears
the window seals. Similarly, after closing a door,
the window motor will be run to raise the door glass
to seat the glass against the body seals.
Fault Analysis Procedure
a) If a window fails to operate, check for fuse failure
and the connectors for poor or open contacts.
b) Check the thermal cut-out by shorting across it and
operating either window. If the windows operate
with the short
ci rcu
it but not without, the cut-out is
faulty.
c) With the ignition on, battery voltage should be
available between the inputterminalsof the switches
and chassis. Operate each switch and ensure that
battery voltage is available between the switch
output terminals and chassis.
d) Measure voltagefrom each switch inputterminalto
the switch earth return terminal. If no voltage is
measured,
the earth return line is open circuit.
e) Measure continuity through the wiring from the
switches to each motor. If continuity is correct,
remove the motor for bench testing.
6.7.04 Door Window Motor
Procedure
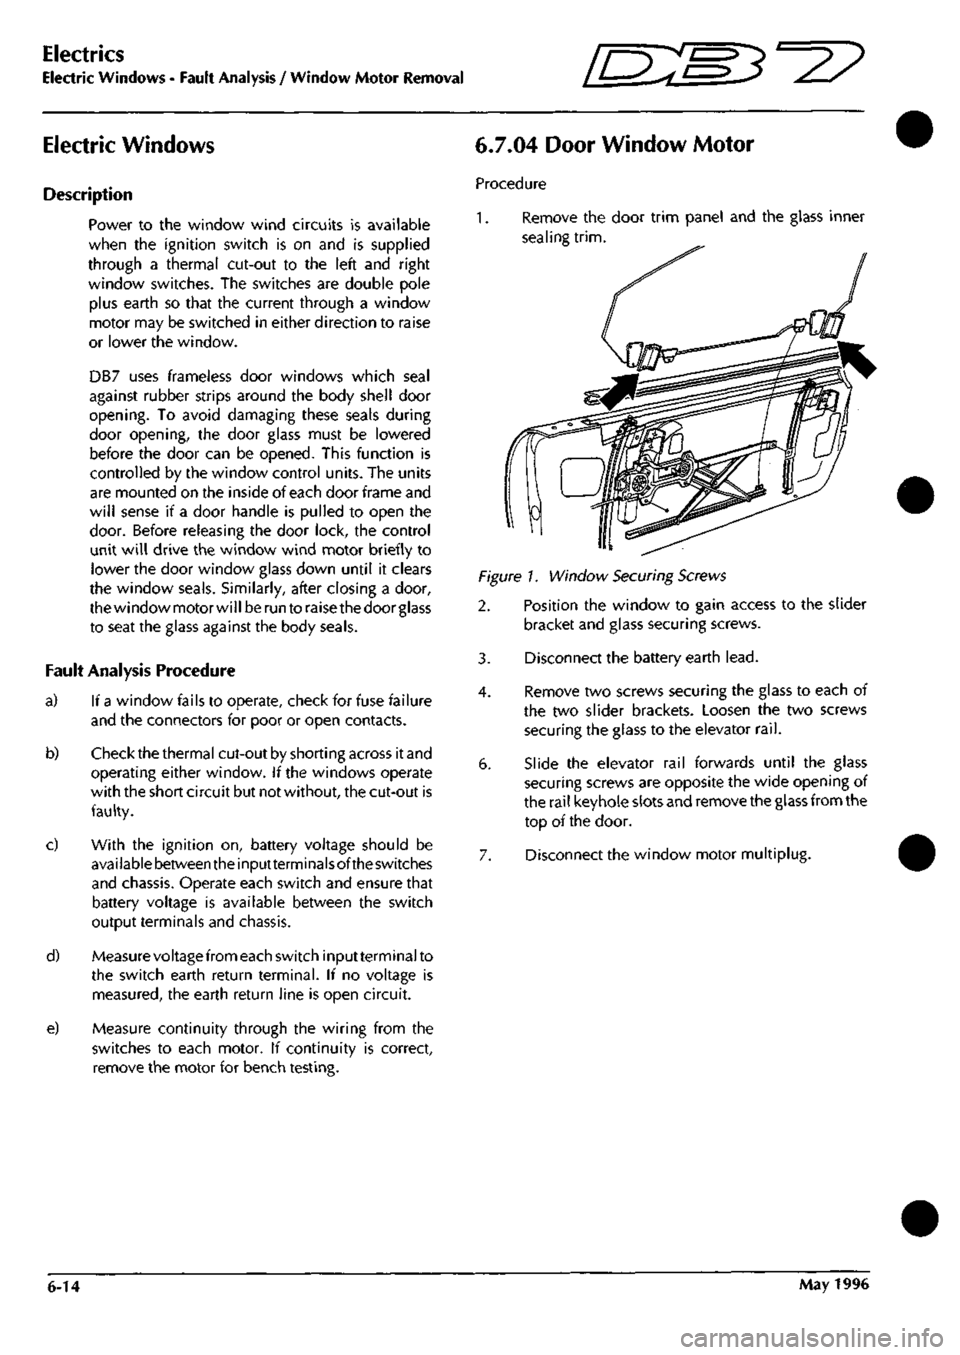
1.
Remove the door trim panel and the glass inner
sealing
trim.
Figure!. Window Securing Screws
2. Position the window to gain access to the slider
bracket and glass securing screws.
3. Disconnect the battery earth
lead.
4.
Remove two screws securing the glass to each of
the two slider brackets. Loosen the two screws
securing the glass to the elevator
rail.
6. Slide the elevator rail forwards until the glass
securing screws are opposite the wide opening of
the rail keyhole slots and remove the glass from the
top of the door.
7. Disconnect the window motor multiplug.
6-14 May 1996
Page 27 of 421
Electrics
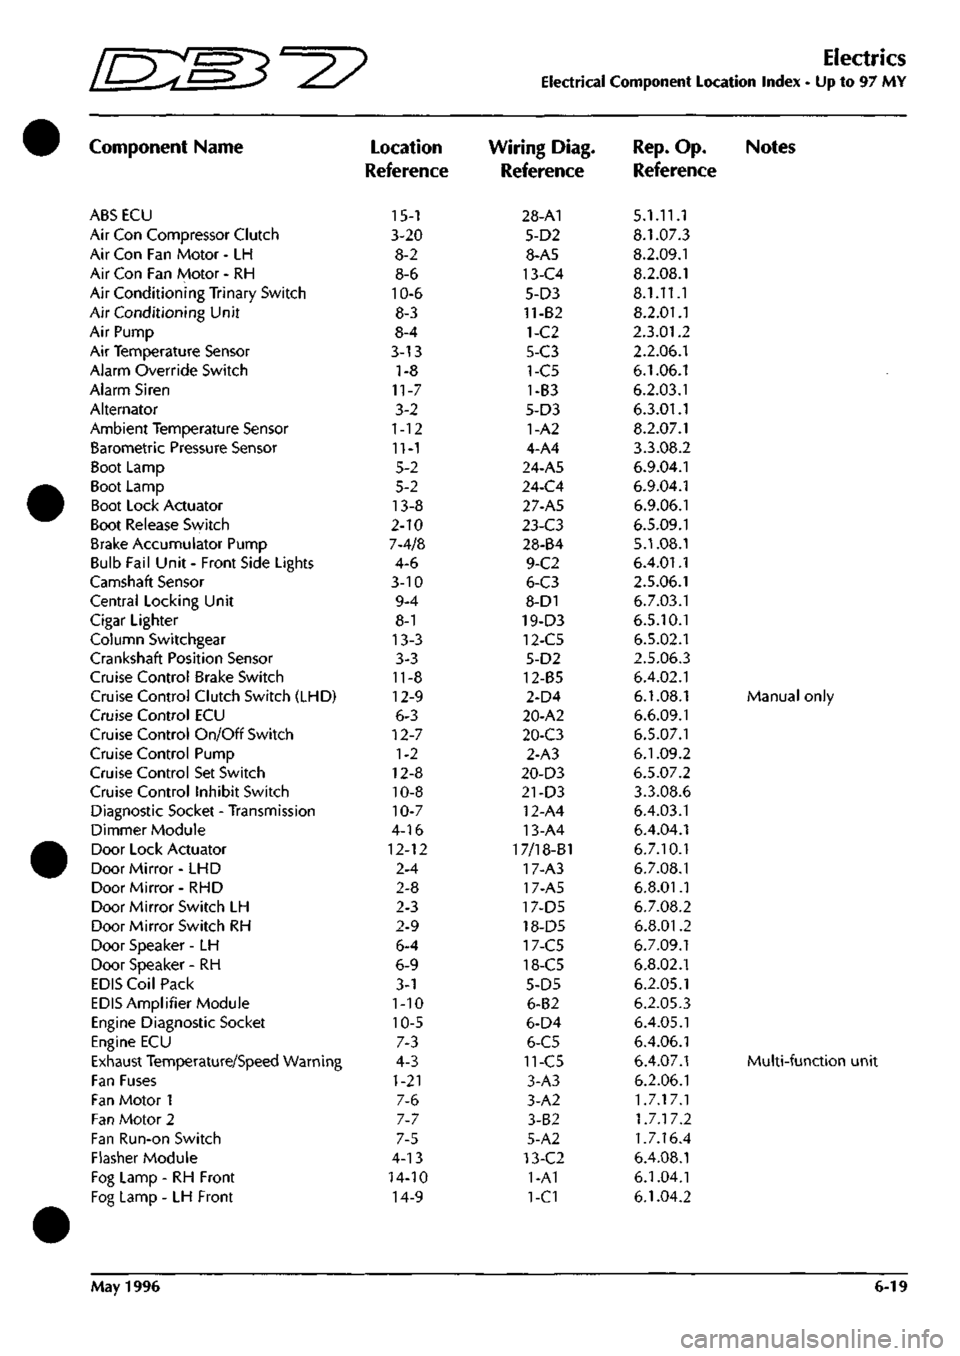
Electrical Component Location Index - Up to 97 MY
Component Name
ABS ECU
Air Con Compressor Clutch
Air Con Fan Motor - LH
Air Con Fan Motor - RH
Air Conditioning Trinary Switch
Air Conditioning Unit
Air Pump
Air Temperature Sensor
Alarm Override Switch
Alarm Siren
Alternator
Ambient Temperature Sensor
Barometric Pressure Sensor
Boot Lamp
Boot Lamp
Boot Lock Actuator
Boot Release Switch
Brake Accumulator Pump
Bulb Fail Unit - Front Side Lights
Camshaft Sensor
Central Locking Unit
Cigar Lighter
Column Switchgear
Crankshaft Position Sensor
Cruise Control Brake Switch
Cruise Control Clutch Switch (LHD)
Cruise Control ECU
Cruise Control On/Off Switch
Cruise Control Pump
Cruise Control Set Switch
Cruise Control Inhibit Switch
Diagnostic Socket - Transmission
Dimmer Module
Door Lock Actuator
Door Mirror- LHD
Door Mirror- RHD
Door Mirror Switch LH
Door Mirror Switch RH
Door Speaker -LH
Door Speaker - RH
EDIS Coil Pack
EDIS Amplifier Module
Engine Diagnostic Socket
Engine ECU
Exhaust Temperature/Speed Warning
Fan Fuses
Fan Motor 1
Fan Motor 2
Fan Run-on Switch
Flasher Module
Fog Lamp - RH Front
Fog Lamp - LH Front
Location
Reference
15-1
3-20
8-2
8-6
10-6
8-3
8-4
3-13
1-8
11-7
3-2
1-12
11-1
5-2
5-2
13-8
2-10
7-4/8
4-6
3-10
9-4
8-1
13-3
3-3
11-8
12-9
6-3
12-7
1-2
12-8
10-8
10-7
4-16
12-12
2-4
2-8
2-3
2-9
6-4
6-9
3-1
1-10
10-5
7-3
4-3
1-21
7-6
7-7
7-5
4-13
14-10
14-9
Wiring Diag.
Reference
28-A1
5-D2
8-A5
13-C4
5-D3
11-82
1-C2
5-C3
1-C5
1-B3
5-D3
1-A2
4-A4
24-A5
24-C4
27-A5
l-i-C3
28-84
9-C2
6-C3
8-D1
19-D3
12-C5
5-D2
12-85
2-D4
20-A2
20-C3
2-A3
20-D3
21-D3
12-A4
13-A4
17/18-B1
17-A3
17-A5
17-D5
18-D5
17-C5
18-C5
5-D5
6-B2
6-D4
6-C5
11-C5
3-A3
3-A2
3-B2
5-A2
13-C2
1-A1
1-C1
Rep.
Op. Notes
Reference
5.1.11.1
8.1.07.3
8.2.09.1
8.2.08.1
8.1.11.1
8.2.01.1
2.3.01.2
2.2.06.1
6.1.06.1
6.2.03.1
6.3.01.1
8.2.07.1
3.3.08.2
6.9.04.1
6.9.04.1
6.9.06.1
6.5.09.1
5.1.08.1
6.4.01.1
2.5.06.1
6.7.03.1
6.5.10.1
6.5.02.1
2.5.06.3
6.4.02.1
6.1.08.1 Manual only
6.6.09.1
6.5.07.1
6.1.09.2
6.5.07.2
3.3.08.6
6.4.03.1
6.4.04.1
6.7.10.1
6.7.08.1
6.8.01.1
6.7.08.2
6.8.01.2
6.7.09.1
6.8.02.1
6.2.05.1
6.2.05.3
6.4.05.1
6.4.06.1
6.4.07.1 Multi-functio
6.2.06.1
1.7.17.1
1.7.17.2
1.7.16.4
6.4.08.1
6.1.04.1
6.1.04.2
May 1996 6-19
Page 28 of 421
Electrics
Electrical Component Location Index •
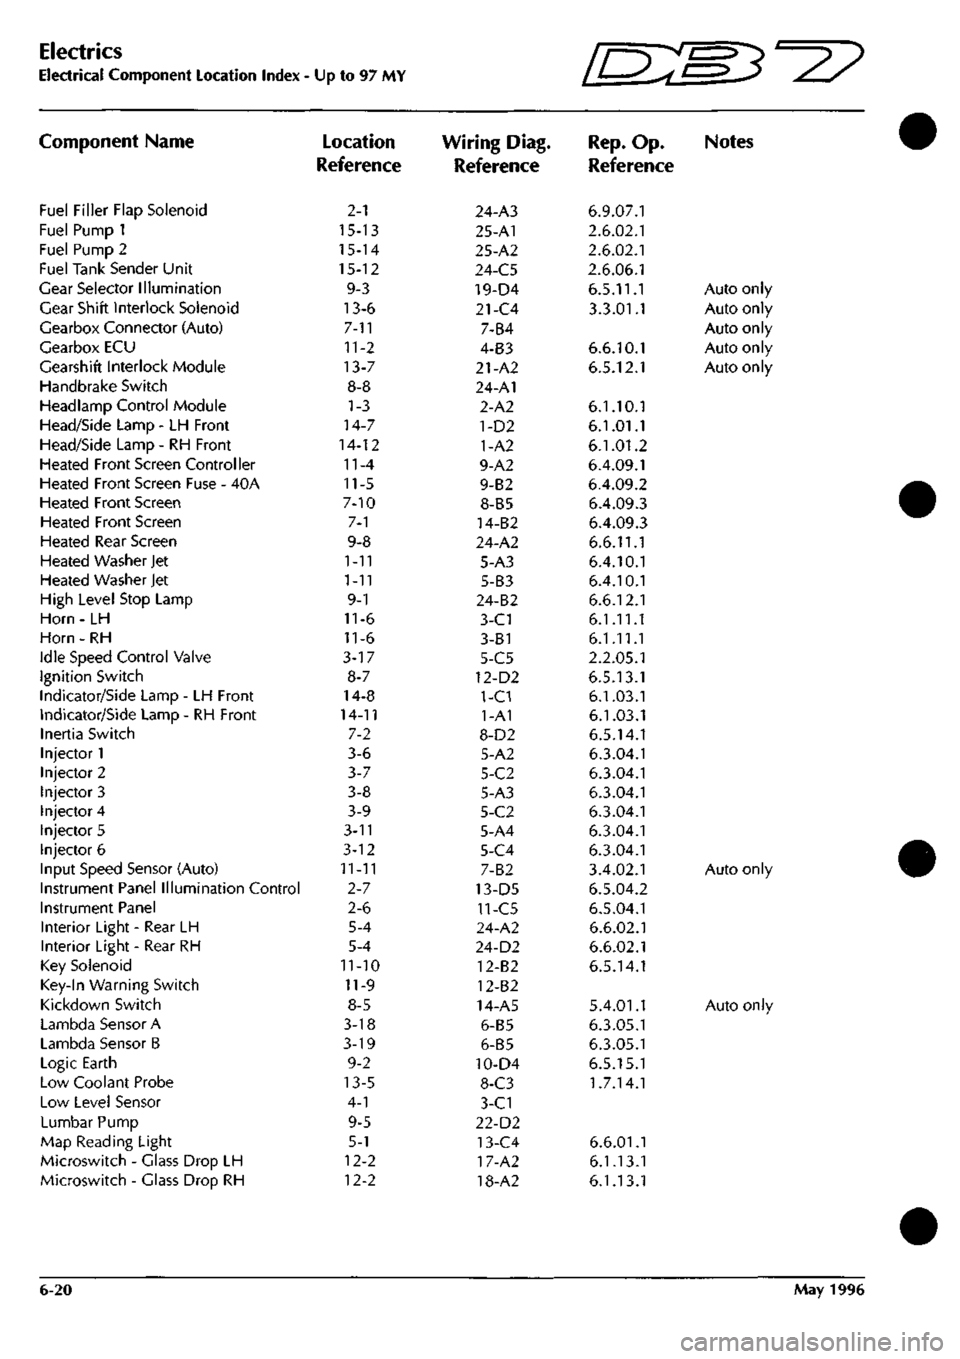
Component Name
Fuel Filler Flap Solenoid
Fuel Pump 1
Fuel Pump 2
Fuel Tank Sender Unit
Gear Selector Illumination
Gear Shift Interlock Solenoid
Gearbox Connector (Auto)
Gearbox ECU
Gearshift Interlock Module
Handbrake Switch
Headlamp Control Module
Head/Side Lamp - LH Front
Head/Side Lamp - RH Front
Heated Front Screen Controller
Heated Front Screen Fuse - 40A
Heated Front Screen
Heated Front Screen
Heated Rear Screen
Heated Washer Jet
Heated Washer Jet
High Level Stop Lamp
Horn - LH
Horn - RH
Idle Speed Control Valve
Ignition Switch
Indicator/Side Lamp - LH Front
Indicator/Side Lamp - RH Front
Inertia Switch
Injector 1
Injector 2
Injector 3
Injector 4
Injector 5
Injector 6
Input Speed Sensor (Auto)
Instrument Panel Illumination Control
Instrument Panel
Interior Light - Rear LH
Interior Light - Rear RH
Key Solenoid
Key-In Warning Switch
Kickdown Switch
Lambda Sensor A
Lambda Sensor B
Logic Earth
Low Coolant Probe
Low Level Sensor
Lumbar Pump
Map Reading Light
Microswitch - Glass Drop LH
Microswitch - Glass Drop RH
Up to 97 MY
Location
Reference
2-1
15-13
15-14
15-12
9-3
13-6
7-11
11-2
13-7
8-8
1-3
14-7
14-12
11-4
11-5
7-10
7-1
9-8
1-11
1-11
9-1
11-6
11-6
3-17
8-7
14-8
14-11
7-2
3-6
3-7
3-8
3-9
3-n
3-12
11-11
2-7
2-6
5-4
5-4
11-10
11-9
8-5
3-18
3-19
9-2
13-5
4-1
9-5
5-1
12-2
12-2
Wiring Diag.
Reference
24-A3
25-A1
25-A2
24-C5
19-D4
21-C4
7-B4
4-B3
21-A2
24-A1
2-A2
1-D2
1-A2
9-A2
9-B2
8-B5
14-B2
24-A2
5-A3
5-B3
24-B2
3-C1
3-81
5-C5
12-D2
1-C1
1-A1
8-D2
5-A2
5-C2
5-A3
5-C2
5-A4
5-C4
7-B2
13-D5
11-C5
24-A2
24-D2
12-B2
12-B2
14-A5
6-B5
6-B5
10-D4
8-C3
3-C1
22-D2
13-C4
17-A2
18-A2
Ini^'
IL-^^'^
Rep.
Op.
Reference
6.9.07.1
2.6.02.1
2.6.02.1
2.6.06.1
6.5.11.1
3.3.01.1
6.6.10.1
6.5.12.1
6.1.10.1
6.1.01.1
6.1.01.2
6.4.09.1
6.4.09.2
6.4.09.3
6.4.09.3
6.6.11.1
6.4.10.1
6.4.10.1
6.6.12.1
6.1.11.1
6.1.11.1
2.2.05.1
6.5.13.1
6.1.03.1
6.1.03.1
6.5.14.1
6.3.04.1
6.3.04.1
6.3.04.1
6.3.04.1
6.3.04.1
6.3.04.1
3.4.02.1
6.5.04.2
6.5.04.1
6.6.02.1
6.6.02.1
6.5.14.1
5.4.01.1
6.3.05.1
6.3.05.1
6.5.15.1
1.7.14.1
6.6.01.1
6.1.13.1
6.1.13.1
W3^y
Notes
Auto only
Auto only
Auto only
Auto only
Auto only
Auto only
Auto only
6-20 May 1996
Page 46 of 421
I
00
n m o
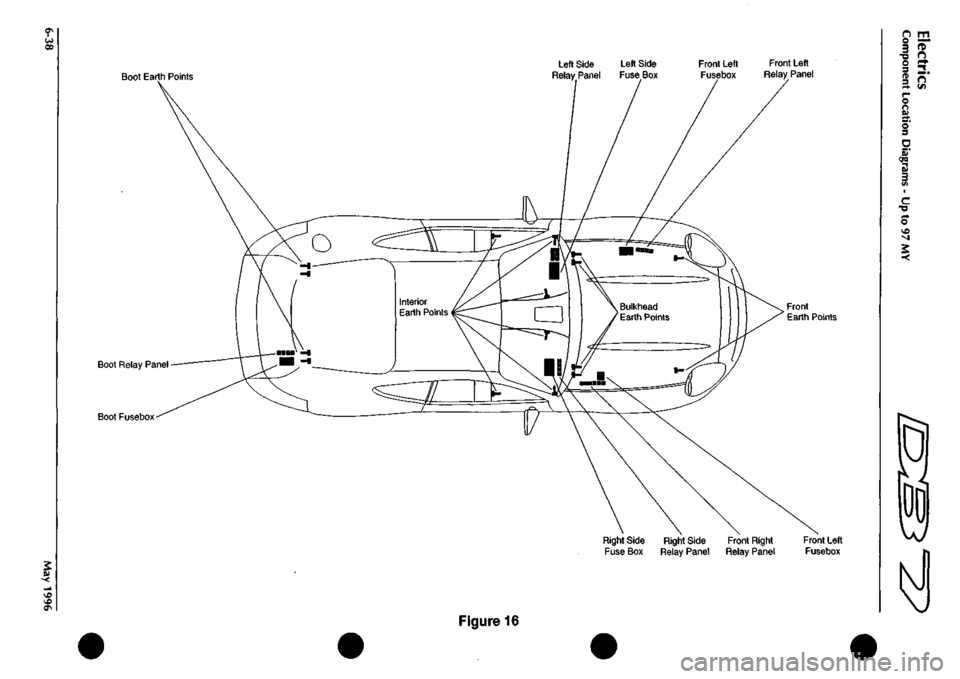
Boot Earth Points
Left Side Relay Panel
Left Side Fuse Box Front Left Fusebox
Front Left Relay Panel
n
Boot Relay Panel
Boot Fusebox
3
I =•
r-O ft
5' 3
cro
C •a
o
-<
Front Earth Points
Right Side Fuse Box Right Side Relay Panel Front Right Relay Panel
Front Left Fusebox
2
&<
^
I7>
Figure 16
Page 49 of 421
Electrics
Loom Location Diagrams - Up to 97 MY
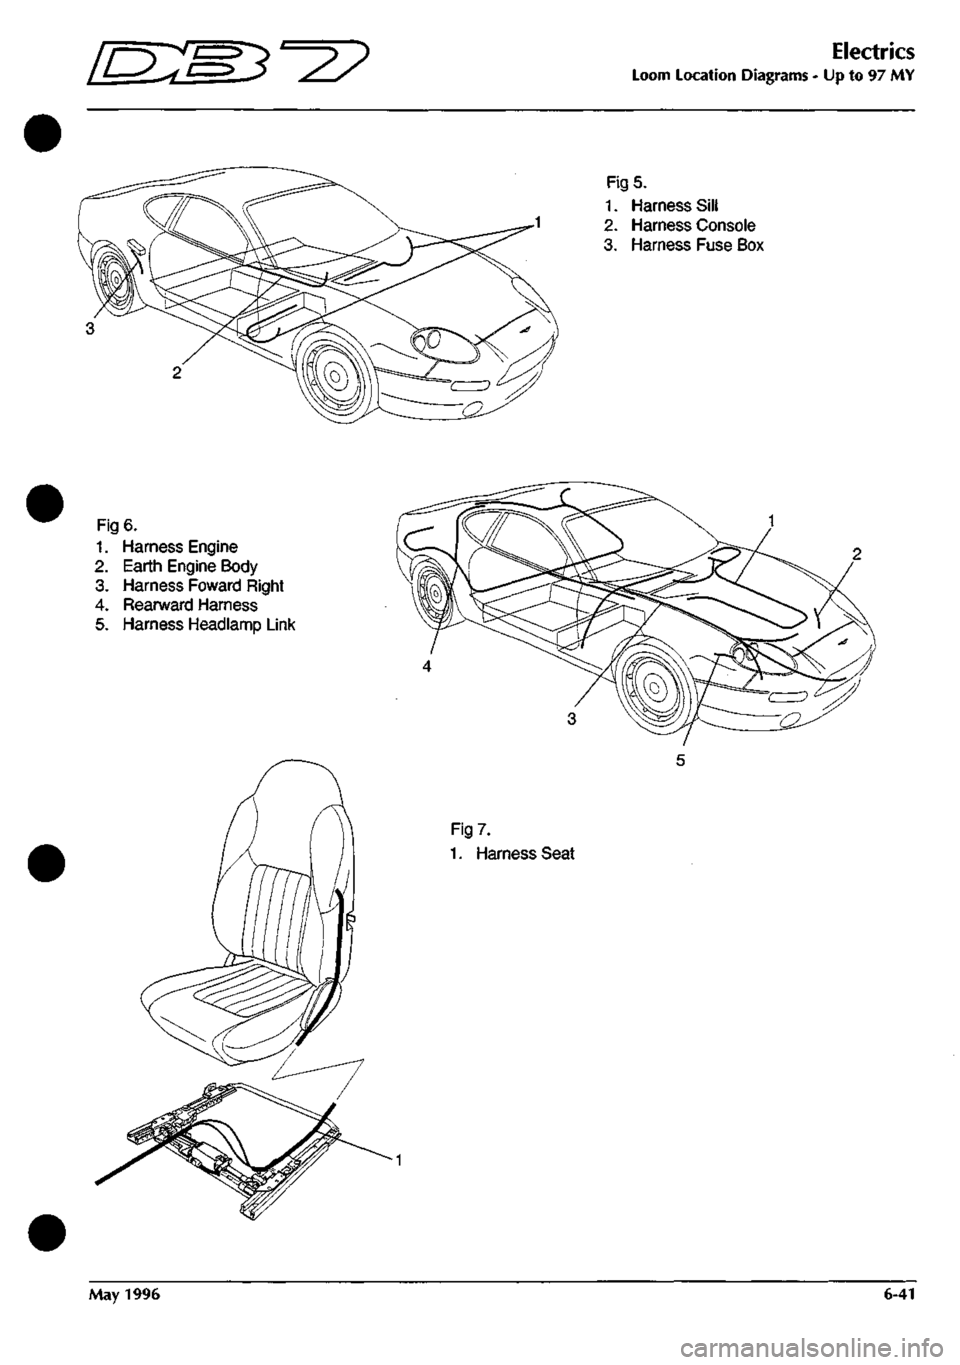
Fig 5.
1.
Harness Sill
2.
Harness Console
3. Harness Fuse Box
Fig 6.
1.
Harness Engine
2.
Earth Engine Body
3. Harness Foward Right
4.
Rearward Harness
5. Harness Headlamp Link
Fig 7.
1.
Harness Seat
May 1996 6-41
Page 99 of 421
NO COLOUR PIN 1881 B I m vi i
REVERSE LIGHTS RELAY STOP LAMP RELAY
KO COLOUn 497 SLG 491 W 900 GN
901 NP
PIK 85 88 87 e7A
-iS-
AREA Bl Bl CI
-Id-..
NO COLOUR PIN 901 GB 85 90Z G 8G 903 GP 87 ITS PY 87A ?« 5 59
Ml Bl CI B2-I93 Bl CI
law
NO COLOUR 5 YS 175 PY 259 OR 260 0 261 NR 483 LGK 479 S 491 W 492 YW 493 KB 494 BR 495 OR 496 OU 497 SLG 500 KB 501 GB 507 GP 829 NO 833 NS 834 PS 835 NY 845 CP 646 NS 847 NY 849 TIN 852 P 863 GP 866 PC 867 RS 880 GP 885 B 889 BR 890 B 891 B 893 R 894 WS 896 R 697 WS 900 GH 902 G 904 G 907 WK 918 RG 927 BRD 930 WK 932 GW 933 GR 936 U 939 B 941 RS
AREA B6 A5 B6 BG 86 A3 B2 A3 86 86
B3-I9:
B6 66 A4 C4-I98 A5
C4-I9;
B6 C3-I96 B6 B4-I97 B2-I95 B6 B4-I97 86 D4 A3 B6 B2-I94 A3 82 83 82 D2 D2 D2 03 D3 A4 A3 A5 D3 03 C6 C6 C6 C6 C6 C6 B2-I94
NO COLOUR 5 YS 259 OR 260 0 261 NR 492 YW 493 KB 495 OR 496 OU 829 NO 834 NS 846 NS 849 TIN 866 PG 880 GP 882 UG 884 UR 916 N 917 N 919 NS 921 NS 922 KB 923 KB 924 NY 925 PS 926 PS 927 BRD 929 HY 930 WK 952 GW 933 CR 935 BR 936 U 939 B
-ma'
Bl Bl Bl Bl Bl Bl Bl 61 61 Bl Bl CI CI A3 Al K 04 04 03 03 C4-I9t 04-198 B4-I91 C3-I96 C3-I96 CI 64-191 CI CI CI
63-19!
CI 01
NO COLOUR 881 8 883 6 890 6
9?i
B
AREA Al A2 a a
FUSEBOX ASSEMBLY 12 WAY
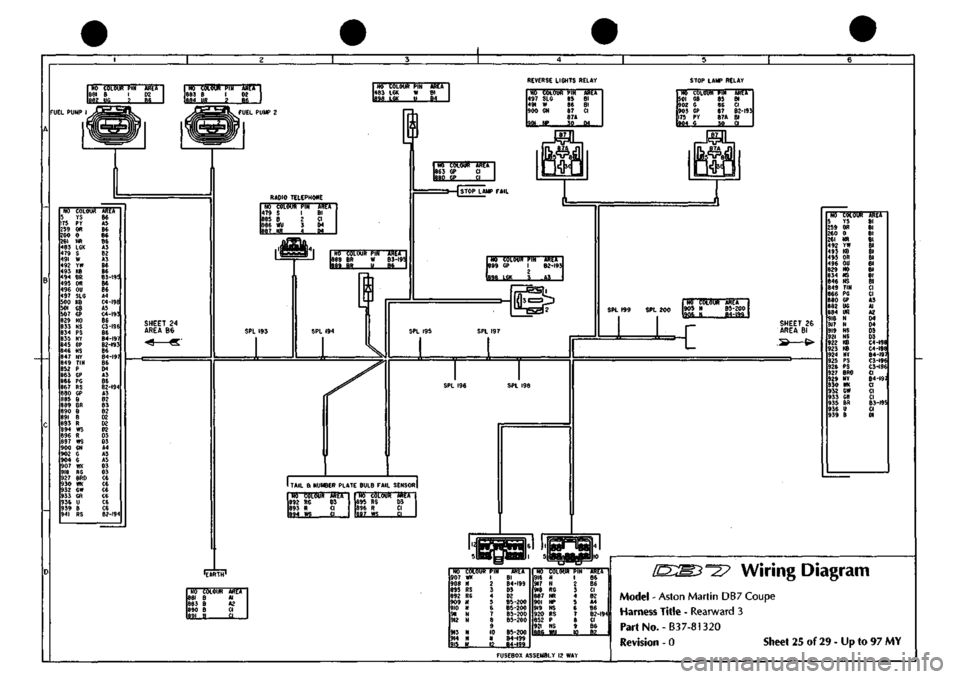
Wiring Diagram
Model - Aston Martin DB7 Coupe
Harness Title - Rearward 3
PartNo.-B37-81320
Revision - 0 Sheet 25 of 29 - Up to 97 MY
Page 103 of 421
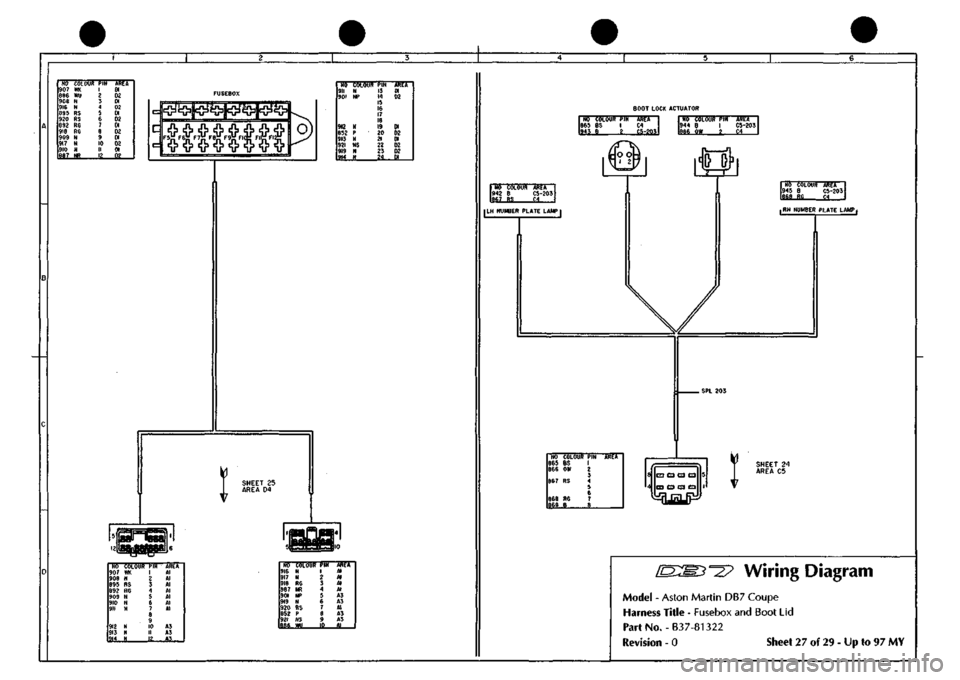
NO COLOUf 907
m
886
WU
908
N
916
N
895
RS
920
RS
692
RG
918
RC
909
N
917
N
910
N
887
NR
PIN 1 •/ 3 4 5 6 7 e 9 10 II IS
AREA 01 02 01 02 01 02 01 02 01 02 01 02
^^c^ldrjiiQJ^i^i^^
ti6
911 901
912 8S? 915 921 919
V<
COLOU!
N HP
N P N NS N N
I*1N 13
15 16 17
m
19 20 21 22 23
24
Mi
a 02
Dl 02 01 02 D2 Dl
SHEET
25
AREA
D4
IB
PBflHBlPPtiJ
NO COLOUf 907
IK
908
N
895
RS
892
RG
909
N
910
N
911
N
912
N
913
N
914
N
PIN 1 2 3 4 5 6 7 8 9 10 II 12...
AREA Al Al
Al
Al Al Al Al
A3 A3
flj
NO COLOUR
PIN
916
N
917
N
918
RC
987
KR
901
NP
919
N
920
RS
852
P
)ZI
NS
886
WU
1 2 3 4 5 e 7 8 9 IB-
AREA Al Al Al Al A3 A3 Al A3 A3 Al
BOOT LOCK ACTUATOR
865
BS I C4 ?
Ho ioLm
M
mi
944
B I
C5-203 966
OW ? C4
M C6L0Ut) ARtA
942
B
C5-203 867
RS C4
ILH NUMBER PLATE LAMP
I
11
NO 945 COLOUR B RO C5-203 ?4
...
,RH NUMBER PLATE LAMP,
NO COLOUf 865
BS
866
OW
867
RS
868
RO
869
B
PIN 1 2 3 4 5 6 7
?
AREA
8
o a Q a 5
4
C3
Q Q a I
SHEET 24 AREA C5
'^? Wiring Diagram
Model
-
Aston Martin DB7 Coupe
Harness Title
-
Fusebox and Boot Lid
PartNo.-B37-81322
Revision
- 0
Sheet 27 of 29
-
Up to 97 MY
Page 129 of 421
Electrics
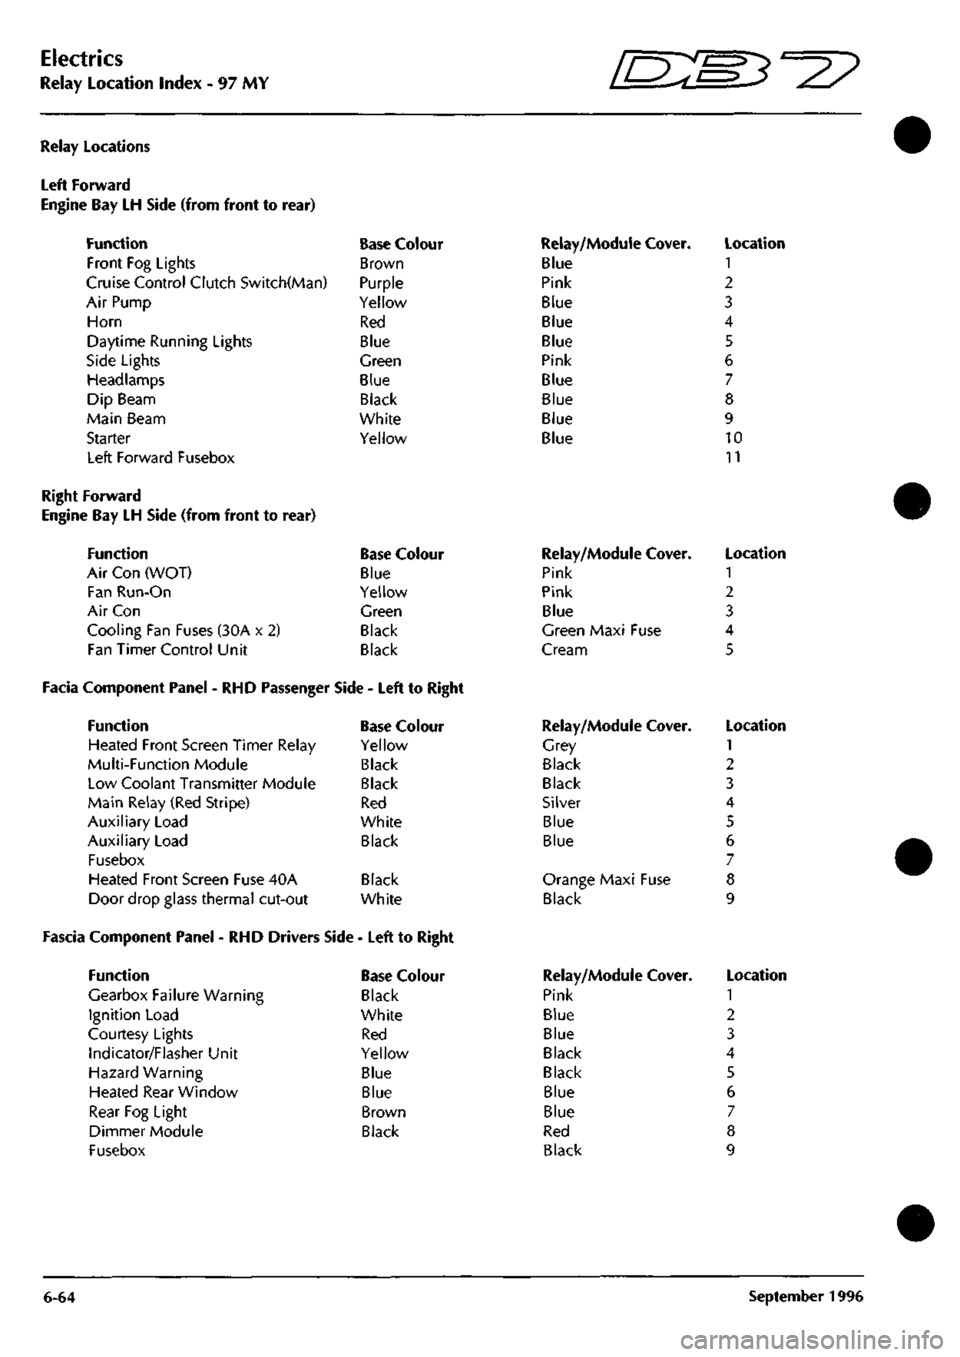
Relay Location Index - 97 MY 5^^?
Relay Locations
Left Forward
Engine Bay LH Side (from front to
Function
Front Fog Lights
rear)
Cruise Control Clutch Switch(Man)
Air Pump
Horn
Daytime Running Lights
Side Lights
Headlamps
Dip Beam
Main Beam
Starter
Left Forward Fusebox
Base Colour
Brown
Purple
Yellow
Red
Blue
Green
Blue
Black
White
Yellow
Relay/Module Cover.
Blue
Pink
Blue
Blue
Blue
Pink
Blue
Blue
Blue
Blue
Location
1
2
3
4
5
6
7
8
9
10
11
Right Forward
Engine Bay LH Side (from front to rear)
Function Base Colour
Air Con (WOT) Blue
Fan Run-On Yellow
Air Con Green
Cooling Fan Fuses (30A x 2) Black
Fan Timer Control Unit Black
Facia Component Panel - RHD Passenger Side - Left to Right
Function Base Colour
Heated Front Screen Timer Relay Yellow
Multi-Function Module Black
Low Coolant Transmitter Module Black
Main Relay (Red Stripe) Red
Auxiliary Load White
Auxiliary Load Black
Fusebox
Heated Front Screen Fuse 40A Black
Door drop glass thermal cut-out White
Fascia Component Panel - RHD Drivers Side - Left to Right
Function
Gearbox Failure Warning
Ignition Load
Courtesy Lights
Indicator/Flasher Unit
Hazard Warning
Heated Rear Window
Rear Fog Light
Dimmer Module
Fusebox
Base Colour
Black
White
Red
Yellow
Blue
Blue
Brown
Black
Relay/Module
Pink
Pink
Blue
Cover.
Green Maxi Fuse
Cream
Relay/Module
Grey
Black
Black
Silver
Blue
Blue
Cover.
Orange Maxi Fuse
Black
Relay/Module
Pink
Blue
Blue
Black
Black
Blue
Blue
Red
Black
Cover.
Location
1
2
3
4
5
Location
1
2
3
4
5
6
7
8
9
Location
1
2
3
4
5
6
7
8
9
6-64 September 1996