coolant temperature ASTON MARTIN V8 VANTAGE 2010 User Guide
[x] Cancel search | Manufacturer: ASTON MARTIN, Model Year: 2010, Model line: V8 VANTAGE, Model: ASTON MARTIN V8 VANTAGE 2010Pages: 947, PDF Size: 43.21 MB
Page 295 of 947
Cooling System (03.03)
Engine (03.00)
Issue 5, Janauary 2010 Workshop Manual 3-3-1
Engine (03.00)
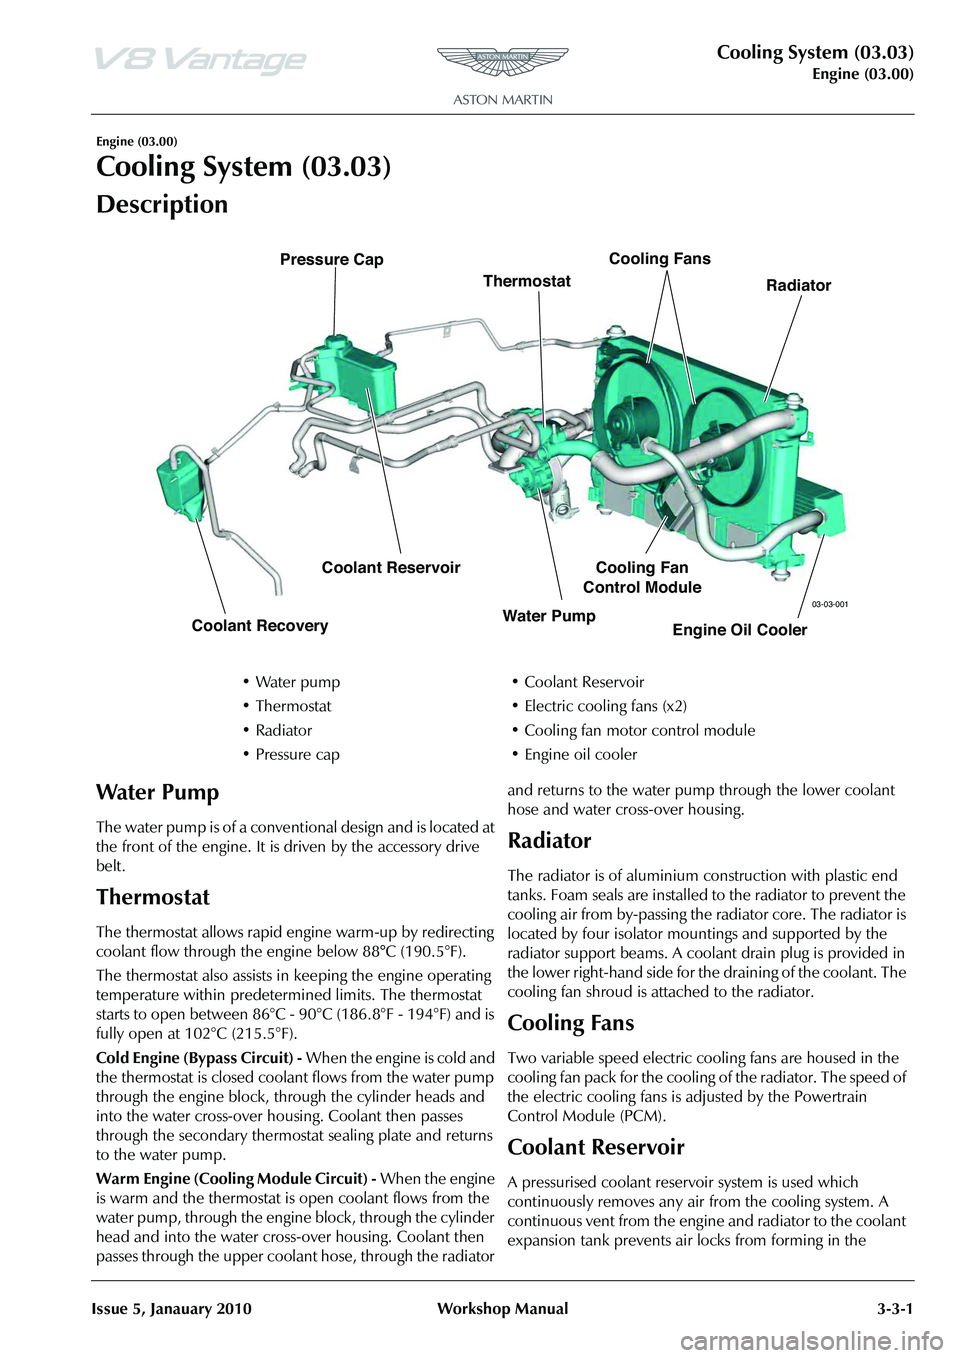
Cooling System (03.03)
Description
The water pump is of a conventional design and is located at
the front of the engine. It is driven by the accessory drive
belt.
Thermostat
The thermostat allows rapid en gine warm-up by redirecting
coolant flow through the engine below 88 °C (190.5°F).
The thermostat also assists in keeping the engine operating
temperature within predetermi ned limits. The thermostat
starts to open between 86°C - 90°C (186.8°F - 194°F) and is
fully open at 102°C (215.5°F).
Cold Engine (Bypass Circuit) - When the engine is cold and
the thermostat is closed coolant flows from the water pump
through the engine block, through the cylinder heads and
into the water cross-over housing. Coolant then passes
through the secondary thermostat sealing plate and returns
to the water pump.
Warm Engine (Cooling Module Circuit) - When the engine
is warm and the thermostat is open coolant flows from the
water pump, through the engine block, through the cylinder
head and into the water cros s-over housing. Coolant then
passes through the upper coolant hose, through the radiator and returns to the water pump through the lower coolant
hose and water cross-over housing.
Radiator
The radiator is of aluminium construction with plastic end
tanks. Foam seals are installed to the radiator to prevent the
cooling air from by-passing the radiator core. The radiator is
located by four isolator mo
untings and supported by the
radiator support beams. A coolant drain plug is provided in
the lower right-hand side for the draining of the coolant. The
cooling fan shroud is attached to the radiator.
Cooling Fans
Two variable speed electric cooling fans are housed in the
cooling fan pack for the cooling of the radiator. The speed of
the electric cooling fans is adjusted by the Powertrain
Control Module (PCM).
Coolant Reservoir
A pressurised coolant reservoir system is used which
continuously removes any air from the cooling system. A
continuous vent from the engine and radiator to the coolant
expansion tank prevents air locks from forming in the
•Water pump
• Thermostat
•Radiator
• Pressure cap
• Coolant Reservoir
• Electric cooling fans (x2)
• Cooling fan motor control module
• Engine oil cooler
Radiator
Cooling Fans
Thermostat
Coolant Reservoir Engine Oil Cooler
Cooling Fan
Control Module
Water Pump
Coolant Recovery Pressure Cap
03-03-001
Page 296 of 947
Cooling System (03.03)
Engine (03.00)3-3-2 Workshop Manual Issue 5, Janauary 2010
cooling system. No manual bleed points are provided on the
system.
The coolant reservoir should be full when the coolant system
is cold.
Engine Oil Cooler
The oil temperature is contro lled by an air/oil cooler
mounted at the front of the car. Engine oil is removed from
the dry sump, with the scavenge pump. The oil is routed to
a temperature controlled thermostat which controls the
directional flow of the oil. With the thermostat closed the oil
is routed directly to the oil tank. When the thermostat starts
to open (at 105°C) the oil is routed via the air/oil cooler
before entering the tank.
Specifications
Torque Figures
Maintenance
Coolant-Drain/Fill
1. Raise vehicle on ramp.
2. Remove front undertray (refer to Workshop Manual procedure 01.02.NB Undertray - Front - Renew).
3. Position suitable container to collect coolant.
4. Remove pressure cap from coolant reservoir.
5. Remove drain plug from radiator, allow coolant to drain.
6. Installation
7. Clean radiator drain plug.
8. Install and tighten drain plug.
9. Remove drain container.
10. Install front undertray (refer to Workshop Manual procedure 01.02.NB Undertray - Front - Renew).
11. Lower vehicle on ramp.
12. Fill cooling system with specified coolant mix to maximum level in coolant reservoir.
Antifreeze Mix
50% OAT coolant/50% water
Pressure Cap 150kpa
Leakage Rates 30cm/min. 150-180kpa
60xcm/min. 10kpa
Up to 75kpa @ 150cm/h
Water Pump Pumps 4ltr/min. @ 1000rpm
Pumps 240ltr/min. @ 7000rpm
Thermostat Opens between 86°C - 90°C (186.8°F -
194°F)
Fully open at 102°C
The anti-freeze is un ique and cannot be mixed with other
anti-freeze solutions. The OAT coolant/water mixture has a
life of 150,000 miles or 5 years (which ever comes first).
Description Nm. Ib/ft
Condenser A/C pipes 8-10 6-8
Thermostat Housing 8-12 6-9
Thermostat housing support bracket 23-27 17-20
Water pump 23-27 17-20
Water pump pulley 23-27 17-20
Oil Cooler 50 36
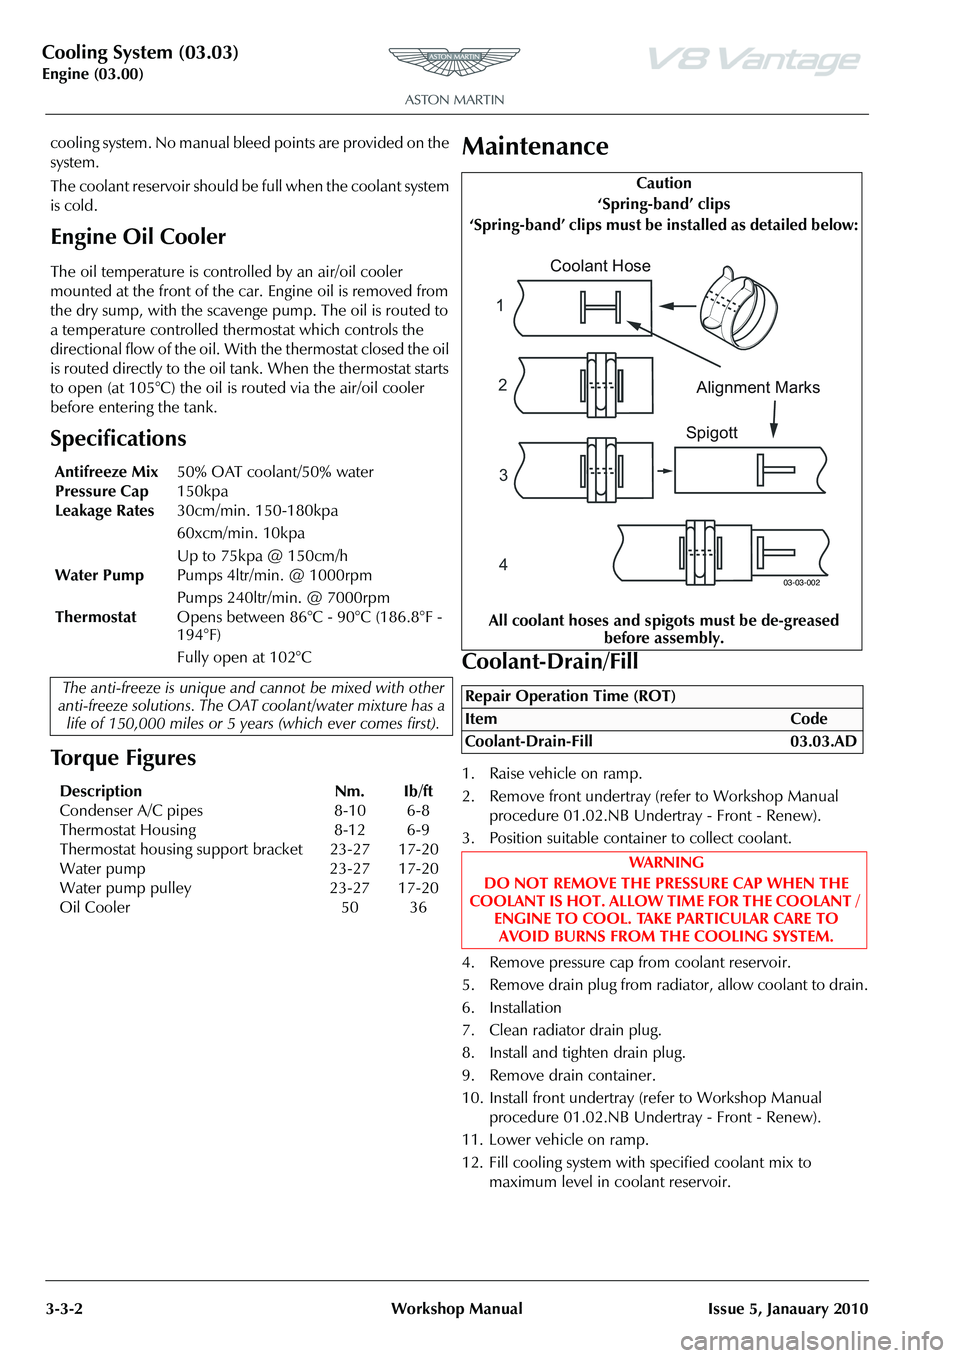
Caution
‘Spring-band’ clips
‘Spring-band’ clips must be installed as detailed below:
All coolant hoses and spigots must be de-greased before assembly.
Repair Operation Time (ROT)
ItemCode
Coolant-Drain-Fill 03.03.AD
WAR NI NG
DO NOT REMOVE THE PRESSURE CAP WHEN THE
COOLANT IS HOT. ALLOW TIME FOR THE COOLANT /
ENGINE TO COOL. TAKE PARTICULAR CARE TO AVOID BURNS FROM THE COOLING SYSTEM.
03-03-002
3
2
4
Coolant Hose SpigottAlignment Marks
Page 297 of 947
Cooling System (03.03)
Engine (03.00)
Issue 5, Janauary 2010 Workshop Manual 3-3-3
13. Install and tighten pressure cap.
14. Run engine until normal operating temperature is reached.
15. Stop engine, allow to cool down.
16. Re-check coolant level, top-up as necessary.
Thermostat - Renew
Removal
1. Drain Coolant (refer to Workshop Manual procedure 03.03.AD Coolant - Drain and Refill).
2. Release breather valve (bolt x1) and tie aside.
3. Unclip engine harness for access (x4).
4. Remove one end of engine breather hoses for access (x3).
5. Remove breather valve bracket for access (nuts x2 bolt x1).
6. Remove thermostat housing from manifold (bolt x3).
7. Remove thermostat and sealing ring.
Installation
1. Install new thermostat and sealing ring .
2. Install thermostat housing (torque).
3. Install breather valve bracket.
4. Install breather hoses (x3) and clip.
5. Clip engine harness.
6. Install breather valve.
7. Refill coolant (refer to Workshop Manual procedure 03.03.AD Coolant - Drain and Refill).
Wa t e r P u m p - R e n e w
Removal
1. Drain cooling system (refer to Workshop Manual procedure 03.03.AD Coolant - Drain and Refill).
2. Disconnect breather pipe qu ickfits (x2) from air cleaner
duct.
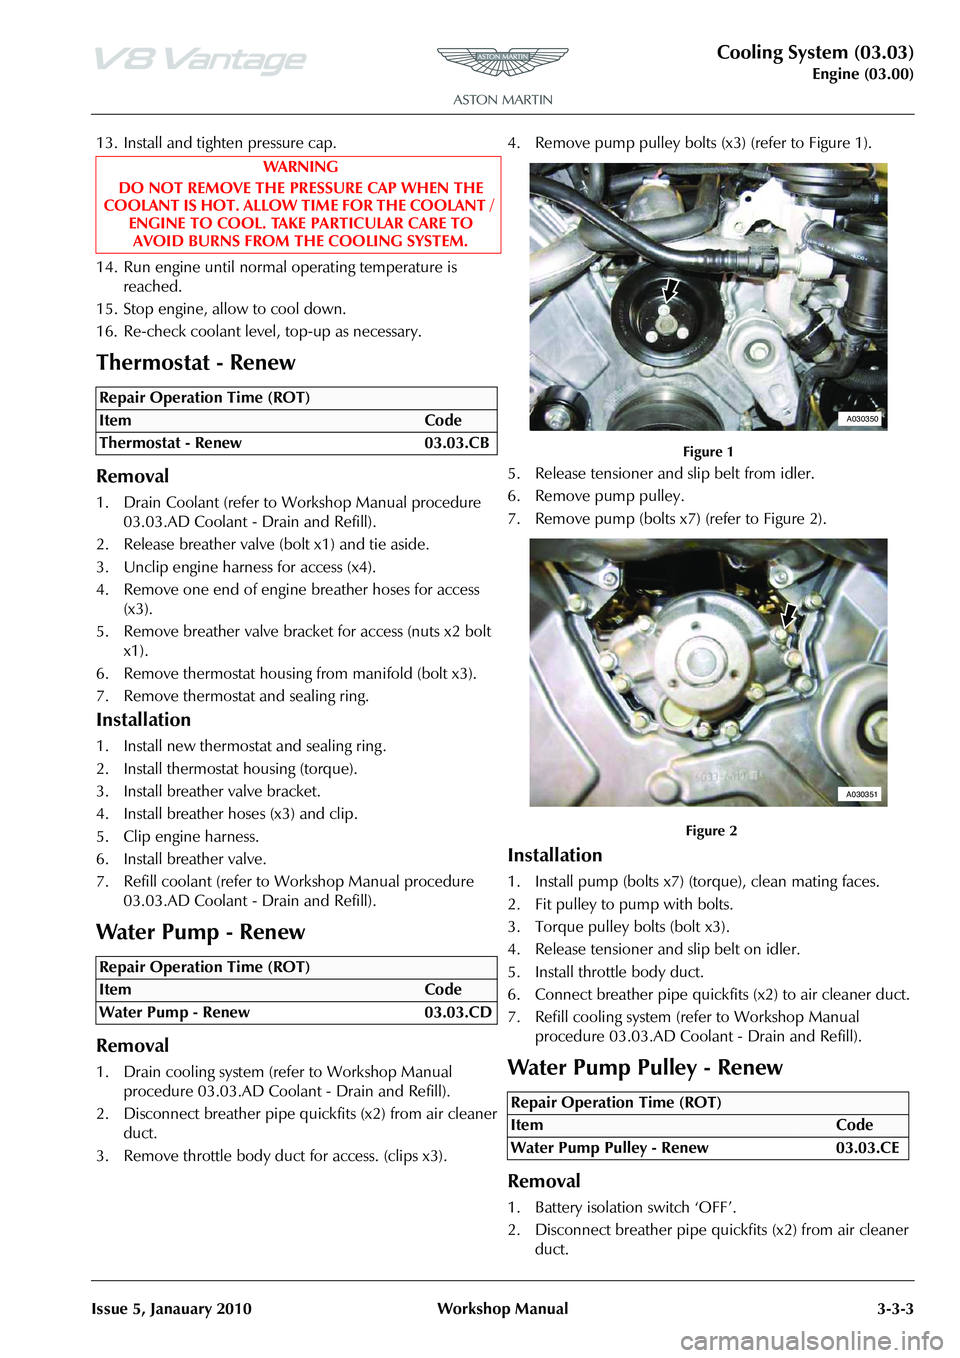
3. Remove throttle body du ct for access. (clips x3). 4. Remove pump pulley bolts (x
3) (refer to Figure 1).
Figure 1
5. Release tensioner and slip belt from idler.
6. Remove pump pulley.
7. Remove pump (bolts x7 ) (refer to Figure 2).
Figure 2
Installation
1. Install pump (bolts x7) (torque), clean mating faces.
2. Fit pulley to pump with bolts.
3. Torque pulley bolts (bolt x3).
4. Release tensioner and slip belt on idler.
5. Install throttle body duct.
6. Connect breather pipe quickf its (x2) to air cleaner duct.
7. Refill cooling system (refer to Workshop Manual procedure 03.03.AD Coolant - Drain and Refill).
Water Pump Pulley - Renew
Removal
1. Battery isolation switch ‘OFF’.
2. Disconnect breather pipe qu ickfits (x2) from air cleaner
duct.
WA R N I N G
DO NOT REMOVE THE PRESSURE CAP WHEN THE
COOLANT IS HOT. ALLOW TIME FOR THE COOLANT /
ENGINE TO COOL. TAKE PARTICULAR CARE TO
AVOID BURNS FROM THE COOLING SYSTEM.
Repair Operation Time (ROT)
Repair Operation Time (ROT)
Repair Operation Time (ROT)
A030350
A030351
Page 303 of 947

Cooling System (03.03)
Engine (03.00)
Issue 5, Janauary 2010 Workshop Manual 3-3-9
4. Disconnect expansion tank feed hose (quickfit) (refer to Figure 3).
Figure 3
5. Disconnect heater feed hose (clip x1) (refer to Figure 4).
Figure 4
6. Disconnect heater return hose (clip x1) (refer to Figure 5).
Figure 5
7. Disconnect breather hose (qui ckfit) (refer to Figure 6).
Figure 6
8. Disconnect separator hose (clip x1) (refer to Figure 7).
Figure 7
9. Disconnect coolant temperature multiplug (refer to
Figure 8).
Figure 8
10. Remove harness clips (x2).
11. Remove 4th bolt of vacuum tank bracket fixing (refer to Figure 9).
A030361B
A030364
A030364A
A030359
A030361
A030373
Page 304 of 947

Cooling System (03.03)
Engine (03.00)3-3-10 Workshop Manual Issue 5, Janauary 2010
12. Remove coolant manifold (bolts x4) (refer to Figure 9).
Figure 9
13. Remove old seals.
14. Remove bracket breather (bolt x1, nut x2).
Installation
1. Install bracket breather (bolt x1, nuts x2) (torque).
2. Clean gasket faces.
3. Install new seals.
4. Install coolant manifold (bolts x4) (torque).
5. Install 4th bolt of vacuum tank bracket fixing (torque).
6. Install harness clips (x2).
7. Connect coolant temp multiplug.
8. Connect separator hose (clip x1).
9. Connect breather hose (quickfit).
10. Connect heater return hose (clip x1).
11. Connect heater feed hose (clip x1).
12. Connect expansion tank feed hose (quickfit).
13. Disconnect top hose (clip x1).
14. Connect bottom hose (clip x1).
15. Install reservoir bracket asse mbly - vacuum system (refer
to Workshop Manual procedu re 03.08.AE Reservoir and
Bracket Assembly - Vacuum System - Renew).
Engine Electric Co olant Temperature
Sensor - Renew
Removal
1. Drain Cooling system (refer to Workshop Manual procedure 03.03.AD Coolant - Drain and Refill).
2. Disconnect breather pipe qu ickfits (x2) from air cleaner
duct.
3. Remove throttle body duct for access. (clips x3). 4. Remove pump pulley bolts (x3) (refer to Figure 1).
Figure 1
5. Release tensioner and slip belt from idler (refer to Figure
2).
Figure 2
6. Remove pump pulley.
7. Disconnect throttle body coolant hose (refer to Figure 3).
Figure 3
Repair Operation Time (ROT)
A030368A030350
A030553
A030364
Page 309 of 947

Fuel Charging System (03.04)
Engine (03.00)
May 2007 Workshop Manual 3-4-3
Installation Manifold to Vehicle
3. Install new gaskets to cylinder block (glue in place).
4. Install manifold (allowing access to install bolt for purge
line P-clip).
5. Install manifold bolts (x10) (torque and tightening sequence).
6. Install bolts (x2) bracket to manifold (rear).
7. Connect EGR pipe union.
8. Connect EGR vacuum hose.
9. Connect air cleaner duct (clip x1).
10. Connect breather pipe quickf its (x2) to air cleaner duct.
11. Connect throttle body multiplug and harness clip.
12. Connect manifold heating hoses (x2).
Installation RH Side
13. Connect EGR vac pipe to sensor and manifold.
14. Install coolant pipe bracket (bolt x2, nut x2).
15. Connect EGR (x1), fuel rail pressure sensor (x1) and
injector multiplugs (x4).
16. Refit harness to coolant pipe bracket (fir tree x3).
17. Connect heater hose to pipe (quick fit).
18. Refit heater hose (clipx2) and EGR vacuum lines (clips x2) to bracket.
19. Install fuel feed pipe.
20. Install purge pipe P-clip.
21. Install harness bracket to engine.
22. Feed harness into inner wing area.
23. Install fusebox to bracket.
24. Install earth lead to fusebox.
25. Install battery lead to fusebox (1x nut and rubber cover).
26. Install multiplugs to fuse box.
27. Install fusebox bracket fixings.
28. Refit harness fir tree clips to cylinder head.
29. Refit engine breather hose.
30. Install VVT solenoid multip lug, position coil and CMP
harness (1x edge clip).
31. Install ECM (see Workshop Manual procedure 03.14.BB XREF: 319 Engine Control Module - RH Renew
32. Install coil cover.
Installation LH Side
33. Connect breather hose to manifold (quickfit).
34. Connect IAT multiplug.
35. Unclip injector harness from cam cover (x2).
36. Connect injector multiplugs (x4).
37. Install pipe support bracket (nuts x2, bolts x2).
38. Install harness support bracket (bolt x1, nut x2) release harness clips (fir tree x3).
39. Connect booster hose to manifold and support clip. 40. Connect heater hose from pipe (quick fit).
41. Install heater hose (x2) and throttle body hose (x2) from
support bracket.
42. Connect purge line to manifold and into support clip.
43. Connect breather hoses (x2) to cam cover.
44. Install coil cover.
45. Install corner cross brace (t orque bolts with vehicle on
level ground).
46. Refill coolant (see Workshop Manual procedure 03.03.AD Coolant - Drain and Refill).
47. Install cross brace (torque bolts with vehicle on level
ground).
Fuel Injection Pressure Sensor - Renew
Removal
1. Depressurise fuel rail (see Workshop Manual procedure 10.01.EK Fuel System - Depressurise).
2. Disconnect vacuum hose.
3. Remove sensor from fuel rail (bolts x2).
4. Disconnect multiplug.
Installation
1. Install sensor to fuel rail (bolts x2) (torque).
2. Connect multiplug.
3. Connect vacuum hose.
Fuel Temperature Sensor - Renew
Removal
1. Depressurise fuel rail (see Workshop Manual procedure 10.01.EK Fuel System - Depressurise).
2. Disconnect vacuum hose.
3. Remove sensor from fuel rail (bolts x2).
4. Disconnect multiplug.
Installation
1. Install sensor to fuel rail (bolts x2) (torque).
2. Connect multiplug.
3. Connect vacuum hose.
WA R N I N G
THE INTAKE MANIFOLD IS HEAVY. TO AVOID
PERSONAL INJURY OR DAMAGE TO THE INTAKE MANIFOLD, INTAKE MANIFOLD REMOVAL /
ISTALLATION IS A TWO PERSON OPERATION.
Installation Not Handed
Repair Operation Time (ROT)
Repair Operation Time (ROT)
Page 359 of 947
Engine Sealing (03.10)
Engine (03.00)
Issue 5, Janauary 2010 Workshop Manual 3-10-1
Engine (03.00)
Engine Sealing (03.10)
Specifications
Maintenance
Engine Timing Cover - Renew
1. Remove the front subframe (refer to Workshop Manual procedure 02.01.BA Subframe Assembly - Front -
Remove for Access and Refit).
2. Put an applicable container in position under the engine
to collect drained oil.
3. Remove the sump drain plug and drain the oil from the engine.
4. Remove the oil tank assembly (refer to Workshop Manual procedure 03.02.CA Tank Assembly - Oil
Cooler - Renew).
5. Drain cooling system (refer to Workshop Manual procedure 03.03.AD Coolant - Drain and Refill).
6. Remove the left cam cover (Refer to ’Left Side Cam Cover - Remove and Install’, page 3-10-4) 7. Remove the outer and inner seals from the left cam
cover.
8. Remove the right cam cover (Refer to ’Right Side Cam Cover - Remove and Install’, page 3-10-9).
9. Remove the outer and inner seals from the right cam cover.
10. Release the clips and disconnect the two coolant hoses from the coolant manifold.
11. Release the clip and disconnect the hose from oil the separator.
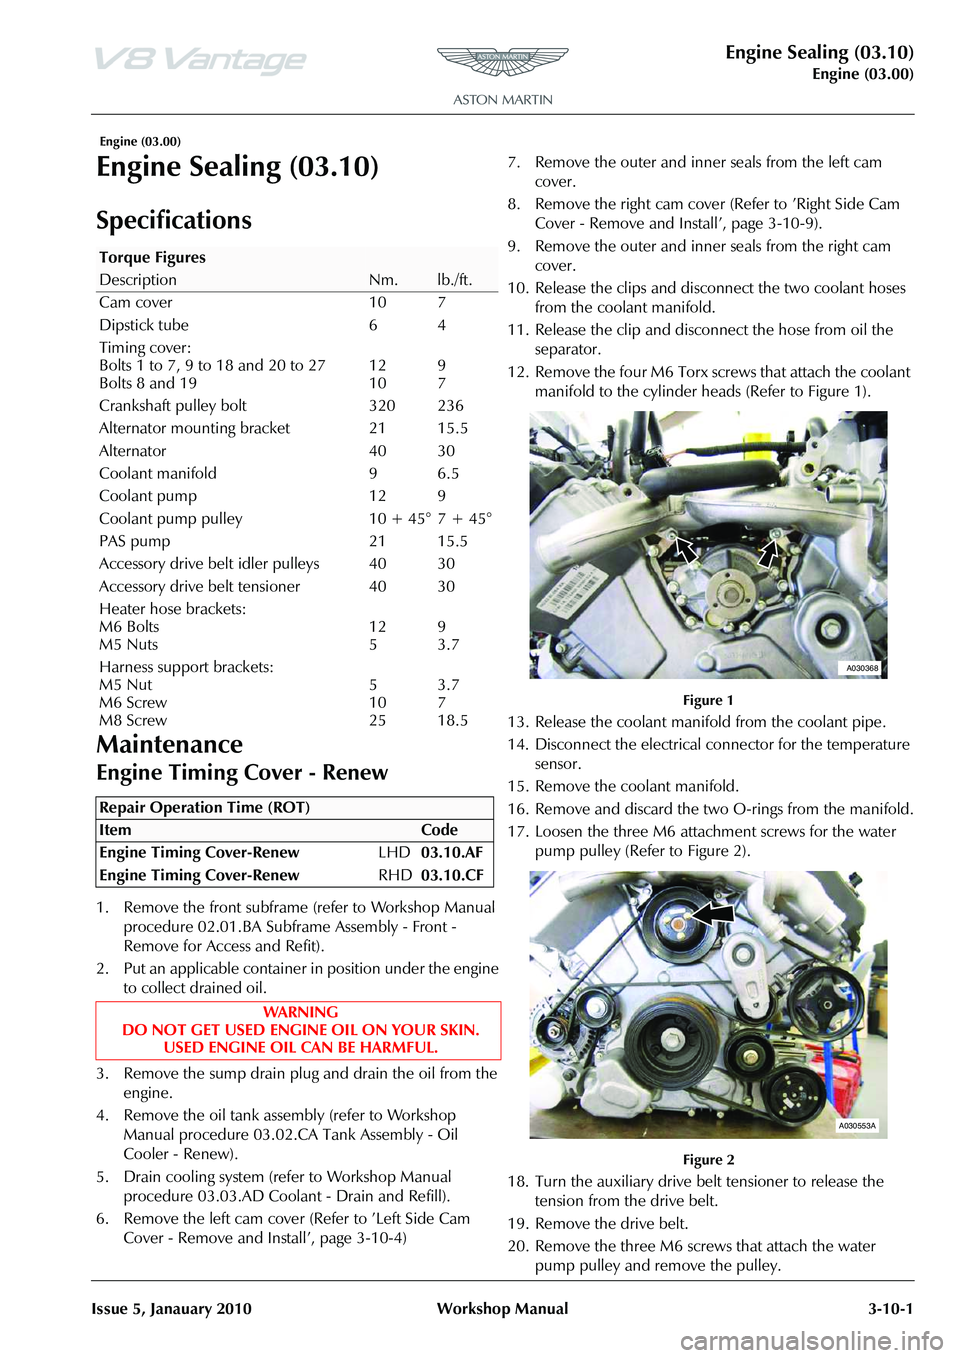
12. Remove the four M6 Torx screws that attach the coolant manifold to the cylinder heads (Refer to Figure 1).
Figure 1
13. Release the coolant manifold from the coolant pipe.
14. Disconnect the electrical connector for the temperature sensor.
15. Remove the coolant manifold.
16. Remove and discard the two O-rings from the manifold.
17. Loosen the three M6 attachment screws for the water pump pulley (Refer to Figure 2).
Figure 2
18. Turn the auxiliary drive be lt tensioner to release the
tension from the drive belt.
19. Remove the drive belt.
20. Remove the three M6 screws that attach the water pump pulley and remove the pulley.
Torque Figures
DescriptionNm.lb./ft.
Cam cover 10 7
Dipstick tube 6 4
Timing cover:
Bolts 1 to 7, 9 to 18 and 20 to 27
Bolts 8 and 19
12
10
9
7
Crankshaft pulley bolt 320 236
Alternator mounting bracket 21 15.5
Alternator 40 30
Coolant manifold 9 6.5
Coolant pump 12 9
Coolant pump pulley 10 + 45° 7 + 45°
PAS pump 21 15.5
Accessory drive belt idler pulleys 40 30
Accessory drive be lt tensioner 40 30
Heater hose brackets:
M6 Bolts
M5 Nuts
12
5
9
3.7
Harness support brackets:
M5 Nut
M6 Screw
M8 Screw
5
10
25
3.7
7
18.5
Repair Operation Time (ROT)
A030368
A030553A
Page 362 of 947
Engine Sealing (03.10)
Engine (03.00)3-10-4 Workshop Manual Issue 5, Janauary 2010
20. Put the alternator in position.
21. Install the M8 bolt that attaches the top of the alternator.
22. Install the M10 nut and bolt that attaches the bottom of the alternator.
23. Torque tighten the alternator attachment bolts.
24. Connect the battery cable to the alternator.
25. Install and torque the nut that attaches the battery cable.
26. Install the cover for the cable connection.
27. Connect the electrical connector to the alternator.
28. Apply new engine oil to the seal on a new oil filter.
29. Install the new oil filter.
30. Install the drain tube for the oil separator into the clip in the bracket.
31. Install the drain tube for the oil separator into timing cover.
32. Install the idler pulley for the air conditioning compressor.
33. Install and torque the M10 bolt that attaches the idler pulley.
34. Install the alternator idler pulley.
35. Install and torque the M10 bolt that attaches the idler pulley.
36. Install the auxiliary drive belt tensioner.
37. Install and torque the M10 bolt that attaches the tensioner.
38. Put the water pump pulley in position.
39. Install the three M6 bolts that attach the water pump pulley.
40. Turn the auxiliary drive be lt tensioner until you can
install the drive belt.
41. Torque tighten the three M6 water pump pulley bolts.
42. Clean the coolant manifold and the mating faces on the cylinder heads.
43. Install two new O-ring seals into the coolant manifold.
44. Put the coolant manifold in position.
45. Connect the electrical connector for the temperature sensor.
46. Install the coolant pipe in the manifold.
47. Install and torque tighten the four M6 Torx bolts that attach the coolant manifold to the cylinder heads.
48. Connect the three coolant hoses to the coolant manifold and install the hose clips.
49. Connect the engine breather to the oil separator.
50. Clean the left and right cam covers.
51. Install the inner and outer seals on the left cam cover.
52. Install the left cam cover (Refer to ’Left Side Cam Cover - Remove and Install’, page 3-10-4).
53. Install the inner and outer seals on the right cam cover.
54. Install the right cam cover (Refer to ’Right Side Cam Cover - Remove and Install’, page 3-10-9).
55. Install the front subframe (refer to Workshop Manual procedure 02.01.BA Subframe Assembly - Front -
Remove for Access and Refit). 56. Install the oil tank assembly
(refer to Workshop Manual
procedure 03.02.CA Tank Assembly - Oil Cooler -
Renew).
57. Fill the cooling system (refer to Workshop Manual procedure 03.03.AD Coolant - Drain and Refill).
Left Side Cam Cover - Remove and
Install
Removal
1. Disconnect the battery earth cable.
2. Remove the front crush brace. (Refer to procedure 01.01.LC - Front Crush Brace).
3. Remove the left side front crush bar for the body reinforcement. (Refer to procedure 01.01.AC - Left Side
Front Crush Bar for the Body Reinforcement).
4. Disconnect the breather pi pes from the cam cover and
the oil tank Y-piece.
5. Use applicable caps to seal the open ports.
6. Remove the ignition coil cover.
7. Disconnect the electrical connector from each of the four ignition coils.
8. Disconnect the electrical connector from the Variable
Valve Timing (VVT) solenoid.
9. Release the fir tree clip that attaches the wiring harness for the ignition coils.
10. Move the wiring harness for the ignition coils away.
11. Release the wiring harness for the injectors from the mounts.
12. Cut and remove the three cable ties that attach the rear of the wiring harness for the injectors.
13. Release the purge pipe an d heater pipe from the two
clips on the wiring harness bracket.
14. Remove the two nuts and three screws that attach the front bracket for the wiring harness.
15. Remove the three screws that attach the rear bracket for the wiring harness.
16. Cut and remove the four cable ties that attach the rear
of the wiring harness to the front bracket.
17. Remove the rear bracket for the wiring harness.
18. Remove the front bracket for the wiring harness.
19. Remove the screw that attaches each of the four ignition coils.
20. Remove the four ignition coils.
21. Remove the 14 screws that attach the cam cover to the
engine.
Repair Operation Time (ROT)
ItemCode
Left Side Cam Cover - Remove and
Install 03.10.AS
Note: When you remo ve the cam cover attachment bolts in
the step that follows , record their installed positions in the
cam cover.
Page 369 of 947
Engine Sealing (03.10)
Engine (03.00)
Issue 5, Janauary 2010 Workshop Manual 3-10-11
Removal
1. Remove the left side cam cover (Refer to ’Left Side Cam Cover - Remove and Install’, page 3-10-4).
2. Remove the right side cam cover (Refer to ’Right Side Cam Cover - Remove and Install’, page 3-10-9).
Install
1. Install the left side cam cover (Refer to ’Left Side Cam Cover - Remove and Install’, page 3-10-4).
2. Install the right side cam cover (Refer to ’Right Side Cam Cover - Remove and Install’, page 3-10-9).
Engine Timing Cover-Renew (with Engine
Removed
)
Removal
1. Remove the engine assembly (refer Workshop Manual procedure 03.00.AA Engi ne Assembly - Renew).
2. Position drain container.
3. Remove the drain plug and drain the oil from the sump.
4. Remove the left cam cover (Refer to ’Left Side Cam Cover - Remove and Install’, page 3-10-4).
5. Remove the right cam cover (Refer to ’Right Side Cam Cover - Remove and Install’, page 3-10-9).
6. Release the hose clips and disconnect the two coolant hoses from the coolant manifold.
7. Release the hose clip and di sconnect the hose from the
oil separator.
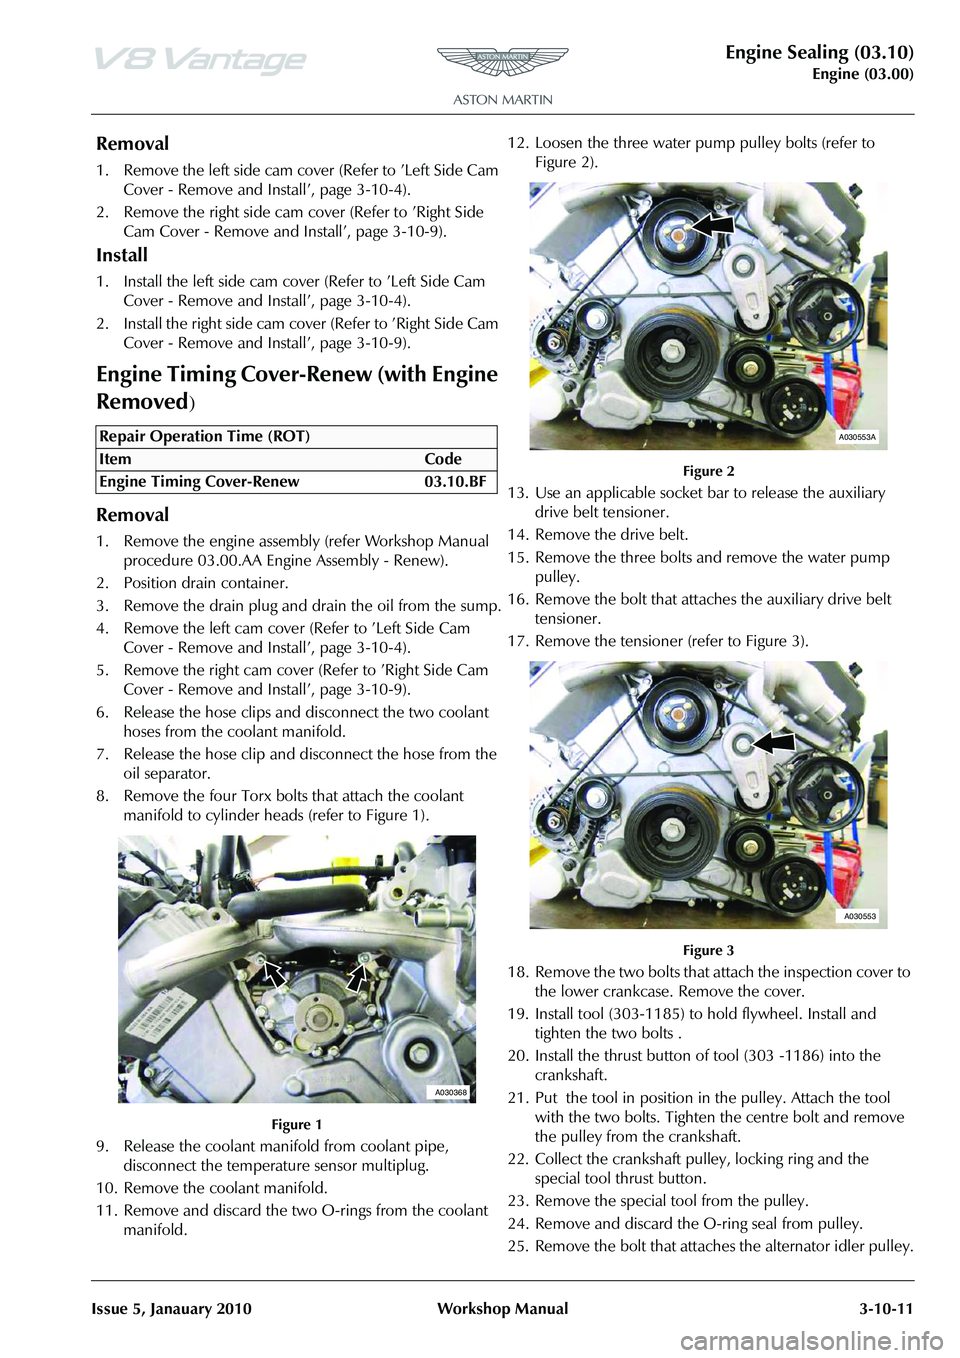
8. Remove the four Torx bolts that attach the coolant manifold to cylinder heads (refer to Figure 1).
Figure 1
9. Release the coolant mani fold from coolant pipe,
disconnect the temperature sensor multiplug.
10. Remove the coolant manifold.
11. Remove and discard the two O-rings from the coolant manifold. 12. Loosen the three water pump pulley bolts (refer to
Figure 2).
Figure 2
13. Use an applicable socket bar to release the auxiliary
drive belt tensioner.
14. Remove the drive belt.
15. Remove the three bolts and remove the water pump pulley.
16. Remove the bolt that attaches the auxiliary drive belt tensioner.
17. Remove the tensioner (refer to Figure 3).
Figure 3
18. Remove the two bolts that attach the inspection cover to the lower crankcase. Remove the cover.
19. Install tool (303-1185) to hold flywheel. Install and tighten the two bolts .
20. Install the thrust button of tool (303 -1186) into the crankshaft.
21. Put the tool in position in the pulley. Attach the tool with the two bolts. Tighten the centre bolt and remove
the pulley from the crankshaft.
22. Collect the crankshaft pulley, locking ring and the special tool thrust button.
23. Remove the special tool from the pulley.
24. Remove and discard the O-ring seal from pulley.
25. Remove the bolt that attaches the alternator idler pulley.
Repair Operation Time (ROT)
A030368
A030553A
A030553
Page 371 of 947
Engine Sealing (03.10)
Engine (03.00)
Issue 5, Janauary 2010 Workshop Manual 3-10-13
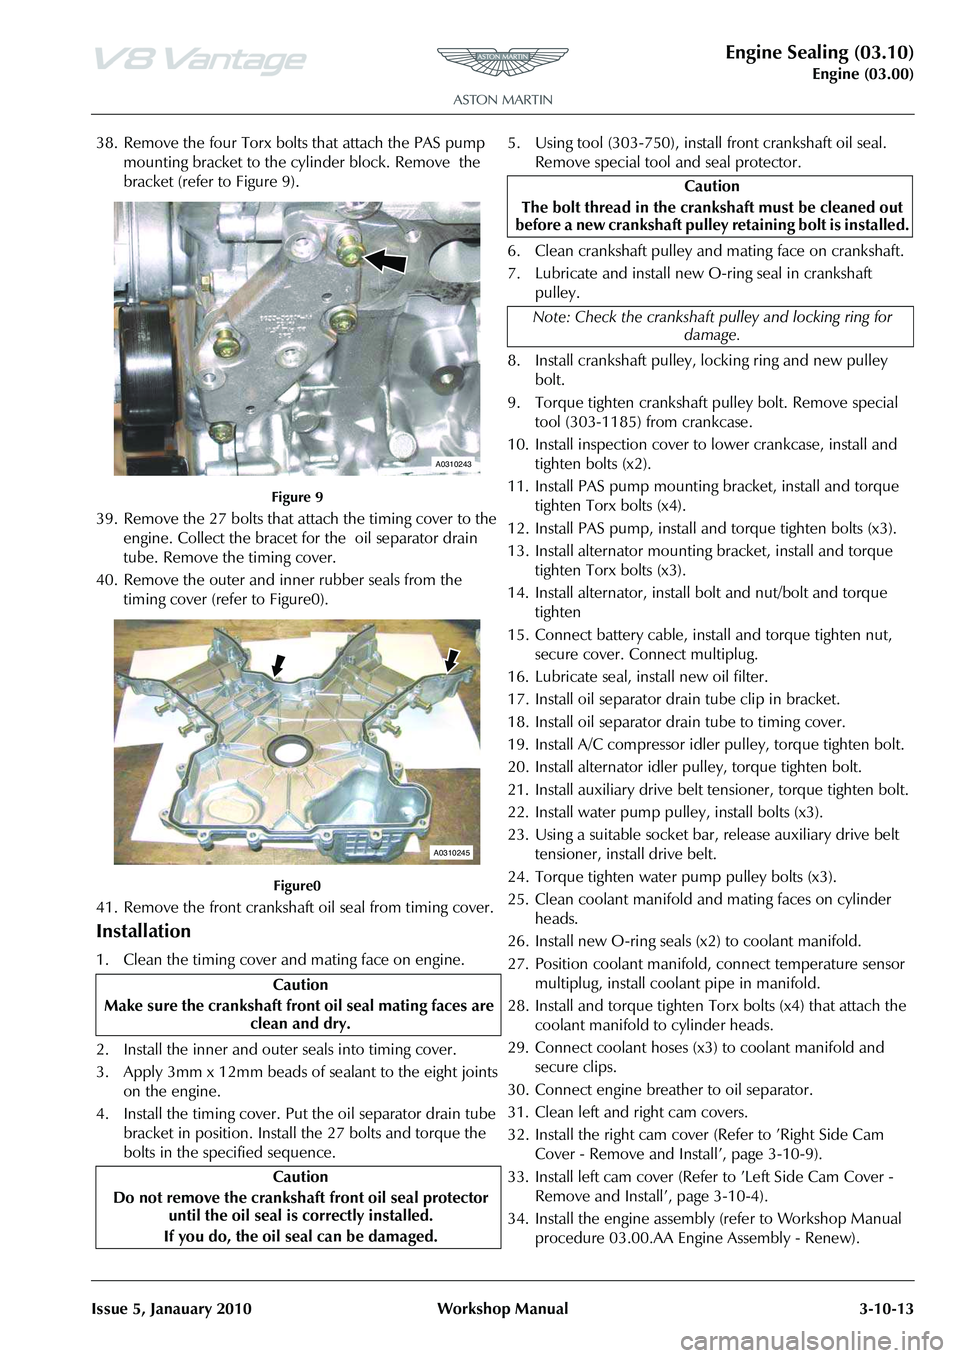
38. Remove the four Torx bolts that attach the PAS pump mounting bracket to the cylinder block. Remove the
bracket (refer to Figure 9).
Figure 9
39. Remove the 27 bolts that attach the timing cover to the engine. Collect the bracet for the oil separator drain
tube. Remove the timing cover.
40. Remove the outer and inner rubber seals from the timing cover (refer to Figure0).
Figure0
41. Remove the front crankshaft oil seal from timing cover.
Installation
1. Clean the timing cover and mating face on engine.
2. Install the inner and outer seals into timing cover.
3. Apply 3mm x 12mm beads of sealant to the eight joints
on the engine.
4. Install the timing cover. Put the oil separator drain tube bracket in position. Install the 27 bolts and torque the
bolts in the specified sequence. 5. Using tool (303-750), instal
l front crankshaft oil seal.
Remove special tool and seal protector.
6. Clean crankshaft pulley and mating face on crankshaft.
7. Lubricate and install new O-ring seal in crankshaft pulley.
8. Install crankshaft pulley, locking ring and new pulley bolt.
9. Torque tighten crankshaft pulley bolt. Remove special tool (303-1185) from crankcase.
10. Install inspection cover to lower crankcase, install and tighten bolts (x2).
11. Install PAS pump mounting bracket, install and torque tighten Torx bolts (x4).
12. Install PAS pump, install and torque tighten bolts (x3).
13. Install alternator mounting bracket, install and torque tighten Torx bolts (x3).
14. Install alternator, install bolt and nut/bolt and torque tighten
15. Connect battery cable, install and torque tighten nut, secure cover. Connect multiplug.
16. Lubricate seal, install new oil filter.
17. Install oil separator drai n tube clip in bracket.
18. Install oil separator drain tube to timing cover.
19. Install A/C compressor idler pulley, torque tighten bolt.
20. Install alternator idler pulley, torque tighten bolt.
21. Install auxiliary drive belt te nsioner, torque tighten bolt.
22. Install water pump pulley, install bolts (x3).
23. Using a suitable socket ba r, release auxiliary drive belt
tensioner, install drive belt.
24. Torque tighten water pump pulley bolts (x3).
25. Clean coolant manifold and mating faces on cylinder heads.
26. Install new O-ring seals (x2) to coolant manifold.
27. Position coolant manifold, connect temperature sensor
multiplug, install coolant pipe in manifold.
28. Install and torque tighten Torx bolts (x4) that attach the coolant manifold to cylinder heads.
29. Connect coolant hoses (x3) to coolant manifold and
secure clips.
30. Connect engine breather to oil separator.
31. Clean left and right cam covers.
32. Install the right cam cover (Refer to ’Right Side Cam Cover - Remove and Install’, page 3-10-9).
33. Install left cam cover (Refer to ’Left Side Cam Cover -
Remove and Install’, page 3-10-4).
34. Install the engine assembly (refer to Workshop Manual procedure 03.00.AA Engine Assembly - Renew).
Caution
Make sure the cranks haft front oil seal mating faces are
clean and dry.
Caution
Do not remove the crankshaft front oil seal protector
until the oil seal is correctly installed.
If you do, the oil seal can be damaged.
A0310243
A0310245
Caution
The bolt thread in the cran kshaft must be cleaned out
before a new crankshaft pulley retaining bolt is installed.
Note: Check the crankshaft pulley and locking ring for damage.