instrument panel ASTON MARTIN V8 VANTAGE 2010 Workshop Manual
[x] Cancel search | Manufacturer: ASTON MARTIN, Model Year: 2010, Model line: V8 VANTAGE, Model: ASTON MARTIN V8 VANTAGE 2010Pages: 947, PDF Size: 43.21 MB
Page 3 of 947
Contents
Issue 5, January 2010 Workshop Manual 0-0-3
V8 Vantage Workshop Manual
Contents
IntroductionWelcome .............................................................. 0-0-6
Safety Precautions ................................................. 0-0-7
Lifting and Jacking ................................................. 0-0-9
Vehicle Recovery ................................................ 0-0-10
Vehicle Identification Number ............................ 0-0-11
Body System (01.00) Body Structure (01.01) .......................................... 1-1-4
Front End System (01.02) ...................................... 1-2-1
Body Closures (01.03) ........................................... 1-3-1
Interior Trim (01.05) ............................................. 1-4-1
Exterior Trim (01.08) ............................................. 1-8-1
Mirrors (01.09) ...................................................... 1-9-1
Seating (01.10).................................................... 1-10-1
Glass, Frame and Mechanism (01.11) .................. 1-11-1
Instrument Panel (IP) (01.12) . .............................. 1-12-1
Handles and Lock Mechanisms (01.14) ............... 1-14-1
Wipers and Washer System (01.16)..................... 1-16-1
Convertible Roof and Roof Opening
Subsystem (01.17)................ ...............................1-17-1
Bumpers (01.19) ................................................. 1-19-1
Restraining Devices (01.20) .... ............................. 1-20-1
Frame and Mounting (02.00) Subframes (02.03) ................................................. 2-1-2
Engine System (03.00) Engine Assembly....................................................3-0-3
Engine Structure (03.01)........................................ 3-1-1
Lubrication System (03.02).................................... 3-2-1
Cooling System (03.03) ......................................... 3-3-1
Fuel Charging System (03.04) ................................ 3-4-1
Accessory Drive System (03.05)............................. 3-5-1
Engine Cranking System (03. 06) ............................ 3-6-1
Valve Train (03.09) ............................................... 3-9-1
Engine Sealing (03.10)......................................... 3-10-1
Power Conversion (03.11)................................... 3-11-1
Evaporative Emissions (03.13) ............................. 3-11-1
Engine Management System (0 3.14).................... 3-14-1
Throttle Control (03.16) ...... ................................ 3-16-1
Foot Operated Control (03.18)............................ 3-18-1
Suspension (04.00) Road Wheel Alignment (04.00) ............................. 4-0-2
Front Suspension (04.01)....................................... 4-1-1
Rear Suspension (04.02)........................................ 4-2-1
Shock Absorber System (04.03) ............................. 4-3-1
Road Wheels and Tyres (04.04) ............................ 4-4-1
Driveline (05.00) Driveshaft (05.01) ................................................. 5-1-2
Halfshafts (05.05) .................................................. 5-2-1 Brake System (06.00)
Front Disc Brake (06.03) ....................................... 6-3-2
Rear Disc Brakes (06.04) ....................................... 6-4-1
Hand Brake (06.05) .............................................. 6-5-1
Brake Actuation System (06.06 ) ............................ 6-6-1
Power Brake System (06.07) ................................. 6-7-1
Anti-lock Braking System (06.09)........................... 6-9-1
Transmission (07.00) Transmission Cooling (07.02) ................................ 7-0-2
Manual Transmission (07.03) ................................ 7-3-1
Automatic Control System (07.05)......................... 7-5-1
Manual Control System (07.06) ............................. 7-6-1
Automatic Shifting Subsytem (07.11) .................. 7-11-1
Clutch (08.00) Clutch Controls (08.02) ......................................... 8-1-2
Exhaust (09.00) Exhaust Overview ................................................. 9-1-2
Silencer Assembly (09.01) ..................................... 9-1-3
Pipes and Supports (09.03) ................................... 9-2-1
Exhaust Protection (09.04) .................................... 9-3-1
Fuel (10.00) Fuel Tank and Lines (10.01) ................................ 10-1-2
Steering (11.00) Steering Gear (11.01) .......................................... 11-1-2
Power Steering (11.02)........................................ 11-2-1
Steering Column (11.04) ..................................... 11-4-1
Steering Column Switches (1 1.05) ....................... 11-5-1
Steering Wheel (11.06) ....................................... 11-6-1
Climate Control (12.00) Body Ventilation system (12.01) .......................... 12-1-2
Heater System (12.02) ........................................ 12-2-1
Air Conditioning (A/C) System (12.03) ................. 12-3-1
Information, Gauge and Warning (13.00) Instrument Cluster (13.01) .................................. 13-1-2
Power Supply (14.00) Battery System (14.01) ........................................ 14-1-2
Alternator and Regulator System (14.02) ............. 14-2-1
Vehicle Entertainment (15.00) Audio System (15.01)................................ ..........15-1-2
Antenna (15.02).................................................. 15-2-1
Vacuum Distribution (16.00) Body Vacuum System (16.01) ............................. 16-1-2
Lighting (17.00) Front Lights (17.01) ............................................. 17-1-2
Interior Lighting (17.02) ...................................... 17-2-1
Rear Lights (17.03) .............................................. 17-3-1
Lighting Mechanisms (17.04). .............................. 17-4-1
Page 14 of 947
1-1-2 Workshop Manual Issue 5, January 2010
RH/LH Seat Switchpack Assembly - Renew...........7-13
Lumbar Pump for the Front Seat (From 08MY)
- Remove and Install.............................................7-13
Lumbar Valve for the Front Seat (From 08MY)
- Remove and Install.............................................7-14
Lumbar Bladder for the Front Seat (From 08MY)
- Remove and Install.............................................7-14
Glass, Frame and Mechanism (01.11) .................. 1-8-1 Description .............................................................8-1 Frameless doors......................................................8-1
Specifications .........................................................8-1
Maintenance ...........................................................8-1 Glass Regulator - Renew .........................................8-1
RH/LH Door Glass - Renew ....................................8-2
Door Glass - Adjust/Reset .......................................8-3
Front Windshield - Renew ......................................8-3
Rear Windshield - Renew .......................................8-4
Quarter Window Glass - Renew .............................8-6
Passenger Window Lift Switch - Renew ..................8-6
Driver Window Lift Switch - Renew........................8-7
Instrument Panel (IP) (01.12)................................ 1-9-1 Specifications ..........................................................9-1
Maintenance ...........................................................9-1 Instrument Panel - Renew ......................................9-1
Airbag Panel and Door Assembly - Renew ..............9-6
Glovebox Assembly - Renew ..................................9-6
Instrument Centre Panel Asse mbly - Renew............9-7
Knee Protector - Renew .........................................9-7
Instrument Panel As sembly - Renew .......................9-7
Cluster Bezel Panel - Renew .................................9-10
Driver Panel Assembly - Renew ............................9-10
Instrument Panel Bezel A ssembly (With Sat. Nav.)
- Renew ...............................................................9-11
Instrument Panel Bezel Assembly
(Without Sat. Nav.) - Renew .................................9-11
Rear Console Panel Assembly - Renew .................9-12
Armrest Pad Assembly - Renew ............................9-13
Console Panel Assembly - Renew .........................9-13
RH/LH Rear Console Pa nel Assembly - Renew
(Roadster Only) ....................................................9-13
Centre Console Panel - Remove and Install
(Coupe Only) .......................................................9-15
Centre Console Panel - Remove and Install
(Roadster Only) ....................................................9-19
RH/LH Lower Quarter Panel Assembly - Renew
(Roadster Only) ....................................................9-29
Handles and Lock Mechanisms (01.14) .............. 1-10-1 Description ...........................................................10-1 Vehicle Key/Remote Transmitter...........................10-1
Central Locking System ........................................10-1
Remote Transmitter ..............................................10-1
Fuel Filler Assembly ..............................................10-1
Boot Emergency Release ....... ...............................10-1
Specifications ........................................................10-2
Maintenance .........................................................10-2 Ignition Cylinder Lock - Re new.............................10-2
RH/LH Front Door Latch As sembly - Renew .........10-2
Bonnet Latch Assembly - Renew...........................10-3
Hood Release Cable Assembly - Renew (Roadster Only) .................................................... 10-3
Bonnet Secondary Latch Asse
mbly - Renew ......... 10-4
Tailgate Latch and Cable Assembly - Renew ......... 10-4
Fuel Filler Actuator Assembly - Renew
(Roadster Only) .................................................... 10-4
Fuel Filler Release Cable - Renew (Roadster Only) 10-5
Fuel Flap Release Switch - Renew ........................ 10-6
RH/LH Tonneau Latch Motor - Renew
(Roadster Only) .................................................... 10-7
RH/LH Tonneau Latch - Renew (Roadster Only) ... 10-7
RH/LH Tonneau Cover Striker Assembly
- Renew (Roadster Only) ...................................... 10-8
Tailgate Latch Assembly-Renew (Roadster Only) ... 10-8
Wipers and Washer System (01.16) ....................1-11-1 Headlamp Washing .............................................. 11-1
Specifications ........................................................ 11-2
Maintenance ......................................................... 11-2 Windscreen Wiper Motor As sembly - Renew ....... 11-2
Wiper Linkage Assembly - Renew ........................ 11-2
Windshield Wash Tube - Renew .......................... 11-2
Windscreen Reservoir and Motor Assembly
- Remove and Install ............................................ 11-3
Low Level Water Sensor - Remove and Install ...... 11-4
Headlamp Wash Motor and Pump Assembly
- Renew ............................................................... 11-5
Headlamp Wash Tube Assembly - Renew ............ 11-5
Washer Fluid Reservoir - Renew........................... 11-6
Convertible Roof and Roof Opening Subsystem
(01.17)..................................................................1-12-1 System Description .............................................. 12-1
Maintenance ......................................................... 12-2 Hood Assembly-Renew ........................................ 12-2
Canopy Cover - Renew ........................................ 12-5
Header Latch Motor - Renew ............................... 12-9
Hydraulic Main Actuator Cy linder - Renew .......... 12-9
Hydraulic Tensrod Cylinder - Renew .................. 12-10
Hydraulic Tonneau Cylinder - Renew................. 12-11
Convertible Top ECU - Renew ........................... 12-13
Hydraulic Pump - Renew ................................... 12-13
Hydraulic Lock Valve - Renew............................ 12-16
RH/LH Front Cantrail Seal - Spare Part
- Renew ............................................................. 12-18
RH/LH Front Cantrail Seal Spare Part Kit
- Renew ............................................................. 12-18
RH/LH Middle Cantrail Seal Spare Part
- Renew ............................................................. 12-18
RH/LH Middle Cantrail Seal Spare Part Kit
- Renew ............................................................. 12-19
Rear Seal Spare Part Assembly Kit - Renew ......... 12-20
LH Fully Automatic Latching Kit - Renew............ 12-21
RH Fully Automatic Latching Kit - Renew ........... 12-22
Convertible Roof Hydraulic Pump
- Check Fluid Level ............................................ 12-23
Cantrail Cover Trim - Renew .............................. 12-25
B-Post Trim Cover - Renew ................................ 12-25
Tonneau Cover - Renew .................................... 12-27
LH Front Main Hydraulic Cylinder Pipe
- Renew ............................................................. 12-29
LH Rear Main Hydraulic Cylinder Pipe
Page 79 of 947
Seating (01.10)
Body System (01.00)
Issue 4, November 2008 Workshop Manual 1-7-13
11. Secure cover to bottom of seat back shell.
12. Secure cover to seat back shell (studs and velcro).
13. Install airbag module (bolt x1) (torque).
14. Install multiplug bracket fixing.
15. Connect airbag multiplu g and secure to bracket.
16. Install lever cover.
17. Install release lever.
18. Install seat 6 way height adjuster (see Workshop Manual procedure 01.10.AE 6 Way Height Adjuster - Inc.
Motors - Renew).
RH/LH Seat Switchpack Assembly -
Renew
Removal
1. Remove instrument panel bezel assembly (see Workshop Manual procedure 01.12.AV Bezel Assembly
- Instrument Panel - Remove for Access and Refit).
2. Remove console panel assembly (see Workshop Manual procedure 01.12.DB Panel Assembly Console - Renew).
3. Remove instrument cluster hood (6 clips)
4. Remove passenger upper ou ter panel assembly (see
Workshop Manual procedure 01.12.AE Panel Assembly
- IP - Upper - Passenger - Renew).
5. Remove passenger panel assembly (4 clips and 4 screws)
6. Remove driver's upper inner panel assembly (5 clips)
7. Remove driver's upper outer panel assembly (4 clips)
8. Remove driver's panel assembly (4 clips and 3 screws)
9. Remove receiver and audio media system panel screws (x4), disconnect multiplugs (x12).
10. Pull back carpet and disconnect seat adjust switch multiplugs (x6), release harness clip (x2)
11. Remove instrument centre panel assembly
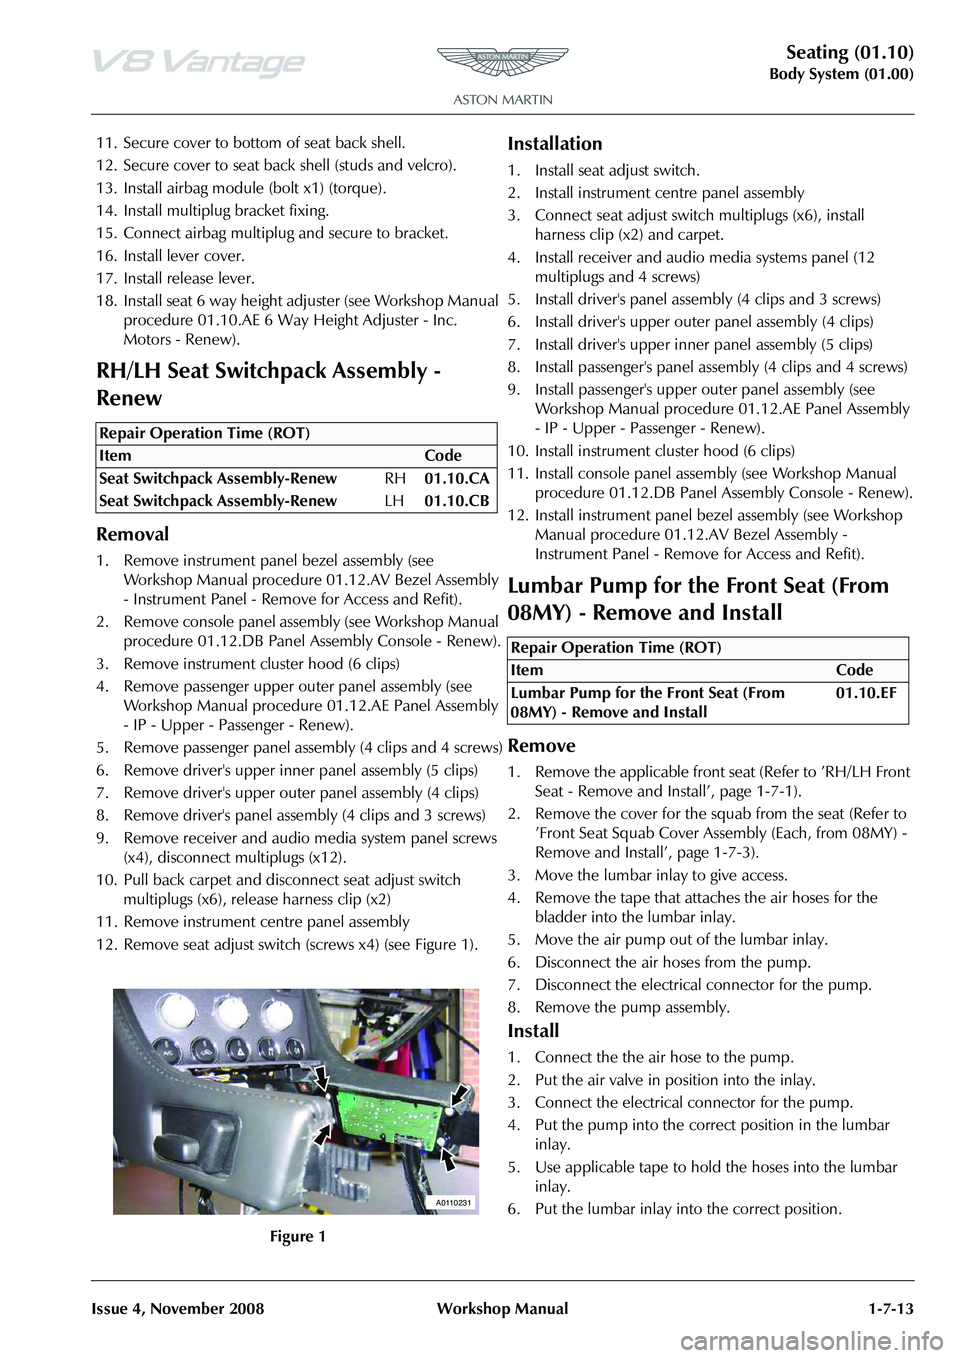
12. Remove seat adjust switch (screws x4) (see Figure 1).
Installation
1. Install seat adjust switch.
2. Install instrument centre panel assembly
3. Connect seat adjust switch multiplugs (x6), install
harness clip (x2) and carpet.
4. Install receiver and audio media systems panel (12 multiplugs and 4 screws)
5. Install driver's panel asse mbly (4 clips and 3 screws)
6. Install driver's upper oute r panel assembly (4 clips)
7. Install driver's upper inne r panel assembly (5 clips)
8. Install passenger's panel assembly (4 clips and 4 screws)
9. Install passenger's upper outer panel assembly (see
Workshop Manual procedure 01.12.AE Panel Assembly
- IP - Upper - Passenger - Renew).
10. Install instrument cluster hood (6 clips)
11. Install console panel assemb ly (see Workshop Manual
procedure 01.12.DB Panel Assembly Console - Renew).
12. Install instrument panel be zel assembly (see Workshop
Manual procedure 01.12.AV Bezel Assembly -
Instrument Panel - Remove for Access and Refit).
Lumbar Pump for the Front Seat (From
08MY) - Remove and Install
Remove
1. Remove the applicable front seat (Refer to ’RH/LH Front Seat - Remove and Install’, page 1-7-1).
2. Remove the cover for the squab from the seat (Refer to ’Front Seat Squab Cover Assembly (Each, from 08MY) -
Remove and Install’, page 1-7-3).
3. Move the lumbar inlay to give access.
4. Remove the tape that attaches the air hoses for the bladder into the lumbar inlay.
5. Move the air pump out of the lumbar inlay.
6. Disconnect the air hoses from the pump.
7. Disconnect the electrical connector for the pump.
8. Remove the pump assembly.
Install
1. Connect the the air hose to the pump.
2. Put the air valve in position into the inlay.
3. Connect the electrical connector for the pump.
4. Put the pump into the correct position in the lumbar inlay.
5. Use applicable tape to hold the hoses into the lumbar inlay.
6. Put the lumbar inlay into the correct position.
Repair Operation Time (ROT)
A0110231
Repair Operation Time (ROT)
Page 89 of 947
Instrument Panel (IP) (01.12)
Body System (01.00)
Issue 5, January 2010 Workshop Manual 1-9-1
Body System (01.00)
Instrument Panel (IP) (01.12)
Specifications
Maintenance
Instrument Panel - Renew
Removal
1. Disconnect vehicle battery.
2. Drain cooling system (see Workshop Procedure 03.03.AD Coolant - Drain and Refill).
3. Evacuate air conditioning system (see Workshop Procedure 12.03.FA Tank - Receiver Drier - Renew).
4. Remove RH door (see Work shop Procedure 01.03.EA
Door Assembly - RH - Remo ve for Access and Refit).
5. Remove LH front seat (see Workshop Manual 01.10.AB
Seat Assembly - Front - LH - Remove for Access and
Refit).
6. Remove RH front seat (see Workshop Manual 01.10.AA Seat Assembly - Front - RH - Remove for Access and
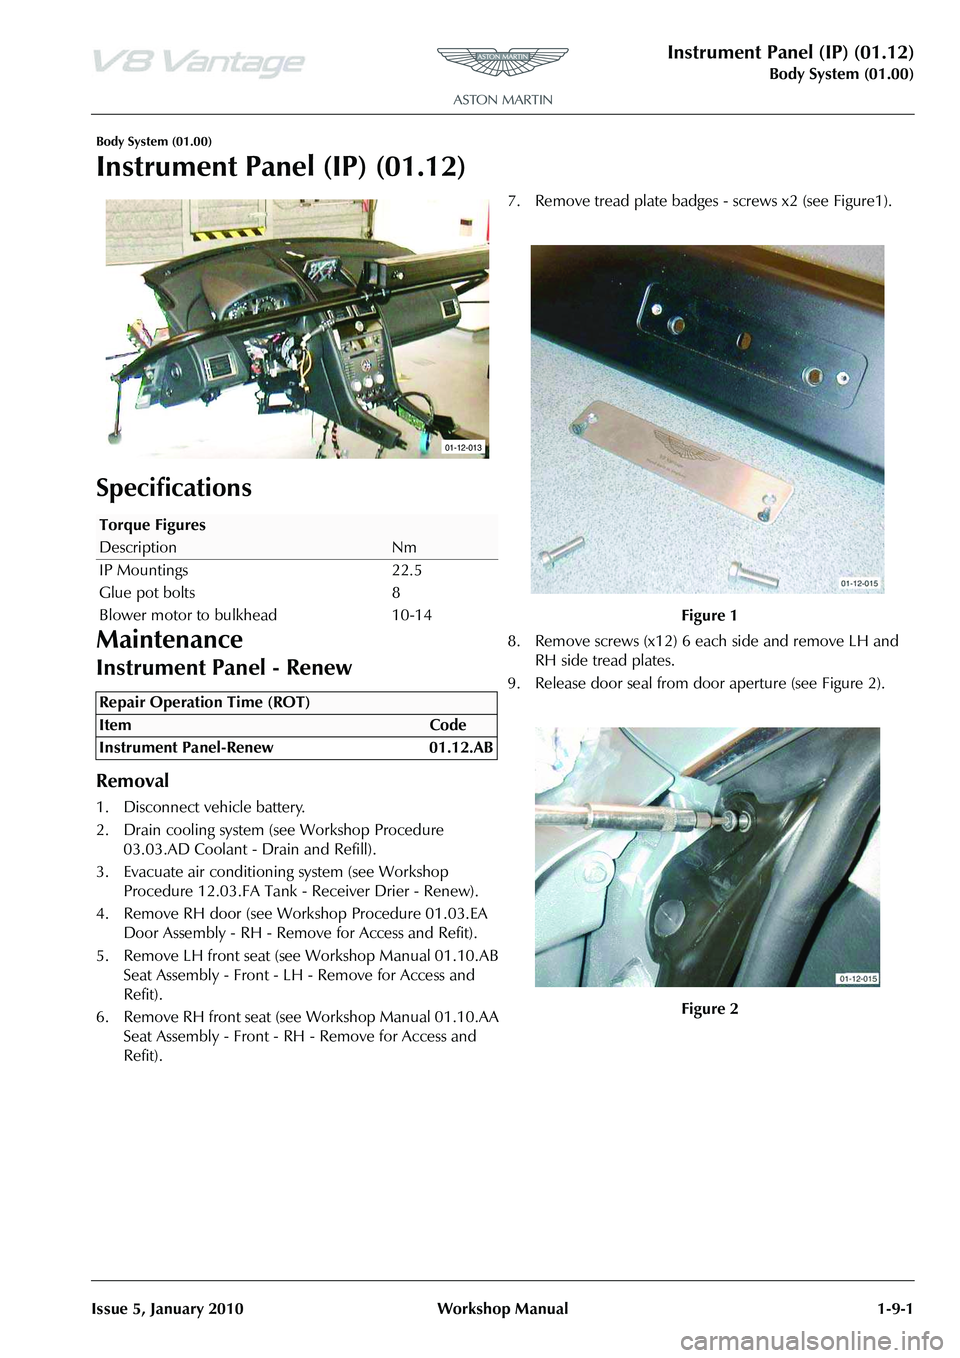
Refit). 7. Remove tread plate badges - screws x2 (see Figure1).
8. Remove screws (x12) 6 each
side and remove LH and
RH side tread plates.
9. Release door seal from d oor aperture (see Figure 2).
Torque Figures
DescriptionNm
IP Mountings 22.5
Glue pot bolts 8
Blower motor to bulkhead 10-14
Repair Operation Time (ROT)
01-12-013
Figure 1
Figure 2
Page 90 of 947
Instrument Panel (IP) (01.12)
Body System (01.00)1-9-2 Workshop Manual Issue 5, January 2010
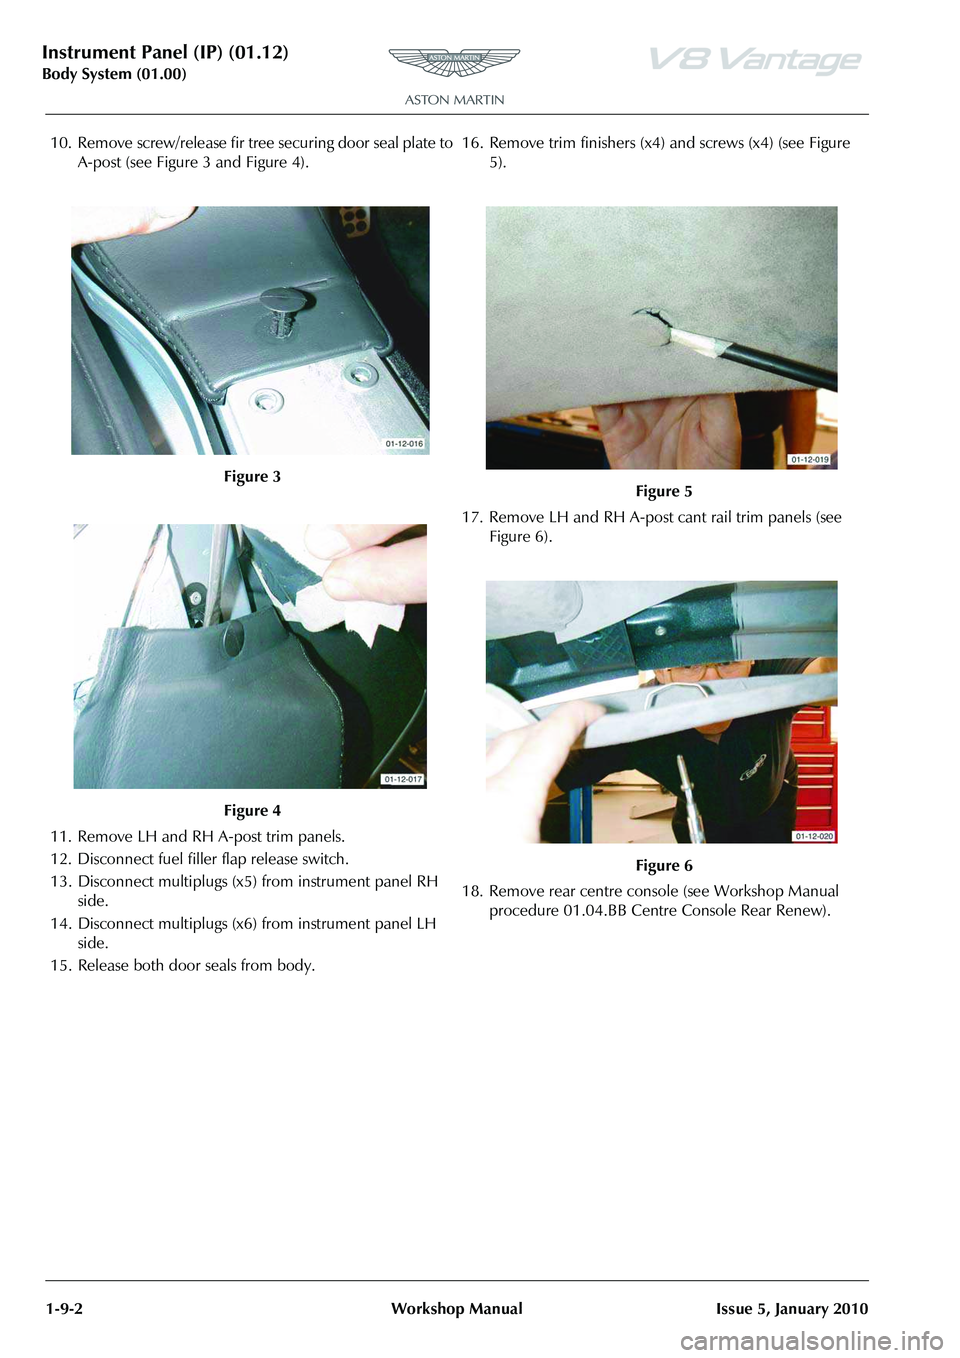
10. Remove screw/release fir tree securing door seal plate to
A-post (see Figure 3 and Figure 4).
11. Remove LH and RH A-post trim panels.
12. Disconnect fuel filler flap release switch.
13. Disconnect multiplugs (x5) from instrument panel RH side.
14. Disconnect multiplugs (x6) from instrument panel LH side.
15. Release both door seals from body. 16. Remove trim finishers (x4) and screws (x4) (see Figure
5).
17. Remove LH and RH A-post cant rail trim panels (see Figure 6).
18. Remove rear centre console (see Workshop Manual procedure 01.04.BB Cent re Console Rear Renew).
Figure 3
Figure 4
Figure 5
Figure 6
Page 91 of 947
Instrument Panel (IP) (01.12)
Body System (01.00)
Issue 5, January 2010 Workshop Manual 1-9-3
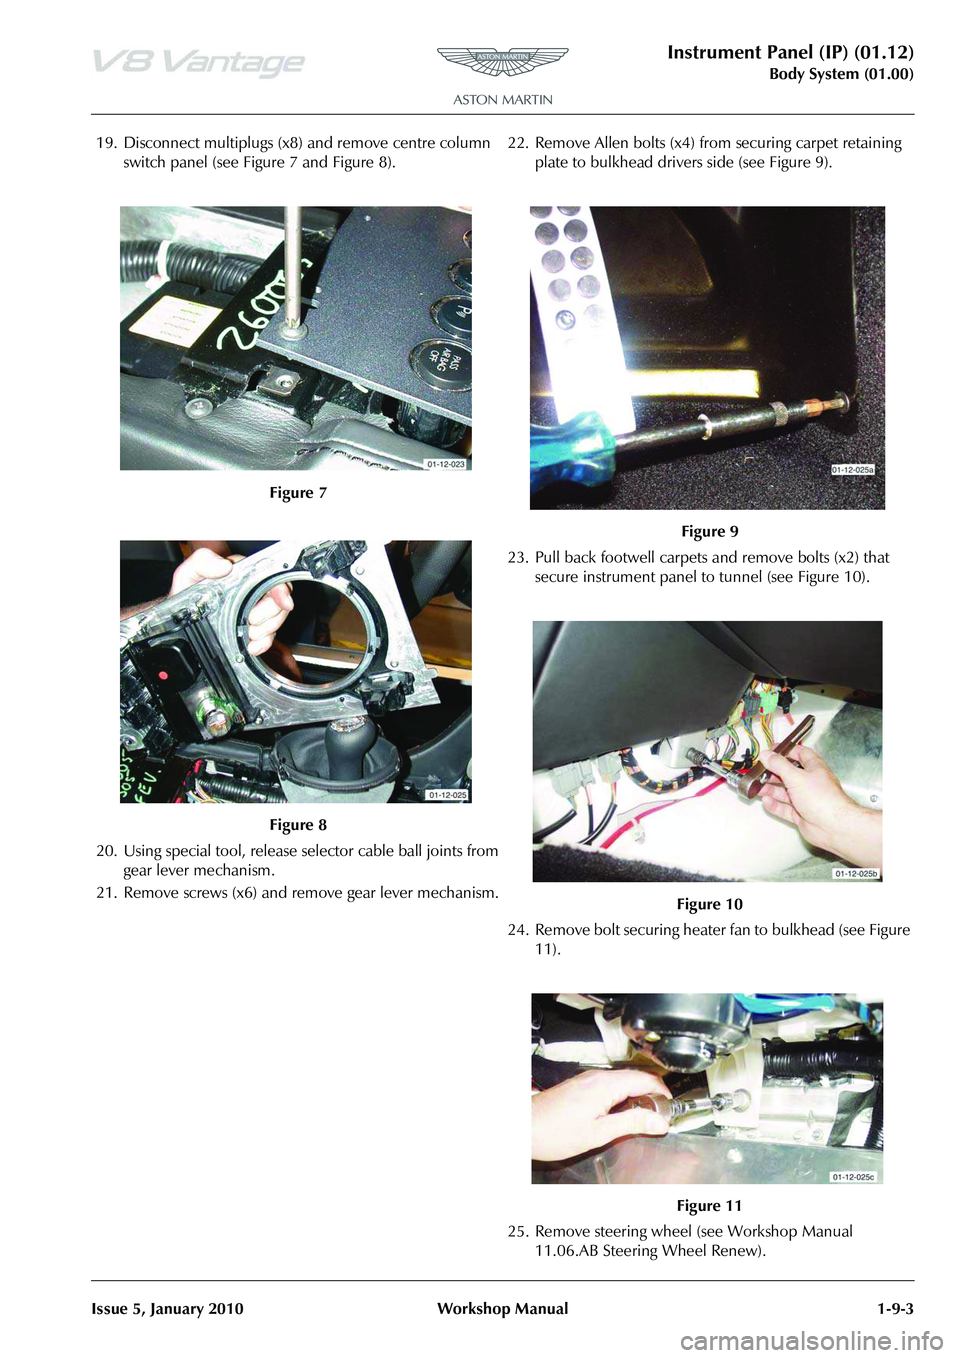
19. Disconnect multiplugs (x8) and remove centre column
switch panel (see Figure 7 and Figure 8).
20. Using special tool, release se lector cable ball joints from
gear lever mechanism.
21. Remove screws (x6) and remove gear lever mechanism. 22. Remove Allen bolts (x4) from securing carpet retaining
plate to bulkhead drivers side (see Figure 9).
23. Pull back footwell carpets and remove bolts (x2) that secure instrument panel to tunnel (see Figure 10).
24. Remove bolt securing heater fan to bulkhead (see Figure 11).
25. Remove steering wheel (see Workshop Manual 11.06.AB Steering Wheel Renew).
Figure 7
Figure 8
Figure 9
Figure 10
Figure 11
Page 92 of 947

Instrument Panel (IP) (01.12)
Body System (01.00)1-9-4 Workshop Manual Issue 5, January 2010
26. Remove screws (x7) from steering column upper and lower shrouds (see Figure 12).
27. Remove lower and upper column shrouds (see Figure
13).
28. Release and remove drivers side lower instrument panel clips (x7) and disconnect air temperature pipe (see
Figure 14).
29. Pull back steering column bulkhead gaiter. 30. Remove and discard pinch bolt from upper column to
intermediate shaft.
31. Disconnect multiplugs (x14 ) from instrument panel to
main body harness.
32. Remove instrument panel upper air vents (x2) (see
Figure 15).
33. Remove screws from instrument panel to bulkhead (x4).
34. Remove bolts securing instru ment panel to both A-posts
(x6).
35. With assistance, position tool (501-F116) to instrument panel (see Figure 16).
36. Attach and tighten brackets (x2) to instrument panel.
Figure 12
Figure 13
Figure 14
Figure 15
Figure 16
Page 93 of 947
Instrument Panel (IP) (01.12)
Body System (01.00)
Issue 5, January 2010 Workshop Manual 1-9-5
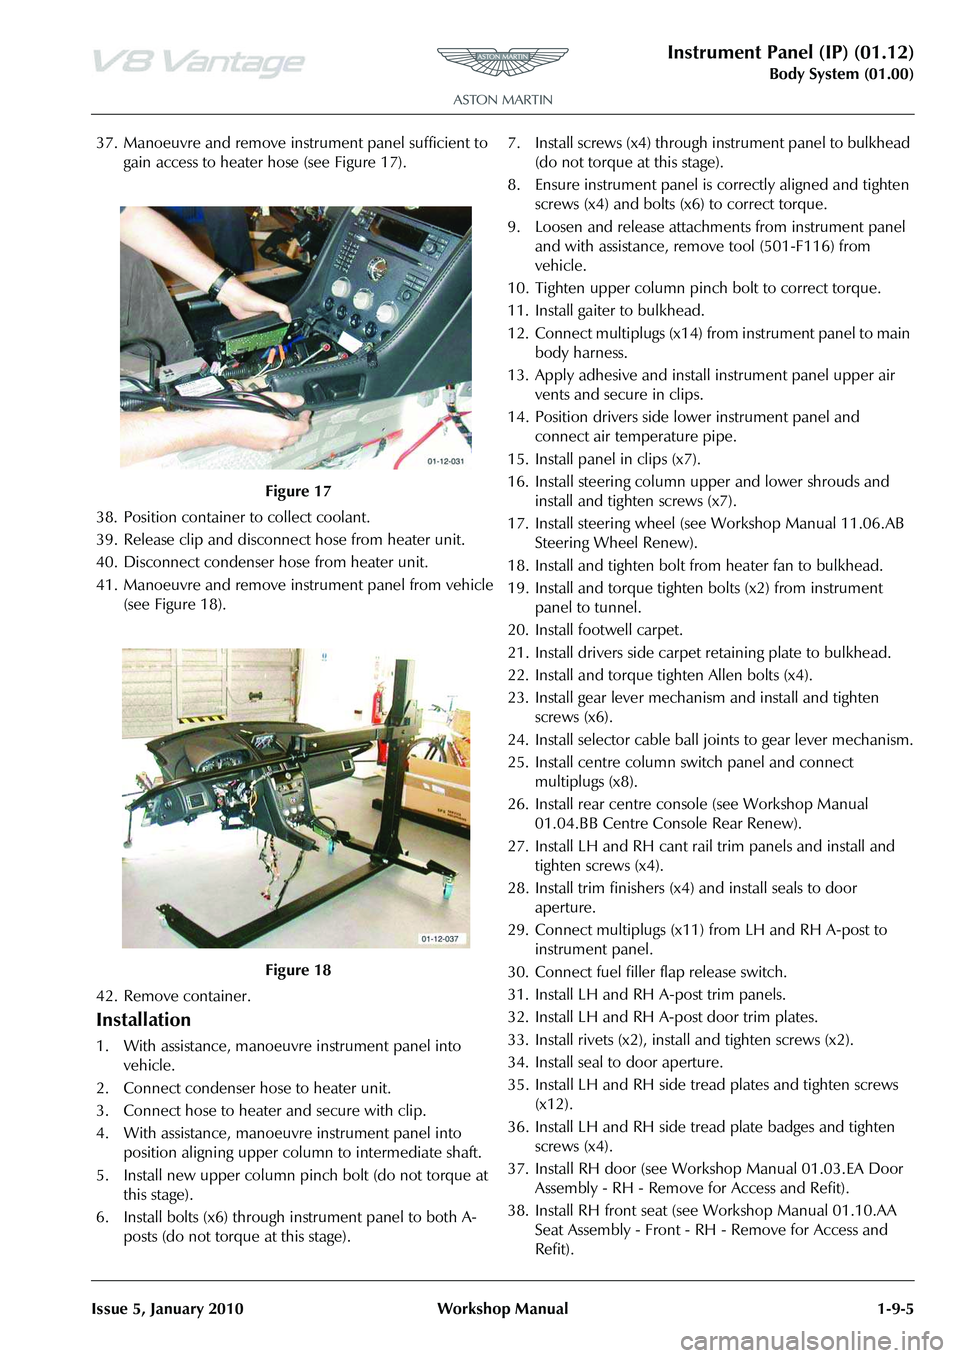
37. Manoeuvre and remove inst rument panel sufficient to
gain access to heater hose (see Figure 17).
38. Position container to collect coolant.
39. Release clip and disconne ct hose from heater unit.
40. Disconnect condenser hose from heater unit.
41. Manoeuvre and remove inst rument panel from vehicle
(see Figure 18).
42. Remove container.
Installation
1. With assistance, manoeuvre instrument panel into vehicle.
2. Connect condenser hose to heater unit.
3. Connect hose to heater and secure with clip.
4. With assistance, manoeuvre instrument panel into position aligning upper column to intermediate shaft.
5. Install new upper column pinch bolt (do not torque at this stage).
6. Install bolts (x6) through instrument panel to both A- posts (do not torque at this stage). 7. Install screws (x4) through
instrument panel to bulkhead
(do not torque at this stage).
8. Ensure instrument panel is correctly aligned and tighten screws (x4) and bolts (x6) to correct torque.
9. Loosen and release attachme nts from instrument panel
and with assistance, remove tool (501-F116) from
vehicle.
10. Tighten upper column pinch bolt to correct torque.
11. Install gaiter to bulkhead.
12. Connect multiplugs (x14) fr om instrument panel to main
body harness.
13. Apply adhesive and install instrument panel upper air
vents and secure in clips.
14. Position drivers side lower instrument panel and connect air temperature pipe.
15. Install panel in clips (x7).
16. Install steering column upper and lower shrouds and install and tighten screws (x7).
17. Install steering wheel (see Workshop Manual 11.06.AB Steering Wheel Renew).
18. Install and tighten bolt from heater fan to bulkhead.
19. Install and torque tighten bolts (x2) from instrument panel to tunnel.
20. Install footwell carpet.
21. Install drivers side carpet retaining plate to bulkhead.
22. Install and torque tighten Allen bolts (x4).
23. Install gear lever mechanism and install and tighten screws (x6).
24. Install selector cable ball joints to gear lever mechanism.
25. Install centre column switch panel and connect multiplugs (x8).
26. Install rear centre cons ole (see Workshop Manual
01.04.BB Centre Console Rear Renew).
27. Install LH and RH cant rail trim panels and install and tighten screws (x4).
28. Install trim finishers (x4) and install seals to door aperture.
29. Connect multiplugs (x11) from LH and RH A-post to
instrument panel.
30. Connect fuel filler flap release switch.
31. Install LH and RH A-post trim panels.
32. Install LH and RH A-post door trim plates.
33. Install rivets (x2), insta ll and tighten screws (x2).
34. Install seal to door aperture.
35. Install LH and RH side tread plates and tighten screws (x12).
36. Install LH and RH side tread plate badges and tighten screws (x4).
37. Install RH door (see Workshop Manual 01.03.EA Door Assembly - RH - Remove for Access and Refit).
38. Install RH front seat (see Workshop Manual 01.10.AA Seat Assembly - Front - RH - Remove for Access and
Refit).
Figure 17
Figure 18
Page 94 of 947
Instrument Panel (IP) (01.12)
Body System (01.00)1-9-6 Workshop Manual Issue 5, January 2010
39. Install LH front seat (see Workshop Manual 01.10.AB Seat Assembly - Front - LH - Remove for Access and
Refit).
40. Fill cooling system (see Workshop Manual 03.03.AD
Coolant - Drain and Refill).
41. Re-charge air conditioni ng system (see Workshop
Manual 12.03.FA Tank - Receiver Drier - Renew).
42. Connect vehicle battery.
Airbag Panel and Door Assembly -
Renew
Removal
1. Remove glovebox assembly (see Workshop Manual
procedure 01.12.AL Glovebox Assembly - Renew).
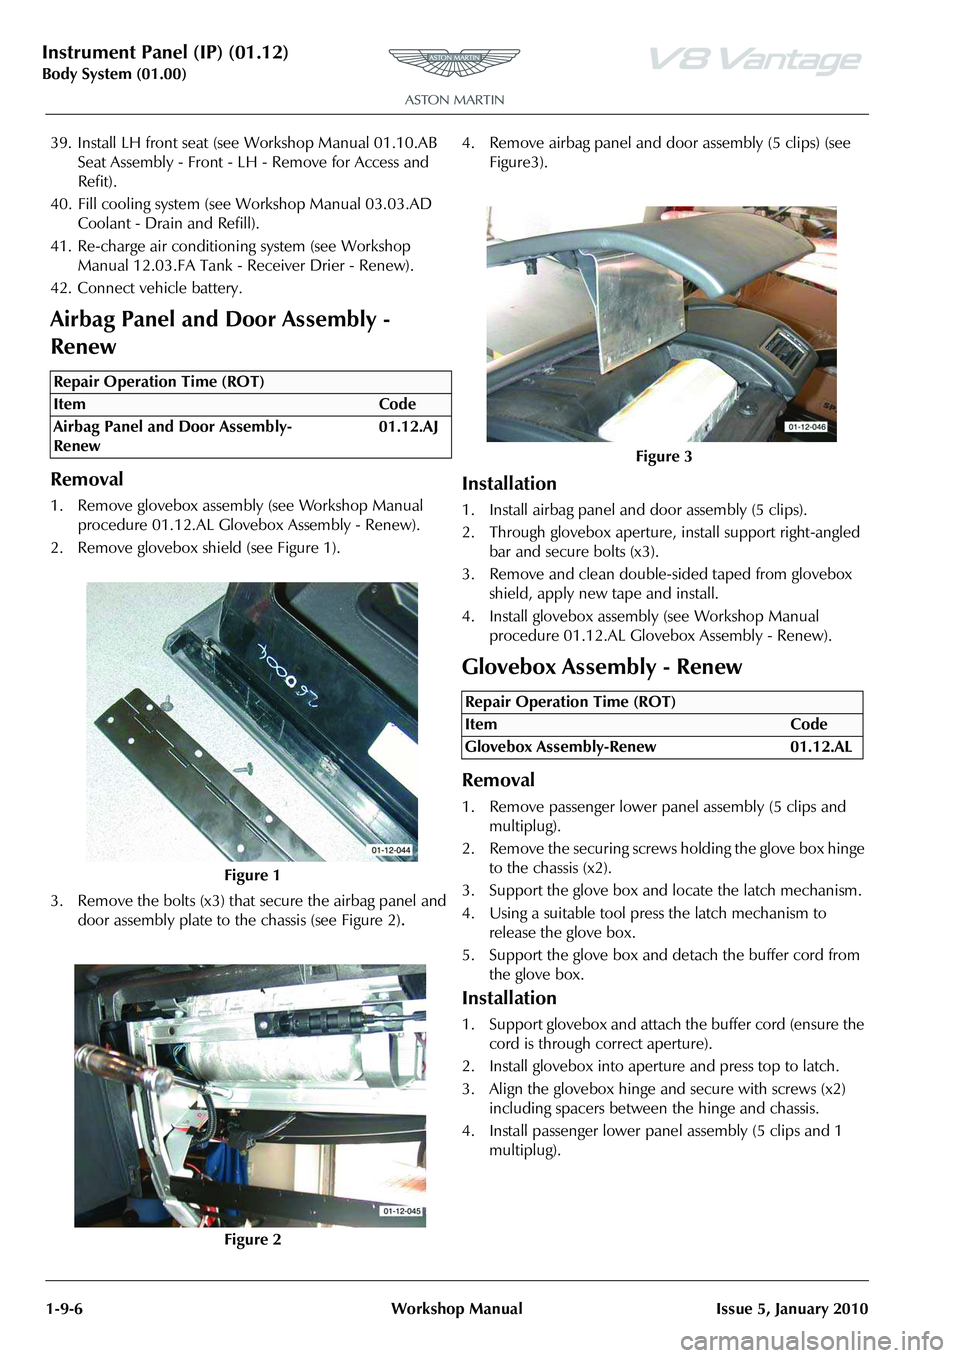
2. Remove glovebox shield (see Figure 1).
3. Remove the bolts (x3) that secure the airbag panel and
door assembly plate to the chassis (see Figure 2)
.
4. Remove airbag panel and d oor assembly (5 clips) (see
Figure3).
Installation
1. Install airbag panel and door assembly (5 clips).
2. Through glovebox aperture, install support right-angled bar and secure bolts (x3).
3. Remove and clean double-sided taped from glovebox shield, apply new tape and install.
4. Install glovebox assembly (see Workshop Manual procedure 01.12.AL Gloveb ox Assembly - Renew).
Glovebox Assembly - Renew
Removal
1. Remove passenger lower panel assembly (5 clips and
multiplug).
2. Remove the securing screws holding the glove box hinge to the chassis (x2).
3. Support the glove box and locate the latch mechanism.
4. Using a suitable tool press the latch mechanism to release the glove box.
5. Support the glove box and detach the buffer cord from the glove box.
Installation
1. Support glovebox and attach the buffer cord (ensure the cord is through correct aperture).
2. Install glovebox into aperture and press top to latch.
3. Align the glovebox hinge an d secure with screws (x2)
including spacers between the hinge and chassis.
4. Install passenger lower panel assembly (5 clips and 1 multiplug).
Repair Operation Time (ROT)
Figure 3
Repair Operation Time (ROT)
ItemCode
Glovebox Assembly-Renew 01.12.AL
Page 95 of 947
Instrument Panel (IP) (01.12)
Body System (01.00)
Issue 5, January 2010 Workshop Manual 1-9-7
Instrument Centre Panel Assembly -
Renew
1. Remove instrument panel bezel assembly (see Workshop Manual procedure 01.12.AV Bezel Assembly
- Instrument Panel - Remove for Access and Refit).
2. Remove console panel assembly (see Workshop Manual procedure 01.12.DB Panel Assembly Console - Renew).
3. Remove instrument cluster hood (6 clips)
4. Remove passenger upper ou ter panel assembly (see
Workshop Manual procedure 01.12.AE Panel Assembly
- IP - Upper - Passenger - Renew).
5. Remove passenger panel assembly (4 clips and 4 screws)
6. Remove driver's upper inner panel assembly (5 clips)
7. Remove driver's upper outer panel assembly (4 clips)
8. Remove driver's panel assembly (4 clips and 3 screws)
9. Remove receiver and audio media system panel screws (x4), disconnect multiplugs (x12).
10. Pull back carpet and disconnect seat adjust switch multiplugs (x6), release harness clip (x2)
11. Remove instrument centre panel assembly
12. Remove seat adjust switches (screws x8).
Installation
1. Install seat adjust switches (screws x8).
2. Install instrument centre panel assembly
3. Connect seat adjust switch multiplugs (x6), install harness clip (x2) and carpet.
4. Install receiver and audio media systems panel (12 multiplugs and 4 screws)
5. Install driver's panel assembly (4 clips and 3 screws)
6. Install driver's upper oute r panel assembly (4 clips)
7. Install driver's upper inne r panel assembly (5 clips)
8. Install passenger's panel assembly (4 clips and 4 screws)
9. Install passenger's upper outer panel assembly (see Workshop Manual procedure 01.12.AE Panel Assembly
- IP - Upper - Passenger - Renew).
10. Install instrument cl uster hood (6 clips)
11. Install console panel asse mbly (see Workshop Manual
procedure 01.12.DB Panel Assembly Console - Renew).
12. Install instrument panel be zel assembly (see Workshop
Manual procedure 01.12.AV Bezel Assembly -
Instrument Panel - Remove for Access and Refit).
Knee Protector - Renew
Removal
1. Remove driver's lower panel assembly (7 clips) and disconnect air temperature pipe.
2. Disconnect footwell light and remove unit from panel.
3. Mark one socket for relocation and remove diagnostic sockets (x2) from panel.
4. Remove pop-rivets (x5), sc rews (x4) and remove panel.
Installation
1. Align knee protector panel in position and secure with
screws (x4).
2. Install pop-rivets (x5).
3. Install diagnostic sockets (x2) (ensure marked socket is in correct location).
4. Install footwell light and reconnect multiplug.
5. Install driver's lower panel assembly (7 clips) and connect air temperature pipe.
Instrument Panel Assembly - Renew
Removal
1. Remove Instrument pane l assembly (see Workshop
Manual procedure 01.12.AB Instrument Panel - Facia
Assembly - Remo ve for Access and Refit).
2. Remove steering column (bolts x4, multiplugs x5).
3. Remove passenger air bag module (screws x4).
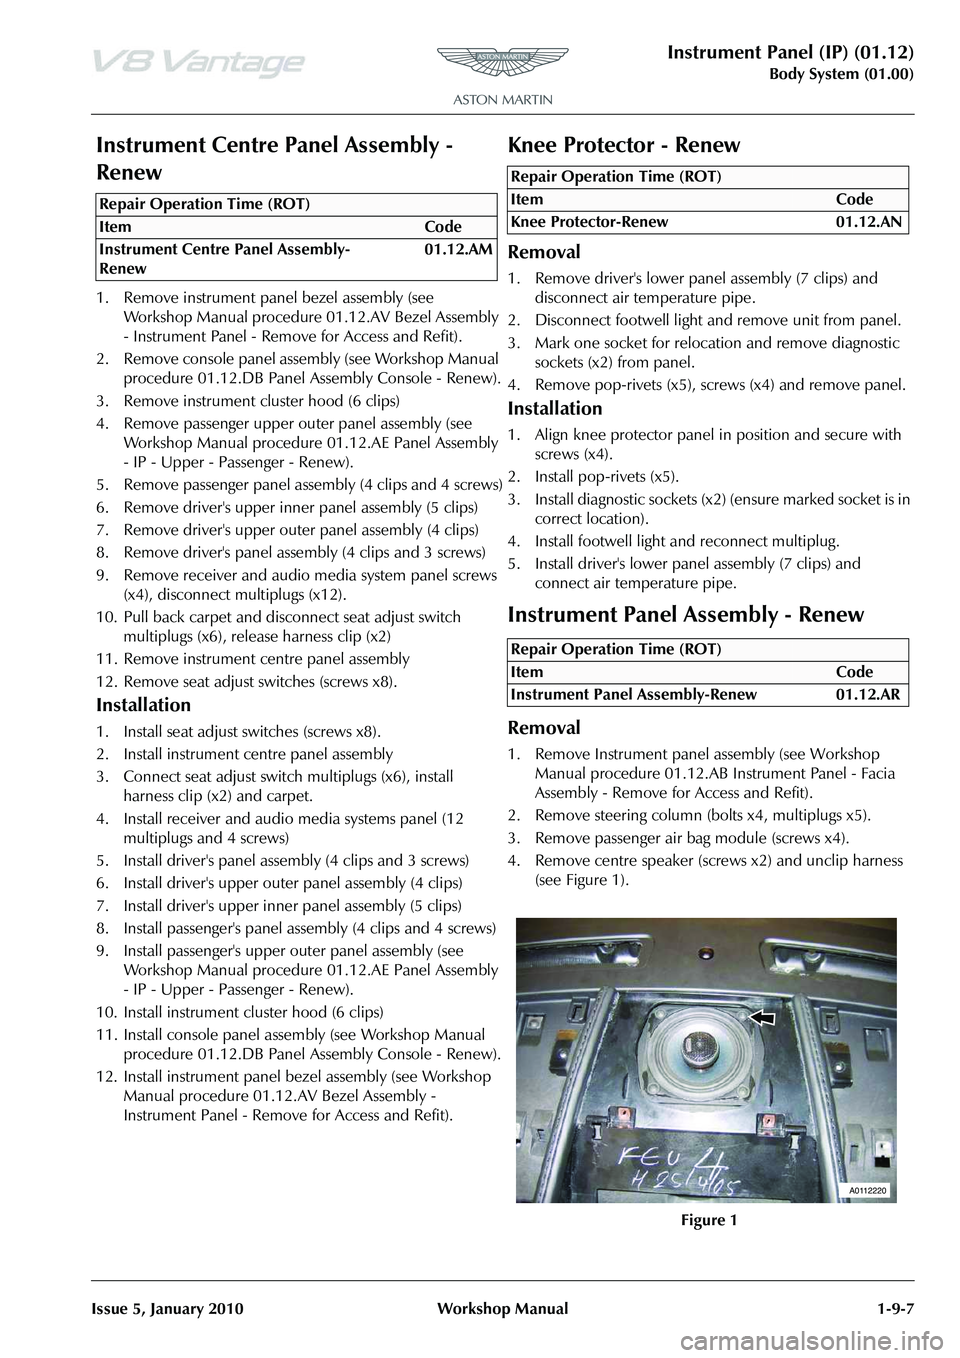
4. Remove centre speaker (screws x2) and unclip harness (see Figure 1).
Repair Operation Time (ROT)
Repair Operation Time (ROT)
Repair Operation Time (ROT)
A0112220