HYDRAULIC PUMP ASTON MARTIN V8 VANTAGE 2010 Owner's Manual
[x] Cancel search | Manufacturer: ASTON MARTIN, Model Year: 2010, Model line: V8 VANTAGE, Model: ASTON MARTIN V8 VANTAGE 2010Pages: 947, PDF Size: 43.21 MB
Page 547 of 947

Manual Transmission (07.03)
Transmission (07.00)
Issue 5, January 2010 Workshop Manual 7-3-31
43. Disconnect the electrical connector from the wiring
harness for the torque tube.
44. Remove the bolt that attaches the bracket for the electrical connector.
45. Move the bracket for the electrical connector away.
46. Remove the bolt that attaches the transaxle ground cable to the transaxle Automatic Shift Mechanism (ASM)
pump.
47. Disconnect the electrical connector from the ASM
pump.
48. Release the wiring harness for the ASM pump from the two clips that attach it to the transxle.
49. Identify and disconnect the five electrical connectors from the transaxle.
50. Disconnect the electrical connector from the selector
position sensor.
51. Remove the bolt that attaches the ground cable eyelet to the transaxle.
52. Put the wiring harness under the hydraulic pipe for the clutch, and move it away from the transaxle.
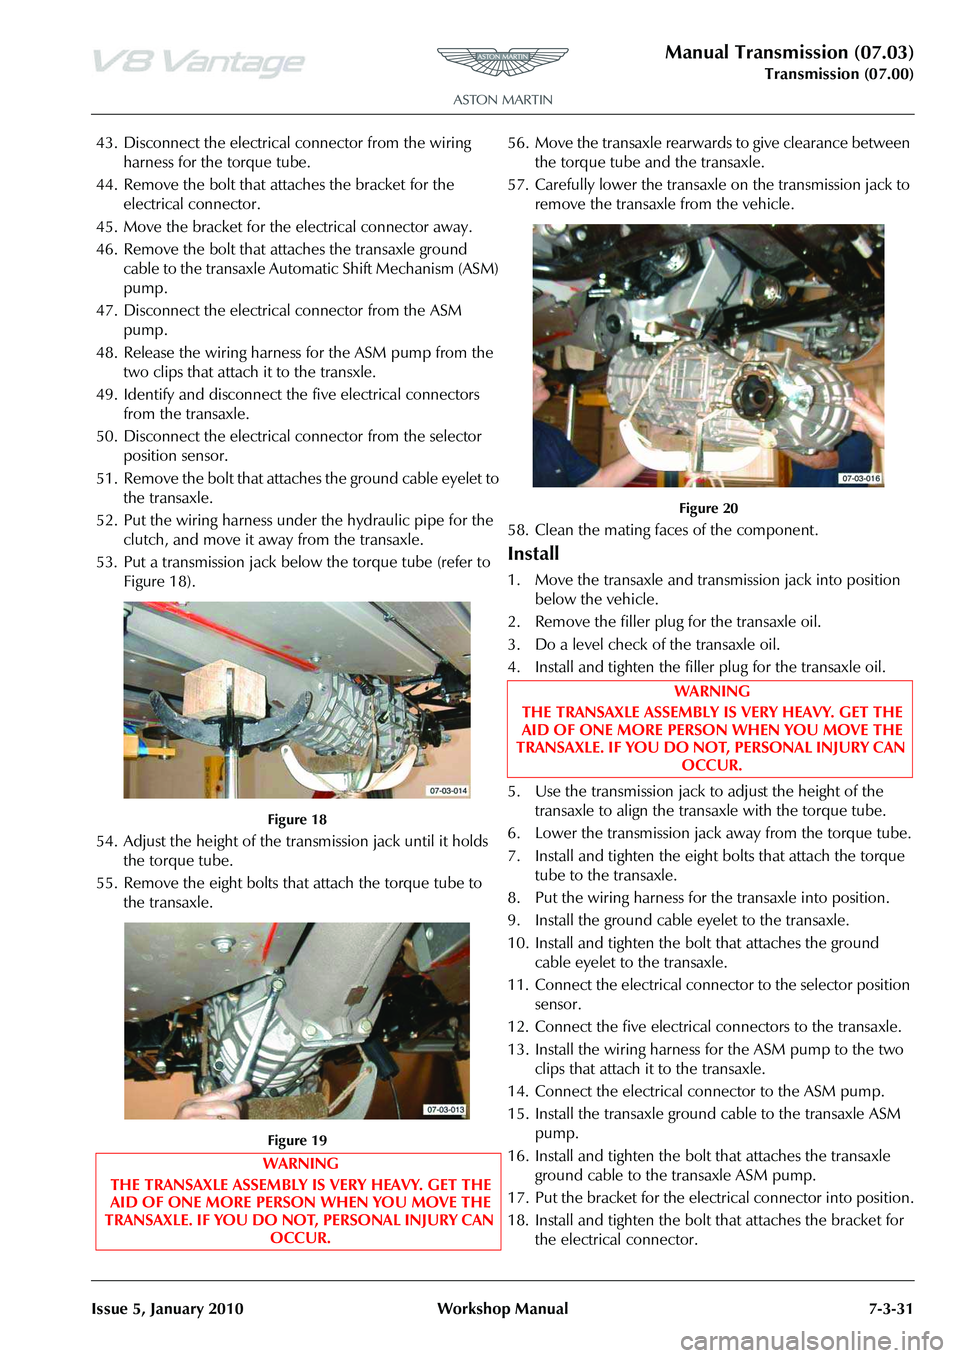
53. Put a transmission jack belo w the torque tube (refer to
Figure 18).
Figure 18
54. Adjust the height of the tran smission jack until it holds
the torque tube.
55. Remove the eight bolts that attach the torque tube to the transaxle.
Figure 19
56. Move the transaxle rearwards to give clearance between the torque tube and the transaxle.
57. Carefully lower the transaxle on the transmission jack to remove the transaxle from the vehicle.
Figure 20
58. Clean the mating faces of the component.
Install
1. Move the transaxle and transm ission jack into position
below the vehicle.
2. Remove the filler plug for the transaxle oil.
3. Do a level check of the transaxle oil.
4. Install and tighten the filler plug for the transaxle oil.
5. Use the transmission jack to adjust the height of the transaxle to align the transaxle with the torque tube.
6. Lower the transmission jack away from the torque tube.
7. Install and tighten the eight bolts that attach the torque tube to the transaxle.
8. Put the wiring harness for the transaxle into position.
9. Install the ground cable eyelet to the transaxle.
10. Install and tighten the bolt that attaches the ground cable eyelet to the transaxle.
11. Connect the electrical connector to the selector position sensor.
12. Connect the five electrical connectors to the transaxle.
13. Install the wiring harness for the ASM pump to the two clips that attach it to the transaxle.
14. Connect the electrical connector to the ASM pump.
15. Install the transaxle ground cable to the transaxle ASM pump.
16. Install and tighten the bolt that attaches the transaxle ground cable to the transaxle ASM pump.
17. Put the bracket for the electrical connector into position.
18. Install and tighten the bolt that attaches the bracket for the electrical connector.
WARNING
THE TRANSAXLE ASSEMBLY IS VERY HEAVY. GET THE AID OF ONE MORE PERSON WHEN YOU MOVE THE
TRANSAXLE. IF YOU DO NOT, PERSONAL INJURY CAN OCCUR.
WARNING
THE TRANSAXLE ASSEMBLY IS VERY HEAVY. GET THE AID OF ONE MORE PERSON WHEN YOU MOVE THE
TRANSAXLE. IF YOU DO NOT, PERSONAL INJURY CAN
OCCUR.
Page 604 of 947

Power Steering (11.02)
Steering (11.00)
Issue 5, January 2010 Workshop Manual 11-2-1
Steering (11.00)
Power Steering (11.02)
Description
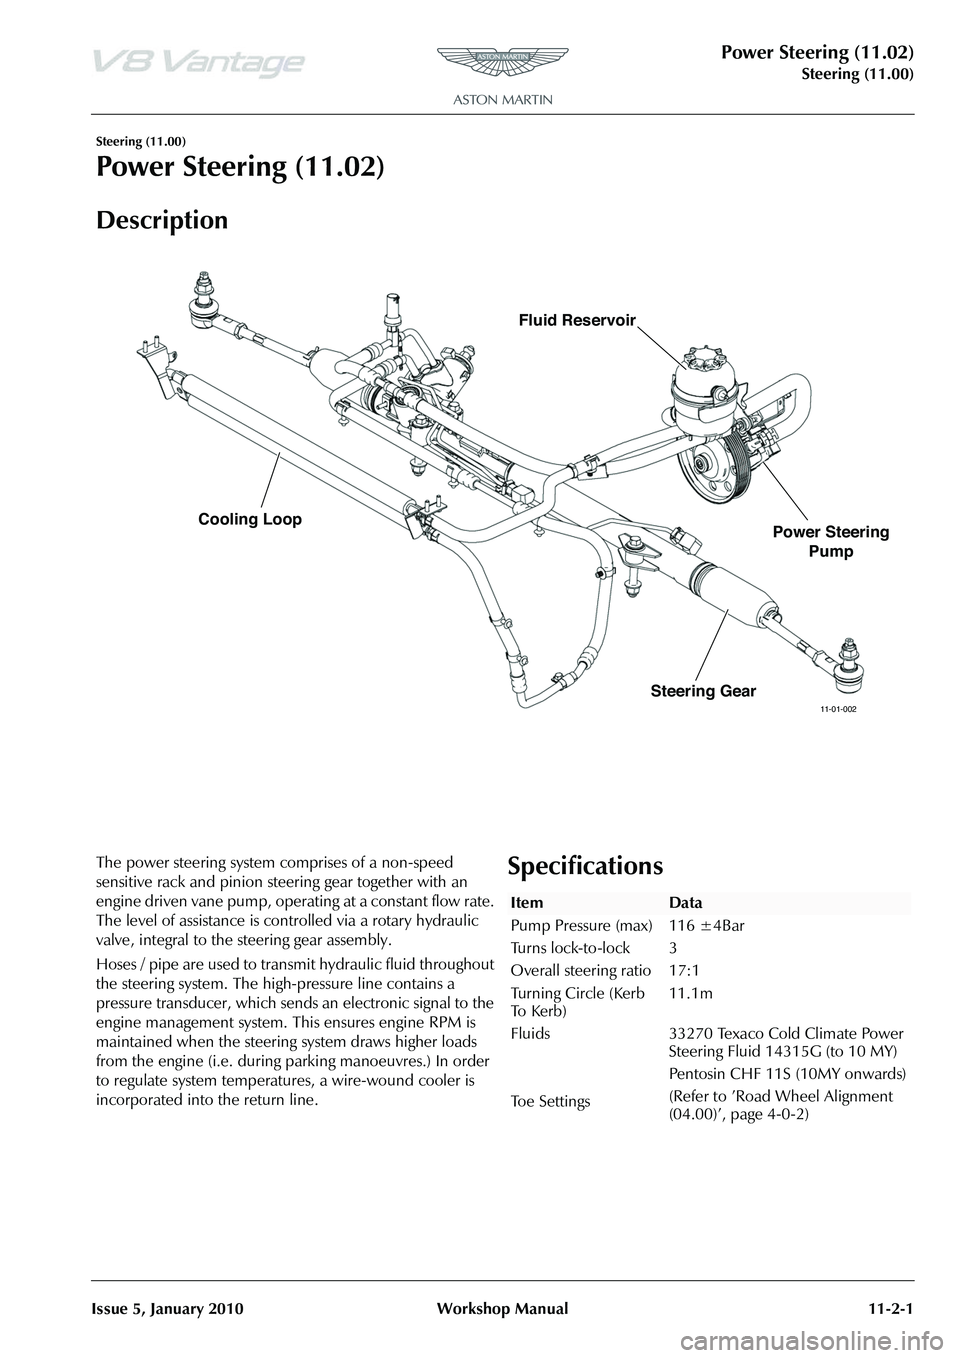
The power steering system comprises of a non-speed
sensitive rack and pinion steering gear together with an
engine driven vane pump, operating at a constant flow rate.
The level of assistance is co ntrolled via a rotary hydraulic
valve, integral to the steering gear assembly.
Hoses / pipe are used to transm it hydraulic fluid throughout
the steering system. The high -pressure line contains a
pressure transducer, which sends an electronic signal to the
engine management system. This ensures engine RPM is
maintained when the steering system draws higher loads
from the engine (i.e. during parking manoeuvres.) In order
to regulate system temperatures, a wire-wound cooler is
incorporated into the return line.Specifications
11-01-002Steering Gear
Cooling Loop
Power Steering
Pump
Fluid Reservoir
ItemData
Pump Pressure (max)
Turns lock-to-lock
Overall steering ratio
Turning Circle (Kerb
To K e r b )
Fluids
Toe Settings 116 ±4Bar
3
17:1
11.1m
33270 Texaco Cold Climate Power
Steering Fluid 14315G (to 10 MY)
Pentosin CHF 11S (10MY onwards)
(Refer to ’Road Wheel Alignment
(04.00)
Page 910 of 947

Aston Martin V8 Vantage2009MY OBDII Documentation 4.7L Aston Martin Confidential
Component P CodesMalfunction Strategy
Description Malfunction Criteria
(Fault) Fault condition
(Internal labels) Threshold Value
(Fault condition) Entry conditions Entry conditions values Filter Time to
log DTCPump relay P0947 Pump relay connected GNDPump relay Short circuit to GND The asic UH04 inside the TCU
detects the fault and communicate it to the uP
Driver output current > th3 during valve on phase th3= 3.7A
NOT (Cranking) 200ms
Clutch system P186D Clutch or actuator or valve damagedClutch not opening before gear
shifting Clutch not open in a timeout timeout = 500ms (Gear shifting in
progress) AND
(Clutch opening
Gear Box system P1734 Mechanical or hydraulic problemGear Box. Disengage failed
(mechanical causes) Gear not disengaged in a timeout timeout = 500ms (Gear shifting phase)
AND (disengage phase)
Gear Box system P1701 Mechanical or hydraulic problemGear Box. Wrong gear
engagement The gear which is going to be
engaged is not the requested one (Gear shifting phase)
Hydraulic circuit P0868 Hydraulic leakage Hydraulic circuit. Pressure low Comparison between sensor pressure signal and threshold = f(oil temperature)
pressure < th Th= 25 bar @ -30°C
Th= 40 bar @120°C linear interpolation (Engine ON) AND
NOT (cranking) 200ms
Power grounds P1710 Power grounds. Disconnection both ground pins Power grounds. Disconnection
both ground pins The diagnosis is based on the batter
y
voltage modification during the
activation of the clutch electrovalve. Ubatt < Ubatt0 - DltUbatt Ubatt0 = Ubatt before
starting the testDltUbatt = 2,5V Wake-up phase
ASM OBD
628/04/2008