Key AUDI A3 2016 Owner´s Manual
[x] Cancel search | Manufacturer: AUDI, Model Year: 2016, Model line: A3, Model: AUDI A3 2016Pages: 328, PDF Size: 81.78 MB
Page 93 of 328
.... N
0 > CX)
.... I.Cl U"I
.... I.Cl ....
The selector lever is not locked when shifting
quickly through N, for examp le from R to D . This
makes it poss ible to free the vehicle when it is
stuck by "rocking" it . The selecto r lever lock en
gages if the lever stays in the N position longer
than approximately 2 seconds when the brake
pedal is not pressed .
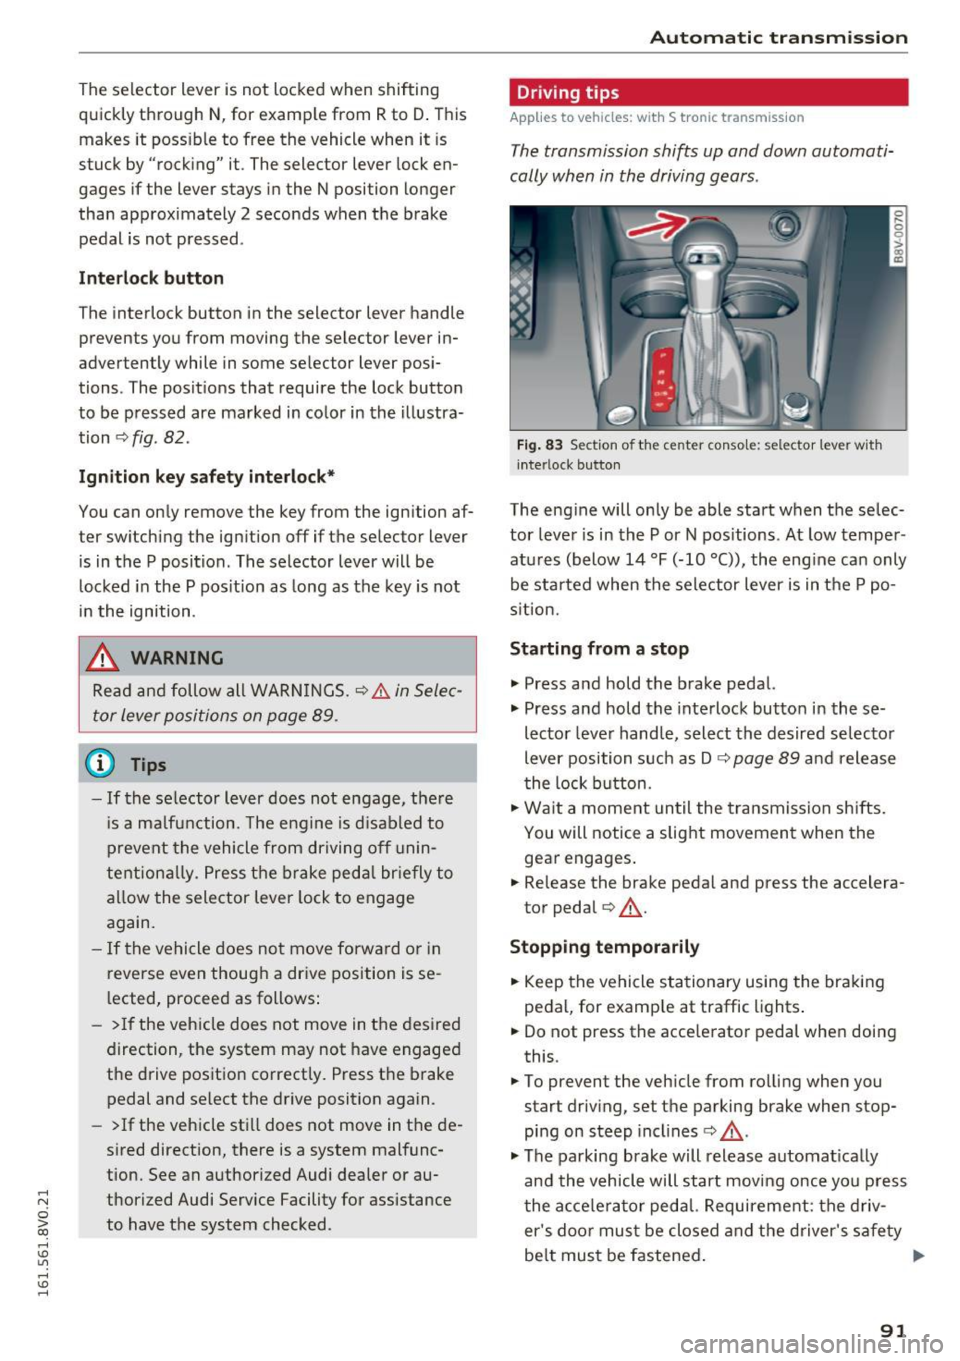
Interlock button
The interlock button in the selector lever handle
prevents you from moving the selector lever in
adverten tly while in some sele ctor lever posi
tions . The posit ions that require the lock button
to be pressed are marked in color in the illustra
tion
¢ fig . 82 .
Ignition key safety interlock*
You can only remove the key from the ignition af
ter switching the ignition off if the selec tor lever
is in the P position . The selector lever will be
l ocked in the P pos ition as long as the key is not
in the ignition .
.&, WARNING
Read and follow all WARNINGS.¢ & in Selec
tor lever positions on page 89.
{O) Tips
-If the select or lever does not engage, there
i s a malfunction. The eng ine is disabled to
prevent the vehicle from driving off unin
tentionally. Press the brake pedal briefly to
allow the selector lever lock to engage
again.
- If the vehicle does not move forward or in
reverse even though a drive position is se
l ected, proceed as follows:
->If the veh icle does not move in t he desired
direction, the system may not have engaged
the drive position correctly. Press the brake
pedal and select the drive position again .
-> If the vehicle still does not move in the de
sired direction, there is a system malfunc
tion. See an authorized Audi dealer or au
thorized Audi Service Facility for assistance
to have the system checked.
Automatic transmission
Driving tips
Applies to vehicles : wit h S t ronic transmiss ion
T he transmission shifts up and down automati
cally when in the driving gears .
Fig. 83 Section of t he center conso le: sel ector leve r wit h
inte rlock butto n
The engine will only be able start when the selec
tor lever is in the P or N pos itions . At low temper
atures (below 14 °F (-10 °()), the eng ine can only
be started when the selector lever is in the P po
sition.
Starting from a stop
.,. Press and hold the brake pedal.
.,. Press and hold the interlock butto n in these
lector lever handle, select the desired selector
lever position such as D ¢
page 89 and release
t he lock button.
.,. Wait a moment until the transmission shifts.
You w ill not ice a slight movement when the
gear engages .
.,. Release the brake pedal and press the accelera
tor pedal ¢&, .
Stopping temporarily
.,. Keep the vehicle stationary using the braking
pedal, for examp le at traffic lights.
.,. Do not press the accelerator pedal when doing
this .
.,. To prevent the vehicle from rolling when you
start driving, set the parking brake when stop
ping on steep incl ines ¢&, .
.,. The parking brake will release automat ically
and the vehicle will start moving once yo u press
the acce le rator pedal. Requirement: the driv
er 's doo r must be closed and the driver's safety
be lt must be fastened . ..,.
91
Page 94 of 328
Automatic transmissio n
Stopp ing /park ing
If the se lecto r lever is not in the P posit ion when
you open the driver's door, the vehicle could roll .
In vehicles with a convenience key*, the message:
Shift to P , vehicle can roll away . Doors c an be
lo cked onl y in P
appears. You will a lso hear a
warn ing tone.
... Press and hold the brake pedal¢_&. .
... Set the parking brake.
.,. Se lect the P selector lever position.
Stopp ing on an inclin e
.,. Always press the brake peda l to hold the vehi
cle in place and prevent it from "rolling back"
¢ _&. . Do
not try to prevent the vehicle from
"ro lling back" when a gear is engaged by in
creasing the engine speed ¢(D.
Starting on an inclin e in vehicl es without Hill
H old *
... Set the parking brake.
.,. With the driving gear selected, press the acce l
erator pedal carefully. The parking brake re
leases automatically . Requirement : the driver's
door must be closed and the driver's safety belt must be fastened .
Starting on an incline in veh icles with Hill
Hold*
.,. With the driving gear selected, remove your
foot from the brake pedal and press the accel
erator pedal~
page 87, Hill hold.
Under certain c ircumstances, (such as driv ing in
the mountains or towing a trailer), it may be use
fu l to sw itch temporarily to the manua l shift p ro
g ram in o rde r to adjust the gea rs to the driving
conditions by hand
c:? page 94.
When parking on a level surface, simply place the
selecto r leve r in the P position. On inclines, act i
vate the parking brake first and then move the
selector lever to the P posi tion
~ page 85. This
prevents the loc king mechanism from being
loaded too heav ily and wi ll make it easier to
move the selector lever out of the P position.
92
A WARNING
- The vehicle can roll even when the engine is
sw itched off.
- Unintended vehicle movement can lead to
serious injuries.
- Never leave your veh icle with the engine
running while in gear. If you must leave
your veh icle when the engine is running, set
the park ing brake and move the selector lev
er to the P posit ion.
- Power is still transferred to the wheels when the engine is running at idle . To pre
vent the vehicle from "creeping", yo u must
keep your foot on t he b rake when the en
gine is ru nning and the selector lever is in
the D, Sor R position or "tip tronic" mode is
selected.
- Do not inadve rten tly p ress the accelerator
pedal when the vehicle is stationary. Other
wise the vehicle will start to move immedi
ately, even if the parking brake is set. This
could result in a crash.
- Do not press the acce lerator pedal when
changing the selector lever posit ion while
the vehicle is stat ionary and the engine is
running.
- Never engage the R or P selector level pos i
tions while dr iv ing. It could cause a crash.
- Before driving down a steep slope, reduce your speed and shift into a lower gear w ith
"t i ptronic".
- Do not ride the brakes or press the brake pedal too often o r too long when dr iv ing
downhill. Constant braking causes the brakes to overheat and substant ially re
duces bra king performance, increases b rak
ing d istance or causes comp lete failure of
the bra ke sys tem.
- If you must stop on an incline, always hold
the vehicle in place w ith the foot brake or
p ar king bra ke to p revent it from rolling
back.
- Never hold the vehicle on an incline with a
slipping clu tch. The clutch opens automati
cally when it becomes too hot from the
over load . T he
l§1 indicator light turns on
Page 100 of 328
e-tron
e-tron Plug-in hybrid drive
Introduction
A pp lies to veh icles: w ith plug -in hybrid drive
General information
The plug- in hybrid drive is a drive concept that al
lows yo u to choose between driving w ith the elec
tr ic moto r, with the gaso lin e engine o r using a
comb inat io n of both.
All work done on the high-voltage system must
only be performed by certified high-voltage tech n icians at autho rized Aud i dea le rs or authorized
Aud i Serv ice Facilities in accordance with Audi
gu idelines.
The high-voltage system is composed of the fol low ing h igh-vo ltage components: the high-volt
age battery, the powe r electron ics, the e lectr ic
motor, the high-voltage A/C compressor, the
high-vo ltage heater, the charging system and
charging port as well as the orange high-voltage
wiring.
The pedal referred to in this sect ion of the Own
er's Manua l is the equivalent of the acce lerator
pedal (gas pedal) in a standard veh icle.
High-voltage battery
The high-voltage battery is located under the
rear bench seat in the veh icle and does not re
qu ire any maintenance from the driver. Addition
a l information about the high-voltage battery can
be found under
Q page 112 .
A WARNING
The voltage in the high-vo ltage system is life
threatening. Touching a damaged high-volt
age component can result in a fatal e lectr ic
shock. The components in the high-voltage
system are ma rked with a warning label which
wa rns against the h igh-vo ltage.
- The voltage level in the high-voltage system
is still dangerous and potentially life-threat
ening when the ignition is switched off.
- Never perform work on orange high-voltage
cables or on high-voltage components. Only
98
authorized repair facilities that are certified
may perform work on the high-voltage sys
tem.
- Never damage, alter or remove the orange
high-voltage cable or disconnect it from the
high-voltage system.
- Never perform any work using c utting, shap
ing or sharp-edged too ls or heat sources
near the h igh-vo ltage system and high-volt
age cables.
- Aud i regulat ions must be followed during
all work performed on the high-voltage sys
tem and h igh-vo ltage components.
- When working on the h igh-vo ltage system
and h igh-voltage compone nts, make sure
the remote cont rol key is kept far enough
away from the vehicle so that there is no
ris k of the ignit ion be ing inadve rten tly
sw itched on.
- Gases that escape from the high-vol tage
b attery can be poisono us or flammable.
- Damage to the high-voltage battery could
cause the h igh-vo ltage battery to leak im
media tely or in the fu ture, and poisonous or
flammab le gases cou ld escape . Do not in
ha le the gases!
- Do not expose yourse lf to any leaking fluids
and do not come into contact with them .
- The high-volt age battery e lectroly te fl uid is
caustic. I f electrolyte fluid comes into con
tact with the sk in, f lush the affected area
for at least 15 minutes with clean water.
Then wash the affected area with soap.
Have the affected area examined by a med i
cal professional.
- In the event of a technical emergency, in
form the responders that the vehicle is
equ ipped with a high-voltage battery.
A WARNING
Never leave the vehicle unattended when in
drive ready mode
~ page 100 with a gear en
gaged . The veh icle can start moving ("creep
ing") even if the gaso line engine is switched
off, since the e lectr ic motor is still operating.
This may cause collis ions and severe or fatal
-
Page 116 of 328
e-tron
Charging dock
Applies to vehicles: with p lug -in hybrid drive and charging
dock
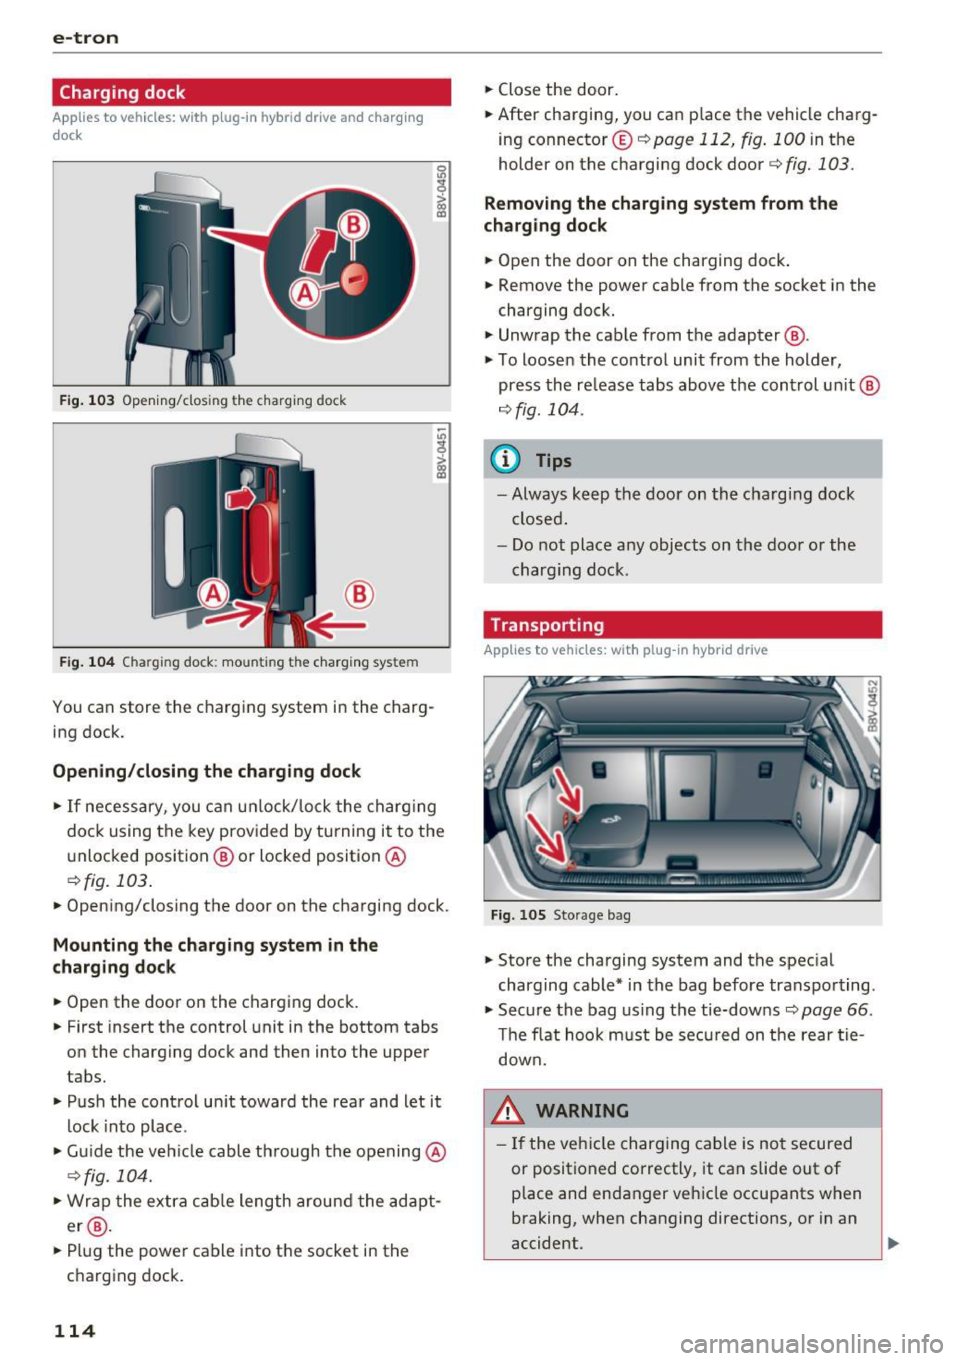
F ig . 1 03 Opening/clos ing t he charg ing dock
®
Fig . 1 04 Charging dock: mounting the ch arging system
You can store the charg ing system in the charg
ing dock.
Opening /closing the charging dock
• If necessary, you can u nlock/lock the charg ing
dock using the key provided by turning it to the
unlocked position @ or locked position @
¢fig. 103.
• Opening/closing the door on the charging dock.
Mounting the cha rging system in the
charging dock
• Open the door on the charging dock.
• First insert the control unit in the bottom tabs
on the charging dock and then into the upper
tabs.
• Push the control un it toward the rea r and let it
lock into place.
• Gu ide the vehicle cable th rough the opening @
¢fig_ 104.
• Wrap the extra c ab le length around the adapt
er @ .
• Plug the power cable into the socket in the
charging dock.
114
• Close the door.
• After charging, you can place the vehicle charg
ing connecto r© ¢
page 112 , fig. 100 in the
holder on the charging dock door¢
fig. 103.
Removing the charging system from the
charging dock
• Open the door on the charging dock .
• Remove the power cable from the socket in the
charging dock.
• Unwrap the cable from the adapter @.
• To loosen the contro l unit from the holder,
press the re lease tabs above the cont rol un it @
r=:> fig. 104.
(D Tips
- Always keep the door on the cha rg in g dock
closed .
- Do not place any objects on the doo r or the
charging dock.
Transporting
Applies to vehicles: with plug-in hybrid drive
Fig. 105 Storage bag
• Store the charging system and the spec ial
charging cable* in the bag before transpo rting.
• Secure the bag us ing the tie-downs¢
page 66.
The flat hoo k m ust be sec ured on t he rear tie
down.
8_ WARNING
- If the veh icle charging cable is no t secured
or positioned correctly, it can slide out of
p lace and endanger ve hicle occupants when
braking, when changing directions, or in an
accident.
Page 123 of 328
.. Press the~ button @ r::?vpage 115, fig. 106 on
the control unit.
Unlocking the control unit
Requirement: the P IN must be activated.
.. Press any button on the control unit.
.,. PIN? appears on the display field .
.. Enter the PIN .
.. Press the
IOKI button @.
{O) Tips
-The PIN is deactivated in the factory default
settings.
- If you do not remember your PIN, contact
an authorized Audi dea ler or authorized
Audi Service Fac ility.
- If the first PIN entry differs from the second
ent ry, the first PIN entry is displayed.
- If nothing is entered w ith in 20 seconds of
th is, the set value is not changed.
Indicator Lights and
messages
Applies to vehicles: with plug-in hybrid drive
If the B indicator light turns on, the high-volt
age battery is charging or is already completely
charged.
I f the . indicator light stays on, there is a mal
function in the charging system. Have the prob l em corrected immediately by an authorized Audi
dea ler or authorized Audi Service Facility.
l'I Charging connector still attached. Driving
not possible
This message appears when the charg ing system
is sti ll connected to the veh icle. Remove the con
nector
r::?v page 117, After charging.
1,1 AC charging: currently not possible
This message appears when the charging system
is incompatible. Only charge using the charging
system that is designed for your vehicle.
;::: 1,1 AC charging : system fault! Plea se contact 0
iii Service
e-tron
This message appears if there is a malfunction in
the charging system. Have the prob lem corrected
immediately by an authorized Audi dealer or au
thori zed Audi Service Facility .
Vehicle charging
connector emergency
release
Applies to vehicles: with plug -in hybrid drive
There could be a malfunction if you are not able
to pull the vehicle charging connector out of the
vehicle charging port. You must use the emer
gency release to release the vehicle charging con
nector.
Requirement: the se lector lever must be in the P
position, the vehicle must be unlocked and the
charging process must have been ended or inter
rupted.
.,. Press and hold the immediate charging button
@ r::?vpage 115, fig . 107 .
.. Press the [@l button on the remote control key
at the same time.
.. Remove the connector.
.. Drive to an authorized Audi dealer or author
ized Audi Service Facility immediately to have
the malfunction corrected .
If the charging connector still cannot be removed
after using the emergency release, see an author
ized Audi dealer or authorized Audi Service Facili -
ty for assistance .
Charging unit cover
emergency release
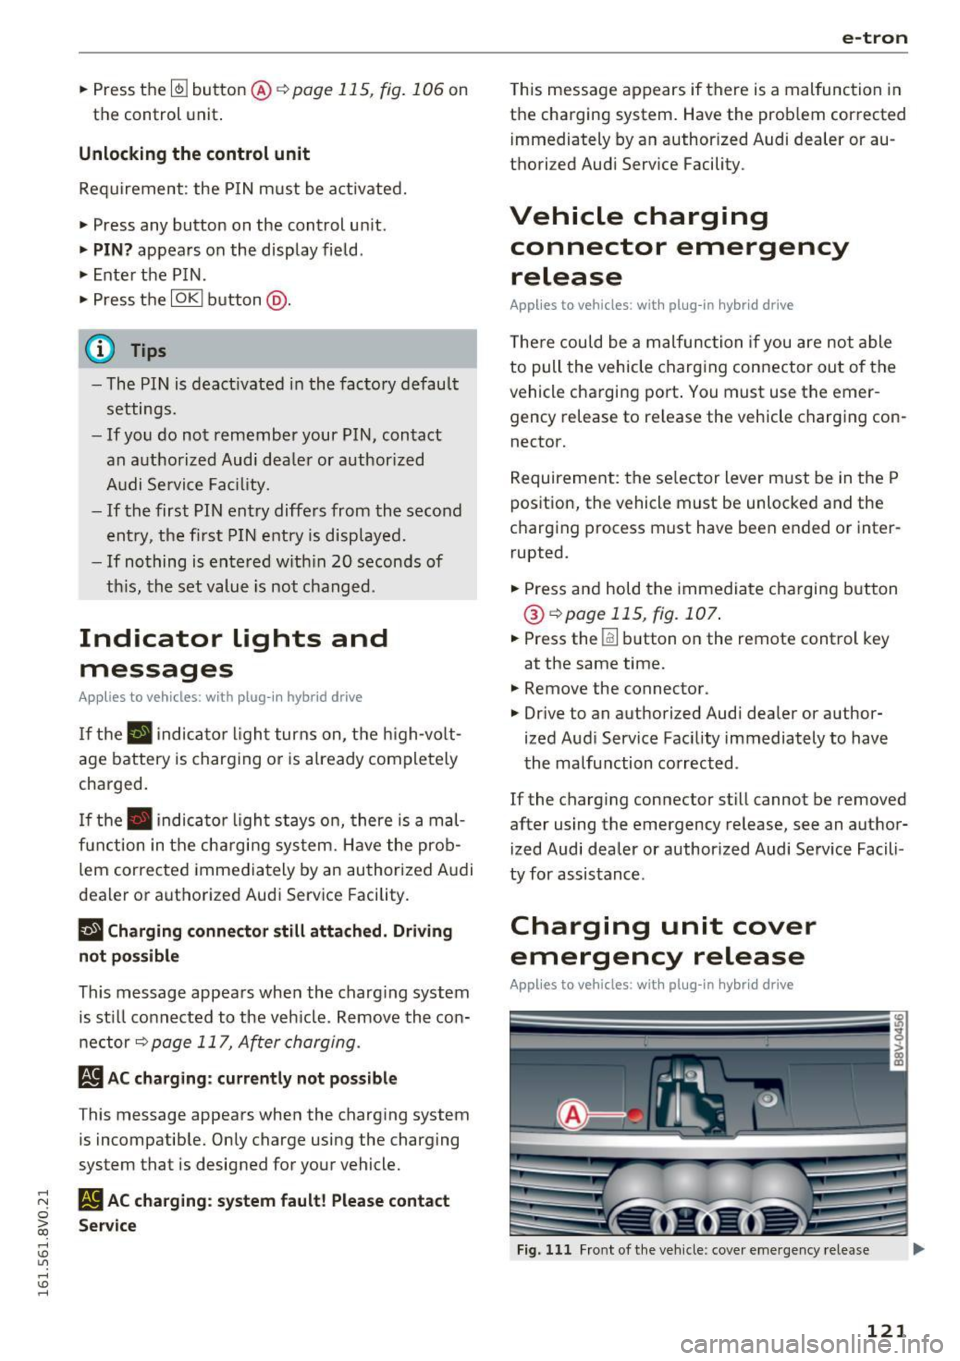
Applies to vehicles: with plug-in hybrid drive
~ Fig. 111 Front of the vehicle: cover emergency release U"I
121
Page 127 of 328

,....,
N
0 > co ,....,
as needed after switching the ignition on/
off again.
Vehicle status
Applies to vehicles: with plug- in hybrid drive
You can access various vehicle statuses using the
services, such as:
- high-voltage battery charge level,
- electric range,
- mileage,
- next inspection.
For addit ional information, refer to¢
page 101,
Power meter overview
and ¢ page 102, Range
display.
A WARNING
Do not be misled by the status report displays
by ignor ing messages and/or illuminated
warning and indicator lights in the vehicle.
This could lead to break downs in on the road,
accidents and serious injuries.
@ Tips
- If the high-voltage battery is not charged,
the amount of access requests is limited to
15 after switching off the ignition. This
helps conserve the 12 volt vehicle battery.
You cannot control functions or access in
formation if the charge level of the 12 volt
vehicle battery is too low.
- If at least two minutes have passed after
the last time the ign ition was switched off,
you can reset the access counter back to "0"
as needed after switching the ignition on/
off again .
Vehicle position
Applies to vehicles: with plug -in hybrid drive
The vehicle collects data under certa in conditions
and sends it to a server.
When data is stored, you can data such as the ex
amples listed below using the Audi connect e
tron services:
- Vehicle location display
e-tron
-Display of one's own location
- Route to your vehicle
If your mob ile dev ice also has a navigation func
tion, you can nav igate to your last known parking
location .
For example, you have the option to show the
route to your vehicle and to send the correspond
i ng locations.
(D Tips
- The new parking locat ion cannot be deter
m ined with this service if the vehicle is
moved after shutting the vehicle off and
w ithout switching the ignition on and off
again, for example when being towed or if
the vehicle is stolen .
-If the vehicle is moved and shut off again
using the second key, for example, the new
park position is transmitted to the
server af
ter removing the key.
Charging
Applies to vehicles: with plug- in hybrid drive
You can contro l and access the high-voltage bat
tery ch arging process remotely using these
serv
ices. You have the following options:
- check the battery charge level,
- start/end the charging process,
- program the charging t imer with/without cl i-
mate control,
- deactivate/activate the charging timer.
For additional information, refer to¢
page 112,
Charging the battery with the Audi e-tron charg
ing system.
A WARNING
Only perform charging functions on the high
voltage battery if the vehicle is shut off cor
rectly, is connected to a suitable socket and if
the ignition is switched off.
125
Page 147 of 328

.... N
0 > CX)
.... I.Cl U"I
.... I.Cl ....
Late: in this set ting, t he system provides correc
tive steering just before a vehicle whee l touches a
detected lane marker line.
Vibrat ion warning
You can switch the additional vibrating warning
i n the steering wheel on or
off.
& WARNING
With the vibration warning switched off, no
visible warning will appear in the instr ument
cluster display when crossing a lane marker.
@ Tips
Market-specific: your sett ings are stored au
tomatically and assigned to the remote con
trol key in use.
Audi side assist
Description
A pp lies to vehicles: with Audi side assist
Fig. 130 Sensor detectio n range
Fig. 131 D isplay on the exterior mirro r
Side assist he lps you monitor your blind spot and
traffic behind your vehicle. Within the limits of
the system, it warns you about vehicles that are
com ing closer or that are traveling with yo u with-
A ss ist
in senso r range (D ¢ fig. 130 : if a lane change is
classified as critical, the display @ in the exterior
mirror¢
fig. 131 turns on .
T he displ ay in the left exterior mirror p rovides as
sistance when making a lane change to the le ft,
whi le the display in the right exterior mirror pro
vides ass istance when making a lane ch ange to
the right.
Information stag e
As long as you do not a ct ivate the tu rn signal,
side assist
informs you about vehicles that are
detected and classified as critical. The display in
the mirror turns on, but is dim .
T he disp lay remains dim i n the information stage
so that your view toward the front is not distur
bed.
Warning stage
If you activate the turn s ignal, side assist warns
yo u about vehicles that are detected and classi
fied as crit ica l. T he d isp lay in the respective mir
ror blinks bright ly. If this happens, check traffic
by glancing in the rearview mirror and over your
shou lder ¢.&.
in General information on
page 146.
(D Tips
- You can adjust the brightness on of the dis
play on the rearview mirror¢
page 147.
145
Page 149 of 328

,....,
N
0 > co ,....,
behind very quickly. The display may not
turn on in time.
- In poor weather conditions such as heavy
rain, snow or heavy mist.
- On very wide lanes, in tight curves, or if
there is a rise in the road surface. Vehicles
in the adjacent lane may not be detected
because they are outside of the sensor range.
- Audi side assist cannot detect all vehicles
under all conditions, which can increase the
risk of accidents.
- Please note that side assist only displays ap
proaching vehicles or vehicles in your blind
spot if your vehicle is traveling at least
19 mph (30 km/h).
- In certa in situations, the system may not
work or its function may be limited. For ex
amp le:
- The display may not turn on at the right
time if vehicles are approaching or passing
very quickly.
- In poor weather conditions, such as heavy rain, snow or fog.
- In very wide lanes, in tight curves or when
there are slopes in the roadway, vehicles
in the neighboring lanes may not be de
tected because they are outside of the
sensor range.
(D Note
The sensors can be displaced by impacts or
damage to the bumper, wheel housing and
underbody. This can affect the system. Have
an authorized Audi dealer or authorized Audi
Serv ice Facility check their function .
(Di Tips
-If the window glass in the driver's door or
front passenger's door has been t inted, the
display in the exterior mirror may be misin
terpreted.
- For an explanation on conformity with the
FCC regulations in the United States and the
Industry Canada regu lations, refe r to
r::!> page 309.
Assist
Switching on and off
App lies to vehicles : wi th Audi side ass ist
T he system and be switched on and off in the
MM I*.
"' Select: the I MENU I button> Car> Sys tem s"
control button > Driver a ssistanc e > Audi s ide
a ssis t.
With Off , the system is switched off.
An activated system w ill s ignal every time the ig
nition is switched on by turning the displays in
the exte rior m irro rs on briefly.
Adjusting the display brightness
App lies to vehicles: wi th Audi side ass ist
The display brightness can be adjusted in the
MM!* .
"' Select: the IM ENU I button > Ca r > Sys te m s*
control button > Dri ver assi st a n ce > Au di s ide
a ssis t.
The display br ightness adjusts automatically to
the brightness of the surroundings, both in the
information and in the warning stage. In very
dark or very bright surround ings, the d isp lay is
al ready set to the minimum o r max imum level by
the automatic adjustment. In such cases, you may not ice no change when adjust ing the bright
ness, or the change may only be noticeable once
the surroundings change.
Adjus t the br igh tness to a leve l where the display
in the information stage will not disrupt your
view forward . If you change the brightness, the
display in the exterior mirror will briefly show the
brightness level in the information stage . The
brightness of the warning stage is linked to the
brightness in the information stage and is adjust
ed along with the information stage adjustment .
(D Tips
-Side ass ist is not act ive while you are mak
ing the adjustment.
- Your settings are automatica lly stored and
assigned to the remote control key being
used.
147
Page 152 of 328
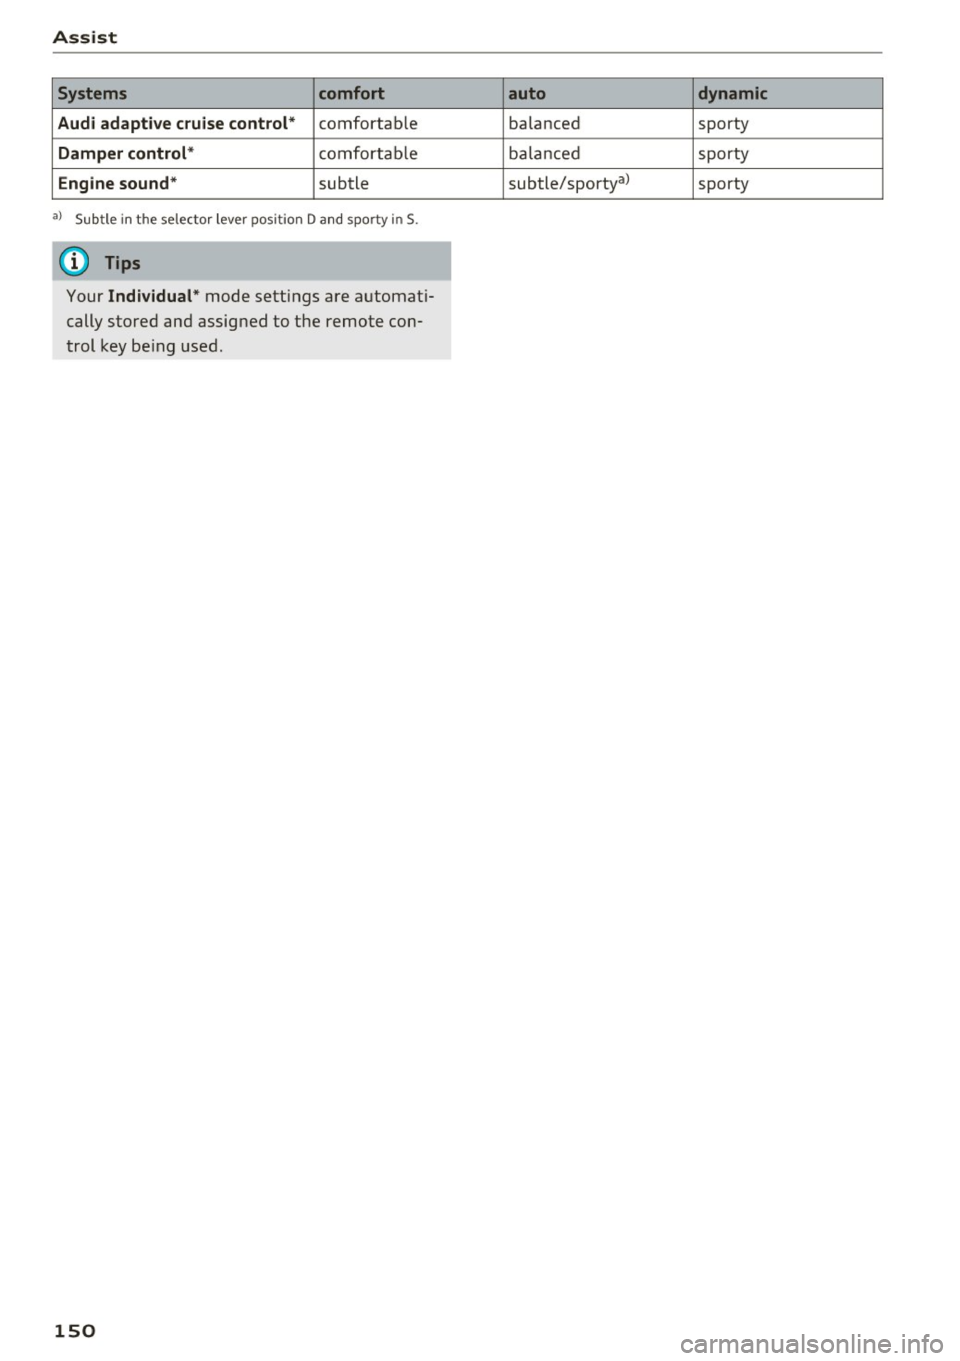
Assist Systems comfort
Audi adaptive c ru ise control*
comfortab le
Damper control * comfortable
Engine sound* subtle
al Sub tle in t he se lecto r lever position D a nd s porty in S.
(D Tips
Your Individual * mode settings are a utomat i
cally stored and assigned to the remote con
trol key be ing used.
150
auto dynamic
balanced sporty
ba la nced sporty
subtle/sporty al sporty
Page 159 of 328

,....,
N
0 > co ,....,
A ppl ies to vehicles: with parkin g system plus/rearview cam·
era
The display and warning tones con be adjusted in
the MMI.
~ Select: the I MENU ! button >Car > Systems *
control button > Driver assistance > Parking
aid .
Display
On * -
an op tic al d isp lay is shown for the parking
system plus, a rearview camera image is s hown
for parking system plus with rearv iew camera* .
Off -Whe n the par king system is switched off,
only audib le sign als are give n.
Signal tones
Front volume -
volume for the front and side*
a rea
Rear volume -volume for t he rear area
Front frequenc y-frequency for the front and
side * area
Rear frequency -frequency fo r the rear area
Music volume during nav . prompts -the volume
of the a udio/v ideo so urce is lowe red when t he
pa rking system is turned o n.
The new ly selected leve l is demons trated briefly
by the sound generator.
- The warning tones ca n also be adjusted d i
r ec tly from the visua l display or t he rearv iew
cam era image *. Simply pr ess the
Settings
co ntrol bu tton.
- The setti ngs a re auto mat ica lly stored and
ass igned to the remote co ntro l key t hat is in
u se .
Error messages
App lies to vehicles: with par kin g system plus/rearview cam
era
There is an erro r in the system if the LED in the
P111A. button is b linking and you hear a continuous
Parking systems
alarm for a few seconds after sw itch ing on the
par king system or w hen the pa rking system is a l
ready activated. If the error is not cor rected be
fo re you switch off the ignition, the LED in the
Pw ,
button w ill blink the next time you switch on the
park ing system by shifting into reverse.
Parking sy stem plus*
If a sensor is fa ulty, the~ symbol will appear i n
f ront of/behind the vehicle in the MMI display. If
a rear sensor is faulty, only obstacles that are in
areas @and @are shown <=>
page 152, fig. 136.
If a front sensor is fa ulty, only obstacles that are
i n a reas © and @are shown .
Drive to an authorized Audi dealer or authorized
Audi Service Facility immed iate ly to have the
malfu nction corrected.
157