AUDI A3 2020 Owner´s Manual
Manufacturer: AUDI, Model Year: 2020, Model line: A3, Model: AUDI A3 2020Pages: 400, PDF Size: 107.47 MB
Page 341 of 400
8V2012721BK
Wheels
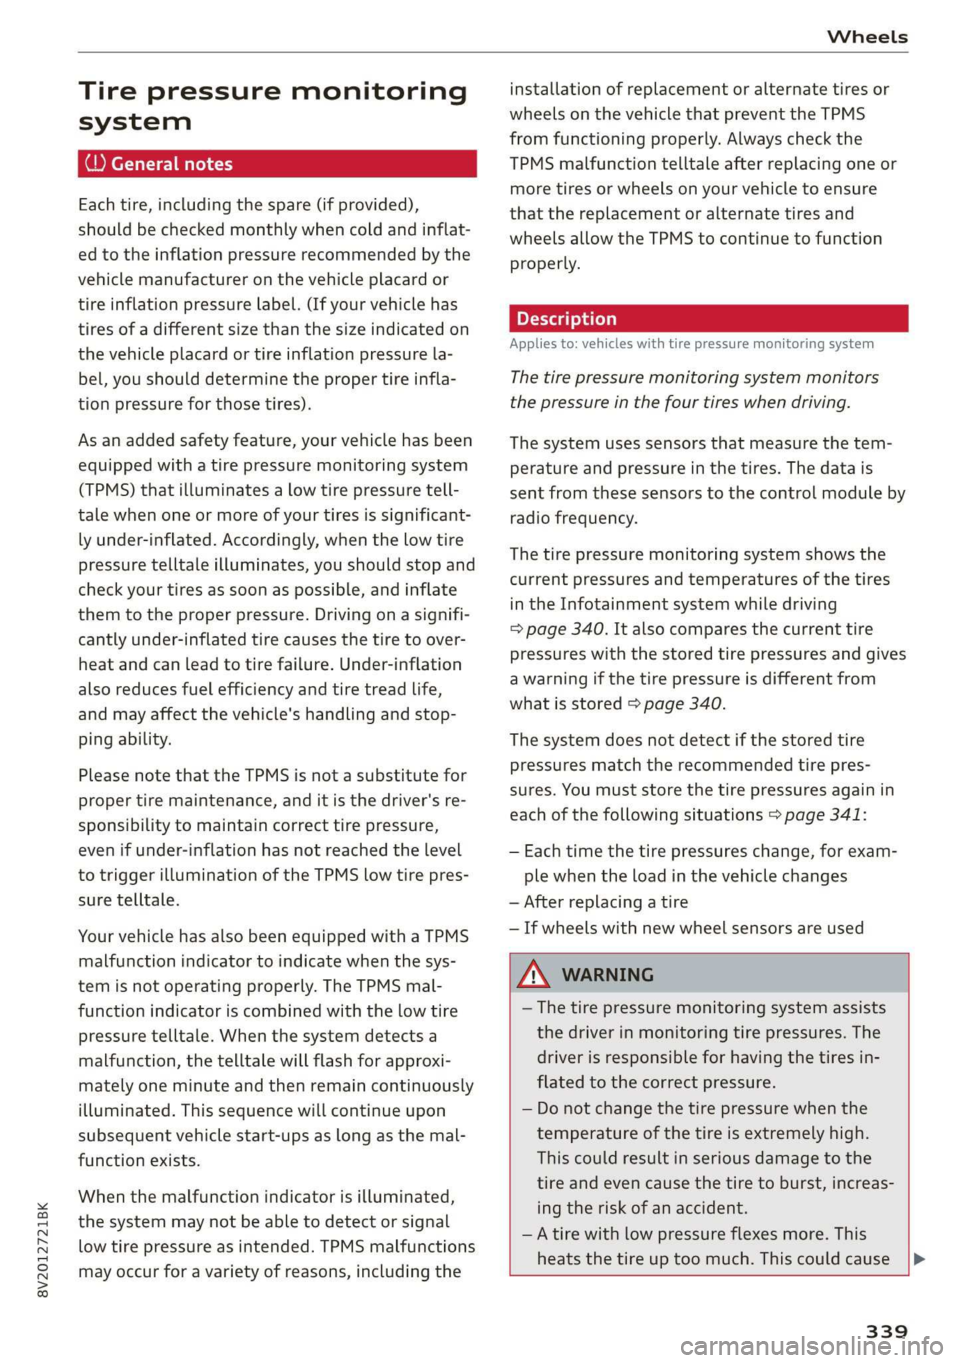
Tire pressure monitoring
system
(1) General notes
Each tire, including the spare (if provided),
should be checked monthly when cold and inflat-
ed to the inflation pressure recommended by the
vehicle manufacturer on the vehicle placard or
tire
inflation pressure label. (If your vehicle has
tires of a different size than the size indicated on
the vehicle placard or tire inflation pressure la-
bel, you should determine the proper tire infla-
tion pressure for those tires).
As an added safety feature, your vehicle has been
equipped with a tire pressure monitoring system
(TPMS) that illuminates a Low tire pressure tell-
tale when one or more of your tires is significant-
ly under-inflated. Accordingly, when the low tire
pressure telltale illuminates, you should stop and
check your tires as soon as possible, and inflate
them to the proper pressure. Driving ona signifi-
cantly under-inflated tire causes the tire to over-
heat and can lead to tire failure. Under-inflation
also reduces fuel efficiency and tire tread life,
and may affect the vehicle's handling and stop-
ping ability.
Please note that the TPMS is not a substitute for
proper tire maintenance, and it is the driver's re-
sponsibility to maintain correct tire pressure,
even if under-inflation has not reached the level
to trigger illumination of the TPMS low tire pres-
sure telltale.
Your vehicle has also been equipped with a TPMS
malfunction indicator to indicate when the sys-
tem is not operating properly. The TPMS mal-
function indicator is combined with the low tire
pressure telltale. When the system detects a
malfunction, the telltale will flash for approxi-
mately one minute and then remain continuously
illuminated. This sequence will continue upon
subsequent vehicle start-ups as long as the mal-
function exists.
When the malfunction indicator is illuminated,
the system may not be able to detect or signal
low tire pressure as intended. TPMS malfunctions
may occur for a variety of reasons, including the
installation of replacement or alternate tires or
wheels on the vehicle that prevent the TPMS
from functioning properly. Always check the
TPMS malfunction telltale after replacing one or
more tires or wheels on your vehicle to ensure
that the replacement or alternate tires and
wheels allow the TPMS to continue to function
properly.
Applies to: vehicles with tire pressure monitoring system
The tire pressure monitoring system monitors
the pressure in the four tires when driving.
The system uses sensors that measure the tem-
perature and pressure in the tires. The data is
sent from these sensors to the control module by
radio frequency.
The tire pressure monitoring system shows the
current pressures and temperatures of the tires
in the Infotainment system while driving
= page 340. It also compares the current tire
pressures with the stored tire pressures and gives
a warning if the tire pressure is different from
what is stored > page 340.
The system does not detect if the stored tire
pressures match the recommended tire pres-
sures. You must store the tire pressures again in
each of the following situations > page 341:
— Each time the tire pressures change, for exam-
ple when the load in the vehicle changes
— After replacing a tire
— If wheels with new wheel sensors are used
Z\ WARNING
—The tire pressure monitoring system assists
the driver in monitoring tire pressures. The
driver is responsible for having the tires in-
flated to the correct pressure.
— Do not change the tire pressure when the
temperature of the tire is extremely high.
This could result in serious damage to the
tire and even cause the tire to burst, increas-
ing the risk of an accident.
— A tire with low pressure flexes more. This
heats the tire up too much. This could cause |>
339
Page 342 of 400

Wheels
the tread to separate and even cause the tire
to burst, increasing the risk of an accident.
— The tire pressure monitoring system does
not warn about damage or defects in the
tire construction that could cause the tire to
burst, for example. Inspect your tires regu-
larly.
Note that the tire pressure also depends on the
temperature of the tire. The tire pressure increas-
es as the engine becomes warmer while driving.
Z\ WARNING
Read and follow the important information
and notes > page 339.
@) Tips
— If tires are replaced, the sensors and valves
do not need to be removed or replaced. Only
replace the valve stem and, if necessary, the
valve and the wheel electronics. If you have
questions, see an authorized Audi dealer or
authorized Audi Service Facility.
— An incorrect display or a malfunction in the
tire pressure monitoring system can occur
after using the tire mobility kit. Have the
sensors replaced by an authorized Audi
dealer or authorized Audi Service Facility.
— For an explanation on conformity with the
FCC regulations in the United States and the
Industry Canada regulations, see
=> page 377.
Displaying tire pressures and temperatures
Applies to: vehicles with tire pressure monitoring system
Requirement: you must be driving the vehicle.
> Select in the Infotainment system: the [MENU
button > Vehicle > left control button > Service
& checks > Tire pressure monitoring > Display
tire pressure.
The current tire pressures are shown in green,
yellow or red numbers in the Infotainment sys-
tem:
— Green: the current tire pressure and the speci-
fied tire pressure are approximately the same.
— Yellow: the current tire pressure is lower than
the specified tire pressure.
— Red: the current tire pressure is much lower
than the specified tire pressure.
The specified tire pressure is the last tire pressure
that was stored > page 341.
340
@) Tips
The tire pressure or temperature is not dis-
played while the vehicle is stationary and in
adaptation mode. Dashes --.-- are shown in
place of the pressure and temperature.
ON ic deste oy
Applies to: vehicles with tire pressure monitoring system
If the @ indicator light turns on, the pressure in
at least one tire is too low or new sensors were
not adapted:
@ Indicator light turns on after turning the
ignition on
The tire pressure is too low compared to the
specified pressure.
> Check and store the tire pressure(s) the next
time it is possible > page 341.
@ Indicator light turns on while driving
Wheels with new sensors were not adapted or
the tire pressure has reached a critical level com-
pared to the specified pressure.
> Avoid unnecessary steering and braking maneu-
vers.
> Adapt your driving style to the situation.
> Stop as soon as possible and check the tire(s).
> If it is possible to continue driving, see an au-
thorized Audi dealer or authorized Audi Service
Facility immediately and have your tire(s) re-
paired or replaced.
ZA\ WARNING
Read and follow the important information
and notes > page 339.
Page 343 of 400

8V2012721BK
Wheels
Storing new tire pressures
Applies to: vehicles with tire pressure monitoring system
The tire pressure specifications must be stored
correctly for the tire pressure monitoring system
to function reliably.
It is always necessary to store the tire pressures
when the tire pressures are modified, for exam-
ple due to a change in load or when new sensors
are installed.
> Before storing the tire pressures, make sure the
tire pressures of all four tires meet the speci-
fied values and are adapted to the load
=> page 330, fig. 260. Only correct and store
the pressure in tires whose temperature is ap-
proximately the same as the ambient tempera-
ture. If the temperature of the tire is higher
than the ambient air temperature, the tire
pressure must be increased approximately
3.0 PSI (0.2 bar) above the value on the sticker.
» Switch the ignition on.
> Select in the Infotainment system: [MENU] but-
ton > Vehicle > left control button > Service &
checks > Tire pressure monitoring > Store tire
pressure > Yes, store now. After storing the tire
pressures, the tire pressure monitoring system
measures the current pressures while driving
and stores them as the new specified pressures.
> If the changed tire pressures are not displayed
in the Infotainment system, drive the vehicle
for approximately 10 minutes so that the sen-
sor signal from the wheels is received again.
During this adaptation phase, --.-- is displayed
for the pressure and temperature and the tire
pressure monitoring system is only partially
available. It only provides a warning if one or
more tire pressures is below the minimum per-
mitted specified pressure.
If the @ indicator light turns on and the mes-
sage Tire pressure: wheel change detected.
Please check all tires and store pressures in
MMI also appears, the system has detected that
the position of the sensors has changed because
of a tire rotation, or that new sensors were instal-
led. Store the new tire pressures.
ZX WARNING
Read and follow the important information
and notes > page 339.
Malfunctions
Applies to: vehicles with tire pressure monitoring system
If the tire pressure monitoring system is not
available, the a indicator light appears in the
instrument cluster display along with the mes-
sage Tire pressure: malfunction! See owner's
manual.
If the ia indicator light appears after switching
the ignition on or while driving and the @ indi-
cator light also blinks for approximately one mi-
nute and then stays on, there is a system mal-
function. The following are examples of situa-
tions that could cause a malfunction:
— If the message appears at the end of the adap-
tation phase, the system may not detect one or
several of the wheel sensors necessary for pres-
sure monitoring. This may result from one or
more wheels without wheel sensors or with in-
compatible wheel sensors being installed.
—Awheel sensor or another component has
failed.
— Using snow chains can affect the function of
the system because of the shielding effect of
the chains.
— The tire pressure monitoring system is not
available due to a malfunction.
— Transmitters with the same frequency, such as
headphones or remote-controlled devices, may
cause a temporary system malfunction due to
the strong electromagnetic field.
The ia indicator light and the message turn off
once the tire pressure monitoring system is avail-
able again. If you cannot correct the malfunction
and the ia indicator light stays on, drive imme-
diately to an authorized Audi dealer or author-
ized Audi Service Facility to have the malfunction
repaired.
341
Page 344 of 400

Care and cleaning
Care and cleaning
General information
Regular, proper care helps to maintain your vehi-
cle's value. It can also be a requirement when
submitting warranty claims for corrosion damage
and paint defects on the body.
The required cleaning and care products can be
obtained from an authorized Audi dealer or au-
thorized Service Facility. Read and follow the in-
structions for use on the packaging.
ZA WARNING
— Using cleaning and care products incorrectly
can be dangerous to your health.
— Always store cleaning and care products out
of reach of children to reduce the risk of poi-
soning.
@ For the sake of the environment
— Purchase environmentally-friendly cleaning
products if possible.
— Do not dispose of cleaning and care prod-
ucts with household trash.
Car washes
The longer that deposits such as insects, bird
droppings, tree sap or road salt remain on the ve-
hicle, the more the surface can be damaged. High
temperatures such as those caused by sunlight
increase the damaging effect.
Before washing, rinse off heavy deposits with
plenty of water.
Stubborn deposits such as bird droppings or tree
sap are best removed with plenty of water and a
microfiber cloth.
Also, wash the underside of your vehicle once
road salt stops being used for the season.
Pressure washers
When washing your vehicle with a pressure wash-
er, always follow the operating instructions pro-
vided with the pressure washer. This is especially
important in regard to the pressure and spraying
distance. Do not aim the spray directly at seals on
342
side windows, doors, the hood, the luggage com-
partment lid, or the panoramic glass roof* or at
tires, rubber hoses, insulating material, the pow-
er top*, sensors*, or camera lenses*. Keep a dis-
tance of at least 16 in (40 cm).
Plug-in hybrid drive: do not direct the stream of
water towards the wall mount clip*.
Do not remove snow and ice with a pressure
washer.
Never use cone nozzles or high pressure nozzles.
The water temperature must not be above 140 °F
(60 °C).
Automatic car wash
Spray off the vehicle before washing.
Make sure that the windows, the panoramic glass
roof*, and the power top” are closed and the
windshield wipers are off. Follow instructions
from the car wash operator, especially if there are
accessories attached to your vehicle.
If possible, use car washes that do not have
brushes.
Washing by hand
Clean the vehicle starting from the top and work-
ing downward using a soft sponge or cleaning
brush. Use solvent-free cleaning products.
Washing vehicles with matte finish paint by
hand
To reduce the risk of damaging the paint when
washing, first remove dust and large particles
from your vehicle. Insects, grease spots, and fin-
gerprints are best removed with a special cleaner
for matte finish paint.
Apply the product using a microfiber cloth. To re-
duce the risk of damaging the paint surface, do
not use too much pressure.
Rinse the vehicle thoroughly with water. Then
clean using a neutral shampoo and a soft micro-
fiber cloth.
Rinse the vehicle thoroughly again and let it air
dry. Remove any water residue using a chamois. >
Page 345 of 400
8V2012721BK
Care and cleaning
ZA\ WARNING
—To reduce the risk of accidents, only wash
the vehicle when the ignition is off and fol-
low the instructions from the car wash oper-
ator.
—To reduce the risk of cuts, protect yourself
from sharp metal components when wash-
ing the underbody or the inside of the wheel
housings.
— After washing the vehicle, the braking effect
may be delayed due to moisture on the
brake rotors or ice in the winter. This in-
creases the risk of an accident. The brakes
must be dried with a few careful brake appli-
cations.
() Note
— If you wash the vehicle in an automatic car
wash, you must fold the exterior mirrors in
to reduce the risk of damage to the mirrors.
Power folding exterior mirrors* must only
be folded in and out using the power folding
function.
—To reduce the risk of paint damage, do not
wash the vehicle in direct sunlight.
—To reduce the risk of damage, do not wash
decorative decals* with a pressure washer.
—To reduce the risk of damage, do not wash
the power top* with a pressure washer.
—To reduce the risk of damage to the surface,
do not use insect removing sponges, kitchen
sponges, or similar items.
— When washing matte finish painted vehicle
components:
— To reduce the risk of damage to the sur-
face, do not use polishing agents or hard
wax.
— Never use protective wax. It can destroy
the matte finish effect.
— Do not place any stickers or magnetic
signs on vehicle components painted with
matte finish paint. The paint could be
damaged when the stickers or magnets
are removed.
(@) For the sake of the environment
Only wash the vehicle in facilities specially de-
signed for that purpose. This will reduce the
risk of dirty water contaminated with oil from
entering the sewer system.
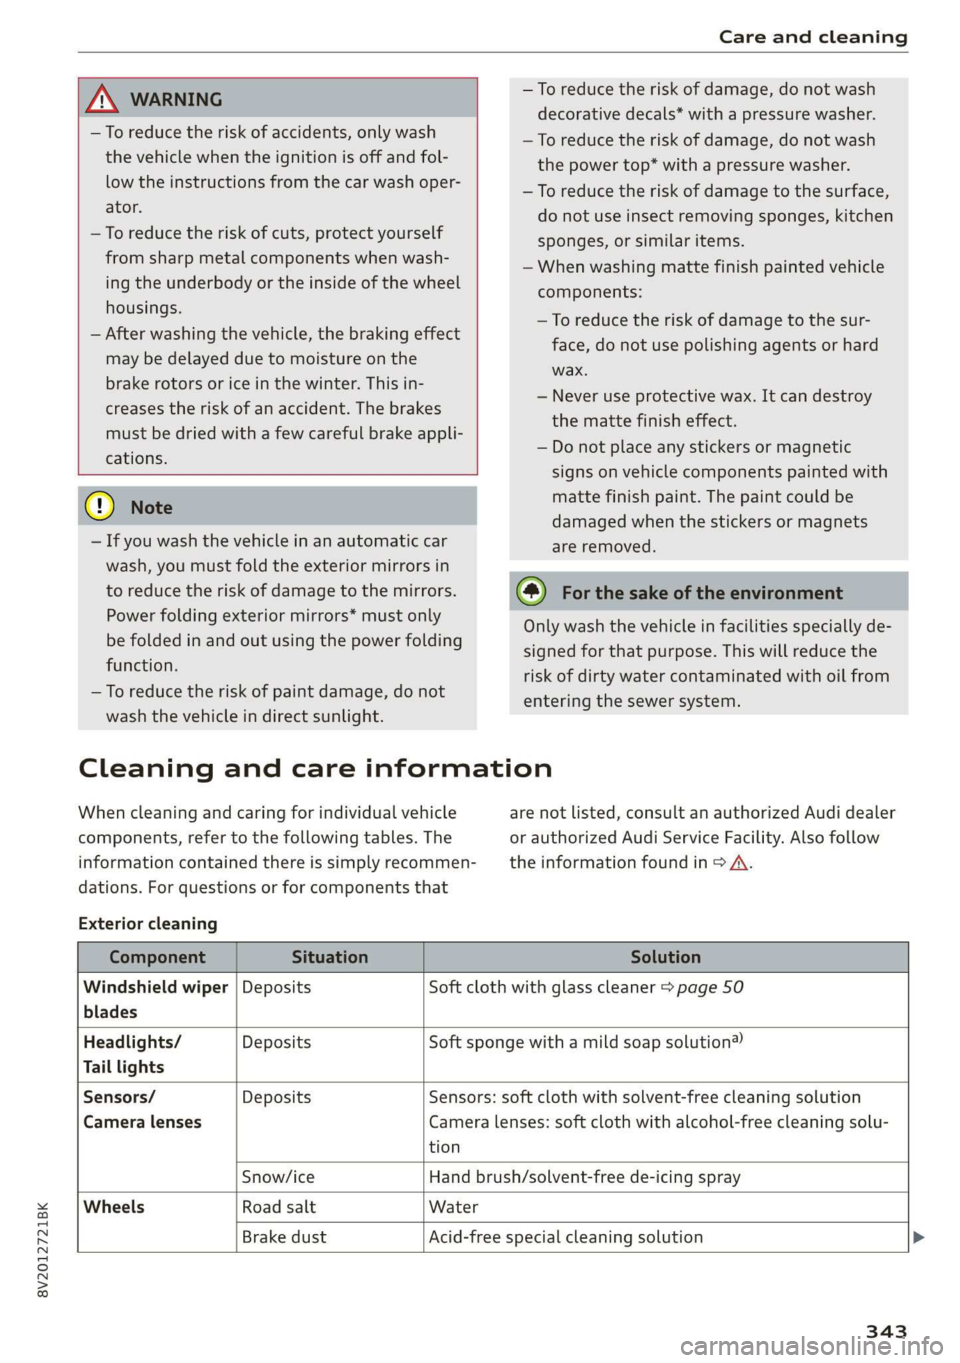
Cleaning and care information
When cleaning and caring for individual vehicle
components, refer to the following tables. The
information contained there is simply recommen-
dations. For questions or for components that
Exterior cleaning
are not listed, consult an authorized Audi dealer
or authorized Audi Service Facility. Also follow
the information found in > A.
Component Situation Solution
Windshield wiper | Deposits Soft cloth with glass cleaner > page 50
blades
Headlights/ Deposits Soft sponge with a mild soap solution®
Tail lights
Sensors/ Deposits Sensors: soft cloth with solvent-free cleaning solution
Camera lenses Camera lenses: soft cloth with alcohol-free cleaning solu-
tion
Snow/ice Hand brush/solvent-free de-icing spray
Wheels Road salt Water
Brake dust Acid-free special cleaning solution >
343
Page 346 of 400
Care and cleaning
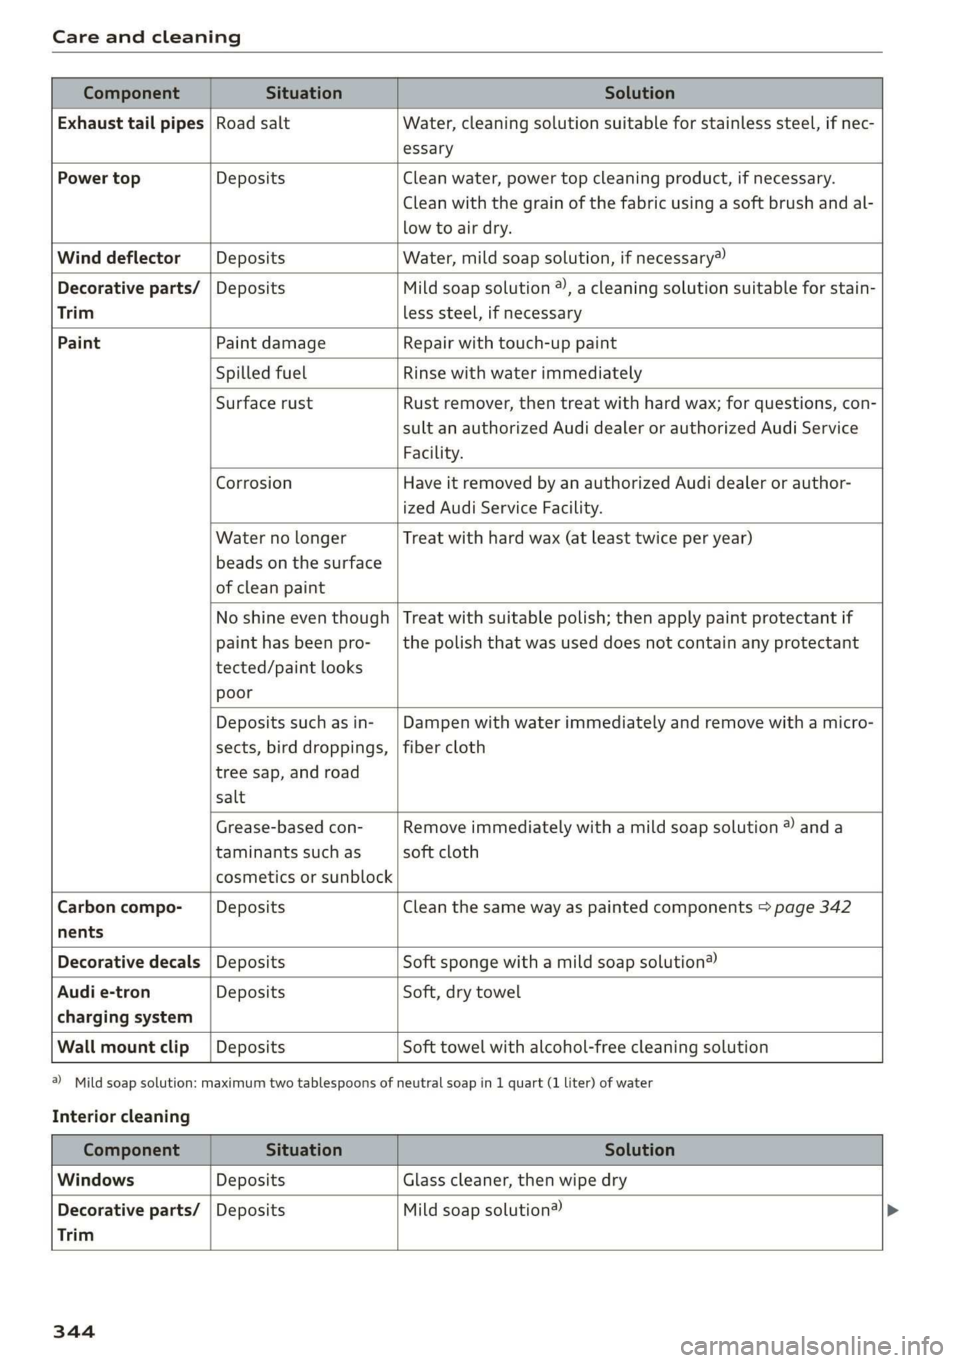
Trim
Component Situation Solution
Exhaust tail pipes | Road salt Water, cleaning solution suitable for stainless steel, if nec-
essary
Power top Deposits Clean water, power top cleaning product, if necessary.
Clean with the grain of the fabric using a soft brush and al-
low to air dry.
Wind deflector Deposits Water, mild soap solution, if necessary®
Decorative parts/ | Deposits Mild soap solution @), a cleaning solution suitable for stain-
less steel, if necessary
Paint Paint damage Repair with touch-up paint
Spilled fuel Rinse with water immediately
Surface rust Rust remover, then treat with hard wax; for questions, con-
sult an authorized Audi dealer or authorized Audi Service
Facility.
Corrosion Have it removed by an authorized Audi dealer or author-
ized Audi Service Facility.
Water no longer
beads on the surface
of clean paint Treat
with hard wax (at least twice per year)
No shine even though
paint has been pro-
tected/paint looks
poor
Treat with suitable polish; then apply paint protectant if
the polish that was used does not contain any protectant
Deposits such as in-
sects, bird droppings,
tree sap, and road
salt
Dampen with water immediately and remove with a micro-
fiber cloth
Grease-based con-
taminants such as
cosmetics or sunblock
Remove immediately with a mild soap solution ® and a
soft cloth
Carbon compo- Deposits Clean the same way as painted components > page 342
nents
Decorative decals | Deposits Soft sponge with a mild soap solution®
Audi e-tron Deposits Soft, dry towel
charging system
Wall mount clip | Deposits Soft towel with alcohol-free cleaning solution
a) Mild soap solution: maximum two tablespoons of neutral soap in 1 quart (1 liter) of water
Interior cleaning
Component Situation Solution
Windows Deposits Glass cleaner, then wipe dry
Decorative parts/ | Deposits Mild soap solution®)
Trim
344
Page 347 of 400
8V2012721BK
Care and cleaning
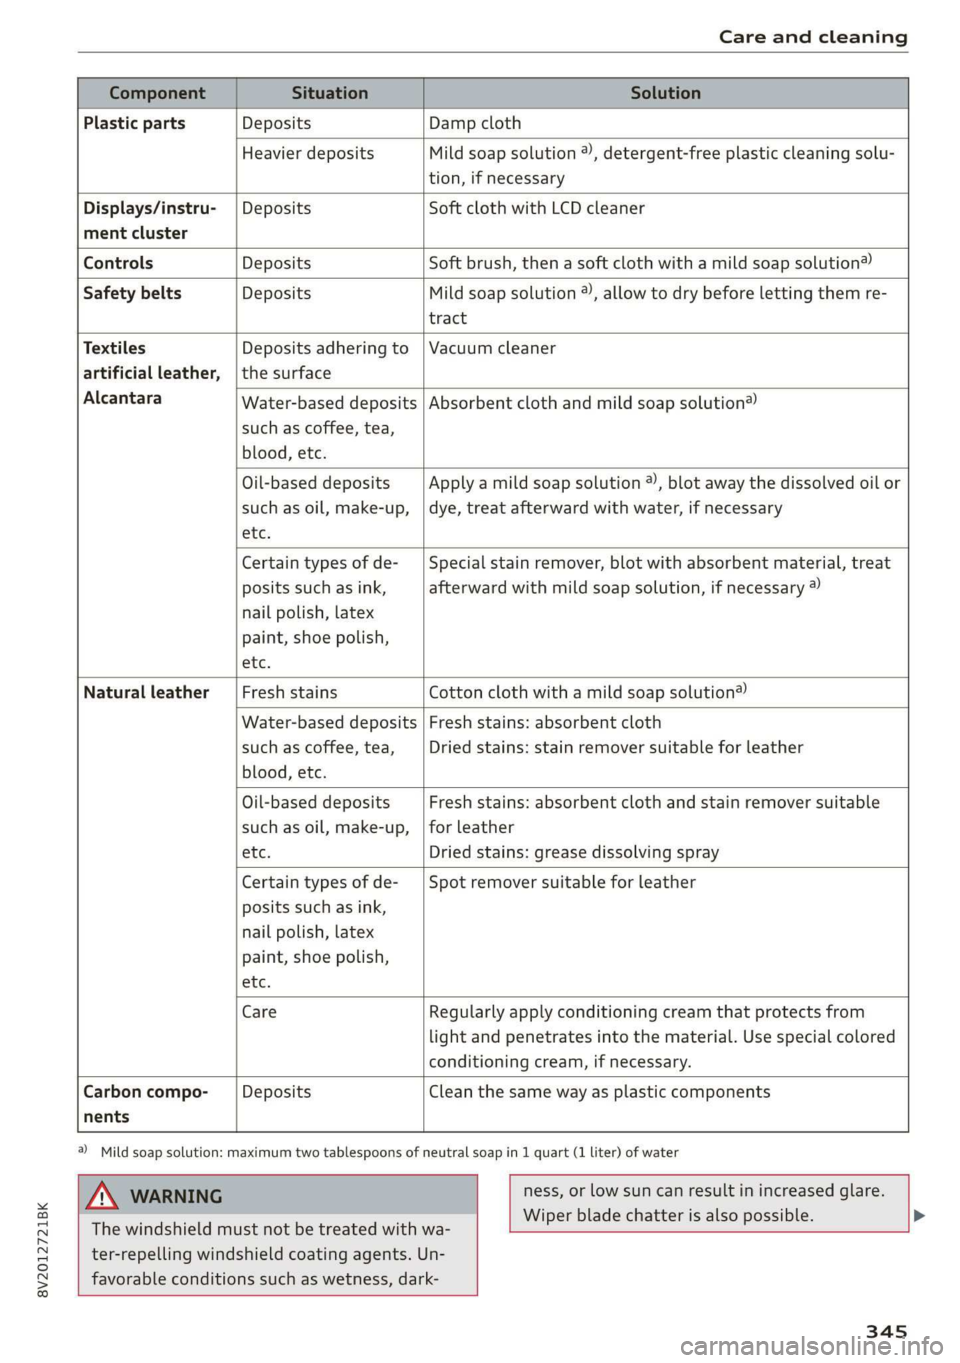
Component Situation Solution
Plastic parts Deposits Damp cloth
Heavier deposits Mild soap solution 2), detergent-free plastic cleaning solu-
tion, if necessary
Water-based deposits
such as coffee, tea,
blood, etc.
Displays/instru- | Deposits Soft cloth with LCD cleaner
ment cluster
Controls Deposits Soft brush, then a soft cloth with a mild soap solution®)
Safety belts Deposits Mild soap solution ®), allow to dry before letting them re-
tract
Textiles Deposits adhering to | Vacuum cleaner
artificial leather, |the surface
Alcantara Absorbent cloth and mild soap solution®
Oil-based deposits
such as oil, make-up,
etc.
Apply a mild soap solution ®), blot away the dissolved oil or
dye, treat afterward with water, if necessary
Certain types of de-
posits such as ink,
nail polish, latex
paint, shoe polish,
etc.
Special stain remover, blot with absorbent material, treat
afterward with mild soap solution, if necessary ®
Natural leather Fresh stains Cotton cloth with a mild soap solution®
Water-based deposits
such as coffee, tea,
blood, etc.
Fresh stains: absorbent cloth
Dried stains: stain remover suitable for leather
Oil-based deposits
such as oil, make-up,
etc.
Fresh stains: absorbent cloth and stain remover suitable
for leather
Dried stains: grease dissolving spray
Certain types of de-
posits such as ink,
nail polish, latex
paint, shoe polish,
etc.
Spot remover suitable for leather
nents
Care Regularly apply conditioning cream that protects from
light and penetrates into the material. Use special colored
conditioning cream, if necessary.
Carbon compo- Deposits Clean the same way as plastic components
a) Mild soap solution: maximum two tablespoons of neutral soap in 1 quart (1 liter) of water
ZA WARNING
The windshield must not be treated with wa-
ter-repelling windshield coating agents. Un-
favorable conditions such as wetness, dark-
ness, or low sun can result in increased glare.
Wiper blade chatter is also possible.
345
Page 348 of 400
Care and cleaning
ZA WARNING
— Never immerse the Audi e-tron charging sys-
tem and connectors in water.
— The Audi e-tron charging system must only
be cleaned when the control unit is com-
pletely disconnected from the power supply
and from the vehicle.
@) Note
— Headlights and tail lights
— Never clean headlights or tail lights with a
dry cloth or sponge.
— Do not use any cleaning products that con-
tain alcohol, because they could cause
cracks to form.
— Wheels
— Never use any paint polish or other abra-
sive materials.
— Damage to the protective layer on the
rims, such as stone chips or scratches,
must be repaired immediately.
— Camera lenses
— Never use warm or hot water to remove
snow or ice from the camera lens. This
could cause the lens to crack.
— Never use abrasive cleaning materials or
alcohol to clean the camera lens. This
could cause scratches and cracks.
— Power top
— Remove bird droppings immediately.
— Never use gasoline, spot remover, ben-
zene, paint thinner or other solvents to re-
move.
— Door windows
— Remove snow and ice on windows and ex-
terior mirrors with a plastic scraper. To re-
duce the risk of scratches, move the scra-
per only in one direction and not back and
forth.
— Never remove snow or ice from door win-
dows and mirrors using warm or hot water
because this could cause cracks to form.
—To reduce the risk of damage to the rear
window defogger, do not apply any stick-
ers on the heating wires on the inside of
the window.
346
— Decorative parts and trim
— Never use chrome care or cleaning prod-
ucts.
— Paint
— To reduce the risk of scratches, the vehicle
must be free of dirt and dust before pol-
ishing or waxing.
—To prevent paint damage, do not polish or
wax the vehicle in direct sunlight.
—To reduce the risk of paint damage, do not
polish away rust spots.
— Remove cosmetics and sunscreen immedi-
ately because they could damage the
paint.
— Decorative decals
—To reduce the risk of damage, do not use
any rough powder or abrasive cleaning
products.
—To reduce the risk of damage, do not pol-
ish decorative decals that have a matte or
printed finish.
— Due to the risk of damage, do not use an
ice scraper to remove snow and ice on win-
dows with decorative decals on them.
— Displays and instrument cluster
— The displays/instrument cluster and the
trim surrounding them must not be
cleaned with dry cleaning methods be-
cause they could be scratched.
— Make sure that the instrument cluster is
switched off and has cooled off before
cleaning it.
— Make sure no fluids enter the spaces be-
tween the instrument cluster and the
trim, because that could cause damage.
— Controls
— Make sure that no fluids enter the con-
trols, because this could cause damage.
— Safety belts
— Do not remove the safety belts to clean
them.
— Never clean safety belts or their compo-
nents with chemicals or with corrosive flu-
ids or solvents and never allow sharp ob-
jects to come into contact with the safety
belts. This could cause damage to the belt
webbing.
Page 349 of 400
8V2012721BK
Care and cleaning
—If there is damage to the webbing, the
connections, the retractors, or the buck-
les, have them replaced by an authorized
Audi dealer or authorized Audi Service Fa-
cility.
— Textiles, artificial leather, and Alcantara
— Never treat artificial leather or Alcantara
with leather care products, solvents, floor
polish, shoe polish, spot remover, or simi-
lar products.
— Have a cleaning specialist remove stub-
born stains to reduce the risk of damage.
— Never use steam cleaners, brushes, hard
sponges, etc. when cleaning.
— Do not turn on the seat heating* to dry
the seat.
— Objects with sharp edges, such as zippers
or rivets on clothing or belts, can cause
damage to the surface.
— Open hook and loop fasteners, for exam-
ple on clothing, can damage seat covers.
Make sure hook and loop fasteners are
closed.
— Natural leather
— Never treat leather with solvents, floor
polish, shoe polish, spot remover or simi-
lar products.
— Objects with sharp edges, such as zippers
or rivets on clothing or belts, can cause
damage to the surface.
— Never use steam cleaners, brushes, hard
sponges, etc. when cleaning.
— Do not turn on the seat heating* to dry
the seat.
—To help prevent the leather from fading,
do not leave the vehicle in direct sunlight
for long periods of time. If leaving the ve-
hicle parked for long periods of time, you
should cover the leather to protect it from
direct sunlight.
— Wall mount clip
— Do not us any abrasive cleaning products
or any that contain alcohol, because these
increase the risk of discoloration.
@) Tips
— Insects are easier to remove from paint that
has been freshly waxed.
— Regular waxing can prevent rust spots from
forming.
— Decorative decals can age due to environ-
mental conditions, which can result in dam-
age such as brittleness. The color may fade
if exposed to excessive sunlight.
Taking your vehicle out
of service
If you would like to take your vehicle out of serv-
ice for a long period of time, contact an author-
ized Audi dealer or authorized Audi Service Facili-
ty. They will advise you of important measures,
such as corrosion protection, service, and storage
procedures. Also follow the information about
the vehicle battery > page 315.
347
Page 350 of 400

Emergency assistance
sistance Equipment
Trunk escape latch
Applies to: vehicles with trunk escape latch (Sedan and Cab-
riolet)
In case of an emergency, the rear lid can be
opened from the inside using the trunk escape
latch.
2 3 S
ne = & yo
B8V-0379
Fig. 262 Luggage compartment: vehicle tool kit, tire mobi-
lity kit and vehicle jack* placement
Fig. 261 Luggage compartment: Trunk escape latch
B8V-0609
> Push the latch in the direction of the arrow un-
til the lock releases.
The trunk escape latch inside the rear lid is made
of fluorescent material to glow in the dark.
Z\ WARNING
The trunk escape latch is to be used only in an
emergency.
General information
> Park the vehicle as far as possible from moving
traffic in the event of a breakdown. In the event
of a flat tire, park the vehicle on a level surface.
If you are ona steep hill, be especially careful.
» Set the parking brake. Fig. 263 Luggage compartment: cargo floor folded up
> Place the selector lever in the “P” position. (versions 1 and 2)
> Switch the emergency flashers on.
> Have the passengers exit the vehicle. They
should move to a safe place, for example be-
hind a guard rail.
Vehicle tool kit, cargo floor cover and side
panel
Applies to: vehicles with version 1
_ The vehicle tool kit, tire mobility kit* and the
A WARNING compressor® are located in the luggage compart-
ment, separated in the side panels @)
) > fig. 262.
Pay attention to the steps above. They are for
your protection and the for the safety of other
drivers. > To open the side panel, turn the lock and re-
move the cover @)* / (
der the cargo floor cover (
348