wheel alignment AUDI A3 2020 Owner´s Manual
[x] Cancel search | Manufacturer: AUDI, Model Year: 2020, Model line: A3, Model: AUDI A3 2020Pages: 400, PDF Size: 107.47 MB
Page 330 of 400

Wheels
—Do not use run-flat tires on
your vehicle. Using them when
not permitted can lead to ve-
hicle damage or accidents.
—If you install wheel covers on
the vehicle, make sure they al-
low enough air circulation to
cool the brake system. If they
do not, this could increase the
risk of an accident.
Tire wear and damage
B4H-0415
Fig. 258 Tire profile: treadwear indica-
tor
Tire wear
Check the tires regularly for wear.
—Inflation pressure that is too low
or high can increase tire wear
considerably.
—Driving quickly through curves,
rapid acceleration, and heavy
braking increase tire wear.
) Obey any applicable regulations in the
country where the vehicle is being oper-
ated.
328
—Have an authorized Audi dealer
or authorized Audi Service Facili-
ty check the wheel alignment if
there is unusual wear.
—Have the wheels rebalanced if an
imbalance is causing noticeable
vibration in the steering wheel.
If you do not, the tires and other
vehicle components could wear
more
quickly.
Treadwear indicator
Original equipment tires contain
treadwear indicators in the tread
pattern, which are bars that are
1/16 in (1.6 mm) high and are
spaced evenly around the tire per-
pendicular to the running direc-
tion > fig. 258. The letters “TWI”
or triangles on the tire sidewall
indicate the location of the tread-
wear indicators.
The tires have reached the mini-
mum tread depth )) when they
have worn down to the treadwear
indicators. Replace the tires with
new ones > A.
Page 357 of 400

8V2012721BK
Emergency assistance
» Wind the jack up further until the flat tire — Do not raise the vehicle until you are sure
comes off the ground > A\. the jack is securely engaged.
— Passengers must not remain in the vehicle
when it is jacked up.
— Make sure that passengers wait in a safe
place away from the vehicle and well away
from the road and traffic.
Position the vehicle jack only under the designat-
ed lifting points on the sill > fig. 271. There is ex-
actly one location for each wheel. The jack must
not be positioned at any other location > AS ©.
An unstable surface under the jack can cause the — Make sure jack position is correct, adjust
vehicle to slip off the jack. Always provide a firm as necessary and then continue to raise
base for the jack on the ground. If necessary the jack.
place a sturdy board or similar support under the
jack. On hard, slippery surfaces (such as tiles) @) Note
use a rubber mat or similar to prevent the jack
from slipping owl, Do not Lift the vehicle by the sill. Position the
vehicle jack only at the designated lifting
A WARNING points on the sill. Otherwise, your vehicle will
be damaged.
— You or your passengers could be injured
while changing a wheel if you do not follow
Peon es imteen ene: Taking the wheel off/installing the spare
— Position the vehicle jack only at the desig- Follow these instructions step-by-step for chang-
nated lifting points and align the jack. ing the wheel.
Otherwise, the vehicle jack could slip and
cause an injury if it does not have suffi-
cient hold on the vehicle.
— A soft or unstable surface under the jack
may cause the vehicle to slip off the jack.
Always provide a firm base for the jack on
the ground. If necessary, use a sturdy
board under the jack.
— On hard, slippery surface (such as tiles)
use a rubber mat or similar to prevent the
jack from slipping.
— Only raise your vehicle with the vehicle
jack provided by the factory. If you use a
vehicle jack for another vehicle, your vehi-
cle can slide and cause injury.
— Changes in load can affect the height of
the vehicle.
— Never start the engine when the vehicle is
raised, which could cause an accident.
— Support the vehicle securely with appro-
priate stands if work is to be performed
underneath the vehicle; otherwise, there is
a potential risk for injury.
—To help prevent injury to yourself and your
passengers:
2 R + 4
0 a
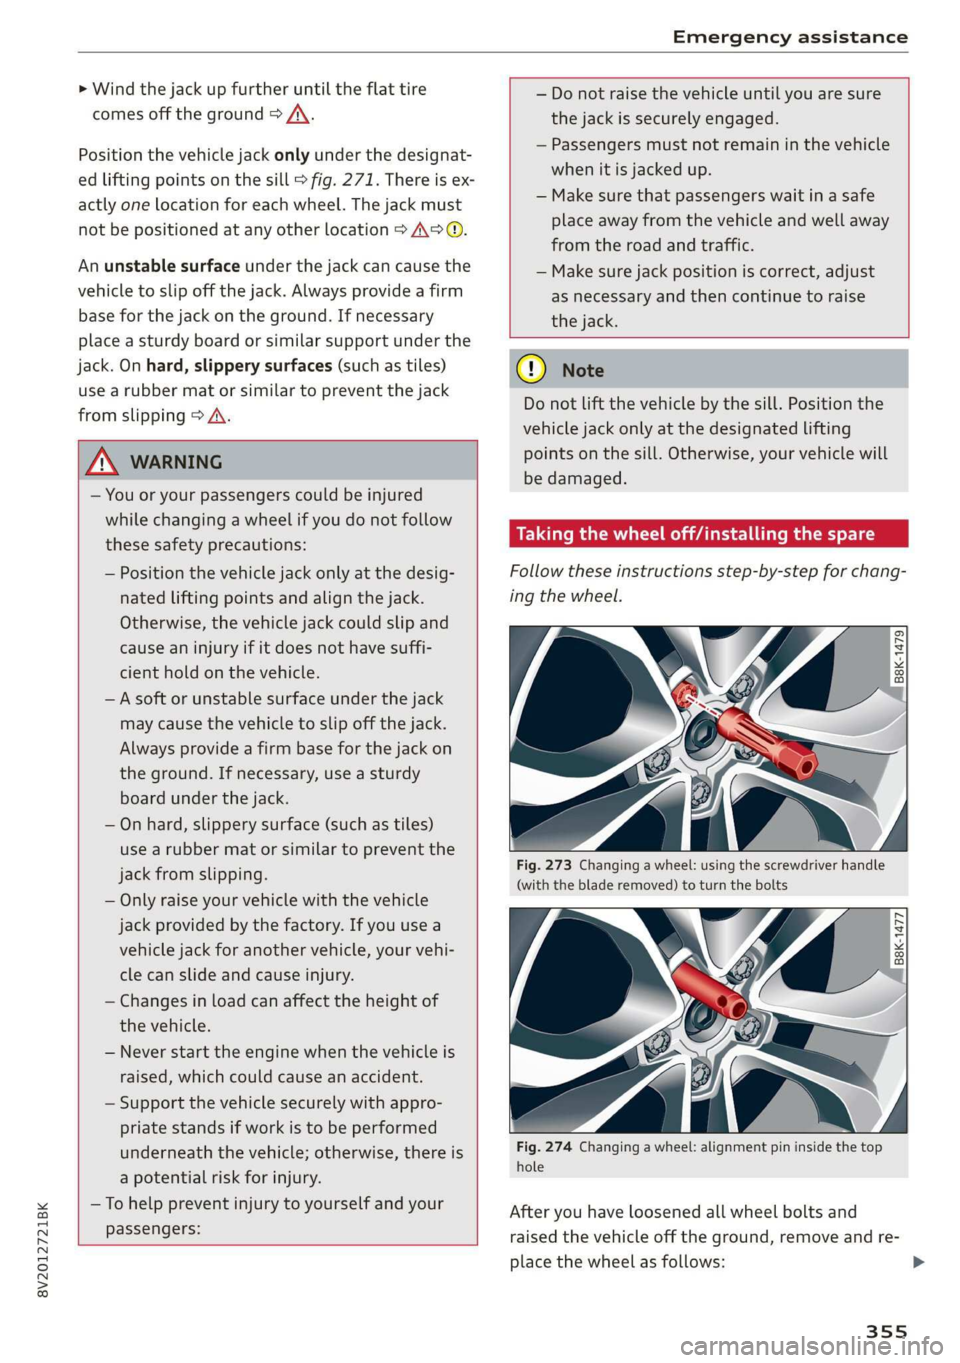
Fig. 273 Changing a wheel: using the screwdriver handle
(with the blade removed) to turn the bolts
6 &
Tt
“ oO oO
~
Fig. 274 Changing a wheel: alignment pin inside the top
hole
After you have loosened all wheel bolts and
raised the vehicle off the ground, remove and re-
place the wheel as follows:
355
Page 358 of 400

Emergency assistance
Removing the wheel
>» Use the hexagonal socket in the screwdriver
handle to completely remove the topmost
wheel bolt and set it aside on a clean surface
> fig. 273.
> Screw the threaded end of the alignment pin
from the tool kit hand-tight into the empty bolt
hole > fig. 274.
> Then remove the other wheel bolts as described
above.
> Take off the wheel leaving the alignment pin in
the bolt hole >@).
Putting on the compact spare wheel
> Lift the spare wheel and carefully slide it over
the alignment pin to guide it in place >@.
> Use the hexagonal socket in the screwdriver
handle to screw in and tighten all wheel bolts
slightly.
> Remove the alignment pin and insert and tight-
en the remaining wheel bolt slightly like the
rest.
> Turn the jack handle counter-clockwise to lower
the vehicle until the jack* is fully released.
> Use the wheel bolt wrench to tighten all wheel
bolts firmly > page 353. Tighten them cross-
wise, from one bolt to the (approximately) op-
posite one, to keep the wheel centered.
@) Note
When removing or installing the wheel, the
rim
could hit the brake rotor and damage the
rotor. Work carefully and have a second per-
son help you.
G) Tips
Never use the hexagonal socket in the handle
of the screwdriver to loosen or tighten the
wheel bolts.
— Pull the reversible blade from the screwdriv:
er before you use the hexagonal socket in
the handle to turn the wheel bolts.
— When mounting tires with unidirectional
tread design make sure the tread pattern is
pointed the right way > page 356.
— The wheel bolts should be clean and easy to
turn. Check for dirt and corrosion on the
356
mating surfaces of both the wheel and the
hub. Remove all dirt from these surfaces be-
fore remounting the wheel.
Tires with unidirectional tread design
Tires with unidirectional tread design must be
mounted with their tread pattern pointed in the
right direction.
Using a spare tire with a tread pattern
intended for use in a specific direction
When using a spare tire with a tread pattern in-
tended for use in a specific direction, please note
the following:
— The direction of rotation is marked by an arrow
on the side of the tire.
— If the spare tire has to be installed in the incor-
rect direction, use the spare tire only tempora-
rily since the tire will not be able to achieve its
optimum performance characteristics with re-
gard to aquaplaning, noise and wear.
— We recommend that you pay particular atten-
tion to this fact during wet weather and that
you
adjust your speed to match road condi-
tions.
— Replace the flat tire with a new one and have it
installed on your vehicle as soon as possible to
restore the handling advantages of a unidirec-
tional tire.
Notes on wheel changing
Please read the information > page 326 if you
are going to use a spare tire which is different
from the tires on your vehicle.
After you change a tire:
— Check the tire pressure on the spare immedi-
ately after installation.
— Have the wheel bolt tightening torque
checked with a torque wrench as soon as pos-
sible by your authorized Audi dealer ora
qualified service station.
— With steel and alloy wheel rims, the wheel
bolts are correctly tightened at a torque of
90 ft lbs (120 Nm).
Page 383 of 400

8V2012721BK
Numbers and
Symbols
2-zone deluxe automatic climate control.... 66
A
BIG 6 evens a: acavivi oo sano i aaness oan 8 oe 66
A/C cooling Mode: «6 vive seein 6s wiewe ss ven 66
Accélerator pedals sii « 2 casos x o ware a & ewes 76
also refer to Accelerator pedal........... 76
ACGOSSONIES « ssezens on cesses © weame a» oremwes o 59,376
Active lane assist
refer to Audi active lane assist.......... 128
Active rollover protection system......... 242
Retracting rollover protection.......... 243
Adaptive cruise control
refer to Audi adaptive cruise control..... 118
Adaptive dampers........... 000 eee eae 92
Adjusting the additional display........... 19
Adjusting the air distribution............. 67
Adjusting the sound.................00- 234
Adjusting the temperature..............- 66
Adjusting the vents...............-0000- 68
Ait DaGjrce « 2 roses © & eoccses 2s vasene 8m meee 2 wee 253
Airbag system. ...........2.-0000- 253,273
Advanced Airbag System components.... 260
Care ee ee 268
ChILAIE iss + ¢ exes + © eaws s © ees + © ees 280
Childirestraints:: « csssccns a o ssowias o awaene © ws 280
Components (front airbags)............ 260
Danger of fitting a child seat on the front
PASSENGEN SCA cen. os wwe sv wrwew we eRe & e 254
Disposal... ... 2. cece eee 268
Front ‘airbags: = sess» » ene : een ey eee < 258
How do the front airbags work?......... 263
How many airbags does my vehicle have? . 260
How the Advanced Airbag System compo-
nents work together.............0000- 262
Important safety instructions on the knee
airbagisystem « « cscs ss ecies se eee bs eee 271
Kneeairbagsixs « 2 sco es sews ewan 2 ¥ wes 269
Monitoring.......... 0. cece e eee 265
PASSENGER AIR BAG OFF light.......... 265
REPA@INS:: = wssus 2 waune s § nous 5 2 ER 3 a 268
Safety instructions.............-..00- 267
Side airbags ............. 0. cece ee eee 271
Warning/Indicator lights.............. 265
When must the system be inspected?.... 265
Air pressure
Tire Pressure Monitoring System indicator . 337
Airtransport.... 2.0... eee eee eee eee 97
Alarm system
refer to Anti-theft alarm system.......... 30
Alignment pin (tire change).............-. 348
Allseason tires... 0.0.2.0... cece eee eee 335
All weather lights... . 0.0.0... c cece ee eee 43
All wheel drive
refer to quattro...............--0 eee ee 93
AMI
refer to Audi music interface........... 217
Android Auto
refer to Audi smartphone interface...... 228
Anti-freeze
Windshield washer system............. 317
Anti-lock braking system. .............0-. 93
Anti-Slip Regulation. ...............00005 93
Anti-theft alarm system .............0000- 30
Apple CarPlay
refer to Audi smartphone interface...... 228
ASR
refer to Anti-Slip Regulation............. 93
Audi active lane assist................04 128
Cleaning the camera area.............. 343
MESSAGES were 5 o sees & & EER § Oo Howes 5 eee 130
Audi adaptive cruise control............. 118
Cleaning the:senson « suis ss saw a 8 wens ss 343
Distance display, distance warning....... 124
M@SSAQES cerns & 2 sews 5 o SoG Fo ew E Bo ee 124
Audi adaptive light.................00008 43
Audi connect
(fer tO CONNECEs « x ees + x ewe + RoR BE 182
Audi connect Infotainment
Services overview... 0.0.6.0 6 cece ee ee 184
Audi connect Remote & Control
refer to Vehicle control services......... 185
Audidriveselect:.:. 2. isco es mune ee eens ev oe 91
Audi e-tron compact charging system.... . 105
Audi music interface................--- 217
Audi music stream
Weferito WIE bs + secs so womwne 3 ¥ eewves 187,214
AUGIO TICS ccs 2 same yo sanwes a o arene «eR 219
381