check engine AUDI A3 2020 Owner´s Manual
[x] Cancel search | Manufacturer: AUDI, Model Year: 2020, Model line: A3, Model: AUDI A3 2020Pages: 400, PDF Size: 107.47 MB
Page 6 of 400
Table of contents
Audi smartphone interface...... 228
Setup... eee eee ee eee 228
OPeratintg’s + ease s x mows « woeE se ow ee 229
Troubleshooting wwii «s wwine ev eee ae eae 229
System settings.................. 230
Setting the date andtime............. 230
MMI SOMOS: » sunses 0 » anexeiae o anseane » 0 exons 230
Connection manager................. 231
System update isis ss wows x ¢ seows a eaves 234
Sound settingS............0 ee eee eee 234
Volume settings ..............000000. 234
Restarting the MMI.................. 235
Software license information.......... 235
237 237 237
Correct passenger seating positions..... 238
Driver's and front passenger's footwell.. 241
Pedal area.......... eee eee eee eee 241
Active rollover protection system....... 242
Safety belts...................0.. 245
General notes.................00005. 245
Why use safety belts?................ 246
Safety belts. ............... 00000005 248
Belt tensioners... 0.02... cece eee eee 252
Airbag system.................00. 253
Important information............... 253
Front:airbags’: = seis s = canes + = esis + oer 257
Monitoring the Advanced Airbag System. 265
Knee airbags...............-0 ee eee 269
Side@:airbags x: < sews se eewes te eee ee oe 271
Sidercurtain airbags « swe ss wei sv woes 274
GAUGES AATEC iss 5 « nee a 5 Baa GE EE Be 278
Important information............... 278
Child safety seats................000. 284
Securing child safety seats............ 289
LATCH system (lower anchorages and
tethers forichildren) sic. o = essere x 3 awmin « 5 aoe 292
Additional information............... 297
Maintenance and Care........... 298
Checking and Filling............. 298
FUGlaves: «2 wows s 2 seems © a meee 4 S oweme a 2 a 298
Reftieling crass « sccswes e neness xe aeiceme x acer 299
Refueling ......... 0... cee ee eee eee 302
Emissions control system............. 303
Engine compartment...........0.500% 304
Engineoil........ 0... eee eee eee 307
Cooling SYSteM . <= sees ic sees be tees we 311
Brake Pluidhise «2 ascii 2 2 soos 2 x comes © x sree 313
Electrical system. ...........002-000 314
Battenysa « 5 news so ASS & ROS TE BaF 315
Windshield washer system............ 317
Service interval display............... 318
Whe6US: « ses ss sess os ees ss eee 2 a 319
Wheelsiand Tiresis « scsinin + « sore © a eneron » 319
Tire Pressure Monitoring System indicator . 337
Tire pressure monitoring system....... 339
Care and cleaning................ 342
General information................. 342
Gar washesi: « sosus so ime a 0 mana + omen 6 342
Cleaning and care information......... 343
Taking your vehicle out of service....... 347
Troubleshooting................. 348
Emergency assistance........... 348
Trunk escape latch............-.0000- 348
General
information................. 348
Equipment............. 00. cece eee 348
Tire Mobility kit’: goss « 2 sewn 2 y eweE a eos 349
Replacing wheels...........00ee eens 352
Sparetire........ 2... eee eee eee 357
Fuses and bulbs.................. 360
FUSES 2... eee ete eee 360
BULDS-
General...............0. 0000 cece 364
Starting by pushing or towing.......... 364
JUIMPESTAREIIG . « suerns 6 & sasnnes » « sanree wo samme 364
Towing with atowtruck............... 367
Raising the vehicle.................-. 369
Page 12 of 400
Quick access
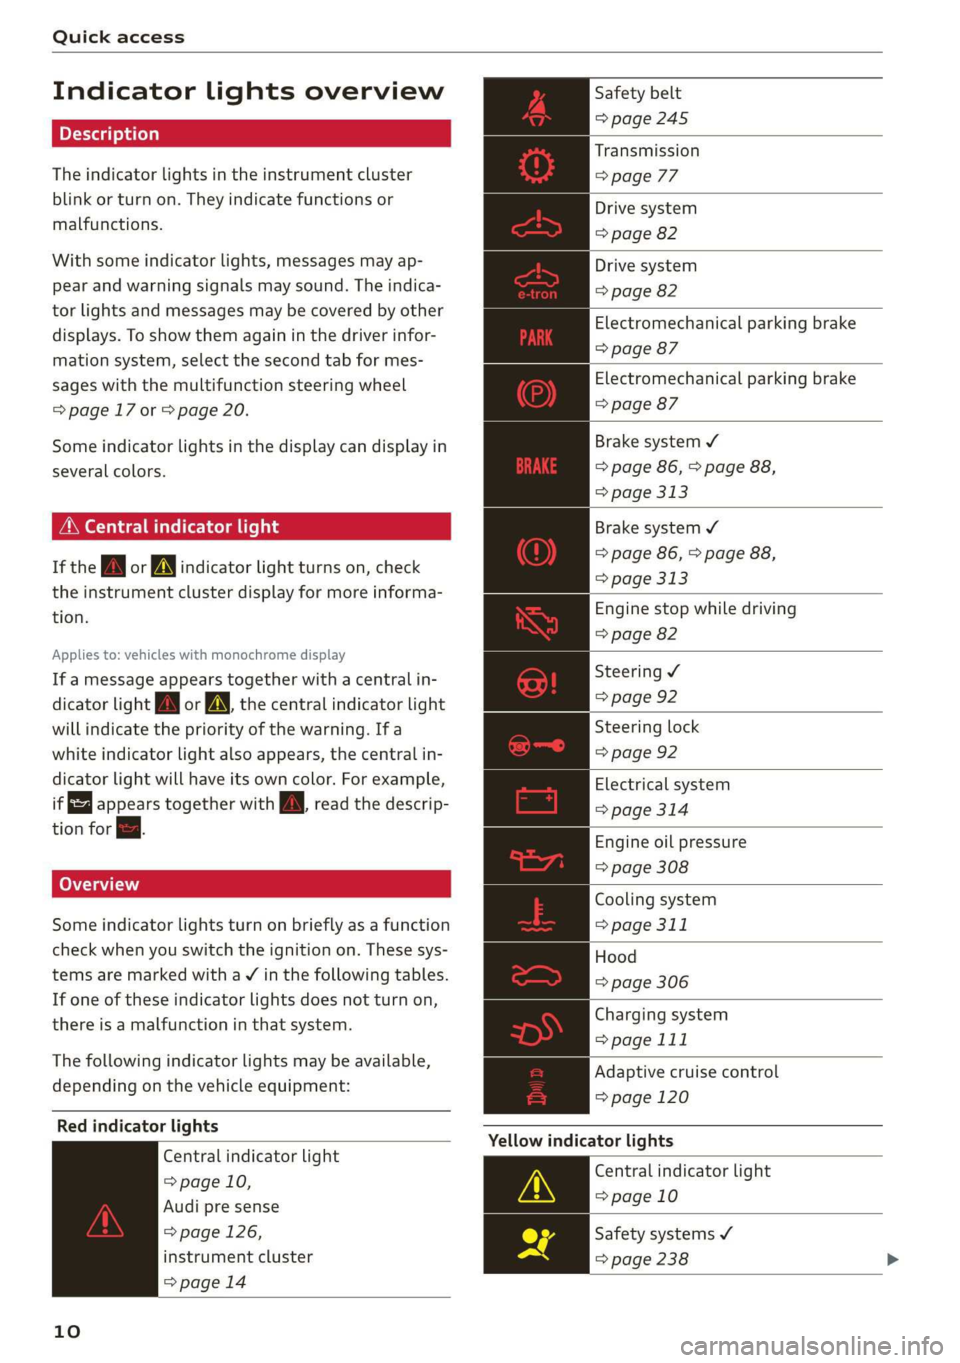
Indicator lights overview
The indicator lights in the instrument cluster
blink or turn on. They indicate functions or
malfunctions.
With some indicator lights, messages may ap-
pear and warning signals may sound. The indica-
tor lights and messages may be covered by other
displays. To show them again in the driver infor-
mation system, select the second tab for mes-
sages with the multifunction steering wheel
=> page 17 or > page 20.
Some indicator lights in the display can display in
several colors.
MMe O eel em lis
If the wa or MN indicator light turns on, check
the instrument cluster display for more informa-
tion.
Applies to: vehicles with monochrome display
If a message appears together with a central in-
dicator light A\ or A the central indicator light
will indicate the priority of the warning. Ifa
white indicator light also appears, the central in-
dicator light will have its own color. For example,
it appears together with Bw read the descrip-
tion for &.
Some indicator lights turn on briefly as a function
check when you switch the ignition on. These sys-
tems are marked with a V in the following tables.
If one of these indicator lights does not turn on,
there is a malfunction in that system.
The following indicator lights may be available,
depending on the vehicle equipment:
Red indicator lights
Central indicator light
=> page 10,
Audi pre sense
=> page 126,
instrument cluster
=> page 14
10
Safety belt
=> page 245
Transmission
> page 77
Drive system
=> page 82
Drive system
=> page 82
Electromechanical parking brake
=> page 87
Electromechanical parking brake
=> page 87
Brake system ¥
=> page 86, > page 88,
=> page 313
Brake system ¥
=> page 86, > page 88,
> page 313
Engine stop while driving
=> page 82
Steering ¥
=> page 92
Steering lock
=> page 92
Electrical system
=> page 314
Engine oil pressure
=> page 308
Cooling system
=> page 311
Hood
=> page 306
Charging system
> page 111
Adaptive cruise control
=> page 120
Yellow indicator lights
Central indicator light
=> page 10
Safety systems ¥
=> page 238
Page 27 of 400
8V2012721BK
Opening and closing
Opening and closing
Central locking
You can lock and unlock the vehicle centrally. You
have the following options:
— Remote control key > page 27
— Sensors in the front door handles* > page 28
— Lock cylinder on the driver's door > page 30,
or
— Interior central locking switch > page 29
Turn signals
The turn signals flash twice when you unlock the
vehicle and flash once when you lock the vehicle.
If they do not flash when locking, check if all
doors and lids are closed.
Automatic locking (Auto Lock)
The Auto Lock function locks all doors and the
luggage compartment lid once the speed has ex-
ceeded approximately 9 mph (15 km/h). The ve-
hicle will unlock again if the unlock function in
the central locking switch is pressed, the “P” gear
is engaged, or the ignition is switched off.
You can open the doors individually from the in-
side by pulling the door handle one time. To open
the rear doors* individually, you must pull the
door handle twice.
In the event of a crash with airbag deployment,
the doors will also automatically unlock to allow
access to the vehicle.
Selective door unlocking
The doors and luggage compartment lid will lock
when they close. You can set in the Infotainment
system whether only the driver's door or the en-
tire vehicle should be unlocked when unlocking
=> page 29.
Unintentionally locking yourself out
Only lock your vehicle when all of the doors and
the luggage compartment lid are closed and the
remote control key is not in the vehicle. This re-
duces the risk of locking yourself out accidental-
ly.
The following conditions prevent you from lock-
ing your remote control key in the vehicle:
—If the driver's door is open, the vehicle cannot
be locked by pressing the & button on the re-
mote control key or by touching the locking
sensor* on a door.
— If the convenience key* that was last used is in-
side the luggage compartment, the luggage
compartment lid will automatically open again
after closing it >©.
— If the last convenience key* that was used is de-
tected inside the vehicle, the vehicle cannot be
locked from the outside for a brief time > ©.
ZA WARNING
— If you leave the vehicle, switch the ignition
off and take the vehicle key with you. This
applies particularly when children remain in
the vehicle. Otherwise the children could
start the engine or operate electrical equip-
ment such as power windows.
— No one, especially children, should stay in
the vehicle when it is locked from the out-
side, because the windows can no longer be
opened from the inside > page 30. Locked
doors make it more difficult for emergency
workers to get into the vehicle, which puts
lives at risk.
CG) Note
Applies to: vehicles with convenience key
— If the convenience key that was last used is
detected inside the passenger compart-
ment, then the vehicle cannot be locked
from the outside using the sensor. Take the
convenience key with you and lock the vehi-
cle again. Otherwise, the vehicle will not be
protected against unauthorized access.
— If you lock the vehicle using the button on
the vehicle key with the front passenger's
or rear door* open while accidentally plac-
ing the key in the passenger compartment
and closing the door, the vehicle will not
lock. The turn signals will flash several
times to indicate this. If you do not open
25
>
Page 35 of 400
8V2012721BK
Opening and closing
Child safety lock
Applies to: vehicles with mechanical child safety locks
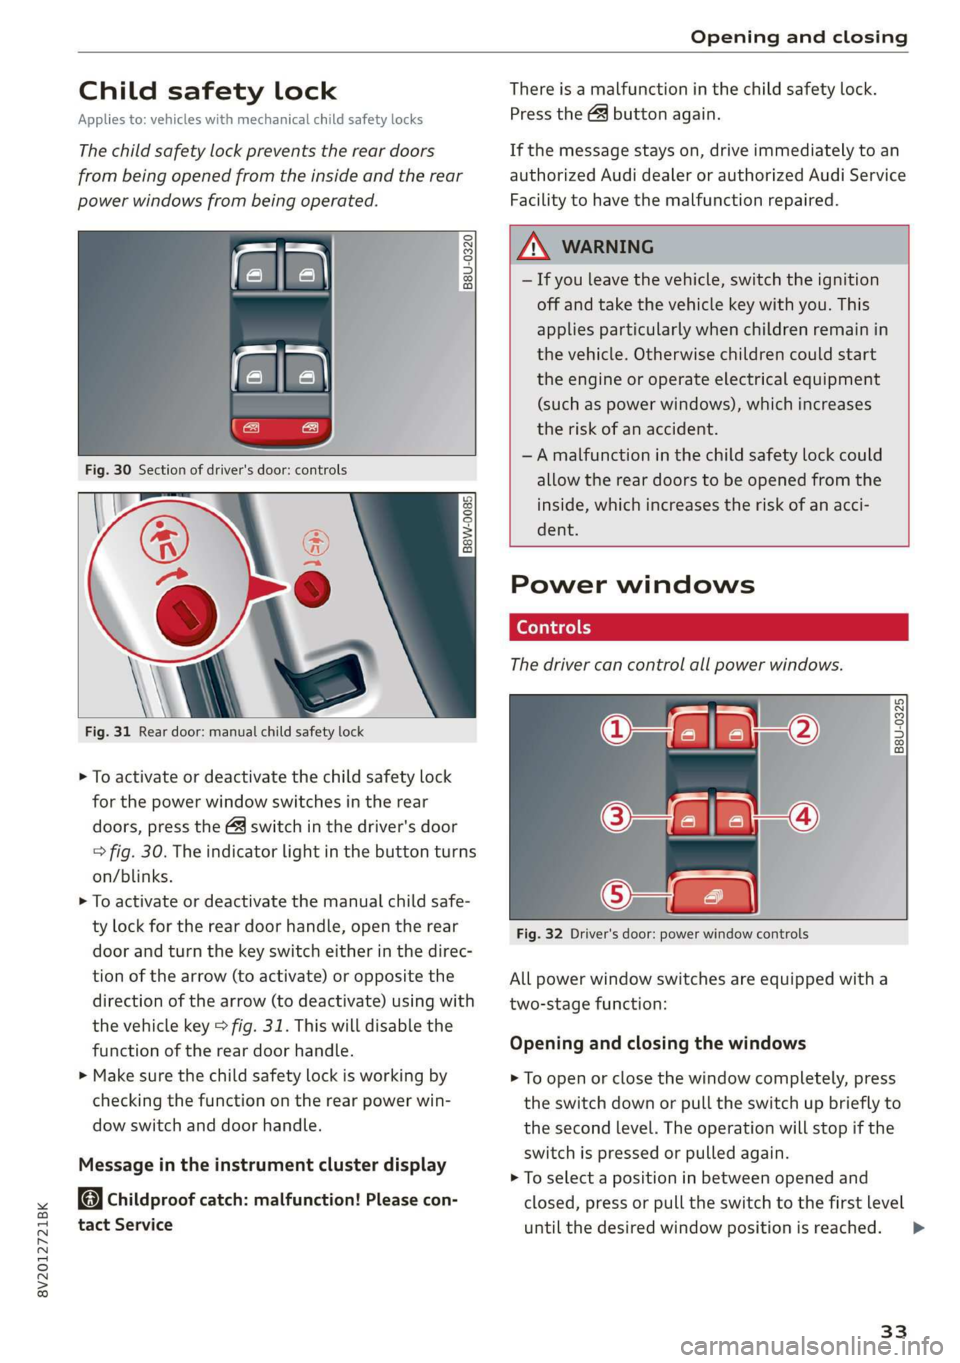
The child safety lock prevents the rear doors
from being opened from the inside and the rear
power windows from being operated.
B8U-0320
Fig. 31 Rear door: manual child safety lock
> To activate or deactivate the child safety lock
for the power window switches in the rear
doors, press the 4&3 switch in the driver's door
=> fig. 30. The indicator light in the button turns
on/blinks.
> To activate or deactivate the manual child safe-
ty lock for the rear door handle, open the rear
door and turn the key switch either in the direc-
tion of the arrow (to activate) or opposite the
direction of the arrow (to deactivate) using with
the vehicle key > fig. 31. This will disable the
function of the rear door handle.
> Make sure the child safety lock is working by
checking the function on the rear power win-
dow switch and door handle.
Message in the instrument cluster display
Childproof catch: malfunction! Please con-
tact Service
There is a malfunction in the child safety lock.
Press the GQ button again.
If the message stays on, drive immediately to an
authorized Audi dealer or authorized Audi Service
Facility to have the malfunction repaired.
, WARNING
— If you leave the vehicle, switch the ignition
off and take the vehicle key with you. This
applies particularly when children remain in
the vehicle. Otherwise children could start
the engine or operate electrical equipment
(such as power windows), which increases
the risk of an accident.
—A malfunction in the child safety lock could
allow the rear doors to be opened from the
inside, which increases the risk of an acci-
dent.
Power windows
The driver can control all power windows.
rey q 2
Z| 2
a
Fig. 32 Driver's door: power window controls
All power window switches are equipped with a
two-stage function:
Opening and closing the windows
> To open or close the window completely, press
the switch down or pull the switch up briefly to
the second level. The operation will stop if the
switch is pressed or pulled again.
> To select a position in between opened and
closed, press or pull the switch to the first level
until
the desired window position is reached.
33
>
Page 77 of 400
8V2012721BK
Driving
Gears and driving programs
RAZ-0405
HEeEes
D/S .
a
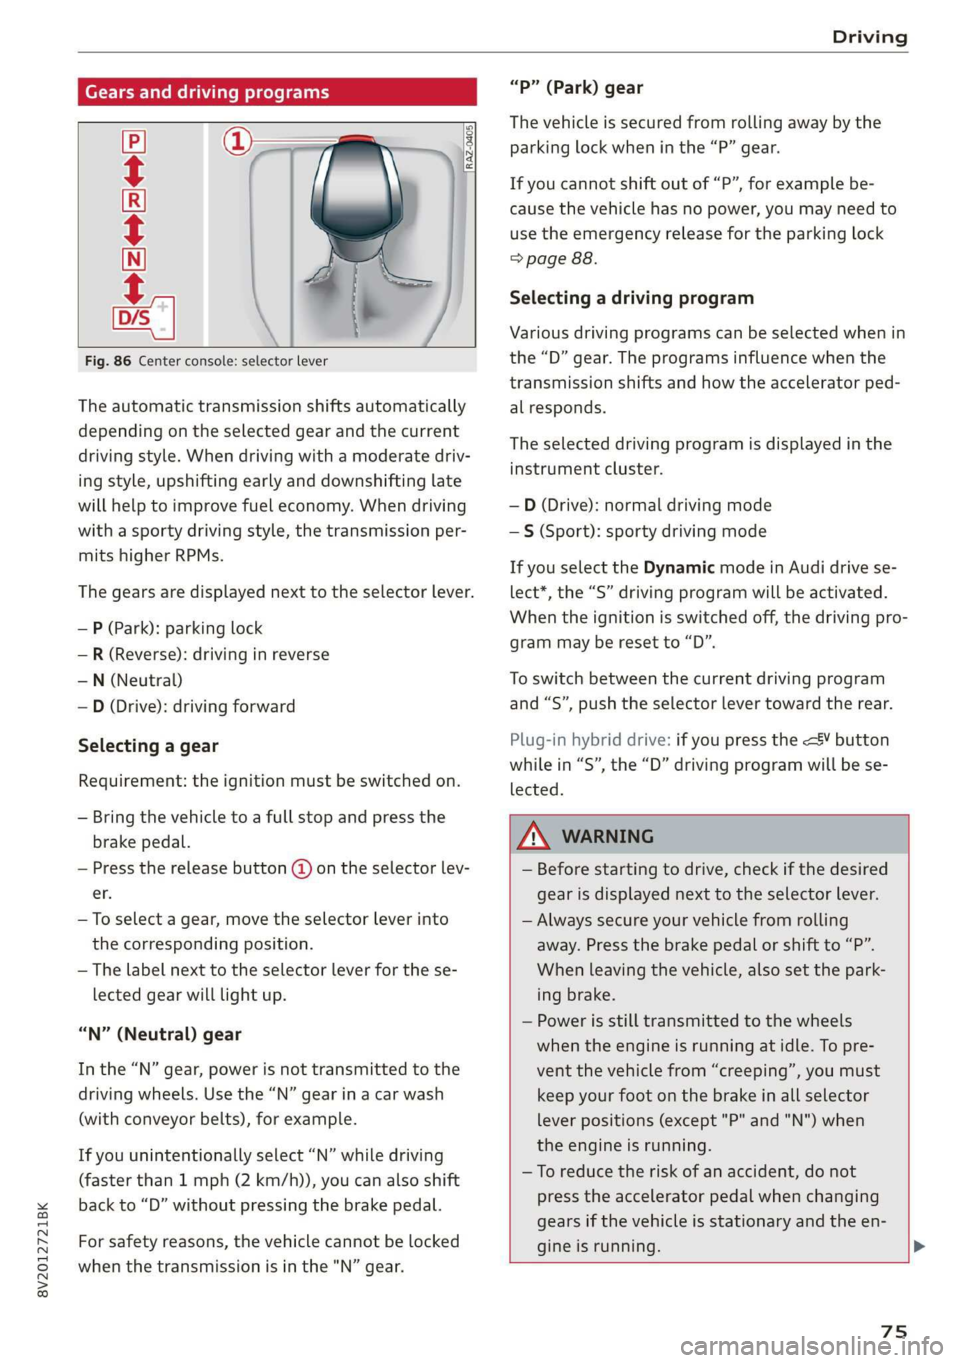
Fig. 86 Center console: selector lever
The automatic transmission shifts automatically
depending on the selected gear and the current
driving style. When driving with a moderate driv-
ing style, upshifting early and downshifting late
will help to improve fuel economy. When driving
with a sporty driving style, the transmission per-
mits higher RPMs.
The gears are displayed next to the selector lever.
— P (Park): parking lock
—R (Reverse): driving in reverse
—N (Neutral)
— D (Drive): driving forward
Selecting a gear
Requirement: the ignition must be switched on.
— Bring the vehicle to a full stop and press the
brake pedal.
— Press the release button (@) on the selector lev-
er.
—To select a gear, move the selector lever into
the corresponding position.
— The label next to the selector lever for the se-
lected gear will light up.
“N” (Neutral) gear
In the “N” gear, power is not transmitted to the
driving wheels. Use the “N” gear in a car wash
(with conveyor belts), for example.
If you unintentionally select “N” while driving
(faster than 1 mph (2 km/h)), you can also shift
back to “D” without pressing the brake pedal.
For safety reasons, the vehicle cannot be locked
when the transmission is in the "N” gear.
“Pp” (Park) gear
The vehicle is secured from rolling away by the
parking lock when in the “P” gear.
If you cannot shift out of “P”, for example be-
cause the vehicle has no power, you may need to
use the emergency release for the parking lock
=> page 88.
Selecting a driving program
Various driving programs can be selected when in
the “D” gear. The programs influence when the
transmission shifts and how the accelerator ped-
al responds.
The selected driving program is displayed in the
instrument cluster.
—D (Drive): normal driving mode
—S (Sport): sporty driving mode
If you select the Dynamic mode in Audi drive se-
lect*, the “S” driving program will be activated.
When the ignition is switched off, the driving pro-
gram may be reset to “D”.
To switch between the current driving program
and “S”, push the selector lever toward the rear.
Plug-in hybrid drive: if you press the
lected.
Z\ WARNING
— Before starting to drive, check if the desired
gear is displayed next to the selector lever.
— Always secure your vehicle from rolling
away. Press the brake pedal or shift to “P”.
When leaving the vehicle, also set the park-
ing brake.
— Power is still transmitted to the wheels
when the engine is running at idle. To pre-
vent the vehicle from “creeping”, you must
keep your foot on the brake in all selector
lever positions (except "P" and "N") when
the engine is running.
—To reduce the risk of an accident, do not
press the accelerator pedal when changing
gears if the vehicle is stationary and the en-
gine is running.
75
Page 84 of 400
Driving
— Turn off electrical equipment that is not need-
ed, for example seat heating*.
— Anticipate upcoming traffic situations while
driving to avoid unnecessary acceleration and
braking.
— Avoid driving at high speeds.
— Avoid adding extra weight to the vehicle if pos-
sible, for example by not leaving roof racks or
bike racks installed when they are not needed.
— Make sure the tire pressure is correct.
— Have maintenance performed regularly on the
vehicle.
— Do not drive with winter tires during the summ-
er.
— Do not let the engine run while the vehicle
parked.
— Use the Start/Stop system.
— Utilize the engine braking effect.
— Avoid driving short distances when possible.
— Plug-in hybrid drive: brake early and evenly to
use the recuperation function.
@) Tips
The amount of noise produced by the vehicle
can increase significantly when driving with a
sporty style. Show respect to others around
you and the environment with the way you op-
erate your vehicle, especially at night.
Energy management
Your vehicle is equipped with an intelligent ener-
gy management system for distributing electrici-
ty. This significantly improves the starting ability
and increases the vehicle battery life.
G) Tips
— If you drive short distances frequently, the
vehicle battery may not charge enough
while driving. As a result, convenience func-
tions for electrical equipment may be tem-
porarily unavailable.
— The vehicle battery will gradually drain if
the vehicle is not driven for long periods of
time, or if electrical equipment is used
when the engine is not running. To ensure
that the vehicle can still be started, the
82
electrical equipment will be limited or
switched off.
S Engine stopped: power steering and brake
booster not possible
There is a malfunction in the engine or the fuel
supply. More force is needed to steer and brake
the moving vehicle when the engine is stopped.
If the vehicle is rolling, try to bring it to a stop off
to the side from moving traffic. See an author-
ized Audi dealer or authorized Audi Service Facili-
ty for assistance.
EB EB Drive system: malfunction! Safely stop
vehicle
There is a malfunction in the plug-in hybrid sys-
tem. The brake booster and the power steering
may stop working. Stop the vehicle immediately
at a suitable location or as soon as possible. Park
the vehicle in a safe place outdoors that is not
near buildings, roof overhangs, carports or simi-
lar structures. Switch the ignition off. Have the
problem corrected by an authorized Audi dealer
or authorized Audi Service Facility.
B i B Electric drive: overheated! Safely stop
vehicle and check coolant
The coolant level is too Low or the coolant tem-
perature is too high. Stop the vehicle in the out-
doors as soon as it is safely possible. Switch the
ignition off.
Read the important safety precautions > A in
Coolant on page 312 and check the coolant level
= page 312. If the coolant level is OK, the mal-
function may be caused by the system overheat-
ing. Let the vehicle's electric drive system cool
down for some time.
— If the message turns off after cooling down and
switching the ignition back on, you can contin-
ue driving. Contact an authorized Audi dealer or
authorized Audi Service Facility immediately to
have the malfunction corrected.
— If the indicator light stays on, contact an au-
thorized Audi dealer or authorized Audi Service
Facility.
Page 85 of 400

8V2012721BK
Driving
B / BI Drive system: malfunction! Please con-
tact Service
There is a malfunction in the drive system. Drive
slowly to an authorized Audi dealer or authorized
Audi Service Facility to have the malfunction cor-
rected.
B / BI Drive system: malfunction! Restart not
possible. Please contact Service
There is a malfunction in the plug-in hybrid sys-
tem. Do not open the hood. Drive to an author-
ized Audi dealer or authorized Audi Service Facili-
ty immediately to have the malfunction correct-
ed.
B / B Battery temperature too low. Vehicle
cannot be started. See owner's manual
The outside temperature is too low. The vehicle
can no longer start at temperatures below -18 °F
(-28 °C). Contact an authorized Audi dealer or au-
thorized Audi Service Facility.
| - POWER LIMIT| Warning! Limited performance
If the indicator light turns on and this message
appears, there may be an engine control mal-
function. The engine output is reduced. Drive to
an authorized Audi dealer or authorized Audi
Service Facility immediately to have the malfunc-
tion corrected.
Drive system: engine must be running.
Please exit EV e-tron mode
It may be necessary for the gasoline engine to
run longer for technical reasons, such as when
condensation accumulates in the engine. Driving
exclusively in electric mode is not possible in this
phase.
Other indicator lights
If the B i Ha indicator light turns on, there may
be an engine control malfunction. Drive slowly to
an authorized Audi dealer or authorized Audi
Service Facility to have the engine checked.
D In certain countries.
ZA WARNING
If the engine stops while driving, you will
need to use more force to brake the vehicle.
This increases the risk of an accident. There
will still be power steering if the ignition is
switched on while the vehicle is rolling and
there is sufficient vehicle battery charge. Oth-
erwise, you must use greater force when
steering.
Start/Stop system
Applies to: vehicles with Start/Stop system
The Start/Stop system can help increase fuel
economy and reduce CO2 emissions.
In Start/Stop mode, the engine shuts off auto-
matically when the vehicle is stopped, such as at
a traffic light. The ignition remains switched on
during this Stop phase. The engine will restart
automatically when needed.
The Start/Stop system is automatically activated
once the ignition is switched on.
Basic requirements for Start/Stop mode
— The driver's door must be closed.
— The driver's seat belt much be fastened.
— The hood must be closed.
— The vehicle must have driven faster than 2 mph
(3 km/h) since the last time it stopped.
@) Note
Always switch the Start/Stop system off when
driving through water > page 85.
@ Tips
The engine stops shortly before the vehicle
comes to astop ). The full function of the
brake booster and the power steering is still
available.
83
Page 86 of 400

Driving
Stopping/starting the engine
Applies to: vehicles with Start/Stop system
2 S
Ss S.
= & a
|
Fig. 92 Instrument cluster: engine switched off (Stop
phase)
> Brake the vehicle to a stop. The engine stops
shortly before the vehicle comes to a stop or if
the vehicle is stationary ». Keep your foot on
the brake pedal. The AY indicator light ap-
pears in the display. The needle in the tachome-
ter also moves into the READY position.
> The engine starts again when you remove your
foot from the brake pedal. The indicator light
turns off.
Additional information
The engine stops in the "P", "N" and "D" selector
lever positions.
If you select the "R" selector lever position during
a Stop phase, the engine will start again.
Shift to "P" quickly to prevent the engine from
starting unintentionally when shifting through
"RH
You can control if the engine will stop or not by
reducing or increasing the amount of force you
use to press the brake pedal. For example, if you
only lightly press on the brake pedal in stop-and-
go traffic or when turning, the engine will not
switch off when the vehicle is stationary. If you
press the brake pedal harder, the engine will
switch off.
@ Tips
— Press the brake pedal during a Stop phase
to keep the vehicle from rolling.
D_Incertain countries.
84
— The ignition will turn off if you press the
START ENGINE STOP] button* during a
Stop phase. The needle in the tachometer
moves into the OFF position.
General information
Applies to: vehicles with Start/Stop system
Starting and stopping the engine automat-
ically
The system checks if certain conditions are met
before and during the Stop phase, and deter-
mines if the engine stops and how long it re-
mains stopped. For example, if power usage is
high, the engine will not be stopped. Along with
other conditions, the following factors influence
the automatic engine start or stop:
— Environmental conditions (slopes, inclines, ele-
vation, temperature)
— Battery (charge status, temperature, power us-
age)
— Engine temperature
— Assist systems
— Driving behavior
Depending on the engine, the indicator light
may appear if the engine is not stopped.
Z\ WARNING
To reduce the risk of asphyxiation, never allow
the engine to run in confined spaces.
@) Tips
If you select the "D" or "N" selector lever posi-
tion in a vehicle with an automatic transmis-
sion after shifting into reverse, the vehicle
must be driven faster than 6 mph (10 km/h)
in order for the engine to switch off again.
Page 91 of 400
8V2012721BK
Driving
Z\ WARNING
— The parking lock may only be released using
the emergency release if the parking brake
is set. If it is not working, secure the vehicle
from rolling using the brake pedal or other
suitable means, such as blocking a front and
a rear wheel. An unsecured vehicle may roll
away, which increases the risk of an acci-
dent.
— Only activate the emergency release while
ona level surface or a slight slope.
—To reduce the risk of an accident, you must
not drive when the emergency release is ac-
tivated.
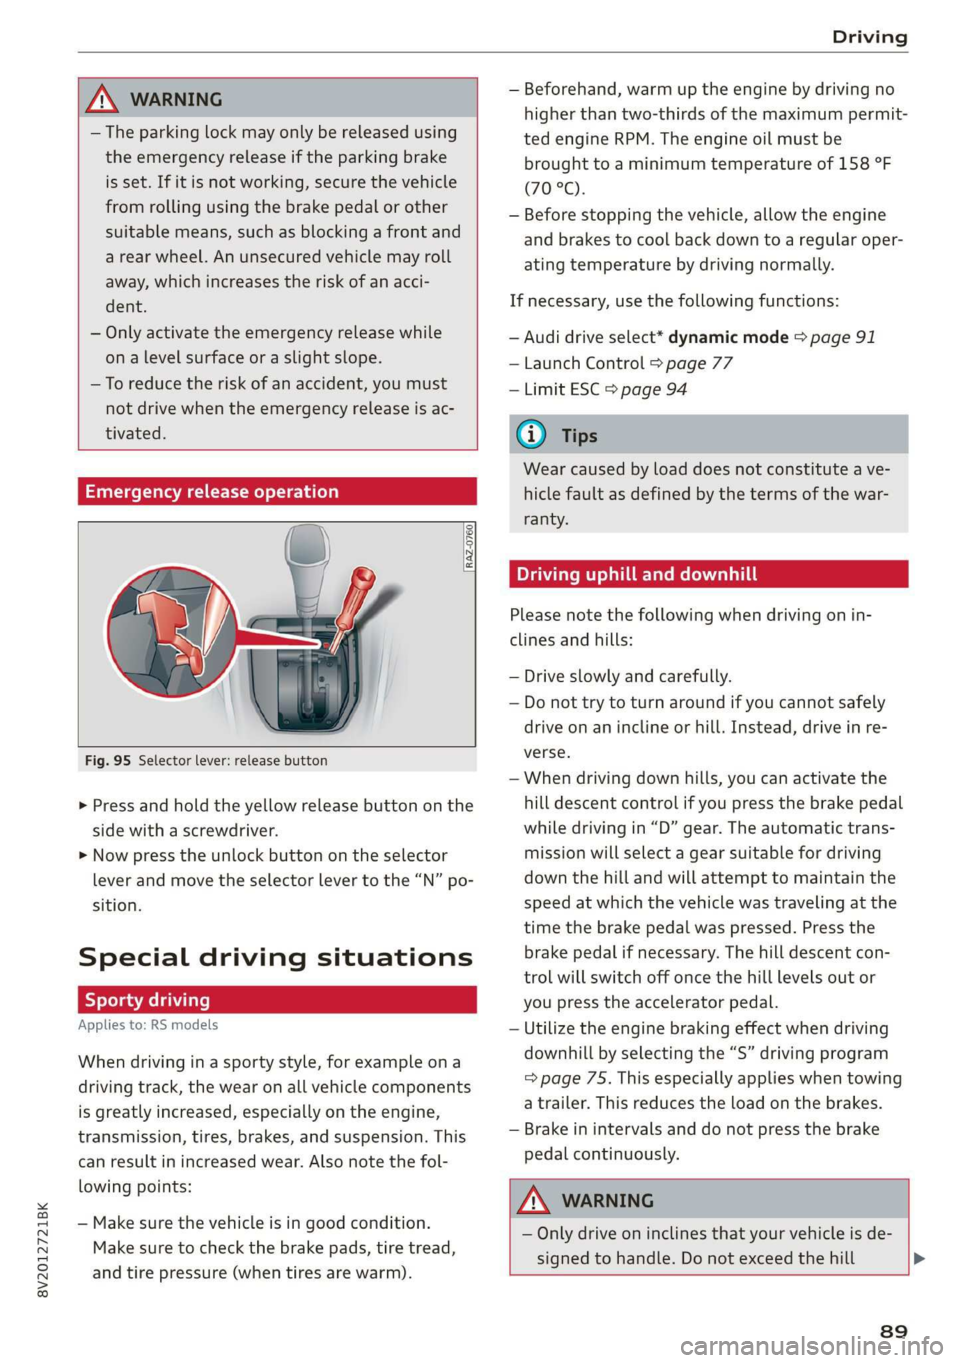
Emergency release operation
®@
RAZ-0760
Fig. 95 Selector lever: release button
> Press and hold the yellow release button on the
side with a screwdriver.
> Now press the unlock button on the selector
lever and move the selector lever to the “N” po-
sition.
Special driving situations
Sy Toa AS ENA Las |
Applies to: RS models
When driving in a sporty style, for example ona
driving track, the wear on all vehicle components
is greatly increased, especially on the engine,
transmission, tires, brakes, and suspension. This
can result in increased wear. Also note the fol-
lowing points:
— Make sure the vehicle is in good condition.
Make sure to check the brake pads, tire tread,
and tire pressure (when tires are warm).
— Beforehand, warm up the engine by driving no
higher than two-thirds of the maximum permit-
ted engine RPM. The engine oil must be
brought to a minimum temperature of 158 °F
(70°C).
— Before stopping the vehicle, allow the engine
and brakes to cool back down to a regular oper-
ating temperature by driving normally.
If necessary, use the following functions:
— Audi drive select* dynamic mode = page 91
— Launch Control > page 77
— Limit ESC > page 94
@® Tips
Wear caused by load does not constitute a ve-
hicle fault as defined by the terms of the war-
ranty.
Driving uphill and downhill
Please note the following when driving on in-
clines and hills:
— Drive slowly and carefully.
— Do not try to turn around if you cannot safely
drive on an incline or hill. Instead, drive in re-
verse.
— When driving down hills, you can activate the
hill descent control if you press the brake pedal
while driving in “D” gear. The automatic trans-
mission will select a gear suitable for driving
down the hill and will attempt to maintain the
speed at which the vehicle was traveling at the
time the brake pedal was pressed. Press the
brake pedal if necessary. The hill descent con-
trol will switch off once the hill levels out or
you press the accelerator pedal.
— Utilize the engine braking effect when driving
downhill by selecting the “S” driving program
=> page 75. This especially applies when towing
a trailer. This reduces the load on the brakes.
— Brake in intervals and do not press the brake
pedal continuously.
A WARNING
— Only drive on inclines that your vehicle is de-
signed to handle. Do not exceed the hill >
89
Page 92 of 400

Driving
climbing ability of your vehicle. Your vehicle
could tip or slide.
— Do not drive at an angle on steep inclines
and hills. If your vehicle is about to tip, you
must immediately start steering in the di-
rection of the downward slope to reduce the
risk of an accident.
— Always be ready to brake when using the hill
descent control function.
Driving through water
If you must drive through water, follow these in-
structions:
— Check the stability of the ground, the current,
and the water depth. If the ground is unstable,
there is a strong current, or there are waves,
the water must only reach up to the lower edge
of the body at the most.
— Deactivate the Start/Stop system*.
— Drive carefully and no faster than at walking
speeds to prevent the front of the vehicle from
creating waves, because they could splash
above the lower edge of the body. Oncoming
vehicles could also create waves.
— Do not stop the vehicle while in the water.
— Drive in reverse.
— Do not turn the engine off.
ZA\ WARNING
After driving through water, press the brake
pedal carefully to dry the brakes so that the
full braking effect will be restored.
@) Note
Vehicle components such as the engine, drive
system, suspension, or electrical system can
be severely damaged by driving through wa-
ter.
G) Tips
If possible, avoid driving through salt water
because it increases the risk of corrosion. Use
fresh water to clean any vehicle components
that come into contact with salt water.
90