ESP AUDI A3 CABRIOLET 2016 Repair Manual
[x] Cancel search | Manufacturer: AUDI, Model Year: 2016, Model line: A3 CABRIOLET, Model: AUDI A3 CABRIOLET 2016Pages: 272, PDF Size: 67.88 MB
Page 211 of 272
<( a:, ... N .... N ... 0
s: a:,
Occupant loading and distri
bution for vehicle normal load
for various designated seating
capacities
Refer to the tire inflation pres
sure label
c::> page 214, fig. 171
for the number of seating posi
tions. Refer to the table
c::> table
on page 216
for the number of
people that correspond to the ve
hicle normal load.
New tires or wheels
Audi recommends having all work
on tires or whee ls perfo rmed by
an authorized Audi dealer or au
thorized Audi Service Facility .
These facilities have the proper
knowledge and are equ ipped with
the required tools and replace
ment parts .
.,,. New tires do not yet have the
opt imum adhesion properties.
Drive carefully and at moderate
speeds for the first 350 m iles
(500 km) with new tires .
.,,. On ly use tires w ith the same de
sign, size (rolling c ircumference)
and as close to the same tread pattern as possible on all four
wheels.
Tire s and wheel s
.,,.Do not replace tires individually.
At least replace both tires on the same axle at the same time .
.,,. Audi recommends that you use
A udi Original equipment tires. If
you would like to use different
tires, please note that the tires may perform differently even if
they are the same si ze
c::> ,&. .
.,,. If you would like to equip your
vehicle w ith a tire/r im comb ina
tion that is different from what
was installed at the factory, con
sult w ith an authorized Audi
dealer or authorized Audi Service
Facility before making a pur
chase ¢
..1,..
The spare t ire* is diffe rent from
the regular tires installed on the
vehicle - for example, if winter
tires or wide tires are installed -
then only use the spare tire* tem
porarily in case of emergency and
drive carefully while it is in use . It
should be replaced with a regular
tire as soon as possible.
On
all wheel d rive vehicles, all
four wheels must be equipped
with tires that are the same brand
and have the same construction
and tread pa ttern so that the
drive system is not damaged by
2 11
Page 214 of 272
Tires and wheels
This can especially have a nega
t ive effect on handling, on the
risk aquaplaning when driving
through water, when driving
through curves and when brak ing, which increases the risk of
an accident.
Tire pressure
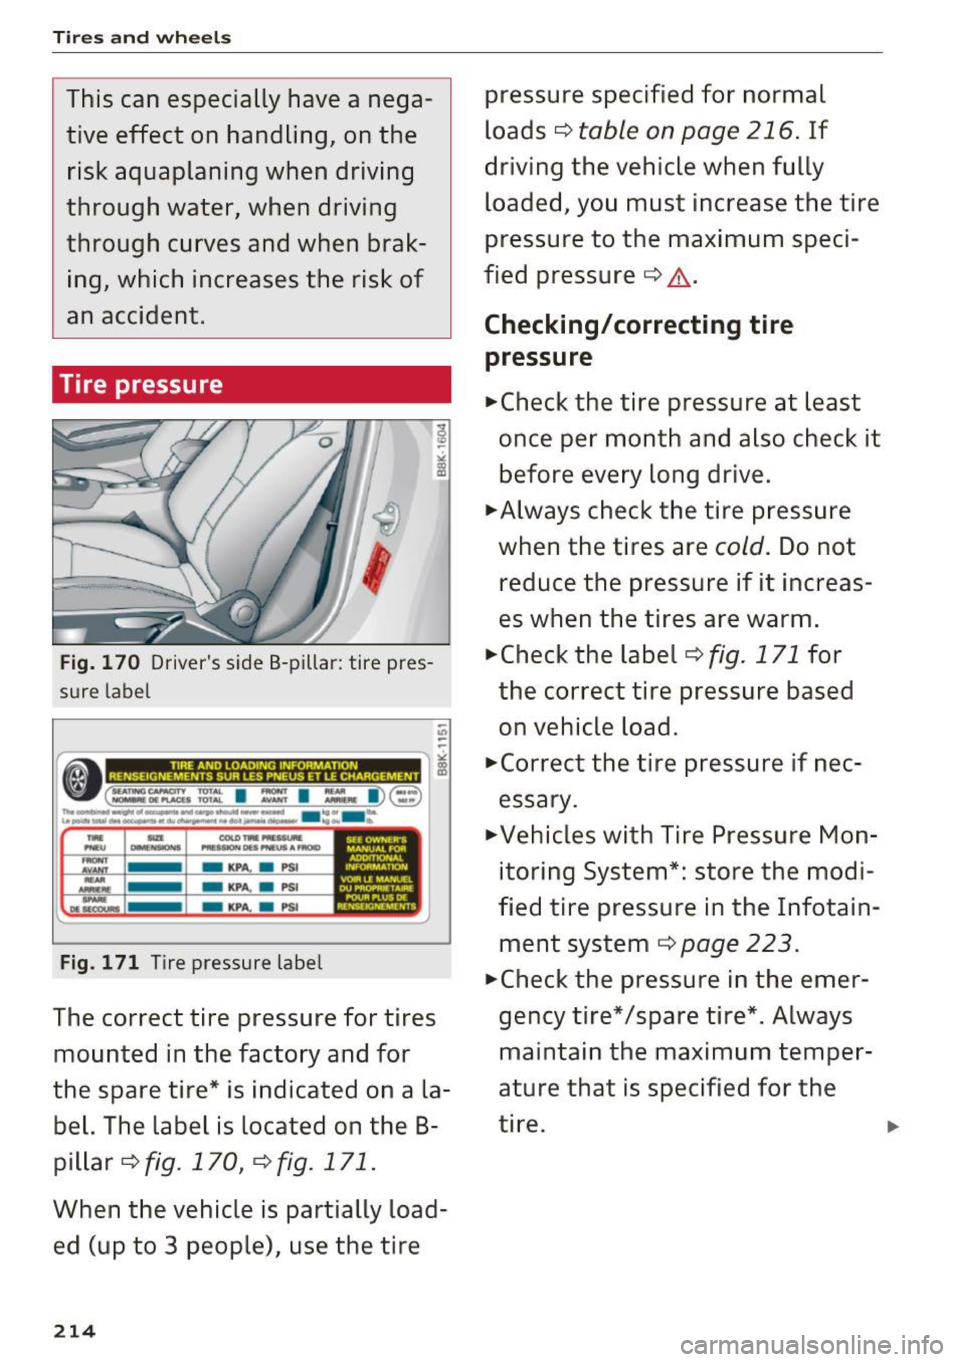
Fig. 170 Dr iver's side 8-pillar: tire pres
sur e lab el
-"' -r,...-------------~
•c==. ~:t I :'.!: I :,. 1)§ l il! ................. .._.. ....................... .... . .. , '--................................ ,............ .... -.
TN 11D COt..O TN Nl&AUM. ,_U ~ ,,,...,..00,....AMOID
- KP aPSt
- KPA. a PSI
- KPA. a PSl
Fig. 171 Tire pressure label
SIE OWNl:llt'S MAN UAL FOR AD0010NAl 1NfOAMAT101-4 ~l[M.ANUCL DU PMCM"M T Al!IJ[ POW. ,tU$ Dl MNSC.JONlMtNTS
The correct tire pressure for tires
mounted in the factory and for
the spare tire* is indicated on a la
bel. The label is located on the B
pillar
¢fig. 170, ¢fig. 171.
When the vehicle is partially load
ed (up to 3 people), use the tire
214
pressure specified for normal
loads¢
table on page 216. If
driving the vehicle when fully loaded, you must increase the tire
pressure to the maximum speci
fied pressure ¢.&, .
Checking/correcting tire
pressure
.,.Check the tire pressure at least
once per month and also check it
before every long drive .
.,.Always check the tire pressure
when the tires are
cold . Do not
reduce the pressure if it increas
es when the tires are warm .
.,.Check the label ¢
fig. 171 for
the correct tire pressure based
on vehicle load.
.,.Correct the tire pressure if nec
essary .
.,.Vehicles with Tire Pressure Mon
itoring System*: store the modi
fied tire pressure in the Infotain
ment system ¢
page 223.
.,.Check the pressure in the emer
gency tire* /spare tire*. Always
maintain the maximum temper
ature that is specified for the
tire. .,.
Page 220 of 272

Tires and wheels
"' Check and cor rect the seating of the snow
c h ains if necessa ry after dr iving a few feet. Fo l
l ow the instructions from the manufacturer .
"' Note the maximum permitted speed when d riv
i ng with snow chains. Do not exceed 30 mp h
(SO km/h) .
Snow chains not only improve the
driving in win
ter road conditions, but also the
broking .
Use of snow cha ins is o nly pe rmitted with certain
rim/t ire combinations due to tec hnical reasons .
C hec k with an authorized A udi dealer o r autho r
i z ed Audi Service Fac ility to see if yo u may use
snow cha ins.
Use
fine-mesh snow chains . They must not add
mo re t han 0.53 inch (13.5 mm) in height, includ
i n g the chain loc k.
You must remove the c hains when d riving on
roads that are
free of snow . W hen roads a re free
of snow, snow c hains ca n impair handling and
damage the ti res, and the chai ns w ill quickly be
destroyed.
A WARNINC
Us ing inco rrect snow c hains or insta lling snow
c hai ns inco rre ctl y can resul t in loss o f vehicle
c o ntro l, w hich incr ease s th e ris k of an a cci
d ent .
(D Note
Snow chains can damage th e rims/wheel cov
ers* i f the cha ins come in to d irect contact
w it h t hem. R emove the w heel c overs* first .
U se coat ed sn ow cha ins.
Low aspect ratio tires
Your Au di is fac to ry-equipped wi th low aspec t ra
tio tires . These ti res have been tho roughly tested
a nd been se lected specifically fo r yo ur model fo r
their supe rb per fo rmance, road feel and handling
un der a variety of driving conditions . As k yo ur au
thor ized Audi dealer for mo re details.
The low aspect ratio of these t ires is i ndicated by
a numeral of
55 or less in t he tire's size designa
tion. The nume ra l rep resents the rat io of the
tire's sidewall he ight i n relat io n to its tread width
220
exp ressed in perce nta ge . Conventiona l tir es h ave
a height/width ratio of 60 or more.
The performance of low-aspect -ratio tires is par
ticularly sensitive to improper inflation pres
sure. It is therefore important that low aspect ratio tires are inflated to the specified pressure
and that the inflation pressure is regularly
checked and maintained. Tire pressures should
be checked at least once a month and always
before a long trip
r=> pog e 214.
What you can do to avoid tire and rim
damage
Low aspect ratio tires can be damaged more eas i
l y by impact with potho les, curbs, gullies or
r idges on the road, particularly if the tire is un
der inflated .
In orde r to min imize the occur rence of impact
damage to the tires of you r vehicle, we recom
mend that you observe the following preca u
tions:
- Always ma intain recommended inflation pres
sures. Check you r tir e pressure every
2,000 miles (3,000 km) and add a ir if necessa
ry.
- Dr ive ca refully on roads w it h potholes, deep
gu llies o r ridges . Th e impac t from dr iv ing
t hroug h or over such o bstacl es ca n da mage
your tire s. I mpac t w ith a curb may also cau se
d am age to yo ur ti re s.
- After any impac t, imme diate ly inspect you r
t ire s or h ave them inspe cted by t he nea rest a u
t hori ze d Audi d ealer. Repl ace a dama ged t ire as
soon as possible.
- Ins pect your tir es eve ry 2,00 0 m iles (3,0 00 k m)
for dama ge and wear. Dam age is no t always
easy to see . Damage can lead to loss of a ir and
unde rinflation, w hich coul d event ua lly cause
tire fa ilure. If yo u be lieve that a tire may have
been damaged, replace the tire as soon as pos
sible .
- These tires may wear mo re quick ly than others.
- Please also remember that, while t hese tires
delive r responsive hand ling, they may ride less
comfortably and make mo re noise than other
choices. ""
Page 221 of 272
<( co .... N r--N .... 0 ,.__
> co
Reduced performance in winter /cold season
conditions
All tires are designed for certain purposes. The
low aspect ratio, ultra high performance t ires
originally installed on your vehicle are intended
for maximum dry and wet road performance and handling . They are not suitable for cold, snowy or
i cy weather cond it ions. If you dr ive under those
circumstances, you shou ld equ ip your vehicle
with all-season or winter tires, whic h offe r better
traction under those conditions. We suggest you
use the recommended snow or all-season tires
specified for you r vehicle, or their equivalent.
Refer to¢
page 219 for more detailed informa
tion regarding winter tires.
Uniform tire quality grading
-Tread wear
- Traction AA A B C
- Temperature ABC
Quality grades can be found where applicable on
the tire side wall between tread shoulder and
maximum section w idth ¢
page 204, fig . 168 .
For example: Tread wear 200, Traction AA, Tem
perature
A .
All passenger car tires must conform to Federal
Safety Requirements in addition to these grades.
Tread wea r
The tread wear grade is a comparative rating
based on the wear rate of the tire when tested
under contro lled conditions on a specified gov
ernment test course.
F or example, a tire graded
150 would wear one
and one ha lf
( 1 1/2) times as well on the govern
ment course as a tire graded
100.
The relative performance of tires depends upon
the actual conditions of their use, howeve r, and
may depart significantly from the norm due to
variations in driving habits, service practices and
differences in road characteristics and climate.
Traction
The traction grades, from highest to lowest, are
AA, A, B and
C. Those grades represent the tire's
Tires and wheels
ability to stop on wet pavement as measured un
der controlled conditions on specified govern
ment test surfaces of asphalt and concrete. A tire
marked C may have poor traction performance
¢ &.
Temperature
The temperature grades are A (the highest), B,
and
C, representing the tire's resistance to the
generation of heat and its ability to dissipate
heat when tested under controlled conditions on
a specified indoor laboratory test wheel.
Sustained high temperature can cause the mate
rial of the tire to degenerate and reduce tire life,
and excessive temperature can lead to sudden
tire failure¢ &.
The grade
C corresponds to a level of perform
ance which all passenger car tires must meet un
der the Federal Motor Vehicle Safety Standard
No.
109 . Grades Band A represent higher levels
of performance on the laboratory test wheel than
the minimum required by law.
&, WARNING
The traction gra de assigned to this tire is
based on straight-ahead braking traction
tests, and does not include acceleration, cor
nering, hydroplaning or peak traction charac
teristics.
.&_ WARNING
= -
The temperature grade for this tire is estab lished for a tire that is properly inflated and
not overloaded. Excessive speed, underinfla
tion, or excessive loading, either separately or
in comb inat ion, can cause heat buildup and
possible tire failure .
.&_ WARNING
--
Temperature grades apply to tires that are
properly inflated and not over or underinflat
ed.
221
Page 223 of 272
<( co .... N r--N .... 0 r--> co
Indicat or lights
IE -Loss of pressure in at least one ti re c::> ,& .
Check the tires and replace or repair if necessary.
Check/correct the pressures of all four tires. Then
store the tire pressures in the MMI
<=:>page 223.
mm (T ire Pressure Monitoring System) Tire
press ure: System malfuncti on!.
Ifm appears
after switching the ignition on or whi le driving
and the
IE indicator light in the instrument clus
ter blinks for approximately one minute and then
stays on, there is system malfunction . Try to
store the correct tire pressures
c::> page 223 . If
the indicator light does not turn off or turns on
again after a short period of time, drive to an au
thor ized Audi dealer or authorized Audi Service
Faci lity immediately to have the malfunction cor
rected.
A WARNING
- If the tire pressure warning light IE in the
instrument cluster turns on, the pressure in
one or more tires is too low . Reduce the ve
hicle speed immediately and avo id any hard
steering or braking maneuvers. Stop as soon as possible, check the tire and inflate the
t ire to the correct pressure, which is speci
fied on the tire pressure label on the veh icle
<=:> page 214. Driving w ith a t ire with low
pressure c auses the t ire to overheat and can
result in failure of the tire . Low pressure can
also have a negative effect on the driving
and braking behavior of the vehicle .
- T he driver is responsib le for maintaining the
correct tire pressures . You must check the
tire pressures regularly .
- Under certain conditions (such as a sporty
driv ing style, winter conditions or unpaved
roads), the pressure monitor indicator may
be delayed.
- Do not use run-flat tires on your vehicle . Us
ing them when not permitted can lead to
vehicle damage or accidents .
(D Tips
-The tire pressure monitoring system can al
so stop working when there is an ESC mal
function.
Tir es and wheel s
- Us ing snow chains may result in a system
ma lfunction.
- The tires with the identification "AO" or
"RO"
c::> page 211 have been matched with
your Audi tire pressure monitoring system .
We recommend that you use these tires.
- The tire pressure monitoring system can on
ly monitor the tire pressure of the driving
tires. Check the tire pressure of the spare
wheel in the luggage compartment so that if necessary it is ready for use.
Storing tire pressures
App lies to : vehicles wi th Tir e Pressure Mo nito rin g Sys te m in
dic ator
A change in tire pressur e or a change in tires
must be stored in the syst em .
The tire press ure is stored in the MM I.
.,. Make sure before storing that the t ire pressures
of all four tires meet the specified values and
are adap ted to the load. O therwise the system
could malfunction
c::> page 214.
.. Switch on the ignition.
.,. Select: the I MENU I button> Ca r> Sys tem s*
con trol button > S er vice & control > Tire pre s
s u re m on itor > Stor e tire pressu re > Yes , sto re
no w.
(D Tips
Do not store the tire pressures if snow chains
are installed. Otherw ise the system could
malfunction.
223
Page 224 of 272

Care and cleaning
Care and cleaning
General information
Regular, prope r care helps to maintain your vehi
cle's value.
It can a lso be a requirement when
submitting war ranty claims for cor rosion damage
and pa int defects on the body.
The necessary care prod ucts can be obtained
from an autho rized Audi deale r or authorized
Aud i Service Facility. Read and follow the instruc
tions for use on the packaging.
A WARNING
- Using clean ing and care products incorrectly
can be dangero us to your hea lth .
- Always store clean ing and care products out
of reach of children to reduce the r isk of po i
so ning .
@ For the sake of the environment
- Preferably use environmentally-friendly
products when buying cleaning agents.
- Do not dispose of leftove r clean ing and care
products with household t rash.
Car washes
The longer that deposits s uch as insects, bird
droppings, tree sap or road salt remain on the ve h icle, the more the surface can be damaged. High
temperatures such as those caused by sunlight
i n crease the damag ing effect .
Before washing, r inse off heavy deposits with
p lenty of water.
St ubb orn deposits such as bird droppings or tree
sap are best removed with plenty of wate r and a
microfiber cloth.
Also, wash the underside of yo ur vehicle once
road sa lt stops being used for the season .
Pressure washers
When washing your veh icles with a pressure
washer, always follow t he ope ra ti ng ins tructions
p rovided w ith the pressure washer. This is espe
cially important in regard to the pressure and
spraying distance . Do not direct the stream of
224
water d irect ly onto seals for the side windows,
doors, luggage compartment lid or hood or onto
the tires, r ubber hoses, insulat ing mater ia l, the
power top, sensors* or camera lenses*. Keep a
distance of at least 16 in (40 cm).
Do not remove snow and ice with a pressure
washe r.
Never use rot ary no zzles or high pressure no z
z les .
The wate r temperatu re must not be above 140 °F
(60 °().
Automatic car washes
Spray off the ve hicle before wash ing.
Make su re t hat the windows and power top are
closed and the windsh ield wipers are off. Follow
i nstruct ions from the car wash operator, espe
c ially if there are accessories attached to your ve
hicle.
If possible, use car washes that do not have
brushes.
Washing by hand
Clean the vehicle starting from the top and work
ing down using a soft sponge or cleaning brush .
U se solvent-free cleaning products .
Washing vehicles with matte finish paint by
hand
To avoid damaging the pa int when washing, first
remove dust and large part icles from your vehi
cle. Insects, grease spots and f ingerprints are
best removed w ith a special cleaner for matte
finish paint .
Apply the product using a microf iber cloth. To
avo id damag ing the pa int surface, do not use too
much pressure.
Rinse the veh icle thorough ly with water. Then
clean using a neutra l shampoo and a soft m icro
fiber cloth.
Rinse the vehicle thoroughly again and let it air
dry. Remove any water residue using a sham my.
Stubborn deposits such as bird dropp ings or tree
sap are best removed with plenty o f water and a
microfiber cloth. .,..
Page 226 of 272
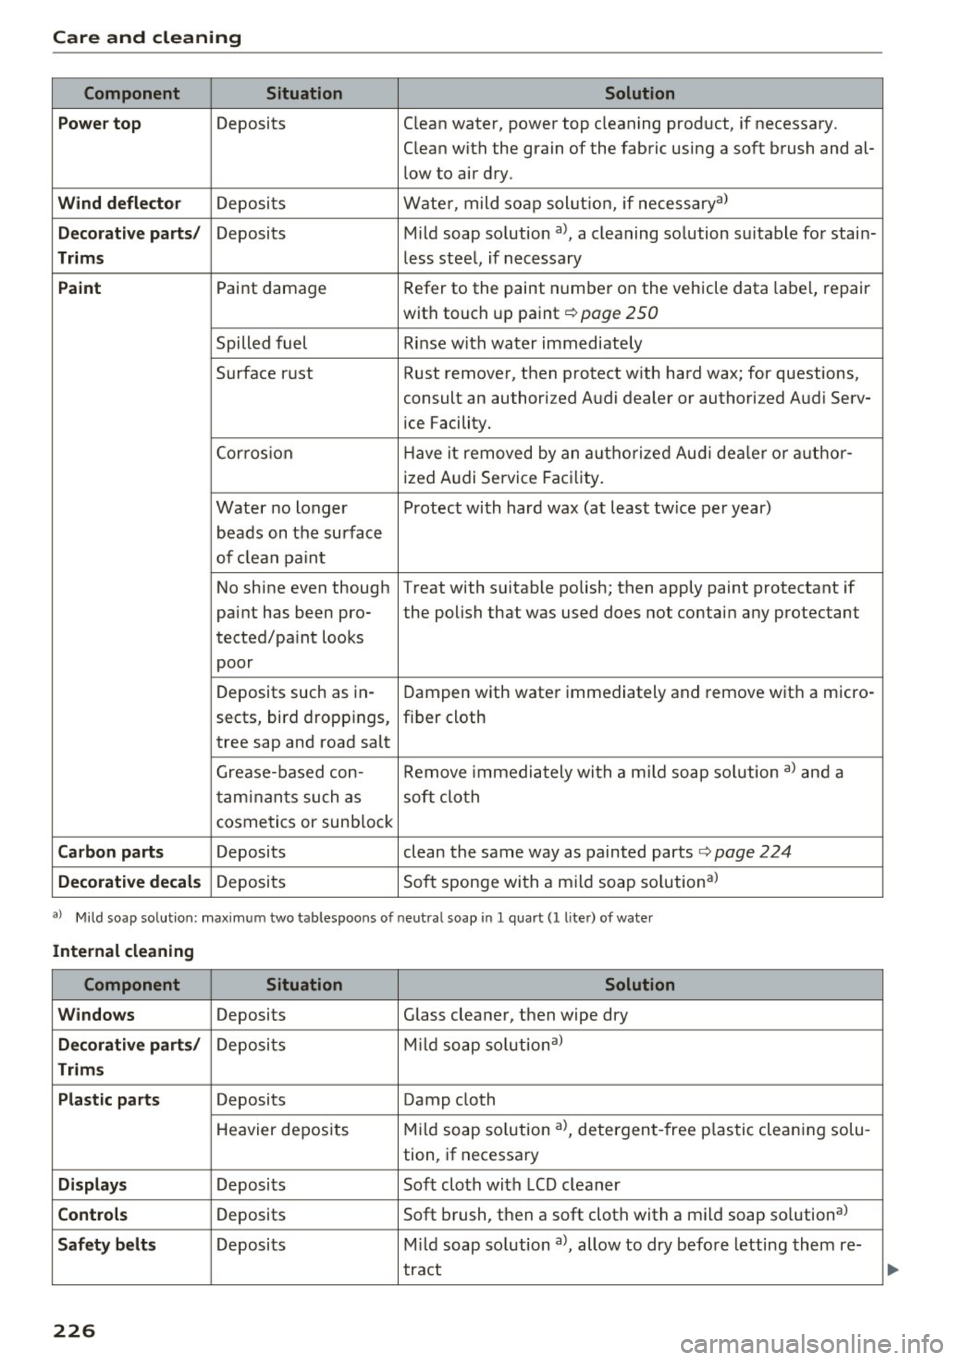
Care and cleaning
Component Situation Solution
Power top
Deposits Clean water, power top cleaning product , if necessary.
Clean with the grain of the fabric using a soft brush and al- low to air dry.
Wind deflector Deposits Water, mild soap solution,
if necessaryal
Decorative parts/ Deposits Mild soap solution a>, a cleaning solution suitable for stain-
Trims less steel, if necessary
Paint Paint damage Refer to the paint number on the vehicle data label, repair
with touch up paint
r:!) page 250
Spilled fuel Rinse with water immediately
Surface r ust Rust remover, then protect with hard wax; for questions,
consult an authorized Audi dealer or authorized Audi Serv-
ice Facility.
Corrosion H
ave it removed by an authorized Aud i dealer or author-
ized Audi Service Facility.
Water no longer Protect with hard wax (at least twice per year)
beads on the surface
of clean paint
No shine even though Treat with suitable polish; then apply paint protectant if
paint has been pro- the polish that was used does not contain any protectant
tected/pa int looks
poor
Deposits such as in- Dampen with water immediately and remove with a micro-
sects, bird droppings,
fiber cloth
tree sap and road salt
Grease-based con- Remove
immediately with a mild soap solution a) and a
taminants such as soft cloth
cosmetics or sunblock
Carbon parts Deposits clean the same way as painted parts ~ page 224
Decorative decals Deposits Soft
sponge with a mild soap solution al
a) Mild soap so lution: maxim um two tablespoons of neutral soap in l quar t (l lite r) of water
Internal cleaning
Component Situation Solution
Windows
Deposits Glass cleaner, then wipe dry
Decorative parts/ Deposits Mild
soap solutiona )
Trims
Plastic parts
Deposits Damp cloth
Heavier deposits Mild soap so lution a>, detergent-free p lastic clean ing solu -
tion, if necessary
Displays Deposits Soft cloth with LCD cleaner
Controls Deposits Soft
brush, then a soft cloth with a mild soap so lutional
Safety belts Deposits Mild soap so lution a>, allow to dry before letting them re-
tract
226
Page 227 of 272
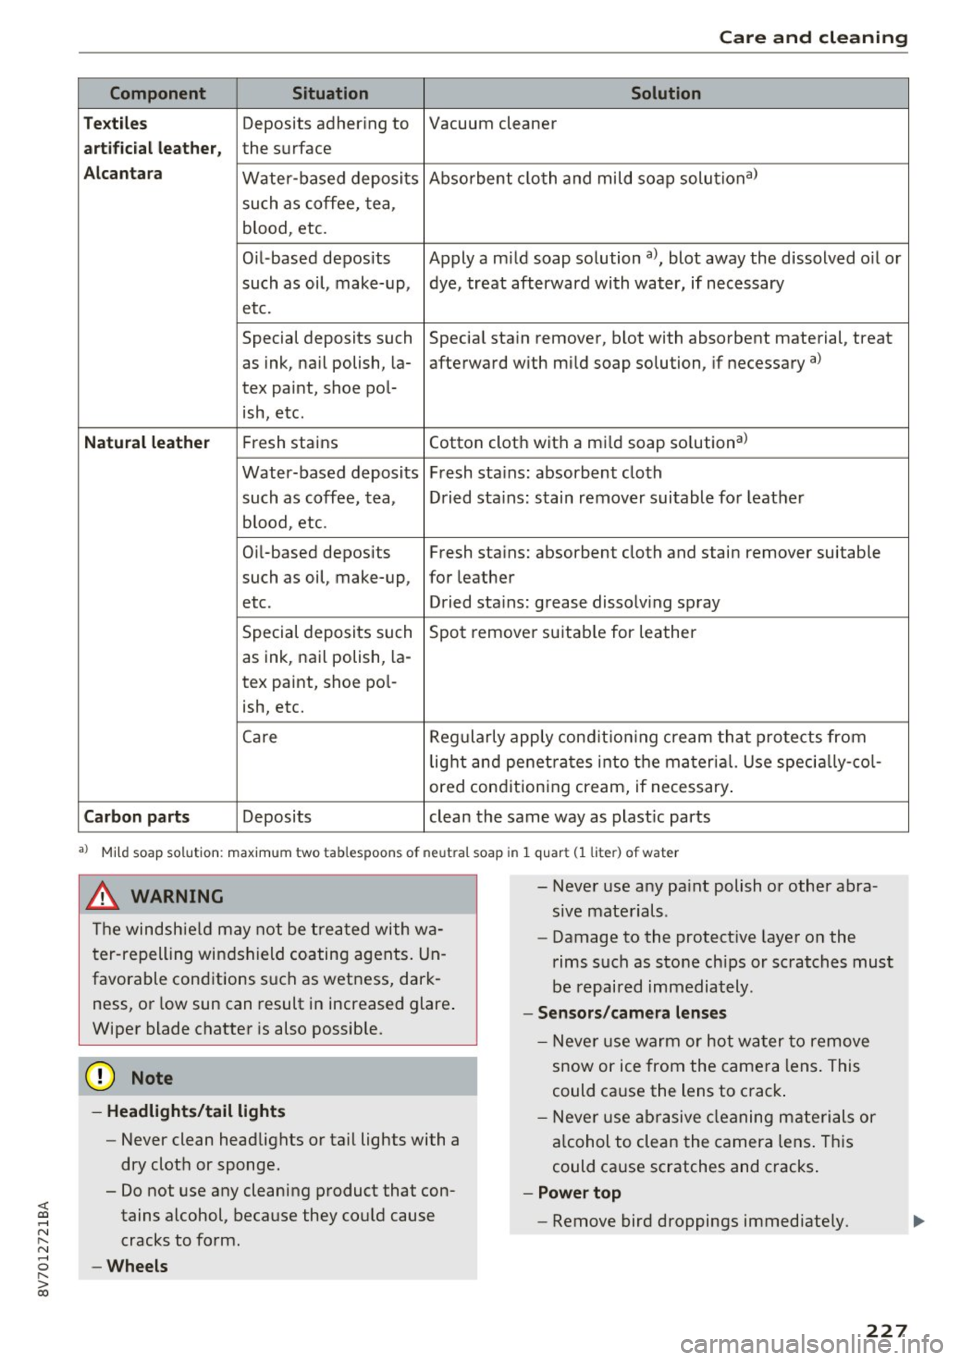
<( co .... N ,.__
N .... 0 ,.__
> co
Care and cleaning
Component Situation Solution
T ex til es
Deposits adhering to Vacuum cleaner
art ifici al leat her, the surface
A lcan tara Water-based deposits Absorbent
cloth and mild soap solutiona>
such as coffee, tea,
b lood, etc.
Oil -based deposits Apply a m ild soap solution
a), blot away the dissolved o il or
such as oil, make-up, dye, treat afterward with water, if necessary
etc.
Special deposits such Special stain
remover, blot with absorbent material, treat
as ink, nail polish, la- afterward with mild soap solution, if necessary
a)
tex paint, shoe pol-
ish, etc.
Natu ral le ath er Fresh stains Cotton cloth with a mild soap solution a>
Water-based deposits Fresh stains: absorbent cloth
such as coffee, tea, Dried stains : stain
remover suitable fo r leather
b lood , etc.
Oi l-based deposits Fresh stains: absorbent cloth and stain
remover suitable
such as oil, make-up, for leather
etc. Dried stains : grease dissolving spray
Special deposits such Spot remove r suitab le for leather
as ink, nai l polish, la-
tex paint, shoe pol-
ish, etc.
Care Regularly apply condit ion ing c ream that protects from
lig ht and penet rates into the material. Use specia lly-co l-
ored conditioning cream, if necessary .
Carbon part s Deposits clean the same way as plast ic parts
a) Mi ld soap solution: maximum two tablespoons of neutral soap in 1 q uart (1 liter) of water
.8, WARNING
The windshield may not be trea ted with wa
ter-repelling windshield coating agents. Un
favorable cond itions such as wetness, dark
ness, or low sun can result in increased glare.
Wiper blade chatter is also possible.
@ Note
- Headlight s/tail li ght s
-Never clean headlights or tail lights with a
dry cloth or sponge.
- Do not use any cleaning product that con
tains alcohol, because they could cause
cracks to form.
- Whe els
-
- Never use a ny pa int polish or other abra
sive materials .
- Damage to the protect ive layer on the
rims such as sto ne ch ips or scratches must
be repaired immediately .
-Sen sor s/camera l enses
- Neve r use warm or hot water to remove
snow or ice from the camera lens . This
could cause the lens to crack .
- Neve r use ab rasive cleaning materials or
a lcohol to clean the camera lens . This
could cause scratches and cracks .
-Power top
- Remove bird droppings immediately .
227
Page 230 of 272

Emerg ency assis ta nce
Emergency assistance
Trunk escape latch
Applies to: vehicles with trunk escape latch (A3 sedan)
In case of an emergency, the rear lid can be
opened from the inside using the trunk escape
latch.
Fig. 172 luggage compartment: t runk escape latch
.,. Push the latch in the direction of the arrow un
til the lock releases .
The trunk escape latch inside the rear lid is made of fluo rescent mater ial to glow in the dark.
_& WARNING
The trunk escape latch is to be used only in an
emergency .
General information
.,. Park the vehicle as far as poss ible from moving
traff ic in the event of a flat tire. In the event of
a flat t ire, park the vehicle on a level surface. It
you are on a steep incline, be especia lly careful.
.,. Set the park ing brake.
.,. Place the selector lever in the P position.
.,. Switch the emergency flashers on.
.,. Put on a reflective vest, if available .
.,. Set up the warning triangle, if available .
.,. Have the passengers exit the vehicle . They
should move to a safe place, for example be
hind a guard rail.
_& WARNING
Pay attention to the steps above. They are for
your protection and the for the safety of other
drivers.
2 30
Equipment
Vehicle tool kit
Applies to: vehicles with vehicle tool kit
Fig. 173 lu gg age compartmen t: cargo floor cove r fo lded
upward (example)
The vehicle tool kit, t ire repa ir set* and compres
sor* are stored in the luggage compartment un
der the floor cover~
fig. 173 .
.,. Hook the p lastic hook@ into the luggage com
partment seal.
.,. Unhook the cargo floor before closing the lug
gage compartment lid.
_& WARNING
Improper use of the vehicle jack can cause se
rious personal injuries.
- Never use the screw driver hex head to
tighten wheel bolts, since the bolts cannot
attain the necessary tightening torque if you
use the hex head, potentially causing an ac
cident.
- The factory-supplied jack is intended only
for your veh icle model. Under no circum
stances should it be used to lift heavy
vehicles or other loads; you risk injuring
yourself .
- Never start the engine when the veh icle is
raised, which co uld cause an accident .
- Support the vehicle securely with a ppropri
ate stands if work is to be pe rformed under
neath the vehicle; otherwise, there is a po
tential risk for injury.
- Never use the jack supplied with your Audi
on another vehicle, particularly on a heavier
one. The jack is only su itable for use on the
vehicle it came with. ..,.
Page 242 of 272
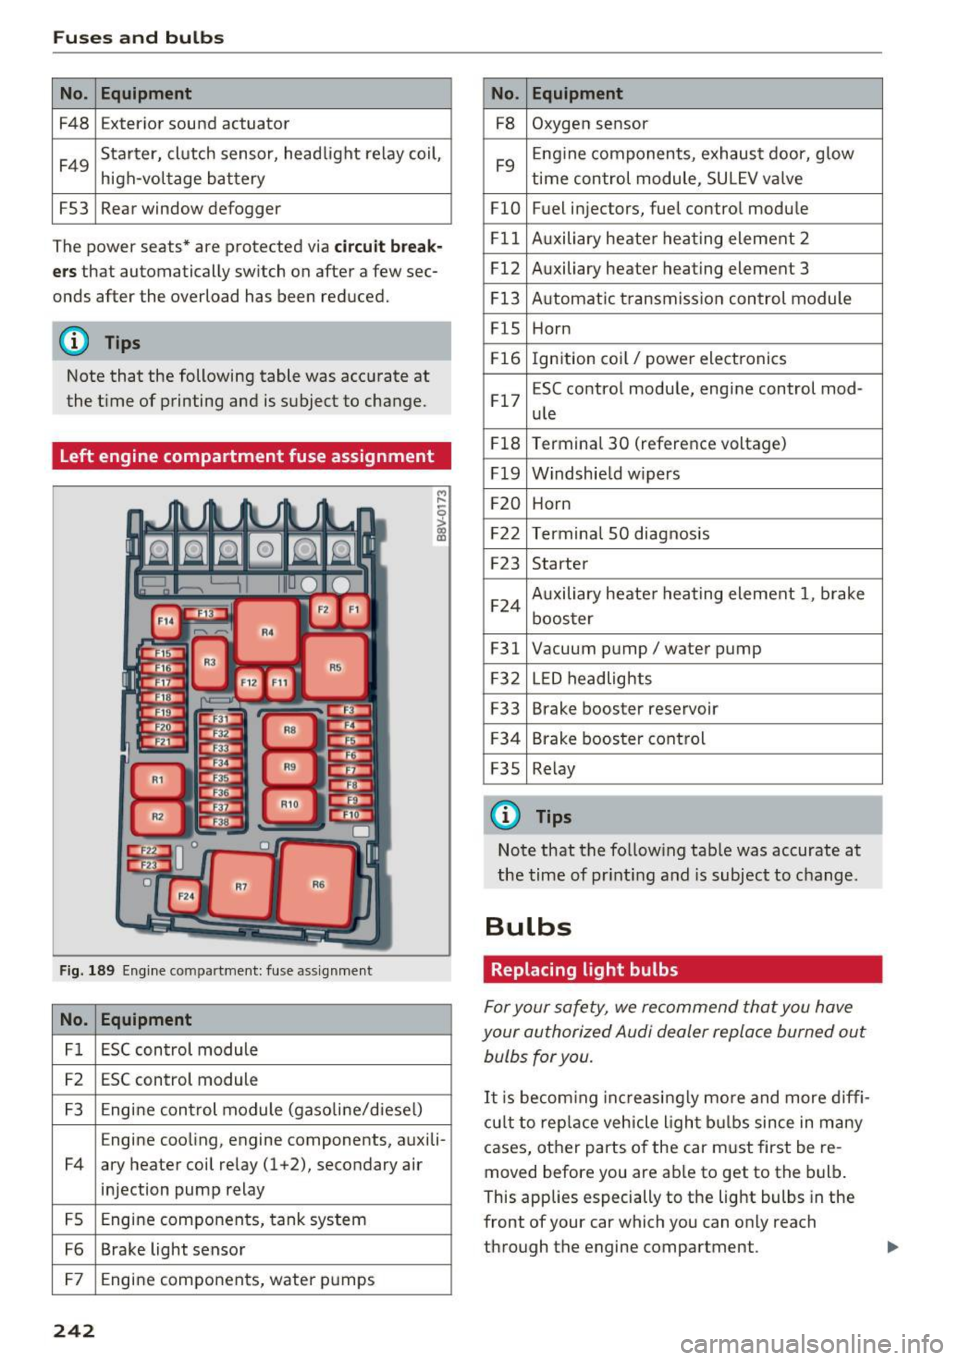
Fuses and bulbs
No . Equipment
F48 Exterior sound actuator
F49 Starter, clutch sensor, headlight relay coil,
high-voltage
battery
FS3 Rear window defogger
The power seats* are protected via
circuit break
ers
that automatically switch on after a few sec
onds after the overload has been reduced.
(D Tips
Note that the following table was accurate at
the time of printing and is subject to change.
Left engine compartment fuse assignment
Fig . 189 Engine compartment: fuse assignment
No. Equipment
Fl ESC control module
F2 ESC control module
F3 Engine control module (gaso line/diesel)
Engine cooling, engine components, auxili-
F4 ary heater coil relay (1+2), secondary air injection pump relay
FS Engine components,
tank system
F6 Brake light sensor
F7 Engine components, water
pumps
242
No. Equipment
F8 Oxygen sensor
F9 Engine
components, exhaust door, glow
time control module, SU LEV valve
FlO Fuel injectors, fuel control module
Fll Auxiliary heater heat ing element 2
F12 Auxiliary heater heating element 3
F13 Automatic transmiss ion control module
FlS Horn
F16 Ignition coil/ power electronics
F17 ESC control module, engine control mod-
ule
F18 Terminal 30 (reference voltage)
F19 Windshie ld w ipers
F20 Horn
F22 Terminal SO diagnosis
F23 Starter
F24 Auxiliary heater heating element
1, brake
booster
F31 Vacuum pump/ water pump
F32 LED headlights
F33 Brake booster reservoir
F34 Brake booster control
F3S Relay
@ Tips
Note that the following tab le was accurate at
the time of printin g and is subject to change.
Bulbs
Replacing light bulbs
For your safety, we recommend that you have
your authorized Audi dealer replace burned out bulbs for you.
It i s becom ing increasingly more and more diffi
cult to replace vehicle light bulbs since in many
cases, other parts of the car must first be re
moved before you are ab le to get to the bulb.
This applies especially to the light bulbs in the
front of your car which you can only reach
through the engine compartment .