phone AUDI A3 CABRIOLET 2016 Owners Manual
[x] Cancel search | Manufacturer: AUDI, Model Year: 2016, Model line: A3 CABRIOLET, Model: AUDI A3 CABRIOLET 2016Pages: 272, PDF Size: 67.88 MB
Page 7 of 272
<( co .... N r--N .... 0 r--> co
In addition to this Owner's Manual, your Audi
comes with the
- MMI Operat ing Instructions
- Warranty
& Maintenance booklet.
If you are missing one of these publications , or if
you believe that the information is not complete,
contact your author ized Audi dealer for assis
tance .
MMI Operating Instructions
contain detailed description of the Aud i Mu lti
Media Interface (MMI) includ ing the nav igation
system, the sound system and the hand held
phone.
The Warranty & Maintenance booklet
explains how you can keep your Audi in top d riv
ing condition by having it serviced regu larly and
contains detailed information about the warran
ties covering your Aud i. Always have the booklet
with you when you take your veh icle to an author
iz ed A udi dealer for serv ice. Your Audi Serv ice Ad
visor w ill record each scheduled service and can
answer any questions you may have regarding
h ow to maintain your vehicle.
In Canada,
the vehicle literature is also available in French .
To obtain a copy, co nta ct you r dealer or write to:
Au Canada, on peut se procurer un exemplaire en
frarn;ais de ce document aupres du concession
naire ou de:
Aud i Canada
Client Assistance
Assistance a la Clientele
777 Bayly Street, West ,
Ajax, Ontario LlS 7G7
If you sell your Audi
all literature should be left in the vehicle to make
the Warranty terms as well as all operating, safe
ty and maintenance informat ion ava ilable to the
next owner.
Owner 's Literature
If you change your address or if you bought
this Audi used
be sure to send in a "Notice of Address Change" I
"Not ice of Used Car Purchase" post card. This
card can be found in the Warranty
& Mainte
nance booklet or obtained from your authorized
Audi dealer.
It is in your own interest that we are able to
contact you should the need arise.
5
Page 11 of 272
<( co .... N r--N .... 0 r--> co
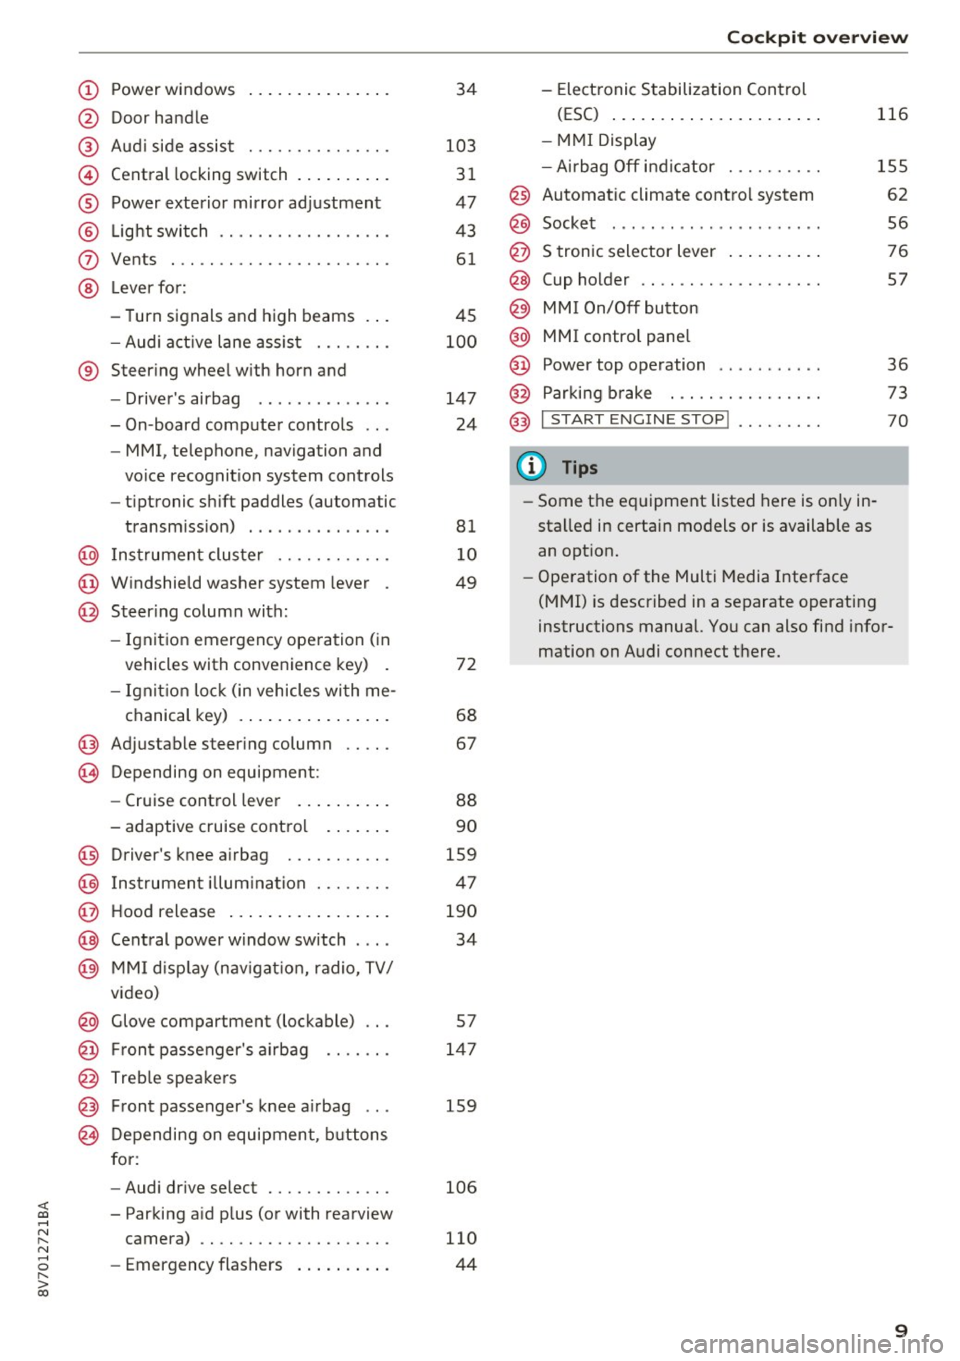
CD
@
®
©
®
®
(J)
®
Power windows
Door handle
Aud i side assist ... ......... .. .
Central locking switch .. ... .. .. .
Power exterior mirror ad justment
L ig ht swit ch .... . .......... .. .
Vents
L ever fo r:
- Turn signals and high beams . . .
- Audi a ct ive lane assis t ..... .. .
® Steer ing whee l w ith horn and
- Drive r's airbag ...... ..... .. .
- On-board compute r controls .. .
- MMI, telephone, navigation and
vo ice recognit ion system cont rols
- tiptronic sh ift paddles (automatic
transm iss ion) . .. .... ... .. .. .
@ Ins trumen t cluste r ....... .. .. .
© W indshield washer system lever .
@ Steering column with:
- Ignit ion emergency operation ( in
vehicles with convenience key) .
- Ignit io n lock (in vehicles wi th me - 34
103 3 1
47
43
61
4S
1 0 0
147
24
81 1 0
49
72
chanical key) . . . . . . . . . . . . . . . . 68
@ Adjustable steer ing column
(B) D epending on equipment: 67
- Cruise control leve r . . . . . . . . . . 88
- adaptive cruise contro l . . . . . . . 90
@ Driver's knee a irbag . . . . . . . . . . . 1S9
@ Ins trumen t illum ination . . . . . . . . 47
@ Hood release . . . . . . . . . . . . . . . . . 190
@ Central power w indow sw itch . . . . 34
@ MMI d isp lay (nav igat ion, radio, TV/
video)
@ Glove compartment (lockable) . . . S7
@ Fron t passenger's ai rbag . . . . . . . 147
@ Treble spea ke rs
@ Front passenger's k nee a irbag . . . 159
@ Depending on equipmen t, b utt ons
for:
- Audi dr ive select . . . . . . . . . . . . . 106
- Par king a id p lus (or with rearview
camera) .. ............... .. .
- Emerg ency flashers .. ... .. .. . 110
44
Coc
kpit o ve rv iew
- Elect ronic Stabilization Control
(ESC) ... .. .. .. .... . ..... .. .
- MMI Display
- Ai rbag Off i ndicator ......... .
@ Automatic climate contro l system
@ Socket ..... .. .. ... ......... .
@ S tronic selector lever .. ..... .. .
@ Cup holder .. .. .............. .
@) MM I On/Off button
@ MMI contro l pane l
@ Power top operation . ... ... .. . .
@ Par kin g b rake . .............. .
@) I START ENGINE STOP ! ........ .
(D Tips
- Some the eq uipment listed here is on ly in
sta lled in certai n models or is available as
an opt ion. 116
155
62
56
76
57
36
73
70
- Operation of the Multi Media Inte rface
(MMI) is described in a separate operating
instructions manual. You can also find info r-
mation on A udi connect t here.
9
Page 24 of 272
<( co ..... N
" N ..... 0 r--. > 00
Driver information
system
Overview
Applies to: ve hicles with driver information system
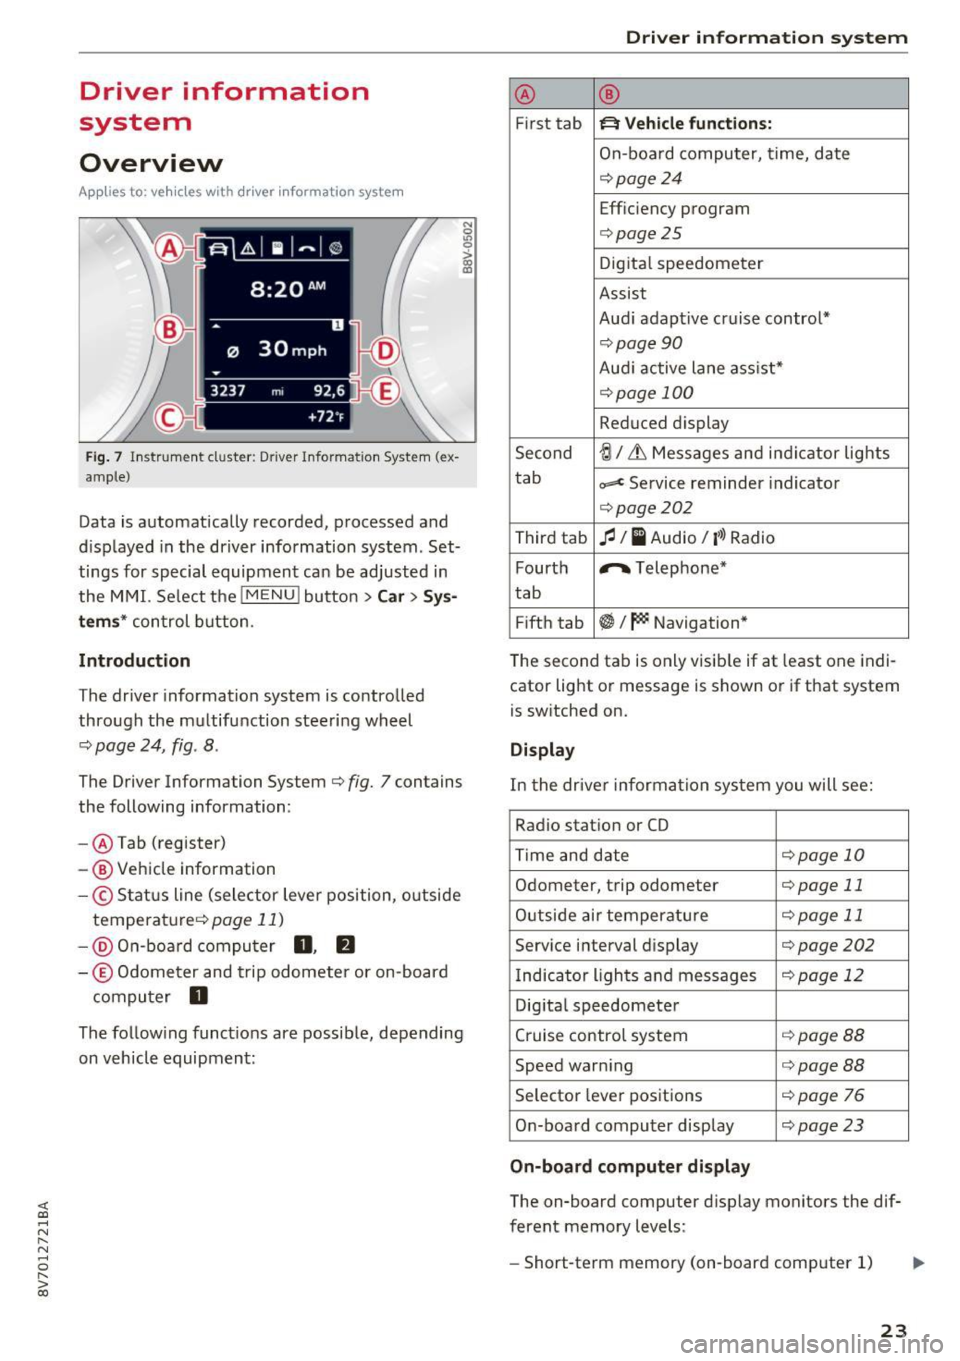
Fig. 7 Instrument cluster : Driver Information System (ex
ample)
Data is automatically recorded, processed and
displayed in the driver information system . Set·
tings for special equipment can be adjusted in
the MMI. Select the
I MENU I button >Car > Sys
tems*
control button.
Introduction
The driver information system is controlled
through the multifunction steering wheel
¢ page 24, fig . 8 .
The Driver Information System ¢ fig. 7 contains
the following information:
- @ Tab (register)
- @ Vehicle information
-© Status line (selector lever position, outside
temperat ure¢ page
11)
-@ On-board computer D , fJ
-© Odometer and trip odometer or on-board
computer
D
The following functions are possible, depending
on vehicle equipment:
Driver in forma tion system
@ ®
First tab ~ Vehicle functions:
On-boa rd computer, time, date
¢page24
Efficiency program
¢page25
Digital speedometer
Assist
Aud i adaptive cruise control*
¢page 90
Audi active lane ass ist*
¢ page 100
Reduced display
Second
ti/ & Messages and indicator lights
tab
c,,,d Service reminder indicator
¢ page202
Third tab fl I I Audio/ I'>) Radio
Fourth ,.,.
Telephone*
tab
Fifth tab
$I~ Navigation*
The second tab is only visible if at least one indi
cator light or message is shown or if that system
is switched on.
Display
In the driver information system you will see:
Radio station or CD
Time and date
¢page 10
Odometer, trip odomete r ¢page 11
Outside air temperature ¢page 11
Service interval display ¢page202
Indicator lights and messages ¢ page 12
Digital speedometer
Cruise control system
¢page BB
Speed warning <=:>page BB
Selector lever positions ¢ page 76
On-board computer display ¢page 23
On-board computer display
The on-board computer display monitors the dif
ferent memory levels :
- Short-term memory (on-board computer 1)
23
Page 25 of 272
Driver information system
-Long-term memory (on-board computer 2)
- Efficiency program
The follow ing information can be displayed con
secutively in the on-board computer:
- Time
- Date
- Estimated range based on current fue l level
- Travel time
- Average consumpt ion
- Average speed
- Distance
- Current fuel consumption
On-board computer
O (short-term memory)
The short-term memory collects driving informa tion from the time the ignition is switched on un
til it is switched off. If you continue driving
with
in two hours
after switching the ignition off, the
new values are included when calculating the cur
rent tr ip informat ion. If stopped for more the
two hours, the short term memory is automati
cally erased once you begin driving.
On-board computer
fl (long-term memory)
Unlike the short-term memory, the long-term
memory is not erased automatically. You can se
lect the time period for evaluating trip informa
tion yourself .
Efficiency program
ii
The efficiency program can help you to use less
fuel
c::;,page 25.
(D Tips
- For information on using the other button
fields, such as the audio, telephone* and
navigation* functions, see the MMI owner's
manual.
- Disconnecting the battery causes all the
memory data to be erased.
24
Operation
Applies to: vehicles wit h driver information system
The driver information system is controlled with
the multifunction steering wheel.
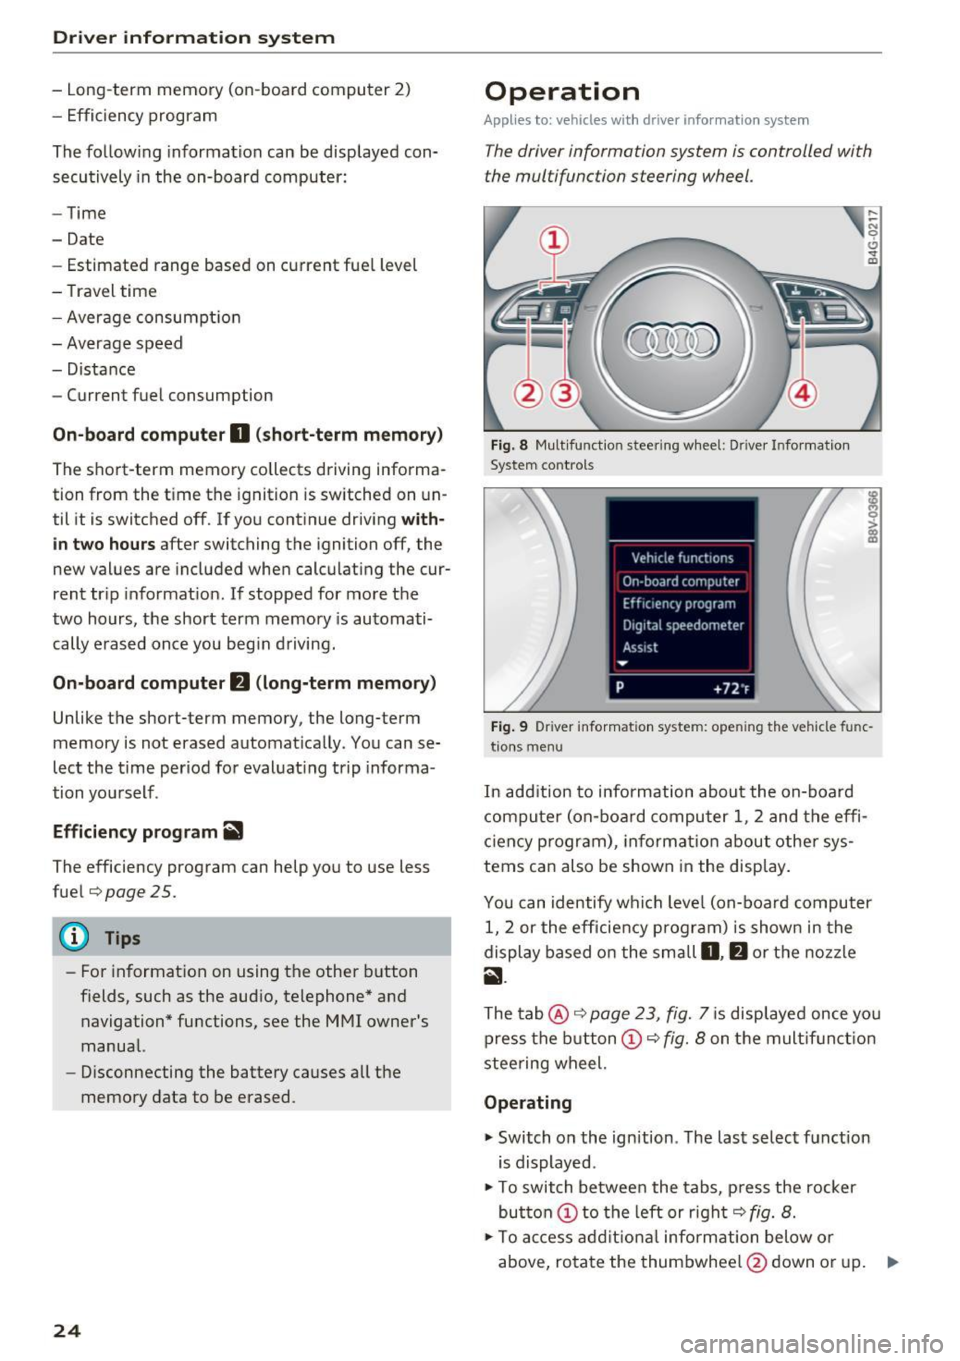
Fig. 8 Mult ifunction steering wheel: Dr iver Info rmation
System controls
Fig. 9 Dr iver infor mation system: open ing the vehicle func
t ions menu
In add it ion to information about the on-board
computer (on-board computer 1 , 2 and the effi
c iency p rogram), informa tion about other sys
tems can also be shown in the display.
You can identify which level (on-board computer
1, 2 or the efficiency program) is shown in the
display based on the small
D, fJ or the nozzle
ii.
The tab@ c::;, page 23, fig. 7 is displayed once yo u
press the button(!)¢
fig. 8 on the multifunct ion
steering wheel.
Operating
"' Switch on the ignition . The last select function
is displayed .
"' To switch between the tabs, press the rocker
button
(D to the left or right c::;, fig. 8.
"'To access additional information below or
above, rotate the thumbwheel @down or up. ""
Page 28 of 272
<( co .... N r--N .... 0 r--> co
Opening and closing
Central locking
Key set
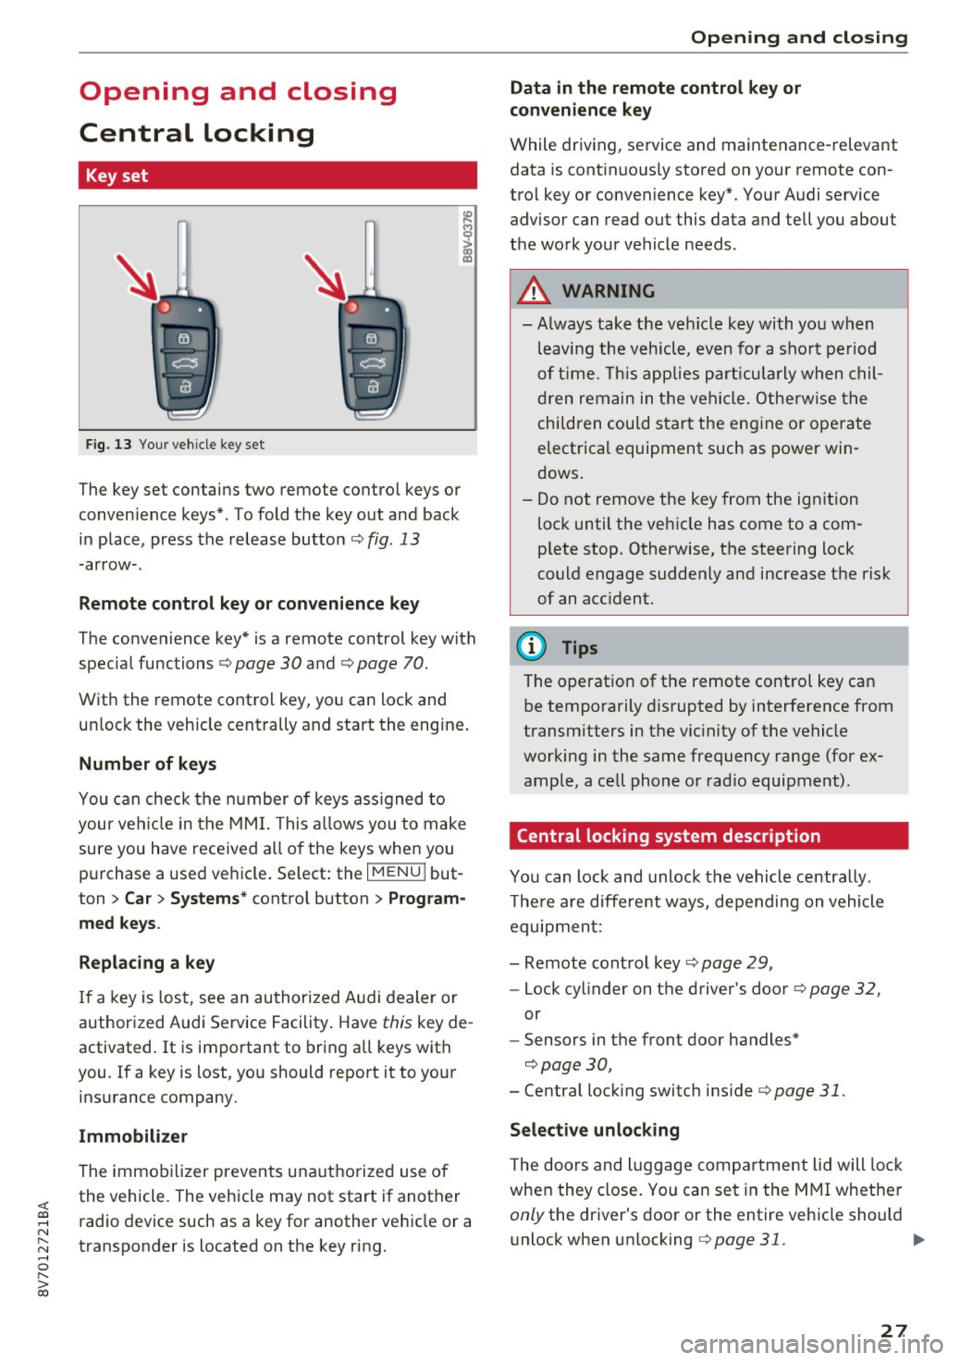
Fig. 13 Your vehicle key set
The key set contains two remote control keys or
conven ience keys*. To fold the key out and back
in place, press the release button ¢
fig. 13
-arrow-.
Remote control key or convenience key
The convenience key* is a remote control key with
special functions ¢
page 30 and¢ page 70.
With the remote control key, you can lock and
unlock the vehicle centrally and start the engine.
Number of keys
You can check the number of keys ass igned to
your vehicle in the MMI. This allows you to make
sure you have received all of the keys when you
purchase a used vehicle . Select: the
I MENU I but
ton
> Car > Systems* control button > Program
med keys.
Replacing a key
If a key is lost, see an authorized Audi dealer or
authorized Audi Service Facility. Have
this key de
activated.
It is important to bring all keys with
you . If a key is lost, you should report it to your
insurance company.
Immobilizer
The immobilizer prevents unauthorized use of
the vehicle . The vehicle may not start if another
radio device such as a key for another vehicle or a
transponder is located on the key ring.
Opening and closing
Data in the remote control key or
convenience key
While driving, service and maintenance-relevant
data is continuous ly stored on your remote con
trol key or convenience key*. Your Audi service advisor can read out this data and tell you about
the work your vehicle needs.
A WARNING
--- Always take the vehicle key with you when
leaving the vehicle, even for a sho rt period
of tim e. This applies particularly when chil
dren remain in the vehicle. Otherwise the
children could start the engine o r operate
electrica l equipment such as power win
dows .
- Do not remove the key from the ignition
lock until the veh icle has come to a com
p lete stop. Otherwise, the steering lock
could engage suddenly and increase the risk
of an acc ident.
(D Tips
The operation of the remote control key can
be temporarily disrupted by interference from
transmitters in the vicinity of the vehicle
working in the same frequency range (for ex
ample, a cell phone or rad io equipment) .
Central locking system description
You can lock and unlock the vehicle centrally.
T here are different ways, depending on vehicle
equipment:
- Remote control key¢
page 29,
-Lock cylinder on the driver's door ¢page 32,
or
- Sensors in the front door handles*
¢page 30,
- Central locking switch inside¢ page 31.
Selective unlocking
The doors and luggage compartment lid will lock
when they close. You can set in the MMI whether
only the dr iver 's door or the entire vehicle should
unlock when un locking
¢ page 31. .,..
27
Page 73 of 272
Driving
at idle for approxim ately two minutes before
shutting it
off.
Starting the engine if there is a
malfunction
A pp lies to: ve hicles w ith conve nien ce key
It may not be possible to start the engine under
certain circumstances, for example if the battery
in the vehicle key is drained, if interference is af
fected the key or if there is a system malfunc
tion .
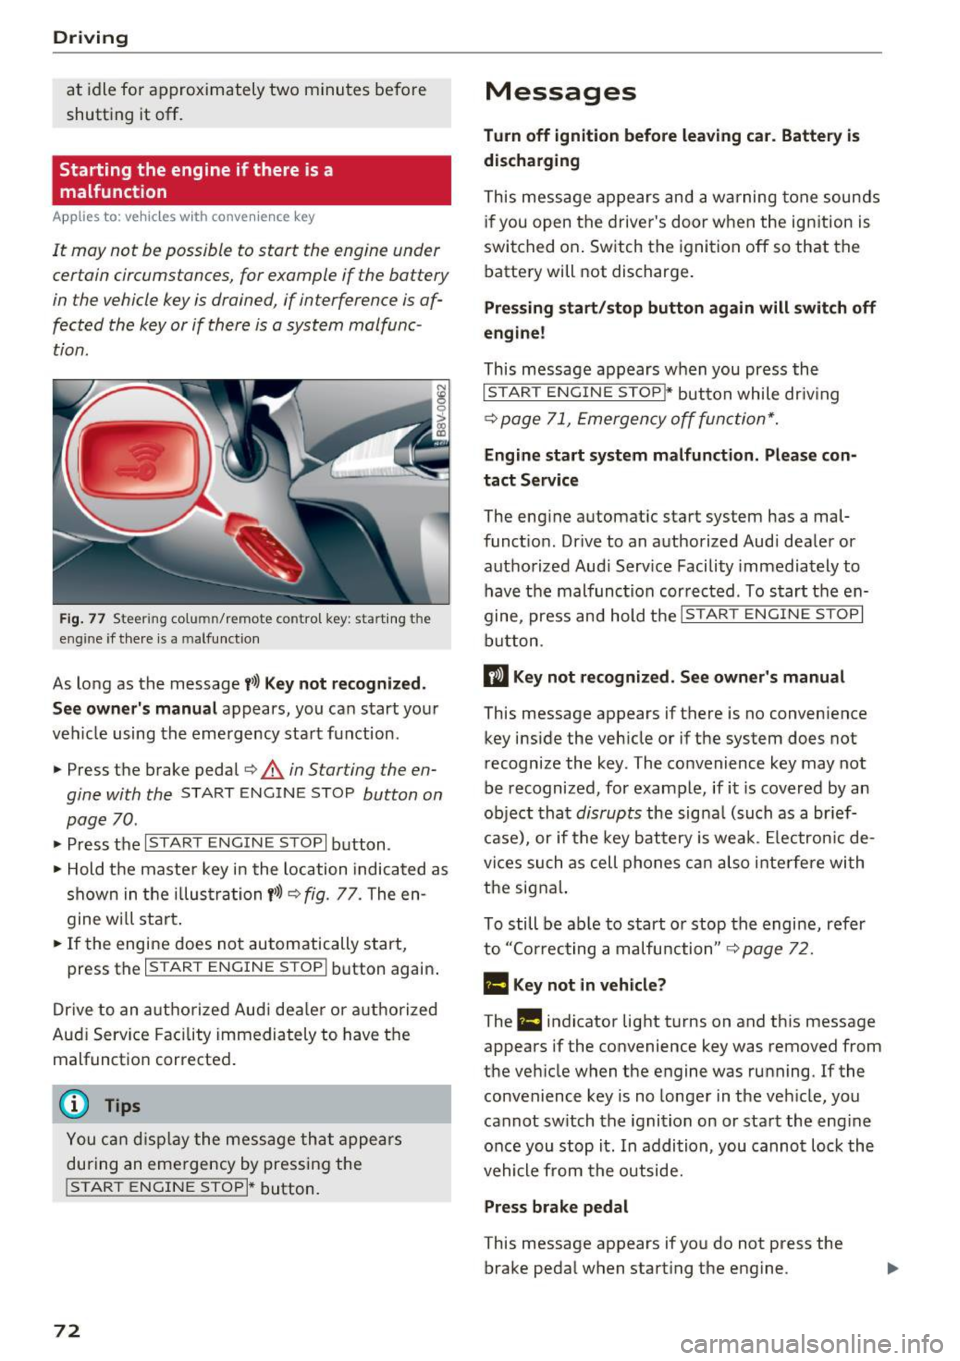
Fig. 77 Steering co lumn/ remote control key: start ing t he
eng ine if th ere is a malfu nct ion
As long as the message t>>) Key not recognized.
See owner' s manual
appears, you can start yo ur
ve hicle using the emergency sta rt function .
• Press t he b rake pedal ¢
A in Starting the en
gine with the
ST ART ENGINE STOP button on
page 70 .
• Press the ~1s= T~A~R~ T~E~N~G~I~ N~E~s= T=o=P~I b utton .
• Hold t he maste r key in the location indica ted as
shown in the i llus trati on
t>>) Q fig. 77. The en
g ine w ill sta rt .
• If the engine does not automatically start,
press the
I START ENGINE STOPI button again .
D rive to an a uth o riz ed Aud i de aler or a uthori zed
Aud i Serv ice Facility immediately to have the
malfunct io n corrected .
Y ou ca n disp lay the me ss a ge th at appe ars
durin g an eme rgency by pressing the
!START ENGINE STOPI* button.
72
Messages
Turn off ignition before leaving car. Battery is
discharging
This mes sage appears and a warning tone sounds
i f you open t he drive r's doo r w hen t he ig nition is
swi tched on . Switch the igni tion
off so that the
batte ry will not discharge .
Pressing start/stop button again will switch off
engine!
This message appears w hen you press the
I STAR T EN GINE STOP~ button while dr iv ing
¢ page 71, Emergency off fun ction*.
Engine start system malfun ction. Please con
tact Service
The eng ine automat ic start system has a mal
funct ion. Dr ive to an a uthorized Audi dea le r or
authorized Aud i Serv ice Facility immedia tely to
have the malfunct ion cor rected. To s tart the en
gine, press an d hold the
I START ENGINE STOPI
button.
II Key not re cogniz ed. S ee owner 's manual
This message appears if there is no conven ience
key i nside the vehicle or if the system does not
recognize the key . The convenience key may not
be recognized, for example, if i t is covered by an
ob ject tha t
disrupts the signa l (such as a br ief
c a se), or if the key battery is we ak. Elec tron ic de
vices such as cell phones c an also inte rfe re wi th
the signa l.
To still be ab le to start o r stop the engine, refer
to ''Co rrecting a malfu nction"
Q page 7 2.
Ill Key not in vehicle?
The Ill indicator light t urns on and th is message
appears if the convenience key was removed from
the vehicle when the engine was ru nning. If the
convenience key is no longe r in the veh icle, yo u
cannot sw itch the ignition on or sta rt the e ng ine
o nce you stop it . In addition, you canno t loc k the
vehicle from the outside.
Press brake pedal
This message appears if yo u do not press the
brake peda l when starting the engine.
Page 125 of 272
<( co ..... N
" N ..... 0 r--. > 00
.. Make sure that nothing can interfere with the
pedals.
.. Adjust front seat , head restraint and mirrors
correctly for your height.
.. Instruct passengers to adjust the head re
straints accord ing to their height .
.. Make sure to use the right ch ild restraint cor
rectly to protect children
~ page 165, Child
safety .
.,. Sit properly in your seat and make sure that
your passengers do the same
¢page 53, Front
seats .
.. Fasten your safety be lt and wear it properly. Al
so instruct your passengers to fasten their safe
ty belts properly ¢
page 135 .
What impairs driving safety?
Safe driving is directly related to the condition of
the vehicle , the driver as well as the driver's abili
ty to concentrate on the road without being dis
tracted.
The driver is responsible for the safety of the ve
hicle and all of its occupants. If your ability to
drive is impaired, safety risks for everybody in the
veh icle increase and you also become a hazard to
everyone else on the road
¢ ,&. Therefore :
.,. Do not let yourself be distracted by passengers
or by using a cellular telephone.
.. NEVER dr ive when your driv ing ability is im
paired (by medications, alcohol, drugs, etc.) .
.. Observe all traffic laws, rules of the road and
speed limits and plain common sense.
.. ALWAYS adjust your speed to road, traffic and
weathe r conditions.
.. Take frequent breaks on long trips. Do not drive
for more than two hours at a stretch .
.. Do NOT drive when you are tired, under pres
sure or when you are stressed.
A WARNING
Impaired dr iv ing safety increases the risk of
ser ious personal inj ury and death whenever a
vehicle is being used.
Driving safety
Correct passenger
seating positions
Proper seating position for the driver
The proper driver seating position is important
for safe, relaxed driving .
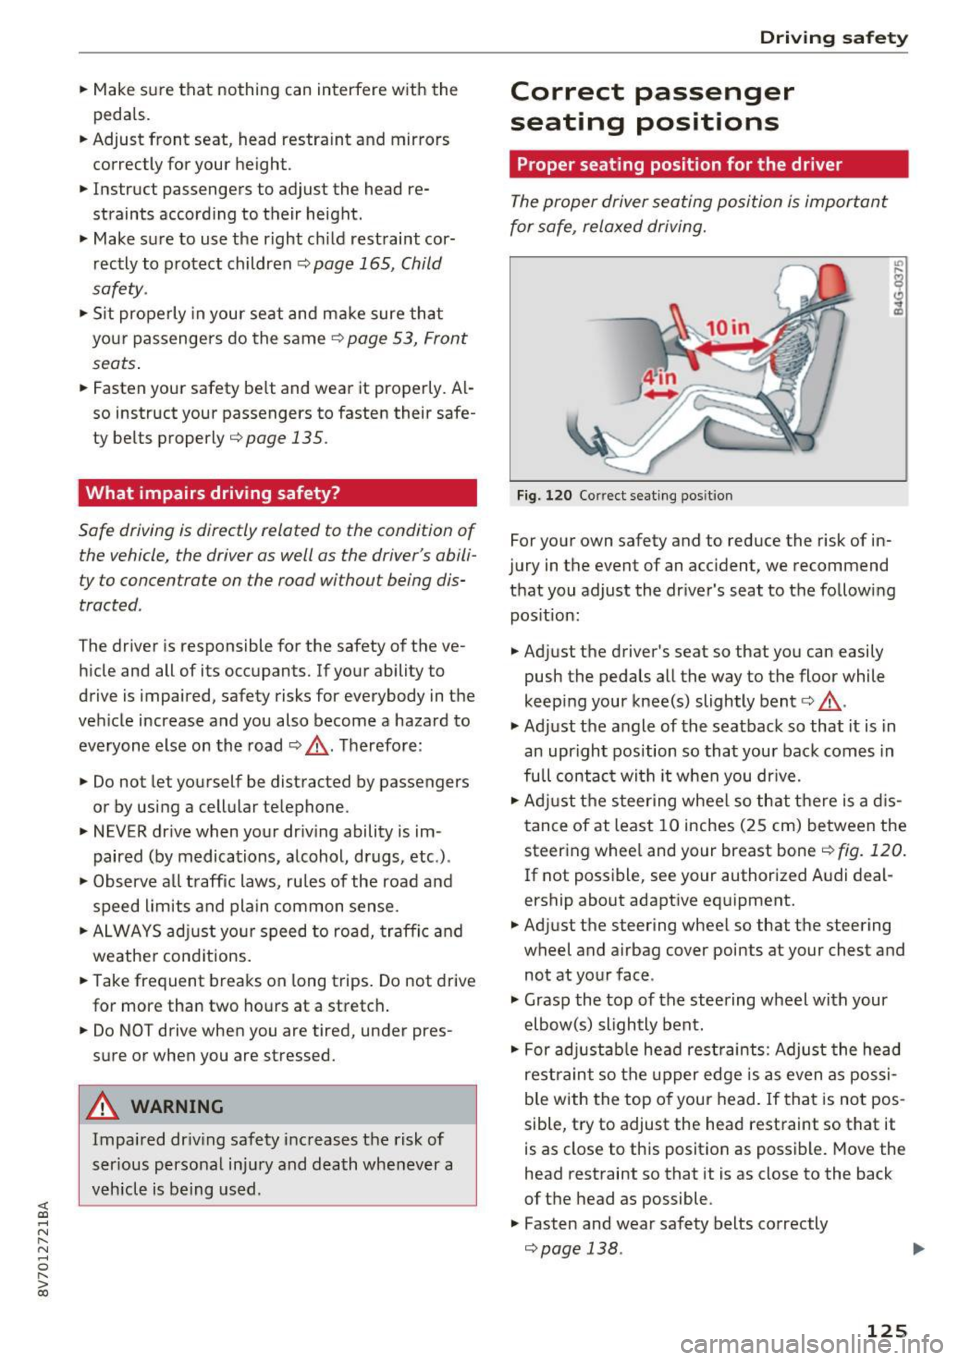
Fig. 120 Correct seating pos it ion
For your own safety and to reduce the risk of in
jury in the event of an accident, we recommend
that you adjust the driver 's seat to the following
position:
.. Adjust the driver's seat so that you can easily
push the pedals all the way to the floor while
keep ing your knee(s) slightly bent¢,& .
.,. Adjust the angle of the seatback so that it is in
an upright position so that your back comes in
full contact wi th it when you dr ive .
.. Adjust the steering wheel so that there is a dis
tance of at least 10 inches (25 cm) between the
steering whee l and your breast bone¢
fig. 120.
If not poss ible, see your author ized A udi deal
ership about adaptive equipment.
.. Adjust the steering wheel so that the steering
wheel and airbag cover points at your chest and
not at your face .
.,. Grasp the top of the steering wheel with your
elbow(s) slightly bent .
.. For adjustable head restraints: Adjust the head
restraint so the upper edge is as even as possi
b le with the top of your head. If that is not pos
sible, try to adjust the head restraint so that it
is as close to this posit ion as possible. Move the
head restraint so that it is as close to the back
of the head as possible.
.. Fasten and wear safety belts correctly
¢page 138. ..,.
125
Page 148 of 272
Airbag system
-Therefore, always wear your safety belts and
make sure that everybody in your vehicle is
properly restrained.
- Always hold the steering wheel with both
hands on the outside of the steering wheel
rim at the 9:00 o 'clock and 3 :00 o'clock po
sitions to help reduce the risk of personal in
jury if the driver's airbag inflates .
- Never hold the steering wheel at the 12
o'clock position or with your hands any
where inside the steering wheel or on the steering wheel hub. Holding the steering
wheel the wrong way increases the risk of
severe injury to the arms, hands, and head if
the driver airbag deploys.
A WARNING
Objects between you and the airbag will in
crease the risk of injury in a crash by interfer
ing with the way the airbag unfolds and/or by
being pushed into you as the airbag inflates.
- Always make sure nothing is in the front air-
-
bag deployment zone that could be struck
by the airbag when it inflates.
- Objects in the zone of a deploying airbag
can become projectiles when the airbag de
ploys and cause serious personal injury.
- Never hold things in your hands or on your lap when the vehicle is in use .
- Never place accessories or other objects
(such as cup holders, telephone brackets,
note pads, navigation systems, or things
that are large, heavy, or bulky) on the doors;
never attach then to the doors or the wind
shield; never place them over or near or at
tach them to the area marked ,.AIRBAG" on
the steering wheel, instrument panel or the
seat backrests; never place them between
these areas and you or any other person in
the vehicle.
- Never attach objects to the windshield
above the passenger front airbag, such as
accessory GPS navigation units or music
players. Such objects could cause serious in
jury in a collision, especially when the air bags inflate .
148
-Never recline the front passenger seat to
transport objects. Items can also move into
the deployment area of the side airbags or
the front airbag during breaking or in a sud
den maneuver . Objects near the airbags can
fly dangerously through the passenger com
partment and cause injury, particularly
when the seat is reclined and the airbags in
flate.
A WARNING
A person on the front passenger seat, espe
cially infants and small children, will receive
serious injuries and can even be killed by be ing too close to the airbag when it inflates .
- Although the Advanced Airbag System in
-
your vehicle is designed to turn off the front
passenger airbag if an infant or a small child
is on the front passenger seat, nobody can
absolutely guarantee that deployment un
der these special conditions is impossible in
all conceivable situations that may happen
during the useful life of your vehicle.
- The Advanced Airbag System can deploy in
accordance with the .,low risk" option for 3-
and 6-year-old children under the U.S . Fed
eral Standard if a child with electrical capac
itance greater than the combined capaci
tance of a typical one-year old infant re
strained in one of the forward facing or rear
ward-facing child seats with which your ve
hicle was certified is on the front passenger
seat and the other conditions for airbag de
ployment are met.
- Accident statistics have shown that children
are generally safer in the rear seat area than
in the front seating position.
- For their own safety, all children, especially
12 years and younger, should always ride in
the back properly restrained for their age and size.
Advanced front airbag system
Your vehicle is equipped with a front Advanced
Airbag System in compliance with United States
Federal Motor Vehicle Safety Standard 208, as
well as Canada Motor Vehicle Safety Standard ..,.
Page 154 of 272
Airbag system
A WARNING
A child in a rearward-facing child seat instal
led on the front passenger seat will be seri
ously injured and can be killed if the front air
bag inflates - even with an Advanced Airbag
System.
- The inflating airbag will hit the child seat or
infant carrier with great force and will
smash the child seat and child against the backrest, center armrest, door or roof.
- Always install rear-facing child seats on the
rear seat.
- If you must install a rearward facing child
seat on the front passenger seat because of exceptional circumstances and the
PASSEN
GER AIR BAG OFF
light does not come on
and stay on, immediately install the rear
facing child seat in a rear seating position
and have the airbag system inspected by
your Audi dealer.
A WARNING
Objects between you and the airbag will in
crease the risk of injury in a crash by interfer
ing with the way the airbag unfolds or by be
ing pushed into you as the airbag inflates .
- Never hold things in your hands or on your
lap when the vehicle is in use .
- Never transport items on or in the area of
the front passenger seat . Objects could
move into the area of the front airbags dur
ing braking or other sudden maneuvers and
become dangerous projectiles that can
cause serious personal injury if the airbags
inflate.
- Never place or attach accessories or other
objects (such as cup holders, telephone
brackets , large, heavy or bulky objects) on
the doors, over or near the area marked "A IRBAG" on the steering wheel, instru
ment panel, seat backrests or between
those areas and yourself. These objects
could cause injury in a crash, especially
when the airbags inflate .
- Never recline the front passenger 's seat to
transport objects. Items can also move into
the area of the side airbag or the front air-
154
-
bag during braking or in a sudden maneu
ver. Objects near the airbags can become
projectiles and cause injury, particularly
when the seat is reclined.
- Never place or transport objects on the
front passenger seat. Objects on the front passenger seat could cause the capacitive
sensor in the seat to signal to airbag system
that the seat is occupied by a person when it
in fact is not , or that the person on the seat
is heavier than he or she actually is. The
change in electric capacitance because of
such objects can cause the passenger front
airbag to be turned on when it should be
off, or can cause the airbag to work in a way
that is different from the way it would have
worked without objects on the seat.
- Always make sure that there is nothing on
the front passenger seat that will cause the
capacitive passenger detection system in
the seat to signal to the Airbag System that
the seat is occupied by a person when it is not, or to signal that it is occupied by some
one who is heavier than the person actually
sitting on the seat. The presence of an ob
ject could cause the passenger front airbag to be turned on when it should be off, or
could cause the airbag to work in a way that is different from the way it would have
worked without the object on the seat.
A WARNING
The fine dust created when airbags deploy can
cause breathing problems for people with a history of asthma or other breathing condi
tions .
- To reduce the risk of breathing problems,
those with asthma or other respiratory con
ditions should get fresh air right away by
getting out of the vehicle or opening win
dows or doors .
- If you are in a collision in which airbags de
ploy , wash your hands and face with mild
soap and water before eating.
- Be careful not to get the dust into your eyes,
or into any cuts or scratches.
- If the residue should get into your eyes,
flush them with water .
Page 158 of 272
Airbag syste m
-If, in exce ptional circumstances, you must
install a forward-faci ng chi ld restraint on
t h e front passenger seat, always m ove the
seat into its rearmost pos ition in the s eat's
f ore an d aft adjustm ent ra nge, as far away
from th e airbag as pos sibl e. Th e backrest
mus t be adjusted to an up right posit ion.
Make s ure that the
PAS SENGER AIR BAG
OFF
light comes on and stays on all the time
whenever the ignition is switched on.
.&_ WARNING
- If the PASSENGER AIR BAG OFF light does
not go out when an ad ult is sitting on the
front passenger seat after taking the steps
described above, make sure the adu lt is
properly seated and restrained at one of the
rear seat ing positions .
- Have the airbag system inspected by your
Audi dealer before transporting anyone on
the front passenger seat .
(D Tips
If the capacitive passenger detection system
determines that the front passenger seat is
empty, the frontal airbag on the passenger
side will be turned off, and the
PASSENGER
AIR BAG OFF
l ight will stay on.
Repair , care and disposal of the airbags
Pa rts of t he a irbag system are installed at many
d ifferent places on your Aud i. Insta lling, remov
ing, servic ing o r repa iring a part in an area of the
veh icle can damage a part of an airbag system
and p revent that system from working properly
in a co llision .
There are some important things you have to
know to make sure that the effectiveness of the
system wi ll not be impaired and that discarded
components do not cause injury or poll ute the
env ironment.
.&_ WARNING
Improper care, serv icing and repair proce
dures can increase the r isk of personal injury
and death by preventing an airbag from de-
158
-
p loying when needed or deploy ing an a irbag
unexpectedly:
- Never cover, obstruct, or change the steer
ing wheel horn pad or airbag cover or the in
strument panel or modify them in any way.
- Never attach any objects s uch as c up ho lders
or telephone mountings to the surfaces cov
ering the a irbag un its .
- For cleaning the horn pad or instrument
panel, use only a soft, dry cloth or one mois
tened w ith plain water. Solvents or cleaners
could damage the airbag cover or change
the st iffness o r streng th of the material so
that the airbag cannot deploy and p rotect
prope rly.
- Never repair, ad just, or change any parts of
the airbag system.
- All work on the steering wheel, inst rument
panel, front seats or e lectr ica l system ( in
cluding the installation of a udio eq uipment,
cellular tele phones and C B radios, etc.)
m ust be perfo rmed by a qu alified techn ician
who has the training and specia l equipment
necessary.
- For any work on the airbag system, we
strong ly recommend that you see your au
thorized A udi dealer or qualified wo rkshop.
- Never modify the front b umper or parts of
the vehicle body.
- Always make sure that the side a irbag can
inflate w ithout interference:
- Never install seat covers or replacement
upholstery ove r the front seatbacks that
have not been specifically approved by
A udi .
- Never use addi tional seat c ushions that
cover the areas where the side airbags in
flate .
- Damage to the orig inal seat cove rs or to
the seam in the area of the s ide airbag
module mus t always be repaired immedi
ate ly by an autho riz e d Au di dealer .
- The a irbag sys tem can deploy only once. Af
ter an airbag has been deployed, i t m ust be
replaced with new replacement parts de
signed and approved espec ia lly for your
Aud i model version . Replacement of com
plete airbag systems or airbag components